Argosy HD 360U User manual

System Requirements
♦ Notebook or Desktop PC with USB2.0 or USB1.1 port.
♦ Windows 98SE/Me/2000, or Windows XP (Make sure the device driver for USB Host controller
has been installed and is available).
♦ Mac OS9.x or above.
NOTE:
♦ USB2.0 host supports 480Mbps (maximum) data transfer rate, USB1.1 host only supports
12Mbps (maximum) data transfer rate. Check your system to make sure you have the right
hardware to gain maximum performance.
♦ When using this external drive with USB interface under Macintosh system, only USB1.1
function can be supported.
USB 2.0
3.5” External Hard Disk Drive
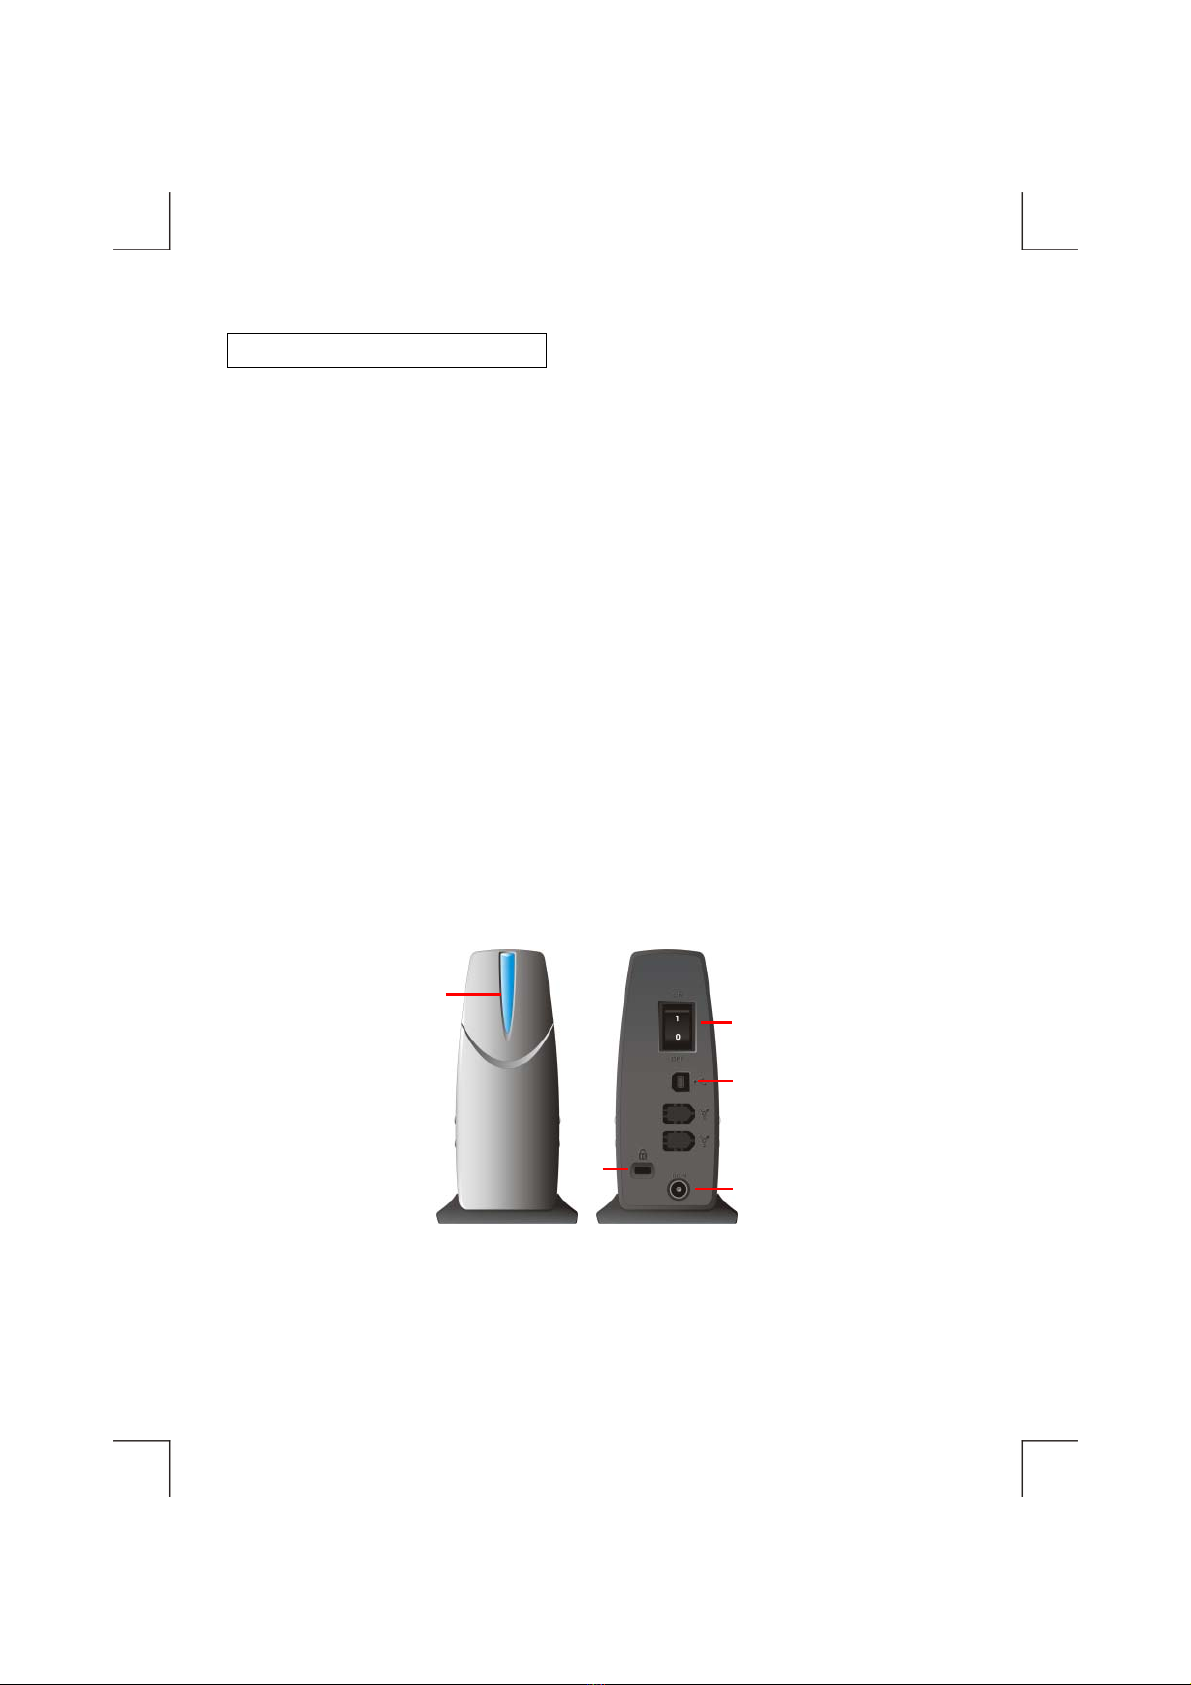
Part Names and Functions
1. LED:
Power-on and Data-access indicator.
2. Power Switch:
Power-on and Power-off.
3. USB2.0 Interface Connector:
This connector connects to the USB2.0 interface cable.
4. External Power Jack:
This jack connects to the AC adapter.
5. Kensington Lock Connector (Optional).
FRONT
REAR
1
2
3
4
5

Hardware Installation
Cable Connection
1. Insert the plug of the USB interface cable into the Interface Connector (see the figure).
2. Insert the plug of AC adapter into the External Power Jack of drive.
3. Attach the AC adapter to the outlet.
4. Press Power Switch to “ON”.
5. You are now ready to install the device driver.
A
C Adapte
r
USB Cable
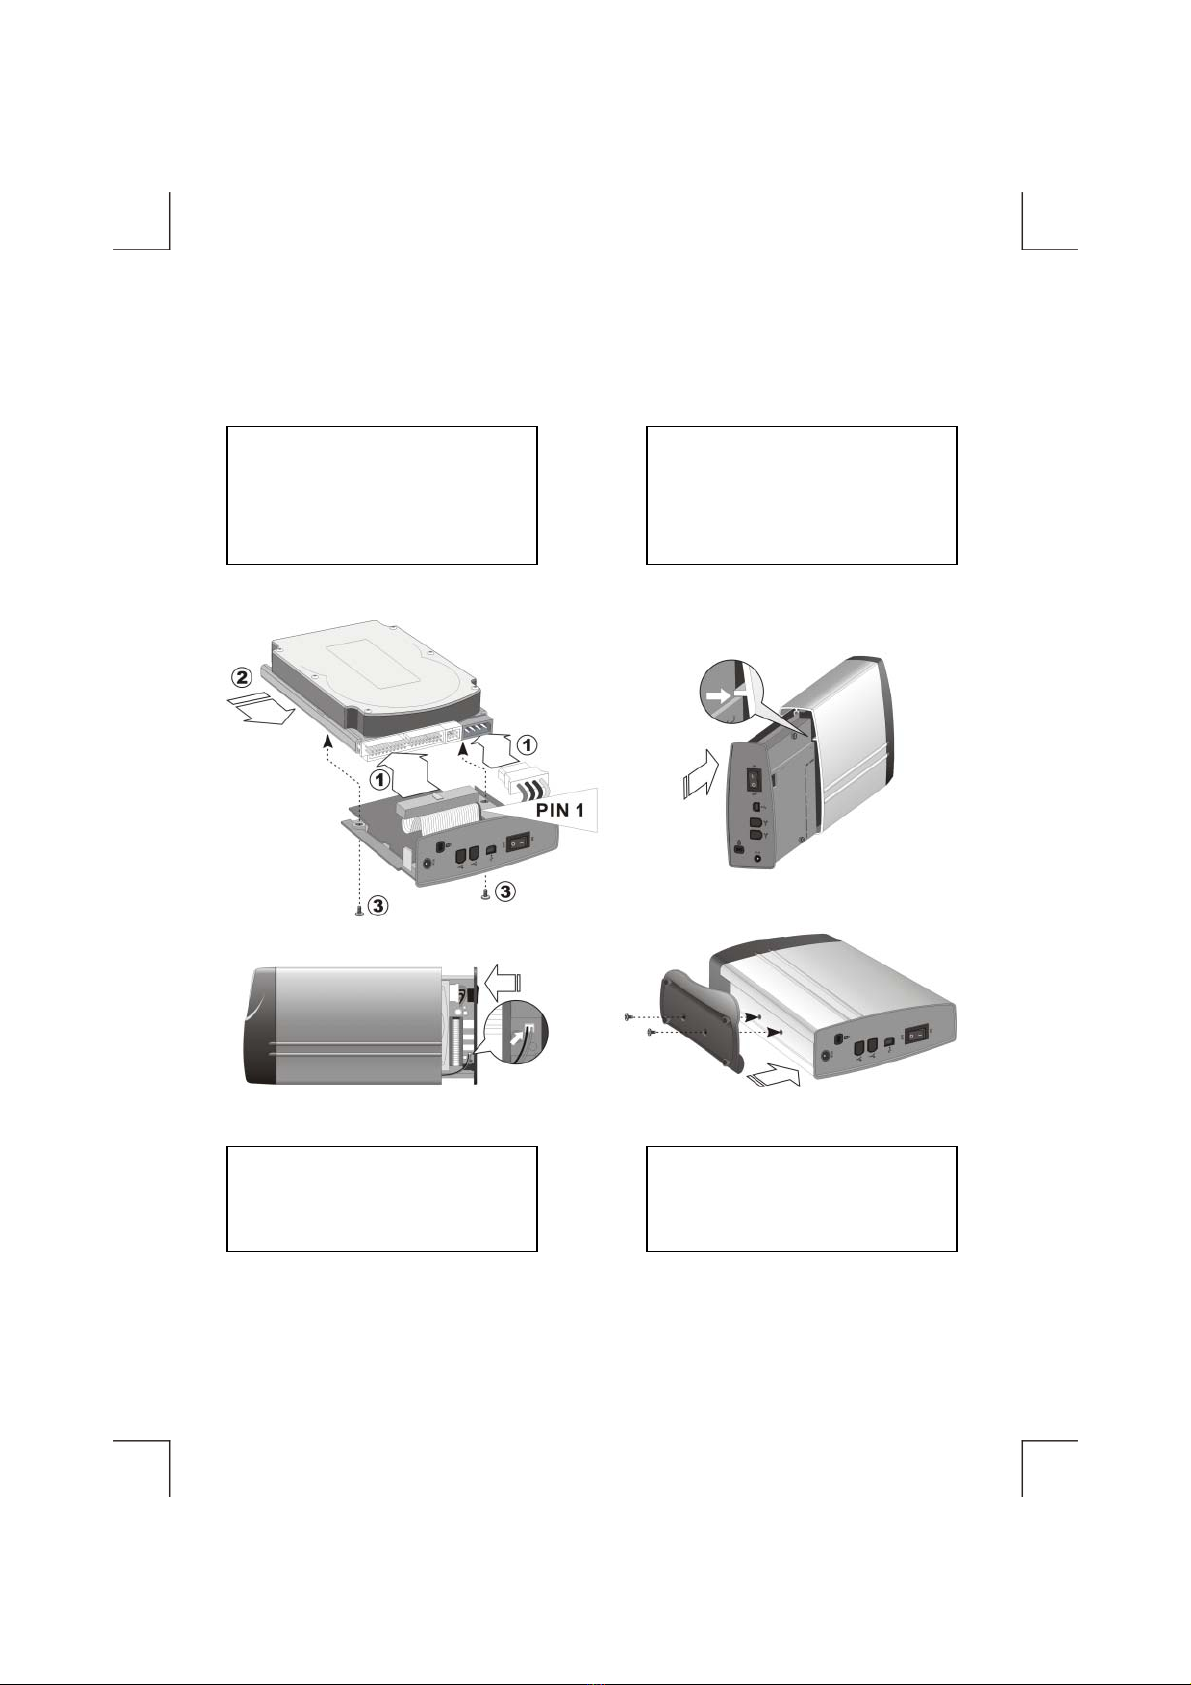
How To Assemble Hard Disk Drive Into The Hard Disk Kit
Follow the sequence in figure,
attach the IDE and Power cables to
disk drive, and then fix the PCB an
d
drive with screws.
1 Loading the drive into case, notice
at the tray alignment.
2
Plug the cable of LED (already on
the case) into the connector on
PCB.
3 Push the drive into case completely.
Fix the stand, case and drive with
screws.
4

How To Disassemble Hard Disk Drive From The Hard Disk Kit
Release the screws on stand to
separate the stand, case and drive.
1 Pull out the drive from case about
4cm, be careful, don’t break the
LED cable.
2
Pull out the cable of LED from the
connector on PCB.
3 Pull out the drive from case.
Release the screws, and then pull
out the rest cables.
4

Software Installation
Windows Me/2000/XP and Macintosh
Just insert the interface cable into computer, the hard disk drive will be recognized automatically.
Windows 98SE
1. Boot-up computer into Windows. Do not connect the external hard disk drive into computer.
Insert the “Driver CD” into CD-ROM drive, the welcome screen will pop-up automatically. If
welcome screen does not pop-up, double click “My Computer”, double click the CD-ROM
contains “Driver CD”, and then double click “index.htm” to open the welcome screen.
2. On the left part of welcome screen, click “Install Device Driver”. On the right part, scroll the
screen to “HD 360U”, and then click “USB 2.0 Driver for Windows 98SE”.
3. Click “Install” on the next screen. When a “File Download” dialog prompts “Would you like to
open the file or save it to your computer?”, click “Open” and the setup program will start
immediately.
4. Select “Choose Setup Component” and then click Next. (If you select “Choose Uninstall
Component” will remove the device driver from system).

5. When the program prompts “You must reboot the system to make this setup effective”, click OK
and then Finish to restart computer.
6. After the computer is restart and boot into Windows system, insert the USB interface cable into
computer, the external hard disk drive will be recognized automatically.
Partition The External Hard Disk Drive
Using FDISK Under Windows 98SE/Me
FDISK is a program to create one or more partitions of the hard disk, after the partition was built and
formatted, data can be write to the hard disk.
To partition the external hard disk, you must execute FDISK under the MS-DOS mode under
Windows 98SE/Me, please follow the steps:
1. Boot-up the computer into Windows 98SE/Me system. Plug the external hard disk to computer,
and make sure it is recognized.
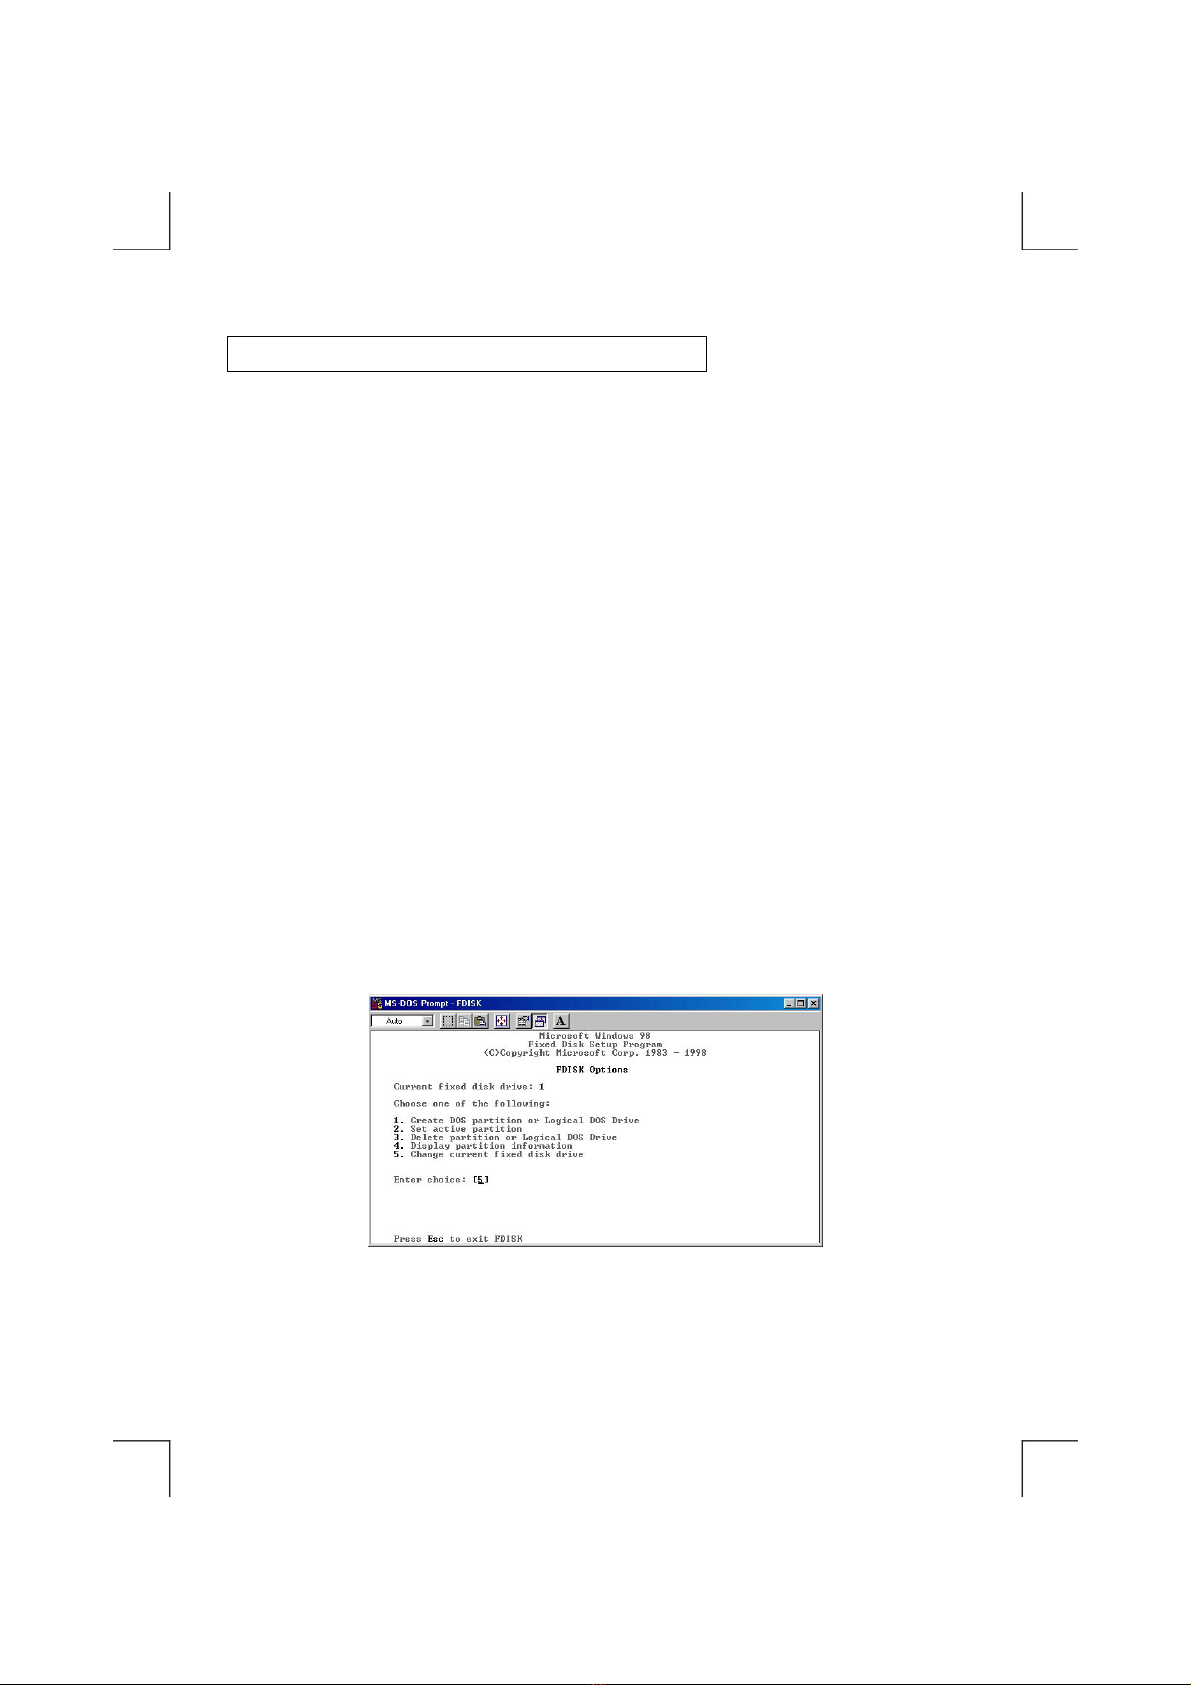
2. Go into the MS-DOS mode by click on Start ÖPrograms ÖMS-DOS Prompt.
3. At the DOS prompt, type ‘FDISK’ and press Enter.
4. In the first screen of FDISK, answer the question: Do you want to enable large disk support?
Y if you want to create a partition larger than 2GB (FAT32).
N if you want to create a partition small than 2GB (FAT16).
5. The next screen is ‘FDISK OPTIONS’,
IMPORTANT: you must type 5 on this screen to change the current fixed disk drive, the
default fixed drive set by FDISKis your internal hard disk, if you don’t change
it to the external hard disk, the data of internal hard disk will be destroyed.
Note: If the option 5 doesn’t appear on this screen means the external hard disk is not installed
properly, please check with the software installation.

6. In the ‘Change Current Fixed Disk Drive’ screen, type the disk drive number that assigned to the
external hard disk (usually, the external hard disk is the fixed disk drive number 2).
7. Back to ‘FDISK OPTIONS’ screen, type 4to display the content of the fixed disk drive, check
the content to make sure the current drive is the external hard disk.
8. Now you can create (type 1) or delete (type 3) the partition of the external hard disk.
9. After you finish FDISK, re-boot computer to activate these changes.
Using Disk Management Under Windows 2000/XP
Note: The external hard disk can’t works with ‘Dynamic Disk’ type. Do not upgrade the external
hard disk to ‘Dynamic Disk’ type, always use it with ‘Basic Disk’ type.
1. To partition the external hard disk under Windows 2000 or Windows XP, please plug the
external hard disk and make sure it is recognized, then,
♦ In Windows 2000: click Start ÖSettings ÖControl Panel ÖAdministrative Tools Ö
Computer Management to open ‘Computer Management’ window.
♦ In Windows XP: click Start ÖControl Panel ÖPerformance and Maintenance Ö
Administrative Tools ÖComputer Management to open ‘Computer Management’ window.
2. Click on ‘Disk Management’ on the left part of this window, all connected disk drives will be
listed in the right part. Find out the largest number of Disk #, for example, on the below picture,
Disk 1 is the largest number, and it is the external hard disk. On the right side of the Disk 1 is the
status of the partitions of this disk drive, you can create a new or delete an exist partition by
right-click on this area. The next steps will describe how to create a new partition on thisexternal
hard disk.

Note:
If the hard disk in the external hard disk kit is a whole new hard disk without
any partition, when the Disk Management is opened, a ‘Stop’ mark indicates
this drive is an ‘Unknown’ type of disk (refer to the figure shown on right side).
In this situation, Windows system won’t allow you to create partition with this drive. In the
meantime, you can:
♦ In Windows 2000: Windows will start up the ‘Write Signature and Upgrade Disk Wizard’
immediately. You can use this ‘Wizard’ to initial the hard disk to the ‘Basic Disk’ type and
can then create partition in the drive.
♦ In Windows XP: you can right-click on the ‘Stop’ mark, and then click ‘Initialize disk’ to
initial the hard disk to the ‘Basic Disk’ type and can then create partition in the drive.
3. If the type of the hard disk drive is ‘Dynamic’, you must change it to the ‘Basic’. To do this,
right-click on the status area (left area) of Disk 1, and then click ‘Revert to Basic Disk’ from the
options. Wait for few seconds, the type of the hard disk drive will be changed to ‘Basic’ type.
4. To create a newpartition in the external hard disk, right-click on the right area of Disk 1, click on
‘Create Partition…’, the ‘Create Partition Wizard’ appears, click Next.
5. Select ‘Primary partition’, click Next.
6. Specify the size that you want this partition to be, click Next.
7. Assign a drive letter for this partition, please use the default value, and click Next.

8. Refer to thefigure shown below, select ‘Format this partitionwith the following settings’, choose
the File system, and specify a name for the Volume label, select ‘Perform a Quick Format’, then,
click Next.
9. Click Finish, now the formatting is proceed, after the process is done, the ‘Disk Management’
window is changed as below. Make sure the status of the partition is ‘Healthy’.
10. Now, a partition is created in the external hard disk, you can write data to it, and if you want, one
or more partitions can be created in the same hard disk drive, just repeat the above steps.
This manual suits for next models
1
Table of contents
Other Argosy Storage manuals


Popular Storage manuals by other brands

Sun Microsystems
Sun Microsystems Sun Fire V1280 Service manual

Transcend
Transcend StoreJetTM 3.5 user manual

Dell
Dell FS7500 Installation and setup

Fujitsu
Fujitsu GP5-HD9G3 user guide

V-Bro Products
V-Bro Products Garage Gator GGR220 Installation, Operating, and Safety Instructions

Seagate
Seagate ST34321A product manual


