ARKNIKKO MemoPad T1 User manual

Tablet with Android™
Please read this manual before operating your tablet,
and keep it for further reference.
V1.0
USER MANUAL
Tablet PCARKNIKKO MemoPad T1
FCC:
This device complies with part 15 of the FCC Rules. Operation is subject to the condition
that this device does not cause harmful interference
(1) this device may not cause harmful interference, and
(2) this device must accept any interference received, including interference that
may cause undesired operation.
Changes or modifications not expressly approved by the party responsible for compliance
could void the user's authority to operate the equipment.
NOTE: This equipment has been tested and found to comply with the limits for a Class B
digital device, pursuant to Part 15 of the FCC Rules. These limits are designed to provide
reasonable protection against harmful interference in a residential installation.
This equipment generates, uses and can radiate radio frequency energy and,
if not installed and used in accordance with the instructions, may cause harmful
interference to radio communications. However, there is no guarantee that interference will
not occur in a particular installation.
If this equipment does cause harmful interference to radio or television reception,
which can be determined by turning the equipment off and on, the user is encouraged to
try to correct the interference by one or more of the following measures:
-- Reorient or relocate the receiving antenna.
-- Increase the separation between the equipment and receiver.
-- Connect the equipment into an outlet on a circuit different
from that to which the receiver is connected.
-- Consult the dealer or an experienced radio/TV technician for help.
The device has been evaluated to meet general RF exposure requirement. The device can
be used in portable exposure condition without restriction.
FCC ID: S5V-MEMOPAD01
To maintain compliance with FCC’s RF Exposure guidelines, This equipment should be
installed and operated with minimum distance between 20cm the radiator your
body: Use only the supplied antenna.
ARKNIKKO

CONTENTS
Features
Unit at a glance
Getting started
About applications
About applications
Pre-installed applications
Connect to a Wi-Fi network
Internet navigating
Connect to a bluetooth device
Optional connections
Specifications
Troubleshooting
Contact us
1
2
3
5
6
6
7
9
10
11
12
13
14

1 2
Browse the Web
Visit your favorite websites.
Check your E-mail
Keep in touch with friends and families.
Watch YouTube™ Videos
Browse the world’s most popular video- sharing community.
Read your favorite books
Download thousands of books with the included E-book reader * .
Discover thousands of apps for Android games, applications, and more with Play Store
(Customers need to download it from Google™ Play Store).
Connect to the Internet wirelessly
With high-speed Wi-Fi 802.11 b/g/n (2.4GHz) networking, you can enjoy your media
library anytime and anywhere.
Portable powerhouse (6000mAh battery) makes you feel free to listen popular music,
watch videos, and search photos.
MicroSD memory card reader.
Increase your storage capacity (up to 128GB supported).
Built-in camera
Convenient front-facing camera 5MP / rear camera 8MP (support flash).
Automatic orientation detection
Read any way you want; the display adjusts automatically!
Reading books in the e-Pub format requires the included E-book reader application.
FEATURES UNIT AT A GLANCE
Front Camera
Speaker
Headphone: Audio output connection for headphones.
MicroSD Card Slot: Load external microSD cards here.
Mic
Rear Camera
VOL+ / VOL-
Reset
Power Button / Screen Saver
Type-C USB
1
2
3
4
5
6
7
8
9
1
2
6
7
9
10
8
4
3
5
10

3 4
GETTING STARTED
Turning on / off the tablet
To turn on the tablet:
Press and hold the Power button until the LCD screen turns on. Wait until the Home screen
appears, the tablet is now ready for use.
To turn off the tablet:
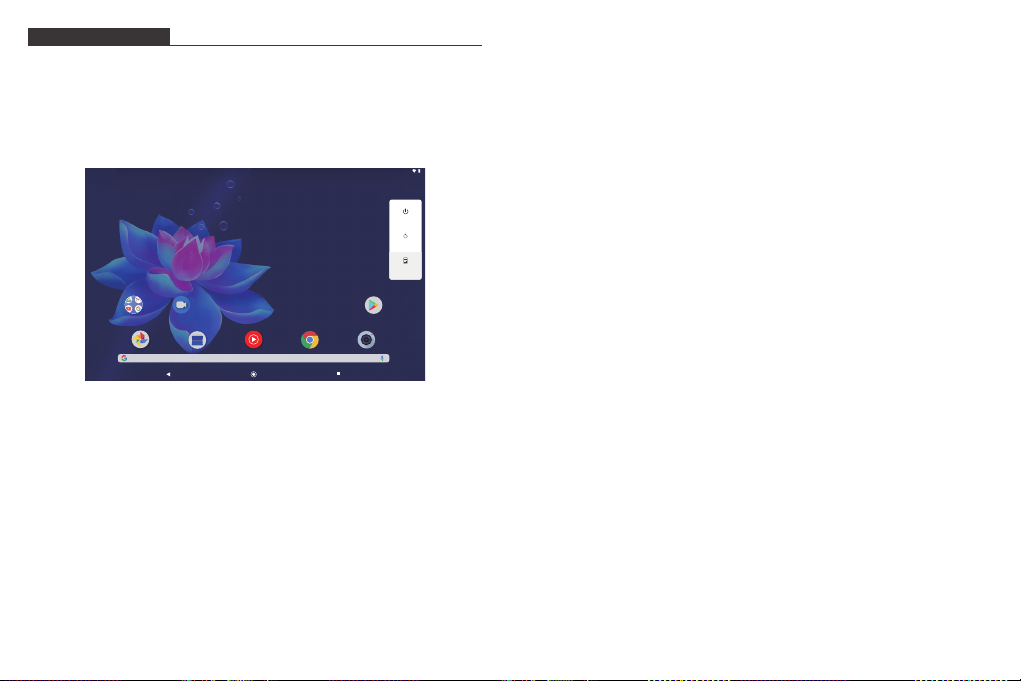
1. Press and hold the Power button until the Device Options menu appears.
2. Tap “OK” to turn off the tablet.
Turning on / off the screen (Sleep mode)
When the tablet is on, you can turn off the screen to save battery power. Simply press the
Power button once to turn the screen off. Press the Power button again to turn the screen
back on.
To save battery power, the screen can be set to turn off automatically when the tablet is
not in using(between 1 minute and 30 minutes).
This screen timeout option can be found in the Display menu.
Changing the language
Many users purchase Android tablets that come with the user interface in English, and
they want to use their native language, like Spanish, French, Chinese, German and so on.
Wallpaper
Tap and hold your finger in any blank space of the home screen, you will see a pop-up
menu; you can choose wallpaper from Gallery or your downloaded files or those listed as
options; set the one you like to be wall paper.
Widgets
Tap and hold your finger in any blank space of home screen, you will see a pop-up menu
with widget.
Tip:
1. Tap one icon and move on to top of another icon, you can create a new folder on home
screen. Open the folder; click ‘Unnamed Folder ’ to rename the folder.
2. Swipe down vertically from top part of a display to enter quick notification menu.
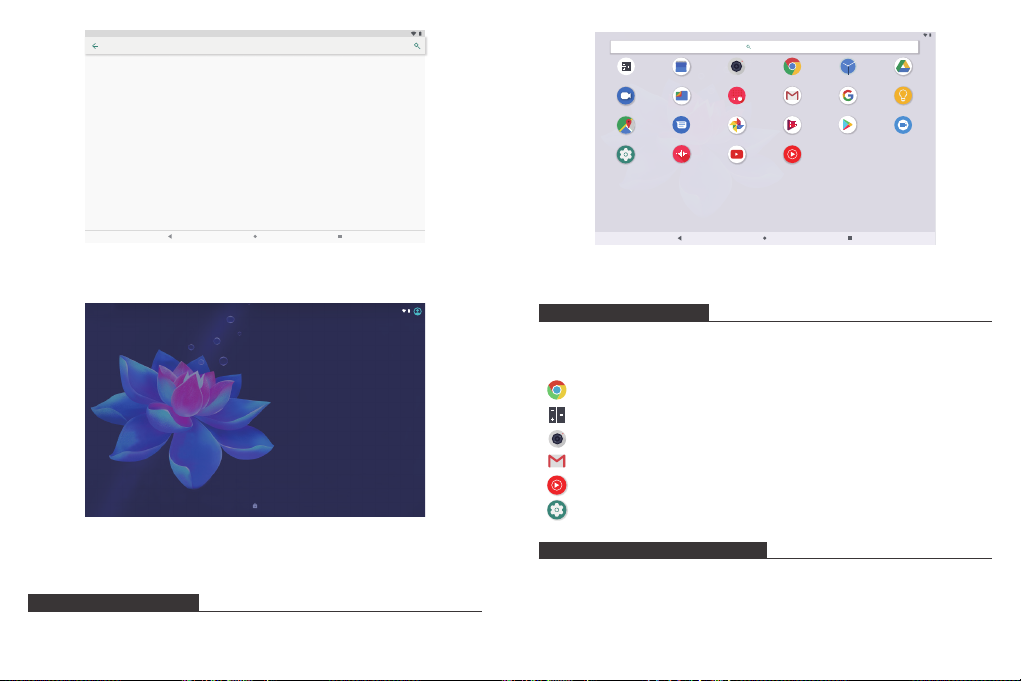
Screen Lock
Set a screen lock to secure your tablet.
Tap - Setting-Security-Screen security-Select screen lock, and select a mode from None,
Swipe, Pattern, PIN and Password. You can create a Backup PIN as a safety measure in
case you forget your code.
Tap "settings-system-language & input-languages-add a language". A list is shown with
all the available display languages that you can use on your Android device.
Tap and hold the lines near the name of the language that you want to use, and drag it to
the top of the list.
If you do not need a particular display language, you can delete it. Click the three dots in
the top-right corner of the screen, near the text Language preferences. A menu is shown,
with only one option: "Remove". Tap on it.
Home Screen
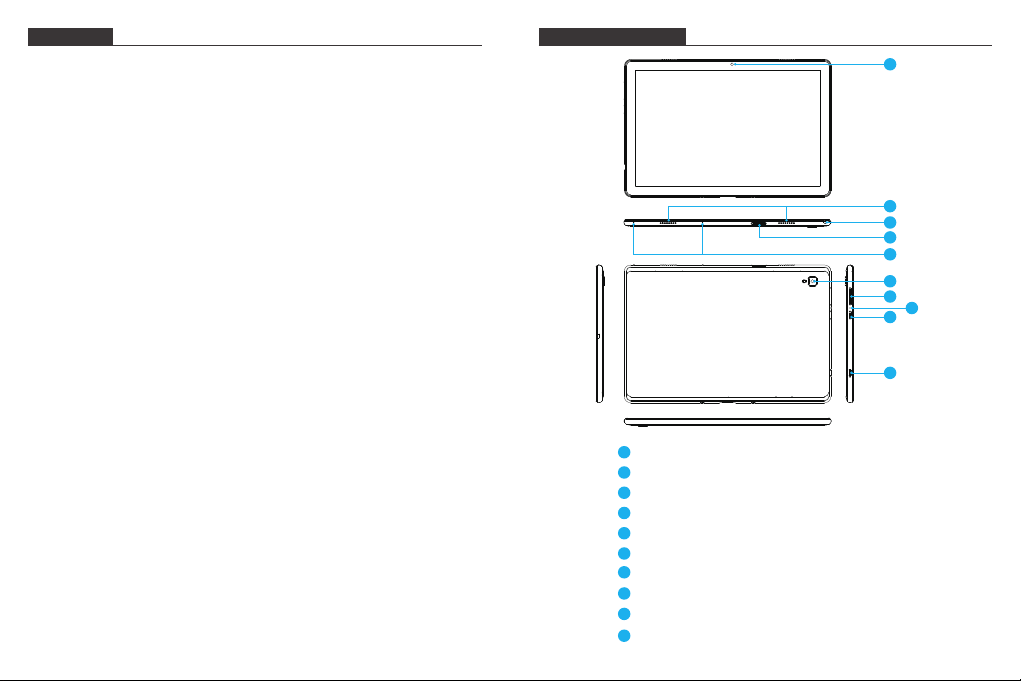
① Back: Press to check previous operating display.
② Home Screen: Press to go to home screen.
③ Background: Press to check applications running on background. Existing idle apps
may provide a better performance.
④ Application Panel: Press to check all available Applications.
9:13 AM
31
Gogle
Duo
Power off
Restart
Screenshot

5 6
ABOUT APPLICATIONS
To open an application, tap the application icon on the home screen or in the Launcher
where you can tap the icon right up on the home screen to get in. Launcher screen:
Unlocking the Screen
When the screen turns off, you will have to unlock the screen when you turn it back on.
To unlock the screen, swipe up the lock icon.
The screen shown above is for illustrative purposes only. We reserve the right to modify
and improve the final list of applications available on the tablet.
ABOUT APPLICATIONS
Pre-installed Applications
Some applications have been installed on your tablet for your convenience.
These applications include:
Browse the web.
Perform simple mathematical operations.
Take pictures or videos with the camera.
Check your e-mail.
Play music.
Access the Settings menu to adjust the tablet’s options.
Screen shot
Press and hold the power button and volume “-” at the same time to screenshot.
The screenshot will be saved in the photos file. PRE-INSTALLED APPLICATIONS
Installing Applications
You can also download and install additional applications from the device’s applications
marketplace, the web browser, or other sources.
The tablet must be set to allow installation of applications from non-market sources. The
unknown sources option can be set in the Application settings menu.
Choose screen lock
9:13 AM
None
PIN
Current screen lock
Swipe
Pattern
Password
9:13AM
Fri, Dec 20
31
G
Play Movies & TVMessages Photos
YouTube YT Music
FM Radio
Maps
Screen Capture
Gmail
Play Store
Google
Files
Duo
Calculator
Keep Notes
Calendar Camera Chrome Clock Drive
Sound RecorderSettings
Search apps
9:13 AM

7 8
Note:
1. Users are responsible for all charges from specific apps if it is necessary.
2. Manufacturers/sellers are not responsible for apps that are incompatible with the device.
3. In some cases, there may be no icon in the app Panel after an app is installed. Possible
reasons may be that this app is not compatible with your OS or the downloaded file is
a broken one so you may need to download a full version.
If you install and use an OS other than the one provided by the manufacturer, it may cause
your device to malfunction, therefore, your device will no longer be covered by the
warranty in this condition.
CONNECT TO A Wi-Fi NETWORK
The Notification bar displays icons that indicate your tablet’s Wi-Fi status.
Notification that an open Wi-Fi network is in range.
Connected to a Wi-Fi network (waves indicate connection strength).
[no icon] There are no Wi-Fi networks in range, or the Wi-Fi radio is off.
1. Turn on the Wi-Fi radio if it is not already on.
a. Go to the Home screen: Press the Home button.
b. Open the Settings menu: tap the icon right up on the home screen to get into the
launcher, then tap Settings icon.
c. Open the Wireless & networks menu: Slide the icon to ON status.
When Wi-Fi is on, the tablet will look for and display a list of available Wi-Fi networks.
Notes: If a network that you have connected to previously is found, the tablet will connect
to it. If you don’t see your network in the list, you can force the tablet to re-scan. To scan
for networks, tap the Menu button, and then touch Scan.
2. Select an available Wi-Fi network to connect:
In the same Wi-Fi settings menu above, tap a network in the list.
If the network is open, the tablet will prompt you to confirm connection to the network.
Tap “Connect” to confirm.
If the network is secured (as indicated by a Lock icon), the tablet will prompt you to enter
a password or other credentials. Tap the Wireless password box to show the on-screen
keyboard and then use it to enter the password.
Tap “Connect” to confirm.
Wi-Fi
Use Wi-Fi
CPGC-2.4G
HuaWei
aWiFi-b7d9
CPGC-5G
TP-LINKAD5E
TP-LINKAD5E-5G
9:13 AM
Wi-Fi
Use Wi-Fi
CPGC-2.4G
HuaWei
aWiFi-b7d9
CPGC-5G
TP-LINKAD5E
TP-LINKAD5E-5G
9:13 AM
CPGC-5G
Password
Advanced options
CANCEL CONNECT
Show password

910
When you have successfully connected to a Wi-Fi network, the Notifications bar at the
upper right of the screen will show a Wi-Fi signal indicator.
Notes: To learn about how to add a Wi-Fi network when it is not in range or when the
router is set to obscure the network name (SSID), or to configure advanced Wi-Fi options,
please refer to the manual.
INTERNET NAVIGATING
Before using your browser, make sure Wi-Fi or internet is connected.
Setting Browser
You can use the browser to pre-install or download others you prefer. Tap the icon on top
right corner of the browser page to open the sub-menu for more detailed setting.
Navigating
Tap the browser icon to open your browser. You can access a website quickly by entering
the URL on screen keypad. Websites are optimized for viewing on your actual devices.
Bookmarks
1. Tap on any web page to add a bookmark. You can then tap ”OK” to save or rename
the website.
2. Tap to view bookmarked sites, pages you saved and your browsing history.
3. To delete a bookmark, go to bookmarks page, tap and hold the bookmark you want to
delete. Tap “Delete bookmark”. At the Delete confirmation window, tap OK.
Cookies
Cookies placed on your device by a website during navigation contain some site-specific
information. It can also contain some personal information (such as a username and
password) which can pose a security risk if not properly managed. You can clear these
cookies from your device at any time. Go to Home webpage, press Settings - Privacy &
Security - Clear all cookies data.
CONNECT TO A BLUETOOTH DEVICE
Turn on Bluetooth
You must pair your device with another device before you can transfer files between them.
Under “Settings”, tap “Connected devices-Connection preferences-Bluetooth-ON”, the
Bluetooth indicator then appears in the status bar. It will start searching for available
devices nearby. If you need re-scan, tap the menu on the top right corner, and tap
“refresh”.
Scan Device
After scanning, there will be a list of all available Bluetooth devices in range. If the device
you want to pair with isn’t in the list, ensure that the other device is turned on and set to
be discoverable.
Pair with Bluetooth Device
Tap the name of an available Bluetooth device you want to pair with. On the target device
you will get a ‘Bluetooth Pairing Request’ dialog. Tap ‘Pair’, it will then show you paired
devices.
Bluetooth
On
Device name
Notepad_101_B_EEA
Pair new device
When Bluetooth is turned on, your device can communicate with other nearby Bluetooth devices.
9:13 AM

11 12
Device Reset
You may reset your tablet when necessary, such as forgotten password or PIN of tablet.
You can reset your tablet. This will clear all information in your tablet and get your device
back to factory mode.
WARNING!
If you perform a Hard Reset, all user applications, user data will be deleted. Please
remember to backup any important data before per-forming a Hard Reset.
OPTIONAL CONNECTIONS
SPECIFICATIONS
Connecting to a Computer
Connect the tablet to a computer to transfer files.
1. Connect your tablet to the computer.
With the included USB cable: Plug the small end of the cable into the USB 2.0 high speed
connector of the tablet. Plug the large end of the cable into an available USB 2.0 high
speed port on the computer.
2. When your tablet is connected, slide down the USB icon then touch icon USB
connected.
3. Mount the storage.
Tap button Transfer files (MTP) to mount the tablet’s built-in storage. When it is mounted,
you can copy files to or from your tablet.
Processor
RAM
Storage
Display
Wi-Fi Networking
Audio Output
PC Interface
Additional Features
Operating System
Power
Playback Time (hours)
SC9863A (Octa-core Cortex A55) 1.6GHz
3GB LRDDR3
32GB flash built-in; MicroSD card slot (max128GB supported)
10.1” 800*1280 IPS Capacitive Touchscreen
802.11 b/g/n (2.4GHz)
3.5mm headphone
USB 2.0 high speed
Up to 8 hours music, 5 hours video, 5 hours web browsing
Built-in microphone and 2X1W speakers
Front camera 5MP and Rear camera 8MP
Android 9.0 Pie
Rechargeable Li-poly battery with Type-C USB Power
Adapter(5V/2A)
Bluetooth 4.0
USB computer connection
Connect as
Camera (PTP)
PTP
Charge only
Charging this device
Media device (MTP)
File transfer
MIDI
MIDI
USB virtual drive
Enable USB virtual drive
9:13 AM

13 14
TROUBLESHOOTING
CONTACT US
For any problem with Dragon Touch products, please feel free to contact us, we will
respond within 24 hours.
Tel: 1-888-811-1140 (US) Mon-Fri (except holiday) 9am-5pm (EST)
Official website: www.dragontouch.com
Google, Android, Google Play and other marks are trademarks of Google LLC.
6. Storage not enough.
• Delete applications you don't use often to spare some space.
• Clean caches in your device regularly. ‘Setting-APPs-Click’ the app and clear cache or
data.
• Install a third-party system cleaner.
• Factory reset your tablet to clear all data.
• Get an extended memory card to expend storage.
1. Device doesn’t power on.
• Reboot your device after charging it for 30 minutes.
• Shortly press your power button to check if it lights up in case your device is in sleep
mode.
• Press the power button for 20 seconds.
• Start a hard reset by pressing the reset button with a pin if there is reset button on your
actual device.
2. Device doesn’t take charge.
• Keep your device into power for 30 minutes if it was completely drained.
• Check and make sure the charger is properly inserted into charging port.
• Try another outlet or compatible charger.
3. Error message during operation.
• Uninstall the application with error message and download to install again. You can also
update certain application with error.
• Delete and clear the system to factory mode with a system reset.
4. Device can’t be detected by PC.
• Make sure your device is in ‘on’ status.
• Try with another USB cable.
• Connect your device to a different port on your PC.
5. Device can’t be connected with Wi-Fi.
• Make sure your turn Wi-Fi to "ON" status.
• Unplug Wi-Fi router, wait for 2 minutes and plug to connect again.
• Make sure you input correct password by selecting "show password" when you input it.
• Check and make sure there is no filtering setting or device connection limit in your
router setting.
• Forget original Wi-Fi connection, reset Wi-Fi router, and connect again.
Table of contents