Arlotto AR6220 Series User manual

AR6220 Series
Network Cameras
Getting Started Guide
Version 1.0.1
January 2014

2
Preface
Read This First
About This Guide
This guide provides the information of the user interface usage for AR6220 series speed dome
network camera.
Abbreviations
The following abbreviations are used in this document
List of Abbreviations
Abbreviation
Description
CCTV
Closed Circuit Television.
DHCP
Dynamic Host Configuration Protocol.
FTP
File Transfer Protocol
IPNC
IP Network Camera
JPEG
Joint Picture Experts Group.
MJPEG
Motion JPEG
NTSC
Nation Television System Committee.
PAL
Phase Alternate Line.
SMTP
Simple Mail Transfer Protocol.
SNTP
Simple Network Time Protocol.
UPnP
Universal Plug and Play.
RTSP
Real Time Streaming Protocol.

3
Contents

4
1. AR6220 Speed dome camera - Overview
This chapter provides the information about the outlook overview of AR6220 IPNC, which show you the
parts available in the network camera
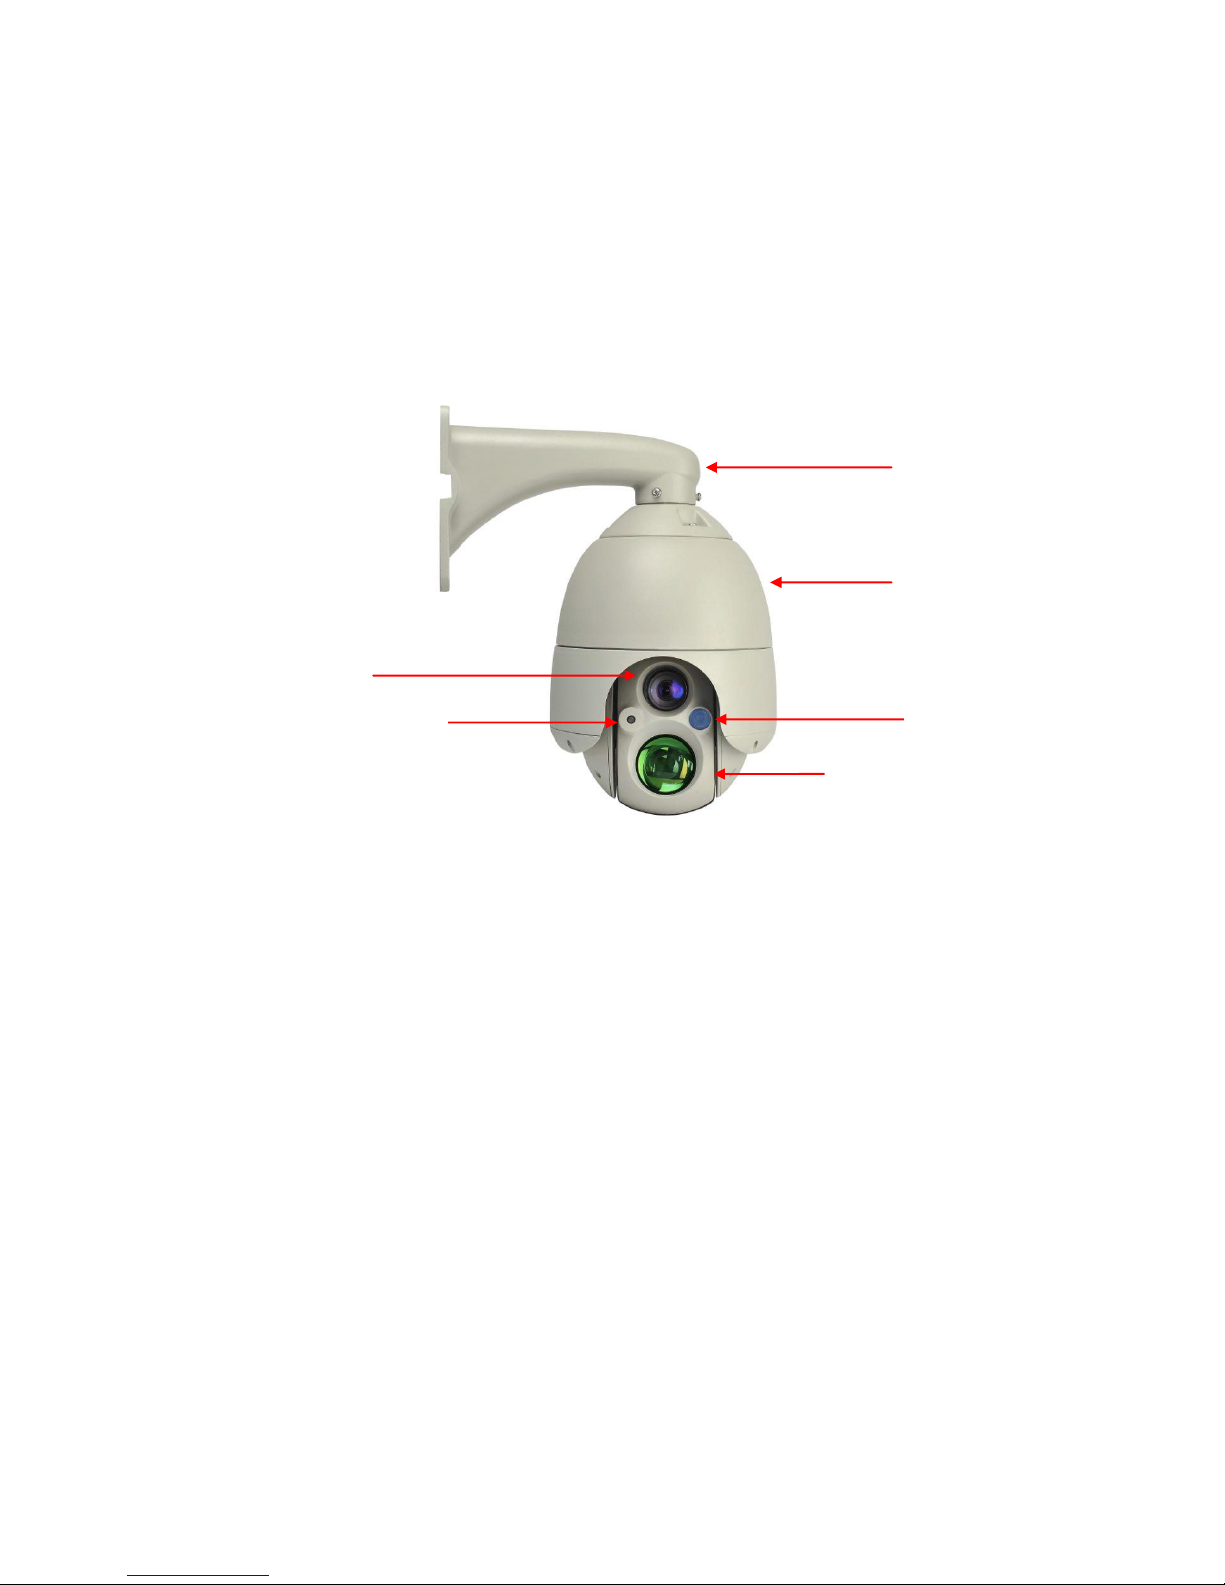
1.1. AR6220 IPNC Details
The following image shows the camera different parts:
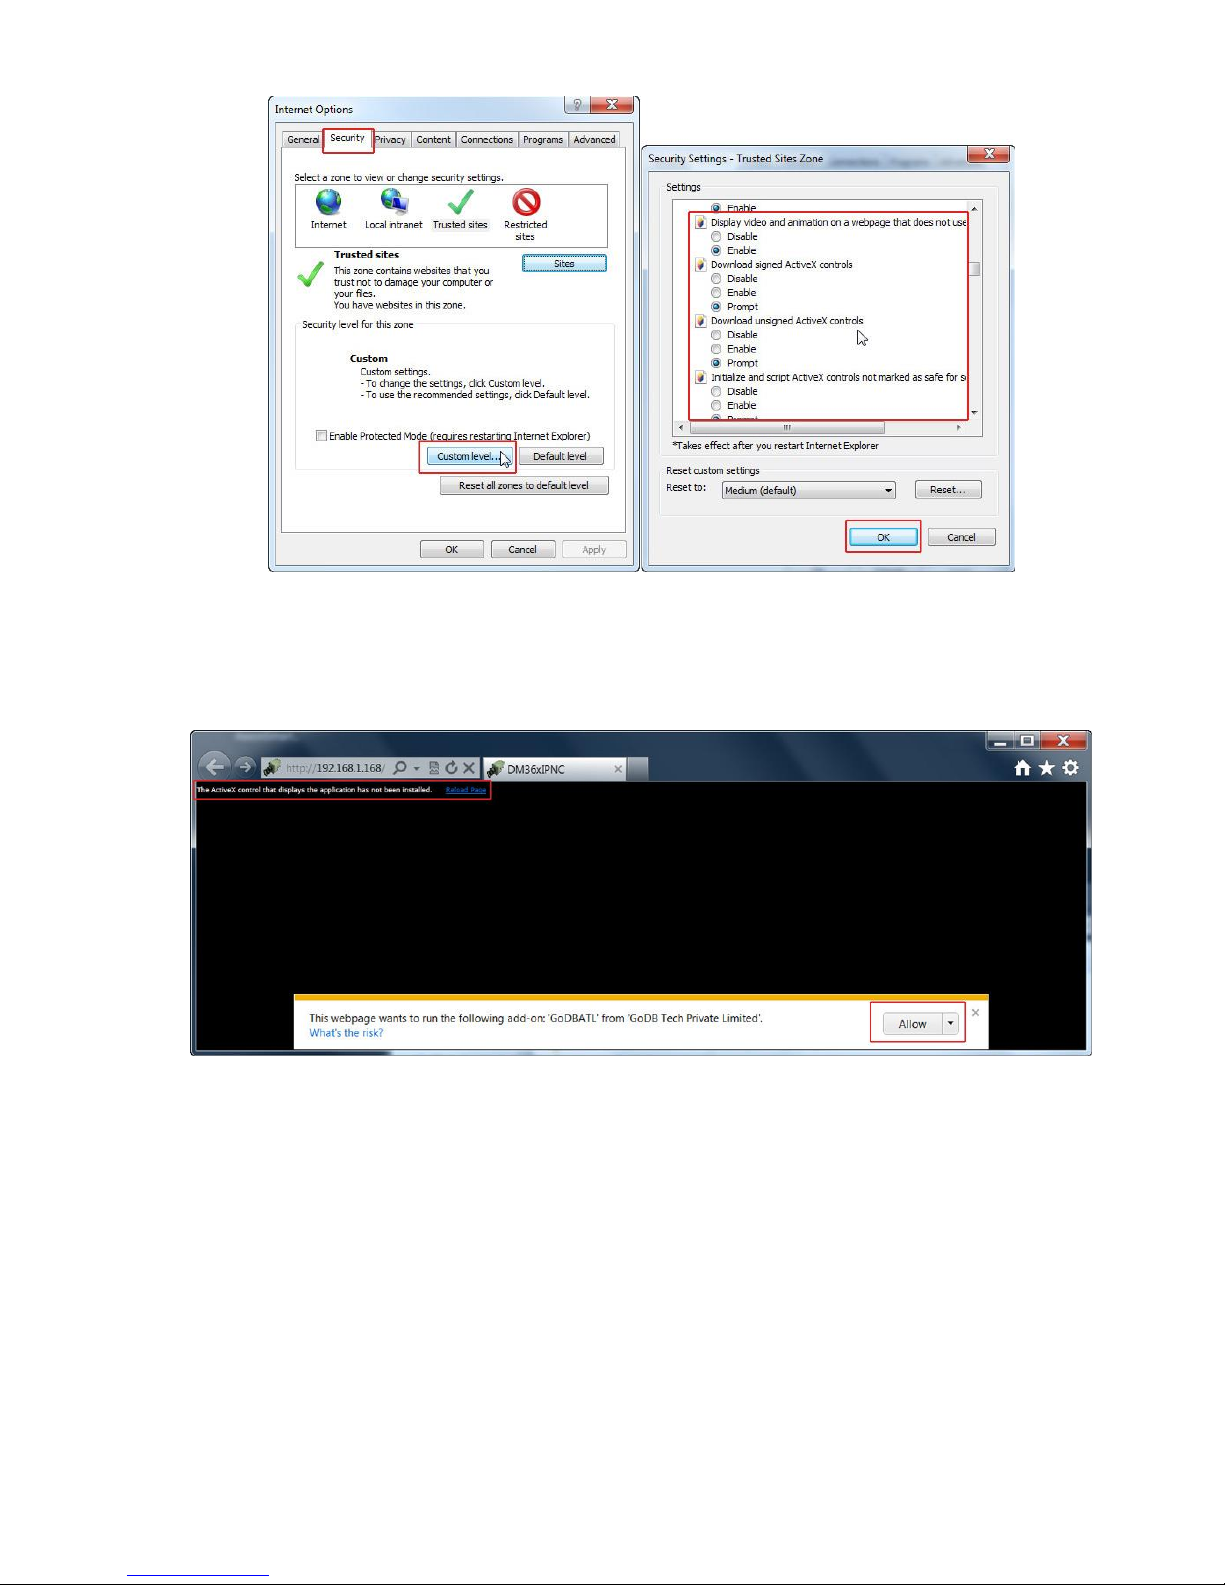
2. AR6220 camera installation
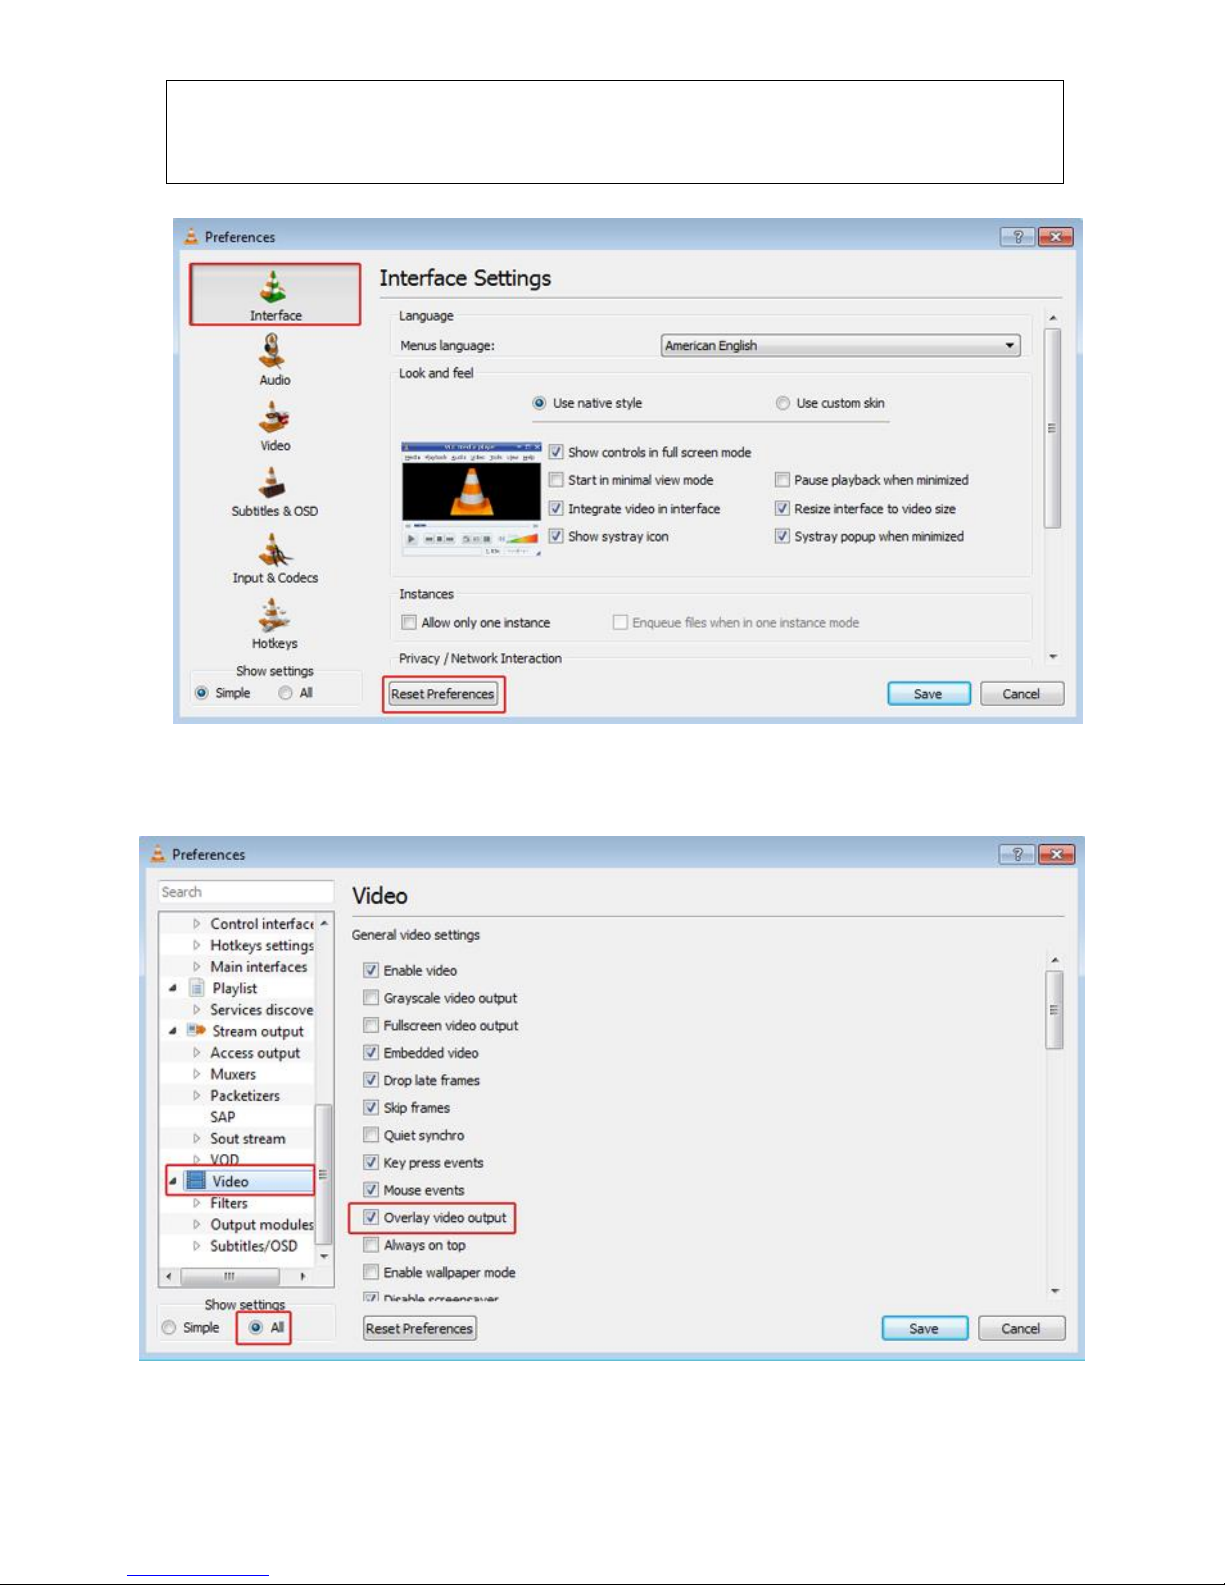
This chapter provides the information about how to connect the IPNC with the PC, and VLC media
player Settings. For hardware installation please refer to the supplied Quick Installation Guide.
2.1. Minimum PC Requirement
Hardware:
Intel(R), Pentium(R), DUAL Core (D),CPU 3.0GHz or equivalent
2GB system memory or above.
Sound Card: DirectX 9.0c compatible sound card
Video Card: 3D hardware accelerator card required –100% DirectX9.0c compatible
10/100 Ethernet switch/hub
Bracket
Housing
IR light
Long distance IR light
Camera module
Light sensor

5
Software:
VLC media player 1.0.5 or above
Windows XP Service Pack 2 or above
Resolution of screen setting: 1280x960 or higher for the display of 720P/1080P
2.2. Connection Using Static IP
You can connect the IPNC with a static IP address. The default static IP is 192.168.1.168.
Note :
To recover the original factory setting and default IP please reset the camera in the user
interface.
Once the camera installation is fully finished you would be able to change the default IP to any you may
need. To make the changes please login in the camera and at Network and Ports please change the IP
as in the next image.
2.3. VLC Media Player Setting
To set the VLC media player and open a network stream:
1)Install VLC media player on your Host PC.
2)Open VLC media player (test with version1.1.9).
3)Click Tools > Preferences. The Preferences dialog box is displayed.

6
Note:
Before setting, ensure that all the parameters are set to default values.
To do this, in the Preferences dialog box, click Reset Preferences.
4)On the left pane, click Video and select Overlay video output option. Also, select All in Show settings.
5)On the left pane, click Input/Codecs > Demuxers > RTP/RTSP.

7
Check the caching value. For low latency, it should be 70~80 based on PC's performance, only in
VLC older version.
6)Click Save to save the settings.
7)In the VLC media player window, on the Media menu, click Open Network Stream. The Open dialog
box is displayed.
8)Select the RTSP option. In Address textbox, type the URL and click Play
MPEG4 Streaming URL :
Streaming 1 rtsp://192.168.1.168:8553/1?videoCodecType=MPEG4
Streaming 2 rtsp://192.168.1.168:8554/1?videoCodecType=MPEG4
MJPEG Streaming URL :
rtsp://192.168.1.168:8555/0?videoCodecType=MJPEG
H.264 Streaming URL :
Streaming 1 rtsp://192.168.1.168:8557/2?videoCodecType=H.264
Streaming 2 rtsp://192.168.1.168:8556/2?videoCodecType=H.264
9)Once you click Play, the video appears on the browser.

8
3. Running AR6220 IPNC Application
This chapter provides information about using the AR6620 IPNC application through the application
interface.
3.1. Starting the Application
To start the application:
1) Plug the power supply to the network camera
2) Open Microsoft Internet Explorer window, type the required IP address in Address box. Press Enter.
(default IP is 192.168.1.168)
3) Once IP address is typed please go to IE tools, then internet options and select security tab. Click in
trusted sited and then in sites.

9
4) After this step a new window will pop-up, here you should add to the trusted website the new IP
number. Please disable the option to require the server verification.
5) In IE, Internet options go to security and click in custom levels, a new window will pop-up, please
enable all ActiveX options. This would allow to IE to load the required ActiveX in the system.

10
Open IE web browser and type the default IP address of the camera, now the IE would require you
to install 2 Add-on applications, in the new menu shown please allow to the system to install them.
6) After installation, user needs to press key F5 on keyboard to refresh the IE active window. This will
take the user to main Login screen

11
7) Enter the required User Name and Password, and then click ”Submit”. If you would like the system
to remember the access data please tick “Remember password”.
Note:
The default user name and password are “admin” and “123456” respectively.
8) After successful installation and login, live video from IPNC can be seen in the Live Video window.
In this screen you can select from the different language options available.

12
3.2. Uninstalling ActiveX Component
Whenever there is a firmware updates of IPNC software, the user should clean the software
components cached on the browser. Following are the steps to clean the software.
1) Close all Web browsers connected to the IPNC and open Internet Explorer in a blank page.
2) In the Windows Internet Explorer window, click on the “Tools”tab. Select Manage Add-ons > Enable
or Disable Add-ons. The Manage Add-ons dialog box is displayed.
3) From the Show drop-down list, select Downloaded Controls.
4) You will see an ActiveX Control published by GoDB Tech Private Limited as shown.

13
5) Clean the cookies and temporary file in IE browser.
6) Remove files gdobridge.dll, gffx.dll, GoDBATL.dll from C:\WINDOWS Folder
7) Enter the path “C:\WINDOWS\Downloaded Program Files” in your PC and delete file “GoDB Class”
and “GFFMpeg Class”.
8) Close and Restart your IE browser.
3.3. Browsing images from the network camera
The images from IPNC are displayed on the Live Video window while accessing IPNC online.
The options available in the Live Video page are:
Select Stream drop-down list: Set the resolution of the image. This is at the top left corner of the
page.
Left Panel to navigate to the other screens and to manage the speed dome view position
(please refer to details in guide).

14
The following icons are available at the Left Menu:
Language selection
Live Video
Add/Edit Users
Settings
Video
Advanced settings
Advanced features
Advanced settings
Camera
Audio
Date/Time
Network/Ports
Alarm
Schedule recording (Not in Speed domes)
PTZ
Maintenance
Support

15
You would also find the next icons in the window:
Icons available on live video page:
1X Display: This will display in 1X mode in the PC. There are scroll bars overlaid on the video
by the player. User can click on these to scroll the image
Snapshot: This will record the snapshot in the internal storage, jpeg format. User needs to enter
the desired filename in the dialog box as shown below. To retrieve the files user should access
the files through SMTP or FTP
Alarm Status: Works when you turn on the motion detection function or other alarm section is
activated, When some elements enter the detection area as you set, it will change its state from
alarm disabled to alarm activated
Record Status: When recording is carried to SD CARD based on Storage selected, this icon will
change its state from disabled to Active
Zoom out/in
Focus out/in/Autofocus
Camera view
setting
No. preset
Go to preset location
Delete all settings
Clear selected preset
Set a location
Change preset No.
Set position speed
Name of preset
Select speed options
Stream resolution
Full size frame
Snapshot
Alarm trigger
Recording status
Audio

16
Toggle Audio: User can use this to switch OFF to ON audio in the camera
Display all Streams: This can be selected to view all the streams in the same view or window.
This will disable “1X Display” icon.

17
3.4. Modifying User Settings
You can perform the following:
Add/Modify User: You can add or modify the user name by entering the following details:
User Name: Type the user name to add/modify.
Password: Type the password to change the existing data
Confirm Password: Type the user password same as in Password box. Password length
supported by application is 4 to 32.
Authority: Select one of the following options:
Admin: You can operate all functions in Web interface. Also, you can add or delete any
user’s account.
Operator: You can operate all functions in Web interface except user Add/Delete.
Viewer: You can only monitor the Web interface, but cannot operate all function and set
parameters.

18
Following are the access control given based on the Authority selected:
MODULES
ACCESS TO USER TYPES
Admin
Operator
Viewer
Live Video(Main Window)
Yes
Yes
Yes
Video/Image Setting
Yes
Yes
No
Camera Setting
Yes
Yes
No
Audio Setting
Yes
Yes
No
Date/Time Setting
Yes
Yes
No
Network and Port Setting
Yes
Yes
No
Alarm Setting
Yes
Yes
No
Storage Setting
Yes
Yes
No
User Setting
Yes
No
No
Maintenance
Yes
No
No
Support
Yes
Yes
Yes
SD Card Explorer
Yes
Yes
Yes
Advanced Features Setting
Yes
Yes
No
Delete: Under User List, select the registered user(s) and then click Delete User to delete a
user.
Note:
Admin is the default account and cannot be deleted.
Maximum of 10 accounts can be created.
Maximum length of username is limited to 32 characters.
Maximum length of password is limited to 33 characters with a minimum length of 4
characters.
Edit/Delete User:
Edit User: Clicking on Edit column for the added user list will allow to the user to change
setting like User Name/ Password/Authority.
Delete User: Clicking on the Delete column for the added user list will allow deleting that
particular user from that camera.

19
3.5. Modifying Video Image Settings
To change the video/image settings, click on the Video Setting button.
Camera: Type the camera title.
Stream Type: Select the stream type.
Single : This will have single stream use cases only
Dual : This will enable dual stream use case with second resolution
Triple: This will enable triple stream use cases
Codec Combo: Select the required codec. The options available are:
H.264 (Single)
MPEG4 (Single)
MegaPixel (Single)
H.264+JPEG (Dual)
MPEG4+JPEG (Dual)
Dual H.264 (Dual)
Dual MPEG4 (Dual)
H.264+MPEG4 (Dual)
Dual H.264+JPEG (Triple)
Dual MPEG4+JPEG (Triple)
Resolution: Select the required image resolution. The options available are:
MPEG4:720, JPEG:VGA, MPEG4:QVGA(in Dual MPEG4+JPEG)
H.264:720, JPEG:VGA, H.264:QVGA(in Dual H.264+JPEG)
H.264:D1, MPEG4:D1(in H.264+MPEG4)
MPEG4:1080P, MPEG4:QVGA(in MPEG4+MPEG4)
MPEG4:720, MPEG4:QVGA(in MPEG4+MPEG4)
MPEG4:D1, MPEG4:D1(in MPEG4+MPEG4)
MPEG4:D1, MPEG4:QVGA(in MPEG4+MPEG4)

20
H.264:1080P, H.264:QVGA(in H.264+H.264)
H.264:720, H.264:QVGA(in H.264+H.264)
H.264:D1, H.264:D1(in H.264+H.264)
H.264:D1, H.264:QVGA(in H.264+H.264)
MPEG4:720, JPEG:720(in MPEG4+JPEG)
MPEG4:720, JPEG:VGA(in MPEG4+JPEG)
MPEG4:D1, JPEG:D1(in MPEG4+JPEG)
H.264:720, JPEG:720(in H.264+JPEG)
H.264:720, JPEG:VGA(in H.264+JPEG)
H.264:D1, JPEG:D1(in H.264+JPEG)
JPG:1600x1200 (in MegaPixel )
H.264:1600x1200 (in MegaPixel)
MPEG4:720 (in Single MPEG4)
MPEG4:D1 (in Single MPEG4)
MPEG4:SXVGA (in Single MPEG4)
MPEG4: 1080P (in Single MPEG4)
MPEG4:720MAX60(in Single MPEG4)
H.264:720(in Single H.264)
H.264:D1(in Single H.264)
H.264:SXVGA(in Single H.264)
H.264:1080P(in Single H.264)
H.264:720MAX60(in Single H.264)
Local Display Video: Select one of the following options of the display device:
OFF: Will switch off the display
NTSC : Will switch to NTSC display @ 30fps
PAL : Will switch to PAL display @ 25fps
Mirror: Select the required option
OFF
VERTICAL: Flips the data in vertical direction
HORIZONTAL: Flips the data in horizontal direction
BOTH: Flips the data in both directions, equivalent to 180 rotation
Video File:
Video Size: From the drop-down list, select the length of an AVI file that needs to be saved
in case of scheduled recording or Alarm Trigger. Options available are
Auto
5 Sec
10 Sec
Stream: From the drop-down list, select the stream that needs to be saved in the AVI file.
The following options are available(this will be based on the combo used):
MPEG4 (1920x1080)
MPEG4(1280x1024)
MPEG4 (1280x720)
MPEG4(720x480)
MPEG4(320x192)
H.264 (1920x1080)
H.264(1280x1024)
H.264 (1280x720)
H.264 (720x480)
H.264(320x192)
Other manuals for AR6220 Series
1
Other Arlotto Security Camera manuals