manuals.online logo
Brands
  1. Home
  2. •
  3. Brands
  4. •
  5. Armitron
  6. •
  7. Watch
  8. •
  9. Armitron 40/6747BLK User manual

Armitron 40/6747BLK User manual

M505, 40/6747BLK, 40/6749GRN, 40/6769BLU
Armitron®
tron®
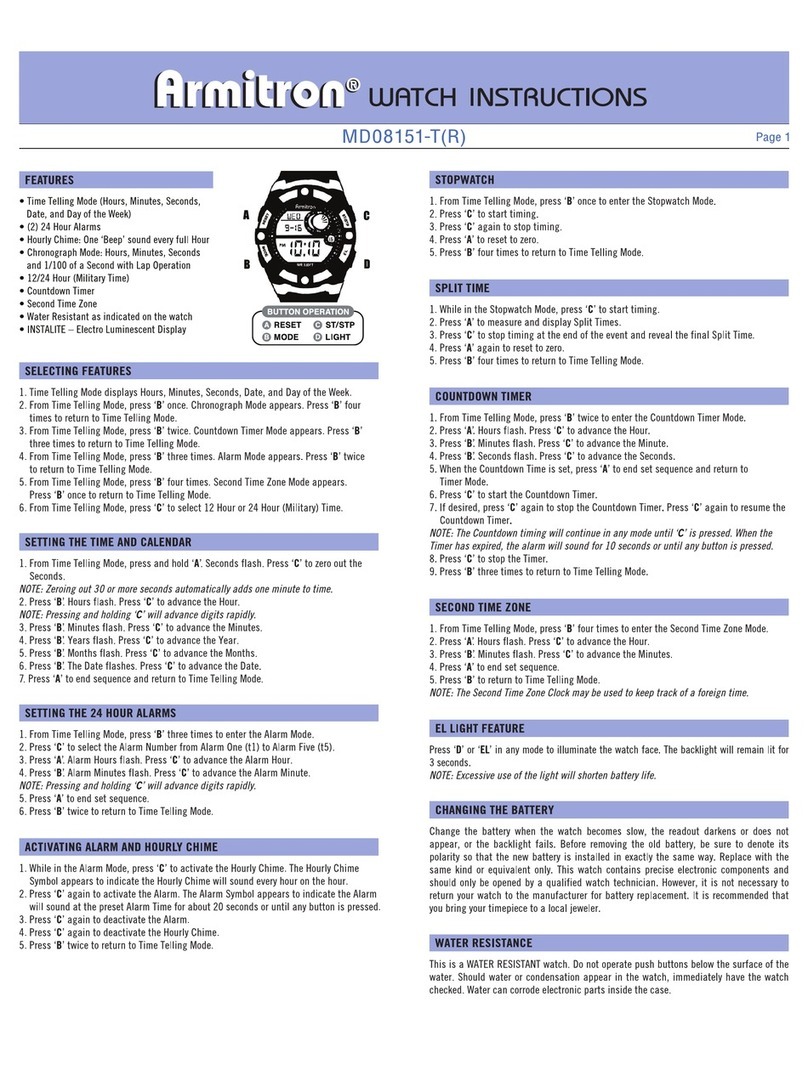
FEATURES
• Time Telling Mode (Hours, Minutes, Seconds, Date,
•and Day of the Week)
• Second Time Zone
• 24 Hour Alarm: Sounds for 20 Seconds at preset
•Alarm Time or until any button is pressed
• Hourly Chime: One ‘Beep’ sound every full Hour
• Chronograph Mode: Hours, Minutes, Seconds and
•1/100th of a Second with Lap/Split Operation
• Countdown Timer
• 12/24 Hour (Military Time)
• Water Resistant to 165ft.
• INSTALITE – Electro Luminescent Display
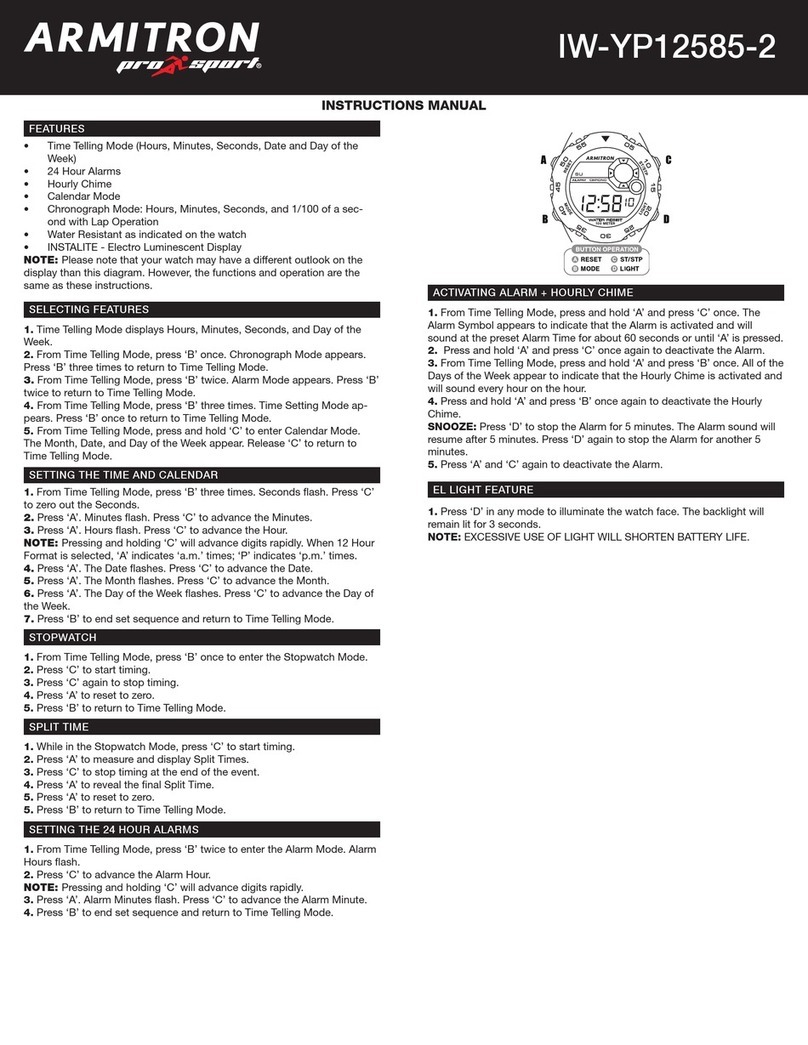
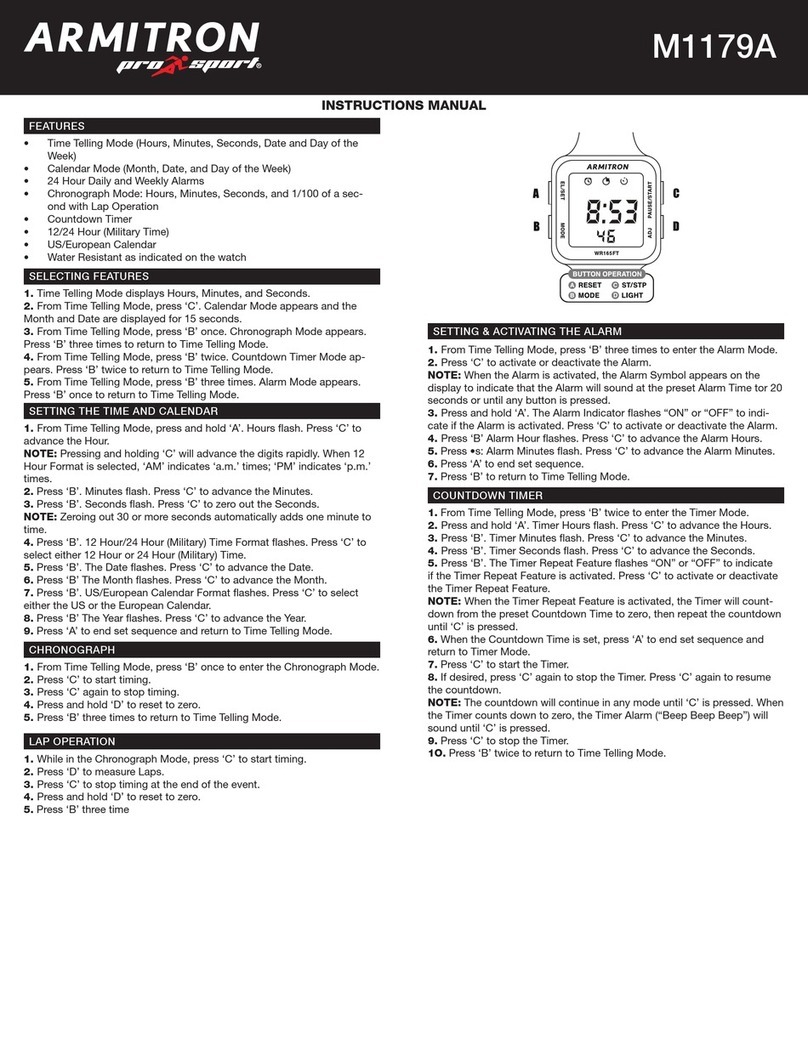
SELECTING FEATURES
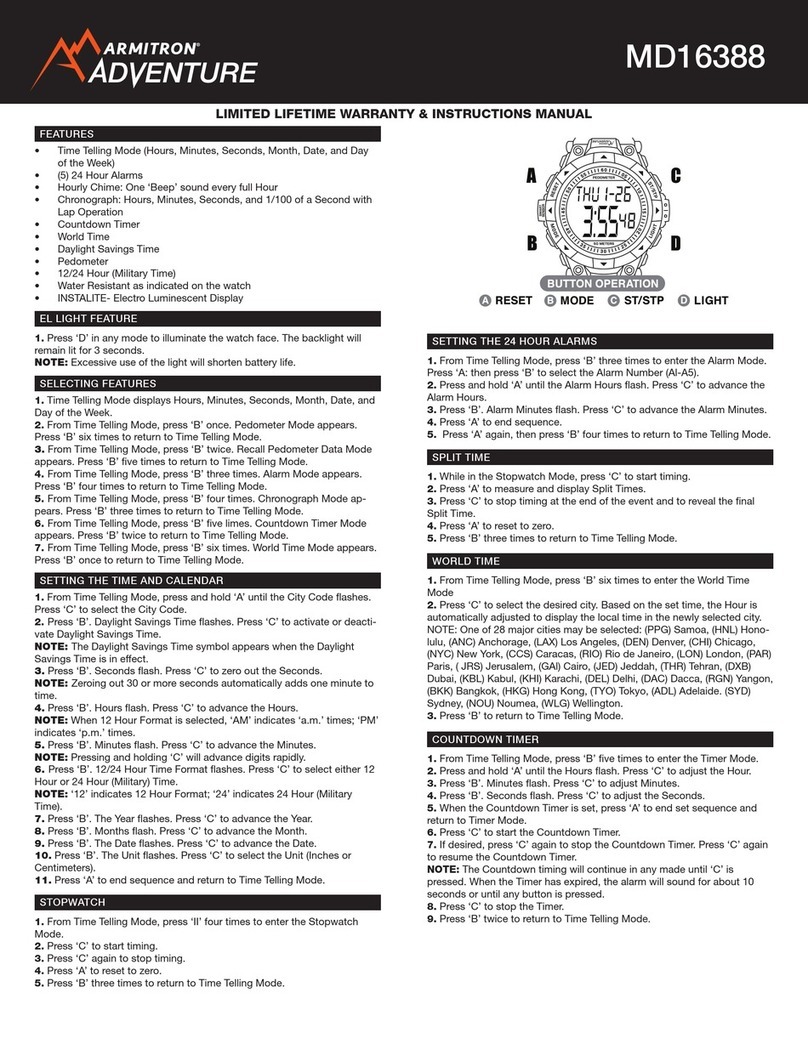
 1.Time Telling Mode displays Hours, Minutes,
 Seconds, Date, and Day of the Week.
 
 2. From Time Telling Mode, press ‘B’ once.
  Chronograph Mode appears. Press ‘B’ four
  times to return to Time Telling Mode.
 3. From Time Telling Mode, press ‘B’ twice.
Alarm Mode appears. Press ‘B’ three times
to return to Time Telling Mode.
 4. From Time Telling Mode, press ‘B’ three
times. Timer Mode appears. Press ‘B’
twice to return to Time Telling Mode.
5. From Time Telling Mode, press ‘B’ four
 times. Second Time Zone Mode appears.
 Press ‘B’ once to return to Time Telling
 Mode.
 6. From Time Telling Mode, press and hold
 ‘C’. The Month and Date appear. Release
‘C’ to return to Time Telling Mode.
INSTALITE - NIGHT VISION DISPLAY
1. Press ‘D’ or the ‘EL’ button in any mode to illuminate
the watch face for three seconds.
NOTE: Excessive use of backlight will shorten battery life.
12/24 HOUR (MILITARY) TIME
 1.From Time Telling Mode, press ‘A’ once.
  Seconds flash. Press ‘B’ six times to enter
  12/24 Hour Time Format.
2.Press ‘C’ to select either 12 Hour Time or
  24 Hour (Military Time).
 NOTE: The selected format will also apply to
 the time in the Second Time Zone.
 3.Press ‘A’ to end set sequence and return
  to Time Telling Mode.
SECOND TIME ZONE
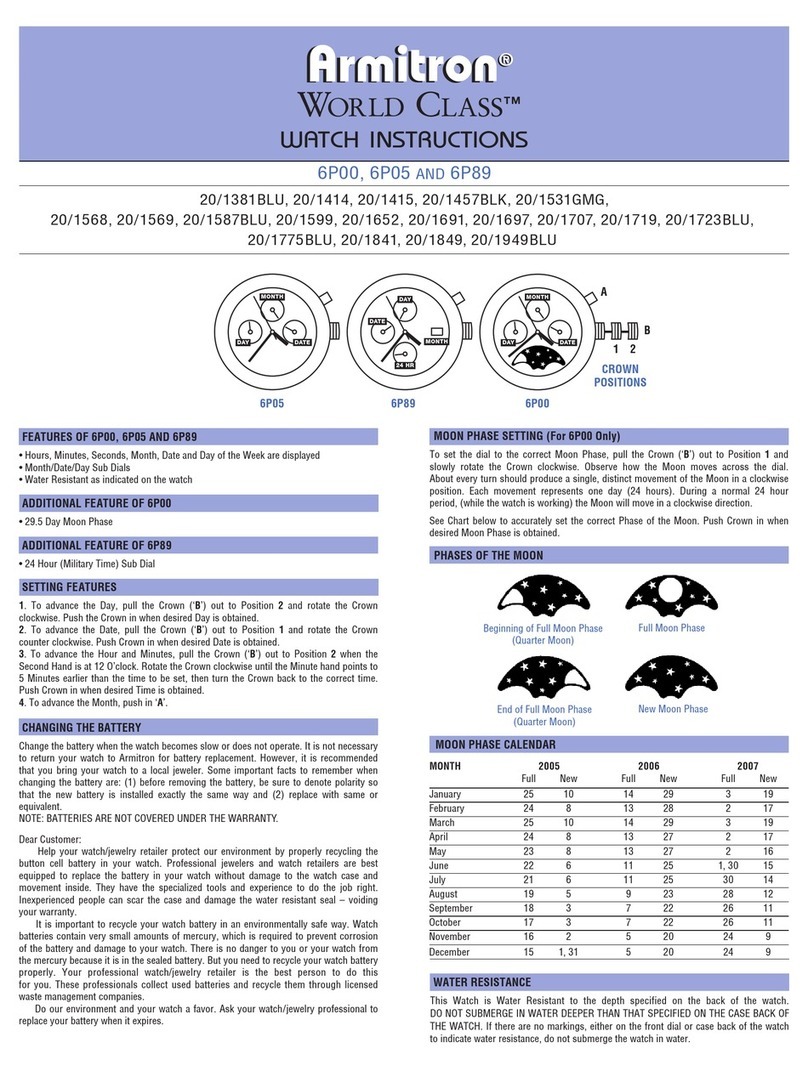
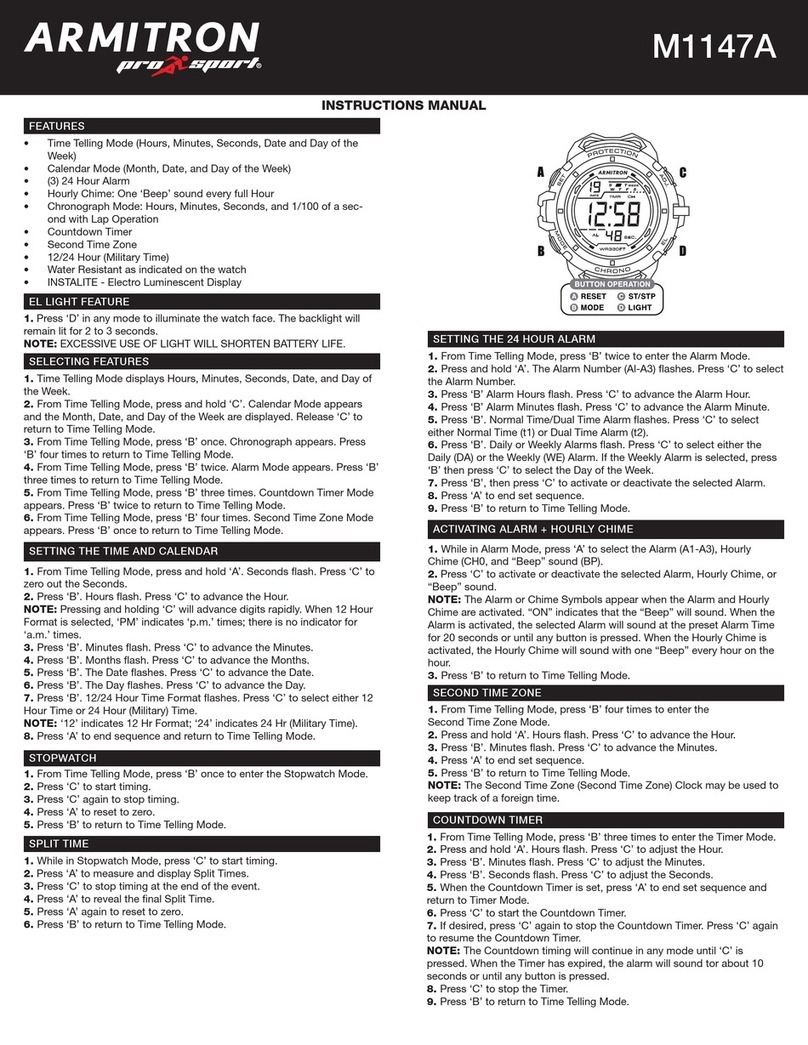
1. From Time Telling Mode, press ‘B’ four times to enter
Second Time Zone Mode.
2. Press ‘A’. Hours flash. Press ‘C’ to advance Hours.
3. Press ‘B’. Minutes flash. Press ‘C’ to advance Minutes
in 30-Minute intervals.
4. Press ‘A’ to end set sequence.
5. Press ‘B’ to return to Time Telling Mode.
SETTING THE TIME AND CALENDAR
1.From Time Telling Mode, press ‘A’.
 Seconds flash. Press ‘C’ to zero out
 seconds.
 NOTE: Zeroing out 30 or more seconds
 automatically adds one minute to time.
2. Press ‘B’. Hours flash. Press ‘C’ to advance
the Hour.
NOTE: Pressing and holding ‘C’ will
advance digits rapidly.
When 12 Hour Format is selected, ‘PM’ indicates ‘p.m.’
times; there is no indicator for ‘a.m.’ times.
3. Press ‘B’. Minutes flash. Press ‘C’ to
advance the Minutes.
4. Press ‘B’. The Month flashes. Press ‘C’ to
advance the Month.
5. Press ‘B’. The Date flashes. Press ‘C’ to
advance the Date.
6. Press ‘B’. The Day of Week flashes.
Press ‘C’ to advance the Day of the Week.
7. Press ‘A’ to end set sequence and return
to Time Telling Mode.
CHRONOGRAPH
1. From Time Telling Mode, press ‘B’ once to enter the
Chronograph Mode.
2. Press ‘C’ to start timing.
3. Press ‘C’ again to stop timing.
4. Press ‘A’ to reset to zero.
5. Press ‘B’ to return to Time Telling Mode.
SPLIT (LAP) OPERATION
1. While in the Chronograph Mode, press ‘C’ to start
timing.
2. Press ‘A’ to measure Splits (or Laps).
3. Press ‘C’ to stop timing at the end of the event.
4. Press ‘A’ to reveal the final Split (or Lap) time.
5. Press ‘A’ again to reset to zero.
6. Press ‘B’ to return to Time Telling Mode.
SETTING THE ALARM
1. From Time Telling Mode, press ‘B’ twice to enter
Alarm Mode.
NOTE: When the Alarm is activated, the Alarm
(‘Beep Beep’) will sound for 20 seconds at preset Alarm
Time or until any button is pressed.
2. Press ‘A’. Hours flash. Press ‘B’ twice. The Alarm
Number flashes. Press ‘C’ to select either Alarm Time 1
(t1) or Alarm Time 2 (t2).
3. Press ‘B’. Hours flash. Press ‘C’ to advance the Hour.
4. Press ‘B’. Minutes flash. Press ‘C’ to advance the
Minute.
5. Press ‘A’ to end set sequence.
6. Press ‘B’ to return to Time Telling Mode.
ACTIVATING THE ALARM AND HOURLY CHIME
1. While in Alarm Mode, press ‘C’ to activate the Alarm.
The Alarm symbol appears to indicate the Alarm is
activated.
2. Press ‘C’ again to activate the Hourly Chime.
‘CH’ appears to indicate the Hourly Chime is activated.
NOTE: When the Hourly Chime is activated, the Chime
(‘Beep’) will sound every hour on the hour.
3. Press ‘C’ again to deactivate Alarm.
4. Press ‘C’ again to deactivate the Hourly Chime.
5. Press ‘B’ to return to Time Telling Mode.
COUNTDOWN TIMER
1. From Time Telling Mode, press ‘B’ three times to enter
the Countdown Timer Mode.
2. Press ‘A’. Hours flash. Press ‘C’ to advance the Hour.
3. Press ‘B’. Minutes flash. Press ‘C’ to advance Minutes.
4. Press ‘B’. Seconds flash. Press ‘C’ to advance Seconds.
5. When Countdown Time is set, press ‘A’ to return to
Countdown Timer Mode.
6. Press ‘C’ to start Countdown timing.
7. If desired, press ‘C’ again to stop Countdown timing.
Press ‘C’ again to resume Countdown timing.
8. If desired, press ‘A’ to reset the Countdown time to the
preset Timer value.
NOTE: During the countdown of the Timer, an alarm
(‘Beep Beep’) will sound when the Seconds Digit is ‘0’ or
‘30’ if the Countdown Time is 3 Minutes or less. When
the Timer counts down below ten seconds, an alarm
(‘Beep’) will sound every second. When the Timer counts
down to zero, an alarm (‘Beep’ ‘Beep’ ‘Beep’) will sound
for 10 seconds or until any button is pressed.
9. Press ‘B’ to return to Time Telling Mode.
WATER RESISTANCE
This is a WATER RESISTANT watch. Do not operate the
push buttons below the surface of the water. Should water
or condensation appear in the watch, immediately have
the watch checked. Water can corrode electronic parts
inside the case.
CHANGING THE BATTERY
Change the battery when the watch becomes slow, the
readout darkens or does not appear, or the backlight fails.
Replace with one (1) CR2025 or equivalent only.
This watch contains precise electronic components and
should only be opened by a qualified watch technician.
How-ever, it is not necessary to return your watch to the
manufacturer for battery replacement. It is recommended
that you bring your timepiece to a local watch repair
facility.
Dear Customer:
Help your watch/jewelry retailer protect our environment
by properly recycling the button cell battery in your watch.
Professional jewelers and watch retailers are best
equipped to replace the battery in your watch without
damage to the watch case and movement inside. They
have the specialized tools and experience to do the job
right. Inexperienced people can scar the case and damage
the water resistant seal – voiding your warranty.
  It is important to recycle your watch battery in an
environmentally safe way. Watch batteries contain very
small amounts of mercury, which is required to prevent
corrosion of the battery and damage to your watch. There
is no danger to you or your watch from the mercury
because it is in the sealed battery. But you need to recycle
your watch battery properly. Your professional watch/
jewelry retailer is the best person to do this for you. These
professionals collect used batteries and recycle them
through licensed waste management companies.
  Do our environment and your watch a favor. Ask your
watch/jewelry professional to replace your battery when it
expires.
WATCH INSTRUCTIONS
8:450 0
A
B
C
D
EL
Armitron
28
W
A
T
E
R
1
6
5
R
E
S
I
S
S
E
T
A
D
J
.
M
O
D
E
E
L
SU
M
O
T
U
WE TH FR SA
TU 8- 28
8:45
00
TU
8- SP
8:45
00
TU 8- AL
I2:00
t
I
TU 8- TR
0:00
00
TU 8- T2
2:45
00
TU 8- AL
8 28
TU 8- 28
8:45
0
00
0
TU 8- 28
8
8:45
00
TU 8- 28
8:4
45
5
00
TU 8- 28
8
828
TU 8- 28
8 2
28
8
TU 8- 28
8 28
TU 8- HR
8:4
45
5
I
I2
2
TU 8- HR
8:4
4
2
24
4
M591, 40/8011BLU, 40/8013BLU, 40/8017, 40/8031, 40/8081, 40/8090
Armitron®
tron®
FEATURES
• Time Telling Mode (Hours, Minutes, Seconds, Date,
•and Day of the Week)
• Calendar Mode (Month and Date)
• 24 Hour Alarm
• Hourly Chime: One ‘Beep’ sound every full Hour
• Chronograph Mode: Hours, Minutes, Seconds and
•1/100th of a Second with Lap Operation
• Countdown Timer
• Second Time Zone
• 12/24 Hour (Military Time)
• Water Resistant as indicated on the watch
• INSTALITE – Electro Luminescent Display
SELECTING FEATURES
 1. Time Telling Mode displays Hour,
  Minutes, Seconds, Date, and Day 
  of the Week.
 2. From Time Telling Mode, press
  and hold ‘C’. Calendar Mode
  appears and the Month and Date
  are displayed. Release ‘C’ to
  return to Time Telling Mode.
 3. From Time Telling Mode, press ‘B’
  once. Chronograph Mode appears.
  Press ‘B’ four times to return to
  Time Telling Mode.
 4. From Time Telling Mode, press ‘B’
  twice. Alarm Mode appears.
  Press ‘B’ three times to return to
  Time Telling Mode.
5. From Time Telling Mode, press ‘B’
  three times. Timer Mode appears.
  Press ‘B’ twice to return to Time
  Telling Mode.
6. From Time Telling Mode, press ‘B’
  four times. Second Time Zone
  Mode appears. Press ‘B’ once to
  return to Time Telling Mode.
INSTALITE - NIGHT VISION DISPLAY
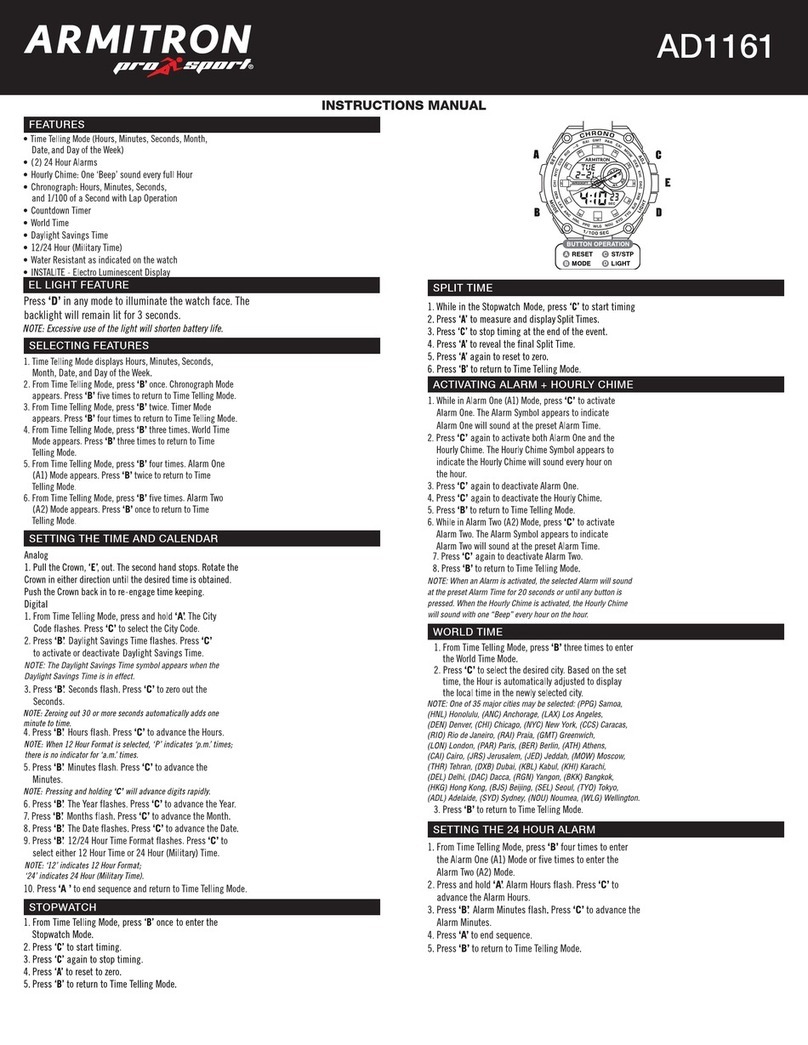
1. Press ‘D’ in any mode to illuminate the watch face.
 The backlight will remain lit for 2 to 3 seconds.
NOTE: EXCESSIVE USE OF THE BACKLIGHT WILL
SHORTEN BATTERY LIFE.
12/24 HOUR (MILITARY) TIME
1. From Time Telling Mode, press ‘A’. Press ‘B’ six times
to enter the 12/24 Hour (Military Time) Mode. Press ‘C’ to
select either 12 Hour or 24 Hour (Military) Time.
2. Press ‘A’ to end set sequence and return to Time
Telling Mode.
SECOND TIME ZONE
1. From Time Telling Mode, press ‘B’ four times to enter
Second Time Zone Mode.
2. Press ‘A’. Hours flash. Press ‘C’ to advance the Hour.
3. Press ‘B’. Minutes flash. Press ‘C’ to advance the
Minutes.
4. Press ‘A’ to end set sequence.
5. Press ‘B’ to return to Time Telling Mode.
SETTING THE TIME AND CALENDAR
 1. From Time Telling Mode,
  press ‘A’. Seconds flash. Press ‘C’
  to zero out the Seconds.
NOTE: Zeroing out 30 or more seconds automatically
adds one minute to time.
2. Press ‘B’. Hours flash. Press ‘C’ to
  advance the Hour.
 NOTE: Pressing and holding ‘C’ will
 advance digits rapidly.
When 12 Hour Format is selected, ‘PM’ indicates ‘p.m.’
times; there is no indicator for ‘a.m.’ times.
 3. Press ‘B’. Minutes flash. Press ‘C’
  to advance the Minutes.
 4. Press ‘B’. Months flash. Press ‘C’
  to advance the Month.
5. Press ‘B’. Date flashes. Press ‘C’ to
  advance the Date.

6. Press ‘B’. The Day of the Week flashes. Press ‘C’ to
advance the Day of the Week.
7. Press ‘A’ to end set sequence and return to Time
Telling Mode.
CHRONOGRAPH
1. From Time Telling Mode, press ‘B’ once to enter the
Chronograph Mode.
2. Press ‘C’ to start timing.
3. Press ‘C’ again to stop timing.
4. Press ‘A’ to reset to zero.
5. Press ‘B’ to return to Time Telling Mode.
LAP OPERATION
1. While in the Chronograph Mode, press ‘C’ to start
timing.
2. Press ‘A’ to measure Laps.
3. Press ‘C’ to stop timing at the end of the event.
4. Press ‘A’ to reveal the final Lap time.
5. Press ‘A’ again to reset to zero.
6. Press ‘B’ to return to Time Telling Mode.
SETTING 24 HOUR ALARM
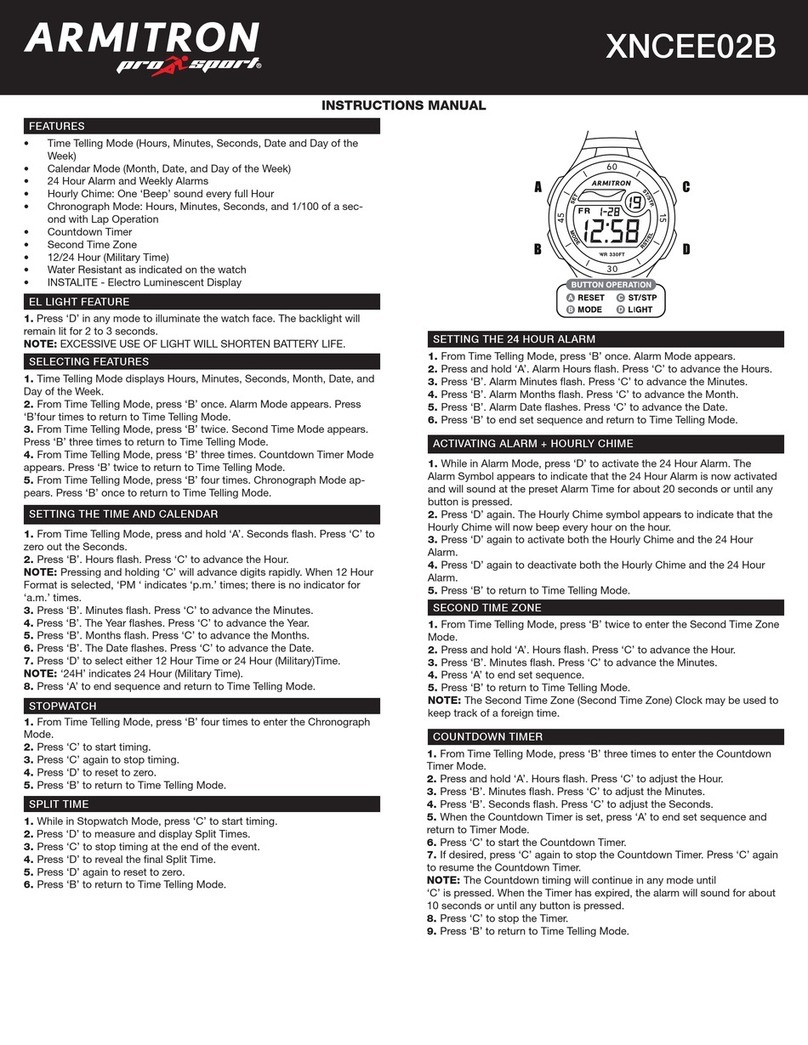
1. From Time Telling Mode, press ‘B’ twice to enter the
Alarm Mode.
2. Press ‘A’. Alarm Hours flash. Press ‘C’to advance the
Alarm Hour.
3. Press ‘B’. Alarm Minutes flash. Press ‘C’to advance the
Alarm Minute.
4. Press ‘B’. Alarm Time Zone flashes. Press ‘C’to select
either Time Zone 1 or Time Zone 2.
NOTE: The Alarm is available in one Time Zone only.
5. Press ‘A’to end set sequence.
6. Press ‘B’to return to Time Telling Mode.
ACTIVATING THE ALARM AND HOURLY CHIME
1. While in Alarm Mode, press ‘C’ to activate the Alarm.
The Alarm symbol appears to indicate the Alarm will
sound at the preset Alarm Time for 20 seconds or until
‘A’, ‘B’ or ‘C’ is pressed.
2. Press ‘C’ again to activate the Hourly Chime.
“CHIME” appears to indicate the Hourly Chime will sound
every hour on the hour.
3. Press ‘C’ again to deactivate the Alarm.
4. Press ‘C’ again to deactivate the Hourly Chime.
5. Press ‘B’ to return to Time Telling Mode.
COUNTDOWN TIMER
1. From Time Telling Mode, press ‘B’ three times to enter
the Timer Mode.
2. Press ‘A’. Hours flash. Press ‘C’ to advance the Hour.
3. Press ‘B’. Minutes flash. Press ‘C’ to advance the
Minute.
4. Press ‘B’. Seconds flash. Press ‘C’ to advance the
Second.
5. When the Countdown Time is set, press ‘A’ to end set
sequence and return to Timer Mode.
6. Press ‘C’ to start the Countdown Timer.
7. If desired, press ‘C’ again to stop the Countdown
Timer. Press ‘C’ again to resume the Countdown Timer.
8. If desired, press ‘A’ to reset the Countdown time to the
preset Countdown time. Press ‘A’ again, then press ‘C’ to
restart the Countdown Timer.
NOTE: The Countdown timing will continue in any mode
until ‘C’ is pressed. When the Timer counts down below
three minutes, an alarm (‘Beep Beep’) will sound when
the Seconds Digit is ‘0’ or ‘30’. When the Timer counts
down below ten seconds, an alarm (‘Beep’) will sound
every second. When the Timer has expired, the alarm
(‘Beep Beep Beep’) will sound for ten seconds or until
‘A’, ‘B’ or ‘C’ is pressed.
9. Press ‘C’ to stop the Timer.
10. Press ‘B’ to return to Time Telling Mode.
WATER RESISTANCE
This is a WATER RESISTANT watch. Do not operate the
push buttons below the surface of the water. Should water
or condensation appear in the watch, immediately have
the watch checked. Water can corrode electronic parts
inside the case.
CHANGING THE BATTERY
Change the battery when the watch becomes slow, the
readout darkens or does not appear, or the backlight
fails. Before removing the old battery, be sure to denote
its polarity so that the new battery is installed in exactly
the same way. Replace with one (1) CR2016 or equivalent
only. This watch contains precise electronic components
and should only be opened by a qualified watch
technician. However, it is not necessary to return your
watch to the manufacturer for battery replacement. It is
recommended that you bring your timepiece to a local
jeweler.
Dear Customer:
Help your watch/jewelry retailer protect our environment
by properly recycling the button cell battery in your watch.
Professional jewelers and watch retailers are best
equipped to replace the battery in your watch without
damage to the watch case and movement inside. They
have the specialized tools and experience to do the job
right. Inexperienced people can scar the case and damage
the water resistant seal – voiding your warranty.
  It is important to recycle your watch battery in an
environmentally safe way. Watch batteries contain very
small amounts of mercury, which is required to prevent
corrosion of the battery and damage to your watch. There
is no danger to you or your watch from the mercury
because it is in the sealed battery. But you need to recycle
your watch battery properly. Your professional watch/
jewelry retailer is the best person to do this for you. These
professionals collect used batteries and recycle them
through licensed waste management companies.
  Do our environment and your watch a favor. Ask your
watch/jewelry professional to replace your battery when it
expires.
WATCH INSTRUCTIONS
8:458:450000
Armitron
PM
WR165
ALARM
CHRONO
WEEK
SA
M
O
D
E
E
L
S
E
T
A
D
J
.
II22
A C
BD
SA I2
PM 8:4500
4I2
SP
PM 8:4500
AL
I2:00tI
TR
0:0000
T2
PM 2:4500
SA I2
PM 8:4
45
500
4
4I2
4I
I2
2
SA I2
PM 8:450
00
0
SA I2
P
PM
M8
8:4500

This manual suits for next models

14

Other Armitron Watch manuals

Armitron YP12598 User manual

Armitron

Armitron YP12598 User manual

Armitron M833 User manual

Armitron

Armitron M833 User manual

Armitron Droid Chrono M1179A User manual

Armitron

Armitron Droid Chrono M1179A User manual

Armitron ProSport M1147A User manual

Armitron

Armitron ProSport M1147A User manual

Armitron Pro Sport M1179A User manual

Armitron

Armitron Pro Sport M1179A User manual

Armitron PRO SPORT M807 User manual

Armitron

Armitron PRO SPORT M807 User manual

Armitron Griffy BJ3407 User manual

Armitron

Armitron Griffy BJ3407 User manual

Armitron AD1127 User manual

Armitron

Armitron AD1127 User manual

Armitron Pro Sport XNAIE01 User manual

Armitron

Armitron Pro Sport XNAIE01 User manual

Armitron Analog Manual

Armitron

Armitron Analog Manual

Armitron pro sport MD0346 User manual

Armitron

Armitron pro sport MD0346 User manual

Armitron M1119 Pro Sport User manual

Armitron

Armitron M1119 Pro Sport User manual

Armitron AD1029 User manual

Armitron

Armitron AD1029 User manual

Armitron 40/8284 MD0699 User manual

Armitron

Armitron 40/8284 MD0699 User manual

Armitron Champion M1216 User manual

Armitron

Armitron Champion M1216 User manual

Armitron MD17421 User manual

Armitron

Armitron MD17421 User manual

Armitron Adventure MD16389 User manual

Armitron

Armitron Adventure MD16389 User manual

Armitron Pro Sport XNAQE01 User manual

Armitron

Armitron Pro Sport XNAQE01 User manual

Armitron pro sport M1085 User manual

Armitron

Armitron pro sport M1085 User manual

Armitron pro sport XNCEE02B User manual

Armitron

Armitron pro sport XNCEE02B User manual

Armitron M799 User manual

Armitron

Armitron M799 User manual

Armitron Pro Sport MD13280 User manual

Armitron

Armitron Pro Sport MD13280 User manual

Armitron T205(5ATM) User manual

Armitron

Armitron T205(5ATM) User manual

Armitron prosport M1044 User manual

Armitron

Armitron prosport M1044 User manual

Popular Watch manuals by other brands

Huawei JPT-B29 quick start guide

Huawei

Huawei JPT-B29 quick start guide

Breitling MONTBRILLANT 47 user guide

Breitling

Breitling MONTBRILLANT 47 user guide

Seiko 8R48 user manual

Seiko

Seiko 8R48 user manual

Casio ANALOG Operation guide

Casio

Casio ANALOG Operation guide

GOLDEN STATE INTERNATIONAL 40-358 instruction manual

GOLDEN STATE INTERNATIONAL

GOLDEN STATE INTERNATIONAL 40-358 instruction manual

Guardian MEDIWATCH Quick start user guide

Guardian

Guardian MEDIWATCH Quick start user guide

Shenzhen Xinkeying Technology DT Series product manual

Shenzhen Xinkeying Technology

Shenzhen Xinkeying Technology DT Series product manual

Insignum LUXOR C08004 quick start guide

Insignum

Insignum LUXOR C08004 quick start guide

LG G-Watch -W100 user guide

LG

LG G-Watch -W100 user guide

LORUS NREZ027C instruction manual

LORUS

LORUS NREZ027C instruction manual

BREIL 6U50 Instruction book

BREIL

BREIL 6U50 Instruction book

Wegner LED Nomad instruction manual

Wegner

Wegner LED Nomad instruction manual

MOBILE GPS ONLINE GATOR user guide

MOBILE GPS ONLINE

MOBILE GPS ONLINE GATOR user guide

TAG Heuer SBR8A Instructions and guarantee

TAG Heuer

TAG Heuer SBR8A Instructions and guarantee

Citizen Eco Drive B740 Settings guide

Citizen

Citizen Eco Drive B740 Settings guide

Citizen Driver's watch CTZ-B8022 instruction manual

Citizen

Citizen Driver's watch CTZ-B8022 instruction manual

Bremont AC-R-II Technical notes

Bremont

Bremont AC-R-II Technical notes

Casio 5692 Operation guide

Casio

Casio 5692 Operation guide

manuals.online logo
manuals.online logoBrands
  • About & Mission
  • Contact us
  • Privacy Policy
  • Terms and Conditions

Copyright 2025 Manuals.Online. All Rights Reserved.