Aroma Professional ABD-700 User manual

High Performance
Blender
ABD-700
Questions or concerns about your blender?
Before returning to the store...
Aroma’s customer service experts are happy to help.
Call us toll-free at 1-800-276-6286
Answers to many common questions and even
replacement parts can be found online. Visit
www.AromaCo.com/Support.

1. Read all instructions, safeguards, and
warnings before operating.
2. To prevent risk of electric shock, never
place the blender base in water or other
liquids. See instruction for cleaning.
3. This appliance should not be used by or
near children or incapacitated persons,
and extra caution should be exercised
when used near them.
4. Unplug from power outlet when not in
use and before assembly, disassembly, or
cleaning.
5. Avoid contact with moving parts,
especially the blade.
6. Do not operate any appliance with
a damaged cord or plug or after the
appliance malfunctions or is dropped or
damaged in any matter. Contact Aroma
Customer Support at 1-800-276-6286
for examination, repair, or electrical or
mechanical adjustment.
7. The use of third party attachments
or accessories such as canning jars,
tampers, or blades not explicitly
recommended or sold by Aroma may
cause re, electric shock, contamination
of food, or injury.
8. Do not use outdoors.
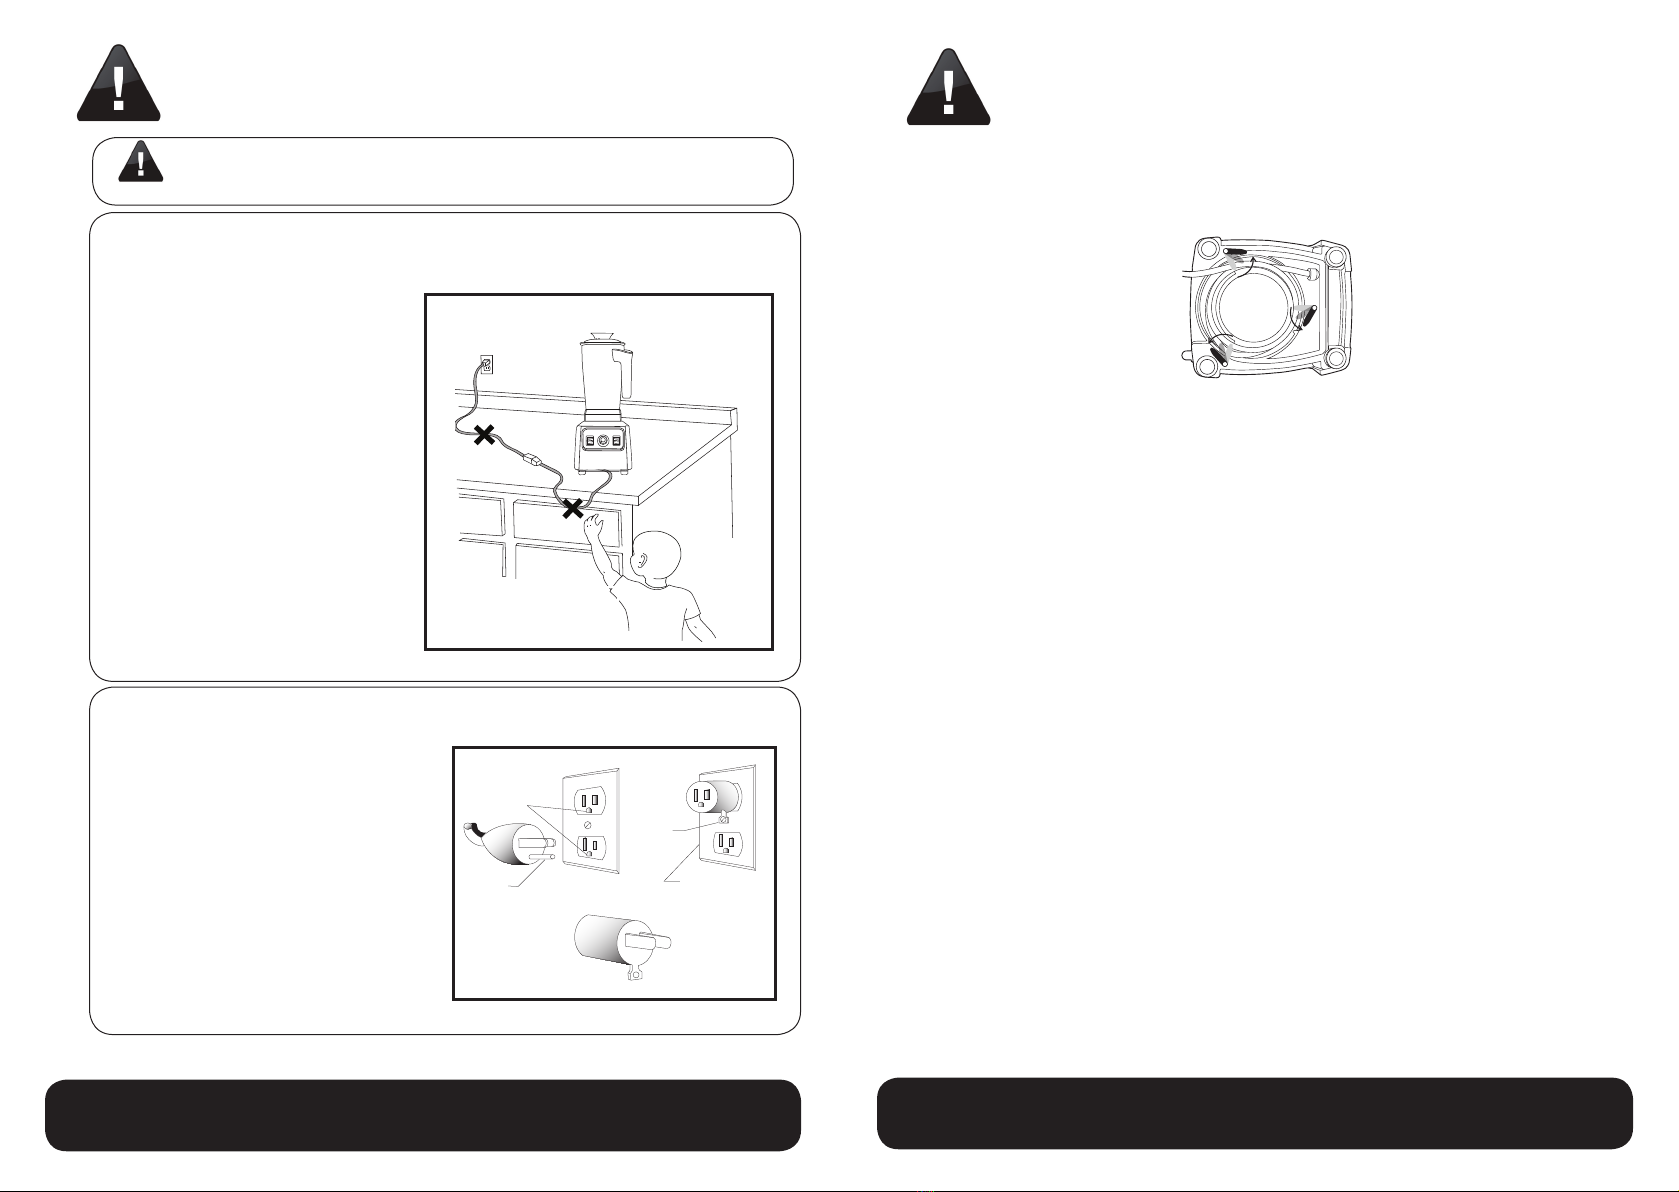
9. Do not let the power cord hang over the
edge of the table or counter.
10. Do not let the power cord contact hot
surfaces, including the stove.
11. Do not let the power cord be submerged
in or exposed to water or any liquids.
Always ensure that the cord and plug are
dry before plugging into a power outlet.
12. Keep hands and utensils out of the
blender container while operating to
prevent the possibility of severe personal
injury and/or damage to the blender. A
rubber spatula may be used, but must
be used only when the blender is not
running.
13. Blades are sharp; handle with care.
To avoid injury, never place the blade
assembly on the based without the
container attached properly.
14. Always make sure the Container Lid is
in place while operating. Only use the
tamper with the Container Lid in place
to prevent the tamper from coming into
contact with the blades. Do not use
the tamper when blending hot liquids or
ingredients.
15. Use caution when blending hot liquids or
ingredients, as spray or escaping steam
may cause scalding and burns. Do not ll
the Container to the maximum capacity.
Keep hands and other exposed skin away
from the lid opening to prevent possible
burns.
16. Do not leave the blender unattended while
operating.
17. This product is for HOUSEHOLD USE
ONLY.
18. Always unplug from the base of the wall
outlet. Never pull on the cord.
19. To disconnect, turn any control to OFF,
then remove plug from wall outlet.
20. Use only on a level, dry and heat-
resistance surface.
Thank you for choosing Aroma! The Aroma Professional Blender is designed to promote a diet
that’s both delicious and healthy. It enables you to effortlessly produce nourishing food and
drinks including whole fruit and vegetable juices, power-packed smoothies, warm soups, zesty
dressings and sauces, baby food and so much more!
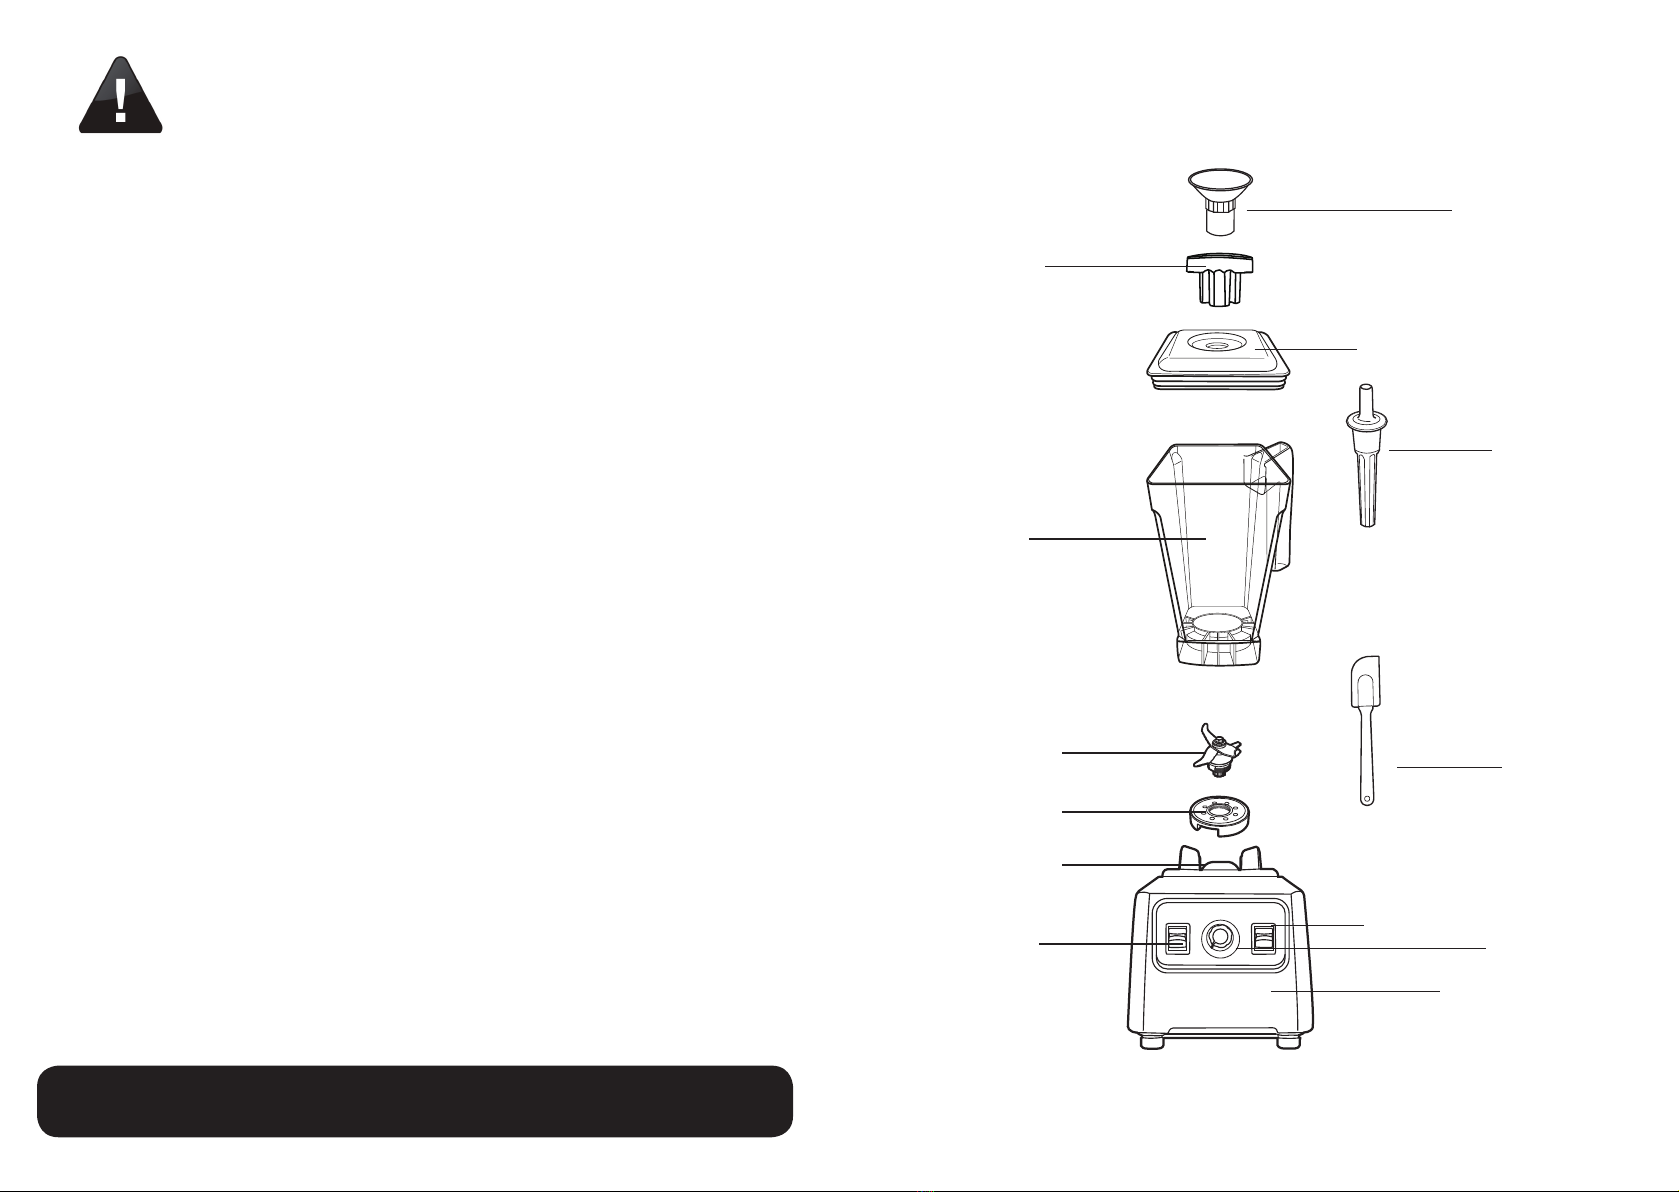
This manual contains instructions for using your blender and its convenient settings, as well as
all of the accessories included.
For more information on your Aroma blender, or for product service, recipes and other home
appliance solutions, please visit us online at www.AromaCo.com.
Published By:
Aroma Housewares Co.
6469 Flanders Drive
San Diego, CA 92121
U.S.A.
1-800-276-6286
www.AromaCo.com
©2014 Aroma Housewares Company
All rights reserved.
www.AromaTestKitchen.com
www.pinterest.com/ aromahousewares
www.facebook.com/AromaHousewares
www.twitter.com/AromaHousewares
See what’s cooking with Aroma®online!
IMPORTANT SAFEGUARDS
WARNING: Serious personal injuries can occur with any blender if it is
not used properly. To avoid such risks, always follow the following basic
safety precautions:
Failure to follow any of these steps can void your warranty and create the risk of serious injury.
SAVE THESE INSTRUCTIONS 1

SAVE THESE INSTRUCTIONS
Failure to follow any of these steps can void your warranty and create the risk of serious injury.
SAVE THESE INSTRUCTIONS
IMPORTANT SAFEGUARDS IMPORTANT SAFEGUARDS
Short Cord Instructions
1. A short power-supply cord is provided
to reduce the risks resulting from
becoming entangled in or tripping
over a longer cord.
2. Longer extension cords are available
and may be used if care is exercised
in their use.
3. If a longer extension cord is used:
a. The marked electrical rating
of the extension cord should
be at least as great as
the electrical rating of the
appliance.
b. The longer cord should be
arranged so that it will not
drape over the counter top
or tabletop where it can be
pulled by children or tripped
over unintentionally.
Grounding Instructions
This appliance must be grounded while in use
to protect the operator from electrical shock.
The appliance is equipped with a 3-conductor
cord and a 3-prong grounding-type plug to t
the proper grounding-type receptacle. The
appliance has a plug that looks like sketch
A. An adaptor, sketch B, should be used for
connecting sketch-A plug plugs to two-plugs
to two-prong receptacles. The grounding
tab, which extends from the adaptor, must be
connected to a permanent ground such as
a properly grounded outlet box as shown in
sketch C using a metal screw.
POWER CORD
The Power Cord is stored neatly at bottom of the base by three plastic tabs. To unravel the
cord for use twist the plastic tabs to the side until they no longer hold the cord in place.
This appliance is equipped with a short power cord to reduce the risk of becoming entangled
in or tripping over the cord. Longer extension cords may be used if the following steps are
followed with care:
1. The marked electrical rating of the extension cord should be at least as high as the
electrical rating of the appliance.
2. Take care that the cord and extension cord does not drape over the counter top where it
can be reached by children or tripped over.
OVERLOAD FAIL-SAFE
For safety, the core motor is equipped with a built in circuit breaker that will automatically shut
off in case of an electrical overload. To reset the unit after an automatic shut off, simply press
the circuit breaker reset button located on the bottom left of the back of the base.
The core motor is also equipped with a temperature guard system to prevent damage from
overheating and will automatically shut off if the temperature ever exceeds 250°F. The unit will
be ready to resume function as soon as the motor cools down.
Failure to follow any of these steps can void your warranty and create the risk of serious injury.
2
DO NOT DRAPE CORD!
KEEP AWAY
FROm ChilDREN!
3
(A)
CIRCUIT GROUNDING
CONDUCTOR
CONNECTED
PROPERLY
GROUND
PRONG
(C)
ADAPTER
GROUNDING MEANS
AA22D
(B)
METAL
MOUNTING
SCREW
COVER OF GROUNDED
OUTLET BOX
• Use this product with rated voltage AC outlets only. Make sure to unplug the
Power Cord when the blender is not being used.
CAUTION

5
4SAVE THESE INSTRUCTIONS
1. Do not open the Container Lid until the blades have completely stopped turning.
2. Unplug the power cord after each use.
3. Do not submerge the base of the blender in water or other liquids. The base is NOT
dishwasher safe.
4. Do not leave foreign objects, such as spoons, forks, or knives, in the container when
starting the blender as this may cause damage as well as serious personal injury.
5. Make sure that the blender and motor assembly are rmly afxed to the blender base
before turning on the blender.
6. To avoid risk of injury from blades, always use a spoon or the included rubber spatula to
remove food from the blender.
ADDITIONAL SAFETY
CONSIDERATIONS
Failure to follow any of these steps can void your warranty and create the risk of serious injury.
4
PARTS AND FEATURES
Funnel
Tamper
Container Lid
Present
Time Switch
Power Knob
Base
Spatula
Container
Lid Cap
Blade
Retainer Nut
Power Axel
Mode Swtich

7
6
PARTS AND FEATURES
CONTAINER LID
The Aroma Professional Blender comes with a heat resistant, easy to clean lid with an opening
to accommodate the included Lid Cap, Funnel, and Tamper. To place the Container Lid on
the Container hold it by the Lid Tab. Insert that corner into the corner closets to the container
handle then press down on the remaining corners until the Container Lid is tightly secure. To
remove the Lid, hold the Container down while lifting the Lid Tab.
LID CAP
The Lid Cap features a unique cross-shaped design to allow for ventilation, making it safe to
use while blending hot liquids while preventing splashing or scalding. With the Container Lid
secure, insert the Lid Cap by tting the cross-shaped end into the opening and pressing down
until it is tightly secure. To remove, hold the Container Lid down with one hand while twisting
the Lid Cap until it is loose enough to remove.
FUNNEL
With the Container Lid secure, insert the narrow end of the funnel into the lid opening to make
it easier to pour liquids or ner foods into the Container without spilling.
TAMPER
Maneuver the Tamper through the opening of the Container Lid to press ingredients into the
blades.
• To avoid splashing, potential scalding from hot liquids, and other potentially
serious injuries, make sure the Lid is always on while the machine is running.
• Do not use the Tamper without the Container Lid to ensure that the Tamper does
not come in contact with the blades. Since the Tamper’s splash disc covers the
entire opening on the Container Lid, do not use it while blending hot foods, as this
can cause an unsafe build-up of pressure or steam.
WARNING
WARNING
PARTS AND FEATURES
BLADES
The Aroma Professional Blender comes equipped with a unique set of powerful horn-shaped
serrated blades that are suitable for both wet and dry blending. They are made of 420-J2
stainless steel hardened with an electrolytic surface treatment and spin on two rust resistant
SUS 440 zinc alloy bearings.
CONTROL PANEL
A. MODE SWITCH: The Mode Switch has three positions: TIMING, OFF, and INFINITY. In
TIMING mode, the unit will run for the duration specied by the Preset Time Switch. In
INFINITY mode, the unit will continue to run until shut off manually. In OFF mode, the unit
will not start.
B. POWER KNOB: The Power Knob turns the unit on and allows the user to control the
speed of the blades from MIN to MAX. The Knob is only active if the Mode Switch is set
to either TIMING or INFINITY.
C. PRESET TIME SWITCH: The Preset Time Switch has three settings: 35 seconds, 60
seconds, and 120 seconds. When the Mode Switch is set to TIMING, the unit will run for
whichever duration the Preset Time Switch is set to.
• Blades are sharp and can cause serious injury. Do not put hands into the
Container while the blender is on or when the Container is on the base.
• For best results and safety, we recommend always setting the Mode Switch rst
before starting the blender using the Power Knob.
WARNING
WARNING
A B C

9
8
HOW TO BLEND WET
INGREDIENTS
1. Load ingredients into the Container. When pouring in liquids, the liquid level should
at minimum cover the blades. Cover with the Container Lid and secure the Lid Cap.
WARNING: To prevent overow, do not ll the container above the 6 cup line as the level
may increase during blending and from tamping.
2. Set the Container rmly on the Base.
3. Set the Mode Switch and, if necessary, the Time Switch.
4. Turn the Power Knob clockwise to turn on the blender. For best results, blend on MAX.
5. To add additional ingredients, remove the Lid Cap and add ingredients using the Funnel.
Once the contents are pureed, add water or ice until it reaches the desired volume and/
or thickness.
6. Turn the Power Knob counter-clockwise to turn off the blender, and then set the Mode
Switch to OFF.
7. Remove the Container from the Base, and the Container Lid from the Container. Pour the
contents from the Container, using the included Spatula to scrape out if necessary.
• When blending hot liquids, start on MIN before moving the speed up to avoid
potential burning or scalding from splashing. Beware of hot steam venting from
the opening of the Container Lid that can cause burns, even with the Lid Cap
in place.
• When making jam purées, fruits high in water content such as strawberries
do not need any additional water. Add sugar to the ingredients and blend on MAX
until pureed. Pour the contents into a double boiler and allow it to cook for 10 to
15 minutes. Allow to cool before serving.
WARNING
TIP
HOW TO BLEND DRY
INGREDIENTS (GRINDING)
1. Load the ingredients into the Container. For best results, use pre-roasted ingredients.
Cover with the Container Lid and either secure the Lid Cap or insert the Tamper.
2. Set the Container rmly on the Base.
3. Set the Mode Switch and, if necessary, the Time Switch.
4. Turn the Power Knob clockwise to turn on the blender. For best results, start on MIN and
slowly work the power up to MAX.
5. To add additional ingredients, remove the Lid Cap and add ingredients using the Funnel.
6. Turn the Power Knob counter-clockwise to turn off the blender, and then set the Mode
Switch to OFF.
7. Remove the Container from the Base, and the Container Lid from the Container. Pour the
contents from the Container, using the included Spatula to scrape out if necessary.
• For Powders, roast ingredients in microwave or conventional oven until all moisture
content has been evaporated. Fill the Container up to at least the 1.5 cup line.
Blend on MAX until the ingredients have been ground to powder.
TIP

11
10
1. Fill the Container up half way with clean water up to the 4 cup marker. For more thorough
cleaning, add two slices of lemon or a couple drops of detergent. Cover with the
Container Lid and secure the Lid Cap.
2. Set the Container rmly on the Base.
3. Set the Mode Switch to Timing and the Time switch to 35.
4. Turn the Power Knob clockwise to MAX.
5. Allow the machine to run until it stops automatically.
6. Remove the Container from the Base, remove the Container Lid, and rinse out the
Container thoroughly with clean water.
7. Dry the exterior of the Container and place it back on the Base.
8. Turn the Power Knob to MAX for three seconds to dry out the Bearings. Turn the blender
off, remove the Container, and allow it to air dry.
CLEANING AND CARE
To ensure the longevity of your Aroma Professional Blender, always make
sure to clean after each use. The blender can be cleaned easily with the
following steps:
When cleaning the appliance,
do not soak the power axel
in water .
Fill the pitcher with clean
water and start the machine
to clean it .
TROUBLESHOOTING
My blender will not start.
Double check the power cord to make sure that it is properly plugged in. Press the circuit
breaker reset button located on the bottom left of the back of the base. If the device still does
not work, call Aroma Customer Service at 1-800-276-6286.
My blender stopped suddenly mid-use and I cannot get it to start again.
It is possible that your blender has overloaded or overheated. Your Aroma Professional
Blender is equipped with an automatic overload fail-safe that automatically shuts off the
machine for safety when overloaded with electricity or heat (see page 4). To reset the unit after
an automatic shut off, simply press the circuit breaker reset button located on the bottom left of
the back of the base.
In case of overheating, simply wait 15 minutes for the motor to cool, and the unit should
resume functionality.
The blade does not rotate smoothly and the machine makes loud abnormal sounds.
The retainer nut in the Container may have come loose. Stop using immediately and contact
Aroma Customer Service at 1-800-276-6286.
• For your safety, always make sure the Mode Switch and Power Switch are both
set to Off, and the Power Cord is unplugged before troubleshooting.
WARNING

12
LIMITED WARRANTY
Aroma Housewares Company warrants this product free from defects in material and
workmanship for one year from provable date of purchase in the continental United States.
Within this warranty period, Aroma Housewares Company will repair or replace, at its option,
defective parts at no charge, provided the product is returned, freight prepaid with proof of
purchase and U.S. $26.00 for shipping and handling charges payable to Aroma Housewares
Company. Before returning an item, please call the toll free number below for a return
authorization number. Allow 2-4 weeks for return shipping.
This warranty does not cover improper installation, misuse, abuse or neglect on the part of the
owner. Warranty is also invalid in any case that the product is taken apart or serviced by an
unauthorized service station.
This warranty gives you specic legal rights and which may vary from state to state and does
not cover areas outside the United States.
AROMA HOUSEWARES COMPANY
6469 Flanders Drive
San Diego, California 92121
1-800-276-6286
M-F, 8:30 AM - 5:00 PM, Pacic Time
Website: www.AromaCo.com
Table of contents
Popular Blender manuals by other brands

Silvercrest
Silvercrest SSZ 500 A1 Operating instructions and safety instructions

Silvercrest
Silvercrest SSMS 600 D4 operating instructions

Health Master
Health Master JLA-8 120 VAC owner's manual

Vitamix
Vitamix 101807 Use and care guide

EUROPRO
EUROPRO NINJA MASTER PREP QB900Q 30 owner's manual

Cater Chef
Cater Chef 537.025 operating instructions