Arrow Kart User manual

Kart
Setup Guide
Arrow Karts Owners Manual
Kart
Setup Guide

Drew Price Engineering Pty Ltd
57-59 Nantilla Road, North Clayton VIC 3168 Australia
PO Box 4105 Mulgrave VIC 3170 Australia
Tel. (03) 9545 3944 Fax (03) 9545 3743
(Int’l: Tel. +61 3 9545 3944 Fax +61 3 9545 3743)
www.dpeng.com.au [email protected]
Drew Price Engineering Pty Ltd
57-59 Nantilla Road, North Clayton VIC 3168 Australia
PO Box 4105 Mulgrave VIC 3170 Australia
Tel. (03) 9545 3944 Fax (03) 9545 3743
(Int’l: Tel. +61 3 9545 3944 Fax +61 3 9545 3743)
www.dpeng.com.au [email protected]

Contents
Contents
2 Axle Bearing Adjustment
2 Height Adjustment of Rear Axle
3 Height Adjustable Stub Axles
4 Brake Adjustment
5 Crash Bar Adjustment
6 Front End Alignment
9 Front Track
10 Rear Track
12 Seat Stays
13 Adjustable/Removable Torsion Bars
15 Tyre Pressures
16 Seat – Fit and Position
17 Weighting Kart
17 Wet Weather
18 Rear Wheel Hubs
19 Brake Maintenance
20 Fitting Tyres
21 Front Wheel Alignment
21 Use and Safety guide
23 Owner registration card
25 Gear ratio chart
26 Maintenance Schedule
28 Troubleshooting Question & Answer Index
CONTENTS 1
Before making any adjustments be sure to test your Arrow in its
recommended standard setup. It is essential to make only one adjustment
at a time.
TAKE NOTE...

Axle Bearing Adjustment
1. AXLE BEARING ADJUSTMENT
Problem: “Lack of rear grip”
Solution: On Arrow karts using a 3 bearing
rear axle design, under certain conditions
where grip level is low extra grip may be
gained by loosening the centre bearing.
Remove the 3 bolts from the alloy bearing
flange and loosely fit three cable ties through
these holes. If you have seat stays fitted you
will need to remove the seat stay from the
alloy-bearing flange.
2. HEIGHT ADJUSTMENT OF THE REAR AXLE
Problem: “Kart is two wheeling excessively through corners”
(i.e. both inside wheels are 10cm off the track surface)
Solution: Raise axle in chassis.
Problem: “The back slides/the kart
oversteers going into the turns”
Solution: Make sure the back axle is located
full down in the chassis (i.e. the kart with
maximum rear ride height)
Why?
With the Arrow karts that allow height adjustment of the rear axle, by raising the height of the rear axle in
the chassis you are lowering the rear ride height. In effect, this changes the “centre of gravity”, (c/g), of your
kart, which is lowered and moved back compared to the axle in its normal full down position in the chassis.
Note: As the general rule the axle should always be left fully down in the chassis as the kart’s normal
setting. Only when track conditions start making the kart two wheel excessively through corners
should the axle be raised in the chassis.
2 AXLE BEARING ADJUSTMENT

Front Stub Axles
Height Adjustable Front Stub Axles
Problem: “The back slides/the kart oversteers going into the turns”
Solution: Raise the front ride height i.e. lower
the front stub axles in the chassis by one
spacer at a time
Problem: “There is too much steering or
front end bite on turn-in”
Solution: Lower the front ride height i.e.
raise the front stub axles in the chassis by one
spacer at a time.
Why?
Height adjustable front stub axles are an aid to achieving that “perfect” kart set-up. What is being achieved
when the front stub axles are lowered or raised is raising and moving back or lowering and moving forward
the kart’s “centre of gravity”(c/g).
When you lower the stubs in the frame you raise the kart’s front ride height. This raises the karts c/g. as well
as moving it further back. The effect on the kart will be to make it a little slower with its first-off reaction on
initial steering wheel input but from then on in the front will have more grip into the apex. The effect of
having moved the c/g. back will be to create more back end grip throughout the whole corner as well as
making the rear of the kart sit flatter.
Be careful of this as you might start feeling that your engine is going off, losing pull off of the turns but the
kart feels great. Wrong, the kart is sitting too flat through the corner. It’s not allowing a “differential effect”,
by lifting the inside (unloaded) back wheel off the track through the apex, pulling the engine down which
is trying to drive both back tyres through differing arcs on a fixed back axle.
Note: By raising the stub axle in the chassis you lower the kart’s front ride height achieving the reverse
of the above.
HEIGHT ADJUSTABLE FRONT STUB AXLES 3

Brake Adjustment
Brake Adjustment
1. PAD WEAR ADJUSTMENT
Problem: “The engine has no top end speed”
Solution: Verify the brakes are not dragging. If needed, increase the gap between the rear
brake pads and the disc by removing shims between the caliper piston and the brake pad.
Problem: “Excessive pad clearance between each pad and the disc”
(Pad adjustment is necessary when the clearance between each pad and the disc exceeds 3mm)
Solution: Reduce the gap between the rear brake
pads and the disc by fitting a shim between the
caliper piston and brake pad. You must do this
on both sides to ensure pad clearance to the disc
is equal. Remove the pad safety pins and fit a
shim between the caliper piston and the brake
pad. Refit the safety pins. You can fit additional
shims as the pads wear more, however, ensure
you do not fit too many shims as this could cause
the pad return springs to spring bind and this
will seriously affect your brake performance. Should you encounter difficulty fitting the shims
then remove the four pad return bolt/springs, fit the shim and refit the return bolt/springs.
Note: The minimum clearance between each pad and the disc should be 1.5mm. Arrow karts brakes are
supplied with 4 adjustment shims (2 x 0.5mm thick and 2 x 1.0mm thick) making adjustment simple.
2. PEDAL PRESSURE ADJUSTMENT
Problem: “Brake pedal pressure does not suit my driving style”
Solution: On the pedal there are three positions available
for the brake actuating linkage. The higher the setting the
more pedal pressure required. A lower setting will make
the brake more sensitive and require less pedal pressure.
On the master cylinder there is two positions available.
The higher setting will produce a more sensitive brake
requiring less pedal pressure.
4 BRAKE ADJUSTMENT

Crash Bar Adjustment
Problem: “Understeer from the apex and out of the corner”
Solution: Loosen or remove the bolt at the front mounting point of both side-pod
supporting bars to the chassis.
Side Pod Bars:
Have these tightened for most conditions.
Loosening these will reduce grip and can
also assist in reducing understeer.
Rear Crash Bar:
The rear crash bar must always be kept
securely tightened.
Front Crash Bar:
The top bolts securing the front bar with a
rubber spacer are best left firmly tightened
but not over tight. Loosening the front bar
will reduce the front steering/grip.
CRASH BAR ADJUSTMENT 5

Front End Alignment
Front End Alignment
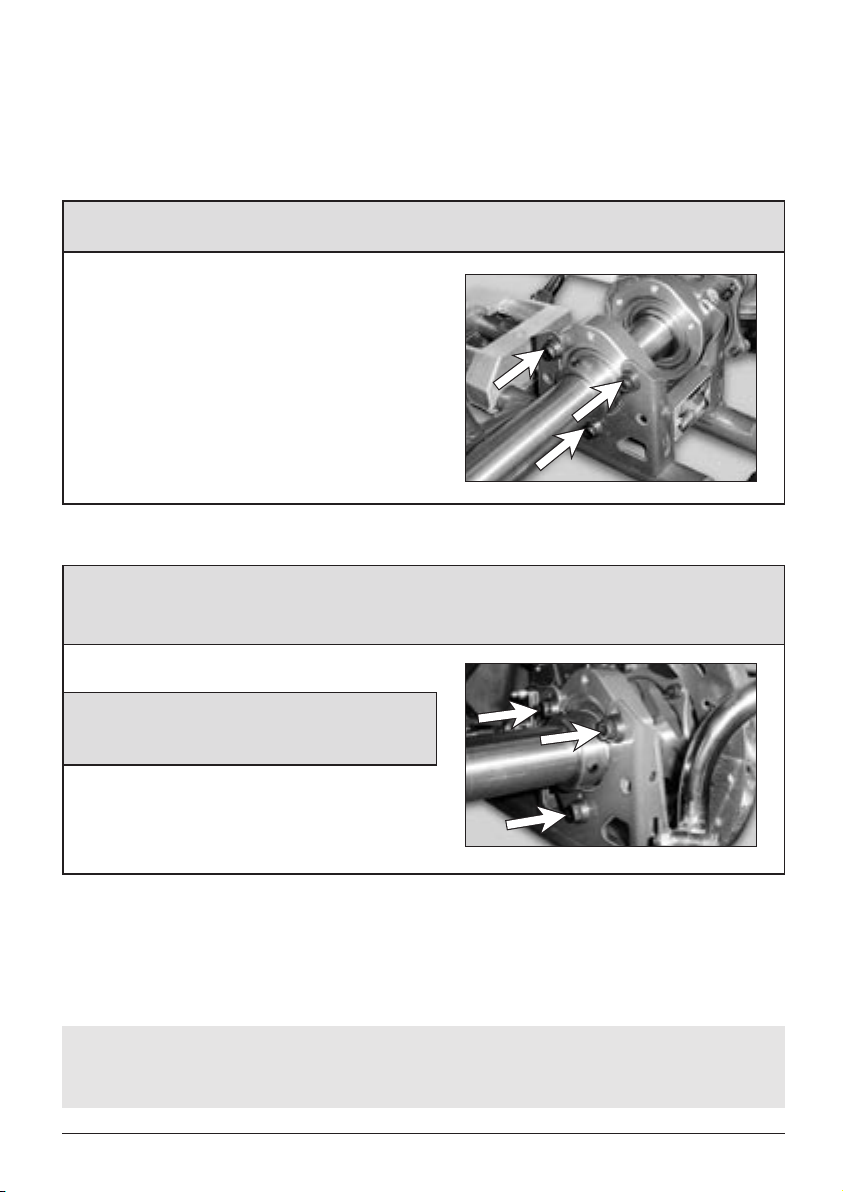
1. ADJUSTABLE ACKERMAN
Problem: “My engine lacks mid-range punch when applying throttle from the apex of
the corner”
Solution: Increase the amount of Ackerman by moving the steering links to the inner
mounting holes on the stub axles
Problem: “The back slides/the kart
oversteers going into the turns”
Solution: Reduce the Ackerman setting
by one hole on the stub axles.
Problem: “There is too much steering or
bite on turn-in”
Solution: Reduce the Ackerman setting by
one hole on the stub axles.
Why?
A) Adjustable Ackerman on the Stub Axles’ Steering Arms
Arrow karts are supplied with stub axle steering arms that offer two settings as to where the steering
links can be bolted. These bolt holes set the amount of Ackerman being run on the kart.
Firstly, let’s explain how Ackerman works. If you take a piece of string 30cm long, and fix one end to
a table, at the free end make a mark at the tip then a second mark 5cm. further in, 25cm from where
the string is fixed. The first mark you made represents the outside front tyre of your kart, the second
mark being the inside front tyre and the fixed end on the string being the fulcrum of the arc the kart
is going through in a corner. Keeping it tight, when you move the string straight off you’ll notice
that the inside front tyre is going through a smaller diameter arc than the outside tyre. All things
being equal, the inside front tyre needs to be turned more into the corner than the outside front,
the principle used to achieve this in a car or, in our case, kart is called Ackerman. The outside holes
give almost parallel steering meaning front wheels turn at almost the same rate one to the other. In
using the inner hole offered on each stub axle, the kart will have more Ackerman or, in other words,
the more the inner stub axle will turn in ratio to the outer stub, (or, if you like, the more the toe-out
increases as the steering wheel is turned.)
6 FRONT END ALIGNMENT

Front End Alignment
On the track increasing Ackerman has the effect of increasing ‘turn-in’ of your kart. It forces the inside
front tyres to work more as well as increasing the mechanical chassis jack effect, or in other words will
increase the amount of lift off the track you’ll get with the inside back tyre through a corner while at
the same time increasing the mechanical grip of the outside back tyre. This is all good stuff but like all
good things in life too much can be bad!
On a track which offers a lot a fast sweeping corners with a fast corner leading onto the longest straight,
running a lot of Ackerman will only help kill your top end speed. It’s like setting the kart with toe-out
where the front tyres become dragging front brakes. On a track with lots of ‘stop, turn, go’ 180° type
corners, lots of Ackerman will really help. The kart will change direction quickly without overworking
the outside front tyre while the engine will be helped on acceleration out of the corner with the added
chassis jacking offering a greater differential effect (see “Height Adjustable Front Stub Axles”).
B) Adjustable Ackerman on the Steering Column
All Arrow karts offer adjustable Ackerman on the
steering column where the steering links are bolted
to the steering column ‘spade’. When supplied from
the factory, the steering links will be bolted on at the
outer two holes of the spade. Bolting both steering
links to the same central hole as offered on the spade
will decrease the amount of Ackerman the kart will
have, (see above for explanation of how Ackerman
principle works).
FRONT END ALIGNMENT 7

Front End Alignment
2. ADJUSTABLE CAMBER AND CASTER
Problem: “The back slides/the kart oversteers going into the turns”
Solution: If camber/caster adjusters are fitted on the kart, reduce the caster setting.
Problem: “There is too much steering or
front end bite on turn-in”
Solution: If there are camber/caster
adjustors in the kart, reduce the caster.
Problem: “There is understeer all the way
through the turn”
Solution: If there are camber/caster
adjustors in the kart, increase the caster.
Why?
Arrow karts are all supplied with camber/caster adjusting concentric king pin-locating washers as standard.
They come from the factory with the camber/caster set in its neutral position. By increasing caster you’ll
increase turn-in grip. Running full caster in the wet is a must. In the dry increasing caster is okay when
looking for better turn-in. It should be noted that too much caster would create a very nervous kart on
entry to corners.
On an Arrow kart there are three possible caster settings while retaining the kart’s standard camber
setting:
• Minimum Caster – Both indicator lines facing to the back of the kart;
• Maximum Caster – Both indicator lines facing to the front of the kart;
• Central or Neutral Caster – Top indicator line pointing to the back with the bottom indicator line pointing
to the front of the kart.
By moving the indicator lines towards the centre of the kart you will introduce increased positive camber
on the attached relevant front wheel, conversely by moving them away from the centre of the kart you will
increase negative camber.
Using alignment bars, the camber setting we recommend should be:
‘SL’ tyres: Zero (meaning both front tyres should the same top to bottom).
‘Open’ CIK Homologated tyres: 0-2mm positive (meaning both front tyres should be straight up and down
or up to a maximum of 2mm wider apart at their tops than their bottoms).
8 FRONT END ALIGNMENT

Front Track
Front Track
Problem: “Understeer on turn-in to the apex of the corner”
Solution: Widen the front track by a 5mm spacer at a time.
Problem: “Oversteer or very sensitive front steering causing the rear to slide.”
Solution: Narrow the front track width by a 5mm spacer at a time.
FRONT TRACK 9
FRONT WHEEL SPACER ADJUSTMENT
Wheel Further Out (more spacers inside wheel)
For setting the front track width, a
good starting point is.
‘Open’ type tyres – 1 x 20mm
spacer and 1 x 10mm spacer on the
inside of each front wheel.
‘High grip’ SL type tyres –
1 x 20mm spacer and 1 x 5mm spacer
on the inside of each front wheel.
‘SL’ tyres – 1 x 10mm spacer and
1 x 5mm spacer on the inside of each
front wheel.
Junior kart on ‘SL’ tyres –
1 x 10mm spacer and 1 x 5mm spacer
on the inside of each front wheel.
Midget/Rooky – 1 x 10mm spacer
and 1 x 5mm spacer on the inside of
each front wheel.
Note: The above settings are for the
Arrow range of karts
Stub Axle WheelSpacers
Wheel Further In (less spacers inside wheel)
Stub Axle WheelSpacers

Rear Track
Rear Track
Problem: “There’s no traction/the kart is oversteering coming from the apex out of a corner”
Solution: Reduce the rear track width by 5mm on both sides at a time.
Problem: “The back slides/the kart oversteers going into the turns”
Solution: Increase the rear track width by 5mm on both sides at a time, being careful
not to exceed the maximum regulation width overall of 1400mm.
Problem: “There is understeer all the way through the turn.”
Solution: Increase the rear track width by 5mm on both sides at a time, being careful
not to exceed the maximum regulation width overall of 1400mm.
Problem: “There is bounce in the rear.”
Solution: Increase the rear track width by 5mm on both sides at a time, being careful
not to exceed the maximum regulation width overall of 1400mm.
Problem: “The track is very bumpy giving the kart a lot of bounce.”
Solution: Increase the rear track width by 5mm on both sides at a time, being careful
not to exceed the maximum regulation width overall of 1400mm.
Problem: “The kart has a tendency to lift up on two wheels through the corners.”
Solution: Increase the rear track width by 5mm on both sides at a time, being careful
not to exceed the maximum regulation width overall of 1400mm.
Why?
Narrowing the rear track will make the rear bite into the track and sometimes provide more rear grip.
However, avoid continually narrowing the rear track to obtain more grip as you will find that only so much
grip can be obtained and you will then be upsetting the balance of the kart making it much more unstable
and difficult to drive.
10 REAR TRACK

Rear Track
Important: Rear track is probably the most important single variable in a kart chassis. Different driving
styles and different tracks will require different settings. The standard setting is the best starting point
and we suggest you vary the rear track by no more than 5mm each side per change.
It is a weird karting phenomenon, but nevertheless a fact that in certain conditions a wider rear track will
provide more grip and in contrast, different conditions may see a narrower rear track provide more grip.
We believe rear track is more an aid in balancing the kart and suggest you be prepared to experiment to
search for your own best setting.
Rear track measurement – Overall width to outside edge of rear wheels:
‘Open’ type tyres (e.g. Bridgestone YGA,) 1395mm
‘High grip’ SL type tyres (e.g. Bridgestone YGK, Maxis HG3,) 1385mm
‘SL’ tyres (e.g. Bridgestone YEQ, Vega XSL,) 1370mm
Low grip ‘SL’ tyres (e.g. Bridgestone YDS, Dunlop SL1,) 1330mm
Midget/Rookie (e.g. Bridgestone YEQ, YDS, Dunlop SL1,) 1115mm
Note: The above settings are for the Arrow range of karts
REAR TRACK 11
Rear Track

Seat Stays
Seat Stays
Problem: “There’s no traction/the kart is oversteering coming from the apex out of a corner”
Solution: Mount seat stays on either side of
the seat. In certain applications 2 sets of seat
stays can be fitted.
Note: Additional seat stays are available which fix to the axle bearing flanges and the top section of the
seat. Testing has shown these to be advantageous under certain conditions and a disadvantage
under others.
12 SEAT STAYS

Adjustable Torsion Bars
Adjustable/Removable Torsion Bars
Problem: “There’s no traction/the kart is oversteering coming from the apex out of a corner”
Solution:
1. Running the rear torsion bar “full stiff”
(i.e. with the blade of the torsion bar
set vertically to the track’s surface) will
maximize rear mechanical grip as well as
reducing rear chassis roll.
2. When karts are fitted with a removable
side torsion bar or are equipped with
tensioning bolts on the fourth rail, tighten
the tensioning bolts completely.
Problem: “There is understeer all the way through the turn.”
Solution:
1. Turning the rear torsion blade bar towards the horizontal position will reduce rear
mechanic grip while increasing rear chassis roll.
If the rear torsion bar is already “full soft”, remove the bar completely.
2. In the case that they are fitted, remove
the tensioning bolts from the side torsion
bar/fourth rail.
If the tensioning bolts are already
removed from the side torsion bar then
remove the torsion bar all together from
the kart.
ADJUSTABLE/REMOVABLE TORSION BARS 13

Adjustable Torsion Bars
Why?
1. Removable Front Torsion Bar
Removable front torsion bar is a set-up affecting mechanical grip on the front tyres. Removing the front
torsion bar in your kart will decrease front-end mechanical grip.
2. Adjustable/Removable Side Torsion Bar (chassis fourth rail)
The tension bolts on the fourth rail on some karts are designed to allow adjustment to the stiffness of
the centre section of these chassis structures. Under normal track conditions this bolt should be left in
and done up tight. As a track offers more grip or as rubber goes down on the driving line, then the bolt
should be loosened until the point you can turn it freely with your fingers. If the track has good grip
with a lot of rubber on the driving line or if the track is very bumpy then the bolt and its spacer should
be removed from the kart altogether.
Some Arrow karts also provide the ability to remove the fourth rail/side torsion bar completely. Having
the side bar fitted in your Kart will normally provide more grip. Conversely, removing this torsion bar
will reduce grip.
3. Adjustable/Removable Rear Torsion Bar
The adjustable/removable rear torsion bar is a good tool in helping to create more grip in the back
of your kart. Arrow karts are supplied with this chassis-tuning feature. This allows you to fine tune the
chassis by increasing or decreasing rear end grip. Running the bar “full stiff” (i.e. with the blade of the
torsion bar set vertically to the track’s surface,) will maximize rear mechanical grip as well as reducing
rear chassis roll. Turning the bar towards the horizontal position will reduce rear mechanical grip while
increasing rear chassis roll. Removing the rear torsion bar completely is the “free-est” setting.
Firstly remember, when racing in the wet always start with the torsion bar fitted in the kart and the
torsion bar “blade” set full stiff. When using the kart on a dry but slippery track, running with the torsion
bar fitted and the blade set horizontally will give the kart more traction off the turn. On a track with a
good visible rubber line we recommend that the torsion bar assembly be run “full-soft” or even removed
from your kart. On tracks that are very bumpy in braking areas and turns, removing the rear bar will allow
the chassis to ride over the bumps smoothly thereby allowing the tyres a better chance of maintaining
contact with the surface.
14 ADJUSTABLE/REMOVABLE TORSION BARS

Tyre Preparation
Tyre Pressures
Tyre Pressures
Problem: “The engine has no top end speed”
Solution: Raise rear tyre pressures by 0.05bar/1 P.S.I.
Problem: “The back slides / the kart oversteers going into the turns”
Solution: Raise the rear tyre pressures by 0.05bar/1 P.S.I.
Problem: “There is too much steering or front end bite on turn-in”
Solution: Lower front tyre pressures by 0.05bar/1 P.S.I.
Problem: “There is understeer all the way through the turn.”
Solution: Raise the front tyre pressure by 0.05bar/1 P.S.I.
Problem: “Understeer on turn-in to the apex of the corner”
Solution: Raise the front tyre pressures by 0.05bar/1 P.S.I.
Problem: “Understeer from the apex and out of the corner”
Solution: Lower rear tyre pressures by 0.05bar/1 P.S.I.
Note: Due to the many specifications and compounds of kart tyres on the market today, we suggest you
seek information from your kart dealer or the particular tyre distributor.
Tyre Preparation
When talking about a new set of ‘SL’ type tyres, we recommend that you firstly do a 10-
lap session at 1/2 pace, (i.e. working the tyre without sliding in the corners.) Allow the
tyres to cool down before further use.
TYRE PRESSURES/PREPARATION 15

Seat – Fit & Position
Seat – Fit and Position
Problem: “There’s no traction / the kart is oversteering coming from the apex out of a corner”
Solution:
1. Move the whole seat a little more upright and back by 12mm or 1 postion on Arrow
models with adjustable seat brackets.
2. Replace the seat with a unit that is stiffer diagonally across the seat
Problem: “Understeers from the apex and out of the corner.”
Solution:
1. Move the seat 12mm further forward or one position on Arrow models with
adjustable seat brackets.
2. Replace the seat with a unit that is softer diagonally across the seat
How to fit a seat correctly...
Picking a seat that fits you correctly and fitting it into your kart are two very important operations that will
affect the performance of the kart. Firstly!, make sure the seat fits you well. We recommend the Kartech (for
‘SL’ type tyres) or Arrow Euro (for high grip ‘SL’ or ‘Open’ type tyre) seats. Place the chosen seat on the floor
and sit in it with your legs out flat and arms held out as if you were in your kart and driving it. You should fit
all the way down into the seat. The seat should firmly hold your hips, while you must be able to place your
flat hand in between the seat and your rib cage without using force. With an Arrow kart, once you’ve got the
correct seat, depending on its size and the model Arrow kart you’re fitting it in to, the Seat Position diagram
and chart included with this Manual (if buying a new kart) will help you ascertain the correct measurements
you’ll need, or refer to our website at www.dpeng.com.au.
When fitting a seat in your kart, it is essential that the frame is not stressed or forced in order to tighten up the
seat fixing bolts. Arrow offers a range of seat spacers that help making the job of fitting a seat easy. Make sure you
use a large diameter seat washer against each side of the seat; a very important must in spreading cornering loads.
Using Arrow spacers, we suggest using a mixture of the 7mm plastic spacer with the 7mm & 12mm aluminium
seat washers, as needed, plus the Arrow plastic seat “wedge”. It is important that only a maximum of one plastic
7mm seat spacer plus the plastic seat wedge is used on each side of the seat. The plastic seat wedge, once fitted,
should be rotated to provide good alignment between the seat and seat bracket surfaces.
As an example, on an Arrow kart we recommend:
Against the seat: Large o.d. washer
Next: 7 or 12mm alum. spacer as required*,
Next: 1 x 7mm plastic spacer if required*,
Next: plastic seat wedge.
Under the front of the seat only plastic seat spacers should be used as packing between the seat and the
welded chassis mounting tabs in obtaining the correct relevant measurements.
16 SEAT – FIT & POSITION
*Note: the quantity/thickness used will vary
depending on the seat size being fitted.

Weight the Kart
Weight the Kart
Lead ballast should be securely fastened to the sides,
rear or underneath of the seat. The best place for the
majority of your lead ballast is underneath the seat at
the front (Crotch area). Do not add ballast to any other
part of the kart chassis. A driver with a light body weight
may achieve better handling by fastening ballast as high
as possible on the seat. Adding a significant amount
of ballast can have a marked affect on the handling of
the kart. It may be necessary to test different mounting
positions for the ballast.
Wet Weather
WET TYRES (HARD COMPOUND SL):
• Front Track: Move front wheels out as far as possible.
• Rear Track: Leave as per your dry setting or move hubs inwards 10mm each side.
Narrowing the rear track too much will result in front understeer.
• Caster Adjustment: If time permits, adjusting to maximum caster (indicator lines to front of kart) will
reduce understeer.
• Tyre Pressure
Extreme wet conditions: 25-30psi 1.7-2.05kg/cm2
Moderate wet conditions: 20-25psi 1.35-1.7kg/cm2
Drying conditions: 15-20psi 1.0-1.35kg/cm2
WET TYRES (SOFT COMPOUND):
• Front Track: Move front wheels out as far as possible.
• Rear Track: Leave as per your dry setting or move hubs inwards 10mm each side.
Narrowing the rear track too much will result in front understeer.
• Caster Adjustment: If time permits, adjusting to maximum caster (indicator lines to front of kart) will
reduce understeer.
• Tyre Pressure
Front: 12 P.S.I. 0.80 kg/cm2
Rear: 14 P.S.I. 0.95 kg/cm2
Handy tip for Arrow owners: Make sure you equip yourself with a set of Kartech stub extensions for
wet weather. These enable an immediate increase of 60mm to your front track. The difference is incredible,
improving both steering and rear grip significantly. An absolute must.
WEIGHT THE KART/WET WEATHER 17

Rear Wheel Hubs
Rear Wheel Hubs
Problem: “Understeer from the apex and out of the corner”
Solution: Replace the rear wheel hubs with shorter units.
Problem: “There’s no traction/the kart is oversteering coming from the apex out of a corner”
Solution: Replace the rear wheel hubs with longer units.
Why?
By increasing or decreasing the distance between the outside of the rear axle
outer bearings and the inside face of the rear wheel hub you are infect increasing
or decreasing the amount of “working” axle. In other words, the length of axle
between the kart’s main chassis rails and the wheel assemble that is left clear to flex
un-unhindered.
In the same way as altering the rear track width, reducing the amount of
“working” axle will make the rear bite into the track and sometimes provide
more rear grip. Instead of going to narrow and/or wide with the rear track,
the ability of changing to longer or shorter hubs is a major advantage in
trying to obtain the ultimate kart balance. Different length wheelhubs are
available and these can be utilised to further fine-tune your kart’s handling
to your individual liking
Note: If your Arrow is fitted with a 40mm axle the wheelhubs incorporate a unique design with a wheel-
locating insert. Fit the insert if you have your wheelhubs over the end of the axle and remove the
insert if you want to slide your wheelhubs further inwards for a narrower rear track. Important: To
remove the insert slide your wheelhub onto the axle and tap the insert against the end of the
axle until it falls out. When the insert is fitted ensure it is fitted fully into the hub before fitting
your wheel. If the insert is sitting against the end of the axle and protruding from the wheelhub
this will stop your wheel from fitting correctly and will cause the wheel to come loose.
18 REAR WHEEL HUBS
Table of contents
Other Arrow Utility Vehicle manuals
Popular Utility Vehicle manuals by other brands

Can-Am
Can-Am Roadster RT-622 2010 Service manual

Club Car
Club Car TURF 272 2003 Maintenance service manual

Erde
Erde 213 Assembly and usage instructions

Erde
Erde CH451 Assembly instructions

Genie
Genie TZ-50 Operator's manual

SANMEN COUNTY YONGFU MACHINE
SANMEN COUNTY YONGFU MACHINE UTV650 Maintenance manual