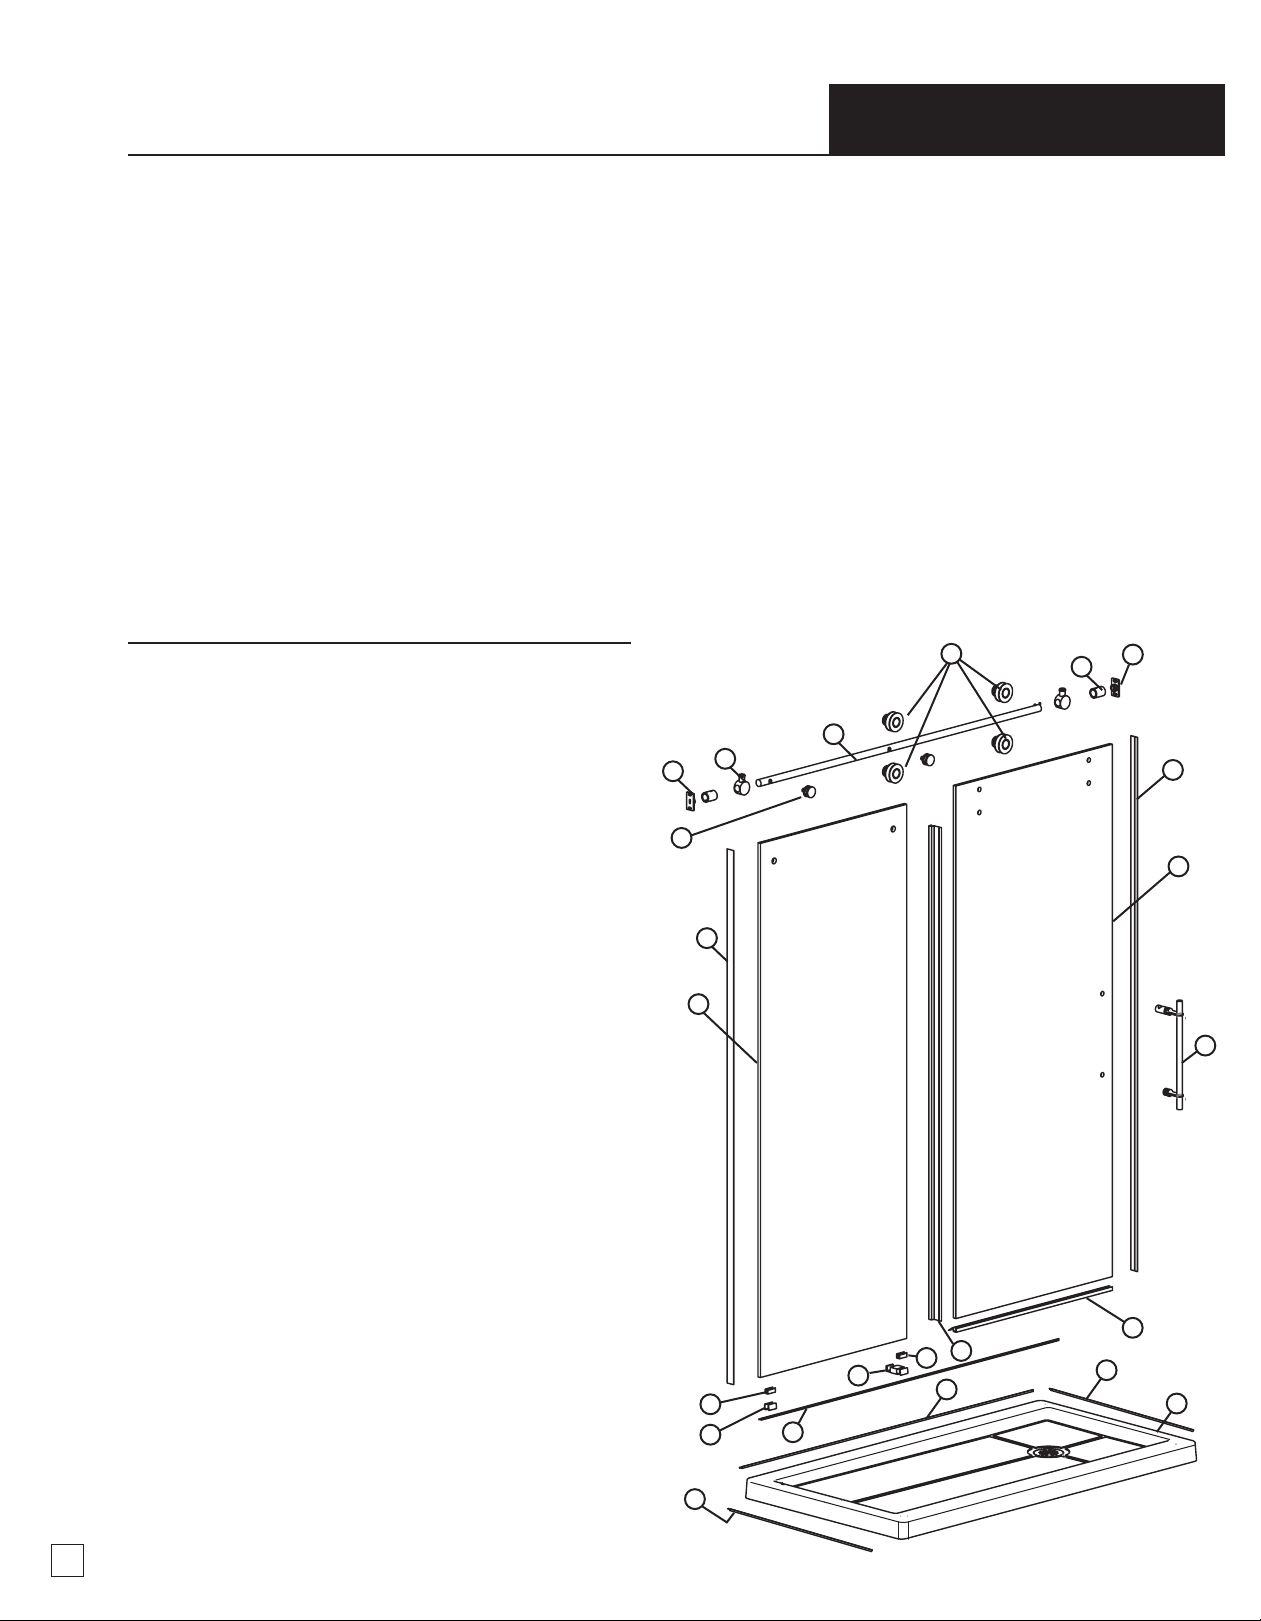
Artika For Living Atlantis User manual

SHOWER
Installation Manual
1
2 people are required for the installation.
This shower absolutely needs 3 walls surrounding it.
The rail wall brackets screws must be installed in wall studs to
support the weight of the doors.
rev. 6-3-2013

2
Installation Manual
IMPORTANT NOTE
Dimensions
The glass door can be installed on the left or right side.
Artika recommends installing the glass door adjacent to the shower faucet wall.
This instruction manual is showing a right side installation. For a left side installation, follow the
instructions as though the slidding door was ont he left.
Questions? customerservice@artikaworld.com 1-866-661-9606
208 cm
(81.8 in/po)
152.4 cm
(60 in/po)
81.3 cm
(32 in/po)

3
You will need
- Screwdrivers
- Drill
- Drill bits 1/4 in. & 1/8 in.
(specic drill bit may be required for ceramic tiles)
- Silicone
- Tape measure
- Pencil
- Level
- If needed: cutting pliers
Parts List
Hardware list (included)
- 3 Allen keys
- 2 regular screws
- 4 wall screws
- 14 Self-drilling 1 inch screws
- 14 Self-drilling 1,25 inch screws
Installation Manual
FE
D
L
M
GF
K
N
C
O
K
P
B
IQ
H
A
J
P
Item Description
A Base 1
BFixed glass panel 1
CSliding door panel 1
DRail 1
EStoppers 2
F Wall brackets 2
G Rail brackets 2
HDouble bottom bracket 1
ISingle bottom bracket 1
JDoor panel gasket 2*
KVertical gaskets 3*
LWheels 4
MFixed panel bracket 2
NHandle 1
OBottom door gasket 1
PBottom panel gasket 2
QThreshold 1
R 60 inch (152.4 cm) tiling ange 1
S 32 inch (81.3 cm) tiling ange 2
T Drain 1
*NOTE: Extra gaskets are included. Only one J gasket and two K
gaskets are necessary.
Questions? customerser[email protected] 1-866-661-9606
R
S
S
Artika Part # Quantity
999-359/P1
999-359/P2
999-359/P3
999-359/P4
999-359/P5
999-359/P6
999-359/P7
999-359/P8
999-359/P9
999-359/P10
999-359/P11
999-359/P12
999-359/P13
999-359/P14
999-359/P15
999-359/P16
999-359/P17
999-359/P18
999-359/P19
999-359/P20

Installation Manual
Instructions
The Atlantis shower enclosure is designed to replace a standard
60 by 32 inch (152.4 x 81.3 cm) tub.
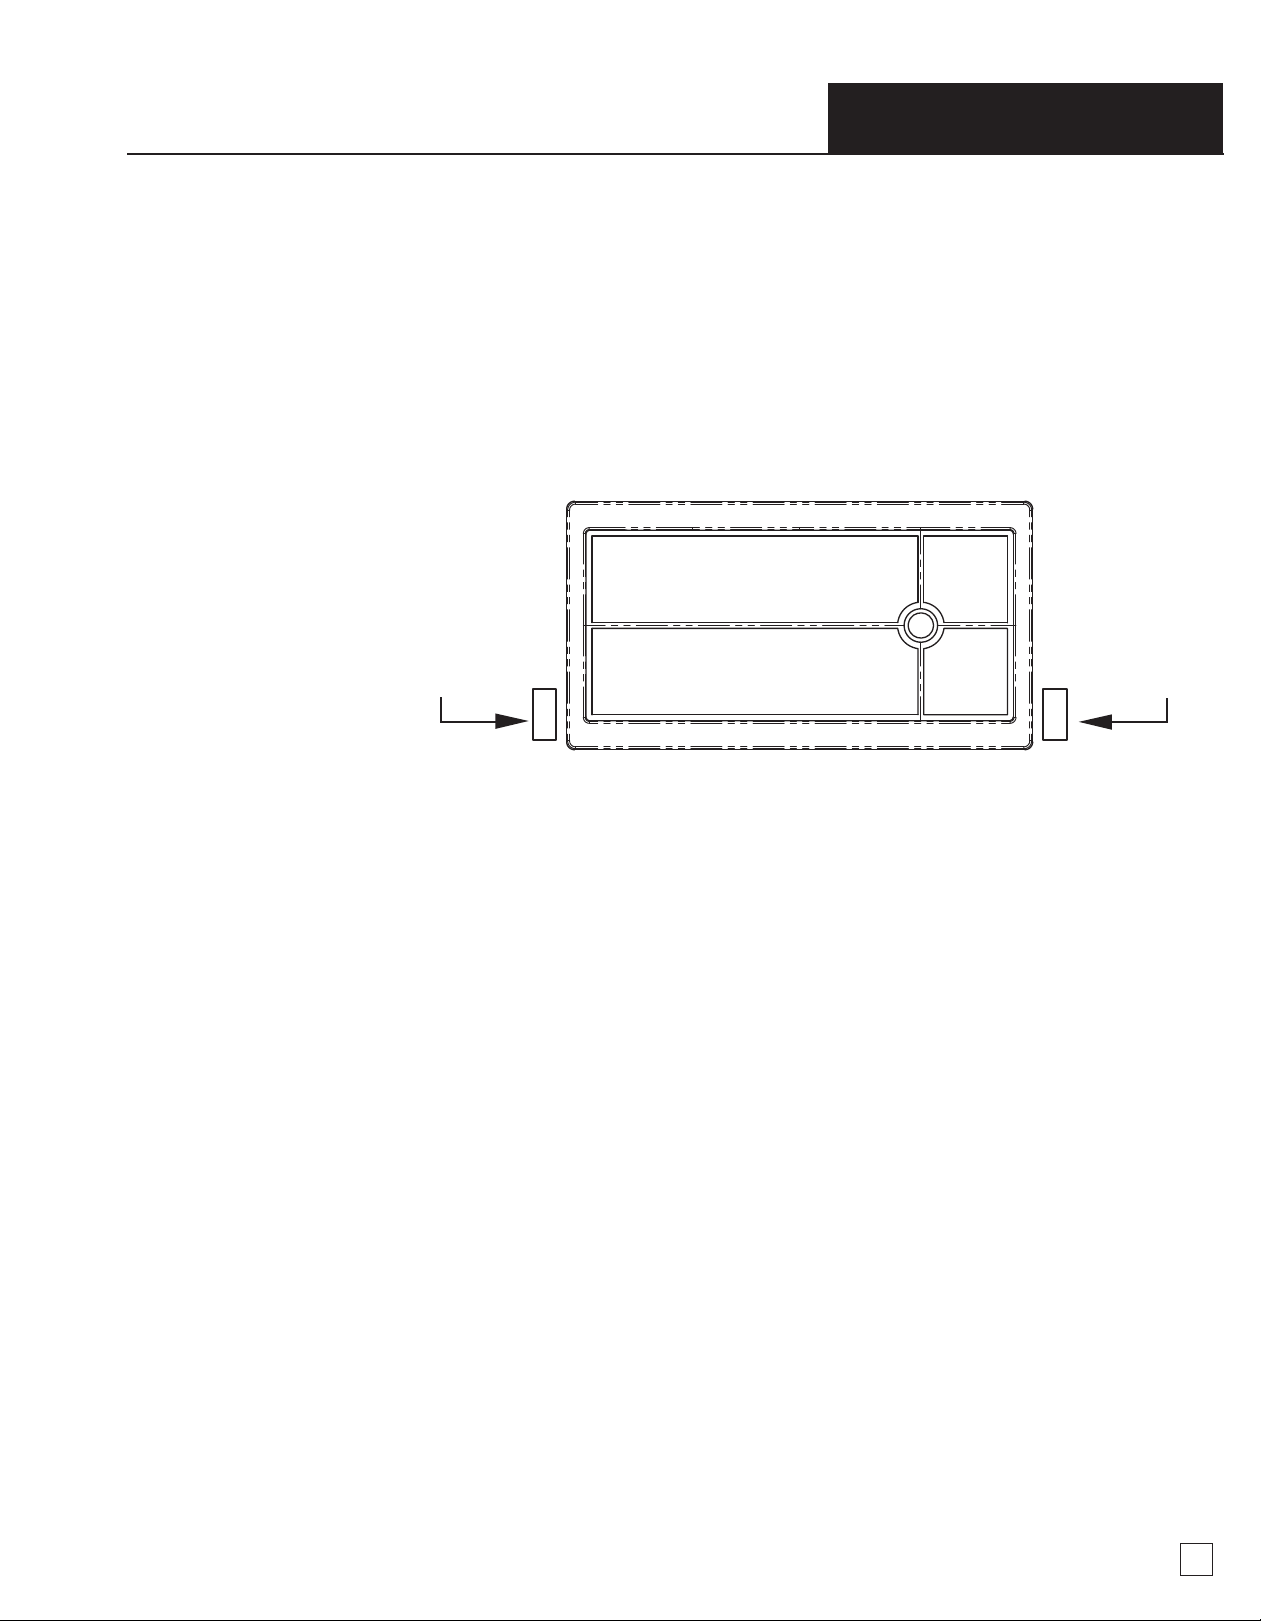
The shower enclosure needs to be encased by 3 surrounding walls.
The shower base can be positioned with the drain on the right or left side.
It is recommend the drain be position next to the wall with the shower faucet.
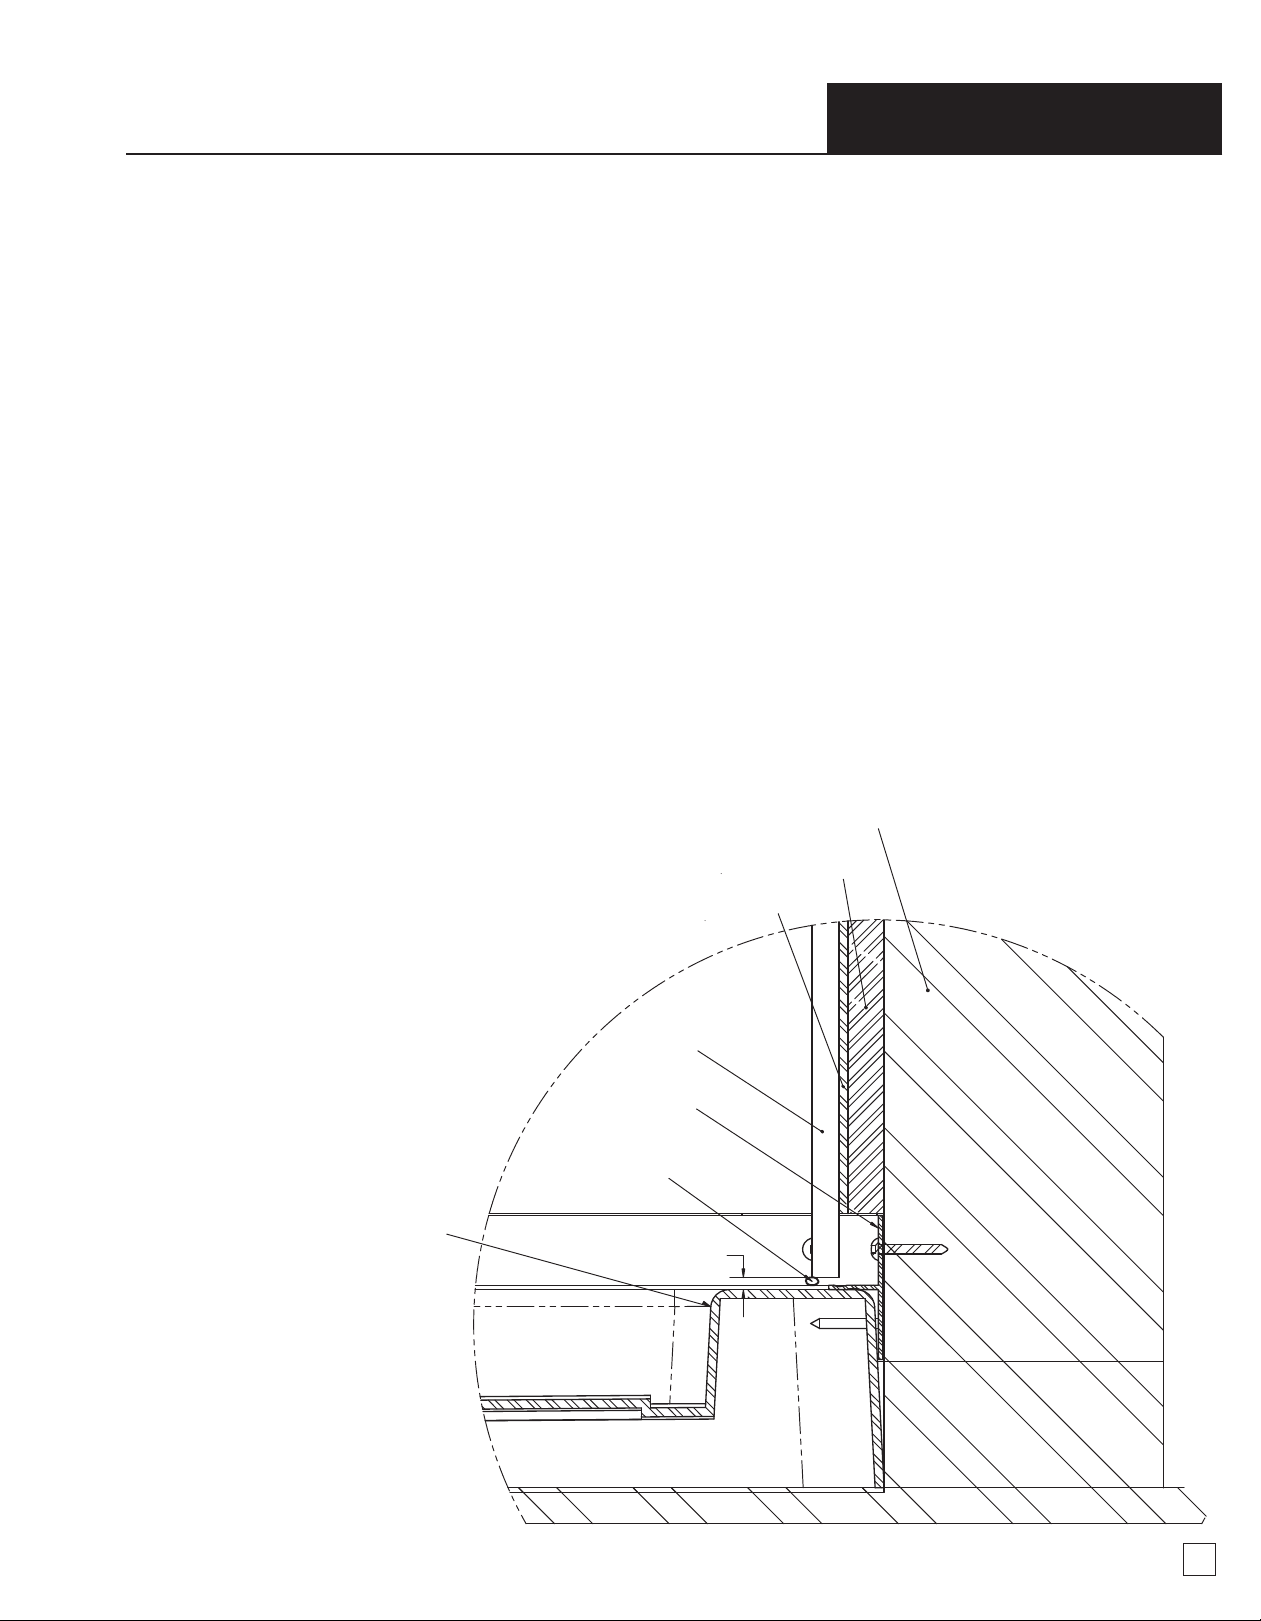
Important : Wall studs will be
needed to install the shower
enclosure.
IMPORTANT
It is recommended that drainage pipes, drains, water lines should all be installed prior to
installing the base. Please follow your local building codes.
Verify the distance between the wall studs.
Minimal distance = 60 inches (152.4 cm)
Maximum distance = 60.5 inches (153.8 cm)
Ensure drainage pipe is centered underneath the shower base drain hole.
The distance between the faucet wall and the center of the drain pipe
should be 9.25 inches.
The distance between the 60 inch (152.4 cm) long wall and the drain pipe
should be 16 inches.
If your measurements are dierent from above, you will need to relocate the position of the
drain pipe in the oor. Artika recommends you contact a professional plumber to modify
the drain position in the oor.
*
4
1- Validate dimensions
2- Test the fit of the shower base
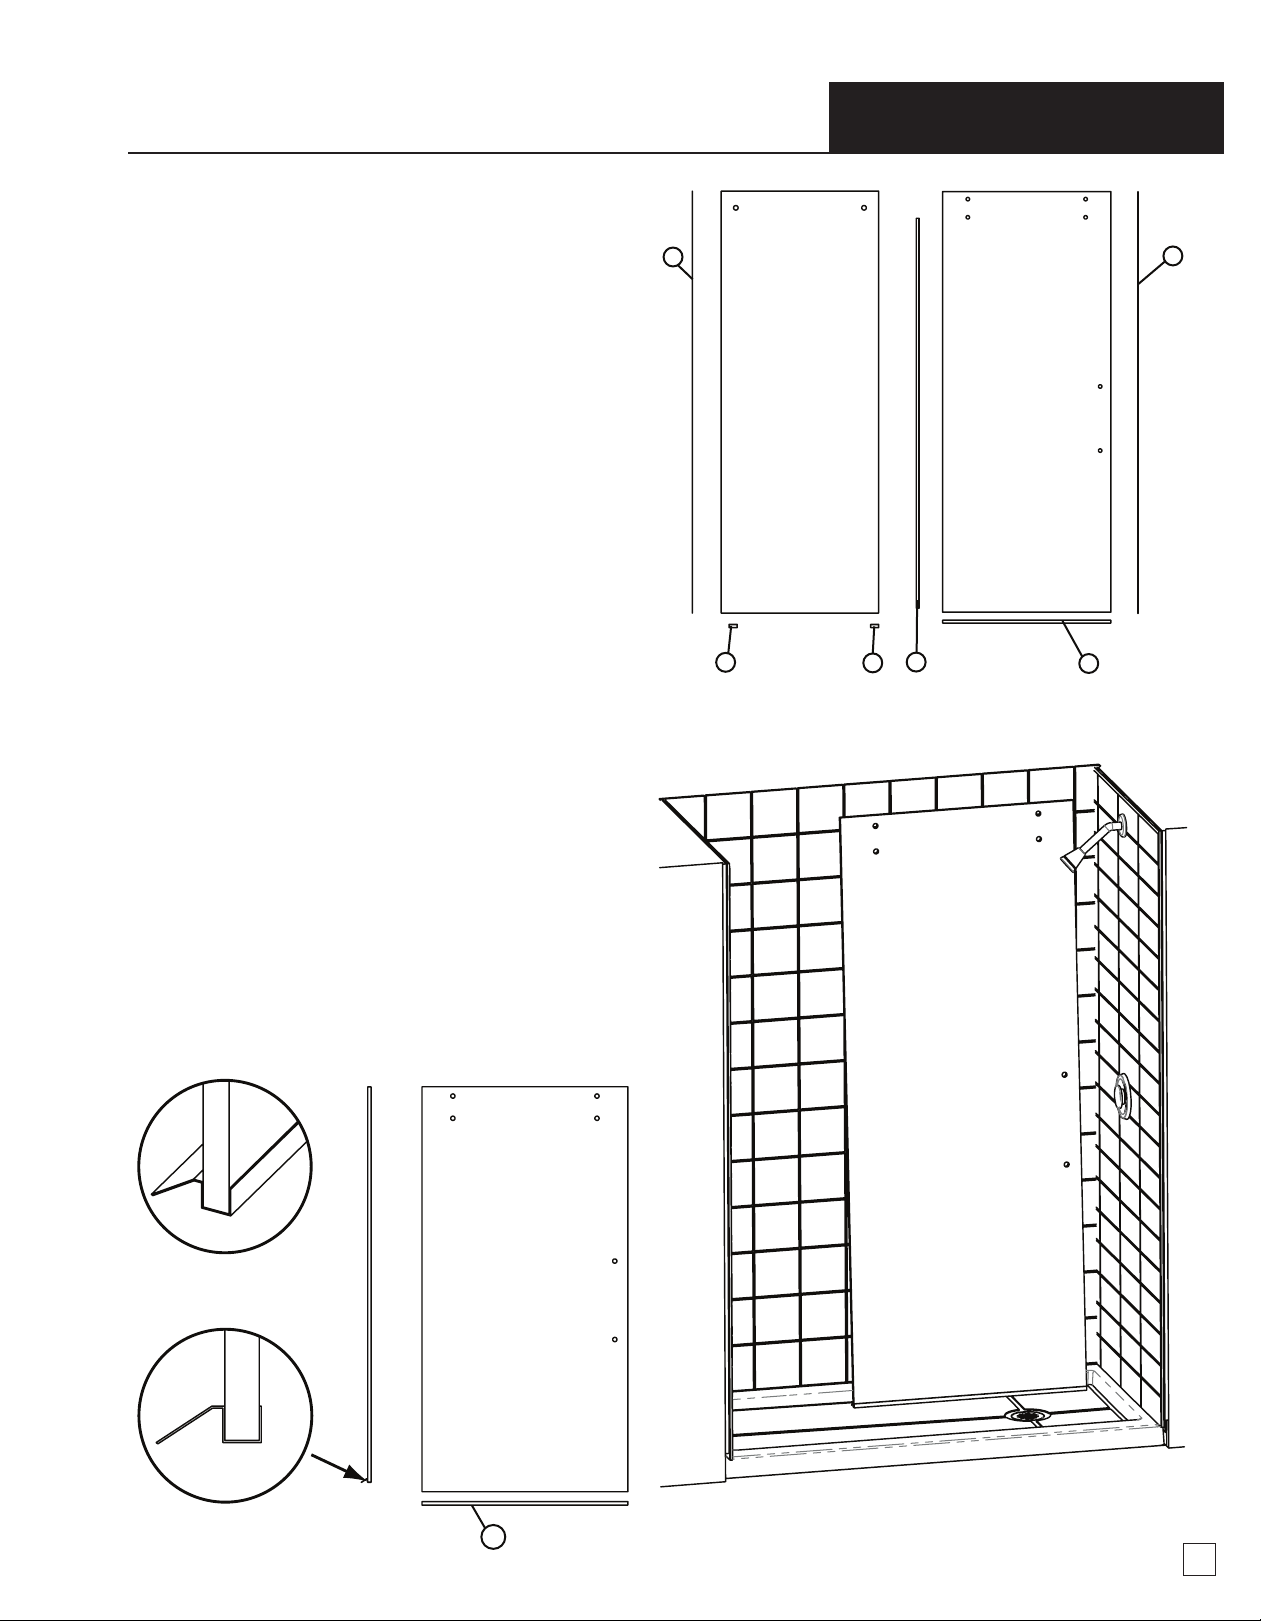
Wall this side
Mandatory
wall stud
Mandatory
wall stud
Right installation
Questions? customerser[email protected] 1-866-661-9606
- 3 Allen keys
- 2 regular screws
- 4 wall screws
- 14 Self-drilling 1 inch screws
- 14 Self-drilling 1,25 inch screws

Exploded view
3- Install the tiling flange
Installation Manual
Determine the 60 inch (152.4 cm) side of the
shower base that will installed next to the 60
inch wall. This is the side where you will install
the long tiling ange.
Start with the long tiling ange. The side with
the groove in the middle of the ange will face
down on the top of the threshold of the
shower base.
Apply a bead of silicone along the groove.
Use the 1 inch self-drilling screws to install the
tiling ange to the side of the base. Use the
bottom groove on the back of the tiling ange
as a guide.
Repeat for the 32 inch (81.3 cm) sides of the
shower base.
I-
II-
III-
IV-
V-
5
Tiling
ange
Bead of silicone
Screw - 1 inch
Shower
base
Bottom part
Middle groove
Bottom groove
Top part
Questions? customerser[email protected] 1-866-661-9606

4. Install the drain
Installation Manual
Disassemble the drain. Remove the stainless
cap, tightening tool, adaptor ring, rubber ring,
large nut, cardboard gasket and rubber
gasket.
Apply a bead of silicone underneath the drain
body and the drain hole on the underside of the
drain body and the edge of the drain hole in the
shower base.
Insert the drain body in the drain hole.
Place the rubber gasket, cardboard gasket
and then the large nut onto the drain body
from underneath the shower base and
tighten.
Wipe excess silicone from the drain.
Place the stainless cap, tightening tool, adap-
tor ring and the rubber ring in a safe place.
They will be installed in a few steps.
I-
II-
III-
IV-
V-
VI-
6
Cap
Tighting
tool
Adaptor
ring
Rubber
ring
Drain body
Drain body
(inverted) Rubber
gasket
Cardboard
gasket
Drain nut
Questions? customerser[email protected] 1-866-661-9606

Installation Manual
I-
II-
III-
IV-
7. Install the base in the shower
enclosure
Lower the base into place. Double check to
ensure the base is level.
8.
Continue installing the drain
Put a rag in the drain pipe.
Insert the rubber ring around the drain pipe.
Insert the adaptor ring around the rubber ring.
Use the tightening tool to secure the adaptor
ring down around the drain.
7
I-
II-
III-
5. Verify the fit of the base
Ensure the base ts properly and the shower
base drain hole is centered over the drain hole
in the oor.
6. Verify that the base is level
If your base is not level, there are 3 options.
Use wooden shims. Suitable for small
adjustments.
Use a leveling compound.
Spreading a mortar.
Floor leveling
compound
or mortar
Questions? customerser[email protected] 1-866-661-9606

8
Installation Manual
9. Check for leaks
With the drain still plugged, check for water leaks
by lling the shower base with 1 gallon (3.5 liters)
of water. Look for air bubbles forming near the
drain. If possible, check drainage pipes below the
oor for leaks. Remove the rag and the tightening
tool. Install the stainless steel drain cover.
10. Secure the tiling flange
to the studs
Using the 1.25 inch screws, fasten the tiling ange
to each stud. If required use shims to prevent the
tiling ange from lifting up from the shower base.
11. Silicone
Apply a bead silicone in each of the two corners
where the tiling anges meet.
12. Install your shower wall
material
Install drywall, water proof membrane and tiles.
Allow the tiles to fully dry and adhere to the wall
(24 hours).
Drywall with
waterproof membrane.
Bead of silicone
Tile Adhesive
Shower base
Stud
Tile
Tiling ange
4 mm
Questions? customerser[email protected] 1-866-661-9606

9
Installation Manual
IMPORTANT NOTE
The glass door can be installed on the left or
right side.
Artika recommends installing the glass door
adjacent to the shower faucet wall.
This instruction manual is showing a right side door installation. For a left side door installation,
follow the instructions as though the sliding door was on the left.
The sliding door must be on the interior side of the shower.
Questions? customerservice@artikaworld.com 1-866-661-9606

Installation Manual
13. Gaskets placement
14. Bottom gasket installation
Protect the shower base using a thick piece of
cardboard.
Install bottom door gasket Oonto the sliding
door panel. Make sure the ap is inside the
shower.
Place the sliding door panel inside the shower
carefully on top of the cardboard.
*NOTE: Extra gaskets are included. Only one J
gasket and two K gaskets are necessary.
K
O
K
PJ
P
SIDE VIEW FRONT VIEW
O

Installation Manual
15. Vertical gasket installation
Install one vertical gasket Kon the xed glass
panel. The ap goes inside the shower. Install
on the side adjacent to the wall.
16. Stoppers installation
Put the stoppers on the rail.
Temporarily x them with the 6 mm Allen key.
17. Wall brackets installation
Put the wall brackets on the rail.
Temporarily x them with the 3 mm Allen key.
Questions? customerser[email protected] 1-866-661-9606
11

Installation Manual
18. Verify the fit of the bar
Insert the bar in the shower. Adjust wall brackets
so both ends touch a wall.
Important: Depending on the thickness of tile
used, it could be possible that the bar is too long.
Artika recommends that you deal with a profes-
sional to cut the bar to the right length.
IF NEEDED, CUT THIS END

Installation Manual
19. Rail installation
Install the rail to the xed door panel using
xed panel bracket M.
Temporarily x it.
Questions? customerser[email protected] 1-866-661-9606
13

Installation Manual
20. Bottom gaskets installation
Place the bottom gaskets Pon the xed panel.
Slide them into the bottom brackets I and H.
H
I
P
P
1.500''
(38 mm)
FLUSH WITH
GLASS
1.500''
(38 mm)

Installation Manual
21. Pre installation of the fixed panel.
Two people are required to perform this step.
Carefully lift the xed glass panel in the
shower. Verify the rail is leveled. Verify the
xed glass panel is leveled vertically. Verify the
xed glass panel and gasket K are at against
the tiles.
J
90
90
Questions? customerser[email protected] 1-866-661-9606
15

Installation Manual
22. Continued
Mark screws locations for the wall
brackets.
Important: Wall brackets must be
aligning with wall studs.
Mark where bottom brackets Iand Hwill be
installed.
I
H

Installation Manual
23. Threshold
Remove the xed door assembly. Verify the
threshold ts onto the shower base. If the
threshold is too long, use cutting pliers to trim
the required lenth. Apply silicone under the
threshold (see below) and position into place.
Fix this bottom gaskets over the threshold
with the regular screws.
Tip: Before applying the silicone, place the
threshold under both brackets and place
them on the mark you previously made for the
bottom brackets.
BOTTOM VIEW
Questions? customerser[email protected] 1-866-661-9606
17

Installation Manual
24. Wall brackets installation
Using the pencil mark from step 11, drill two
holes on each side.
Use the ceramic drill bit to drill through tiles.
Install wall bracket plates.
Reinstall the xed panel assembly.
Slide the collar into place.
WALL STUD
PLATE
COLLAR
DRY WALL
TILES

Installation Manual
25. Wheels installation
Assemble the two top wheels on the sliding
door panel. Wheels have to be installed on the
outside of glass door.
Note: At this step, you have to insert the blue
dry-adhesive washers to the screw of the
wheels before instaling on the glass door.
Two people are required for this step. Carefully
lift the shower door into the channel of the
double bracket and position the wheels onto
the rail simultaneously.
INSIDE VIEW
Questions? customerser[email protected] 1-866-661-9606
19

Installation Manual
25. Continued
Install the bottom wheels.
26. Handle installation
Install the handle onto the sliding door panel.
RAIL
Table of contents
Other Artika For Living Bathroom Fixture manuals
Popular Bathroom Fixture manuals by other brands

GRE
GRE AR1009W owner's manual

BERNSTEIN
BERNSTEIN EX506 Assembly instructions

Franke
Franke STRATOS STRX671E Installation and operating instructions

Spectrum Brands
Spectrum Brands Pfister Carnegie LG49-WE1 Quick installation guide

Hans Grohe
Hans Grohe Metris 31088 1 Series Installation/User Instructions/Warranty

Kraus
Kraus KEF-15603 installation manual

Graff
Graff PHASE G-6355-LM45B T Series installation instructions

Steinbach
Steinbach 00-49020 instruction manual

Bobrick
Bobrick SureFlo B-824 Instructions for installation, operation, maintenance

DURAVIT
DURAVIT SensoWash operating instructions

Gessi
Gessi 316 54157 manual

Kohler
Kohler Grooming K-30495T-L installation instructions