GRE AR1009W User manual

www.grepool.com
9l PVC SOLAR SHOWER
DUCHA SOLAR 9l PVC
DOUCHE SOLAIRE 9l
PVC SOLARDUSCHE 9l PVC
DOCCIA SOLARE 9l
PVC ZONNEDOUCHE 9l
PVC CHUVEIRO SOLAR 9l PVC
9l PCV PRYSZNIC SOLARNY
EN
ES
FR
DE
IT
NL
PT
PO
Owner´s Manual - Manual de Instrucciones
Manuel d´instructions - Bedienungsanleitung
Manuale delle instruzioni - Handleiding met instructies
Manual de instruções - Instrukcja obsługi
HIMAR1009W.21
DISTRIBUTED BY / DISTRIBUIDO POR / DISTRIBUÉ PAR / VERTRIEB DURCH / DISTRIBUITO DA / GEDISTRIBUEERD DOOR / DISTRIBUÍDO POR / WYPRODUKOWANY PRZEZ:
MANUFACTURAS GRE, S.A. ARITZ BIDEA Nº 57 BELAKO INDUSTRIALDEA, APARTADO 69 - 48100 MUNGUIA (VIZCAYA) ESPAÑA Nº Reg. Ind. 48-06762
MADE IN CHINA / FABRICADO EN CHINA / FABRIQUÉ AU CHINE / HERGESTELLT IN CHINA / PRODOTTO IN CHINA / GEPRODUCEERD IN CHINA / FABRICADO NA RPC /
WYPRODUKOWANO W CHINACH

EN
PVC SOLAR SHOWER INSTRUCTION
INSTALLATION
• Find a sunny outdoors location with easy access to the water supply and drains;
• Drill 4 holes of 8mm diameter and 35mm deep on the ground.
• Fix the solar shower vertically on the ground with 4 screws and screw nuts. (screw sizes: ø5×40mm);
Very important to include the seal ring and put A throughly into D!
• Once the shower has been completely installed, connect the water supply (with the adapter if neces-
sary), and turn the handle to on position to let the water in.
• When the tank is full of water, a few drops may come out of the shower head. You can then turn the
handle to off position.
• When the water has been warmed by sun heat, there might be some water drops falling through the
shower head. This is the usual phenomenon caused by the increased volume of water inside the tank
as the temperature rising.
• Also, it is normal that a few drops may leak on and off from the shower head for a while after you
finish shower.

IMPORTANT
• Recommended maximum working pressure 3 bars.
• Do not use shower during thunderstorms and lightening
• Be aware that during the hottest months, the water inside the solar shower may reach 60℃. It is ad-
vised to adjust the water temperature by the handle before having a shower. Also, do not touch the
surface of the solar shower as it may result in a slight scald.
• The solar shower can be used in areas with temperatures above 3℃.
• Please cut off the water supply and drain the water out of the tank completely before winter. Or the
tank will be damaged during freezing temperature.
• Never to change our shower-head-ball, otherwise it would cause damage to the tank or bring poten-
tial leaking.
ACCESSORIES IN CARTON
No. Name of accessories QTY Packing
A Shower head 1
Small box
B Connecting pipe 1
C Screws 4
D Euro Standar Adapter 1

ES
INSTRUCCIONES DUCHA SOLAR
INSTALACIÓN
• Localice un lugar soleado al aire libre con acceso fácil a una toma de agua y a un desagüe.
• Taladre en el suelo 4 orificios de 8 mm de diámetro y 35 mm de profundidad.
• Fije la ducha solar en posición vertical con 4 tornillos y tuercas (tamaño de los tornillos: ø 5 × 40 mm).
Muy importante: coloque la junta e introduzca a fondo la pieza A en D.
• Cuando haya terminado de instalar la ducha, conecte la toma de agua (con el adaptador si fuera ne-
cesario) y gire la manilla a la posición ON para que entre el agua.
• Es posible que caigan algunas gotas desde el cabezal cuando se llene el tanque de agua. En ese
momento, puede girar la manilla a la posición OFF.
• También es posible que salgan gotas del cabezal de la ducha cuando se haya calentado el agua con
el calor del sol. Se trata de un fenómeno habitual debido al aumento de volumen del agua dentro del
tanque cuando sube la temperatura.
• Además, es normal que caigan algunas gotas de la ducha durante un tiempo después de ducharse.

IMPORTANTE
• La presión operativa máxima recomendada es de 3 bares.
• No utilice la ducha durante tormentas eléctricas.
• Tenga en cuenta que, durante los meses más cálidos, el agua de la ducha solar puede alcanzar los 60 °C.
Es recomendable ajustar la temperatura del agua con la manilla antes de ducharse. No toque la su-
perficie de la ducha solar ya que puede causarle quemaduras leves.
• La ducha solar se puede utilizar en zonas con temperaturas superiores a los 3 °C.
• Antes del invierno, corte el suministro de agua y vacíe el tanque por completo. De lo contrario, se
puede dañar el tanque debido a las bajas temperaturas.
• No cambie la bola del cabezal de la ducha, ya que puede causar daños en el tanque u originar fugas.
ACCESORIOS INCLUIDOS EN EL PAQUETE
N.º Nombre del accesorio Ctd Paquete
A Cabezal de la ducha 1
Caja pequeña
B Tubería de conexión 1
C Tornillos 4
D Adaptador estándar europeo 1

FR
DOUCHE SOLAIRE. INSTRUCTIONS
INSTALLATION
• Choisissez un lieu ensoleillé à l’extérieur avec un accès facile à une prise d’eau et à un écoulement.
• Percez 4 trous au sol de 8 mm de diamètre et 35 mm de profondeur.
• Fixez la douche solaire en position verticale avec 4 vis et écrous (taille des vis : ø 5 × 40 mm).
Très important : placer le joint et introduire la pièce A dans D jusqu’au fond.
• Après avoir terminé d’installer la douche, connectez la prise d’eau (avec l’adaptateur si besoin) et
tournez la manette sur la position ON pour permettre l’entrée d’eau.
• Il est possible que quelques gouttes tombent de la tête une fois que le réservoir est rempli d’eau. À
ce moment, vous pouvez tourner la manette sur la position OFF.
• Il est également possible que des gouttes tombent de la tête de la douche lorsque l’eau est chauffée
par le soleil. Il s’agit d’un phénomène habituel en raison de l’augmentation du volume de l’eau du
réservoir lorsque la température monte.
• Il est également normal que quelques gouttes tombent de la douche pendant un certain temps après
s’être douché.
1. Connectez la tête de la douche à A.
2. Introduisez la pièce A avec la B et la C jusqu’au fond de D.
3. Serrez complètement la pièce B.
A – Tuyau pour sortie d’eau
B – Écrou de la douille
C – Joint
D – Tuyau de fi xation avec écrou

IMPORTANT
• La pression maximale de fonctionnement recommandée est de 3 bar.
• Ne pas utiliser la douche pendant les orages.
• Veuillez noter que pendant les mois les plus chauds, l’eau de la douche solaire peut atteindre 60 °C.
Il est conseillé de régler la température de l’eau à l’aide de la poignée avant de se doucher. Ne pas
toucher la surface de la douche solaire, car elle peut causer des brûlures mineures.
• La douche solaire peut être utilisée dans des zones avec des températures supérieures à 3 °C.
• Avant l’arrivée de l’hiver, couper l’approvisionnement en eau et vider complètement le réservoir. Dans
le cas contraire, le réservoir pourrait être endommagé en raison des basses températures.
• Ne pas changer la boule de la tête de douche, étant donné que cela pourrait causer des dommages
dans le réservoir ou provoquer des fuites.
ACCESSOIRES INCLUS DANS LE PAQUET
Nº Nom de l’accessoire Quantité Paquet
A Tête de douche 1
Petite boîte
B Tuyau de connexion 1
C Vis 4
D Adaptateur standard européen 1

DE
GEBRAUCHSANLEITUNG SOLARDUSCHE
MONTAGE
• Wählen Sie einen sonnigen Standort im Freien mit einfachem Anschluss an Wasserzufuhr und Kana-
lisation;
• Bohren Sie 4 Löcher (8 mm Durchmesser, 35 mm Tiefe) in den Sockel.
• Schrauben Sie die Solardusche mit 4 Schrauben und Muttern (Schraubengröße ø 5 × 40mm) senkre-
cht auf den Sockel;
Wichtig! Dichtungsring einlegen und A ganz in D einschrauben!
• Sobald die Dusche vollständig montiert ist, schließen Sie den Wassereinlauf an (falls nötig, mit dem
Adapter) und drehen Sie den Griff auf, um Wasser einzulassen.
• Wenn der Tank mit Wasser gefüllt ist, treten eventuell ein paar Tropfen aus dem Duschkopf aus. Nun
kann man den Griff zudrehen.
• Wenn sich das Wasser durch Sonneneinstrahlung erwärmt hat, treten eventuell ein paar Wasser-
tropfen durch den Duschkopf aus. Dies wird durch das erhöhte Wasservolumen im Tankinneren bei
steigender Temperatur verursacht und ist vollkommen normal.
• Normal ist auch, dass manchmal nach dem Duschen etwas Wasser aus dem Duschkopf nachläuft.
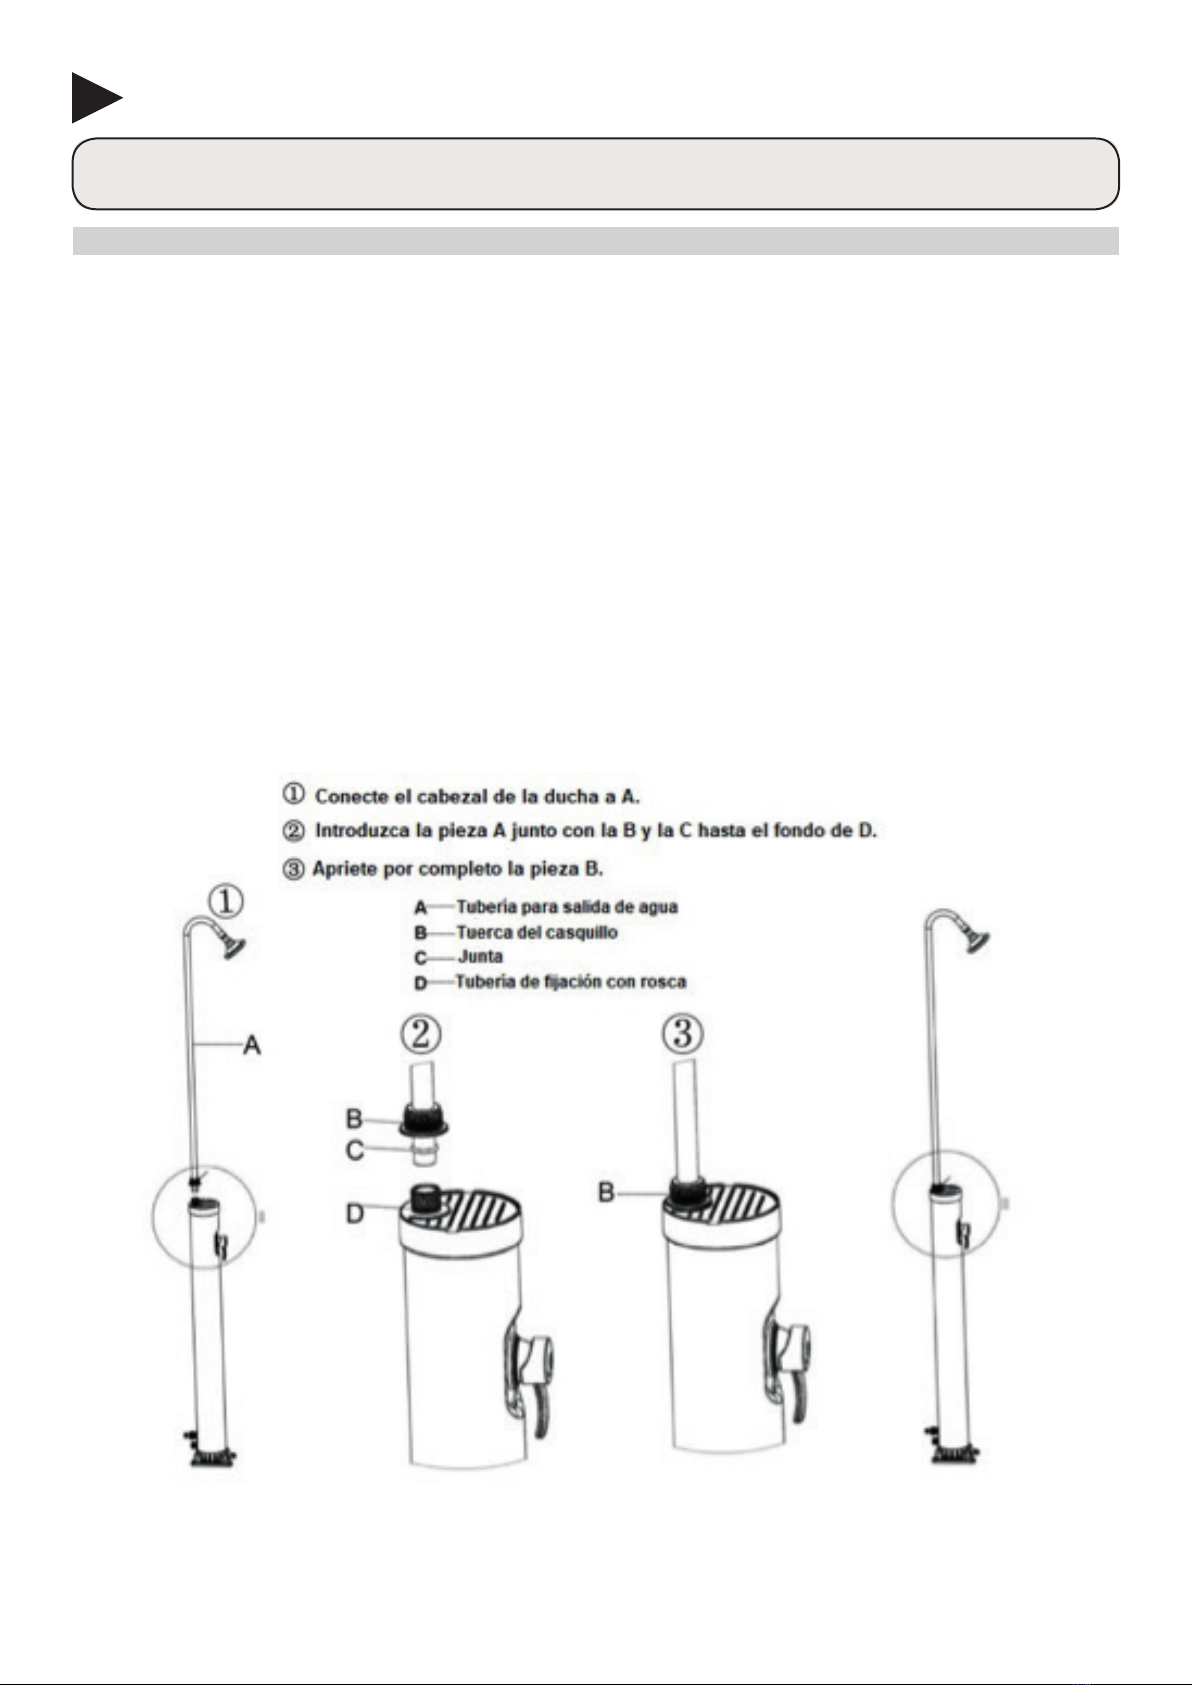
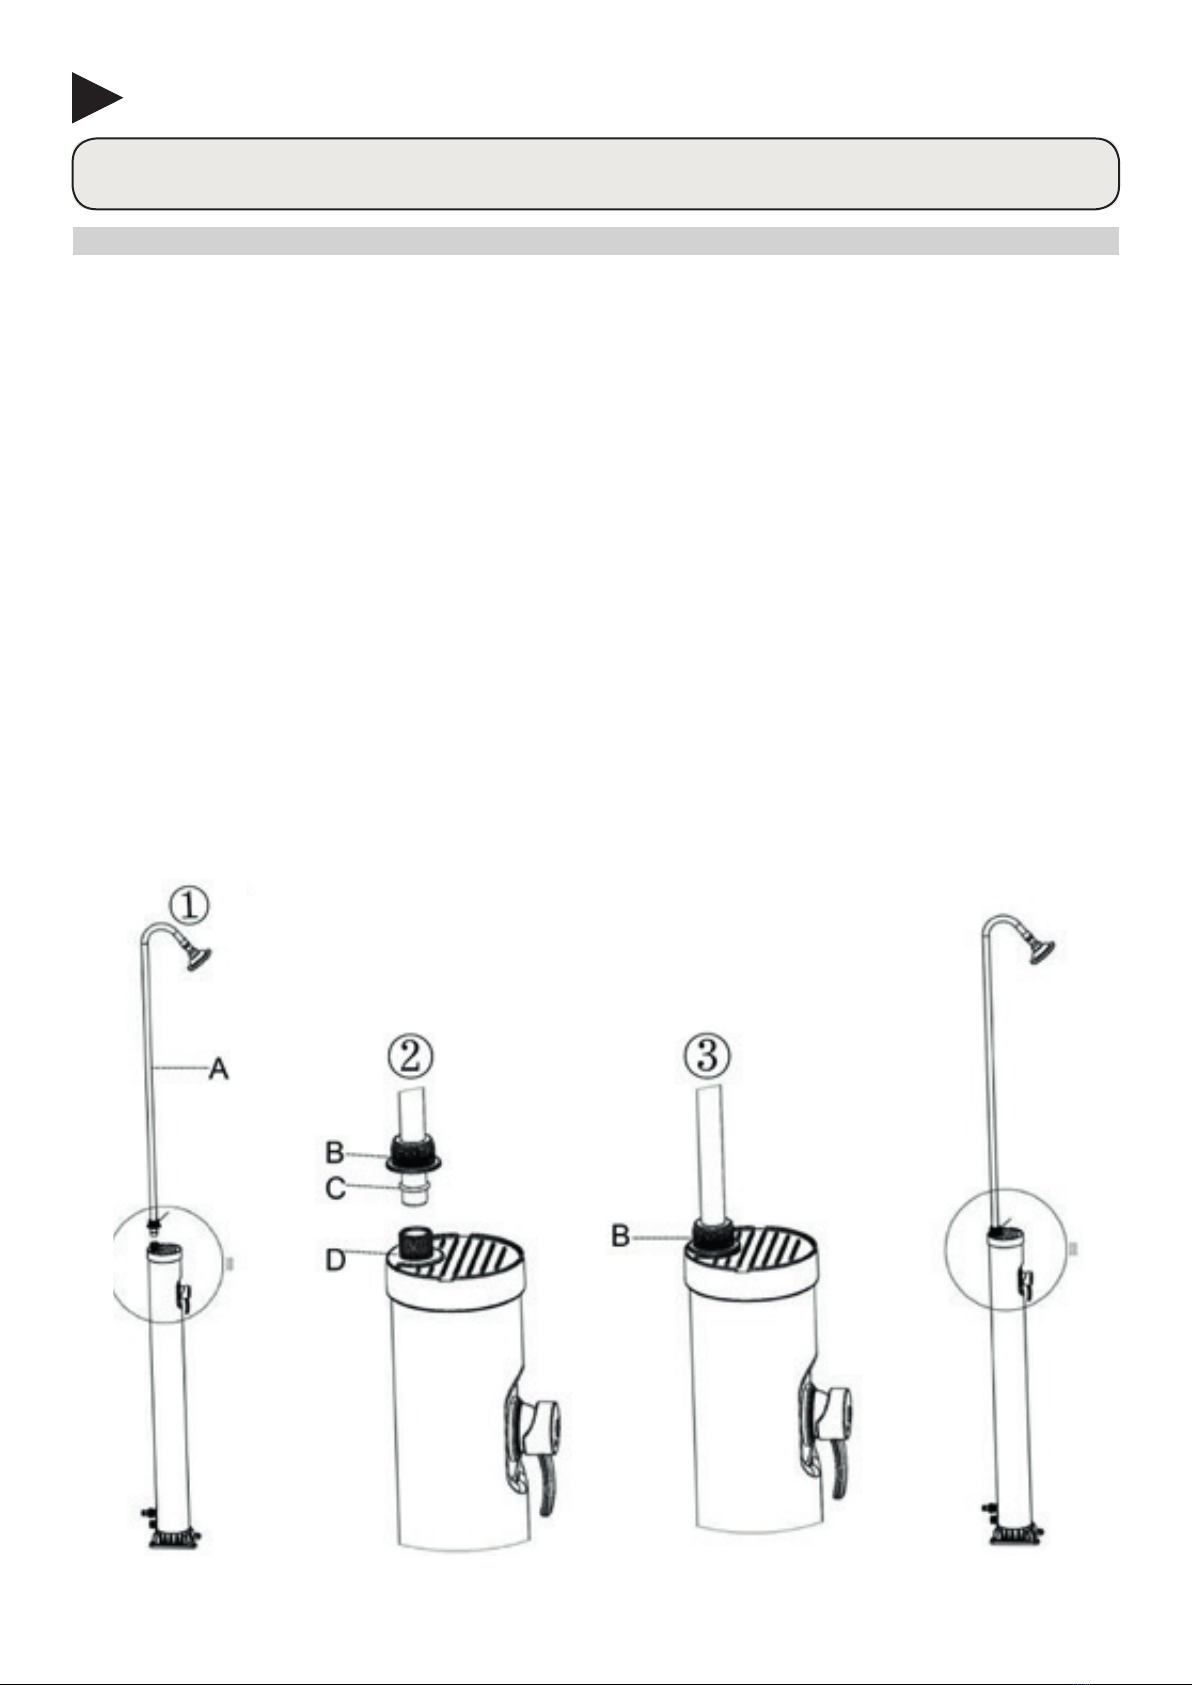
1. Duschkopf an A anschließen.
2. A zusammen mit B und C ganz in D einschrauben.
3. B richtig anziehen.
A - Rohr für Wasseraustritt
B - Stopfbuchsenmutter
C - Dichtring
D - Halterungsrohr mit Gewinde

WICHTIG
• Empfohlener maximaler Betriebsdruck 3 bar.
• Dusche nicht bei Gewitter und Blitzschlag verwenden.
• In den heißen Monaten ist damit zu rechnen, dass sich das Wasser in der Solardusche bis auf 60 ℃
erwärmt. Daher sollte die Wassertemperatur vor dem Duschen mithilfe des Griffs eingestellt werden.
Ebenso sollte man die Oberfläche der Solardusche nicht berühren, da es sonst zu leichten Verbren-
nungen kommen kann.
• Die Solardusche eignet sich für den Einsatz in Umgebungstemperaturen von über 3ºC.
• Vor dem Winter bitte Wasserzufuhr abstellen und den Tank vollkommen entleeren, da der Tank an-
sonsten bei Minustemperaturen Schaden nimmt.
• Die Originalduschkopfkugel darf nicht ersetzt werden werden, da sonst Schäden am Tank entstehen
oder Undichtigkeiten auftreten können.
ZUBEHÖRTEILE IM KARTON
Nr. Artikelbezeichnung Anzahl Verpackung
A Duschkopf 1
Kleiner Karton
B Verbindungsrohr 1
C Schrauben 4
D Euro-Norm-Adapter 1

IT
ISTRUZIONI DOCCIA SOLARE
INSTALLAZIONE
• Individuare un luogo all’aperto soleggiato con un agevole accesso alla rete idrica e alle tubature
• Praticare a terra 4 fori con diametro 8mm e profondità 35mm.
• Fissare la doccia solare a terra verticalmente con 4 viti e 4 dadi. (dimensioni viti: ø 5×40mm);
É molto importante inserire la guarnizione e introdurre A in D!
• Una volta che la doccia è stata installata completamente, collegarla alla rete idrica (se necessario
utilizzare l’adattatore) e ruotare la manopola in posizione ON per far entrare l’acqua.
• Quando il serbatoio è pieno d’acqua, alcune gocce possono fuoriuscire dal soffione della doccia. È
quindi possibile ruotare la manopola in posizione off.
• Quando l’acqua viene riscaldata dal calore del sole, potrebbero fuoriuscire alcune gocce dal soffione
della doccia. Questo fenomeno è comune ed è causato dall’aumento del volume d’acqua all’interno
del serbatoio con l’aumentare della temperatura.
• Può inoltre succedere che alcune gocce possano fuoriuscire dal soffione per un po’ di tempo dopo
aver finito la doccia.
1. Collegare il soffi one ad A.
2. Connettere A con B e C nella parte posteriore di D.
3. Stringere completamente B.
A Tubo di uscita dell’acqua
B Serracavo
C Guarnizione
D Tubo di fi ssaggio fi lettato

IMPORTANTE
• Pressione massima di esercizio consigliata 3 bar.
• Occorre tenere presente che durante i mesi più caldi, l’acqua all’interno della doccia solare può rag-
giungere i 60 ℃. Si consiglia di regolare la temperatura dell’acqua con la manopola prima di fare la
doccia. Evitare inoltre di toccare la superficie della doccia solare in quanto potrebbe provocare una
leggera scottatura.
• La doccia solare può essere utilizzata in zone con temperature superiori a 3 ºC.
• Si prega di interrompere l’alimentazione idrica e scaricare completamente l’acqua dal serbatoio pri-
ma dell’inverno, in caso contrario il serbatoio verrà danneggiato in caso di congelamento.
• Non sostituire mai la nostra sfera del soffione, onde evitare danni al serbatoio o potenziali perdite.
COMPONENTI PRESENTI ALL’INTERNO DELLA CONFEZIONE
No. Nome do acessório QTA. Imballo
A Soffione 1
Scatola piccola
B Tubo di collegamento 1
C Viti 4
D Adattattore standard europei 1

NL
ZONNEDOUCHE MONTAGE-INSTRUCTIES
INSTALLAZIONE
• Zoek een zonnige buitenlocatie met gemakkelijke toegang tot de watertoevoer en -afvoer;
• Boor 4 gaten met een diameter 8mm en diepte van 35mm diep in de grondplaat.
• Bevestig de zonnedouche verticaal op de grondplaat met 4 schroeven en schroefmoeren (schroef-
maten: Ø 5×40mm).
Het is erg belangrijk dat u de afdichtingsring gebruikt en deel A helemaal in D steekt!
• Nadat de douche geheel is geïnstalleerd sluit u hem aan op de kraan (indien nodig met de adapter),
en draait u de hendel in de stand om water door te laten.
• Als de tank vol water zit, kunnen er een paar druppels uit de douchekop komen. U kunt nu de hendel
in de uit-stand zetten.
• Als het water door de zonnewarmte is opgewarmd, kunnen er wat waterdruppels door de douchekop
vallen. Dit is een gebruikelijk fenomeen dat wordt veroorzaakt doordat het watervolume in de tank
uitzet naarmate de temperatuur toeneemt.
• Ook is het normaal dat er af en toe nog even enkele druppels kunnen lekken uit de douchekop nadat
u klaar bent met douchen.
1. Sluit de douchekop aan op A.
2. Sluit A aan op B en C en zorg dat het geheel aansluit
op de bodem van D.
3. Draai B helemaal vast.
A -Leiding voor waterafvoer
B - Wartelmoer
C -Afdichtingsring
D - bevestigingspijp met schroefdraad

BELANGRIJK
• Aanbevolen maximale werkdruk :3 bar.
• Gebruik de douche niet tijdens onweer en bliksem.
• Houd er rekening mee dat tijdens de warmste maanden, het water in de zonnedouche kan oplopen
tot 60 ºC. Het is raadzaam om de watertemperatuur aan te passen aan het handvat alvorens een
douche te nemen. Raak ook het oppervlak van de zonnedouche niet aan, want dat kan leiden tot lichte
brandwonden.
• De zonnedouche kan worden gebruikt in gebieden met temperaturen boven de 3 ºC.
• Sluit de watertoevoer af en laat het water voor de winter volledig uit de tank lopen. Anders raakt de
tank beschadigd tijdens vorst.
• Wijzig nooit onze douchekop-bal, anders zou er schade aan de tank kunnen ontstaan of lekkage kun-
nen optreden.
ACCESSOIRES IN DE DOOS
Nr. Naam van accessoires Aantal Verpakking
A Douchekop 1
Kleine doos
B Verbindingspijp 1
C Schroeven 4
D Euro-standaard Adapter 1

PT
CHUVEIRO SOLAR. INSTRUÇÕES
INSTALAÇÃO
• Procure um lugar ensolarado ao ar livre, com fácil acesso a uma torneira de água e a um escoamento.
• No solo, faça 4 orifícios de 8 mm de diâmetro e 35 mm de profundidade.
• Fixe o chuveiro solar na posição vertical com 4 parafusos e porcas (tamanho dos parafusos:
• ø 5 × 40 mm).
Muy importante: coloque a junta e introduza a peça A em D até ao fundo.
• Quando terminar de instalar o chuveiro, conecte a entrada de água (utilize o adaptador se for ne-
cessário) e gire a chave para a posição ON para que a água comece a encher o depósito do chuveiro.
• É possível que caiam algumas gotas da cabeça do chuveiro quando o tanque de água estiver cheio.
Nesse momento, gire a chave para a posição OFF.
• Também é possível que saiam algumas gotas da cabeça do chuveiro quando a água aquecer com o
calor do sol. Trata-se de um fenómeno habitual, devido ao aumento de volume da água no interior do
depósito ao aumentar a temperatura.
• De igual modo, é normal que caiam algumas gotas da cabeça do chuveiro durante algum tempo de-
pois de tomar banho.
1. Conecte a cabeça do chuveiro a A.
2. Introduza a peça A junto com as peças B e C até ao
fundo na peça D.
3. Aperte fi rmemente a peça B.
A - Tubagem de saída da água
B – Porca do casquilho
C – Junta
D – Tubagem de fi xação com rosca

IMPORTANTE
• A pressão operativa máxima recomendada é de 3 bares.
• Não utilize o chuveiro durante uma tempestade elétrica.
• Tenha presente que, durante os meses mais quentes, a água do chuveiro solar pode chegar a alcan-
çar os 60° C. É recomendável ajustar a temperatura da água com a chave reguladora, antes de tomar
banho. Não toque na superfície do chuveiro solar, uma vez que poderia sofrer queimaduras leves.
• O chuveiro solar pode ser utilizado em zonas com temperaturas superiores a 3° C.
• Antes do inverno, corte o fornecimento de água e esvazie completamente o depósito, para evitar
possíveis danos no mesmo devido às baixas temperaturas.
• Não substitua a bola da cabeça do chuveiro, para evitar causar danos no tanque, ou originar fugas.
ACESSÓRIOS INCLUÍDOS NA EMBALAGEM
N.º Nome do acessório Quant. Embalagem
A Cabeça do chuveiro 1
Caixa pequena
B Tubagem de conexão 1
C Parafusos 4
D Adaptador standard europeu 1

PL
INSTRUKCJA PRYSZNIC SOLARNY
INSTALLATION
• Znajdź słoneczne miejsce z łatwym dostępem do wody
• Wywierć 4 dziury 8mm na głębokość 35mm
• Zamontuj prysznic solarny pionowo do ziemi przy pomocy 4 śrub i nakrętek (rozmiar śruby 5x40mm)
Bardzo ważne jest dołączenie pierścienia uszczelniającego i całkowite włożenie A do D!
• Po zainstalowaniu prysznica podłącz dopływ wody (w razie potrzeby za pomocą adaptera) i przekręć
uchwyt do pozycji włączonej
• Gdy zbiornik jest pełen wody, z głowicy prysznicowej może wypłynąć kilka kropel. Następnie możesz
obrócić uchwyt do pozycji wyłączonej
• Gdy woda została podgrzana przez słońce, przez głowicę prysznica mogą wypływać krople wody.
Jest to typowe zjawisko spowodowane zwiększoną objętością wody w zbiorniku wraz ze wzrostem
temperatury.
• Ponadto jest normalne, że kilka kropel może wyciekać z głowicy prysznicowej przez chwilę po za-
kończeniu kąpieli.
• Podłącz głowicę prysznica do A
• Połącz A z B i C, ciasno z podstawą D
• Dokręć B

WAŻNE
• Rekomendowane maksymalne ciśnienie 3 bar.
• Nie używaj prysznica w trakcie burzy
• Uważaj w trakcie najgorętszych miesięcy, woda w prysznicu może mieć 60C. Wyreguluj temperaturę
wody przed używaniem prysznica. Nie dotykaj powierzchni prysznica przy silnym działaniu słońca,
może być bardzo gorąca.
• Minimalna temperature do używania prysznica 3C
• Proszę odłącz dopływ wody, osusz prysznic i zdemontuj go przed zimą. Mróz może całkowicie
zniszczyć prysznic.
• Nie zamieniaj kulki łożyska przy główce prysznica na inną niż producenta. Może to spowodować
wyciek
Zawartość opakowania
No. Nazwa Ilość Pakowanie
AGłowica prysznica 1
Mały karton
BRura łącząca 1
C Śruby 4
DAdapter Euro 1

1- GENERAL TERMS
• In accordance with these provisions, the seller guarantees that the product corresponding to this guarantee (“the
Product”) is in perfect condition at the time of delivery.
• The Guarantee Term for the Product is two (2) years from the time it is delivered to the purchaser.
• In the event of any defect in the Product that is notified by the purchaser to the seller during the Guarantee Term, the
seller will be obliged to repair or replace the Product, at his own cost and wherever he deems suitable, unless this is
impossible or unreasonable.
• If it is not possible to repair or replace the Product, the purchaser may ask for a proportional reduction in the price or,
if the defect is sufficiently significant, the termination of the sales contract.
• The replaced or repaired parts under this guarantee, will not extend the guarantee period of the original Product, but
will have a separate guarantee.
• In order for this guarantee to come into effect, the purchaser must provide proof of the date of purchase and delivery
of the Product.
• If, after six months from the delivery of the Product to the purchaser, he notifies a defect in the Product, the purchaser
must provide proof of the origin and existence of the alleged defect.
• This Guarantee Certificate is issued without prejudice to the rights corresponding to consumers under national
regulations.
2- INDIVIDUAL TERMS
• This guarantee covers the products referred to in this manual.
• This Guarantee Certificate will only be applicable in European Union countries.
• For this guarantee to be effective, the purchaser must strictly follow the Manufacturer’s instructions included in the
documentation provided with the Product, in cases where it is applicable according to the range and model of the
Product.
• When a time schedule is specified for the replacement, maintenance or cleaning of certain parts or components of the
Product, the guarantee will only be valid if this time schedule has been followed.
3- LIMITATIONS
• This guarantee will only be applicable to sales made to consumers, understanding by “consumer”, a person who
purchases the Product for purposes not related to his professional activities.
• The normal wear resulting from using the product is not guaranteed. With respect to expendable or consumable parts,
components and/or materials, such as batteries, light bulbs, etc. the stipulations in the documentation provided with
the Product, will apply.
• The guarantee does not cover those cases when the Product; (I) has been handled incorrectly; (II) has been repaired,
serviced or handled by non- authorised people or (III) has been repaired or serviced not using original parts. In cases
where the defect of the Product is a result of incorrect installation or start-up, this guarantee will only apply when
said installation or start-up is included in the sales contract of the Product and has been conducted by the seller or
under his responsibility.

1- ASPECTOS GENERALES
• De acuerdo con estas disposiciones, el vendedor garantiza que el producto correspondiente a esta garantía (“el
Producto”) no presenta ninguna falta de conformidad en el momento de su entrega.
• El Período de Garantía para el Producto es de dos (2) años y se calculará desde el momento de su entrega al comprador.
• Si se produjera una falta de conformidad del Producto y el comprador lo notificase al vendedor durante el Periodo de
Garantía, el vendedor deberá reparar o sustituir el Producto a su propio coste en el lugar donde considere oportuno,
salvo que ello sea imposible o desproporcionado.
• Cuando no se pueda reparar o sustituir el Producto, el comprador podrá solicitar una reducción proporcional del precio
o, si la falta de conformidad es suficientemente importante, la resolución del contrato de venta.
• Las partes sustituidas o reparadas en virtud de esta garantía no ampliarán el plazo de la garantía del Producto original,
si bien dispondrán de su propia garantía.
• Para la efectividad de la presente garantía, el comprador deberá acreditar la fecha de adquisición y entrega del
Producto.
• Cuando hayan transcurrido más de seis meses desde la entrega del Producto al comprador y éste alegue falta de
conformidad de aquél, el comprador deberá acreditar el origen y la existencia del defecto alegado.
• El presente Certificado de Garantía no limita o prejuzga los derechos que correspondan a los consumidores en virtud
de normas nacionales de carácter imperativo.
2- CONDICIONES PARTICULARES
• La presente garantía cubre los productos a que hace referencia este manual.
• El presente Certificado de Garantía será de aplicación únicamente en los países de la Unión Europea.
• Para la eficacia de esta garantía, el comprador deberá seguir estrictamente las indicaciones del Fabricante incluidas
en la documentación que acompaña al Producto, cuando ésta resulte aplicable según la gama y modelo del Producto.
• Cuando se especifique un calendario para la sustitución, mantenimiento o limpieza de ciertas piezas o componentes
del Producto, la garantía sólo será válida cuando se haya seguido dicho calendario correctamente.
3- LIMITACIONES
• La presente garantía únicamente será de aplicación en aquellas ventas realizadas a consumidores, entendiéndose
por “consumidor”, aquella persona que adquiere el Producto con fines que no entran en el ámbito de su actividad
profesional.
• No se otorga ninguna garantía respecto del normal desgaste por uso del producto. En relación con las piezas,
componentes y/o materiales fungibles o consumibles como pilas, bombillas etc., se estará a lo dispuesto en la
documentación que acompañe al Producto, en su caso.
• La garantía no cubre aquellos casos en que el Producto: (I) haya sido objeto de un trato incorrecto; (II) haya sido
reparado, mantenido o manipulado por persona no autorizada o (III) haya sido reparado o mantenido con piezas no
originales.
• Cuando la falta de conformidad del Producto sea consecuencia de una incorrecta instalación o puesta en marcha,
la presente garantía sólo responderá cuando dicha instalación o puesta en marcha esté incluida en el contrato de
compra-venta del Producto y haya sido realizada por el vendedor o bajo su responsabilidad.

1- ASPECTS GÉNÉRAUX
• Conformément à ces dispositions, le vendeur garantit que le produit correspondant à cette garantie (“le Produit”) ne
présente aucun défaut de conformité à la date de sa livraison.
• La Période de Garantie pour le Produit est de deux (2) ans et elle sera calculée à partir du moment de sa remise à
l’acheteur.
• S’il se produisait un défaut de conformité du Produit et si l’acheteur le notifiait au vendeur pendant la Période de
Garantie, le vendeur devrait réparer ou remplacer le Produit à ses propres frais à l’endroit qu’il jugerait opportun, à
moins que cela soit impossible ou disproportionné.
• Lorsque le Produit ne pourra être ni réparé ni remplacé, l’acheteur pourra demander une réduction proportionnelle du
prix ou, si le défaut de conformité est suffisamment important, la résolution du contrat de vente.
• Les parties remplacées ou réparées en vertu de cette garantie n’élargiront pas le délai de la garantie du Produit
original, celles-ci étant cependant couvertes par leur propre garantie.
• Pour l’effectivité de la présente garantie, l’acheteur devra justifier la date d’acquisition et de remise du Produit.
• Quand plus de six mois se seront écoulés depuis la remise du Produit à l’acheteur et que ce dernier alléguera un défaut
de conformité de ce Produit, l’acheteur devra justifier l’origine et l’existence du défaut allégué.
• Le présent Certificat de Garantie ne limite pas, ni préjuge les droits correspondant aux consommateurs en vertu des
normes nationales de nature impérative.
2- CONDITIONS PARTICULIÈRES
• La présente garantie couvre les produits auxquels ce manuel fait référence.
• Le présent Certificat de Garantie ne sera applicable que dans les pays de l’Union européenne.
• En vue de l’efficacité de cette garantie, l’acheteur devra suivre strictement les indications du Fabricant comprises dans
la documentation qui est jointe au Produit, quand celle-ci sera applicable selon la gamme et le modèle du Produit.
• Quand un calendrier sera spécifié pour le remplacement, la maintenance ou le nettoyage de certaines pièces ou
de certains composants du Produit, la garantie sera valable uniquement lorsque ledit calendrier aura été suivi
correctement.
3- LIMITATIONS
• La présente garantie ne sera applicable que dans les ventes réalisées aux consommateurs, considérant comme
“consommateur”, toute personne qui achète le Produit à des fins qui n’entrent pas dans le cadre de son activité
professionnelle.
• Aucune garantie n’est concédée quant à l’usure normale due à l’utilisation du produit. En ce qui concerne les pièces,
composants et/ou matériels fongibles ou consommables comme les piles, les ampoules, etc., il faudra respecter, le
cas échéant, ce qui est stipulé dans la documentation qui est jointe au Produit.
• La garantie ne couvre pas les cas où le Produit : (I) a fait l’objet d’un traitement incorrect ; (II) a été réparé, entretenu
ou manipulé par une personne non autorisée ou (III) a été réparé ou entretenu avec des pièces n’étant pas d’origine.
Quand le défaut de conformité du Produit sera la conséquence d’une installation ou d’une mise en marche incorrectes,
la présente garantie répondra uniquement lorsque ladite installation ou ladite mise en marche sera incluse dans le
contrat d’achat et de vente du Produit et aura été réalisée par le vendeur ou sous sa responsabilité.
Table of contents
Languages:
Other GRE Bathroom Fixture manuals
Popular Bathroom Fixture manuals by other brands

Kohler
Kohler K-4709 Service Kit Instructions

Decor Star
Decor Star PL-022-SS installation guide

Triton
Triton DENE HI-FLO Installation and operating instructions

Kraus
Kraus FVS-13800 installation manual

RAVAK
RAVAK AntiCalc SUPERNOVA VSK2 ROSA installation instructions

Cornat
Cornat SP-2-GRIFF instruction manual

brondell
brondell SWASH ECOSEAT 102 owner's manual

OVE
OVE NOAH installation manual

Kohler
Kohler Mira Elite SE Installation and user guide

JASON Hydrotherapy
JASON Hydrotherapy MicroSilk owner's manual

Orbital Systems
Orbital Systems OAS R3 Installation

Home Decorators Collection
Home Decorators Collection HDC60DGV Use and care guide