Artiphon INSTRUMENT 1 User manual

Page 1
INSTRUMENT 1 User Manual
USER
MANUAL
V1.0.0
INSTRUMENT 1

Page 2
INSTRUMENT 1 User Manual
Table of Contents
Page 3
Page 4

Page 3
INSTRUMENT 1 User Manual
Welcome
Hello, and welcome to the manual for the Artiphon INSTRUMENT 1!
The INSTRUMENT 1 is a versatile, expressive, and portable multi-instrument. With this single instrument,
you can perform a variety of intuitive musical gestures and play any sound.
It was designed to be fun and useful for music lovers at all skill levels. The INSTRUMENT 1’s complexity can
be scaled from a simple connection to the Artiphon iOS app up to a powerful and customizable MIDI inter-
face for professional software.
This manual will detail all of the ways the INSTRUMENT 1 can be played and customized.

Page 4
INSTRUMENT 1 User Manual
Hardware
VOLUME AND PRESET KNOBVOLUME AND PRESET KNOB
The circular multi-purpose knob can be turned to control volume and pressed to cycle
between presets.
FINGERBOARDFINGERBOARD
The rectangular, pressure-sensitive playing surface with six strings and twelve frets.
CAPO BUTTONSCAPO BUTTONS
The two triangular buttons at the end of the fingerboard.
BRIDGEBRIDGE
The six triggers between the fingerboard and knob used to trigger sounds.
I/O PANNELI/O PANNEL
ThThe panel for input and output connections on the side of the instrument. This is also
where the power button is located.
LED LIGHTSLED LIGHTS
There are a number of lights on the INSTRUMENT 1. These include the power, volume,
preset, and capo LEDs.

Page 5
INSTRUMENT 1 User Manual
Getting Started
POWERING ON AND CHARGINGPOWERING ON AND CHARGING
Turn the INSTRUMENT 1 on using the power button on the I/O Panel.Turn the INSTRUMENT 1 on using the power button on the I/O Panel.
If the PWR LED doesn’t glow green when powered on, connect your instrument to a pow-If the PWR LED doesn’t glow green when powered on, connect your instrument to a pow-
er source using the included 12V power supply.er source using the included 12V power supply.
A power adapter with three different international prongs are provided. Here’s a GIFA power adapter with three different international prongs are provided. Here’s a GIF
showing how to assemble your power adapter:showing how to assemble your power adapter:
When assembled correctly, the prongs will sit flat with the body of the charger.When assembled correctly, the prongs will sit flat with the body of the charger.
Do not use any power adapter other than the one we provide. Many adapters use theDo not use any power adapter other than the one we provide. Many adapters use the
same shaped plug but can have different electrical properties and may damage the IN-same shaped plug but can have different electrical properties and may damage the IN-
STRUMENT 1.STRUMENT 1.

Page 6
INSTRUMENT 1 User Manual
The PWR LED on the I/O panel changes color to indicate the state of the battery:The PWR LED on the I/O panel changes color to indicate the state of the battery:
A fully charged battery will last at least six hours.A fully charged battery will last at least six hours.

Page 7
INSTRUMENT 1 User Manual
Connecting
Two connection cables are included:Two connection cables are included:
Lightning cable for iPhone, iPad, andLightning cable for iPhone, iPad, and
iPodiPod
USB Cable for Mac and WindowsUSB Cable for Mac and Windows
ComputersComputers
There are two software we provide for customizing and configuring your INSTRUMENT 1:
THE INSTRUMENT 1 IOS APPTHE INSTRUMENT 1 IOS APP
The free Artiphon INSTRUMENT 1 app is available on the Apple App Store. This app in-
cludes sounds and allows you to customize settings for the INSTRUMENT 1. The INSTRU-
MENT 1 app is covered in more detail later in this manual.
THE INSTRUMENT 1 EDITORTHE INSTRUMENT 1 EDITOR
The desktop interface for controlling all the INSTRUMENT 1’s various settings on Mac and
Windows. Note that the desktop editor does not have built-in sounds. The INSTRUMENT
1 Editor is covered in more detail later in this manual.
THIRD PARTY SOFTWARETHIRD PARTY SOFTWARE
The INSTRUMENT 1 is a class-compliant MIDI controller and can connect to any third-par-
ty music making software that accepts MIDI. This includes iOS apps and desktop DAW’s.
We’ll go in to more detail about connecting to third-party software later in this manual.

Page 8
INSTRUMENT 1 User Manual
Main Settings
PRESETPRESET
A saved combination of INSTRUMENT 1 settings. For example, the Guitar preset includes
the settings Fretted, Strum, and Guitar tuning (EADGBE). Every preset for the INSTRU-
MENT 1 is comprised of a Mode, Method, and Tuning. Read on to learn about each of
these elements.
MODEMODE
The mode sets how the INSTRUMENT 1 can be played. Two modes set the fingerboard to
respond like digital strings:
Grid mode has 72 notes on the fingerboard in a 12 x 6 arrangement with an additional 6
triggers on the bridge. Any note on the grid can be pressed and played, meaning you can
play multiple notes on the same string.
Unlike string modes where the tuning ascends chromatically from a base tuning, each
Grid mode note location can be tuned individually.
You’ll notice the notes in Grid mode are where the strings are in Fretted and Fretless
modes, not the spaces in between strings.

Page 9
INSTRUMENT 1 User Manual
Pad mode has 12 locations with an additional 6 triggers on the bridge. In this mode, an
entire fret becomes one large pad, so just a single note or chord will be triggered no mat-
ter what part of the region is pressed.

Page 10
INSTRUMENT 1 User Manual
METHODMETHOD
The method setting determines how you intend to interact with the INSTRUMENT 1.
Some methods are only available for certain modes.
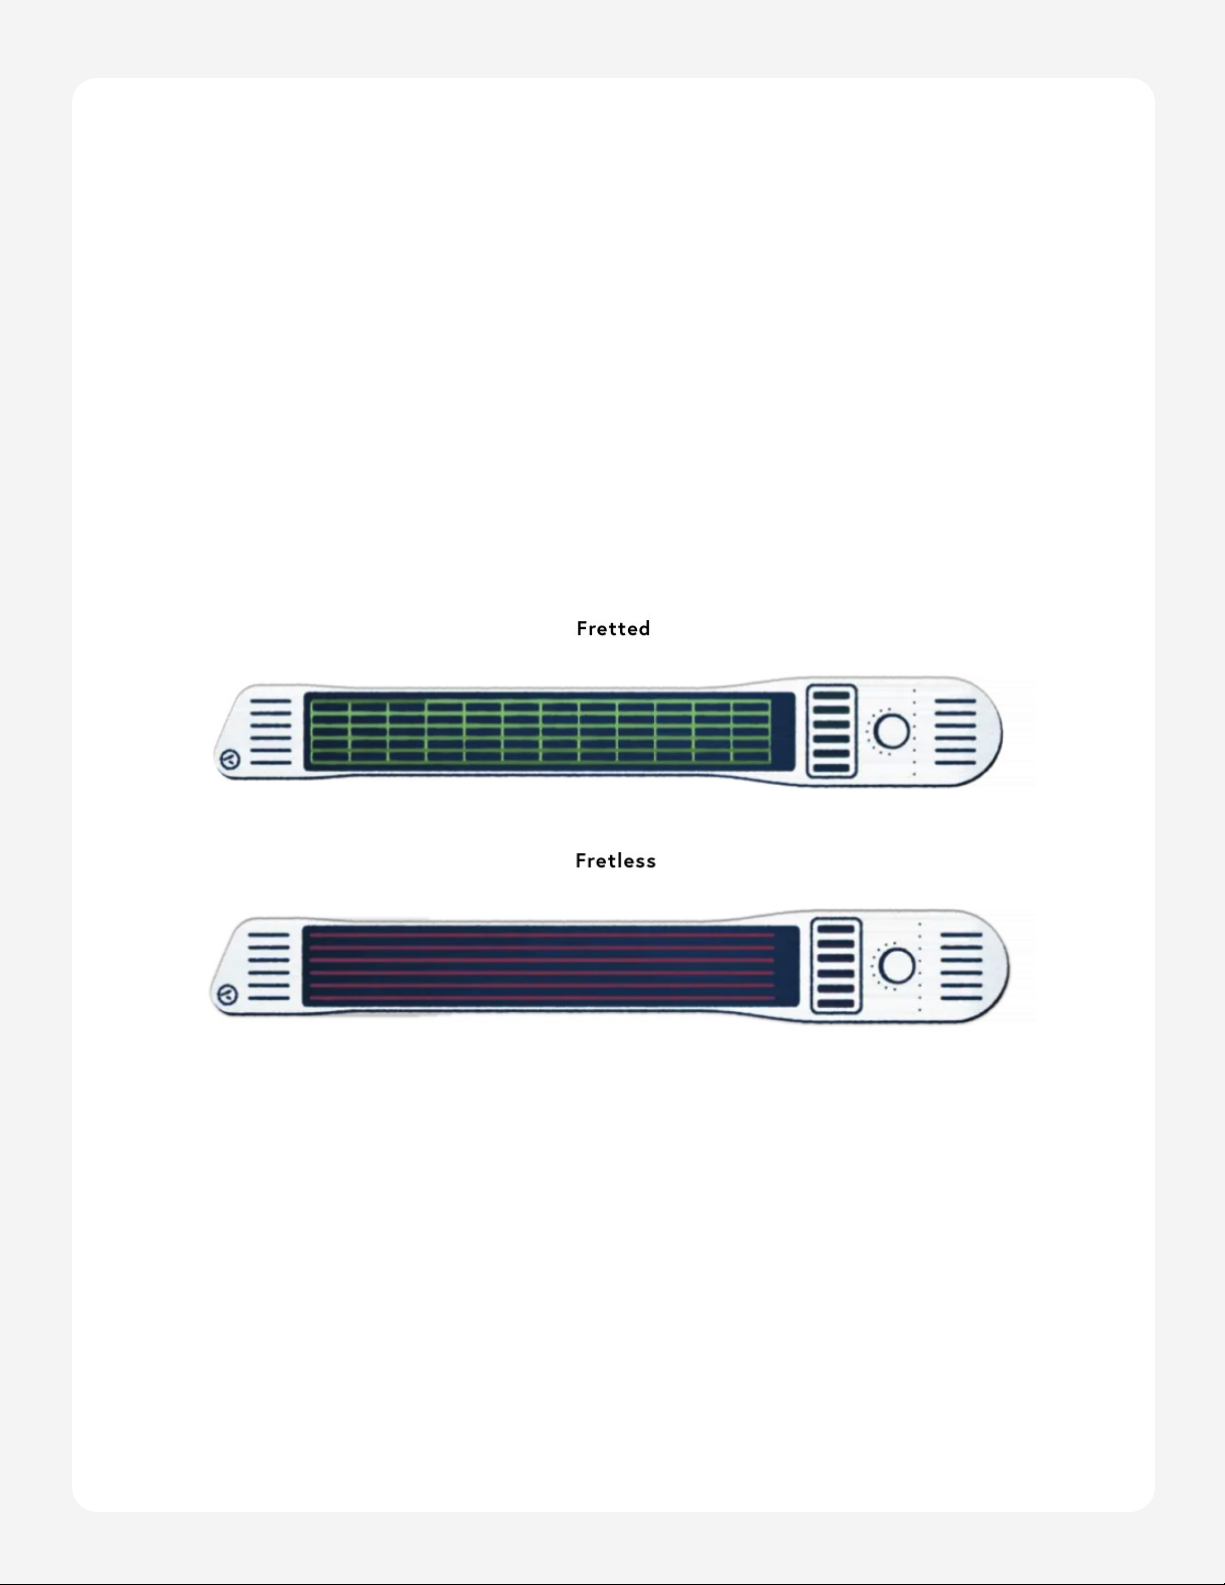
STRUMSTRUM
(Available for Fretted, Fretless, and Pad modes)
Strum method is similar to playing strings like a guitar, bass, banjo, harp, ect. A string will
be activated by strumming or plucking the bridge. Notes can also be activated by striking
the fingerboard as a hammer-on or pulling-off to another fretted note.
The bridge and fingerboard are sensitive to how hard they are played (velocity).
If you are holding a string on the fingerboard, the note will stop when the fingerboard is
released. Open strings will ring out for some time unless they are muted. Strings can be
muted in a few different ways:
If you press straight into the bridge, this will mute the note. When you release this, a
note will not be triggered.
If you touch the bridge, but release slowly, this will not trigger a note. (As if you were
playing bass and your finger lands on a lower string, not intending to pluck it.)
If you lightly press an active open string on the fingerboard, this will mute the note.
TAPTAP
(Available for Fretted, Grid, and Pad modes)
Tap method is similar to playing a keyboard or a drum pad. When you tap or press the
fingerboard or bridge, a note will be triggered. When you release, the note will turn off.
The bridge and fingerboard are sensitive to how hard they are played (velocity).

Page 11
INSTRUMENT 1 User Manual
SLIDESLIDE
(Available for Fretless mode)
Slide method is the Fretless version of Tap, where you can tap a note and slide up or
down a string. This method also allows for vibrato when rocking back and forth over a
fret.
This method uses the MIDI message pitch bend. The Pitch Bend Range output of the IN-
STRUMENT 1 can be set to 12, 24, or 48.
The fingerboard is sensitive to how hard it is played (velocity).
BOWBOW
(Available for Fretted and Fretless modes)
Bow method is similar to using a bowed string instrument like a violin or cello. Pressing
the bridge will activate a string, and modulating pressure will control the MIDI message
brightness (CC 74). Releasing the bridge will end the note. Multiple bridge triggers can
be bowed and independently control brightness.
In the Artiphon app, Bow method is mapped to control volume.

Page 12
INSTRUMENT 1 User Manual
IBOWIBOW
(Available for Fretless, Grid, and Pad modes when connected to the Artiphon app)
iBow uses the accelerometer in iOS devices to control the volume of the sound. The iP-
hone is moved in a bowing motion while pressing down on a string on the INSTRUMENT 1.
The angle of the iPhone and the motion combined determine how loud a sound is played.
TUNINGTUNING
The tuning of the INSTRUMENT 1 can be easily changed and customized. We provide a
number of tuning profiles in the app and editor, and each note can be edited.
The fretted and fretless modes have a base tuning for each string, and the notes ascend
chromatically up the frets. In grid and pad mode, each note element can be edited inde-
pendently.
.

Page 13
INSTRUMENT 1 User Manual
Features
These features can be turned on and off unlike the core settings which are part of everyThese features can be turned on and off unlike the core settings which are part of every
preset. Some features are global, meaning they apply to all presets. Other features arepreset. Some features are global, meaning they apply to all presets. Other features are
preset specific, meaning they can be on for some presets, but not for others.preset specific, meaning they can be on for some presets, but not for others.
MULTI-CHANNEL MIDIMULTI-CHANNEL MIDI
The INSTRUMENT 1 can output MIDI on multiple channels (1-7). This is a new, emerging
MIDI specification called MIDI Polyphonic Expression (MPE). With MPE, you can control
pitch bend and pressure for individual notes, meaning you can slide notes in different
directions with independent pressure control.
PRESSUREPRESSURE
The INSTRUMENT 1 fingerboard and bridge are continuously pressure-sensitive. In
multi-channel mode, the MIDI message is channel pressure, and in single channel mode,
the MIDI message is aftertouch. All INSTRUMENT 1 methods can be made more expres-
sive with pressure.
TILTTILT
The INSTRUMENT 1 can be tilted to control mod wheel (CC 1). The maximum tilt range
starts from horizontal & parallel with the ground going 90 degrees up to vertical. The
minimum and maximum tilt ranges can be adjusted to any range of motion within the 90
degrees.
STRING BENDINGSTRING BENDING
In the Fretted mode, string bending can be activated. Apply pressure to the fingerboard
to bend a string by up to two semitones.
STRING BENDINGSTRING BENDING
Set your INSTRUMENT 1 to Pad mode and Strum method to play Smart Strum. Press any-
where on a pad and strum or pick the bridge to easily play full chords with a single finger.
Change chords by pressing a different pads. This feature is also compatible with pressure,
tilt, and the arpeggiator. Chord tuning profiles can be customized to include different
chord root notes and voicings.

Page 14
INSTRUMENT 1 User Manual
CAPOCAPO
The capo buttons will shift the tuning up or down. This can be set to shift by one semi-
tone or one octave. The maximum number of shifts is 12 up or down.
ARPEGGIATORARPEGGIATOR
Notes will activate at a set tempo as long as they are held down. If multiple notes are
played and held, they will play over and over in the order they were activated. The tempo
can be adjusted by tapping in the app or set to a specific BPM. The rate of the notes can
also be set to a specific note value.
STRING FLIPSTRING FLIP
The INSTRUMENT 1 can be played by both left and right-handed players. The Fretted and
Fretless string modes can be set to either a left or right-handed orientation. The INSTRU-
MENT 1 can globally be set to always right or left. Alternately, it can be set to Automatic
flip, where the INSTRUMENT 1 will flip the strings based on how you are holding it.
There is also a preset-specific override setting, in case you wish to set a preset to flip
specifically one way.
PROGRAM CHANGESPROGRAM CHANGES
When activated, the INSTRUMENT 1 will send a MIDI program change message when you
press the preset selector knob. The messages 0–7 can be sent for the eight presets.

Page 15
INSTRUMENT 1 User Manual
MIDI MAPPING
Single Channel MIDI Multi Channel MIDI Configurable in
App and Editor
MIDI Channels Channel 1 Channel 2-7 (base
channel 1)
Switch Single /
Multi Channel
Fingerboard Pressure Channel Pressure Polyphonic After-
touch
On/Off, Sensitivity
Fingerboard and
Bridge Tap
Note on/off, velocity Note on/off, velocity MIDI note #, Meth-
od Sensitivity
Slide on fingerboard Pitch bend (ch. 1,
adjustable range)
Pitch bend (channel
per note, adjustable
range)
Pitch Bend Range
(12, 24, 48)
Bridge Bow Note on/off, Bright-
ness (CC74)
Brightness (CC74) Method Sensitivity
Bridge Strum Note on/off, velocity Note on/off, velocity Method Sensitivity
String Bending Pitch bend (ch. 1, up
to two semitones)
Pitch bend (channel
per note, up to two
semitones)
Pitch Bend Range
(12, 24, 48)
I1 Tilt Mod Wheel (CC1) Mod Wheel (CC1) On/Off, Tilt Range
Program Changes Program Changes
0 - 7
Program Changes
0 - 7
On/Off

Page 16
INSTRUMENT 1 User Manual
SENSITIVITY SETTINGS
METHOD SENSITIVITYMETHOD SENSITIVITY
This sets the velocity output across all methods. The maximum is 123 and the minimum
increases with Method Sensitivity. If you set this to very high, you can play lightly and
still have loud notes. If you set this to low, you can play with the most dynamic range.
LOWLOW
Velocity 40-123 using light to very hard touch
MEDIUM (DEFAULT)MEDIUM (DEFAULT)
Velocity 60-123 using light to hard touch
HIGHHIGH
Velocity 80-123 using light to medium touch
VERY HIGHVERY HIGH
Velocity 100-123 using light to medium touch
In tap method, velocities 124-127 are possible, but require harder strikes.
HAMMER-ON SENSITIVITYHAMMER-ON SENSITIVITY
(Available for Fretted/Strum)
This sets how hard you have to strike the fingerboard to trigger a hammer-on. If you are
playing the Guitar preset and find that you are unintentionally triggering notes when you
press on the fingerboard, the Hammer-On Sensitivity can be decreased or turned off to
prevent this. Alternately, you can turn this up to make the fingerboard more sensitive.
Turning off hammer-ons will also turn off pull-offs.
AFTERTOUCH SENSITIVITYAFTERTOUCH SENSITIVITY
This how hard you press the fingerboard to control polyphonic aftertouch or channel
pressure. This can also deactivate pressure sensitivity.

Page 17
INSTRUMENT 1 User Manual
ARTIPHON iOS APP
Platform: iOS (iPhone, iPad, and iPod)
Available on the Apple App Store
TECHNIQUES AND SOUNDSTECHNIQUES AND SOUNDS
With the INSTRUMENT 1 you can combine sounds, techniques, and tunings to design your
own custom instruments. The Artiphon companion app for iOS is the quickest way to
adjust settings on existing instrument presets, and to design new ones.
WHAT’S A PRESET?WHAT’S A PRESET?
When using the Artiphon iOS app, a preset is a combination of technique, tuning, and
sound. You can change and adjust existing presets or create new ones, and save them in
your collections folders within the app.
MAKE A CUSTOM PRESETMAKE A CUSTOM PRESET
You can start out with any of the presets found in the app. There are four main built-in
presets (Guitar, Violin, Piano, and Drums) and a selection of custom ones that we de-
signed (and continue to update and add to).
NAMING YOUR PRESETNAMING YOUR PRESET
Pressing the arrow next to the preset name at the top of the screen gives the options to
overwrite the current preset, save it as a new preset, or rename the current preset.

Page 18
INSTRUMENT 1 User Manual
CHOOSING YOUR SOUNDCHOOSING YOUR SOUND
In the Artiphon app any sound can be used with any technique. Choose your sound by
pressing the arrow next to the sound icon. On the Sounds page you can browse be-
tween different instrument sounds that we designed specifically for the INSTRUMENT 1.
CHOOSING YOUR TUNINGCHOOSING YOUR TUNING
Pressing the arrow in the tuning bar at the bottom of the Technique screen opens a list
of tunings to choose from. All the tunings you see can also be customized with the tun-
ing editor.
There are many common tunings to select from, including Standard Violin, Open G, Drop
D, and more. If you’d like to edit or modify a tuning, select Edit and change the value for
each individual string, note, or region.

Page 19
INSTRUMENT 1 User Manual
SELECT YOUR MODESELECT YOUR MODE
Enter the Technique Editor by pressing the arrow on the right of the Artiphon app home
screen.
Swipe to browse between the four modes: Fretted, Fretless, Grid, and Pad. Each mode
will determine how the fingerboard and bridge on your INSTRUMENT 1 respond to your
playing.
CHOOSING YOUR METHODCHOOSING YOUR METHOD
Choose from the Method buttons at the bottom of the screen to select your method.
Fretted Mode: similar to a guitar, electric bass, ukulele, or other stringed instrument
with frets.
Fretless Mode: similar to a member of the violin family, allowing you to slide contin-
uously between notes, and rock your finger for vibrato.
Grid Mode: divides the fingerboard into a grid of 72 note locations.
Pad Mode: divides the fingerboard into 12 pads arranged side-by-side.
Strum Method (works with Fretted, Fretless, and Pad modes): lets you strum or
pluck the bridge triggers to play the corresponding strings of the fingerboard.
Bow Method (works with Fretted and Fretless modes): lets you press on the bridge
triggers and slide continuously between notes on the fingerboard.
Slide Method (works with Fretless Mode): lets you press a note on the fingerboard
and slide continuously up or down the neck.
Tap Method (works with Fretted, Grid, and Pad modes): lets you tap or press a
location on the fingerboard or bridge to play a sound.

Page 20
INSTRUMENT 1 User Manual
SAVING YOUR PRESETSAVING YOUR PRESET
While you can save as many custom presets as you like in the Artiphon iOS app itself,
you can also save your presets to the four user preset locations accessible on the face of
the INSTRUMENT 1. You can switch between these presets at any time by pressing in the
INSTRUMENT 1’s volume/preset knob.
A dialog will ask you which of the user preset locations you want save to.
THE MORE MENUTHE MORE MENU
There are a number of additional features in the More menu that you can apply to your
presets. The technique settings will apply to specific presets, while the INSTRUMENT 1
settings apply to all the presets.
Aftertouch Sensitivity controls how hard you press the fingerboard to control poly-
phonic aftertouch or channel pressure.
Capo Step Size sets the tuning interval that is changed by the Capo button. Se-
lecting 1 will make the tuning shift up or down one semitone, while selecting 12 will
make the tuning shift one octave.
String Flip Mode sets whether the INSTRUMENT 1 is oriented for a left or
right-handed player. Selecting Left or Right will lock it in that orientation. Selecting
I1 flip means that the accelerometer inside the INSTRUMENT 1 will sense the orien-
tation and automatically change.
String Flip Override will force a specific left/right orientation.
Arpeggiator will cause notes to activate at a set tempo as long as you hold down
a key, pad, or string. If multiple notes are played and held, they will play over and
over in the order they were activated. The tempo can be adjusted by tapping in
the app, or set to a specific BPM. The rate of the notes can also be set to a specific
note value.
Hammer-On Sensitivity sets how hard you have to strike the fingerboard to trig-
ger a hammer-on. This setting only works for Fretted mode. If you are playing the
Guitar preset and find that you are unintentionally triggering notes when you press
on the fingerboard, the Hammer-On Sensitivity can be decreased or turned off to
prevent this. Turning off hammer-ons will also turn off pull-offs.
Other manuals for INSTRUMENT 1
1
Table of contents
Other Artiphon Musical Instrument manuals