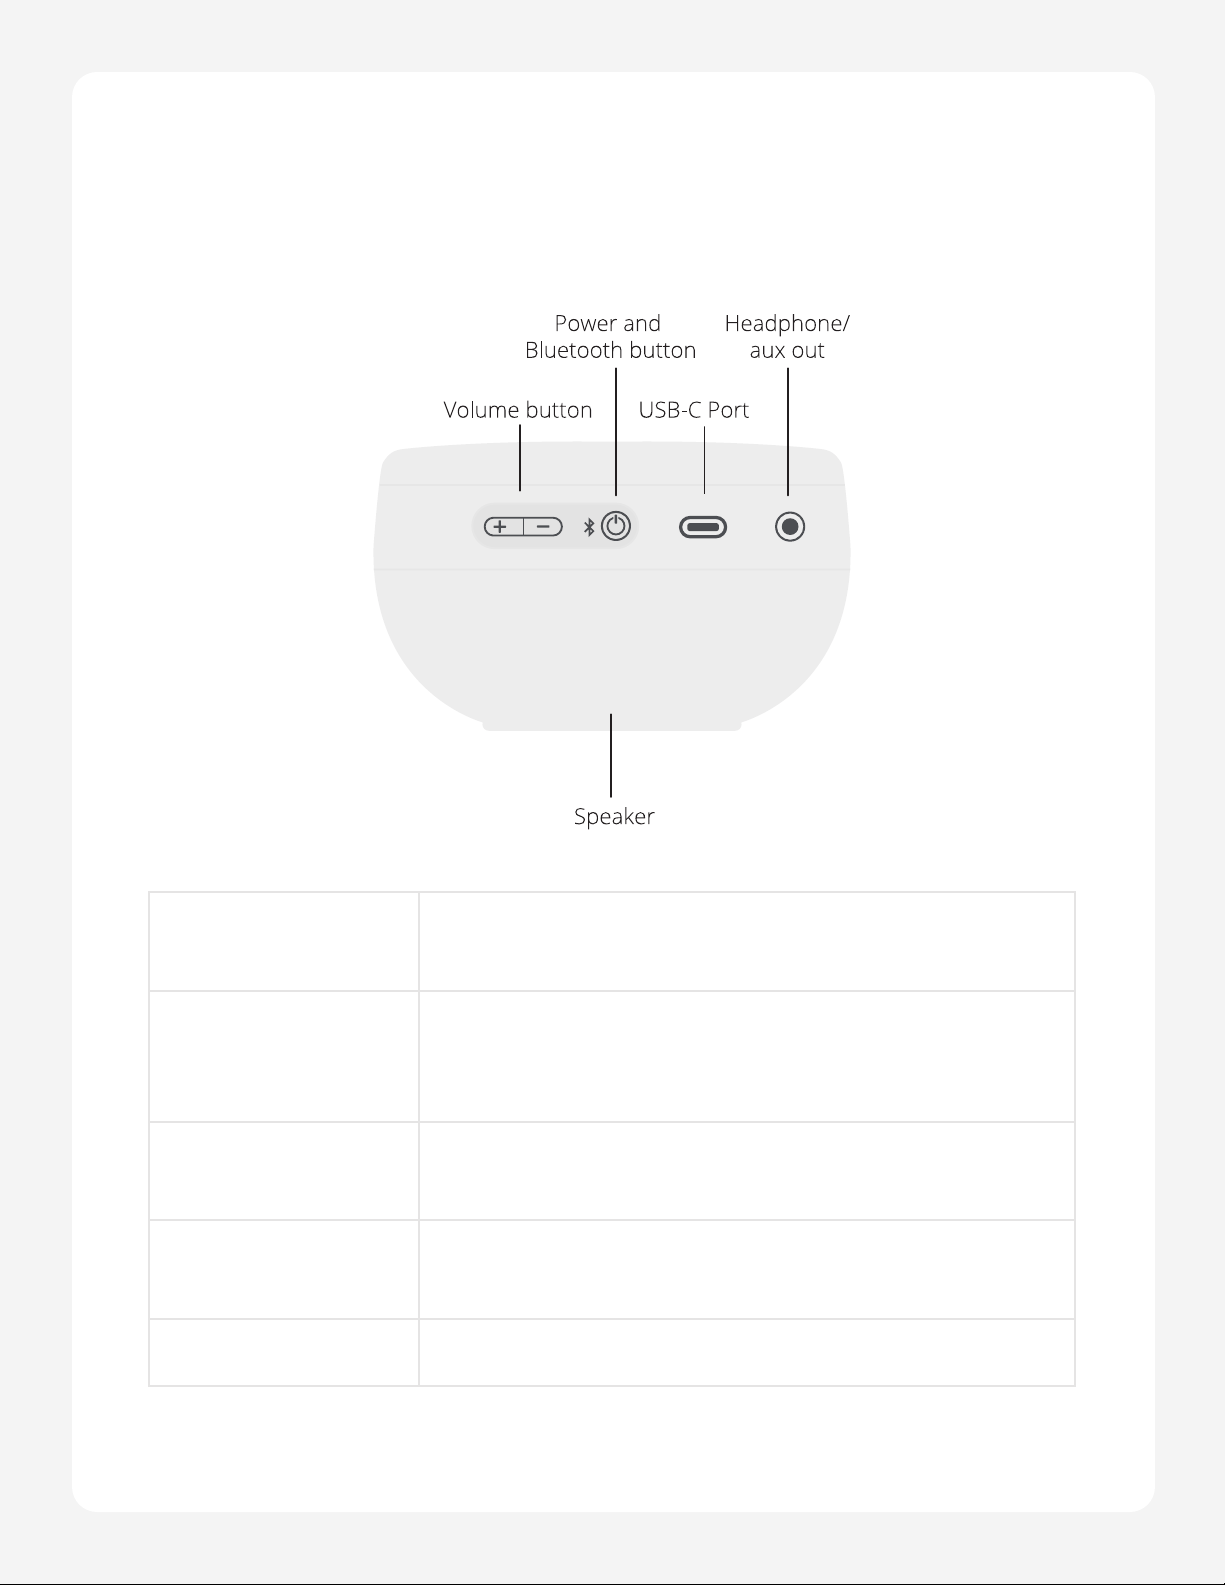
Artiphon ORBA User manual

Page 1
Orba User Manual
USER
MANUAL
V2.0.0
& ORBA
ORBA 2

Page 3
Orba User Manual
Welcome
Congratulations on your new pet Orba! We think you’re going to love it. There are all
kinds of things you can do with this instrument, and we’re excited for you to try them all.
You might see how many loops you can make as you ride the bus to work. Or perhaps
you’ll use Orba as a gestural synth at your next gig – waving it through the air to control
effects as the crowd goes wild. Or maybe you’ll use Orba to play a software synth in that
track you’ve been working on in your DAW. The possibilities are endless.
However you plan to Orba, you probably have some questions. You may be wondering
why we only put eight pads on Orba. Or maybe you’re wondering what all of those little
flashing lights mean. Or maybe you just want to know how to turn up the volume. What-
ever it may be, you’re in the right place.
Welcome to the official Orba User Manual.

Page 4
Orba User Manual
Power
Charging Orba
Orba can be charged from any power-charging USB port using the included USB-C cable.
Either a wall charger for your phone or a computer will work perfectly. Orba remains fully
functional while charging, so you can keep playing even while you’re juicing up.
Charging Indicators
When you connect Orba to a power source and turn it on, you’ll see a single green LED
blinking on pad 8. This indicates that Orba’s battery is charging. If Orba is off, you won’t
see any lights, but rest assured it’s still charging.
BLINKING GREEN
ON AND CHARGING
FULLY GREEN
FULLY-CHARGED
BLINKING RED
LOW BATTERY
YELLOW
NOT CHARGING
MOBILE POWER SAVING
HALF-FILLED GREEN
HALF-CHARGED

Page 5
Orba User Manual
Panel and Controls
Volume button Increase and decrease the volume of Orba’s speaker
Power and Bluetooth
pairing button
Press and hold to turn Orba on and off
USB-C Port Charge Orba’s built-in battery and connect
your external hardware devices
Headphone/aux out 1/8” audio output for headphones or speakers
Speaker 3W active speaker system

Page 6
Orba User Manual
The “A” Button
You can think of the A button as a function or menu button, similar to modifier keys on
a computer like the Command key on Mac or the Control key on Windows. Any time you
want to change what you’re doing on Orba, you’ll use the A button to make it happen. A
single tap of the A button will cycle through each of the four main modes.
Try it:
Start in Drum mode and press the A button once.
Now you’re in Bass mode!
Try it:
If you don’t want to cycle between modes, you can jump to any playing
mode directly by holding A and pressing the pad for that mode.
Using the A Button to Switch Modes
Press and hold the A button, then press one of Orba’s instrument pads (pads 1-4) to acti-
vate that mode.

Page 7
Orba User Manual
Functions

Page 8
Orba User Manual
Function Cheat Sheet
Function Combination
Record A + Pad 6 (Rec)
End a loop A
Stop recording A + Pad 6 (Rec)
Play/Pause loop A + Pad 5 (Play/Pause)
Restart playback from
beginning of loop.
Hold A + Pad 5 (Play/Pause) for one second.
Clear the loop on the
current mode
Hold A + Pad 6 (Rec) until a series of red LEDs make one com-
plete cycle around Orba. Alternatively, simply hold A while
shaking Orba.
Clear everything
Hold A + Pad 6 (Rec) until a series of red LEDs followed by
a series of orange LEDs each make a complete cycle around
Orba. Alternatively, hold A + Pad 6 (Rec) while shake Orba.
Change BPM
Hold A + Pad 7 (BPM) and slide clockwise (increase tempo) or
counter-clockwise (decrease tempo)
Alternatively, hold A and tap Pad 7 (BPM) at the desired tempo.
Octave up Hold A + Pad 8 (Octave) and slide clockwise.

Page 9
Orba User Manual
Octave down Hold A + Pad 8 (Octave) and slide counter-clockwise
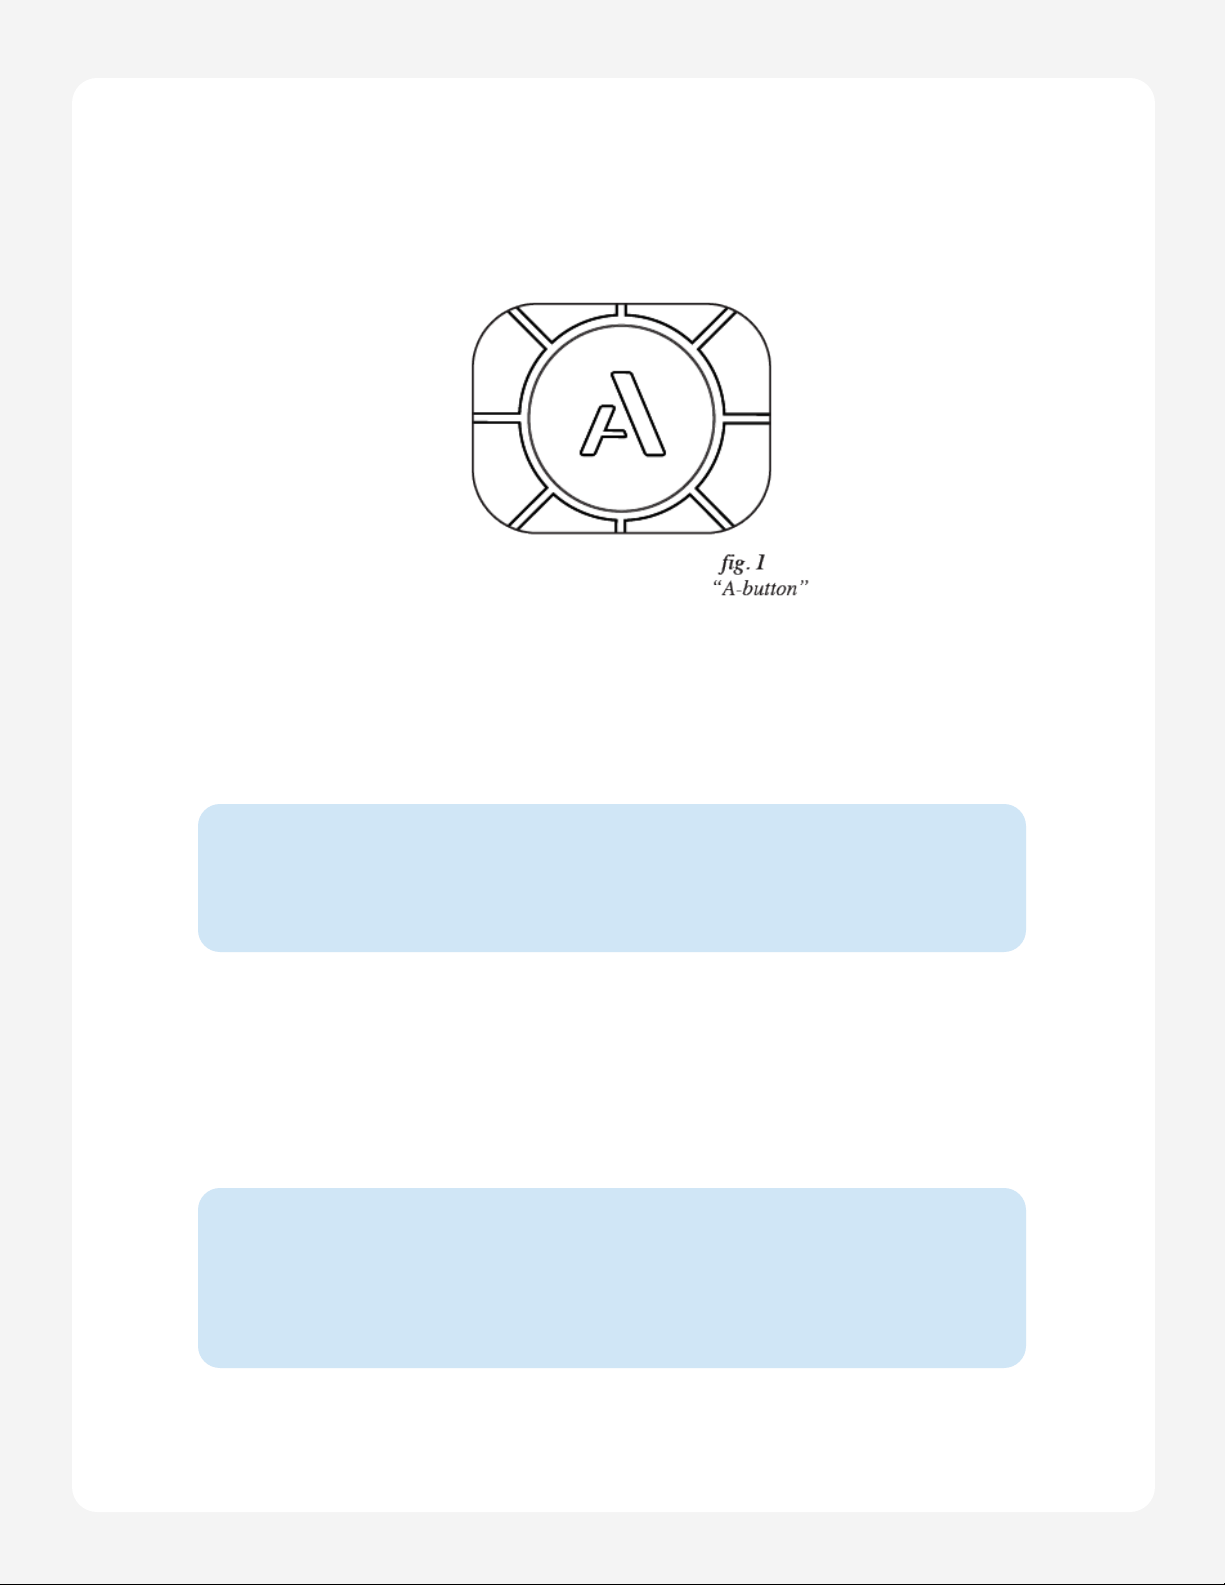
Next mode A
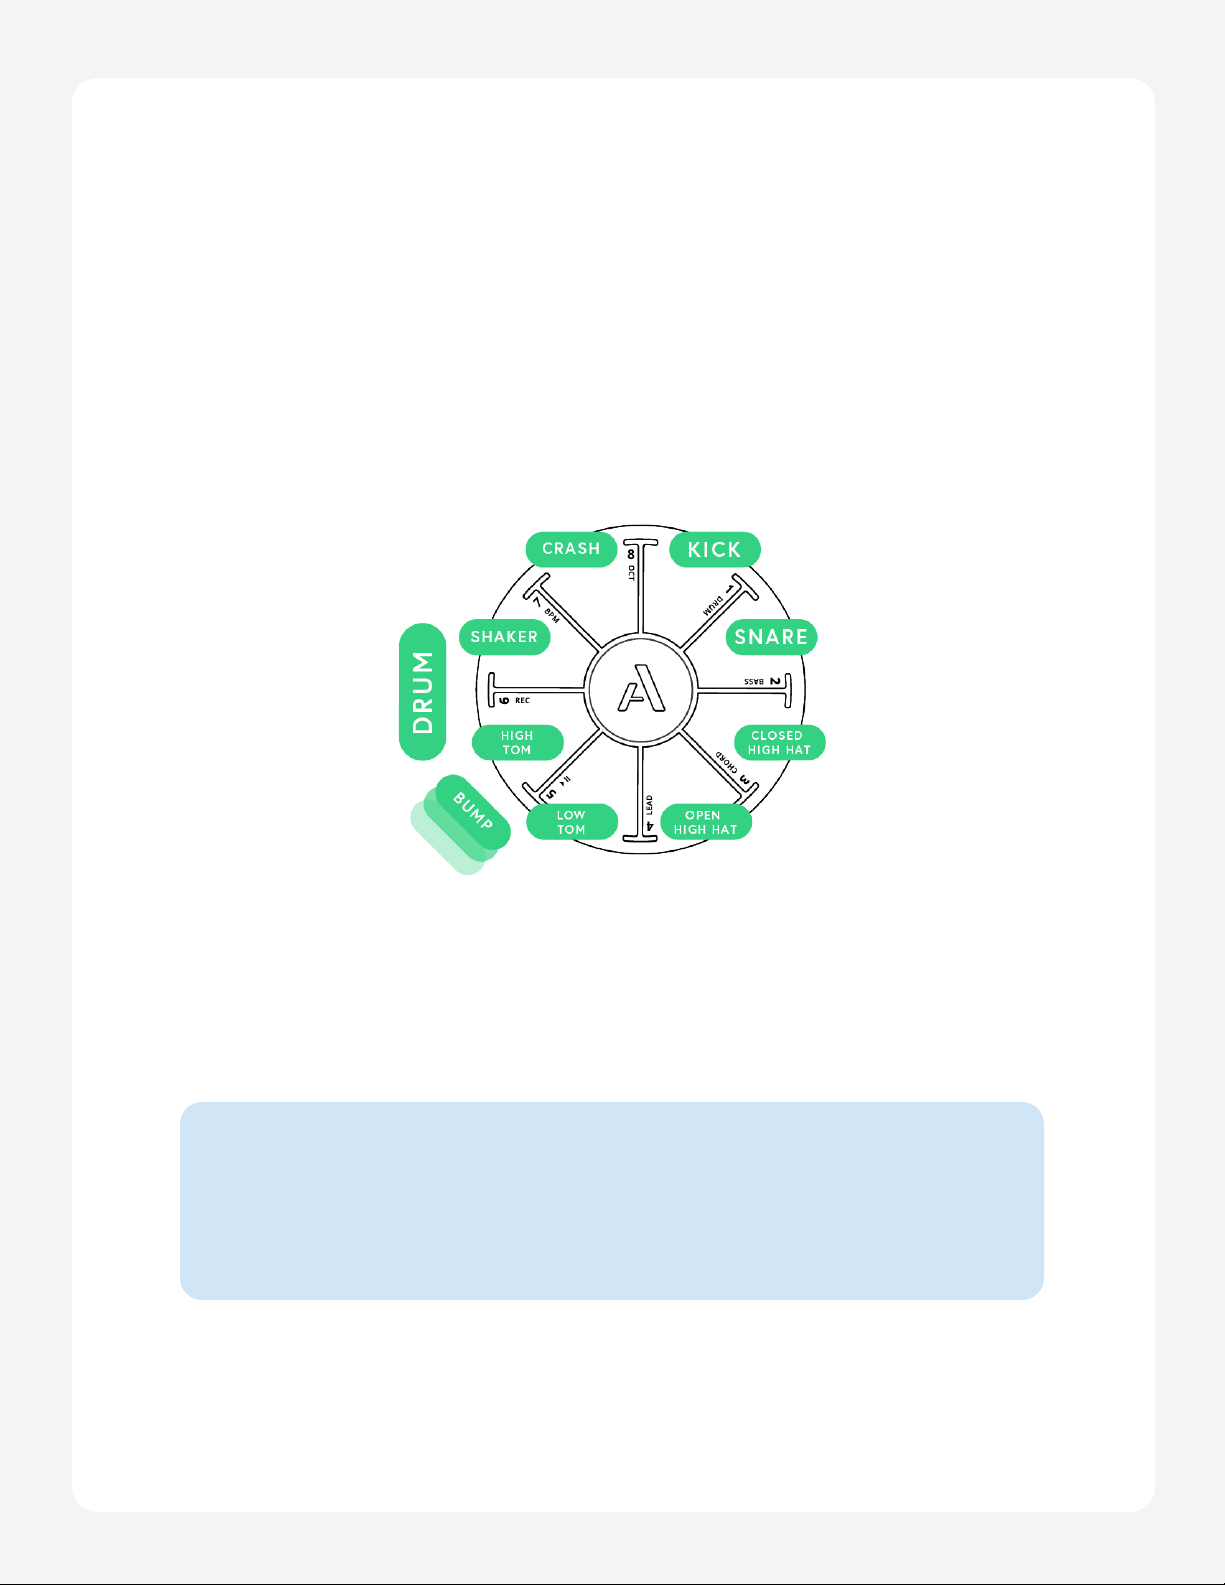
Switch to Drum A + Drum
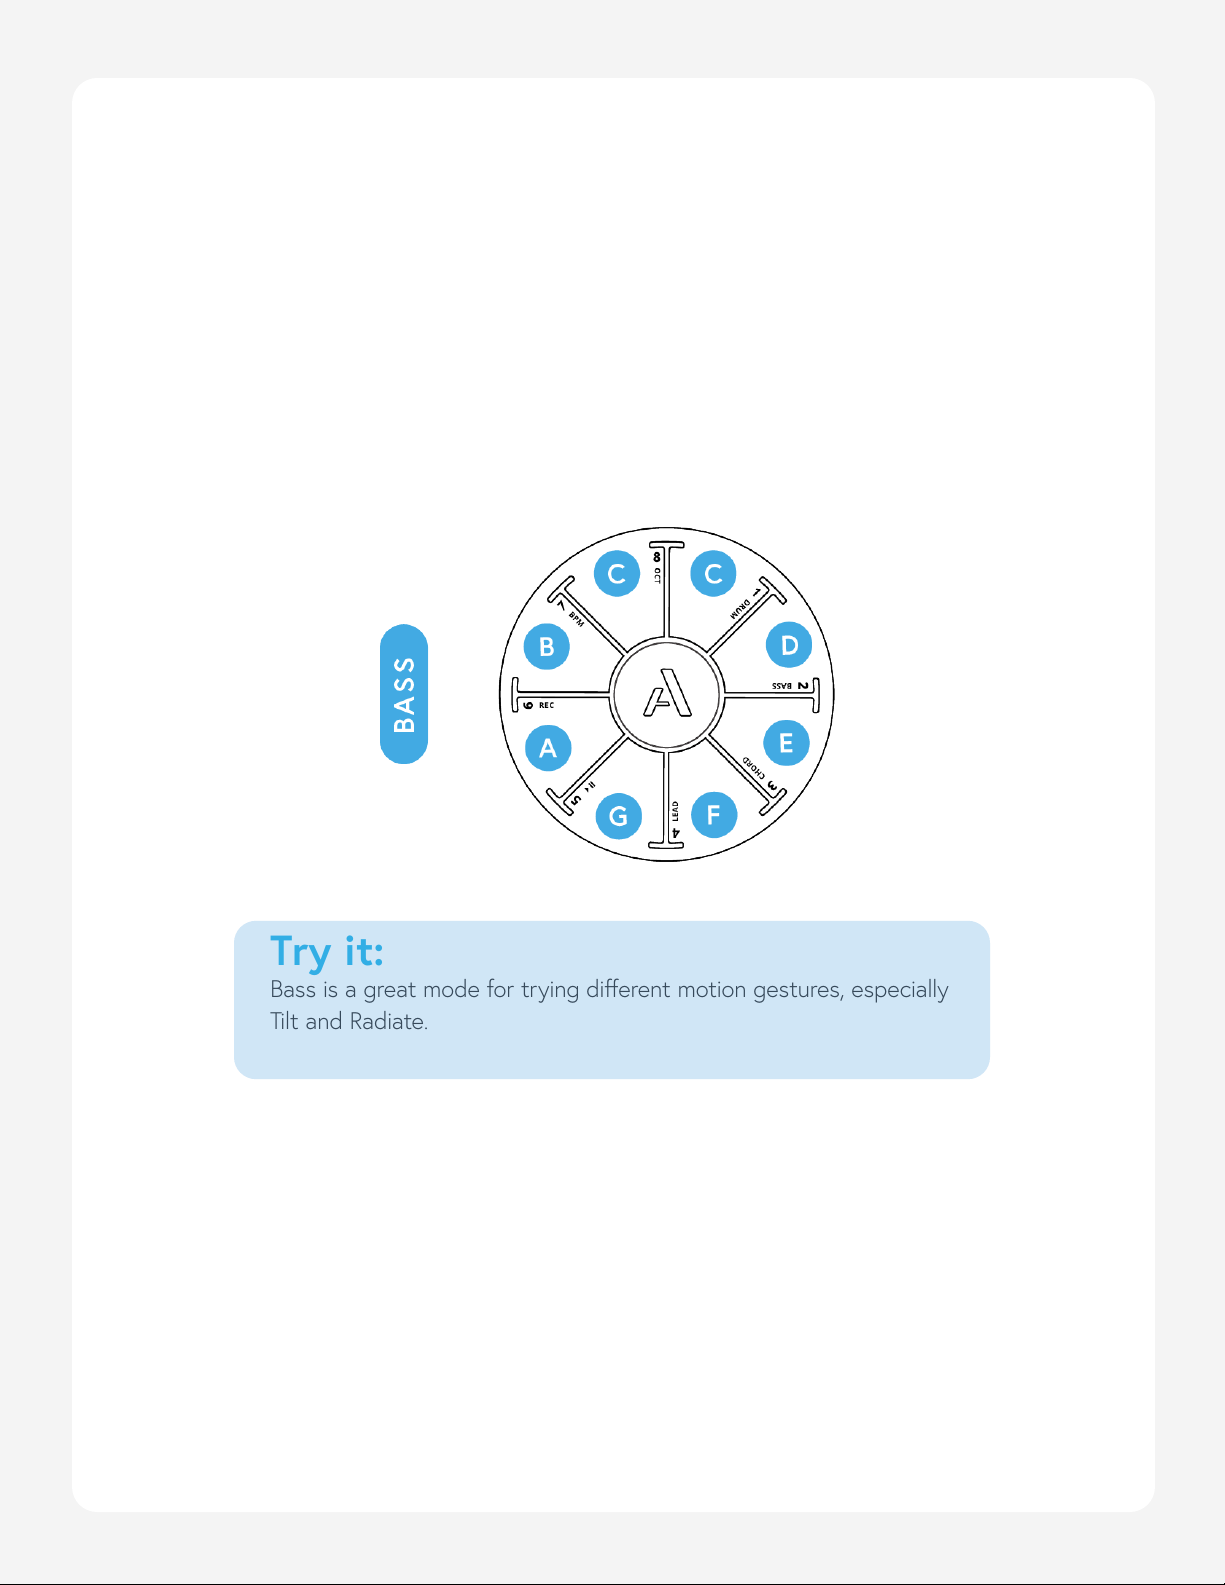
Switch to Bass A + Bass
Switch to Chord A + Chord
Switch to Lead A + Lead
Volume-per-part
You can mix the individual instrument parts of your songs
directly on Orba. To adjust the volume for Drum, Bass, Chord,
and Lead parts hold the A button + the instrument mode pad
you wish to adjust while simultaneously pressing Orba’s volume
controls up or down.
Hard reset
Hold volume down ( - ) button and power button for 15
seconds
Note: Holding volume up ( + ) and power button puts Orba
into update mode. In this state Orba appears unresponsive. To
exit update mode, connect via USB to the desktop app, open
the settings menu and hold Shift while clicking the firmware
update cloud icon. This will force a firmware restore and reacti-
vate Orba.
Activate/ Deactivate
Metronome
While in Record mode, hold A + BPM for 2 seconds

Page 10
Orba User Manual
Modes
DRUM
Drums are velocity-sensitive and will respond to different intensities of tapping, similar
to how a traditional drum changes its tone and volume by hitting it harder or softer. The
sounds also respond to how long your finger stays on each pad. Try holding your finger on
a cymbal to cut it short, or tap and release quickly on a tom to hear a long decay.
Drum mode has nine distinct drum sounds: one per pad, plus an additional one that is
triggered by using the Bump gesture. You can also keep trigger the shaker by holding pad
8 and, well... shaking.
Try it:
You can alternate between open and closed hi-hat sounds on the same pad
simply by changing the way you touch it. A tap with a quick release will let the
“cymbal” ring out, a tap and hold will “choke” the sound.

Page 11
Orba User Manual
Orba’s Bass mode is monophonic, meaning only the most recent note is played at a given
time (this is called “last-note priority” in synthspeak). By default, Bass is tuned to a C
major diatonic scale.
Try it:
Bass is a great mode for trying different motion gestures, especially
Tilt and Radiate.
Modes
BASS

Page 12
Orba User Manual
In Chord mode, each of Orba’s pads triggers multiple notes simultaneously to form a
chord in the key of the song. Chords are a fun way to casually explore song structures
and create new ideas quickly. Like Bass, Chord mode is very responsise to the gestures
Tilt and Radiate. By default, Chord is tuned to chords in C major.
Modes
CHORD

Page 13
Orba User Manual
Lead is a polyphonic mode (meaning you can play several different notes simultaneously).
In Lead, the pads are tuned to a C major pentatonic scale. This is a fun scale with five
notes per octave, making it easy to find a melody that goes along all that rhythm you just
played.
Modes
LEAD

Page 14
Orba User Manual
Looping
Looping is a fun and intuitive way to create a lot of musical ideas very quickly. Orba’s
built-in looper lets you record and layer all four modes together, and even overdub to add
more notes as you get going.
Starting a Loop
• Choose one of the four instrument modes.
• Press A + Pad 6 (REC) in sequence. When you release you’ll hear the metro-
nome click—this indicates the tempo of the song and means you’re ready to
play your first loop. Although the metronome has started, the loop won’t begin
recording until you play your first note.
• Record a few notes, and then tap the A button when you’re ready to end your
loop. The notes you just played will automatically start to play back from the
beginning. Note: the song length will always be as long as the first loop you’ve
recorded. Orba 1 can record up to 16 bars, and Orba 2 can record up to 128
bars.
• Orba’s looper is intuitive, meaning you can start or stop a loop a little ahead or
behind the beat, and it will adjust the notes to what you intended to.

Page 15
Orba User Manual
Overdubbing
While your first loop continues to play, you can begin to layer additional notes and loops
on other modes. Orba will stay in overdub mode until you pause or stop playback by
pressing A + Pad 5 (Play/Pause) to pause the song, or if you press A + Pad 6 (REC) to
disarm your recording.
Playback/Pause
• To pause or resume playback, press the A + Pad 5 (Play/Pause) buttons in sequence.
• To restart playback from the beginning of the loop, press and hold the A + Pad 5
(Play/Pause) for one second.
Try it:
Start with a simple Kick + Snare on drum, then press A to start overdubbing.
Add in your hi-hats on the second pass, maybe toms on a third. Keep adding
drum beats till you notice that your head has been bobbing for a few minutes ;)

Page 16
Orba User Manual
Clearing a Loop
To clear loops one at a time:
1. Pause playback (A + Pad 5 (Play/Pause))
2. Select the mode that you want to clear
3. Press and hold A + Pad 6 (REC) for two seconds. Alternatively, you can hold A and
Shake Orba to clear your current loop
Clearing a Song
To clear your Song (all of your loops at once):
1. Press and hold A + Pad 6 (REC) for 5 seconds. Alternatively, you can hold
A + Pad 6 (REC) and Shake Orba to clear your song.

Page 17
Orba User Manual
Adjusting Tempo
Orba’s default tempo is 120 beats-per-minute (BPM). There are a few different ways to
adjust the tempo of your song. You can do this both in the app or on the device itself. For
now, we will focus on the device itself.
Adjusting Tempo by Tapping
1. Hold the A button
2. Tap Pad 7 (BPM) at the desired tempo
Adjusting Tempo by Sliding
You can also make smaller adjustments to your tempo by using the Slide gesture.
• Hold A + Pad 7 (BPM) together
• Slide your finger up or down from the BPM pad

Page 18
Orba User Manual
Transposing Orba
Changing Octaves
You can transpose octaves right on Orba itself. To shift octaves, press and hold To shift
octaves, press and hold A + Pad 8 (OCT) Slide your finger from the octave pad up to Pad
1 to shift one octave higher, or down to Pad 7 to shift one octave lower.

Page 19
Orba User Manual
Gestures
Orba’s touch and motion sensors combine to capture even your most subtle gestures.
Pick it up and hold it, or just reach over and play a few notes while it’s sitting on your
desk. Tap it with one hand or both, with your fingertips or thumbs, or shake it and bump
the side. You can slide around each pad, or go crazy with some vibrato. It’s all up to you!
Below, you’ll find a bit more information on each gesture and how exactly it works.

Page 20
Orba User Manual
Tap
Tap your finger on a pad. Orba is velocity-sensitive, so the harder you Tap, the louder the
sound.
MIDI Message: Note On/Off

Page 21
Orba User Manual
Vibrato
Tap and move your finger from side-to-side on a pad. Vibrato produces a change in pitch.
the range of pitch can be adjusted with the Pitch Bend Scaling setting in the Orba App.
MIDI Message: Pitch Bend
Other manuals for ORBA
2
This manual suits for next models
1
Table of contents
Other Artiphon Recording Equipment manuals