Asahi KASEI AK8975 User manual

[AK8975/C]
AK8975/AK8975C
3-axis Electronic Compass
1. Features1. Features
A 3-axis electronic compass IC with high sensitive Hall sensor technology.
Best adapted to pedestrian city navigation use for cell phone and other portable appliance.
Functions:
•3-axis magnetometer device suitable for compass application
•Built-in A to D Converter for magnetometer data out
•13 bit data out for each 3 axis magnetic components
- Sensitivity: 0.3 µT / LSB typ.
•Serial interface
- I2C bus interface.
Standard mode and Fast mode compliant with Philips I2C specification Ver.2.1
- 4-wire SPI
•Operation mode:
Power-down mode, Single Measurement mode, Self test mode and Fuse access mode.
•DRDY function for measurement data ready
•Magnetic sensor overflow monitor function
•Built-in oscillator for internal clock source
•Power on Reset circuit
•Self test function with built-in internal magnetic source
Operating temperatures:
•-30°C to +85°C
Operating supply voltage:
•Analog power supply +2.4V to +3.6V
•Digital Interface supply +1.65V to analog power supply voltage.
Current consumption:
•Power-down: 10 µA max.
•Measurement:
- Average power consumption at 8 Hz repetition rate: 350 µA typ.
Package:
AK8975 16-pin QFN package: 4.0 mm ×4.0 mm ×0.75 mm
AK8975C 14-pin WL-CSP (BGA): 2.0 mm ×2.0 mm ×0.6 mm
MS1187-E-02 - 1 - 2010/05

[AK8975/C]
2. Overview
AK8975/C is 3-axis electronic compass IC with high sensitive Hall sensor technology.
Small package of AK8975/C incorporates magnetic sensors for detecting terrestrial magnetism in the X-axis,
Y-axis, and Z-axis, a sensor driving circuit, signal amplifier chain, and an arithmetic circuit for processing the
signal from each sensor. Self test function is also incorporated. From its compact foot print and thin package
feature, it is suitable for map heading up purpose in GPS-equipped cell phone to realize pedestrian navigation
function.
AK8975/C has the following features:
(1) Silicon monolithic Hall-effect magnetic sensor with magnetic concentrator realizes 3-axis magnetometer
on a silicon chip. Analog circuit, digital logic, power block and interface block are also integrated on a
chip.
(2) Wide dynamic measurement range and high resolution with lower current consumption.
Output data resolution: 13 bit (0.3 µT / LSB)
Measurement range: ±1200 µT
Average power consumption at 8Hz repetition rate: 350 µA typ.
(3) Digital serial interface
- I2C bus interface to control AK8975/C functions and to read out the measured data by external CPU. A
dedicated power supply for I2C bus interface can work in low-voltage apply as low as 1.65V.
- 4-wire SPI is also supported. A dedicated power supply for SPI can work in low-voltage apply as low as
1.65V.
(4) DRDY pin and register inform to system that measurement is end and set of data in registers are ready to
be read.
(5) Device is worked by on-chip oscillator so no external clock source is necessary.
(6) Self test function with internal magnetic source to confirm magnetic sensor operation on end products.
MS1187-E-02 - 2 - 2010/05

[AK8975/C]
3. Table of Contents
1. Features....................................................................................................................................1
2. Overview ...................................................................................................................................2
3. Table of Contents ......................................................................................................................3
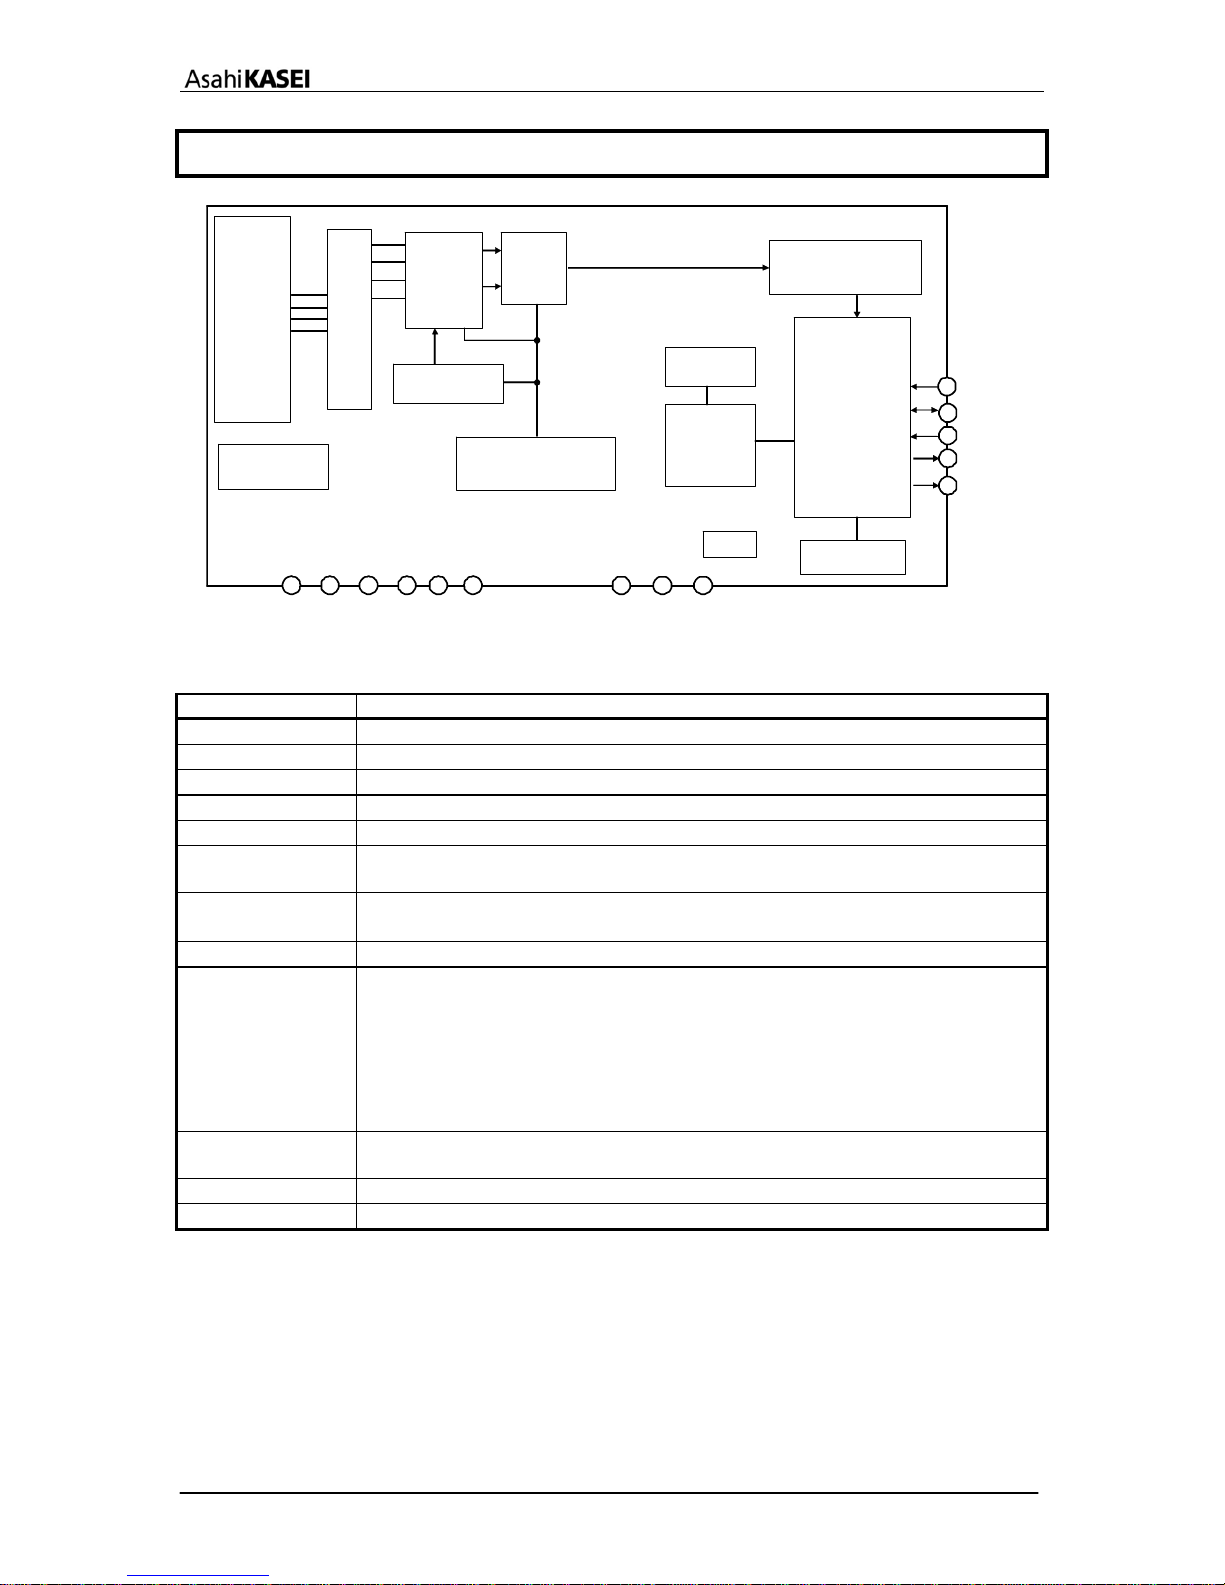
4. Circuit Configuration..................................................................................................................5
4.1. Block Diagram....................................................................................................................5
4.2. Block Function....................................................................................................................5
4.3. Pin Function.......................................................................................................................6
5. Overall Characteristics ..............................................................................................................7
5.1. Absolute Maximum Ratings................................................................................................7
5.2. Recommended Operating Conditions ................................................................................7
5.3. Electrical Characteristics....................................................................................................7
5.3.1. DC Characteristics......................................................................................................7
5.3.2. AC Characteristics ......................................................................................................8
5.3.3. Analog Circuit Characteristics.....................................................................................8
5.3.4. 4-wire SPI ...................................................................................................................9
5.3.5. I2C Bus Interface.......................................................................................................10
6. Functional Explanation............................................................................................................11
6.1. Power States....................................................................................................................11
6.2. Reset Functions ...............................................................................................................11
6.3. Operation Modes..............................................................................................................12
6.4. Description of Each Operation Mode................................................................................13
6.4.1. Power-down Mode....................................................................................................13
6.4.2. Single Measurement Mode .......................................................................................13
6.4.2.1. Data Ready........................................................................................................13
6.4.2.2. Data Error ..........................................................................................................14
6.4.2.3. Magnetic Sensor Overflow.................................................................................14
6.4.3. Self-test Mode...........................................................................................................15
6.4.4. Fuse ROM Access Mode ..........................................................................................15
7. Serial Interface........................................................................................................................16
7.1. 4-wire SPI.........................................................................................................................16
7.1.1. Writing Data ..............................................................................................................16
7.1.2. Reading Data............................................................................................................17
7.2. I2C Bus Interface..............................................................................................................18
7.2.1. Data Transfer ............................................................................................................18
7.2.1.1. Change of Data..................................................................................................18
7.2.1.2. Start/Stop Condition ...........................................................................................18
7.2.1.3. Acknowledge......................................................................................................19
7.2.1.4. Slave Address....................................................................................................19
7.2.2. WRITE Instruction.....................................................................................................20
7.2.3. READ Instruction.......................................................................................................21
7.2.3.1. One Byte READ.................................................................................................21
7.2.3.2. Multiple Byte READ ...........................................................................................21
8. Registers.................................................................................................................................22
8.1. Description of Registers...................................................................................................22
8.2. Register Map....................................................................................................................23
8.3. Detailed Description of Registers.....................................................................................24
8.3.1. WIA: Device ID..........................................................................................................24
8.3.2. INFO: Information......................................................................................................24
8.3.3. ST1: Status 1.............................................................................................................24
8.3.4. HXL to HZH: Measurement Data...............................................................................25
8.3.5. ST2: Status 2.............................................................................................................26
8.3.6. CNTL: Control...........................................................................................................26
8.3.7. RSV: Reserved .........................................................................................................27
8.3.8. ASTC: Self Test Control ............................................................................................27
8.3.9. TS1, TS2: Test 1, 2 ...................................................................................................27
8.3.10. I2CDIS: I2C Disable...................................................................................................27
8.3.11. ASAX, ASAY, ASAZ: Sensitivity Adjustment values...................................................28
MS1187-E-02 - 3 - 2010/05

[AK8975/C]
9. Example of Recommended External Connection....................................................................29
9.1. I2C Bus Interface..............................................................................................................29
9.2. 4-wire SPI.........................................................................................................................30
10. Package ..................................................................................................................................31
10.1. Marking ............................................................................................................................31
10.2. Pin Assignment ................................................................................................................31
10.3. Outline Dimensions..........................................................................................................32
10.4. Recommended Foot Print Pattern....................................................................................33
11. Relationship between the Magnetic Field and Output Code....................................................34
MS1187-E-02 - 4 - 2010/05

[AK8975/C]
4. Circuit Configuration
4.1. Block Diagram
3-axis
Hall
sensor
MUX
SDA/SI
DRDY
Chopper
SW
HE-Drive
Pre-
AMP Integrator&ADC
Interface,
Logic
& Register
SCL/SK
VDD
Voltage
Reference
Timing
Control
VID
SO
OSC1
CSB
Magnetic source
CAD0
VSS
POR FUSE ROM
CAD1 TST1 TST2 RSV
TST6
4.2. Block Function
Block Function
3-axis Hall sensor Monolithic Hall elements.
MUX Multiplexer for selecting Hall elements.
Chopper SW Performs chopping.
HE-Drive Magnetic sensor drive circuit for constant-current driving of sensor
Pre-AMP Variable-gain differential amplifier used to amplify the magnetic sensor signal.
Integrator & ADC Integrates and amplifies pre-AMP output and performs analog-to-digital
conversion.
OSC1 Generates an operating clock for sensor measurement.
6.144MHz(typ.)
POR Power On Reset circuit. Generates reset signal on rising edge of VDD.
Interface Logic Exchanges data with an external CPU.
DRDY pin indicates sensor measurement end and data is ready to be read.
I2C bus interface using two pins, namely, SCL and SDA. Standard mode and Fast
mode are supported. The low-voltage specification can be supported by applying
1.65V to the VID pin.
4-wire SPI is also supported by SK, SI, SO and CSB pins.
4-wire SPI works in VID pin voltage down to 1.65V, too.
Timing Control Generates a timing signal required for internal operation from a clock generated
by the OSC1.
Magnetic Source Generates magnetic field for self test of magnetic sensor.
FUSE ROM Fuse for adjustment
MS1187-E-02 - 5 - 2010/05

[AK8975/C]
4.3. Pin Function
Pin No.
75 75C Pin
name I/O Power
supply
system Type Function
1 A1 TST1 O VDD ANALOG Test pin.
Hi-Z output. Keep this pin electrically nonconnected.
2 A2 CSB I VID CMOS
Chip select pin for 4-wire SPI.
“L” active. Connect to VID when selecting I2C bus interface.
3 A4 RSV I VID CMOS
Reserved pin.
Keep this pin electrically nonconnected or connect to VSS.
SCL
When the I2C bus interface is selected (CSB pin is connected to
VID)
SCL: Control data clock input pin
Input: Schmidt trigger
4 A3
SK
I VID CMOS
When the 4-wire SPI is selected
SK: Serial clock input pin
SDA I/O When the I2C bus interface is selected (CSB pin is connected to VID)
SDA: Control data input/output pin
Input: Schmidt trigger, Output: Open drain
5 D4
SI I
VID CMOS
When the 4-wire SPI is selected
SI: Serial data input pin
When the I2C bus interface is selected (CSB pin is connected to VID)
Hi-Z output. Keep this pin electrically nonconnected.
6 B4 SO O VID CMOS
When the 4-wire SPI is selected
Serial data output pin
7 C4 VID - - Power Digital interface positive power supply pin.
8 - NC1 Non-contact pin.
Keep this pin electrically nonconnected.
9 B3 TST6 O VID CMOS
Test pin.
Vss output. Keep this pin electrically nonconnected or connect to
VSS..
10 C3 DRDY O VID CMOS
Data ready signal output pin.
Active “H”. Informs measurement ended and data is ready to be
read.
When the I2C bus interface is selected (CSB pin is connected to VID)
CAD1: Slave address 1 input pin
Connect to VSS or VDD.
11 D2 CAD1 I VDD CMOS
When the 4-wire serial interface is selected
Connect to VSS.
12 - NC2 Non-contact pin. Keep this pin electrically nonconnected.
When the I2C bus interface is selected (CSB pin is connected to VID)
CAD0: Slave address 0 input pin
Connect to VSS or VDD.
13 D1 CAD0 I VDD CMOS
When the 4-wire serial interface is selected
Connect to VSS.
14 C2 TST2 O VDD ANALOG Test pin.
Hi-Z output. Keep this pin electrically nonconnected.
15 C1 VSS - - Power Ground pin.
16 B1 VDD - - Power Analog Power supply pin.
MS1187-E-02 - 6 - 2010/05

[AK8975/C]
5. Overall Characteristics
5.1. Absolute Maximum Ratings
Vss=0V
Parameter Symbol Min. Max. Unit
Power supply voltage
(Vdd, Vid)
V+ -0.3 +6.5
V
Input voltage VIN -0.3 (V+)+0.3
V
Input current IIN - ±10 mA
Storage temperature TST -40 +125
°C
(Note 1) If the device is used in conditions exceeding these values, the device may be destroyed. Normal operations
are not guaranteed in such exceeding conditions.
5.2. Recommended Operating Conditions
Vss=0V
Parameter Remark Symbol Min. Typ. Max. Unit
Operating temperature Ta -30 +85
°C
VDD pin voltage Vdd 2.4 3.0 3.6 V
Power supply voltage
VID pin voltage Vid 1.65 Vdd V
5.3. Electrical Characteristics
The following conditions apply unless otherwise noted:
Vdd=2.4V to 3.6V, Vid=1.65V to Vdd, Temperature range=-30°C to 85°C
5.3.1. DC Characteristics
Parameter Symbol Pin Condition Min. Typ. Max. Unit
High level input voltage 1 VIH1
70%Vid V
Low level input voltage 1 VIL1
CSB
SK
SI 30%Vid V
High level input voltage 2 VIH2 70%Vid V
Low level input voltage 2 VIL2
SCL
SDA 30%Vid V
High level input voltage 3 VIH3 70%Vdd V
Low level input voltage 3 VIL3
CAD0
CAD1 30%Vdd V
Input current IIN SCL
SK
SDA
SI
CSB
Vin=Vss or Vid -10 +10 μA
Vid≥2V 5%Vid V
Hysteresis input voltage
(Note 2)
VHS
SCL
SDA Vid<2V 10%Vid V
High level output voltage 1 VOH1 IOH≥-100µA (Note 5) 80%Vid V
Low level output voltage 1 VOL1
SO
DRDY IOL≤+100µA (Note 5) 20%Vid V
IOL≤3mA Vid≥2V 0.4 V
Low level output voltage 2
(Note 3)(Note 4)
VOL2
SDA
IOL≤3mA Vid<2V 20%Vid V
IDD1 Power-down mode
Vdd=Vid=3.0V
3 10
μA
IDD2
When magnetic sensor
is driven
6
10 mA
Current consumption
IDD3
(Note 6)
VDD
VID
Self-test mode 10.3 15 mA
(Note 2) Schmitt trigger input (reference value for design)
(Note 3) Maximum load capacitance: 400pF (capacitive load of each bus line applied to the I2C bus interface)
(Note 4) Output is open-drain. Connect a pull-up resistor externally.
(Note 5) Load capacitance: 20pF
(Note 6) Reference value for design.
MS1187-E-02 - 7 - 2010/05

[AK8975/C]
5.3.2. AC Characteristics
Parameter Symbol Pin Condition Min. Typ. Max. Unit
Power supply rise time
(Note 7)
tPUP VDD Period of time from
10%Vdd to 90%Vdd
(Note 8)
200 µs
Power-down mode transit
time (Note 7)
VDD Period of time from
90%Vdd at power-on to
Power-down mode
100 µs
Wait time before mode
setting
Twat 100 μs
(Note 7) Reference value for design
(Note 8) Only when VDD meets this condition, POR circuit starts and resets AK8975/C. After reset, all registers are
initialized and AK8975/C transits to Power-down mode.
tPUP
10%Vdd
90%Vdd
5.3.3. Analog Circuit Characteristics
Parameter Symbol Condition Min. Typ. Max. Unit
Measurement data output bit DBIT 13 bit
Time for measurement TSM Single measurement mode 7.3 9 ms
Magnetic sensor sensitivity BSE Tc=25°C (Note 9) 0.285 0.3 0.315
μT/LSB
Magnetic sensor measurement
range (Note 10)
BRG Tc=25°C (Note 9) ±1229 μT
Magnetic sensor initial offset
(Note 11)
Tc=25°C -1000 +1000 LSB
(Note 9) Value after sensitivity is adjusted using sensitivity fine adjustment data stored in Fuse ROM. (Refer to
8.3.11 for how to adjust.)
(Note 10) Reference value for design
(Note 11) Value of measurement data register on shipment without applying magnetic field on purpose.
MS1187-E-02 - 8 - 2010/05

[AK8975/C]
5.3.4. 4-wire SPI
4-wire SPI is compliant with mode 3
Parameter Symbol Condition Min. Typ. Max. Unit
CSB setup time Tcs 50 ns
Data setup time Ts 50 ns
Data hold time Th 50 ns
Vid≥2.5V 100 nsSK high time Twh
2.5V>Vid≥1.65V 150 ns
Vid≥2.5V 100 nsSK low time Twl
2.5V>Vid≥1.65V 150 ns
SK setup time Tsd 50 ns
SK to SO delay time
(Note 12)
Tdd 50 ns
CSB to SO delay time
(Note 12)
Tcd 50 ns
SK rise time (Note 13) Tr 100 ns
SK fall time (Note 13) Tf 100 ns
CSB high time Tch 150 ns
(Note 12) SO load capacitance: 20pF
(Note 13) Reference value for design.
[4-wire SPI]
CSB
SK
SI
Tc
s
SO
Ts
Tsd Tcd
Th Tdd
Hi-Z Hi-Z
Twh Twl
Tch
[Rise time and fall time]
SK
T
r
Tf
0.9Vid
0.1Vid
MS1187-E-02 - 9 - 2010/05

[AK8975/C]
5.3.5. I2C Bus Interface
CSB pin = “H”
I2C bus interface is compliant with Standard mode and Fast mode. Standard/Fast mode is selected
automatically by fSCL.
(1) Standard mode
fSCL≤100kHz
1.65V≤Vid≤Vdd
Symbol Parameter Min. Typ. Max. Unit
fSCL SCL clock frequency 100 kHz
tHIGH SCL clock "High" time 4.0 μs
tLOW SCL clock "Low" time 4.7 μs
tR SDA and SCL rise time 1.0 μs
tF SDA and SCL fall time 0.3 μs
tHD:STA Start Condition hold time 4.0 μs
tSU:STA Start Condition setup time 4.7 μs
tHD:DAT SDA hold time (vs. SCL falling edge) 0 μs
tSU:DAT SDA setup time (vs. SCL rising edge) 250 ns
tSU:STO Stop Condition setup time 4.0 μs
tBUF Bus free time 4.7 μs
(2) Fast mode
100kHz<fSCL≤400kHz
1.65V≤Vid≤Vdd
Symbol Parameter Min. Typ. Max. Unit
fSCL SCL clock frequency 400 kHz
tHIGH SCL clock "High" time 0.6 μs
tLOW SCL clock "Low" time 1.3 μs
tR SDA and SCL rise time 0.3 μs
tF SDA and SCL fall time 0.3 μs
tHD:STA Start Condition hold time 0.6 μs
tSU:STA Start Condition setup time 0.6 μs
tHD:DAT SDA hold time (vs. SCL falling edge) 0 μs
tSU:DAT SDA setup time (vs. SCL rising edge) 100 ns
tSU:STO Stop Condition setup time 0.6 μs
tBUF Bus free time 1.3 μs
tSP Noise suppression pulse width 50 ns
[I2C bus interface timing] 1/fSCL
SCL VIH3
VIL3
tHIGH
SCL
SDA VIH3
tLOW
tBUF
tHD:STA
tR tF
tHD:DAT tSU:DAT tSU:STA
Stop Start Start Stop
tSU:STO
VIL3
VIH3
VIL3
tSP
MS1187-E-02 - 10 - 2010/05

[AK8975/C]
6. Functional Explanation
6.1. Power States
When VDD and VID are turned on from Vdd=OFF (0V) and Vid=OFF (0V), all registers in AK8975/C are
initialized by POR circuit and AK8975/C transits to Power-down mode.
All the states in the table below can be set, although the transition from state 2 to state 3 and the transition from
state 3 to state 2 are prohibited.
States VDD VID Power states
1 OFF (0V) OFF (0V) OFF (0V).
SCL, SDA should be fixed to the voltage that does
not exceed 3.6V. Other digital pins should be fixed
to L(0V).
2 OFF (0V) 1.65V to 3.6V OFF (0V). It doesn’t affect external interface.
3 2.4V to 3.6V OFF (0V) OFF (0V). It consumes current same as
Power-down mode.
SCL, SDA should be fixed to the voltage that does
not exceed 3.6V. Other digital pins should be fixed
to L (0V).
4 2.4V to 3.6V 1.65V to Vdd ON
Table 6.1
6.2. Reset Functions
AK8975/C has two types of reset;
(1) Power on reset (POR)
When Vdd reaches approximately 2V (reference value for design), POR circuit operates, and AK8975/C
is reset.
(2) VID monitor
When Vid is turned OFF (0V), AK8975/C is reset.
When AK8975/C is reset, all registers are initialized and AK8975/C transits to Power-down mode.
MS1187-E-02 - 11 - 2010/05

[AK8975/C]
6.3. Operation Modes
AK8975/C has following four operation modes:
(1) Power-down mode
(2) Single measurement mode
(3) Self-test mode
(4) Fuse ROM access mode
By setting CNTL register MODE[3:0] bits, the operation set for each mode is started.
A transition from one mode to another is shown below.
MODE[3:0]=“0001”
Transits automatically
MODE[3:0]=“0000”
MODE[3:0]=“1000”
Transits automatically
MODE[3:0]=“0000”
MODE[3:0]=“1111”
MODE[3:0]=“0000”
Power-down
mode
Self-testmode
Sensor is self-tested and the result is output. Transits
toPower-downmode automatically.
Single measurementmode
Sensor is measured for one time and data is output.
Transits to Power-down mode automatically after
measurementended.
FuseROM access mode
Turn on the circuit needed to read out Fuse ROM.
Transits to Power-down mode by writing
MODE[3:0]=“0000”.
Figure 6.1 Operation modes
When power is turned ON, AK8975/C is in power-down mode. When MODE[3:0] is set, AK8975/C transits to
the specified mode and starts operation. When user wants to change operation mode, transit to power-down
mode first and then transit to other modes. After power-down mode is set, at least 100μs(Twat) is needed
before setting another mode.
MS1187-E-02 - 12 - 2010/05

[AK8975/C]
6.4. Description of Each Operation Mode
6.4.1. Power-down Mode
Power to all internal circuits is turned off. All registers except fuse ROM are accessible in power-down mode.
Data stored in read/write registers are remained.
6.4.2. Single Measurement Mode
When single measurement mode (MODE[3:0]=“0001”) is set, sensor is measured, and after sensor
measurement and signal processing is finished, measurement data is stored to measurement data registers
(HXL to HZH), then AK8975/C transits to power-down mode automatically. On transition to power-down
mode, MODE[3:0] turns to “0000”. At the same time, DRDY bit in ST1 register turns to “1”. This is called
“Data Ready”. When any of measurement data register (HXL to HZH) or ST2 register is read, or operation
mode is changed from power-down mode to other mode, DRDY bit turns to “0”. DRDY pin is in the same state
as DRDY bit.
Operation Mode: Single measuremnet
Power-down (1) (2) (3)
Measurement period
Measurement Data Register
Last Data Indefinit
e
Measurement Data (1) Indefinit
e
Data(2) Indefinit
e
Data(3)
DRDY
Register Read Data Register Data Register
Register Write MODE[3:0]="0001" MODE[3:0]="0001" MODE[3:0]="0001"
Figure 6.2 Single measurement mode
6.4.2.1. Data Ready
When measurement data is stored and ready to be read, DRDY bit in ST1 register turns to “1”. This is called
“Data Ready”. DRDY pin is in the same state as DRDY bit. When measurement is performed correctly,
AK8975/C becomes Data Ready on transition to Power-down mode (PD) after measurement. The period from
the end of Nth measurement to the start of (N+1)th measurement is called “Data Readable Period”. Stored
measurement data should be read during Data Readable Period.
(N-1)th Nth (N+1)th
Measurement Measurement
PD PD PD
Data Readable Period Data Readable Period
Figure 6.3 Data Readable Period
MS1187-E-02 - 13 - 2010/05

[AK8975/C]
6.4.2.2. Data Error
When data reading is started out of data readable period, read data is not correct. In this case, DERR bit of ST2
register turns to “1” so that read data can be checked at the end of data reading. DERR turns to “0” when ST2
register is read.
(N-1)th Nth (N+1)th
PD Measurement PD Measurement PD
Data Readable Period Data Readable Period
Measurement Data Register
(N-1)th Indefinite Nth Indefinite (N+1)th In
d
DRDY
DERR
Register Read
ST1 Data ST2 ST1 Data ST2 ST1 Data ST2
Register Register Register
Figure 6.4 Data Error
6.4.2.3. Magnetic Sensor Overflow
AK8975/C has the limitation for measurement range that the sum of absolute values of each axis should be
smaller than 2400μT.
|X|+|Y|+|Z| < 2400μT
When the magnetic field exceeded this limitation, data stored at measurement data are not correct. This is
called Magnetic Sensor Overflow.
When magnetic sensor overlow occurs, HOFL bit turns to “1”. When the next measurement starts, it returns to
“0”.
MS1187-E-02 - 14 - 2010/05

[AK8975/C]
6.4.3. Self-test Mode
Self-test mode is used to check if the sensor is working normally.
When self-test mode (MODE[3:0]=“1000”) is set, magnetic field is generated by the internal magnetic source
and sensor is measured. Measurement data is stored to measurement data registers (HXL to HZH), then
AK8975/C transits to power-down mode automatically.
Before setting self-test mode, write “1” to SELF bit of ASTC register. Data read sequence and functions of
read-only registers in self-test mode is the same as single measurement mode.
When self-test is end, write “0” to SELF bit then proceed to other operation.
<Self-test Sequence>
(1) Set Power-down mode
(2) Write “1” to SELF bit of ASTC register
(3) Set Self-test Mode
(4) Check Data Ready or not by any of the following method.
- Polling DRDY bit of ST1 register
- Monitor DRDY pin
When Data Ready, proceed to the next step.
(5) Read measurement data (HXL to HZH)
(6) Write “0” to SELF bit of ASTC register
<Self-test Judgement>
When measurement data read by the above sequence is in the range of following table after sensitivity
adjustment (refer to 8.3.11), AK8975/C is working normally.
HX[15:0] HY[15:0] HZ[15:0]
Criteria -100≤X≤+100 -100≤Y≤+100 -1000≤Z≤-300
6.4.4. Fuse ROM Access Mode
Fuse ROM access mode is used to read Fuse ROM data.Sensitivity adjustment data for each axis is stored in
fuse ROM. These data are used in calculation of direction by the external CPU.
When Fuse ROM mode (MODE[3:0]=“1111”) is set, circuits reauired for reading fuse ROM are turned on.
After reading fuse ROM data, set power-down mode (MODE[3:0]=“0000”).
MS1187-E-02 - 15 - 2010/05

[AK8975/C]
7. Serial Interface
AK8975/C supports I2C bus interface and 4-wire SPI. A selection is made by CSB pin. When used as 3-wire
SPI, set SI pin and SO pin wired-OR externally.
CSB pin=“L”: 4-wire SPI
CSB pin=“H”: I2C bus interface
7.1. 4-wire SPI
The 4-wire SPI consists of four digital signal lines: SK, SI, SO, and CSB. It is compliant with sequencial read
operation.
Data consists of Read/Write control bit (R/W), register address (7bits) and control data (8bits).
CSB pin is low active. Input data is taken in on the rising edge of SK pin, and output data is changed on the
falling edge of SK pin. (SPI MODE3)
Communication starts when CSB pin transits to “L” and stops when CSB pin transits to “H”. SK pin must be
“H” during CSB pin is in transition. Also, it is prohibited to change SI pin during CSB pin is “H” and SK pin is
“H”.
7.1.1. Writing Data
Input 16 bits data on SI pin in synchronous with the 16-bit serial clock input on SK pin. Out of 16 bits input
data, the first 8 bits specify the R/W control bit (R/W=“0” when writing) and register address (7bits), and the
latter 8 bits are control data (8bits). When any of addresses listed on Table 8.1 is input, AK8975/C recognizes
that it is selected and takes in latter 8 bits as setting data.
If the number of clock pulses is less than 16, no data is written. If the number of clock pulses is more than 16,
data after the 16th clock pulse on SI pin are ignored.
It is not compliant with sereal write operation for multiple addresses.
CSB
SK
SI
(INPUT)
1
RW
SO
(OUTPUT) Hi-Z
A6 A5 A4A3A2A1 A0
23 45678910 11 12 13 14 1516
D7 D6 D5 D4 D3 D2 D1D0
Figure 7.1 4-wire SPI Writing Data
MS1187-E-02 - 16 - 2010/05

[AK8975/C]
7.1.2. Reading Data
Input the R/W control bit (R/W=“1”) and 7 bit register address on SI pin in synchronous with the first 8 bits of
the 16 bits of a serial clock input on SK pin. Then AK8975/C outputs the data held in the specified register
with MSB first from SO pin.
When clocks are input continuously after one byte of data is read, the address is incremented and data in the
next address is output. Accordingly, after the falling edge of the 15th clock and CSB pin is “L”, the data in the
next address is output on SO pin. When CSB pin is driven “L” to “H”, SO pin is placed in the high-impedance
state.
AK8975/C has two incrementation lines; 00H to 0CH and 10H to 12H. For example, data is read as follows:
00H -> 01H ... -> 0BH -> 0CH -> 00H -> 01H ..., and 10H -> 11H -> 12H -> 10H …
When specified address is other than 00H to 12H, AK8975/C recognizes that it is not selected and keeps SO
pin in high-impedance state. Therefore, user can use other addresses for other devices.
CSB
SK
SI
(INPUT)
1
RW
SO
(OUTPUT)
Hi-Z
A6
A
5
A
4
A
3
A2
A
1
A
0
23 45678910 11 12 13 14 1516
D7 D6 D5 D4 D3 D2 D1D0Hi-Z
Figure 7.2 4-wire SPI Reading Data
MS1187-E-02 - 17 - 2010/05

[AK8975/C]
7.2. I2C Bus Interface
The I2C bus interface of AK8975/C supports the standard mode (100 kHz max.) and the fast mode (400 kHz
max.).
7.2.1. Data Transfer
To access AK8975/C on the bus, generate a start condition first.
Next, transmit a one-byte slave address including a device address. At this time, AK8975/C compares the slave
address with its own address. If these addresses match, AK8975/C generates an acknowledgement, and then
executes READ or WRITE instruction. At the end of instruction execution, generate a stop condition.
7.2.1.1. Change of Data
A change of data on the SDA line must be made during "Low" period of the clock on the SCL line. When the
clock signal on the SCL line is "High", the state of the SDA line must be stable. (Data on the SDA line can be
changed only when the clock signal on the SCL line is "Low".)
During the SCL line is "High", the state of data on the SDA line is changed only when a start condition or a
stop condition is generated.
SCL
SDA
DATA LINE
STABLE :
DATA VALID
CHANGE
OF DATA
A
LLOWED
Figure 7.3 Data Change
7.2.1.2. Start/Stop Condition
If the SDA line is driven to "Low" from "High" when the SCL line is "High", a start condition is generated.
Any instruction starts with a start condition.
If the SDA line is driven to "High" from "Low" when the SCL line is "High", a stop condition is generated.
Any instruction stops with a stop condition.
SCL
SDA
STOP CONDITIONSTART CONDITION
Figure 7.4 Start and Stop Conditions
MS1187-E-02 - 18 - 2010/05

[AK8975/C]
7.2.1.3. Acknowledge
The IC that is transmitting data releases the SDA line (in the "High" state) after sending 1-byte data.
The IC that receives the data drives the SDA line to "Low" on the next clock pulse. This operation is referred to
acknowledge. With this operation, whether data has been transferred successfully can be checked.
AK8975/C generates an acknowledge after reception of a start condition and slave address.
When a WRITE instruction is executed, AK8975/C generates an acknowledge after every byte is received.
When a READ instruction is executed, AK8975/C generates an acknowledge then transfers the data stored at
the specified address. Next, AK8975/C releases the SDA line then monitors the SDA line. If a master IC
generates an acknowledge instead of a stop condition, AK8975/C transmits the 8bit data stored at the next
address. If no acknowledge is generated, AK8975/C stops data transmission.
SCL FROM
MASTER
acknowledge
DATA
OUTPUT BY
TRANSMITTER
DATA
OUTPUT BY
RECEIVER
1 98
START
CONDITION
Clock pulse
for acknowledge
not acknowledge
Figure 7.5 Generation of Acknowledge
7.2.1.4. Slave Address
The slave address of AK8975/C can be selected from the following list by setting CAD0/1 pin. When CAD pin
is fixed to VSS, the corresponding slave address bit is “0”. When CAD pin is fixed to VDD, the corresponding
slave address bit is “1”.
CAD1 CAD0 Slave Address
0 0 0CH
0 1 0DH
1 0 0EH
1 1 0FH
Table 7.1 Slave Address and CAD0/1 pin
The first byte including a slave address is transmitted after a start condition, and an IC to be accessed is
selected from the ICs on the bus according to the slave address.
When a slave address is transferred, the IC whose device address matches the transferred slave address
generates an acknowledge then executes an instruction. The 8th bit (least significant bit) of the first byte is a
R/W bit.
When the R/W bit is set to "1", READ instruction is executed. When the R/W bit is set to "0", WRITE
instruction is executed.
MSB LSB
0 0 0 1 1 CAD1 CAD0 R/W
Figure 7.6 Slave Address
MS1187-E-02 - 19 - 2010/05

[AK8975/C]
7.2.2. WRITE Instruction
When the R/W bit is set to "0", AK8975/C performs write operation.
In write operation, AK8975/C generates an acknowledge after receiving a start condition and the first byte
(slave address) then receives the second byte. The second byte is used to specify the address of an internal
control register and is based on the MSB-first configuration.
MSB LSB
A7 A6 A5 A4 A3 A2 A1 A0
Figure 7.7 Register Address
After receiving the second byte (register address), AK8975/C generates an acknowledge then receives the
third byte.
The third and the following bytes represent control data. Control data consists of 8 bits and is based on the
MSB-first configuration. AK8975/C generates an acknowledge after every byte is received. Data transfer
always stops with a stop condition generated by the master.
MSB LSB
D7 D6 D5 D4 D3 D2 D1 D0
Figure 7.8 Control Data
AK8975/C can write multiple bytes of data at a time.
After reception of the third byte (control data), AK8975/C generates an acknowledge then receives the next
data.
If additional data is received instead of a stop condition after receiving one byte of data, the address counter
inside the LSI chip is automatically incremented and the data is written at the next address.
The address is incremented from 00H to 0CH or from 10H to12H. When the address is in the range from 00H
to 0CH, the address goes back to 00H after 0CH. When the address is in the range from 10H to 12H, the
address goes back to 10H after 12H. Actual data is written only to Read/Write registers (0AH to 0FH).
SDA
S
T
A
R
T
A
C
K
A
C
K
S Slave
A
ddress
A
C
K
Register
A
ddress(n) Data(n) P
S
T
O
P
Data(n+x)
A
C
K
Data(n+1)
A
C
K
A
C
K
R/W="0"
Figure 7.9 WRITE Instruction
MS1187-E-02 - 20 - 2010/05
This manual suits for next models
1
Table of contents
Popular Compass manuals by other brands

STOWE MARINE
STOWE MARINE DATALINE-X COMPASS user guide

Weinberger
Weinberger 06223 owner's manual

York
York Suunto Tandem operating instructions

Raytheon Anschütz
Raytheon Anschütz STD 22 Compact GYRO COMPASS Installation and service manual

Silva
Silva EXPEDITION SERIES Product information

Nexus
Nexus NX Compass Installation and operation manual