ASC XS Tower User manual

Manual
XS Tower - The 1-person Mobile Tower
Conform NEN-EN 1298 –IM –nl x en x de x fr
This manual is property of:
ASC Group
Leerlooierstraat 32
4871 EN Etten-Leur
The Netherlands

All rights reserved. Nothing herein should be stored in automated database or made public in any form or by any means, electr onic,
mechanical, photocopying, recording or otherwise, without prior permission from ASC Group. This publication may only be used for ASC products.
2
Disclaimer
This documentation has been provided with the utmost care by ASC Group.
All rights reserved. No part of this publication may be reproduced, stored in a retrieval system,
or transmitted in any form or by any means, electronic, mechanical, photocopying, recording, or
otherwise, without the prior written permission from ASC Group. This publication may only be
used for ASC Group products. Typesetting and printing errors reserved.
If you have any questions, please contact ASC Group:
Leerlooierstraat 32
4871 EN Etten-Leur
Nederland
www.ASCGroup.nl
+3176 5413019

All rights reserved. Nothing herein should be stored in automated database or made public in any form or by any means, electr onic,
mechanical, photocopying, recording or otherwise, without prior permission from ASC Group. This publication may only be used for ASC products.
3
Index
Gebruikershandleiding
Fout! Bladwijzer niet gedefinieerd.
1
Overzicht 4
1.1
Toepassing 4
1.2
Lijst met onderdelen 4
2
Opbouw en gebruik
Fout! Bladwijzer niet gedefinieerd.
2.5
Plaatsing
Fout! Bladwijzer niet gedefinieerd.
Ondergrond
Fout! Bladwijzer niet gedefinieerd.
Obstakels
Fout! Bladwijzer niet gedefinieerd.
Maximale werkhoogte
Fout! Bladwijzer niet gedefinieerd.
Weersomstandigheden
Fout! Bladwijzer niet gedefinieerd.
2.6
Persoonlijke beschermingsmiddelen
Fout! Bladwijzer niet gedefinieerd.
2.7
Opbouw 6
2.8
Opbouwinstructie
Fout! Bladwijzer niet gedefinieerd.
2.9
Gebruik 8
Verlenging/verhoging
Fout! Bladwijzer niet gedefinieerd.
Maximaal toegestaan gewicht
Fout! Bladwijzer niet gedefinieerd.
Verdere belastingen 8
Stabilisatie 8
Kantplanken
Fout! Bladwijzer niet gedefinieerd.
Beveiligingen
Fout! Bladwijzer niet gedefinieerd.
Verplaatsingen
Fout! Bladwijzer niet gedefinieerd.
2.10
Chemische producten 9
3
Inspectie, beheer en onderhoud
Fout! Bladwijzer niet gedefinieerd.
3.1
De Arbowet
Fout! Bladwijzer niet gedefinieerd.
Jaarlijkse controle
Fout! Bladwijzer niet gedefinieerd.
Zelfinspectie
Fout! Bladwijzer niet gedefinieerd.
Beschadiging 10
Wat te doen bij beschadiging
Fout! Bladwijzer niet gedefinieerd.
Reparatie 10
3.2
Transport 11
3.3
Onderhoud
Fout! Bladwijzer niet gedefinieerd.
3.4
Opslag
Fout! Bladwijzer niet gedefinieerd.

All rights reserved. Nothing herein should be stored in automated database or made public in any form or by any means, electr onic,
mechanical, photocopying, recording or otherwise, without prior permission from ASC Group. This publication may only be used for ASC products.
4
1Overview
1.1
Toepassing
The XS-Tower is intended for various work at height, where a solid, stable and safe work floor is
required. The XS-Tower should not be used as a stair tower to provide access to other constructions.
Nor is this suitable for use as a masonry scaffold. If in doubt, always consult your supplier or the
manufacturer; the contact information can be found at the front of this brochure.
1.2
List of components
1. Frame 75-28-4
2. Platform 120 with trapdoor
3. Double horizontal brace 120
4. Stabilizer
5. Set of toeboards (alu)
6. Wheel 125mm (adjustable)
7. Locking Clip
Composition
Floor height
2m
4m
6m
List of components
Frame 75-28-4 (1)
6
10
14
Platform 120 with trapdoor (2)
1
2
3
Double horizontal brace (3)
4
7
10
Stabilizer (4)
4
4
Set of toeboard (5)
1
1
1
Wheel 125mm (6)
4
4
4
Locking Clip (7)
8
16
24
The XS-Tower can be assembled by one person!

All rights reserved. Nothing herein should be stored in automated database or made public in any form or by any means, electr onic,
mechanical, photocopying, recording or otherwise, without prior permission from ASC Group. This publication may only be used for ASC products.
5
2Assembly and use
2.5
Positioning
Sureface
Always position the XS-Tower on a stable and horizontal surface. Make sure that the tower cannot
sink into the ground. In addition, the general slope of the surface may not exceed 1 degrees.
Obstacles
Position the tower in such a way that no danger can arise for the climber when stepping down.
Pay attention to obstacles on the ground and/or obstacles that require the climber to make
extra effort to reach the top platform.
Maximum height
This depends on the placement and type of scaffolding (see Table 1).
Weather conditions
Consult the weather forecast to determine safety in various weather conditions. Consider the
following factors and use common sense.
Windforce
Type Scaffolding
Inside
(no wind)
Outside
(with wind)
XS-Tower
with Stabilizers
8 mtr *
6 mtr *
Table 1. Max. Height
* This is the maximum workingheight; it applies only the XS-Tower with stabilizers
Precipitation
Remove snow and ice from the scaffolding before starting work. If necessary, sprinkle sand on
the work floor to prevent slippage.
Cold
Avoid using the scaffold temperatures below freezing.
2.6
Personal Protective Equipment
Always wear work gloves, safety shoes and safety helmet. When working at
height, use a life-line
At wind force 6 or higher a facade scaffold may not be used.
All rights reserved. Nothing herein should be stored in automated database or made public in any form or by any means, electr onic,
mechanical, photocopying, recording or otherwise, without prior permission from ASC Group. This publication may only be used for ASC products.
6
2.7
Assembly
Watch the assembly instruction video on youtube:
https://youtu.be/X46F6LAs6as
2.8
Assembly Instructions
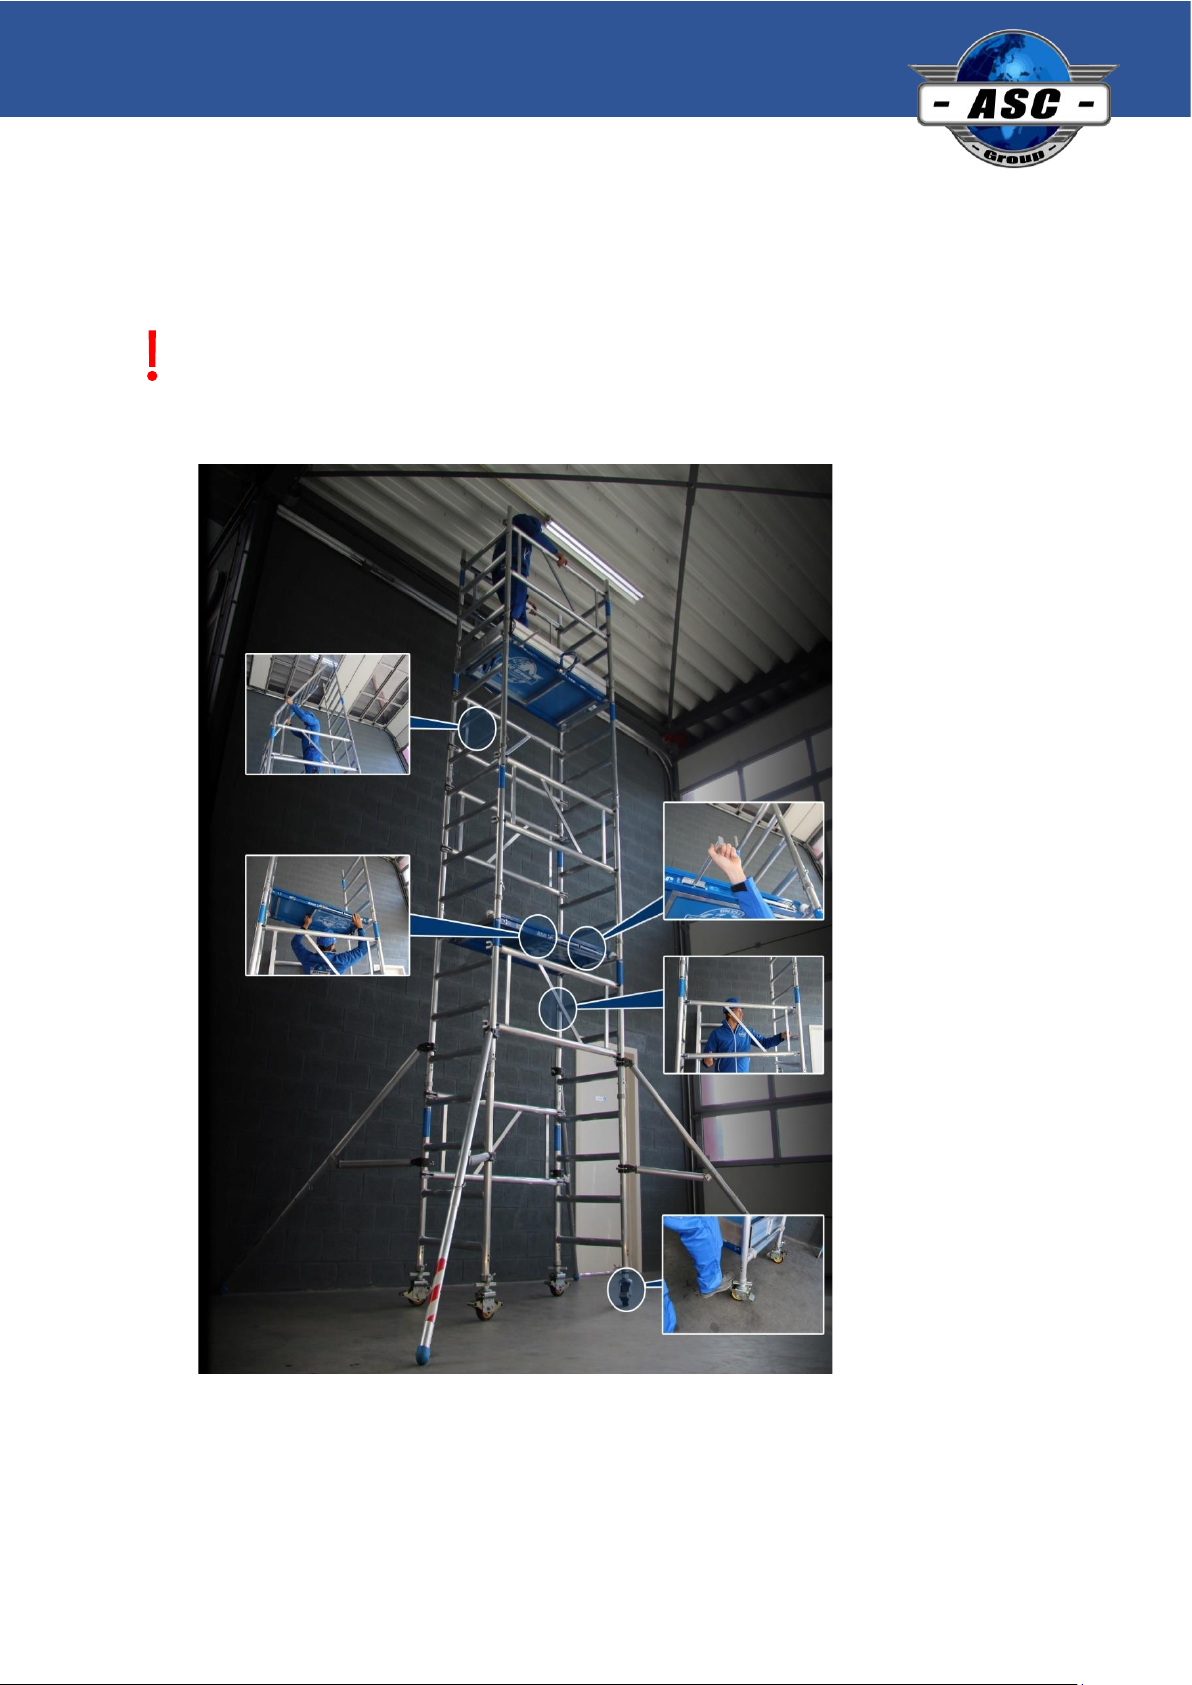
1. Verify that all materials meet the annual inspection and check all
materials for any damage. If in doubt, contact your dealer or ASC Group.
2. Insert the wheels (
6
) into the frames (
1
), excluding locking clip. Make
sure the wheels are brake.
3. Place a double horizontal brace (
3
) between the 2 frames. Both frames
now remain standing.
4. Now place a double horizontal brace (
3
) on the other side as well.
5. The base section must be leveled and adjusted if necessary with the
adjustable wheel posts.
6. Now place two frames (
1
) on top of each other and secure them
together. Then assemble them on the base section and make sure that all
frames are secured with a locking clip (
7
)
7. Position the stabilizers (
4
) and make sure they are firmly on the ground,
always place a stabilizer hitch under a rung (to prevent shifting.
8. Now place one double horizontal brace (
3
) of the base section one section higher.
9. Pull out the suspension mechanisms and secure by turning a quarter turn. Now
place the platform (
2
) on the upper rung of the 2nd frame.
10. Hang 2 frames, 2 double horizontal braces and 1 platform (and only if the desired height is
reached also a side-board set).
11. Always climb up on the inside of the scaffold. Stay on the platform with your legs through
the trapdoor.
12. First, place 2 double horizontal braces on the inside and outside of the assembly frames.
Check all components (use the list of components) that are required for assembly,
are present and undamaged. Damaged components should not be used
All rights reserved. Nothing herein should be stored in automated database or made public in any form or by any means, electr onic,
mechanical, photocopying, recording or otherwise, without prior permission from ASC Group. This publication may only be used for ASC products.
7
13. Then place the next frames and secure them with a locking clip.
14. Repeat steps 9 to 12 until the desired height is reached.
15. Place the toe board set on the working platform.
Check again if that the XS-Tower is properly positioned, the wheels are braked and the
stabilizers are firmly on the ground.
All rights reserved. Nothing herein should be stored in automated database or made public in any form or by any means, electr onic,
mechanical, photocopying, recording or otherwise, without prior permission from ASC Group. This publication may only be used for ASC products.
8
2.9
Use
Extension/increase
Never elevate the scaffolding with a tool. Therefore, do not use stairs, ladders, crates or steps
on the scaffolding unless the stairs or ladder are intended to be part of the scaffolding.
Maximum permissible weight
Please read on the sticker on the platform what the maximum load is. Each ASC Group scaffold
may be loaded to a maximum of 200 kg/m2 and never more than 375 kg in total. This means on
average: two people with (hand) tools. The maximum horizontal load is 30 kg.
Futher loads weights
When working on a scaffold, force is applied to the scaffold. Consider the push-off against the
building when drilling into a wall or the wind tunnel effect (additional wind load) between or in
front of large buildings. Such external loads must always be taken into consideration.
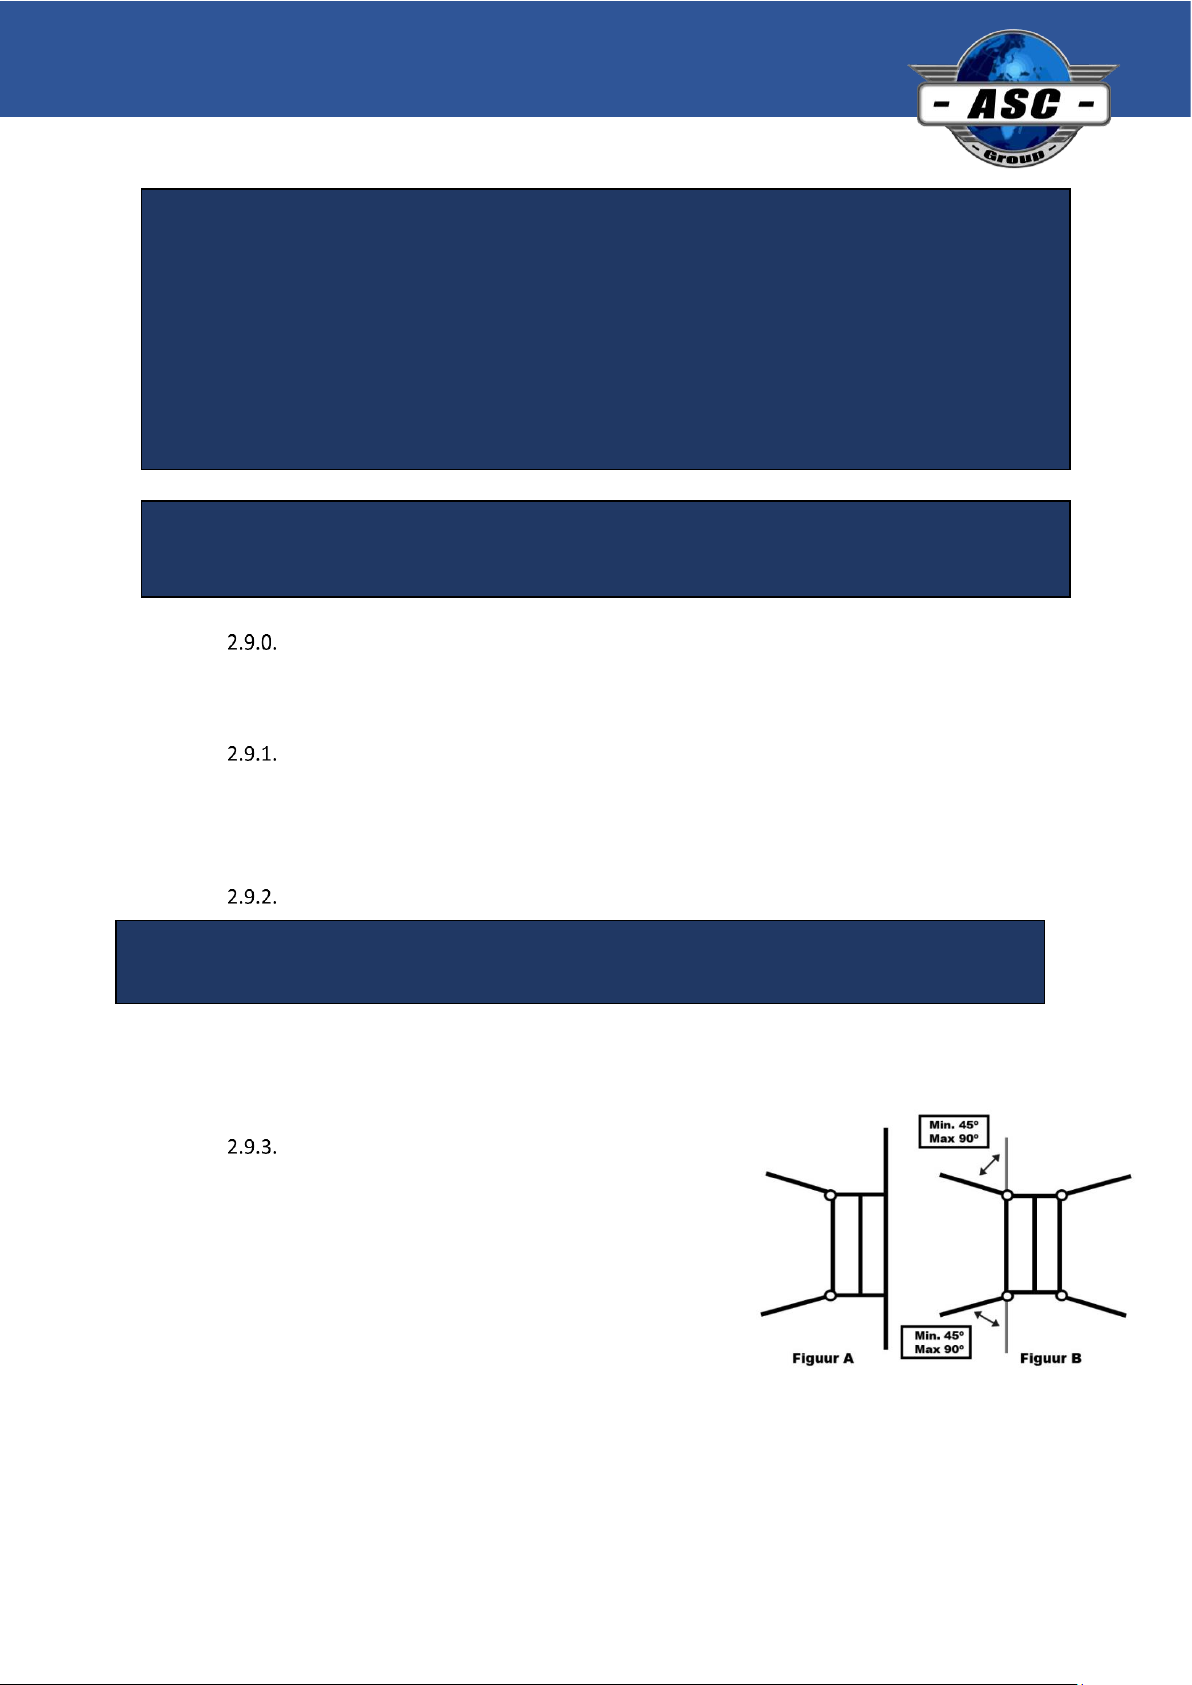
Stabilization
Stabilizers are mandatory to use with an XS Tower.
They are installed at an XS-Tower that is placed against a
building as shown in Figure A and a freestanding one as shown
in Figure B.
Before use, check that:
- All parts are still present
- All the parts are still properly attached
- The tower is still perpendicular
- The scaffold is clean
- There are any changes in the surroundings which may affect safe use
- The brakes are working on the wheel
- The stabilizers are touching the ground
- All locking clips are correctly in place
Never use an XS-Tower near
non-insulated, electrical installations or machinery.
Do not attach a winch or hoist to the scaffold, but use a rope to lift parts,
materials and tools (possibly in a bucket)
All rights reserved. Nothing herein should be stored in automated database or made public in any form or by any means, electr onic,
mechanical, photocopying, recording or otherwise, without prior permission from ASC Group. This publication may only be used for ASC products.
9
Sideboard set
Sideboards are always required on the platform being worked on.
Security
Do not leave a mobile scaffolding unattended in a public place for an extended period. If this is
nevertheless necessary, the scaffolding can be secured to a fixed object with a ring lock. To do this,
put the ring lock through one of the frame's compartments and attach an anti-climb device.
Relocation
A mobile scaffolding can be moved by dismantling and rebuilding it. After moving the scaffolding, it
must be put back into plumb; therefore, go through the checklist again from Section 2.9.
2.10
Chemical products
Avoid contact with acids and chemical products. These can cause corrosion to
the aluminium, which can affect the strength of the aluminium.
All rights reserved. Nothing herein should be stored in automated database or made public in any form or by any means, electr onic,
mechanical, photocopying, recording or otherwise, without prior permission from ASC Group. This publication may only be used for ASC products.
10
3Inspection, care and maintenance
According to the regulations one must work safely at heights. On an ASC Mobile Tower, it is not
obligatory to wear extra fall protection (provided that the recommendations in this manual have
been followed).
3.1
The Health and Safety Law
The Health and Safety Law The Working Conditions Decree is a concrete elaboration of the Safe
Working at Height Act. It states that everything above 2.50 meters is 'working at height' and is
therefore a situation with increased risk of injury. This also means that all materials must be
properly manufactured and checked in a quality cycle. ASC tests all materials and performs
strength calculations. The user must also have the material inspected annually for defects.
Annual control
Your Facade scaffolding must be inspected for any defects annually by an expert. The ASC Group
can perform this control for you.
Self-inspection
The Facade scaffolding can be inspected by yourself. Before each use, always check the
components for any damage. We certainly recommend larger companies to do a monthly
inspection of all components of the Facade scaffolding and to record this inspection. If you are in
doubt about damage, consult an accredited inspector.
Beschadiging
▪Examples of the most common damages on aluminium scaffolding;
Components: if a claw or a sport is loose, the scaffolding must be rejected.
▪Dents and or holes: if there is a big dent in the aluminium or even a crack or hole, the
scaffolding must be rejected.
▪Contamination: if there is too much concrete, paint or other non-removable contamination
on the components, the scaffolding must be rejected; after all, you can no longer judge
whether the components are still intact.
What to do in the event of damage
If there is any damage, which cannot be repaired, the component must be taken out and
replaced. If repairing is possible, please contact ASC Group for further information.
Repair
Repairing a component must be carried out by a certified body or person.

All rights reserved. Nothing herein should be stored in automated database or made public in any form or by any means, electr onic,
mechanical, photocopying, recording or otherwise, without prior permission from ASC Group. This publication may only be used for ASC products.
11
3.2
Transport
▪Always transport the components in accordance with the locally applicable legislation
▪Stack the components correctly for transport; never place the heavy components on top.
▪Transport the components of a scaffolding, preferably standing, f.e in a carrier.
▪Handle the material with care. Do not drop components onto a hard surface; this can reduce
the quality of the material.
3.3
Maintenance
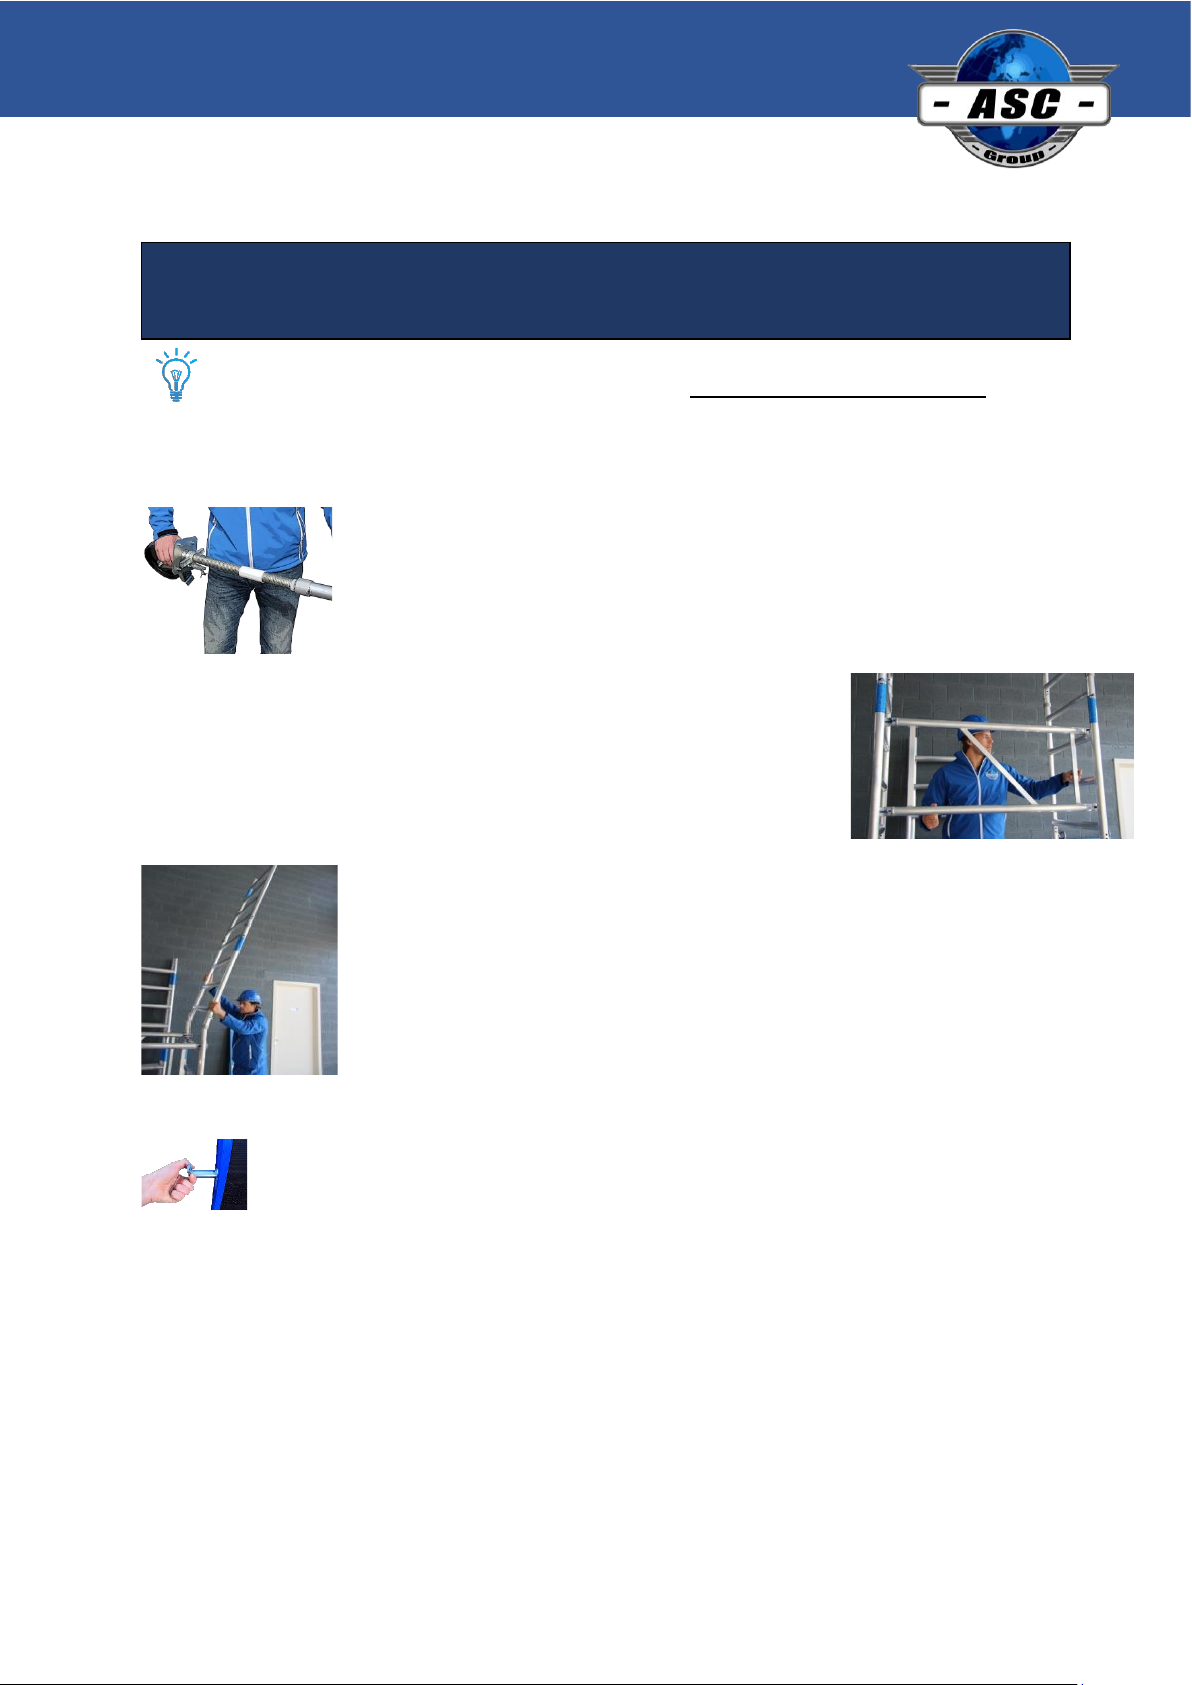
▪Make sure the scaffolding material is clean, especially the connecting pins. The frames should
go in and out easily.
▪Make sure the pawl of the hook of the diagonal and horizontal braces is clean. If necessary,
lubricate it with a little oil. The same applies to the wheel spindle.
▪Replace missing and broken parts in time.
3.4
Storage
Store components of the scaffolding preferably in a dry, clean, dark and frost-free place.
Table of contents
Other ASC Desktop manuals


