ASC A-SWD5 Instruction sheet

屋内・軒下ドームハウジング
取扱説明書
Product Instructions for
Indoor & Under Canopy Housing
A-SWD5
修理及び機器に関するお問い合わせ先
Service and Technical Support
ご使用になる前に、正しく安全にお使い頂くため、
この取扱説明書を必ずお読みください。
そのあと大切に保管し、必要なときにお読みください。
Please read this instruction manual carefully to ensure that
you use the Product correctly and safely Read the
" Safe Use of Equipment" Page1–2.
5975 Shiloh Road, Suite 103, Alpharetta, GA 30005
Tel 770-888-4674 · 1-888-988-4674
Fax 770-888-4675
3-16-9, Toranomon, Minato-ku, Tokyo 105-0001, Japan
Tel +81-3-5473-7627
Fax +81-3-5473-7628
株式会社エーエスシー
東京都港区虎ノ門 3-16-9
Tel 03-5473-7627
Fax 03-5473-7628
URL : http://www.kk-asc.com
製造元/ Manufacture
ー1ー ー2ー
Safe Use of Equipment
警告 WARNING
安全のために必ずお守りください。
機器の改造の禁止
製品の内部を分解したり、改造や追加工をしないでください。
機器の破損や落下、浸水、火災、感電の原因になります。
Prohibit changes or modifications of equipment
You are cautioned that any changes or modifications not expressly approved in this instructions
could void your authority to operate this equipment.
入力電源に関する注意
日本国内においてのみ AC100V タイプのファンヒーター回路が使用できます。
ヒーター動作時には 44W 消費いたしますので、それに適したケーブルと電源の施工が必要です。
電源回路にはブレーカーやヒューズ、接地などの保護対策をしてください。保護対策をしないと火災、
感電の原因になります。
AC24V の電源をご使用になる場合は PSE マーク付のものをご使用ください。
ヒーターは 1 個で 25W、また寒冷地用として 2 個の場合は 50W 消費しますのでカメラとの合計でそ
れに適したケーブルと電源ユニットの選定が必要になります。
CAUTION for Power Supply
CAUTION for U.S.A. and Canada
Use 24VAC a Class 2 Power supply which is UL Listed (in the U.S.A.) or CSA-certified (in Canada)
CAUTION for other countries
Use 24VAC Power supply isolated from 100 to 240VAC, which meets requirements for SELV
(Safety Extra Low Voltage) and complies with Limited Power Source according to IEC 60950.
基本使用環境
本製品は屋内か雨の直接かからない軒下での設置が条件となります。
屋外で雨が直接あたる場所での設置はできません。
雨が直接かからない軒下での設置の場合には、零下になるような地域ではオプションのヒーター
ユニットを装着しないとドームカバーが凍結したり、カメラが正常に動作しない恐れがあります
ので注意が必要です。(オプションのヒーター装着時−20℃〜+40℃通常の軒下)
また 40℃以上、湿度 90%以上を越える屋内での設置はできません。
Basic Operating Environment Condition
This products is for "INDOOR" or "UNDER CANOPY" use only.
Do not install this in "OUT DOOR" or even "UNDER CANOPY WHCH CAN BE HIT BY RAIN DIRECTLY".
In case of "UNDER CANOPY" installation, you are recommended to use optional 24VAC Blower and
Heater in order to avoid freeze of capsule and camera.
(Operating temperarure: (–20ºC(–4ºF)〜+40ºC(+104ºC) under normal under canopy by using
optional 24VAC blower and Heater.)
We are unable to warrant the products which are installed indoor and exposed to constant high
temperature over +40ºC (+104ºF) and over 90% humidity. Operating temperature and humidity of
camera varies from camera to camera. You are requested to confirm camera specification with camera
manufacturer and housing specification with us in advance.
警告
雨天の日の施工は行わないでください。感電の危険や、カバーの曇りの原因になります。
WARNING
To reduce a risk of electric shock, do not expose inside of this unit rain or moisture.
Installation on a rainy day may also cause fog around capsule.
施工
据付工事は、販売店または専門の工事店が実施してください。
間違った工事は故障や事故の原因になります。
Installation
Installation shall be done by qualified installer only and should conform to all local codes.
取付の強度を確保する
カメラハウジングは強度が十分にあると認められる壁面及びポールに確実に取付けてください。
3 分(3/8")のステンレスボルト 4 本で確実に固定してください。
Ensuring strength of supporting Dome Housing Unit
The unit must be properly and securely mounted to a supporting structure capable of sustaining
the weight of the unit. Use 3/8" stainless screws x four (4).
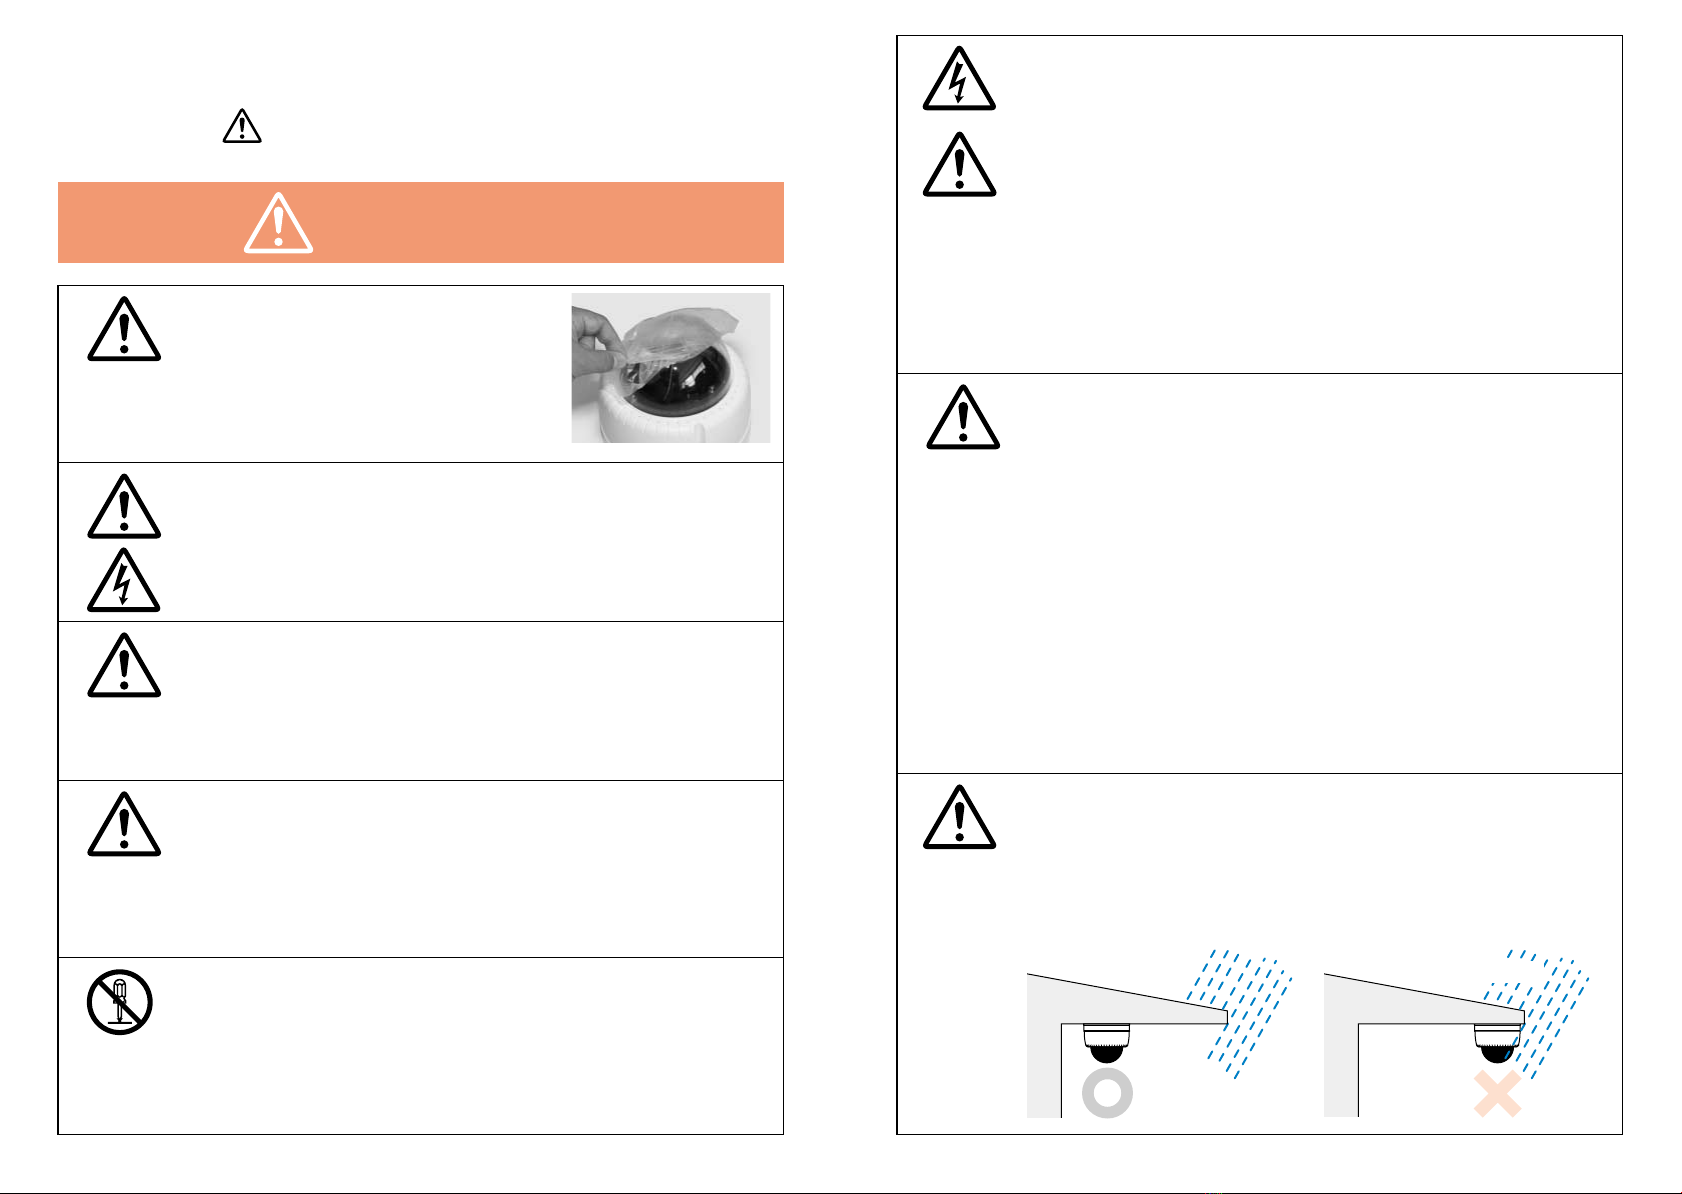
カバーの保護シール
保護シールは据付け工事完了後、カバーを閉めて最後に
はがしてください。指紋がつきますと映像に影響します。
Protective Film
Do not remove protective film until product is installed.
(Finger print causes distortion of picture)
軒下設置可能条件
天井との設置面及びケーブルの入り口付近にシリコンを塗布して水がハウジング内に入るのを防いで
ください。シリコン等液状のシーリング材をご使用ください。
Conditions for Under Canopy Installation
Use Silicoon on the suface of housing and around gate area to prevant entry of water.
Use liquid sealing material.
Canopy Canopy
Wall Wall
No Rain hit
housing directly
Rain hit
housing
OK PROHIBIT
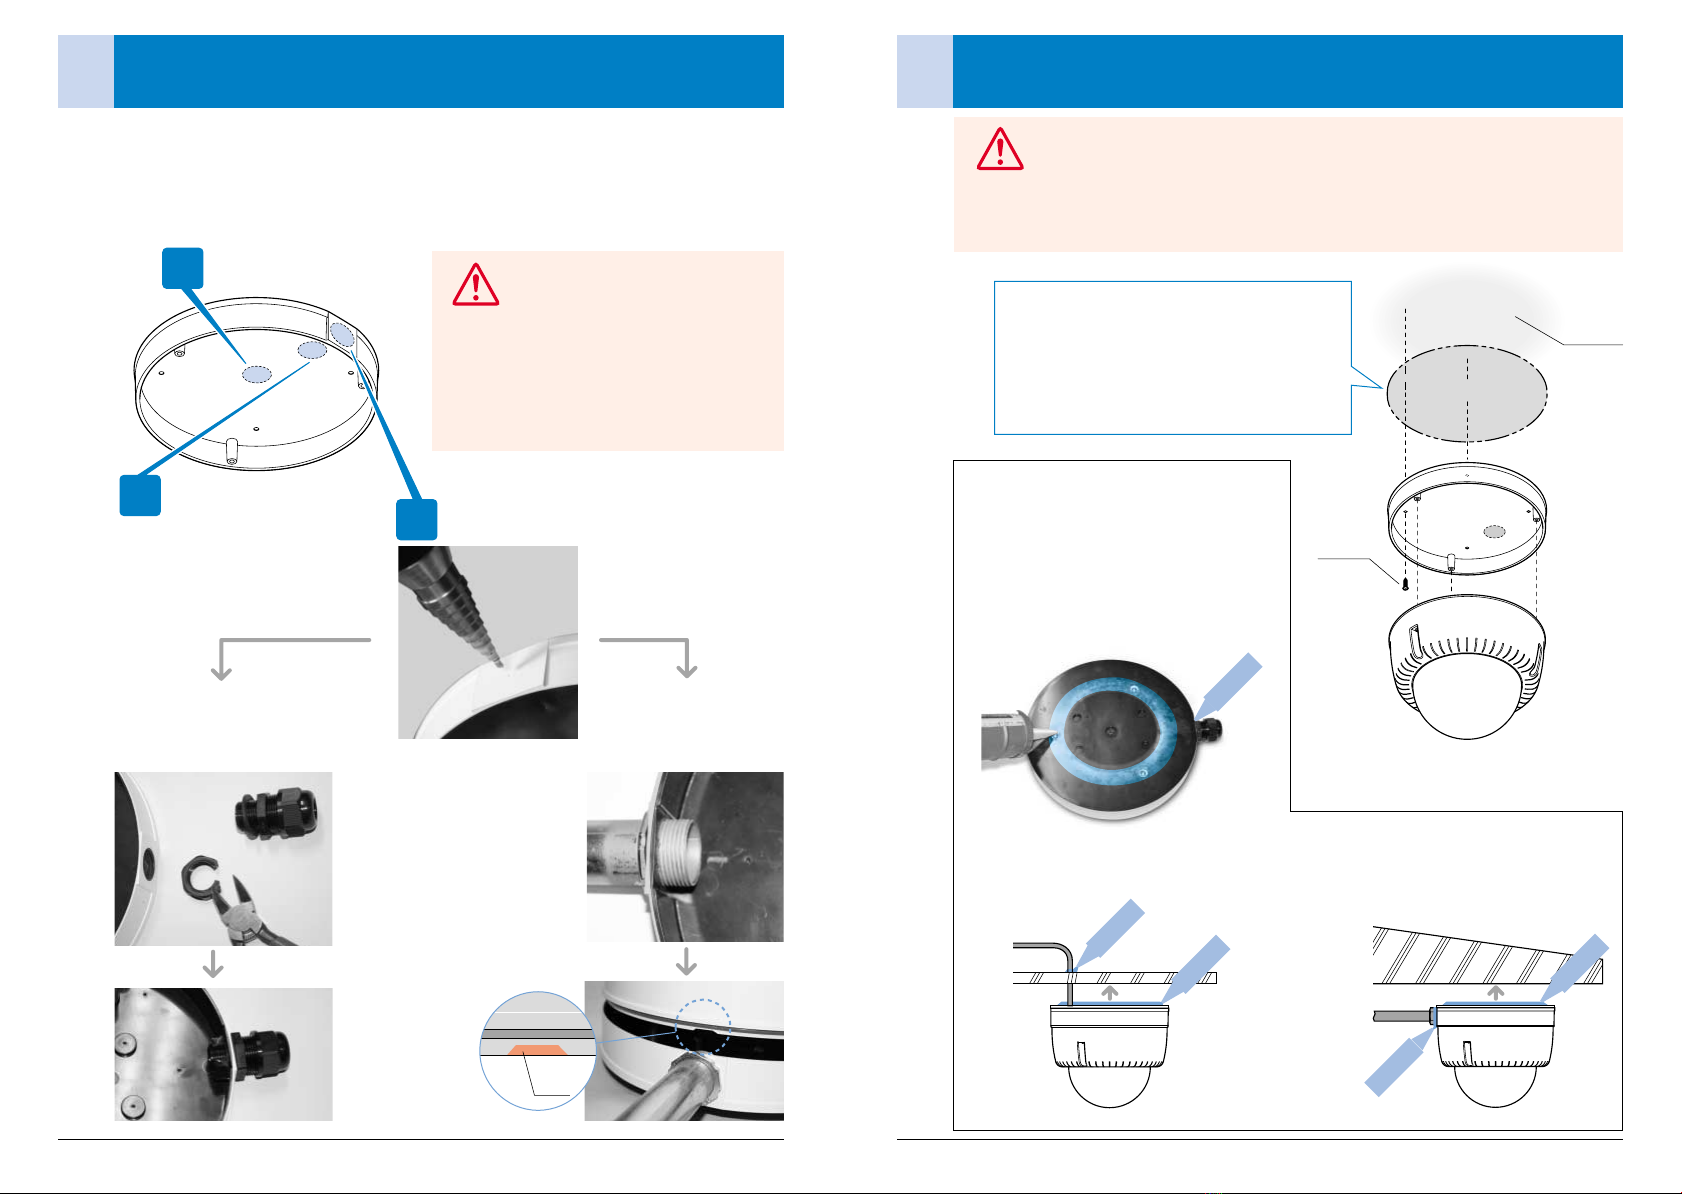
1ケーブルを通す穴を開ける
Make Hole for Cables by using Drill 2A ハウジングの取付(屋内/軒下)
Installation of Housing (Indoor / Under Canopy)
A-SWD5
ー3ー ー4ー
シリコン
Silicon around gate シリコン
Silicon on the Surface
シリコン
Silicon around Gate
Cable thru Pipe
Cable
注意
WARNING
強度が十分にあると認められる天井面に 4 本の M4 ビスでハウジングを取り
付けてください。
The unit must be properly and securely mounted to a supporting structure
of sustaining the weight of unit. Use four M4(or 10-32") stainless screws
to install this product. (Screws are not provided.)
天井面
Ceiling
コンクリートへの取付
表面がコンクリートで凸凹している場合には付属の丸ゴムを
使用します。
天井との設置面及びケーブルの入り口付近にシリコンを
塗布して水がハウジング内部に入るのを防いで下さい。
シリコン等の液状のシーリング材をご使用下さい。
(付属の丸ゴムでは防水は不十分です。)
Use Silicon on surface of housing and around gate
area to prevent entry of water.
Use liquid sealing material.
(Caution: Rubber provided is not good enough.)
シリコン
Silicon on the Surface
M4 × 4
Installation on rugged surface of Concrete
Use rubber Provided when surface of ceiling is rugged
like concrete.
Silicon
Silicon
Silicon
Silicon
ケーブルを通す穴をホールソーやリーマーを使用して適宜開けます。( 出荷時穴は開いていません。)
下記の標準的な3点につきましては、ドリルの刃先を当てる " ガイド "(へこみ)があります。
Make an adequate hole for cables by using drill ! (Cable hole is not open.)
There is "Guide"(Sink) for the standard 3 holes like below.
A
B
C天吊り取付用
Pipe (1" Conduit Pipe)
天井面取付用 Ceiling
壁面取付用 Wall
天井面取付用
壁面取付用
天吊り取付用
Silicon
25 mmパイプを側面からの場合
ニッパで 2mm 程カット
Cut 2mm(0.078") when you
stall 1" Pipe from side.
WARNING
雨の直接かかる軒下での設置はできません。
You cannot insrall this product in "OUTDOOR"
or "UNDER CANOPY WHICH CAN BE HIT BY
RAIN DIRECTLY"
警告
付属のブッシング使用の場合は 21 mmの穴を開
けます。ナットはニッパでカットします。
Make dia 21mm(0.8") Hole for bushing provided.
Cut Hex Nut with Nippers like photo.
カット
Cut
Ceiling
Wall
Pipe (Optional Pipe Mount)
Installation Example 1Installation Example 2

2C ハウジングの取付(壁面)
Installation of Housing (Wall Mount)
2B ハウジングの取付(天吊り/軒下)
Installation of Housing (Pipe Pendant Mount)
A-SWD5CA A-SWD5WB
3A 配線方法 AC100V タイプ
100VAC Power Supply in Japan
軒下用
Under Canopy
屋内用
Indoor
M6 ×4
ー5ー ー6ー
Conduit Pipe
Hex Nut
Conduit Pipe
Hex Nut
Hex Nuts
パイプの径に応じて適宜穴
を開けて固定します。
Make an adequate
diameter holes Conduit
Pipe/Hex Nuts.
Optional
Pipe Mount
Pendant Bracket
A-SWD5CA
AC100V ケーブル(推奨 VCTF1.25mm2× 2 芯または VCTF2mm2× 2 芯)を下図のように接続します。
ケーブルはより線(VVF 等単芯ではなく)のタイプで最大断面積 2mm2が条件となります。
AC100V 入力コンセント
125V 5 × 20mm 2A ヒューズ
ヒータサーモスタット
(43℃で動作 27℃で停止)
AC100V 22W ヒーター
電源回路にはブレーカーやヒューズ、接地などの保護対策をしてください。
保護対策をしないと火災・感電の原因になります。
AC100V タイプにはファンは装着できません。
ケーブルが 25 mmパイプマウントで中心から入る場合はヒーターを付属の
M4 タッピングビスで移動してください。
注意
*事実上周囲温度が 35℃以上
になると動作いたします。
パイプの径に応じて適宜穴を開けて固定します。
Make an adequate diameter holes Conduit
Pipe/Hex Nuts.
屋内 25mm パイプ天吊
(軒下の場合は強風に耐える A-SWD5CA 金具使用のこと)
1" Pipe Pendant Mount "Indoor Use Only"
(Use A-SWD5CA bracket for Under Canopy Use against
gusty wind.)
通常、金具上部の丸穴からケーブルを入れる場合は " ガイド "
(へこみ)にドリルの先を当てて開口します。
M6 のビス 4 本で壁面に確実に固定します。
Silicon
Silicon
Silicon
(Optional) (Optional)
Usually use hole of this wall bracket.
There is guide (Sink) for making holes.
Use four M6(or 1/4"-20) screws to install wall bracket.
Optional
Wall Mount Bracket
A-SWD5WB

4AC24V−DC12V コンバーター A-PS2412(オプション)
Optional 24VAC-12VDC Converter A-PS2412 for Camera
ー7ー ー8ー
AC24V の電源をご使用になる場合は PSE マーク付のものをご使用ください。
ヒーターは 25W(1.1A)消費しますのでカメラの消費電力との合計でそれに適したケーブルと
電源ユニットの選定が必要になります。
Note: Total power consumption for Heater & Blower + Camera need to be added.
Example: Camera Power: 15W
Blower 0.5W
Heater 25W
Total = 40.5W
Required Power: 50VA (Or you can prepare two separate 24VAC power source for camera and Heater & Blower.)
24VAC25W
Heater
24VAC OUT
for camera use only
24VAC IN
AC24V の適合電線
24V AC Wiring Distances
The right diagram are the recommended maximum
distances for 24 VAC with a 10% voltage drop (10%
is generally the maximum allowable voltage drop for
AC powered devices).
12VDC Blower
GND
+
AC24V を DC12V に変換しカメラへ最大 2.5A の電源を供給いたします。
ハウジングの AC24V 出力端子を本機の AC24V に入力につなぎます。(入出力の有無は LED にて表示)
Connect "24VAC Output" to "24AC Input" of this unit.
(You can diagnose 24VAC Input and 12VDC Output by LED lamp.)
Input Voltage: 24VAC +10% (Excessive voltage over 10% may damage this unit.)
Output : 12VDC Max. 2.5amp
5.5
10
20
30
40
50
60
70
80
250
120
89
65
44
35
29
25
21
400
180
141
90
70
56
47
40
34
600
300
225
130
112
90
75
64
55
960
480
358
225
179
143
119
102
85
–
800
571
350
285
228
190
163
140
–
1300
905
525
452
362
301
258
215
–
–
1440
830
720
576
480
411
340
22 20 18 16 14 12 10
Total vA
consumed
Maximum distances from transformer to load
Wire Gauge
ヒーターサーモスタット
Heater Thermostat (110°F ON 80ºF OFF)
*Virtually it activates under environmental temperature over 95ºF
ファンサーモスタット
Blower Thermostat
(40°FON60°F OFF)
ヒーター
Heater
Optional 24VAC
Blower & Heater
Optional A-PS2412
24VAC-12VDC
Power Converter
for camera
3B 配線方法 AC24V タイプ(オプション)
Optional 24VAC Blower & Heater
12VDC OUT
GND
+
24VAC IN
(No Polarity)
CAUTION
ケーブルはなるべくヒーター(上記写真の赤色部分)に触れないこと。
(外皮の弱いケーブルが熱により破損し、漏電の危険性あり)
Keep cables away from Heater (Red Color) to prevent damage of it due to heat.
Usually heater will be installed in front of window.
注意
CAUTION for U.S.A. and Canada
Use 24VAC class 2 power supply which is UL
Listed (in the U.S.A.) or CSA-certification (in
Canada).
CAUTION for other countries
Use 24VAC Power Supply isolated from 100 to
240VAC which meets requirements for SELV
(Safety Extra Low Voltage) and complies with
Limited Power Source according to IEC 60950.
A-PS2412
CAUTION
ケーブルが 25mmパイプマウントで中心から入る場合はヒーター位置を
付属の M4 タッピングビスで移動してください。
Move Heater when you use 1" Conduit Pipe by using M4 tapping screws
provided.
注意
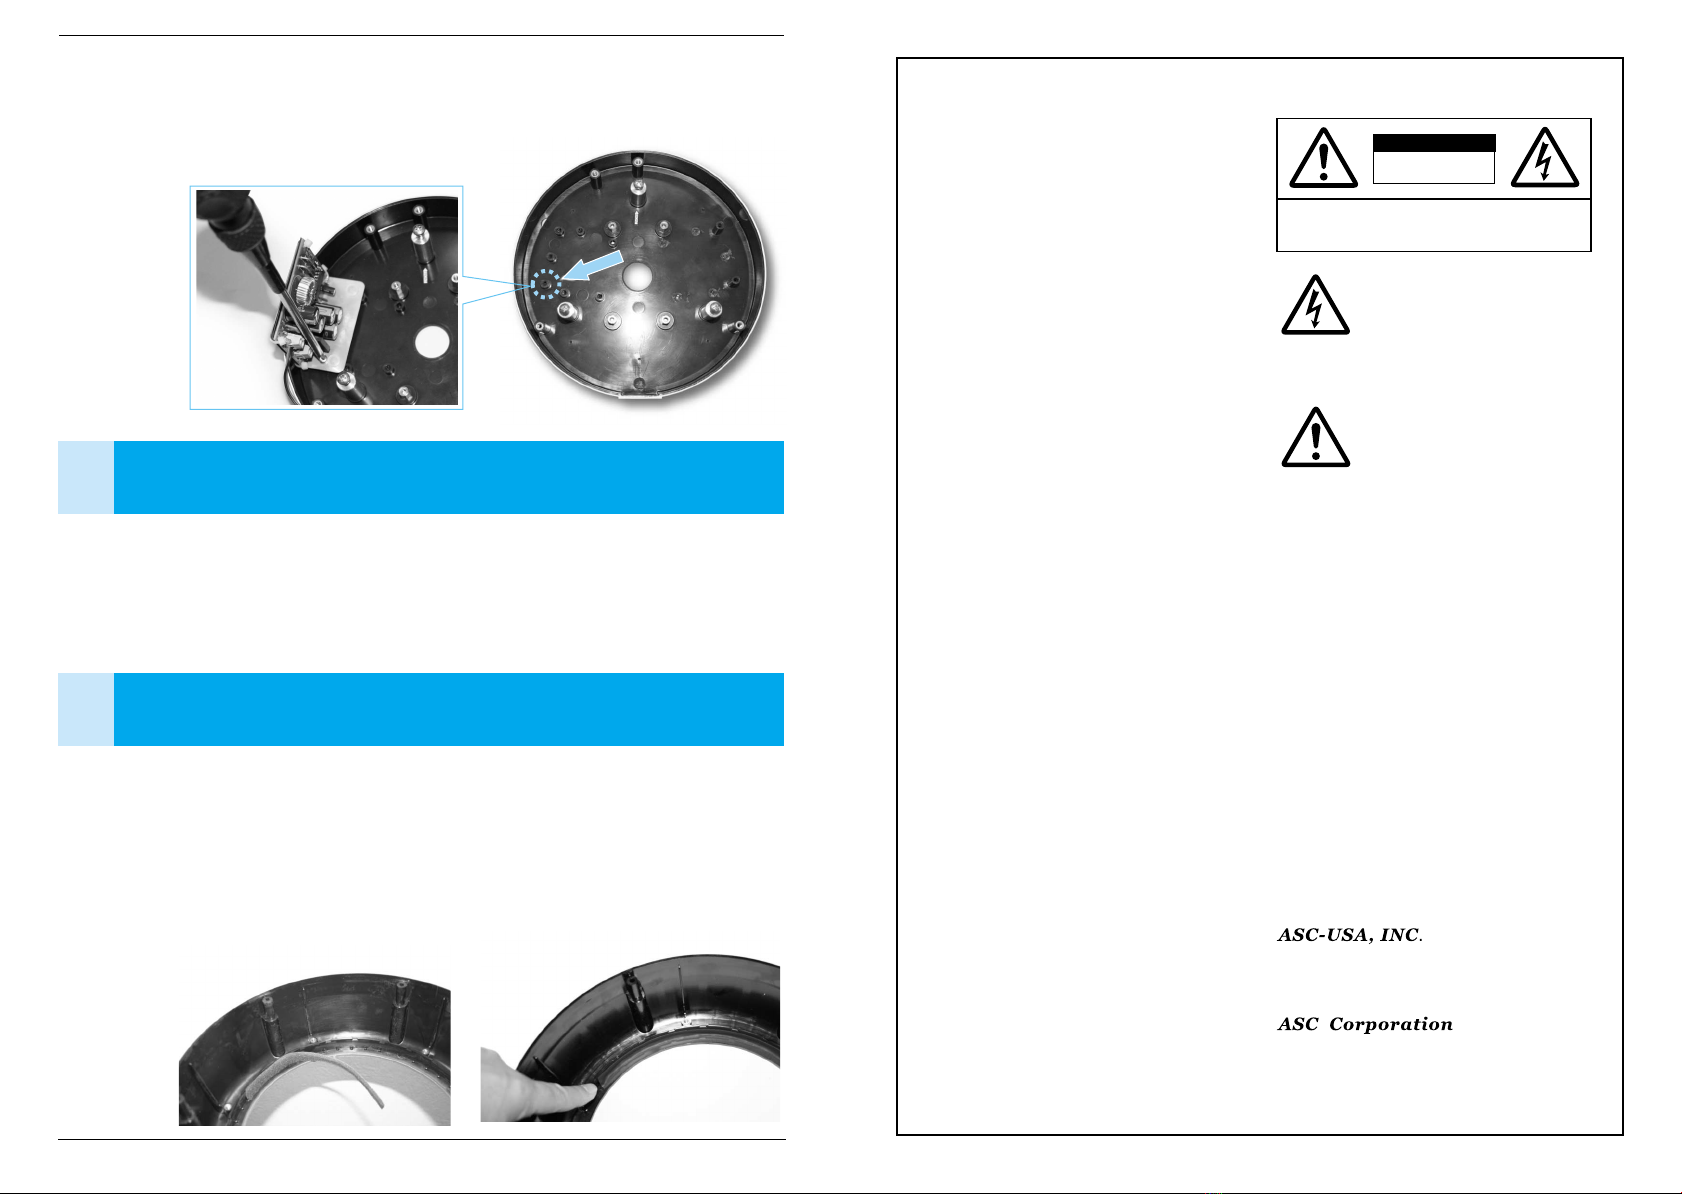
5カメラの取付
Installation of Camera
6防水等級 IPX4 または IP66 の選択
Vent Hole "Open" or "Close" (IPX4 or IP66 Selectable)
カメラの取付に関しては追加説明書をご参考に収納してください。
内部の取付金具はカメラの機種により異なります。
*通常カメラに付属する AC アダプターは収納できません。
See appendix instruction for installation of camera.
Camera bracket varies from camera to camera.
A-PS2412 の取付方法
How to install A-PS2412
矢印の位置に1本のM4タッピングビスで取り付けます。
Install A-PS2412 to the slot pointed by using one(1) M4 tapping screw.
5975 Shiloh Road, Suite 103, Alpharetta, GA 30005
Tel 770-888-4674 · 1-888-988-4674
Fax 770-888-4675
URL : http://www.kk-asc.com
3-16-9, Toranomon, Minato-ku, Tokyo 105-0001, Japan
Tel +81-3-5473-7627
Fax +81-3-5473-7628
本機は出荷時、カバーの周りの通気孔を開いて外気とフィルターを通して通気しております。(IPX4)
これはカバーの曇りと内部温度の上昇を抑制することを目的としております。
しかし、海岸に極端に近い場合、湿度が極端に高い場所および寒冷地では通気孔を塞ぎ密閉する必要があります。(IP66)
(カバーの乾燥及びデフロスト効果の点よりファンを強制にする方がこのような環境では通常良いでしょう)
Vent hole are open for outside through sponge filter in order to avoid fog (IPX4).
You had better close these vent holes by silicon or rubber when you install it in coastal area and any other
extremely humid area (Usually continuous blower is recommended.)
Peel off sponge Filter Seal vent holes by using silicon or rubber.
CAUTION: TO REDUCE THE RISK OF
ELECTRICAL SHOCK, DO NOT EXPOSE
COMPONENTS TO WATER OR MOISTURE.
RISK OF
ELECTRIC SHOCK!
CAUTION
IMPORTANT SAFEGUARDS
1. Read Instructions - All the safety and operating instructions
should be read the unit is operated.
2. Retain Instructions - The safety and operating instructions
should be retained for future reference.
3. Heed Warnings - All warnings on the unit and in the
operating instructions should be adhered to.
4. Follow Instructions - All operating and user instructions
should be followed.
5. Electrical Connections - Only a qualified electrician should
make electrical connections.
6. Attachments - Do not use attachments not recommended
by the product manufacturer as they may cause hazards.
7. Cable Runs - All cable runs must be within permissible
distance.
8. Mounting - This unit must be properly and securely
mounted to a supporting structure capable of sustaining
the weight of the unit .Accordingly:
a. The installation should be made by a qualified installer.
b. The installation should be in compliance with local codes.
c. Care should be exercised to select suitable hardware
to install the unit, taking into account both the composition
of the mounting surface and the weight of the unit. Be
sure to periodically examine the unit and the supporting
structure to make sure that the integrity of the installation
is intact. Failure to comply with the foregoing could
result in the unit separating from the support structure
and falling, with resultant damages or injury to anyone
or anything struck by the falling unit.
LIMITED WARRANTY IN U.S.A.
ASC-USA, INC. warrants that products sold hereunder shall
be free from defects in materials or workmanship for a period
ONE (1) YEAR from the date of purchase by the original end-
user customer (the "Warranty Period").
ASC-USA, INC. makes no other warranty of any kind with
respect to this products, whether expressed or implied,
including without limitation, the implied warranty of fitness for
a particular purpose.
In the event of a breach of the above warranty, ASC-USA,
INC. shall its option, repair or replace said products, or refund
the purchase price paid therefor.
This is the exclusive remedy and ASC-USA, INC.'s sole
obligation with respect to the above warranty.
In no event shall ASC-USA, INC. be liable for any incidental
or consequential damages, as defined in section 2-275 of the
Uniform Commercial Code for a breach of this warranty.
ASC-USA, INC. shall repair or replace defective products
upon shipment of products prepaid to ASC-USA, INC. 5975
Shiloh Road, Suite 103, Alpharetta, GA 30005.
Repairs made by necessary by reason of accident, misuse
or normal wear shall be charged atASC-USA, INC.'s standard
rate. This warranty gives you specific legal rights, and you
may also have other rights which vary from state to state.
SAFETY PRECAUTIONS
The lightning flash with an arrowhead
symbol, within an equilateral triangle, is
intended to alert the user to the presence
of non- insulated "dangerous voltage" within
the product's enclosure that may be of
sufficient magnitude to constitute a risk of
electric shock to persons.
The exclamation point within an equilateral
triangle is intended to alert the user to
presence of important operating and
maintenance (servicing) instructions in the
literature accompanying the appliance.
UNPACKING
Unpack carefully. Electric components can be damaged if
improperly handled or dropped. If an appears to have been
damaged in shipment, replace it property in its carton and
notify the shipper.
Be sure to save:
1. The shipping carton and packaging material. They are the
safest material in which to make future shipments of the
equipment.
2. These installation and Operating Instructions.
SERVICE
If the product need repair service, the customer should contact
ASC-USA, INC. for authorization top return and shipping
instructions.
TECHNICAL SUPPORT
If technical support is needed, please contact:
ー9ー ー10ー
Other manuals for A-SWD5
1
Table of contents
Popular Tent manuals by other brands

Wild Land Drivers
Wild Land Drivers Rock Cruiser instruction manual

TEBAU form & funktion
TEBAU form & funktion Vordach MODENA Assembly instructions

Sears
Sears Hillary 308.730980 owner's manual

ShelterLogic
ShelterLogic SuperMax 26767 Assembly instructions

Alice's Garden
Alice's Garden CCW007 manual

BCP
BCP SKY2590 instruction manual


