ASG DTT-L Series User manual

ASG, Division of Jergens, Inc.
15700 S. Waterloo Road | Cleveland, OH 44110-3898
Phone: (888) 486-6163 | Fax: (216) 481-4519
Email: asginfo@asg-jergens.com | Web: www.asg-jergens.com Page 1 of 15
© 2017 Jergens, Inc. All Rights Reserved | Revision Date: 02/19/18
DTT-L Series Digital Torque Testers
User Manual

ASG, Division of Jergens, Inc.
15700 S. Waterloo Road | Cleveland, OH 44110-3898 | Phone: (888) 486-6163 | Fax: (216) 481-4519 | Email: [email protected] | www.asg-jergens.com
Page 2 of 15
Table of Contents
Service and Warranty ............................................................................................... 3
Overload Capacity Caution ...................................................................................... 3
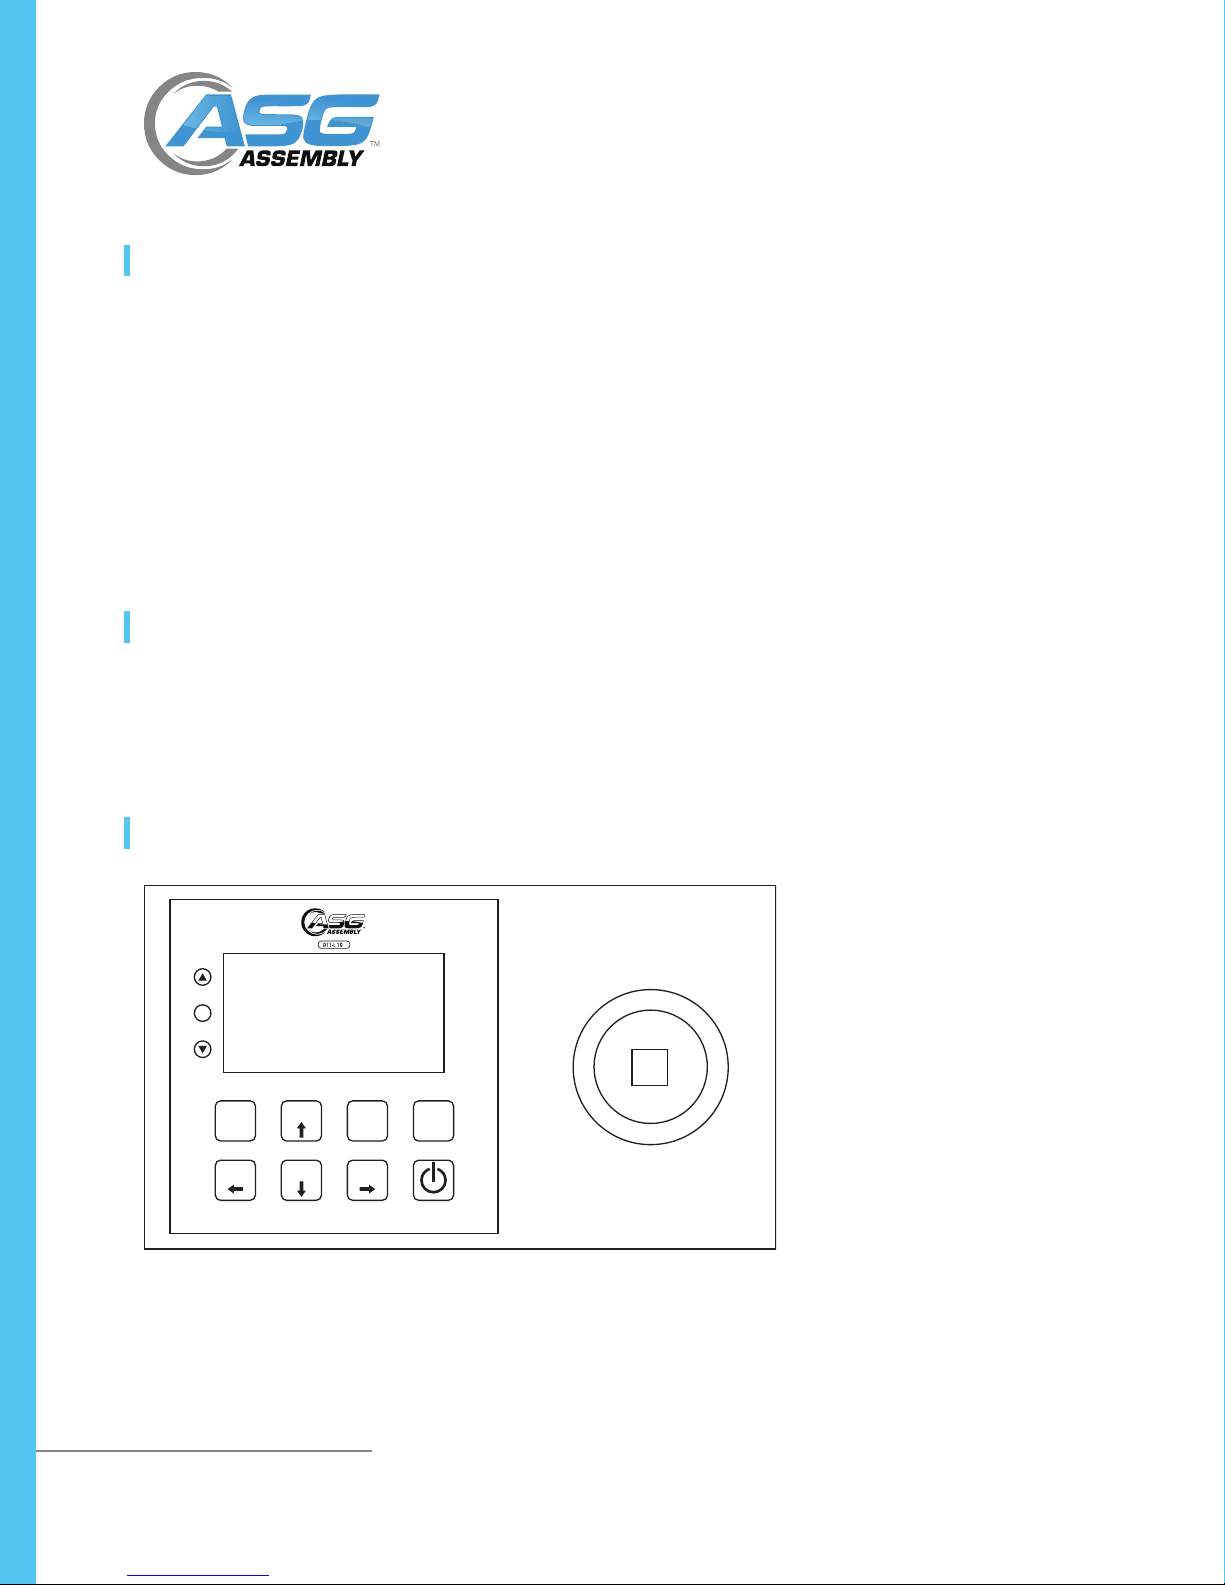
System Overview...................................................................................................... 3
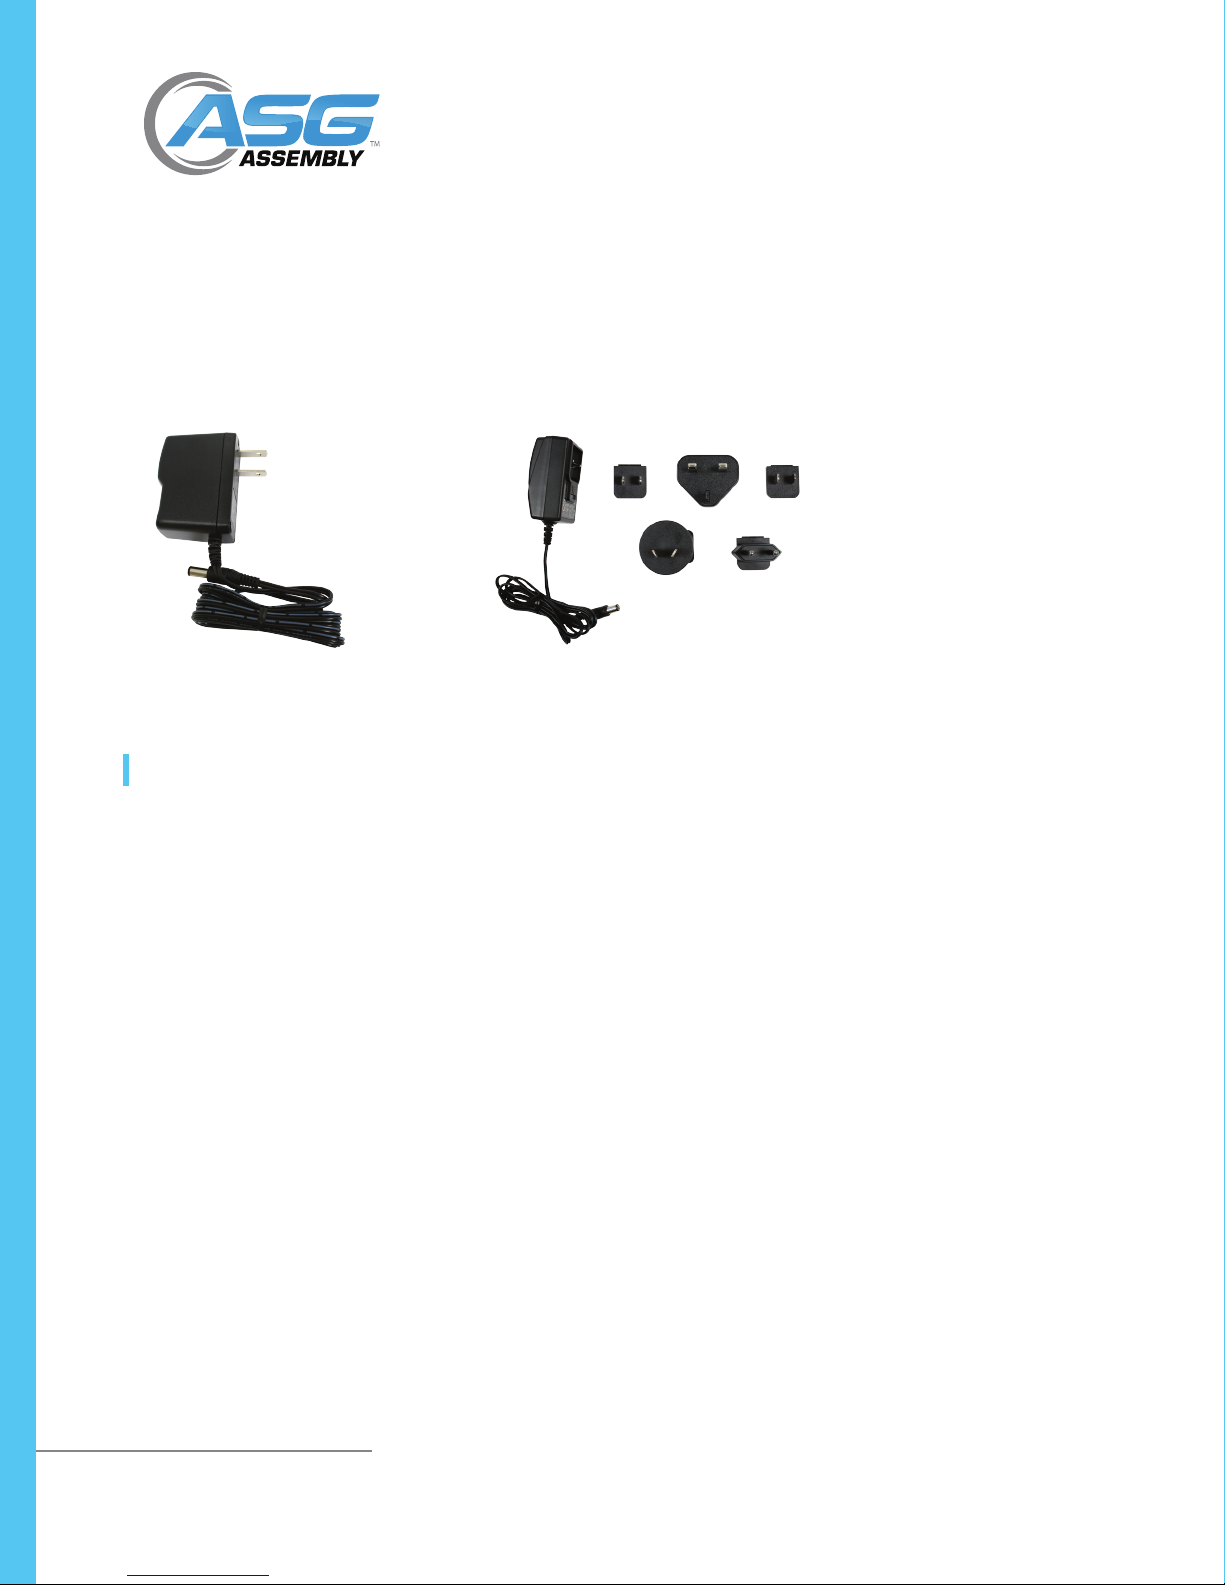
Battery Chargers ............................................................................................ 5
Standard Equipment ................................................................................................ 5
Instructions for Using the Driver Adapter................................................................. 6
Usage....................................................................................................................... 7
Procedure for Manual Torque Screwdrivers..................................................... 7
Procedure for Power Screwdrivers.................................................................. 7
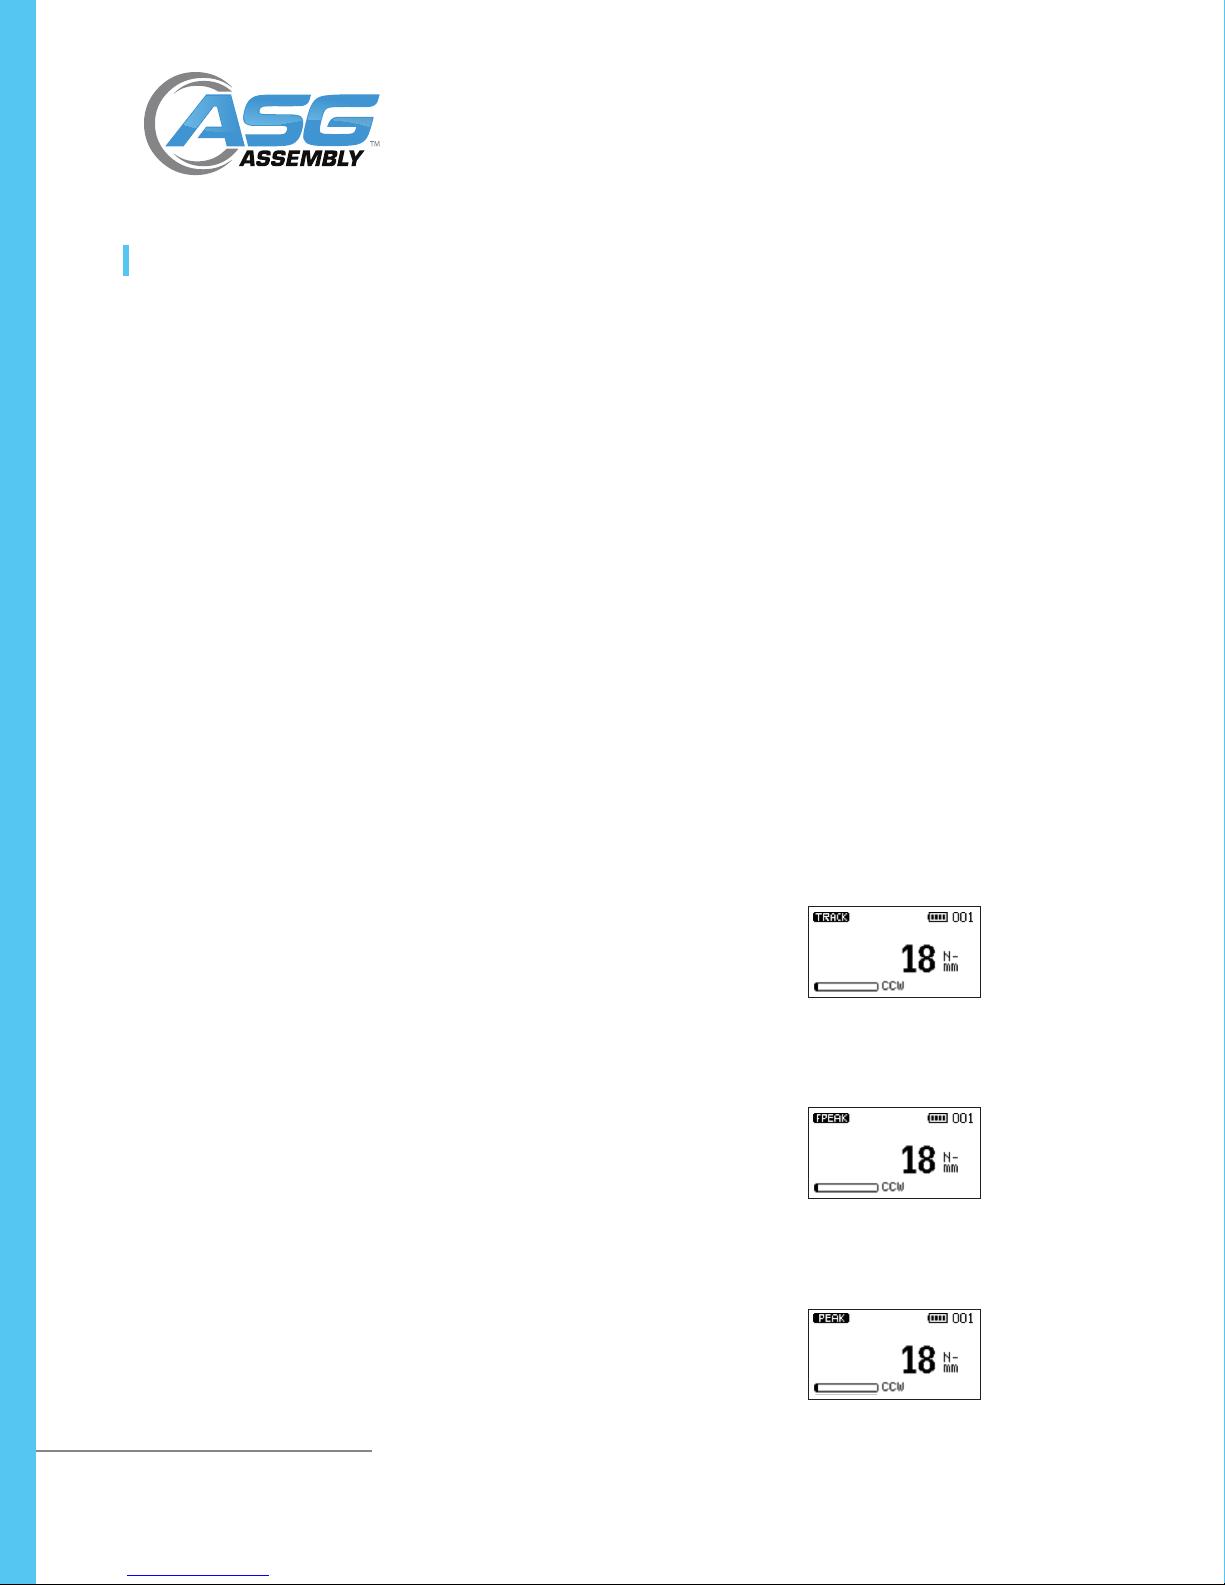
Battery Indicator ...................................................................................................... 8
Basic Function.......................................................................................................... 8
Display of Clockwise/Counter-Clockwise.................................................................. 8
Zeroing the Tester .................................................................................................... 9
Changing the Unit of Measure................................................................................. 9
Changing the Mode of Measure .............................................................................. 9
Backlit Display ....................................................................................................... 10
Saved Reading to Memory............................................................................ 10
Main Menu ............................................................................................................ 10
Setting .......................................................................................................... 10
Auto-Shutdown............................................................................................. 11
Auto-Reset .................................................................................................... 11
Pass-Fail ........................................................................................................ 12
Load Default ................................................................................................. 13
Memory......................................................................................................... 13
View.............................................................................................................. 13
Delete Last .................................................................................................... 14
Delete All ...................................................................................................... 14
Calibration .................................................................................................... 14
Transducer State............................................................................................ 15
About............................................................................................................ 15
DTT-L Series Digital Torque Testers
User Manual

ASG, Division of Jergens, Inc.
15700 S. Waterloo Road | Cleveland, OH 44110-3898 | Phone: (888) 486-6163 | Fax: (216) 481-4519 | Email: [email protected] | www.asg-jergens.com
Page 3 of 15
Service and Warranty
Overload Capacity Caution
ASG, Division of Jergens, Inc., warrants to the original purchaser buying the ASG DTT-L meter with the intention of use rather than
resale, for a period of 1 year. ASG will replace those items found to be defective or otherwise fail to conform, or at ASG’s option
repay the price paid for the item. The buyer’s remedies with respect to any item found to be defective or otherwise not conforming
shall be limited exclusively to the right of replacement or repayment. In no event shall ASG be liable for any incidental, special or
consequential damages or for damages in the nature of penalties.
DISCLAIMER: Seller makes no other warranty what-so-ever, expressed or implied, and all implied warranties of merchantability and
tness for a particular purpose are disclaimed and excluded from this transaction and shall not apply to the goods sold hereunder.
The ASG DTT-L meter is an electronic instrument and should be treated with the same care given any sensitive electronic instrument.
Avoid dropping the unit or dropping items on the unit. Avoid high shock loads to the transducer. Use the proper driver adapter when
using clutch type power tools.
Do not exceed the capacity of the unit. The overload capacity of a DTT-L meter is 200% of its maximum load capacity. If the meter is taken
over capacity, a warning tone will sound, the word “OVERLOAD” will ash on the LCD, and the unit will LOCK until the RESET button is
pressed. Immediately stop applying torque when the overload warnings are observed. A unit subjected to overload or subjected to harsh
conditions, such as use with an impact tool, will not be covered under warranty.
System Overview
ZERO RESET MENU
ESC
ENTER
MEM
MODE UNIT
OK
DTT-L Series Digital Torque Testers
User Manual

ASG, Division of Jergens, Inc.
15700 S. Waterloo Road | Cleveland, OH 44110-3898 | Phone: (888) 486-6163 | Fax: (216) 481-4519 | Email: [email protected] | www.asg-jergens.com
Page 4 of 15
System Overview (Continued)
Model DTT-L 5, DTT-L 10, DTT-L 30, DTT-L 50, DTT-L 100, DTT-L 200
Size 7.125” x 4.375” x 2.125” (181mm x 111mm x 54mm) Size with Mounting Plate*: 8.625” x 4.375” x 2.125” (219mm x 111mm x 54mm)
Weight 4.8 lb (2.2 kg) Weight with Mounting Plate: 6.6lb (3 kg)
Display Graphics LCD display size 128x64 dots
Battery 28 Hours (NiMH 4.2/v rechargeable)
Battery Charger 9V 500mA 110 Volt with US Plug (Optional International Charger Available: 9 Volt, 670 mA, 90-264 VDC, ASG # 66619)
ADC 16 Bit
CPU 8 Bit
Key Button 8 Buttons
Unit of Measure 6-7 User Selectable Torque Units (Depending on Model)
Mode of Measure 3 Modes: Track, Peak, and First Peak
Display Digits 6 Digits Maximum
Special Function Auto Shutdown, Auto Reset, Pass/Fail, Memory, Torque Bar, Battery Indicator and Charging Status, Transducer State
Memory 200 Readings with Alarm when Full
Accuracy ± 0.5% of Full Scale
DTT-L Series Digital Torque Testers
User Manual
* DTT-200 and DTT-500 come with mounting plate
Model Number ASG Number Torque Range
lbf.in N.m
DTT-L 5 66650 0.5 - 5.0 0.06 - 0.56
DTT-L 10 66651 1.0 - 10.0 0.11 - 1.13
DTT-L 30 66652 3.0 - 30.0 0.33 - 3.4
DTT-L 50 66653 5.0 - 50.0 0.56 - 5.6
DTT-L 100 66654 10.0 - 100.0 1.13 - 11.3
DTT-L 200 66655 20.0 - 200.0 2.3 - 22.6
DTT-L 500 66657 50.0 - 500.0 5.6 - 56.5

ASG, Division of Jergens, Inc.
15700 S. Waterloo Road | Cleveland, OH 44110-3898 | Phone: (888) 486-6163 | Fax: (216) 481-4519 | Email: [email protected] | www.asg-jergens.com
Page 5 of 15
Standard Equipment
All DTT-L meters are supplied with the following standard items:
• DTT-L torque meter
• Battery charger/Power adapter
• NOTE: Rundown adapters sold separately; International charger also sold separately
DTT-L Series Digital Torque Testers
User Manual
Battery Chargers
9 Volt, 500 mA, 90-264 VDC
US Power Adapter (Supplied)
9 Volt, 670 mA, 90-264 VDC International
Power Adapter (Optional, Must Order
Separately)
ASG #66603 ASG #66619

ASG, Division of Jergens, Inc.
15700 S. Waterloo Road | Cleveland, OH 44110-3898 | Phone: (888) 486-6163 | Fax: (216) 481-4519 | Email: [email protected] | www.asg-jergens.com
Page 6 of 15
DTT-L Series Digital Torque Testers
User Manual
Instructions for Using the Rundown Adapters
ASG Adapter Number Drive Size Torque Range
lbf.in N.m
66620 4 mm HIOS 0.25 - 2.0 0.03 - 0.23
66631 4 mm HIOS 1.3 - 5.0 0.15 - 0.56
66612 1/4" Hex 1.3 - 5.0, 4.5 - 26.0 0.15 - 0.56, 0.51 - 2.94
66617 1/4" Hex 4.5 - 26.0 0.51 - 2.94
66633 4 mm HIOS 4.5 - 26.0 0.51 - 2.94
66635 5 mm HIOS 4.5 - 26.0 0.51 - 2.94
66618 1/4" Hex 25.0 - 80.0 2.8 - 9.03
66639 5 mm Hex 25.0 - 80.0 2.8 - 9.03
66634 3/8" Hex 50.0 - 200.0 5.65 - 22.6
66642 3/8" Hex 50.0 - 500.0 5.65 - 56.5
Below is a list of all rundown adapters ASG offers for the DTT and DTT-L Series
• Rundown adapters are included with the DTT torque testers. See charts in DTT manual on page 6 for more information.
• Rundown adapters are not included with the DTT-L torque tester, choose the needed rundown adapters from the chart below
when ordering the tester.
* ASG Adapter #66612 comes with two springs covering torque range from 1.3-5.0 lbf.in (0.15-0.56) and 4.5-26.0 lbf.in (0.51-2.94 N.m)
* * *
ASG #66620 ASG #66631 ASG #66612 ASG #66633
ASG #66635 ASG #66618 ASG #66639 ASG #66634
ASG #66617
ASG #66642

ASG, Division of Jergens, Inc.
15700 S. Waterloo Road | Cleveland, OH 44110-3898 | Phone: (888) 486-6163 | Fax: (216) 481-4519 | Email: [email protected] | www.asg-jergens.com
Page 7 of 15
Usage
Procedure for Manual Torque Drivers
• Attach a proper adapter to connect the driver to the 3/8” female square.
• NOTE: It is NOT recommended to use the power tool adapters to calibrate hand torque tools.
• Select FIRST PEAK mode using the MODE button. Press the RESET button if the display is not at 0.
• Turn the driver or wrench clockwise or counterclockwise until the “break” point is reached.
• In FIRST PEAK no other reading can then be displayed until the reset button is pressed.
• The LCD display will show the torque that the driver or wrench is set at. Note the reading or write it down. To enter it into the
DTT-L memory press the ENTER/MEM button. If you are testing several tools, note the memory numbers of the readings for the
various tools. This number is in the upper right hand corner of the LCD. The unit can save up to 200 readings. After that, no
further readings can be entered until the memory is cleared.
• If the torque is not correct, adjust the tool. Repeat the test. When the reading is proper, perform the test several times to be sure
the readings are consistent. The proper reading may be an average of several readings.
Procedure for Power Screwdrivers
• Put the appropriate rundown adapter into the unit’s female 3/8” square socket. It allows the power tool to reach its working speed
before tightening up and causing the clutch to operate.
• Run the tool in reverse to make sure the adapter is unwound. Do not disassemble the driver adapter.
• Make sure the unit is in PEAK mode. If it is not, use the MODE button to select PEAK mode.
• Press the ZERO button to be sure the display is at 0.
• Run the tool forward until it shuts off. The reading on the display will be the torque setting of the tool’s clutch. Note the reading or
write it down.
• To enter it into the units memory, press the ENTER/MEM button. If you are testing several tools, note the memory numbers of the
readings for the various tools. This number is in the upper right hand corner of the LCD. The unit can save up to 200 readings. After
that no further readings can be entered until the memory is cleared.
• If the torque is not correct, adjust the clutch. Repeat the test. When the reading is proper, perform the test several times to be sure
the readings are consistent. The proper reading may be an average of several readings.
• Always unwind the rundown adapter after each test. Do NOT leave the spring under tension while not in use.
DTT-L Series Digital Torque Testers
User Manual

ASG, Division of Jergens, Inc.
15700 S. Waterloo Road | Cleveland, OH 44110-3898 | Phone: (888) 486-6163 | Fax: (216) 481-4519 | Email: [email protected] | www.asg-jergens.com
Page 8 of 15
Battery Indicator
Basic Function
Display of Clockwise/Counter-Clockwise
Battery Basic Function
TRACK
0.003 kgf.cm
CW
005
TRACK
0.003 kgf.cm
CCW
005
F-PEAK
0.003 kgf.cm
CCW
005
PEAK
0.003 kgf.cm
CCW
005
Battery Level > 5.00V
4.99V > Battery Level > 4.8V
4.79V > Battery Level > 4.7V
4.69V > Battery Level > 4.65V
Battery Level < 4.65V
If the battery level is less than 4.6 V, the “Battery Empty” message will be displayed and the tester
will power down automatically. NOTE: Only use the 9V adapter/charger supplied.
Clockwise torque is displayed on the DTT-L and recognized by the symbol “CW.” Counter-clockwise
torque is displayed on the DTT-L and recognized by the symbol “CCW.”
Clockwise symbol
Charging symbol
Load indicator bar
for clockwise
Load indicator
bar for counter-
clockwise
Counter-clockwise symbol
A load indicator bar alerts the operator as to how much torque load is being applied to the
transducer as related to its full scale rating.
DTT-L Series Digital Torque Testers
User Manual

ASG, Division of Jergens, Inc.
15700 S. Waterloo Road | Cleveland, OH 44110-3898 | Phone: (888) 486-6163 | Fax: (216) 481-4519 | Email: [email protected] | www.asg-jergens.com
Page 9 of 15
While operating the tester, it may be necessary to zero the display so that residual torque does not become part of the measured
reading. Press and release the ZERO key.
You can choose from the following modes of measure: Track, First Peak, and Peak. To change the display mode, press the MODE
key. Each time the MODE key is pressed, it will select the next available mode until the tester returns to its original setting.
You can choose from the following units of measure depending on the capacity of your tester: N.mm (not available on the DTT-L 500),
N.cm, N.m, kgf.cm, kgf.m, lbf.in, and lbf.ft. To change the display units, press the UNIT key. Each time the UNIT key is pressed, it will
select the next available unit until the tester returns to its original setting. The DTT-L automatically converts readings as new units of
measure are selected.
NOTE: All units may not be displayed depending on tester capacity.
Basic Function (Continued)
Zeroing the Tester
Changing the Mode of Measure
Changing the Unit of Measure
Press the MODE key until “Track” appears on
the display. The display will now indicate the
torque applied in either direction as it is applied
to the transducer.
Press the MODE key until “Peak” appears on
the display. The display will show the maximum
torque applied to the transducer during a cycle.
Press the MODE key until “FPeak” appears on
the display. The display will show the torque
level applied to the transducer.
Track Mode
Peak Mode
First Peak Mode
DTT-L Series Digital Torque Testers
User Manual

ASG, Division of Jergens, Inc.
15700 S. Waterloo Road | Cleveland, OH 44110-3898 | Phone: (888) 486-6163 | Fax: (216) 481-4519 | Email: [email protected] | www.asg-jergens.com
Page 10 of 15
Any reading can be saved anytime by pressing the MEM key. A total of 200 readings can be stored in the database including the
reading unit.
Basic Function (Continued)
Saved Reading to Memory
When you press any key or apply torque to the transducer greater than 0.5% of full scale, the backlight will go on for 60 seconds.
Backlit Display
DTT-L Series Digital Torque Testers
User Manual
• To access the SETTING menu, press the MENU/ESC key. Use the UP or DOWN
ARROW keys to move the cursor to SETTING. Press ENTER.
• To move between the submenus listed in the SETTING menu, press the UP or
DOWN ARROW keys to move the cursor. The sub-menus in the setting menu are
auto-shutdown, auto-reset, pass-fail, and load default.
• Press ENTER to select the sub-menus, activate feature and enter values. Within
sub-menus the UP, DOWN, LEFT and RIGHT ARROW keys will also change
numerical values.
• Press ESC to return to the setting menu page
Setting
Main Menu
• Press the MENU/ESC key to access the main menu
• To move between the sub-menus listed on the main menu page, press the UP or
DOWN ARROW keys to move the cursor
• Press ENTER to select the sub-menus, activate features and enter values.
Within sub-menus, UP, DOWN, LEFT and RIGHT ARROW keys will also change
numerical values.
• Press ESC to return to the main menu page

ASG, Division of Jergens, Inc.
15700 S. Waterloo Road | Cleveland, OH 44110-3898 | Phone: (888) 486-6163 | Fax: (216) 481-4519 | Email: [email protected] | www.asg-jergens.com
Page 11 of 15
The Auto-Reset feature is used to automatically reset the reading value in peak mode.
This mode works when the reading value is higher than the setting value, causing the
peak value to change to a new held value. The user does not need to press the RESET
key, since the peak value will automatically reset. This feature works in peak mode
only. If this feature is activated, the icon “AR” will display on main display.
• To set Auto-Reset, press the MENU/ESC key, the display will show the main
menu page. Use the UP and DOWN ARROW keys to move the cursor point to
SETTING. Press the ENTER key and use the UP and DOWN ARROW keys to
move the cursor point to AUTO-RESET. Press the ENTER key. The display will
show the Auto-Reset menu page.
• Press the ESC key to return the main menu page
• Use the UP and DOWN ARROW keys to change the value. Use the RIGHT ARROW
key to change the unit. Press ZERO key to reset value to zero. Press ENTER key to
set new value and return to setting menu. Press ESC to return to setting menu.
• Auto-Reset feature will automatically be disabled if you set AUTO-RESET = 0
• To set Auto-Shutdown, press the MENU/ESC key, the display will show the main
menu page. Use the UP and DOWN ARROW keys to move the cursor point to
SETTING. Press the ENTER key and use the UP and DOWN ARROW keys to
move the cursor point to AUTO-SHUTDOWN. Press the ENTER key. The display
will show the Auto-Shutdown menu page.
• The Auto-Shutdown feature can be enabled to conserve battery power where the
meter powers down after 5, 10, and 15 minutes (depending on auto-shutdown
time) since the last key press. Use the UP and DOWN ARROW keys to move the
cursor to the auto-shutdown time preferred and press ENTER.
• Press ESC key to return to the main menu page. If you activate this feature,
the OFF symbol will be displayed on the main display.
Auto-Reset
Auto-Shutdown
DTT-L Series Digital Torque Testers
User Manual
Main Menu (Continued)

ASG, Division of Jergens, Inc.
15700 S. Waterloo Road | Cleveland, OH 44110-3898 | Phone: (888) 486-6163 | Fax: (216) 481-4519 | Email: [email protected] | www.asg-jergens.com
Page 12 of 15
Main Menu (Continued)
The pass-fail feature is used to set a dened acceptable maximum and minimum
torque range for measuring. It is activated by setting the lower level and upper level
torque limit. As long as the torque value is within this range, the green LED display
button will light up OK. Any reading values outside this range (higher or lower), the
orange LED display buttons will light up. The orange up arrow will light up if the
torque range is higher than the set range and the orange down arrow will light up if
the torque range is lower than the set range. If this feature is activated, the PF symbol
will display on the main display.
• To access the Pass-Fail menu, press the MENU/ESC key, the display will show the
main menu page. Use the UP and DOWN ARROW keys to move the cursor point
to SETTING. Press the ENTER key and use the UP and DOWN ARROW keys to
move the cursor point to PASS-FAIL. Press ENTER. The display will show the
Pass-Fail menu page.
• Press the ESC key to return the main menu page
• Use the UP and DOWN ARROW keys to change the value. Use the RIGHT
ARROW key to change the unit. Use the LEFT ARROW key to toggle between
the upper and lower limits. Press the ZERO key to reset value to zero. Press the
ENTER key to set new value and return to setting menu. Press ESC to return to
setting menu.
NOTE: Lower level must be less than the upper level
Pass-Fail
DTT-L Series Digital Torque Testers
User Manual
Example:
Lower Level
Upper Level
= 0 N.m
= 20 N.m
Upper Torque
Level
Lower Torque
Level
Upper Torque
Level
Lower Torque
Level
LOAD LOAD LOAD
TIME TIME TIME
Example:
Lower Level
Upper Level
= 20 N.m
= 0 N.m
Example:
Lower Level
Upper Level
= 10 N.m
= 20 N.m

ASG, Division of Jergens, Inc.
15700 S. Waterloo Road | Cleveland, OH 44110-3898 | Phone: (888) 486-6163 | Fax: (216) 481-4519 | Email: [email protected] | www.asg-jergens.com
Page 13 of 15
Main Menu (Continued)
Memory
This is used to view the saved record, delete the last record, or delete all records.
• To access the Memory menu, press the MENU/ESC key, the display will show
the main menu page. Use the UP and DOWN ARROW keys to move the cursor
point to MEMORY. Press the ENTER key. The display will show the Memory
menu page.
• In this sub-menu, memory is able to be viewed, delete last, or delete all
• Press the ESC key to return to the main menu page
View
Load Default
This is used to view all saved records in memory. The detail of each saved record
consists of mode, reading value with unit, and direction.
• To access the View menu, press the MENU/ESC key, the display will show the
main menu page. Use the UP and DOWN ARROW keys to move the cursor
point to MEMORY. Press the ENTER key. Press the UP and DOWN ARROW
keys to move the cursor point to VIEW and press the ENTER key.
• Use the UP and DOWN ARROW keys to scroll through the readings
• Press the ESC key to return to the memory menu page
The Load Default setting is used to restore the auto-shutdown, auto-reset, and pass-
fail to its original setting. These features will all be turned off.
• To access the Load Default menu, press the MENU/ESC key, the display will show
the main menu page. Use the UP and DOWN ARROW keys to move the cursor
point to SETTING. Press the ENTER key. Press the UP and DOWN ARROW keys to
move the cursor point to LOAD DEFAULT and press the ENTER key.
• Press the ENTER key to reset to default settings
• Press the ESC key to return the main menu page
DTT-L Series Digital Torque Testers
User Manual
LOAD DEFAULT
AUTO-SHUTDOWN OFF=
=
=
OFF
OFF
AUTO-RESET
PASS-FAIL
Press ENTER > Accept

ASG, Division of Jergens, Inc.
15700 S. Waterloo Road | Cleveland, OH 44110-3898 | Phone: (888) 486-6163 | Fax: (216) 481-4519 | Email: [email protected] | www.asg-jergens.com
Page 14 of 15
Main Menu (Continued)
Delete All
Calibration
This is used to delete all saved records.
• To access the Delete All menu, press the MENU/ESC key, the display will show
the main menu page. Use the UP and DOWN ARROW keys to move the cursor
point to MEMORY. Press the ENTER key. Press the UP and DOWN ARROW
keys to move the cursor point to DELETE ALL and press the ENTER key. Press
the UP or DOWN ARROW keys to move the cursor point to DELETE ALL and
press the ENTER key. The display will show the Delete All menu page.
• Press the ESC key to return to the memory menu page
• Press the UP or DOWN arrow keys to select NO or YES. If you select NO and
press the ENTER key, the meter will return to the memory menu page. If you
select YES and press the ENTER key, the meter will delete all saved records and
return to the memory menu page.
DTT-L Series Digital Torque Testers
User Manual
Delete Last
This is used to delete the last saved record.
• To access the Delete Last menu, press the MENU/ESC key, the display will
show the main menu page. Use the UP and DOWN ARROW keys to move
the cursor point to MEMORY. Press the ENTER key. Press the UP and DOWN
ARROW keys to move the cursor point to DELETE LAST and press the ENTER key.
The display will show the Delete Last menu page.
• Press the ESC key to return to the memory menu page
• Press the UP and DOWN ARROW keys to select NO or YES. If you select NO and
press the ENTER key, the monitor will return to the memory menu page. If you
select YES and press the ENTER key, the meter will delete the last saved record
and return to the memory menu page.
ASG service technicians to calibrate the meter; please contact ASG for additional
calibration information.

ASG, Division of Jergens, Inc.
15700 S. Waterloo Road | Cleveland, OH 44110-3898 | Phone: (888) 486-6163 | Fax: (216) 481-4519 | Email: [email protected] | www.asg-jergens.com
Page 15 of 15
Main Menu (Continued)
About
This shows the information regarding your tester (model, capacity, rmware revision,
serial number).
• To access the About menu, press the MENU/ESC key, the display will show main
menu page. Use the UP and DOWN ARROW keys to move the cursor point to
ABOUT. Press the ENTER key. The display will show the ABOUT menu page.
• Press the ESC key to return to the main menu page
Transducer State
This is used to check the status of the transducer. If you suspect that your transducer
has sustained an overload, check the status of the transducer immediately. To
access the Transducer State menu, press the MENU/ESC key, the display will show
main menu page. Use the UP and DOWN ARROW keys to move the cursor point to
TRANSDUCER STATE. Press the ENTER key. Press the UP and DOWN ARROW keys
to move the cursor point to VIEW and press the ENTER key.
• Place the meter horizontally on a at level surface and go to the main menu page
• Use the UP and DOWN ARROW keys to move the cursor point to TRANSDUCER
STATE and press the ENTER key
• The display will show the TRANSDUCER STATE menu page. Press the ESC key to
return to the main menu page
• If the % offset is greater than 10%, please contact ASG to arrange for evaluation
• Transducer state offset number is for reference only and does not determine
whether the transducer is yielded
• These values are given only as an indicator – the need for repair may vary
according to the individual characteristics of the transducer
DTT-L Series Digital Torque Testers
User Manual
This manual suits for next models
6
Table of contents
Other ASG Test Equipment manuals