ASM TAPS AC63231 User manual

IT - ISTRUZIONI DI MONTAGGIO
EN - ASSEMBLY INSTRUCTIONS
DE - MONTAGEANLEITUNG
FR - INSTRUCTIONS DE MONTAGE

420 mm 53 mm
3x 1x
1x
390 mm
3x
MAX 70°C
BEST 38/40°C
BAR
MIN 1 Bar
MAX 5 Bar
BEST 3 Bar
1x
mm 2200-2400
mm
1700-1900
390 mm
IT-Dimensioni sede telaio
EN-Hole cut size
DE-Rahmensitz Abmessungen
FR-Dimensions du siège du cadre
1x 1x
1x

2
3
10’
IT-Cavo di sicurezza (se fornito)
EN-Safety cable (if supplied)
DE-Sicherheitskabel (sofern vorhanden)
FR-Câble de sécurité (si fourni)
3x
4
1
Ch. 2 mm
IT-Telaio allineato al softto
EN-Align frame to ceiling
DE-Rahmen aus der Decke ausgerichtet
FR-Installz le cadre bien aligné au plafond
IT-Usare per il ssaggio
EN-Use clamps for xing
DE-Zum Befestigen verwenden
FR-Utiliser pour la xation
5
IT-Entrata
EN-Inlet
DE-Eintrag
FR-Entrée

EN - Always turn voltage off before performing any operation on the electric system.
IT - Prima di qualsiasi operazione togliere sempre la tensione all’impianto.
EN - Install the Class 2 - 12 Vac +/- 3% - Min. 35 VA device in zone 3, as per the IEC regulations about safety distance.
IT - Installare l’alimentatore Class 2 - 12 Vac +/- 3% - Min. 35 VA nella zona 3 conforme alle distanze di sicurezza previste dalle
normative CEI.
IT - Collegamento elettrico
EN - Electrical connection setup
240 Vac - 1,5 m
IT-Scatola di derivazione con alimentatore
EN-Junction box with power supply
DE-Verteilerkasten mit Netzteil
FR-Boîte récepteur avec alimentation
IT- Interruttore ON/OFF (bipolare)
EN- ON/OFF bipolar switch
DE-Ein / Aus-Schalter. (bipolar)
FR-Interrupteur marche / arrêt. (bipolaire)
150x110x70
IT- Sofone
EN- Rainshower
DE-Duschkopf
FR-Pomme de douche
IT-Tensione
EN-Voltage
DE-Stromspannung
FR-Tension
Frequenza
Frequency
Frequenz
La fréquence
Potenza nominale Max.
Max. rated power input
Max. spezizierte Leistung
Max. puissance d’entrée
nominale
Grado di protezione parti elettriche
Protection level of electrical parts
Schtzgrad für elektrische Teile
Niveau de protection des pièces
électriques
Grado di protezione pulsante
Button protecion level
Schutzgradknopf
Niveau de protection des boutons
100-240 VAC
/
IT- 12V - 5 m
DE - Installieren Sie das Netzteil der Klasse 2 - 12 V DC +/- 3% - Min. 35 VA in Zone 3 gemäß den Sicherheitsabständen, die in
den CEI-Vorschriften vorgeschrieben sind.
FR - Installez l’appareil Classe 2 - 12 Vca +/- 3% - Min. 35 VA dans la zone 3 en respectant les réglementations CEI sur la distance
de sécurité.
6 7
Ch. 2 mm
220 mm
IT-Cascata
EN-Waterfall
DE-Wasserfall
FR-Cascade
300 mm
IT-Pioggia
EN-Rain
DE-Regen
FR-Pluie
550 mm
IT-Nebulizzatori
EN-Nebulisers
DE-Sprühdüsen
FR-Nébuliseurs

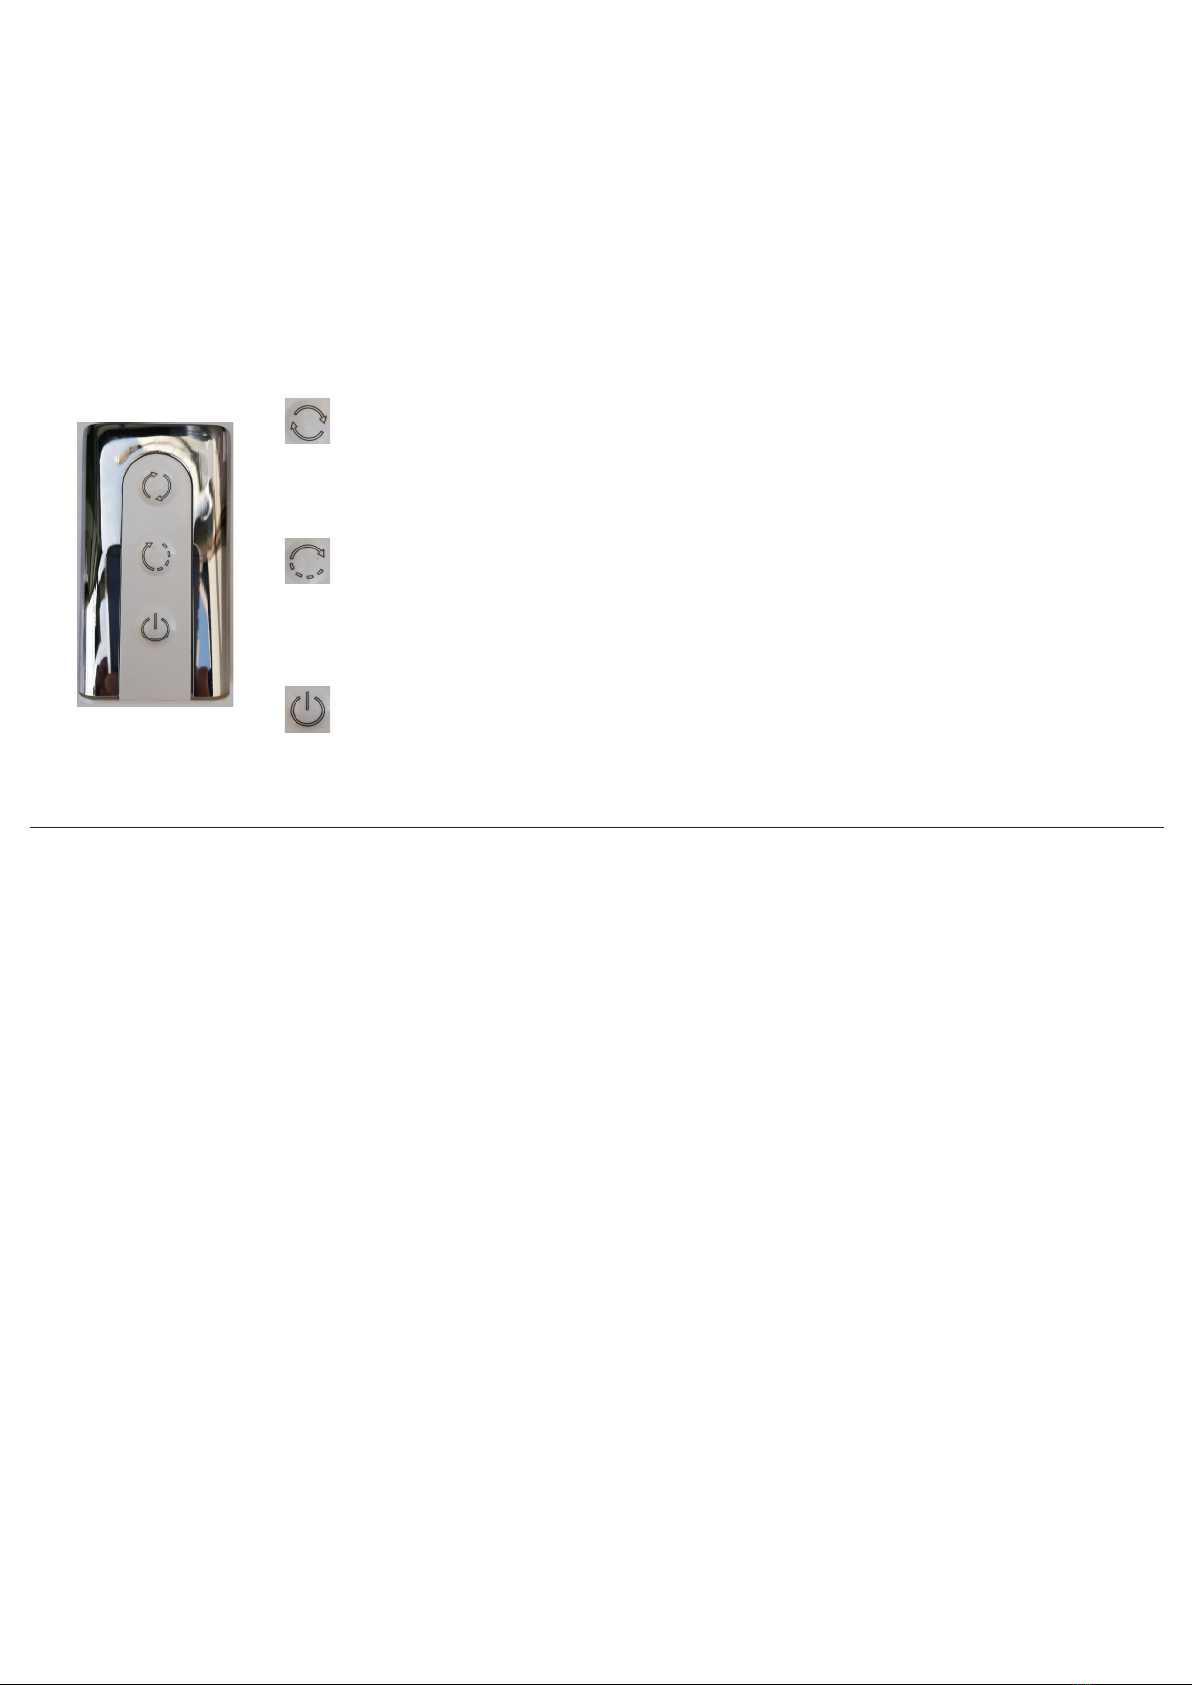
EN-Mode of operation of the RGB LED
IT- Tasto ON/OFF
EN- ON/OFF switch
DE-Ein-/ Aus-Schalter
FR-Allumer / éteindre
IT- Scelta manuale del colore
EN- Manual color selection
DE-Manuelle Auswahl der Farbe
FR-Choix de coleur
IT- Cromoterapia modalità automatica, rotazione colori come sequenza ogni minuto.
EN- Automatic chromotherapy, color rotation every minute following the sequence above.
DE-Automatische Farbtherapie, Farbrotation als Sequenz jede Minute.
FR-Chromothérapie mode automatique, rotation des couleurs en séquence toutes les minutes.
IT - Sequenza colori: Bianco - Rosso - Verde - Blu - Giallo - Fucsia - Azzurro.
EN- Color sequence: White – Red – Green – Blue – Yellow – Fuchsia – Bright Blue.
DE-Farbfolge: Weiß - Rot - Grün - Blau - Gelb - Fuchsia - Hellblau.
FR-Séquence de couleurs: blanc - rouge - vert - bleu - jaune - fuchsia - bleu vif.
FR-Mode de fonctionnement de la LED RVB
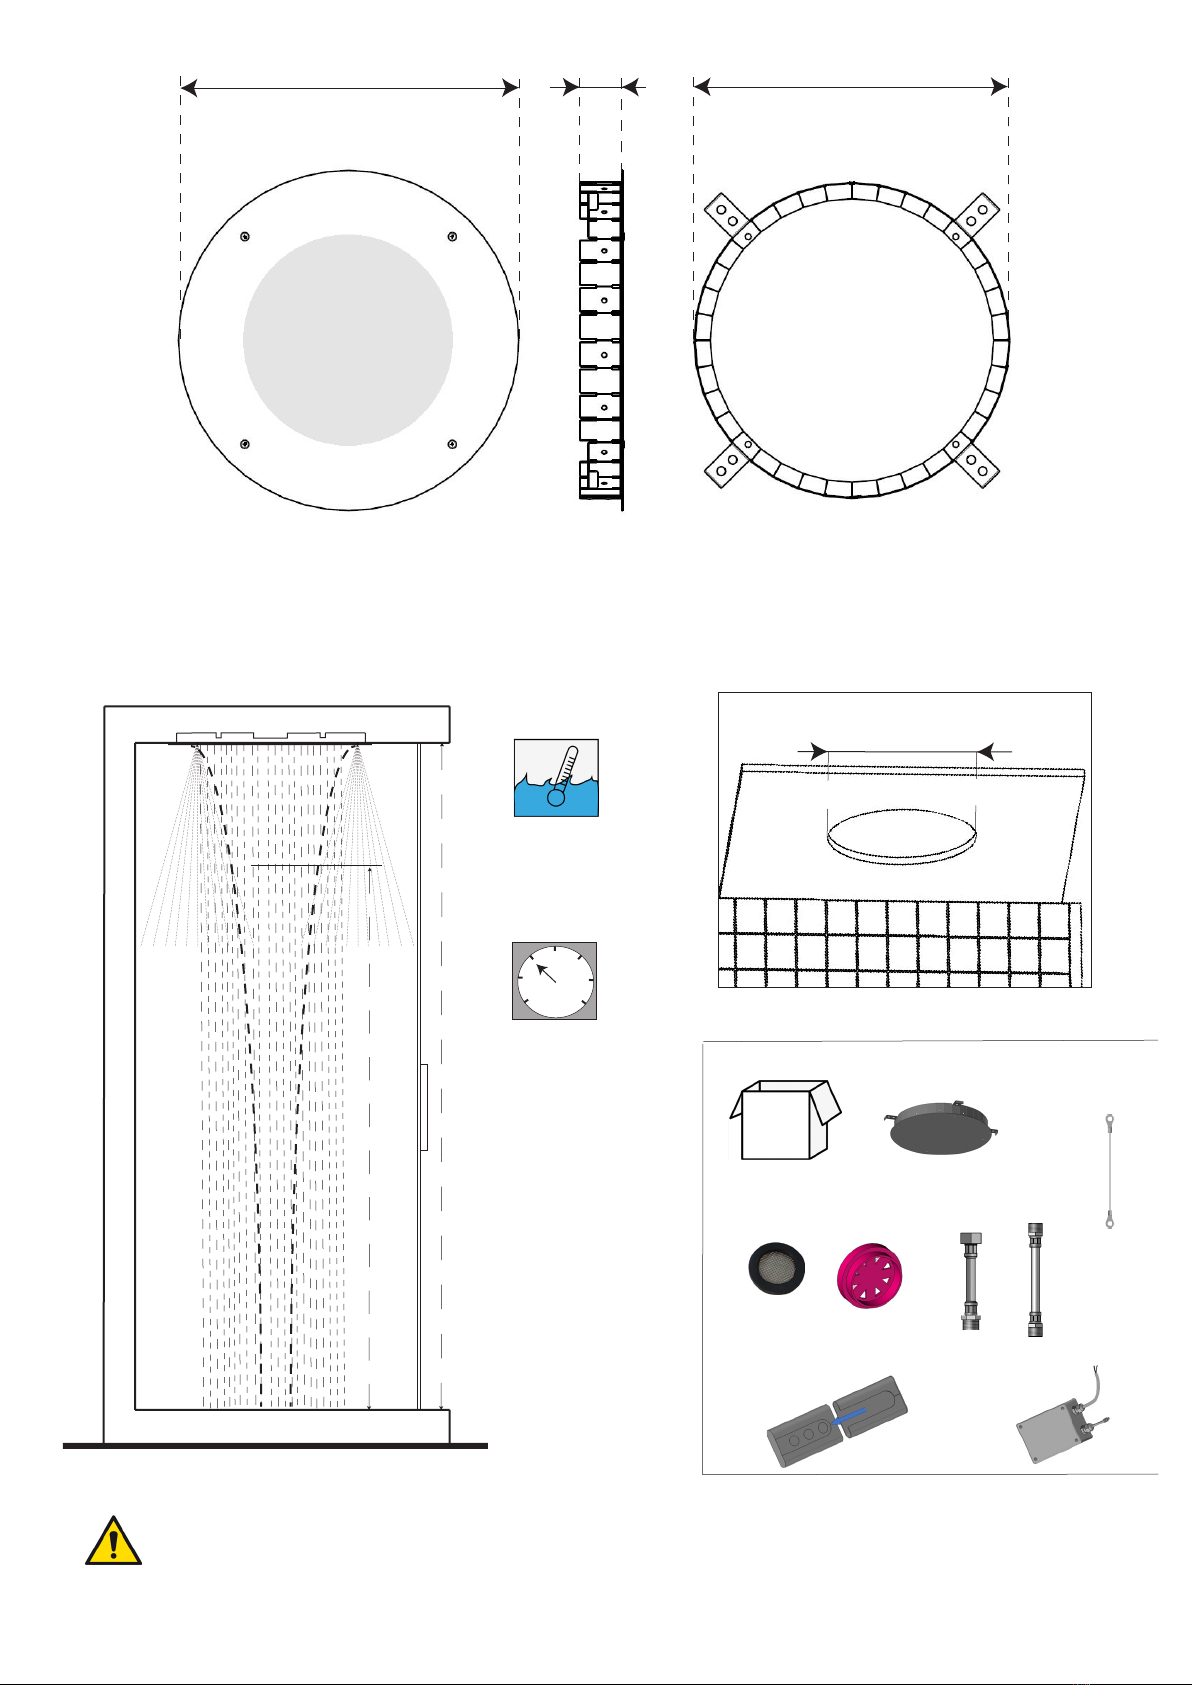
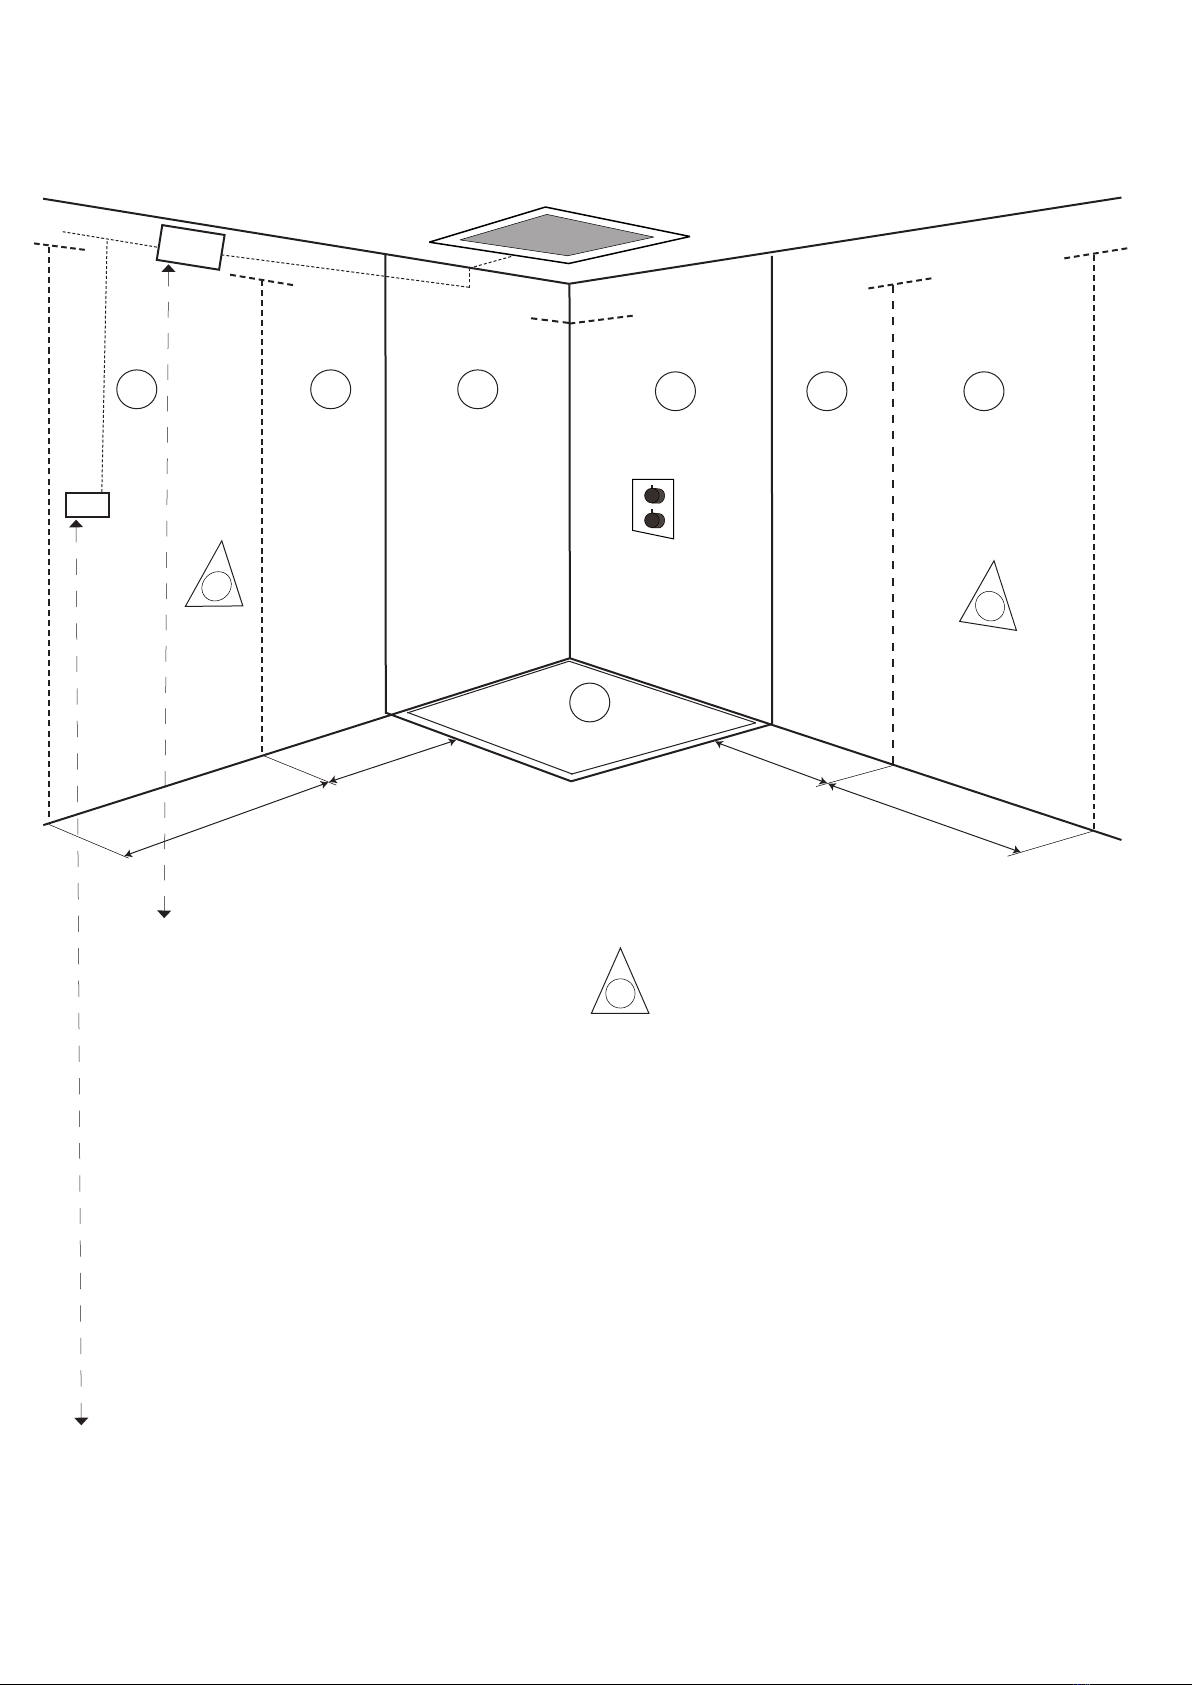
IT - PRIMA INSTALLAZIONE
Abbinamento telecomando:
1. Impianto spento
2. Inserire le batterie formato
AAA alcaline nel telecomando
3. Alimentare la corrente
dell’impianto e attendere 10
secondi
4. Premere il tasto centrale del
telecomando entro 30 secondi
5. Abbinamento OK!
• Durante l’abbinamento
wireless le luci del prodotto
lampeggiano di rosso.
• La procedura di abbinamento
deve essere fatta una sola
volta, tuttavia in caso di
• spegnimento e riaccensione il
sistema non è operativo sulle
luci nei primi 60 secondi.
N.B.: Non utilizzare batterie
ricaricabili
EN - FIRST INSTALLATION
Remote Control pairing:
1. Turn the system off
2. Insert the AAA size alkaline
batteries into the remote
control
3. Power the system on and wait
for 10 seconds
4. Press the center on the
remote control within 30
seconds
5. Pairing accomplished!
• During the pairing process,
the rain shower will briey
ash red.
• The pairing procedure needs
only be done once, however
in the event of powering it
off and then on again the
system’s light will not be
operational during the rst 60
seconds.
NB: Do not use rechargeable
batteries
DE - ERSTE INSTALLATION
Fernbedienungspaarung:
1. Schalten Sie das System aus
2. Legen Sie die Alkalibatterien
der Größe AAA in die Fernbe-
dienung ein
3. Schalten Sie das System ein
und warten Sie 10 Sekunden
4. Drücken Sie innerhalb von 30
Sekunden die mittlere Taste
auf der Fernbedienung.
5. Paarung durchgeführt!
• Während des Pairing-Vorgan-
gs blinkt der Regenschauer
kurz rot.
• Das Pairing-Verfahren muss
nur einmal durchgeführt
werden. Wenn das System
aus- und wieder eingeschal-
tet wird, ist das Systemlicht
während der ersten 60 Sekun-
den nicht betriebsbereit.
Hinweis: Verwenden Sie keine
wiederauadbaren Batterien
FR - PREMIÈRE INSTALLATION
Appariement de la télécommande
à la douche pluie:
1. Éteignez le système, s’il vous
plaît
2. Insérez les piles alcalines AAA
dans la télécommande
3. Allumez le système et atten-
dez 10 secondes
4. Appuyez sur le bouton central
de la télécommande dans les
30 secondes.
5. Appariement accompli!
• Au cours de la procédure de
couplage, la douche pluie
clignotera brièvement en
rouge.
• La procédure de couplage ne
doit être effectuée qu’une
seule fois. Toutefois, si vous
l’éteignez puis rallumez le
système, le voyant ne sera pas
opérationnel pendant les
60 premières secondes.
NB: Ne pas utiliser de piles
rechargeables
IT - Telecomando Cromoterapia - EN - Chromotherapy remote control
DE - Fernbedienung für Chromotherapie - FR - Télécommande pour la Chromothérapie

IT- SCATOLA DI DERIVAZIONE
Ipotetica posizione per scatola di derivazione
(cavo di 1,5 m 240Vac, esterna a cabina doccia).
EN- JUNCTION BOX
Ideal position of the in-wall junction box
(cable:1.5 m, 240Vac. outside the shower box).
DE- VERTEILERKASTEN
Bestmögliche Position für Verteilerkasten (1,5 m
240 VAC Kabel, außerhalb der Duschkabine)
FR- BOÎTE RÉCEPTEUR
Position hypothétique de la boîte de jonction dans
le mur
(câbles de 1,5 m, 240 Vac. l’extérieur de la cabine
de douche).
Norme CEI
IEC regulations
IEC-Normen
IT- Zona (3) d’installazione della scatola di derivazione.
EN- Installation area (3) for the junction box.
DE- Gebiet (3) der Installation des Verteilerkasten
FR- Zone d’installation (3) de la boîte de jonction.
EN- Electrical setup
FR- Installation électrique
A
A
A
12 V
240 Vac
225 cm
225 cm
240 cm
60 cm
60 cm
240 cm
1
12
23
3
0
225 cm
225 cm
IT- Interruttore ON/OFF (bipolare), consigliato.
EN- ON/OFF switch (bipolar), recommended.
DE- EIN / AUS-Schalter (bipolar), empfohlen.
FR- Interrupteur ON / OFF (bipolaire), recommandé.
IT- Sofone
EN- Rainshower
DE-Duschkopf
FR-Pomme de douche

Cleaning every
week
DO NOT USED DETERGENT
CL
Die falsche Verwendung
Dommages causés par des dépôts de calcaire ou
IT - ATTENZIONE: Si declina ogni responsabilità relativa ad eventuali inesattezze contenute in queste istruzioni
dovute ad errori di trascrizione.
We decline all responsibility for eventual inaccuracy contained in the instructions due to
transcript errors.
Wir lehnen jede Verantwortung für Ungenauigkeiten in diesen Anleitung aufgrund von
Transkriptionsfehlern ab.
FR - ATTENTION: Nous déclinons toute responsabilité pour toute inexactitude contenue dans ces instructions
en raison d’erreurs de transcription.

I.21008.rev01
Popular Plumbing Product manuals by other brands

Toto
Toto REI S quick start guide

Franke
Franke F5ET1001 Installation and operating instructions

MEFE
MEFE CAT 679178 installation manual

VILLEROY & BOCH GROUP
VILLEROY & BOCH GROUP Gustavsberg Estetic 150 c-c Mounting instructions

Lefroy Brooks
Lefroy Brooks M1-4301 Installation, operating, & maintenance instructions

Kohler
Kohler K-T944 installation guide

Viega
Viega 8040.18 Instructions for use

American Standard
American Standard Amarilis 8871.000 Specification sheet

American Standard
American Standard Swan 6011 installation instructions

Speakman
Speakman CPT-25001 instructions

Kraus
Kraus KBF-1401 installation manual

Galvin Specialised
Galvin Specialised GalvinCare 50197 Product installation guideline