Cistermiser Easyflush EVO 1.5 User manual

EasyflushEVO
EVO 1.5"
EVO 2"
EVO CISTERN
S
U
S
T
A
I
N
A
B
I
L
I
T
Y
A
W
A
R
D
S
2
0
2
2

2 | cistermiser.co.uk Have a question? Call our customer support team on 0118 969 1611 Have a question? Call our customer support team on 0118 969 1611 cistermiser.co.uk | 3
EVO CISTERN
1Outlet O-ring
2Outlet
3Outlet washer
4Outlet nut
5Cap seal
6Cap washer
7Cap nut
8Flush valve
9Cistern
10 Cistern lid
11 Flush pipe
12 Inlet Valve
13 IR Sensor unit
14 Sensor gasket
15 Sensor nut
16 Clamp plate
17 Screw packer
18 IR activation label
walk & wave
19 Mains transformer
20 Clampplatexingscrew
21 Mainstransformerxingscrews
22 Battery case
23 Sticky pad
Supplied parts
EVO 1.5" / EVO 2"
1Outlet O-ring
2Outlet
3Outlet washer
4Stem washer with boss
5Outlet nut
6Cap seal
7Cap washer
8Cap nut
9Flush valve
10 IR Sensor unit
11 Sensor gasket
12 Sensor nut
13 Clamp plate
14 Screw packer
15 IR activation label
walk & wave
16 Mains transformer
17 Clampplatexingscrew
18 Mains transformer
xingscrews
19 Battery case
20 Sticky pad
1. Introduction
EasyflushEVOisaninfraredactivatednon-touchsiphonWCushingvalve.
Availableasaushvalvewitha1.5"or2"outletandasaushingcistern.Non-touchactivationviawave
(default)orwalkawayiscongurableduringinstallation.
1
5
3
2
4
10
11
6
8
7
9
14
12
13
16
17
1
5
3
2
4
6
7
8
9
10
14
11 15
12
13
16
17
18
22
21
20
15
18
23
19
Optional extras
Remote Controller Programmer (ICU)
Multi Product Power Supply Unit (PSUC)
Side Front Adaptor (SFA)
EasyflushEVO
IFSextensioncable1.5m(IFS/10)
19
20 x4
x4
x4
x4

4 | cistermiser.co.uk Have a question? Call our customer support team on 0118 969 1611 Have a question? Call our customer support team on 0118 969 1611 cistermiser.co.uk | 5
2. Valve Operation
EasyflushEVOisasiphonicushingvalve.Whenaushisactivatedthespilloverlevelisloweredbelowthe
waterlineinitiatingasiphonandushingthecistern.
WARNING:
Cistern must be level!
Idle position Flush position
water level: 6 litre
3. Valve Installation
Beforecommencinginstallation,isolatemainspowersupplyandwatersupply.
TheushisactivatedbytheIRSensorunit.Thiscanbeconguredtoushonawave(default)orush
when the user walks away:
Wave (default): Walk Away:
Memory Flush:
Ifaushisactivatedwhilethecisternisrelling,thesensorwillremembertheushrequestandonly
activatewhenthecisternisfull(tosetrelltimeseepage12).
ThisisindicatedbythreerisinggreenLEDs.
To Flush
1secWave=Half Flush
Presence>45sec=Full Flush
2secWave=Full Flush
Auto Flush
Presence<45sec=Half Flush
Fit Cistern (Cistern supplied with
EVOCISTERNonly).Ensure
cisternismountedlevel.
InstallOutletttingintoCistern. Fit EasyFlushEVO Flush Valve
toOutletincistern.Secureby
rotatingclockwise.
✗ ✗ ✔✔

6 | cistermiser.co.uk Have a question? Call our customer support team on 0118 969 1611 Have a question? Call our customer support team on 0118 969 1611 cistermiser.co.uk | 7
NOTES:
Do not position sensor near toilet roll holder
orgrabrail.
Reectivesurfacesandmaterialssuchas
hi-vis jackets may cause the sensor to
activateunexpectedly.
Walkaway version only.
Minimum distance
applies.
Ifx(seediagram)islessthan12cmit
is recommended that the Hand Activation is
disabled.Refertosection11.
4. EasyflushEVO Valve Set up
Ensurethellvalveisadjustedsothewatershutsoattheindicatedwaterlevelontheushvalve.Thisis
yourfullushvolume.
The height of the EasyflushEVOushvalvewaterlevelandthellingvalveoatlevelmust be at the
sameheight.
To adjust EasyflushEVO Fill Valve rotate
the adjuster at top of valve
EasyflushEVO Flush
Valve water level
Unlock
To adjust height of EasyflushEVO
Flushing Valve rotate upper body
clockwisetorelease.
Adjust
Lift or lower upper body to adjust
height.
Lock
Rotateanticlockwisetolock.
5. Sensor Positioning
EasyflushEVOcanbeoperatedbyWaveactivation(default)orWalkawayactivation.Theinstalledpositionof
thesensorwilldependonyourushactivationsetting(seebelow).
WaveactivationisthedefaultsettingandtheWCwillushwhentheuser’shandisplacedinfrontofthesensor.
Alternatively,withtheWalkawayactivationsetting,theWCwillautomaticallyushwhentheuserleavesthecubicle.
SeeConginsection12tochangethesensoractivationfromWavetoWalkaway.
Top
WC
Front
Side
WCWC
300–400mm
700–900mm
Exposed installation
Cistern mounted sensor
(Wave activation only, default)
Concealed installation
Panel mounted sensor
(Wave activation only, default)
Concealed installation
Panel mounted sensor
(Walkaway activation only)
x
Drillholetotherequired
diameter(refertopage8).

8 | cistermiser.co.uk Have a question? Call our customer support team on 0118 969 1611 Have a question? Call our customer support team on 0118 969 1611 cistermiser.co.uk | 9
Panel mounted sensor installation
Cistern mounted sensor–Waveversiononly
Sensor gasket
Ø38mm
Apply
sanitary
silicone
sealant
Sensor nut
3–15mm
Ø44mm
Apply
sanitary
silicone
sealant
Sensor
gasket
Sensor nut
15– 30mm
Apply
sanitary
silicone
sealant
M4
screw
Clamp plate
(reversible)
6mm packer
(See note*)
30– 38mm
Side/frontadaptor
NOTE:
Forholesbetween40and50mmcontact
Cistermiserforaholeadapter.Aholediameter
largerthan50mmisanonstandardinstallation.
Sensor gasket
Sensor
fastening nut
Sensor xing Mounting options
NOTE:
*Ifwallthicknessisunder32mmusepackertopreventscrewcausingdamagetosensor
NOTE:
Side/frontadaptorrequired.Notsuppliedwith
standardproductbutavailableasanextra.
Contact Cistermiser for further details or order
online at www.cistermiser.co.uk
Thin wall Medium thickness wall Thick wall
6. Power Connections
Isolatemainspowersupplybeforeproceeding.Mainswiringshouldbeundertakenbyacompetent
person.
BatteryCase–Opencaseandt4xAA(LR-6)batteries.UsettingsprovidedorclipontoEasyflushEVO
FlushValve.
MainsAdaptor–Fastenonapanelinadrylocationusingscrewsorstickypadsprovided.Connectthe
un-terminatedcabletoa50Hz230VAVsinglephasesupplyviaa1Afusedspur(notsupplied).
NOTE:
Remove sticky label from
sensorlensbeforeuse.
NOTE:
Either Battery OR Mains can
beconnected,notboth.
Multiple power connections for EasyflushEVO
If installing multiple Cistermiser products, the PSUC Multi Product Power Supply Unit is available as an
accessory.ContactCistermiserformoredetails.
Multi product power supply unit
(Notsupplied,contactCistermiserfor
furtherdetails).Suitableforpowering
upto10EasyflushEVOunits.
(2)ConnectbatterypackOR
mains adaptor to IR Sensor
unit(2-wayconnector)
CAUTION:
Riskofelectricshock.
Isolate supply before
working on wiring
(1)ConnectIRSensor
unit to Flush Valve
(3-way connector)
NOTE:
Always connect Sensor to Flush
Valvebeforeconnectingpower.
Ø38mm

10 | cistermiser.co.uk Have a question? Call our customer support team on 0118 969 1611 Have a question? Call our customer support team on 0118 969 1611 cistermiser.co.uk | 11
7. Testing and Commissioning
Ensureushvalveandllvalvearesettothesameheightlevel(seepage6)sothewaterlevelisatthe
markontheFlushvalve.
Ensurecisternislevelandcheckforleaks.
Activateushviasensorormanualoverridetoverifyoperation.
Sensor LED Glossary
FullushviaWaveor
Walkaway-2green LEDs
singleashoncepersecond
Scratchedlens/blockedsensor
- 3 redLEDssingleashonce
per second
Part Flush via Wave or
Walkaway-1green LED
singleashoncepersecond
Servo motor obstruction
(Call Cistermiser for advice) -
2redLEDssingleashonce
per second
Memoryush/relling
Alternating, 3 green LEDs
rising...
Faultywiring-2red LEDs
singleashoncepersecond
Lowbattery/powerfault-1
redLEDsingleashonceper
second
NOTE:
For chemical water treatment. If the water system has been treated with chemical dosing, ensure the
systemisthoroughlyushedbeforettinganyCistermiserproducts.Concentratedchemicalsindead
legscandamagetheproductandresultinfailure.IfthewateristreatedwithChlorineDioxide(ClO2),
ensureconcentrationlevelsaremaintainedbelow5ppm.
Lift override lever to
activateush
Ensure lever is returned
to lower reset position
8. Maintenance
Fillvalve(suppliedwithEVOCISTERNonly):Periodicallyrinsetheinletlterandvalvediaphragm.Ifthe
diaphragmisdamagedcontactCistermiserforareplacement.
Youmayrinsethelterorthemembranetomaintainyourllvalve.
Ifthemembraneisdamaged,youneedtoreplaceit.
*AmberLED=Conguration

12 | cistermiser.co.uk Have a question? Call our customer support team on 0118 969 1611 Have a question? Call our customer support team on 0118 969 1611 cistermiser.co.uk | 13
9. Usage advice and specication
Factory settings
Range (EF Wave): ~10cm
Range (EF Walkaway): ~55cm(~6cmforhandactivation)
Relldurationafterpartush: 40seconds
Relldurationafterfullush: 60seconds
Partushduration: 2¾ seconds
Fullushduration: 6 seconds
Powerrequirements: Either6Vfrom4xalkalineAA(LR6)batteriesor6VDC
regulatedfrommainsadaptor(1Afusedspurrequired)
Normalbatterylife: 27000cycles
Cleaning: Clean with soap and water only
Lens care: Infrared lens can be polished with a soft cloth
Electronic specication
Controlclassication: Independent
Maximumload: 1A(6W)at6VDC
Rated temperature range: 0-40°C
Mains power supply: 100-250VAC50/60Hz1AMAX
Fill Valve (supplied with EVO CISTERN only)
Minimum working pressure: 0.1bar
Maximumworkingpressure: 10bar
10. Component dimensions
EVO 1.5"& EVO 2"
EVO CISTERN
446
263
316.5
TO BOTTOM OF CISTERN
200.00
30
6 LITRE
CRITICAL
WATER
LEVEL
119.5
122.5 - 182.5
WATER LEVEL
101
OVERALL HEIGHT RANGE 239.5 - 299.5
60mm HEIGHT ADJUSTMENT
EVO - 1.5" outlet
EVO 2 - 2.0" outlet

14 | cistermiser.co.uk Have a question? Call our customer support team on 0118 969 1611 Have a question? Call our customer support team on 0118 969 1611 cistermiser.co.uk | 15
Wave sensing range adjustment (this will restore default settings)
Wait for 1xtriple
red LEDs to enter
wave/walkaway
setting
Sensorwillashsingle
central green LED
for wave mode
During the triple redashbriey
place your hand in front of
thesensor.
Thesensorwillashonecentral
green LED to indicate wave function,
to change function put your hand in
frontofthesensorfor3second.
A B
Cordoubletop/bottomgreen
LEDs for walkaway mode
11. Advanced settings guide
Carryoutonlyifsettingsneedtobechanged.
1Disconnectpower,waitfor5secondsandreconnect.
Whenashingtripleamber.
Ifahandisnotplacedoverthesensor,itwillgointonormaloperationmode.
Placehand4-6cmfromsensor
until constant green, then
removehand.
You are now in conguration mode
2
3
AftercongurationtheLEDswillashtripleamber,givingopportunitytore-entercongurationmode.
4
Wait for bottom red
LED to enter sensing
rangemode.
Brieyplaceyourhandinfrontof
the sensor until the green LED
ashesslowly.Rangeconguration
modewillthenbeready.
Move your hand to the distance from the sensor you would like
tosetasmaximumrange.Wait8secondsuntilconstanttriple
greenLEDsshow.
Sensor distance
isnowset.
A B
C
Wave sensing range adjustment (when Wave variant is selected)
Rell duration adjustment
Wait for 4xtriple
red LEDs to enter
relltime.
Oncethecisternhasrelledcompletelyandthewaterhasceasedtoow,moveyourhand
back into the line of sight of the sensor and triple greenLEDswillshow.Therelltimehas
nowbeenset.
During the triple red ashing,
brieyplaceyourhandinfrontof
thesensor.Thevalvewillushand
thecisternwillrell.Triplegreen
ashingLEDswillbeseen.
A B
C
NOTE:
Partushisautomaticallysettoapproximately⅔offullush
Full ush duration adjustment
Wait for 3xred
LEDstoenterush
duration.
Whenthevalvehasushedforthedesiredfullushtime,moveyourhandoutofthelineof
sight of the sensor and triple greenLEDswillshow.Thewaterwillceasetoowandthe
fullushtimewillbeset.
During the triple red ashing
brieyplaceyourhandinfront
ofthesensor.Thevalvewillstart
toushandtriplegreenashingLEDs
willbeseen.HOLDHANDSTEADY.
A B
C
Stand at the distance from the sensor you would
liketosetasmaximumrange.Wait8seconds
until constant triple greenLEDsshow.
Sensor distance
isnowset.
C
Wait for 2xtriple
red LEDs to enter
sensing rangemode.
Brieyplaceyourhandinfrontof
the sensor until triple green LEDs
ashslowly.Rangeconguration
modewillthenbeready.
A B
Walkaway sensing range adjustment (when Walkaway variant is selected)
X1
X3
X2

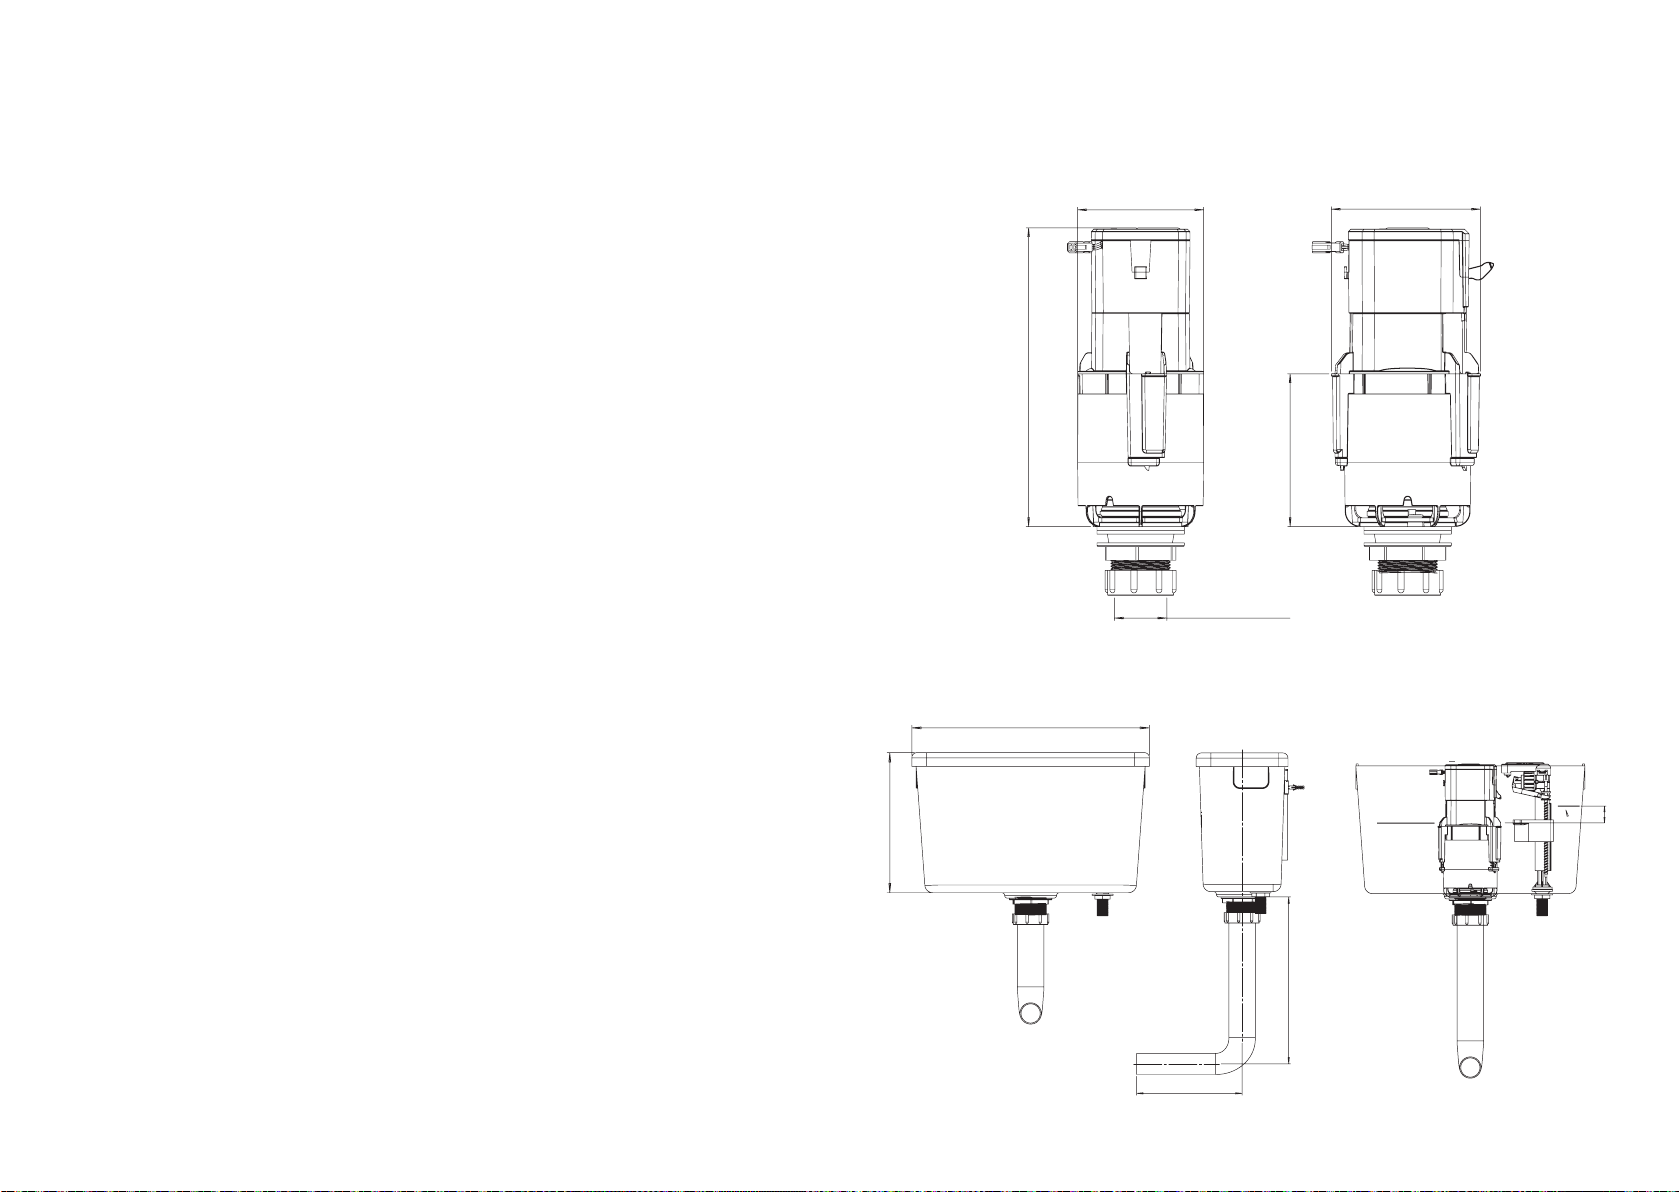
16 | cistermiser.co.uk Have a question? Call our customer support team on 0118 969 1611 Have a question? Call our customer support team on 0118 969 1611 cistermiser.co.uk | 17
12. Infrared Conguration Unit (ICU) guide
Entering conguration mode
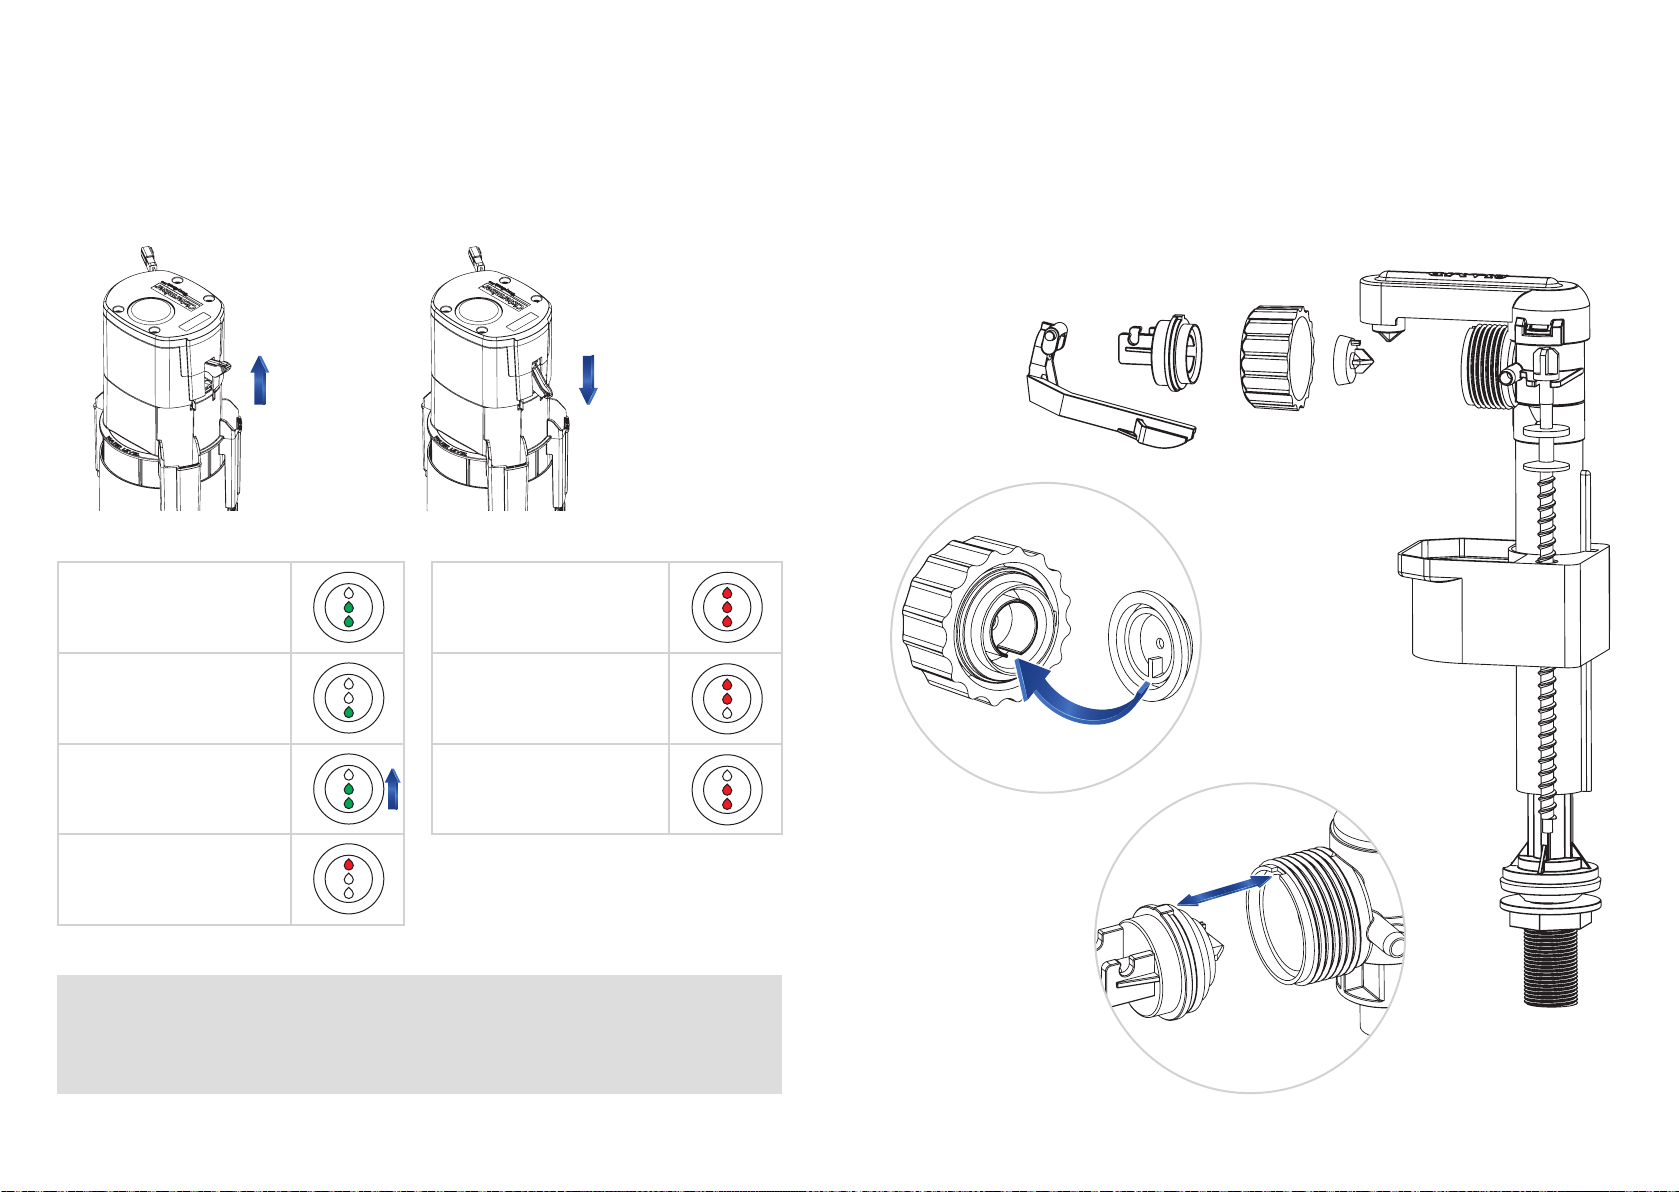
Point the ICU towards the EasyflushEVO sensor
andpresstheconguration button, LEDs will
ashamber.Activationismosteectivewhenthe
congurationbuttonishelddownastheICUis
broughtclosetothesensor.
It can take up to 3 seconds for the product to
sensetheICU.TheEasyflushEVO will return to
normal operation if there are no button presses
for30seconds.
Conguring sensor range
Point the ICU at the EasyflushEVO sensor and
press the 1sensor range button (the sensor
blinks green).
Decrease or increase the sensor range by
pressing the and buttonsrespectively.
Thesensorblinksredwhentheminormax
valueisreached.
Press the button to check the sensor range
setting - the sensor displays the current setting by
ashinggreen;seetable.
SavesettingandexitICUcongurationmodeby
pressing thebutton.
Exitwithoutsavingbypressingthe button.
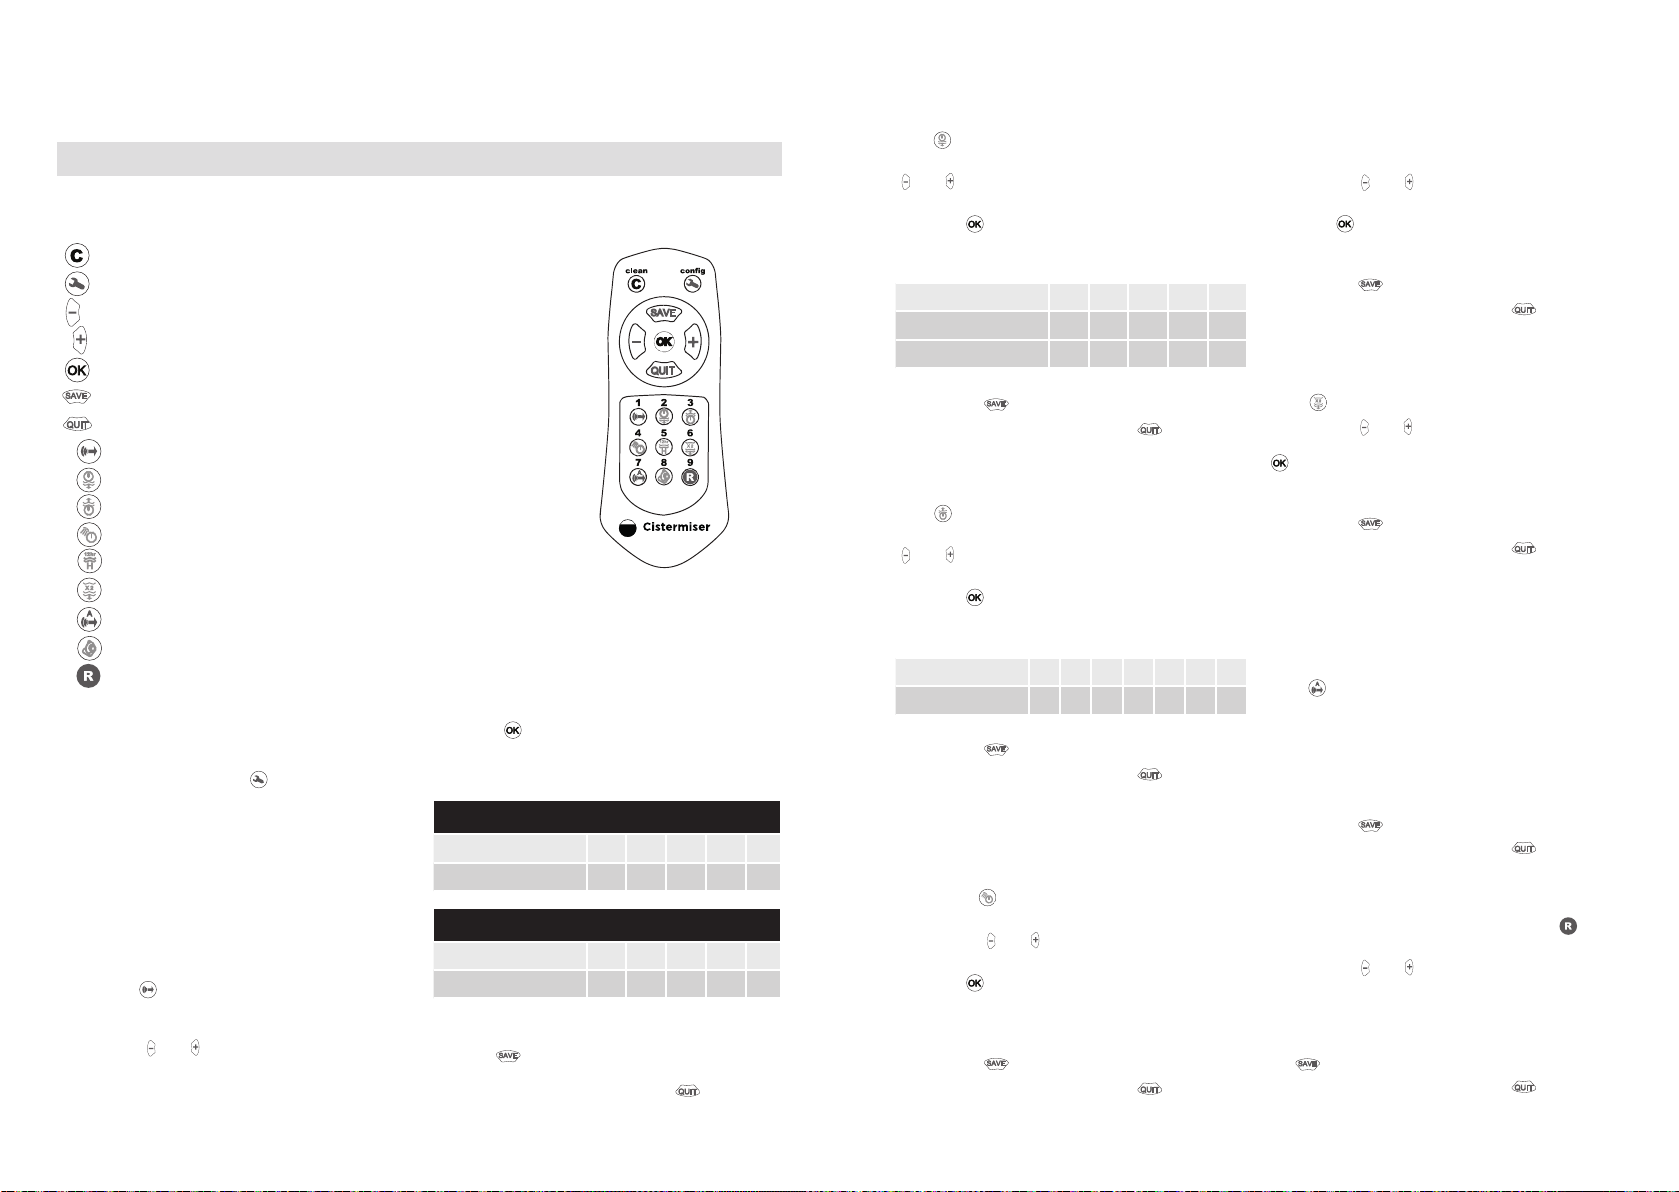
Activates cleaning mode
ActivatesICUcongurationmode
Decreases setting
Increases setting
Checks the setting being altered
SaveschangesandexitsICUcongurationmode
QuitsICUcongurationmodewithoutsavingchanges
Conguressensorrange
Conguresfull/partushtime
Congurescisternrelltime
TogglesWavefunctionON/OFF(WalkawayONLY)
12-hourhygienecycleactivation
Dualushactivation
Autorange setting of sensor range
Nofunction
Switch Wave & Walkaway variants & resets to default
factory settings
5
Button descriptions
1
4
2
3
8
7
6
NOTE: NotsuppliedbutavailablefromCistermiseroranymajorplumbingmerchant.
9
For Wave version
Numberofashes 1 2 34 5
Range(cmapprox) 5 10 15 20 25
For Walkaway version
Numberofashes 1 2 34 5
Range(cmapprox) 45 50 55 60 65
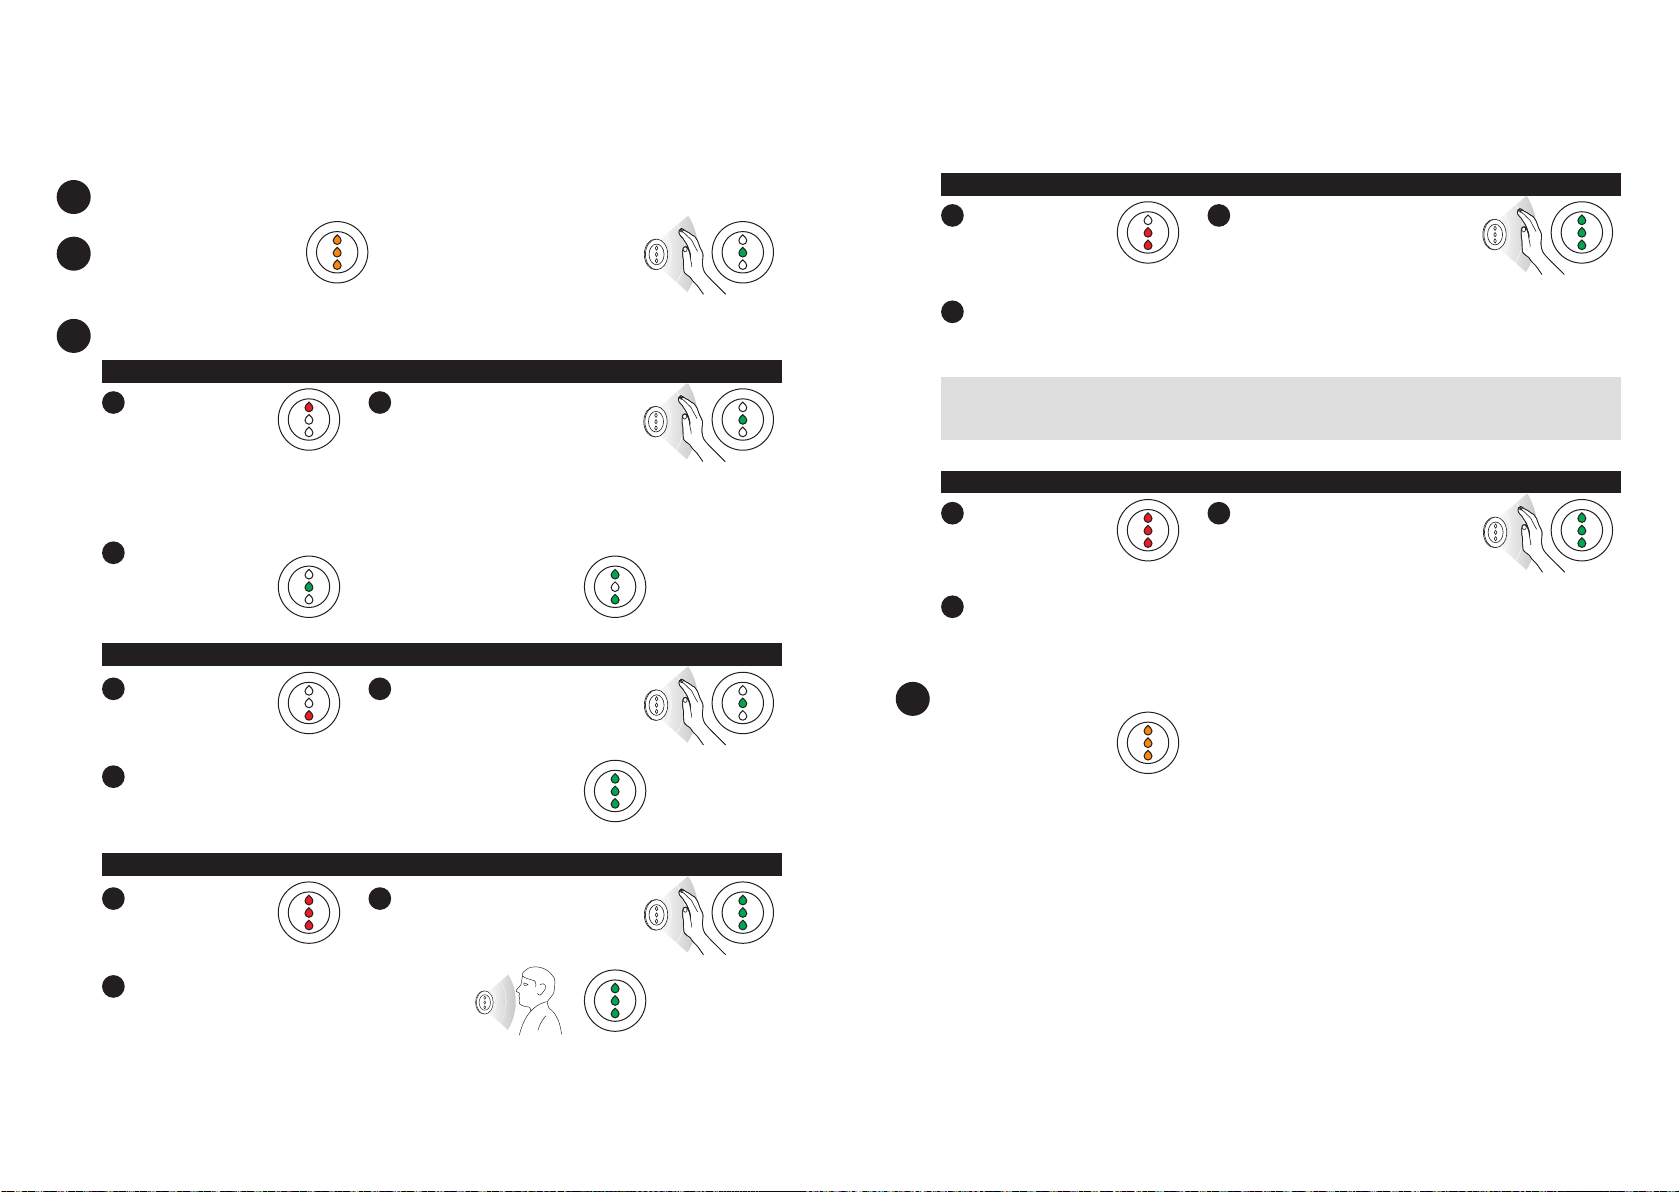
Conguring Full/Part ush time
Point the ICU at the
EasyflushEVO
sensor and press
the 2ushtimebutton(thesensorblinksgreen).
Decreaseorincreasetheushtimebypressingthe
and buttonsrespectively.Thesensorblinks
redwhentheminormaxvalueisreached.
Press the buttontochecktheushtimesetting
-thesensordisplaysthecurrentsettingbyashing
green;seetable.
SavesettingandexitICUcongurationmodeby
pressing the button.
Exitwithoutsavingbypressingthe button.
Conguring rell time
Point the ICU at the
EasyflushEVO
sensor and press
the 3relltimebutton(thesensorblinksgreen).
Decreaseorincreasetherelltimebypressingthe
and buttonsrespectively.Thesensorblinks
redwhentheminormaxvalueisreached.
Press the buttontochecktherelltime
setting - the sensor displays the current setting by
ashinggreen;seetable.
SavesettingandexitICUcongurationmodeby
pressing the button.
Exitwithoutsavingbypressingthe button.
Hand wave ushing (walkaway
mode only) activation and
de-activation
Point the ICU at the EasyflushEVO sensor and
press the 4(the sensor blinks green).By
defaultthehandwavefunctionison.
Pressing the and button switches the hand
wavefunctiononororespectively.
Press the button to check the setting - the
sensorashesgreenonceiffunctionisoor
twiceifitison.
SavesettingandexitICUcongurationmodeby
pressing the button.
Exitwithoutsavingbypressingthe button.
12 hour hygiene ush activation
and de-activation
Point the ICU at the
EasyflushEVO
sensor and press
the hygiene cycle button (the sensor blinks green).
Pressing the and buttons switches the hygiene
ushfunctiononororespectively.
Press the button to check the setting - the sensor
ashesgreenonceiffunctionisoortwiceifitison.
SavesettingandexitICUcongurationmodeby
pressing the button.
Exitwithoutsavingbypressingthe button.
Dual ush activation and
de-activation
Point the ICU at the
EasyflushEVO
sensor and press
the 6(the sensor blinks green).
Pressing the and buttons switches the
dualushfunctiononororespectively.Pressthe
buttontocheckthesetting-thesensorashes
greenonceiffunctionisoortwiceifitison.
SavesettingandexitICUcongurationmodeby
pressing the button.
Exitwithoutsavingbypressingthe button.
Conguring sensor range using
the autorange function
If the cubicle door is opposite the sensor, ensure that
thecubicledoorisclosedorajar,butnotfullyopen.
Point the ICU at the
EasyflushEVO
sensor and press
the 7button.
Immediatelystandclearofthesensor.Sensor
blinks greenfor5seconds,thenasteadygreen
whensettingcomplete.Thesensormeasuresthe
backgroundreectionsandsetsthesensorrange
toanappropriatesetting.
SavesettingandexitICUcongurationmodeby
pressing the button.
Exitwithoutsavingbypressingthe button.
OnlypossiblewhenconguredasWalkaway.
Wave/walkaway conversion
Point the ICU at the sensor and press the 9
button (the sensor blinks green).
Pressing the and button switches the function
toWaveandWalkawayrespectively.PresstheOK
buttontocheckthesetting-thesensorashes
greenonceifwaveortwiceifwalkaway.
SavesettingandexitICUcongurationbypressing
the button.
Exitwithoutsavingbypressingthe button.
Numberofashes 1 2 34 5
Fullushtime(sec) 2¼ 345½8
Partushtime(sec) 1½ 2 2¾ 3¾ 5½
Numberofashes
123456 7
Relltime(sec) 0
20 40 60 80 100 120

18 | cistermiser.co.uk Have a question? Call our customer support team on 0118 969 1611 Have a question? Call our customer support team on 0118 969 1611 cistermiser.co.uk | 19
13. Frequently asked questions
Refer to section 7 Testing and Commissioning for normal
sensor function indicators after user activation
No water is entering the cistern
No obvious indicator
Ensurethatthewatersupplyisconnectedandthellvalveisoperating
correctly.Checkltersforblockages.
The sensor is covered
Anti-vandalmodehasbeentriggered.Theobject/debrisneedstobe
removedfromthesensorandthevalvewillresumenormalfunctionality.
WC ushes when in use
Other issues
Working as normal otherwise
Ensurethatthesensorismountedinthecorrectposition.Refertothe
Sensorpositioning(section5).
Ensurethesensorrangeiscorrectlycongured.Refertothe
advancedsettingguide(section11).
Sensor ashing red middle
LED 4 times per second
Sensoruncalibrated.CallCistermiserforadvise.
Sensor ashing single red
top LEDs
Lowornobatterypower.Changebatteries.Ifoperatedbymains
power,checkwiringthencontactCistermiser.
Sensor ashing triple red
LEDs
Sensorcoveredorheavilyscratched.Uncoverorpolishout
scratches.
Sensor ashing double red
top LEDs
Servomotorobstructionorwiringfault-CallCistermiserforadvice.
Continuous ow into the pan from the cistern
No obvious indicator
Waterowingthroughtheoverow;ensurethatthewaterenteringthe
cisternisbeingshutobyadjustingtheoataccordingly.Iftheoat
issettoohigh,waterwillcontinuouslyowintothecisternandoutof
theoverow.
Cistermiser product warranty and extended warranty
Cistermiser products are guaranteed for
12monthsfromthedateofmanufacture.
The guarantee is for faulty products and parts
only:thereisnolabourwarranty.Ifyoubelieve
your product is faulty, please either contact
Cistermiser directly on 0118 969 1611 or at
[email protected], with a
photograph and the serial number to help
diagnosethecauseoftheproblem.
The warranty on Cistermiser products can
beextendedwithinoneyearofdateof
manufacture, at no cost, to three years from
thedateofinstallation(seedetailsonpage20).
Please make a note of the serial number and
take a photograph of the installation before
youleavesite.
Flush valve not activating
The sensor light does
not ash when a hand is
placed in front of it.
Ensurethepowersupplyisconnected.Ifmainspowerisbeingused
through the mains adaptor check that the mains adaptor is working
byrevertingtothebatterypack.Removethemainsadaptorwhen
usingbatteries.
Sensor is ashing single
top red LED slowly, or
not at all when a hand is
placed in front of it.
Lowornobatterypower;changebatteries.Ifoperatedbymains
power,checkwiringthencontactCistermiser.
Sensor LEDs OK
Checkllvalveandushvalvearealignedwithwaterlevel
Ensure cistern is level
Check manual activation lever is down (neutral position)
Flush volume is too low
Ensurefullushtimeiscorrect(default3seconds),soallwaterisushed
fromthecistern.RefertoEasyflushEVOValvesetup(section4).
Adjustushvalveandllvalveheighttochangefullushvolume.

20 | cistermiser.co.uk Have a question? Call our customer support team on 0118 969 1611 Have a question? Call our customer support team on 0118 969 1611 cistermiser.co.uk | 21
Commissioning check-list
EasyflushEVO
Product serial number
Installation address
No Activity
1. Ensurethecisternisinstalledlevel(checkwithspiritlevel).
2. EnsuretheFlushValveheightissettogivethecorrectushvolume.Ensurethe
FillValveoatheightisadjustedsothewaterlineislevelwiththeindicatoronthe
FlushValve.
3. Ensurewatersupplyisactivated.ForEVOCISTERN0.1-10bar.
4. Checksensorismountedincorrectposition(refertosection5).
6. Ensurelabelisremovedfromsensorbeforeconnectingpower.
7. Checkpowerconnections(refertosection6).
8. Ensureeithermainsorbatterypowerormultiproductpowersupplyisconnected.
9. Checksensorrange,relltime,fullushtimesaresuitableforinstallation(referto
advancedsettingsguidesection11).
10. Testoperation.
a Wave:Placehandwithin~10cmofsensorfor1second=valvewillpartushand
thesensorwillashthesinglegreenLEDoncepersecond.Placehandwithin
10cmofsensorfortwoseconds=valvewillfullushandthesensorwillashthe
doublebottomgreenLEDsoncepersecond.
b Walkaway:Ifpresenceisdetected,sensorashesgreenonceeverythreeseconds.
Whensensordetectsapresenceforlessthan45seconds,valvewillpartush.
Wheresensordetectsapresenceforover45secondsvalvewillfullush.
Checked Date
ThewarrantyonCistermiserproductscanbeextendedwithinoneyearofdate
ofmanufacture,atnocost,tothreeyearsfromthedateofinstallation.Once
the valve has been installed, complete the product commissioning checklist
belowtodemonstratecompliancewiththeinstallationinstructions.Emaila
photograph of this completed form to warranty@cistermiser.co.uk or post to
Cistermiser, Unit 1, Woodley Park Estate, 59-69 Reading Road, Woodley,
Berks, RG5 3AN.
3YEAR
warranty
extended
Notes

22 | cistermiser.co.uk Have a question? Call our customer support team on 0118 969 1611 Have a question? Call our customer support team on 0118 969 1611 cistermiser.co.uk | 23
Notes

SIP/36 Rev 3
SalamanderisoneoftheUK’sleading
manufacturers of pumps for boosting
water pressure for showers, bathrooms
and whole house supply in domestic and
smallcommercialtank-fedsystems.
salamanderpumps.co.uk
Keraomanufacturedelayedactionoat
valves, which provide an accurate and
eectivemethodofcontrollingthelevel
of stored cold water in tanks both with
andwithoutraisedoatvalvechambers.
The range is used in domestic, commercial
andindustrialapplicationsworldwide.
kerao.co.uk
Combimate is a domestic limescale
prevention device that prevents limescale
build-up and soft water corrosion in
combination boilers and other domestic
hotwaterappliances.
combimate.co.uk
TalonistheUKmarketleaderinthe
manufacture and supply of plastic pipe
clips,pipecollarsandxingplugs,plus
arangeofcoverprolesforconcealing
pipework.
talon.co.uk
Cistermiser Limited
Unit1,WoodleyParkEstate,59-69ReadingRoad,
Woodley,Reading,BerkshireRG53AN
t:+44(0)1189691611
e:sales@cistermiser.co.uk
cistermiser.co.uk
A Davidson Holdings company
Davidson Holdings’ brands
This manual suits for next models
2
Table of contents
Other Cistermiser Plumbing Product manuals
Popular Plumbing Product manuals by other brands

Riobel
Riobel pro US13 installation guide

Kinedo
Kinedo Smart Express C installation instructions

Spectrum Brands
Spectrum Brands 016-MF1C Quick installation guide

Spectrum Brands
Spectrum Brands Pfister McAllen LG89-XMCA Quick installation guide

ProFlo
ProFlo PFWSC30175CP installation instructions

Waterworks
Waterworks PTWO04 Installation guidelines