manuals.online logo
Brands
  1. Home
  2. •
  3. Brands
  4. •
  5. aspenhome
  6. •
  7. Indoor Furnishing
  8. •
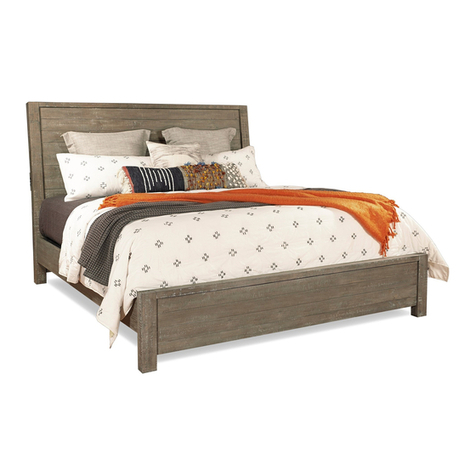
  9. aspenhome I3002-412 User manual

aspenhome I3002-412 User manual

Page1/8
Thankyouforpurchasingthisqualityproduct.Besuretocheckallpacking material carefullyfor
small partsthatmaycomelooseinsidethe cartonduringshipment.
UNIT SHOULDBE INSTALLEDBY2ORMORE PERSONS.
All Bedsneedtobeset upinthe exact final
locationsothatafterfull assemblyit will not
needtobemoved. Moving thebedwill cause
thesupportlegstomoveoutofperpendicular
(90degree),weakenthesupportsystem, and
may allowthebedtocollapse.
aspenhome
RASSEMBLYINSTRUCTIONS
MADEINVIETNAM
ah
BEFORE USING THISPRODUCT PLEASEREAD, UNDERSTAND, AND FOLLOWTHESEINSTRUCTIONS.
Save these instructionsforfuture reference.
FORINDOORUSEONLY
TOOLSREQUIRED (NOTPROVIDED)
PHILLIPSSCREWDRIVER
I3002-403D
I3002-402
I3002-412
ITEMNO:I3002-412Queen Panel HB
I3002-422QueenUpholstered HB
I3002-402Queen Rails
I3002-403Queen LowProfileFB
I3002-403DQueenStorage FB
10-10-2023
I3002-403
I3002-402
I3002-412 Option 3
Option 1
Option 4
Option 2
I3002-403D
I3002-402
I3002-422
I3002-403
I3002-402
I3002-422
Page2/8
aspenhome
RASSEMBLYINSTRUCTIONS
MADEINVIETNAM
ah
BEFORE USING THISPRODUCT PLEASEREAD, UNDERSTAND, AND FOLLOWTHESEINSTRUCTIONS.
Save these instructionsforfuture reference.
FORINDOORUSEONLY
COMPONENTSLIST:I3002-412
No.
1
2
3
5
Description Sketch Quantity
Headboard(HB)
LeftLeg
RightLeg
WoodStretcher 1PC
1PC
1PC
1PC
COMPONENTSLIST:I3002-402
No.
1
2
Description Sketch Quantity
Bed rails
Slats 4PCS
2PCS
COMPONENTSLIST:I3002-403
No.
1
2
Description Sketch Quantity
Footboard(FB) 1PC
HARDWARE LIST:I3002-403D
No.
L
M
N
Description Sketch Quantity
Allen Wrench 4mm 1PC
8PCS
HARDWARE LIST:I3002-412/422
1PC
No.
A
B
C
D
E
Description Sketch Quantity
Allen Wrench 4mm
HARDWARE LIST:I3002-402
8PCS
No.
F
G
H
I
J
Description Sketch Quantity
HangerBolt 5/16" x3"
HexNut5/16"
HexWrench 12mm 1PC
Wood Screw #8x1-1/4" 8PCS
8PCS
K
8PCS
BunFoot
3SupportLeg(forslat) 4PCS
HalfMoon Washer 5/16"
Bolt 5/16"x1-3/4"
Lock Washer5/16"
FlatWasher5/16" x3/4"
Bolt 1/4"x1-1/4"
Lock Washer1/4"
FlatWasher1/4" x3/4"
4CenterSupportLeg 1PC
11 PCS
ITEMNO:I3002-412Queen Panel HB
I3002-422QueenUpholstered HB
I3002-402Queen Rails
I3002-403Queen LowProfileFB
I3002-403DQueenStorage FB
COMPONENTSLIST:I3002-422
No.
1
2
3
5
Description Sketch Quantity
Headboard(HB)
LeftLeg
RightLeg
WoodStretcher 1PC
1PC
1PC
1PC
4CenterSupportLeg 1PC
2PCS
COMPONENTSLIST:I3002-403D
No.
1
2
Description Sketch Quantity
Footboard(FB) 1PC
BunFoot
33PCS
2PCS
4
51PC
SupportLeg(forcenterrail)
Decking
CenterRail
2PCS
4PCS
6
Wood Screw #8 x3/4"
8PCS
8PCS
8PCS
SupportLeg (forfootboard)
11 PCS
11 PCS
10-13-2023
aspenhome
RASSEMBLYINSTRUCTIONS
MADEINVIETNAM
ah
Page3/8
STEP1: Laytheheadboardfacedownonasoftsurface.Attachthe left leg and right leg to
headboardbyusing6bolts(A),lockwashers(B)andflatwashers(C). Donot completely
tighten bolts.
STEP2:Attachthewoodstretchertothe legsbyusing
2bolts(A),lockwashers(B)andflatwashers (C).
WoodStretcher
STEP3:Attachthecentersupportlegtoheadboardandwoodstretcherby using 3bolts(A),
lockwashers(B)andflatwashers(C).Completelytighten all bolts.
ITEMNO:I3002-412Queen Panel HB
I3002-422QueenUpholstered HB
I3002-402Queen Rails
I3002-403Queen LowProfileFB
I3002-403DQueenStorage FB
B
C
D
RightLeg
LeftLeg
B
C
D
B
D
A
A
A
C
10-10-2023
aspenhome
RASSEMBLYINSTRUCTIONS
MADEINVIETNAM
ah
Page4/8
STEP5:Screwthebolts(E)intoHB&FB.Makesuretheslatbearerisinthe UPPER position.
Alignthe boltswiththe holesintheendofsiderailsandattach theside railstoHB&FBusing
halfmoonwashers (F)andnuts(G).Thenuseahexwrench(H)totighten all the nuts.
Side Rail
STEP 4: Putthefootboardupside down
onasoftsurface. Attach thebunfeetand
supportlegs(forfootboard)tofootboard
asshown.
Headboard
Slatbearer
Side Rail
E
GH
Makesuretheslatbeareris
inthe UPPER position.
ITEMNO:I3002-412Queen Panel HB
I3002-422QueenUpholstered HB
I3002-402Queen Rails
I3002-403Queen LowProfileFB
I3002-403DQueenStorage FB
SupportLeg
Bun Foot
STEP 6: Attach thecenterrailtothe
footboardandcentersupport leg of
headboardusing4bolts(J), lock
washers(K)andflatwashers(L).
or Option 1 & 2:
Footboard
CenterRail
L
MK
Centerrail
J
F
10-10-2023
aspenhome
RASSEMBLYINSTRUCTIONS
MADEINVIETNAM
ah
Page5/8
STEP7: Attach2supportlegs(forcenterrail)tothe
centerrailusing4bolts(J),lockwashers (K) and flat
washers(L).UsetheAllenWrench(M)totighten all
ofthebolts.
Leveler
CenterRail
SupportLeg
(forcenterrail)
ITEMNO:I3002-412Queen Panel HB
I3002-422QueenUpholstered HB
I3002-402Queen Rails
I3002-403Queen LowProfileFB
I3002-403DQueenStorage FB
L
MK
STEP9: Putthedeckingovertheslats, secure
deckingtotheslatswithwoodscrews (N) through
thepre-drilledholesinthedecking asshown
below.
STEP8:Arrangeslatsontheslatbearers and then
lay deckingontop oftheslats. Makesuretheslats
arepositionedalongtheseamsofthe decking as
showninthe detailinSTEP9underthe
pre-drilledhole. Remove thedecking andattach
slatstotheslatbearerswithwoodscrews (I). WoodScrews(I)
Slat
Decking
Decking
Theslatshouldsupport
bothpiecesofdecking.
N
Decking
Pre-drilledhole
Makesurethatthereisaslat
underthepre-drilled hole.
J
10-10-2023
Cedar-linedStorageDrawers
FUNCTIONALITYINSTRUCTION
aspenhome
RASSEMBLYINSTRUCTIONS
MADEINVIETNAM
ah
Page6/8
ITEMNO:I3002-412Queen Panel HB
I3002-422QueenUpholstered HB
I3002-402Queen Rails
I3002-403Queen LowProfileFB
I3002-403DQueenStorage FB
PoweredUSBPorts(1
Type A+1Type C) for
Charging on bothsides
I3002-403D
I3002-402
I3002-412
STEP 4: Putthefootboardupside down
onasoftsurface. Attach thebunfeet to
footboardasshown.
or Option 3 & 4:
Footboard
Bun Foot
Cedar-linedStorageDrawers I3002-403D
I3002-402
I3002-422
PoweredUSBPorts(1
Type A+1Type C) for
Charging on bothsides
Option 1
Option 2
Upholstered
10-10-2023
aspenhome
RASSEMBLYINSTRUCTIONS
MADEINVIETNAM
ah
Page7/8
STEP6:Screwthebolts(E)intoHB&FB.Makesuretheslatbearerisinthe LOWER position.
Alignthe boltswiththe holesintheendofsiderailsandattach theside railstoHB&FBusing
halfmoonwashers (F)andnuts(G).Thenuseahexwrench(H)totighten all the nuts.
Side Rail
Headboard
Slatbearer
Side Rail
EGH
Makesuretheslatbeareris
inthe LOWER position.
ITEMNO:I3002-412Queen Panel HB
I3002-422QueenUpholstered HB
I3002-402Queen Rails
I3002-403Queen LowProfileFB
I3002-403DQueenStorage FB
STEP5:Theslatbearershavebeenattachedinposition (b) approximately 2”fromthetop of the side
railsforusewithastoragefootboard.Theslatbearersmustbemovedintoposition (a)based on
thisbedconfiguration.Removetheboltsandscrewsfromtheslatbearers and side railsasshown
below.Thenre-attach theslatbearerstothe siderailsindesiredposition(a)withbolts, lock
washers,flatwashers,andscrews. Caution: Do not over tighten bolts as this may loosen the
threaded inserts in the side rails.
STEP7: Attachthesupportlegs(forslat)tothe slatsasshown.
SupportLeg
(forslat)
ThisEndUp
Slat
b
a
F
10-10-2023
aspenhome
RASSEMBLYINSTRUCTIONS
MADEINVIETNAM
ah
Page8/8
ITEMNO:I3002-412Queen Panel HB
I3002-422QueenUpholstered HB
I3002-402Queen Rails
I3002-403Queen LowProfileFB
I3002-403DQueenStorage FB
FUNCTIONALITYINSTRUCTION
WoodScrews(I)
STEP8: Arrangetheslatsontheslatbearers equally
andattachtotheslatbearerswithwood screws (I).
I3002-403
I3002-402
I3002-412
I3002-403
I3002-402
I3002-422
PoweredUSBPorts(1
Type A+1Type C) for
Charging on bothsides
Upholstered
Option 3
Option 4
10-10-2023
Page 1/10
aspenhome
RASSEMBLYINSTRUCTIONS
MADEINVIETNAM
ah
BEFORE USING THISPRODUCT PLEASEREAD, UNDERSTAND, AND FOLLOWTHESEINSTRUCTIONS.
Save these instructionsforfuture reference.
FORINDOORUSEONLY
Thankyouforpurchasingthisqualityproduct.Besuretocheckallpacking material carefullyfor
small partsthatmaycomelooseinsidethe cartonduringshipment.
UNIT SHOULDBE INSTALLEDBY2ORMORE PERSONS.
All Bedsneedtobeset upinthe exact final
locationsothatafterfull assemblyit will not
needtobemoved. Moving thebedwill cause
thesupportlegstomoveoutofperpendicular
(90degree),weakenthesupportsystem, and
may allowthebedtocollapse.
TOOLSREQUIRED (NOTPROVIDED)
PHILLIPSSCREWDRIVER
I3002-407D
I3002-406
I3002-415
ITEMNO: I3002-415 KingPanelHB
I3002-425KingUpholstered HB
I3002-406 KingRails
I3002-410Cal King Rails
I3002-407KingLowProfileFB
I3002-407DKing Storage FB
I3002-407
I3002-415 Option 3
Option 1
Option 4
Option 2
I3002-407D
I3002-425
I3002-407
I3002-422
I3002-410 I3002-406
I3002-410
I3002-406
I3002-410
I3002-406
I3002-410
10-10-2023
Page 2/10
aspenhome
RASSEMBLYINSTRUCTIONS
MADEINVIETNAM
ah
BEFORE USING THISPRODUCT PLEASEREAD, UNDERSTAND, AND FOLLOWTHESEINSTRUCTIONS.
Save these instructionsforfuture reference.
FORINDOORUSEONLY
COMPONENTSLIST:I3002-415
No.
1
2
3
5
Description Sketch Quantity
Headboard(HB)
LeftLeg
RightLeg
WoodStretcher 1PC
1PC
1PC
1PC
COMPONENTSLIST:I3002-406
No.
1
2
Description Sketch Quantity
Bed rails
Slats 5PCS
2PCS
COMPONENTSLIST:I3002-407
No.
1
2
Description Sketch Quantity
Footboard(FB) 1PC
HARDWARE LIST:I3002-415/425
1PC
No.
A
B
C
D
E
Description Sketch Quantity
Allen Wrench 4mm
HARDWARE LIST:I3002-406/410
8PCS
No.
F
G
H
I
J
Description Sketch Quantity
HangerBolt 5/16" x3"
HexNut5/16"
HexWrench 12mm 1PC
Wood Screw #8x1-1/4" 10 PCS
8PCS
8PCS
BunFoot
3SupportLeg(forslat) 4PCS
11 PCS
HalfMoon Washer 5/16"
Bolt 5/16"x1-3/4"
Lock Washer5/16"
FlatWasher5/16" x3/4" 4CenterSupportLeg 1PC
11 PCS
COMPONENTSLIST:I3002-425
No.
1
2
3
5
Description Sketch Quantity
Headboard(HB)
LeftLeg
RightLeg
WoodStretcher 1PC
1PC
1PC
1PC
4CenterSupportLeg 1PC
2PCS
ITEMNO: I3002-415 KingPanelHB
I3002-425KingUpholstered HB
I3002-406 KingRails
I3002-410Cal King Rails
I3002-407KingLowProfileFB
I3002-407DKing Storage FB
COMPONENTSLIST:I3002-410
No.
1
2
Description Sketch Quantity
Bed rails
Slats 5PCS
2PCS
HARDWARE LIST:I3002-407D
No.
L
M
N
Description Sketch Quantity
Allen Wrench 4mm 1PC
8PCS
KBolt 1/4"x1-1/4"
Lock Washer1/4"
FlatWasher1/4" x3/4"
Wood Screw #8 x3/4"
8PCS
8PCS
O
CenterRail(Long)
31PC
COMPONENTSLIST:I3002-407D
No.
1
2
Description Sketch Quantity
Footboard(FB) 1PC
BunFoot
33PCS
2PCS
4
5
1PC
SupportLeg(forcenterrail)
Decking 2PCS
3PCS
6
SupportLeg (forfootboard)
CenterRail(Short)
7Filler 2PCS
10 PCS
Wood Cap(onlyfor410) 8PCS
11 PCS
10-13-2023
aspenhome
RASSEMBLYINSTRUCTIONS
MADEINVIETNAM
ah
Page 3/10
STEP1: Laytheheadboardfacedownonasoftsurface.Attachthe left leg and right leg to
headboardbyusing6bolts(A),lockwashers(B)andflatwashers(C). Donot completely
tighten bolts.
STEP2:Attachthewoodstretchertothe legsbyusing
2bolts(A),lockwashers(B)andflatwashers (C).
WoodStretcher
STEP3:Attachthecentersupportlegtoheadboardandwoodstretcherby using 3bolts(A),
lockwashers(B)andflatwashers(C).Completelytighten all bolts.
HBBackside
A
B
C
D
RightLeg
LeftLeg
B
C
D
B
C
A
D
ITEMNO: I3002-415 KingPanelHB
I3002-425KingUpholstered HB
I3002-406 KingRails
I3002-410Cal King Rails
I3002-407KingLowProfileFB
I3002-407DKing Storage FB
A
10-10-2023
aspenhome
RASSEMBLYINSTRUCTIONS
MADEINVIETNAM
ah
Page 4/10
STEP5:Screwthebolts(E)intoHB&FB.Makesuretheslatbearerisinthe UPPER position.
Alignthe boltswiththe holesintheendofsiderailsandattach theside railstoHB&FBusing
halfmoonwashers (F)andnuts(G).Thenuseahexwrench(H)totighten all the nuts.
Side Rail
STEP 4: Putthefootboardupside down
onasoftsurface. Attach thebunfeetand
supportlegs(forfootboard)tofootboard
asshown.
Headboard
Slatbearer
Side Rail
E
GH
Makesuretheslatbeareris
inthe UPPER position.
STEP 6: Attach thecenterrailtothe
footboardandcentersupport leg of
headboardusing4bolts(K), lock
washers(L)andflatwashers(M).
ForOption1&2:
Footboard
CenterRail
LM
Centerrail
ITEMNO: I3002-415 KingPanelHB
I3002-425KingUpholstered HB
I3002-406 KingRails
I3002-410Cal King Rails
I3002-407KingLowProfileFB
I3002-407DKing Storage FB
SupportLeg
Bun Foot
The outsideholesmatchto6/6standardkingrails,
the insideholesmatchto6/0Calkingbed rails.
N
F
K
10-10-2023
aspenhome
RASSEMBLYINSTRUCTIONS
MADEINVIETNAM
ah
Page 5/10
STEP7: Attach2supportlegs(forcenterrail)tothe
centerrailusing4bolts(K),lockwashers (L)and
flatwashers(M).UsetheAllenWrench (N) to
tighten all ofthebolts.
Leveler
CenterRail
SupportLeg
(forcenterrail)
STEP8:Arrangeslatsontheslatbearersandthenlaydeckingontop ofthe slats. Make surethe
slatsarepositionedalongthe seams ofthedecking asshowninthedetail inSTEP10underthe
pre-drilledhole.Removethedeckingandattachslatstotheslatbearers withwood screws (I).
ITEMNO: I3002-415 KingPanelHB
I3002-425KingUpholstered HB
I3002-406 KingRails
I3002-410Cal King Rails
I3002-407KingLowProfileFB
I3002-407DKing Storage FB
WoodScrews(I)
Filler Notch
STEP9:FortheCalKingbed,bothfilerboardsare
notched. Usingautilityknifeonlycutoffthesmall piece at
thenotchononeofthefillerboards.Thiscut off filler
boardwillbeplacedat the foot ofthe bedgoingfromleft
toright asshownonthe rightsidebelowinSTEP10. For
the standardKingbed,skipthisstepandarrangethe
deckingboardsasshownright.
LM
NK
10-10-2023
STEP10:Putthedeckingsand fillersovertheslats,
securedeckingstotheslatswithwoodscrews (O)
throughthepre-drilledholesinthe deckingsas
shownbelow.
STEP11:ForCal Kingbed,insertwood capsintotheholeson
headboardandfootboard.ForregularKingbed, skipthisstep.
WoodCap(J)
Makesurethatthere
isaslatunder the
pre-drilledhole.
aspenhome
RASSEMBLYINSTRUCTIONS
MADEINVIETNAM
ah
Page 6/10
O
Decking
Pre-drilledhole
ITEMNO: I3002-415 KingPanelHB
I3002-425KingUpholstered HB
I3002-406 KingRails
I3002-410Cal King Rails
I3002-407KingLowProfileFB
I3002-407DKing Storage FB
O
Decking
Pre-drilledhole
Makesurethatthere
isaslatunder the
pre-drilledhole.
Filler
Filler
Filler
Filler
Filler
Filler
Filler
Filler
StandardKing Bed
CalKingBed
StandardKing Bed
CalKingBed
10-10-2023
FUNCTIONALITYINSTRUCTION
aspenhome
RASSEMBLYINSTRUCTIONS
MADEINVIETNAM
ah
Page 7/10
Option 1
ITEMNO: I3002-415 KingPanelHB
I3002-425KingUpholstered HB
I3002-406 KingRails
I3002-410Cal King Rails
I3002-407KingLowProfileFB
I3002-407DKing Storage FB
StandardKing Bed
CalKingBed
CalKingBed
StandardKing Bed
Option 2
Cedar-lined
StorageDrawers
Powered USBPorts (1
Type A+1Type C) for
Charging on bothsides
Option 1
Powered USBPorts (1
Type A+1Type C) for
Charging on bothsides
Option 2
Cedar-lined
StorageDrawers
Upholstered
Upholstered
10-10-2023
STEP 4: Putthefootboardupside down
onasoftsurface. Attach thebunfeet to
footboardasshown.
ForOption3&4: Bun Foot
aspenhome
RASSEMBLYINSTRUCTIONS
MADEINVIETNAM
ah
Page 8/10
STEP6: Screwthebolts(E)intoHB&FB.Makesuretheslatbearerisinthe LOWER position.
Alignthe boltswiththe holesintheendofsiderailsandattach theside railstoHB&FBusing
halfmoonwashers (F)andnuts(G).Thenuseahexwrench(H)totighten all the nuts.
Side Rail
Headboard
Slatbearer
Side Rail
EGH
Makesuretheslatbeareris
inthe LOWER position.
STEP5:Theslatbearershavebeenattachedinposition (b) approximately 2”fromthetop of the side
railsforusewithastoragefootboard.Theslatbearersmustbemovedintoposition (a)based on
thisbedconfiguration.Removetheboltsandscrewsfromtheslatbearers and side railsasshown
below.Thenre-attach theslatbearerstothe siderailsindesiredposition(a)withbolts, lock
washers,flatwashers,andscrews. Caution:Donotovertightenboltsasthismayloosen the
threadedinsertsinthesiderails.
The outsideholesmatchto6/6standardkingrails,
the insideholesmatchto6/0Calkingbed rails.
ITEMNO: I3002-415 KingPanelHB
I3002-425KingUpholstered HB
I3002-406 KingRails
I3002-410Cal King Rails
I3002-407KingLowProfileFB
I3002-407DKing Storage FB
Footboard
b
a
F
10-10-2023
aspenhome
RASSEMBLYINSTRUCTIONS
MADEINVIETNAM
ah
Page 9/10
STEP8: Arrangetheslatson the slat
bearersequallyandattachtothe slat
bearerswithwoodscrews(I).
STEP7: Attachthesupportlegs(forslat)tothe slatsasshown.
SupportLeg
(forslat)
ThisEndUp
Slat
ITEMNO: I3002-415 KingPanelHB
I3002-425KingUpholstered HB
I3002-406 KingRails
I3002-410Cal King Rails
I3002-407KingLowProfileFB
I3002-407DKing Storage FB
WoodScrews(I)
STEP9: ForCal Kingbed,insertwood capsintotheholeson
headboardandfootboard.ForregularKingbed, skipthisstep.
WoodCap(J)
CalKingBed
StandardKing Bed
WoodScrews(I)
10-10-2023
aspenhome
RASSEMBLYINSTRUCTIONS
MADEINVIETNAM
ah
Page 10/10
ITEMNO: I3002-415 KingPanelHB
I3002-425KingUpholstered HB
I3002-406 KingRails
I3002-410Cal King Rails
I3002-407KingLowProfileFB
I3002-407DKing Storage FB
FUNCTIONALITYINSTRUCTION
Powered USBPorts (1
Type A+1Type C) for
Charging on bothsides
Powered USBPorts (1
Type A+1Type C) for
Charging on bothsides
Upholstered
Upholstered
Option 3
Option 3
Option 4
Option 4
StandardKing Bed
StandardKing Bed
CalKingBed
CalKingBed
10-10-2023

This manual suits for next models

4

Other aspenhome Indoor Furnishing manuals
aspenhome ICF-303 User manual

aspenhome

aspenhome ICF-303 User manual

aspenhome Queen Estate Panel HB I201-412 User manual

aspenhome

aspenhome Queen Estate Panel HB I201-412 User manual

aspenhome I287-412 User manual

aspenhome

aspenhome I287-412 User manual

aspenhome I597-412 User manual

aspenhome

aspenhome I597-412 User manual

aspenhome I240-400-RIV User manual

aspenhome

aspenhome I240-400-RIV User manual

aspenhome I07-415-WBR User manual

aspenhome

aspenhome I07-415-WBR User manual

aspenhome I215-307 User manual

aspenhome

aspenhome I215-307 User manual

aspenhome I233-9130 User manual

aspenhome

aspenhome I233-9130 User manual

aspenhome I218-465F-WHT User manual

aspenhome

aspenhome I218-465F-WHT User manual

aspenhome I349-451B-WST User manual

aspenhome

aspenhome I349-451B-WST User manual

aspenhome I201-456 User manual

aspenhome

aspenhome I201-456 User manual

aspenhome I644-280 User manual

aspenhome

aspenhome I644-280 User manual

aspenhome 107-463-WBR User manual

aspenhome

aspenhome 107-463-WBR User manual

aspenhome I251-303-1 User manual

aspenhome

aspenhome I251-303-1 User manual

aspenhome I3048-6808 User manual

aspenhome

aspenhome I3048-6808 User manual

aspenhome I256-9101 User manual

aspenhome

aspenhome I256-9101 User manual

aspenhome I256-3064 User manual

aspenhome

aspenhome I256-3064 User manual

aspenhome I256-296 User manual

aspenhome

aspenhome I256-296 User manual

aspenhome I218-468-WHT User manual

aspenhome

aspenhome I218-468-WHT User manual

aspenhome I318-6030 User manual

aspenhome

aspenhome I318-6030 User manual

aspenhome ICB-495 User manual

aspenhome

aspenhome ICB-495 User manual

aspenhome IKJ-400-KD User manual

aspenhome

aspenhome IKJ-400-KD User manual

aspenhome ICB-6324-BCH User manual

aspenhome

aspenhome ICB-6324-BCH User manual

aspenhome I233-297 User manual

aspenhome

aspenhome I233-297 User manual

Popular Indoor Furnishing manuals by other brands

Regency LWMS3015 Assembly instructions

Regency

Regency LWMS3015 Assembly instructions

Furniture of America CM7751C Assembly instructions

Furniture of America

Furniture of America CM7751C Assembly instructions

Safavieh Furniture Estella CNS5731 manual

Safavieh Furniture

Safavieh Furniture Estella CNS5731 manual

PLACES OF STYLE Ovalfuss Assembly instruction

PLACES OF STYLE

PLACES OF STYLE Ovalfuss Assembly instruction

Trasman 1138 Bo1 Assembly manual

Trasman

Trasman 1138 Bo1 Assembly manual

Costway JV10856 manual

Costway

Costway JV10856 manual
moss DESIGN Caisson Credenza Assembly instructions

moss DESIGN

moss DESIGN Caisson Credenza Assembly instructions

Aquaglide FULL DECK 15.0 owner's manual

Aquaglide

Aquaglide FULL DECK 15.0 owner's manual

AREBOS AR-HE-SW30 user manual

AREBOS

AREBOS AR-HE-SW30 user manual

Till-Hilft Fulda 87005.330 Assembly instructions

Till-Hilft

Till-Hilft Fulda 87005.330 Assembly instructions

Twoey Outside 2010 quick start guide

Twoey Outside

Twoey Outside 2010 quick start guide

Hettich Easys 200 operating instructions

Hettich

Hettich Easys 200 operating instructions

The bedboss RELAX 404 Series owner's manual

The bedboss

The bedboss RELAX 404 Series owner's manual

Oeseder Möbelindustrie Bern 991 720 Assembly instructions

Oeseder Möbelindustrie

Oeseder Möbelindustrie Bern 991 720 Assembly instructions

Costway HW68469 user manual

Costway

Costway HW68469 user manual

Next ALIX A27743 Assembly instructions

Next

Next ALIX A27743 Assembly instructions

BROSA Hans Assembly guide

BROSA

BROSA Hans Assembly guide

Prodigg MINIKA PBA015T-FUR installation manual

Prodigg

Prodigg MINIKA PBA015T-FUR installation manual

manuals.online logo
manuals.online logoBrands
  • About & Mission
  • Contact us
  • Privacy Policy
  • Terms and Conditions

Copyright 2025 Manuals.Online. All Rights Reserved.