Asuka PN-201 User manual

PN-201
ASUKA On-line Navigation and Multimedia Box
User Manual

2
Table of Contents
I. Introduction .........................................................................................4
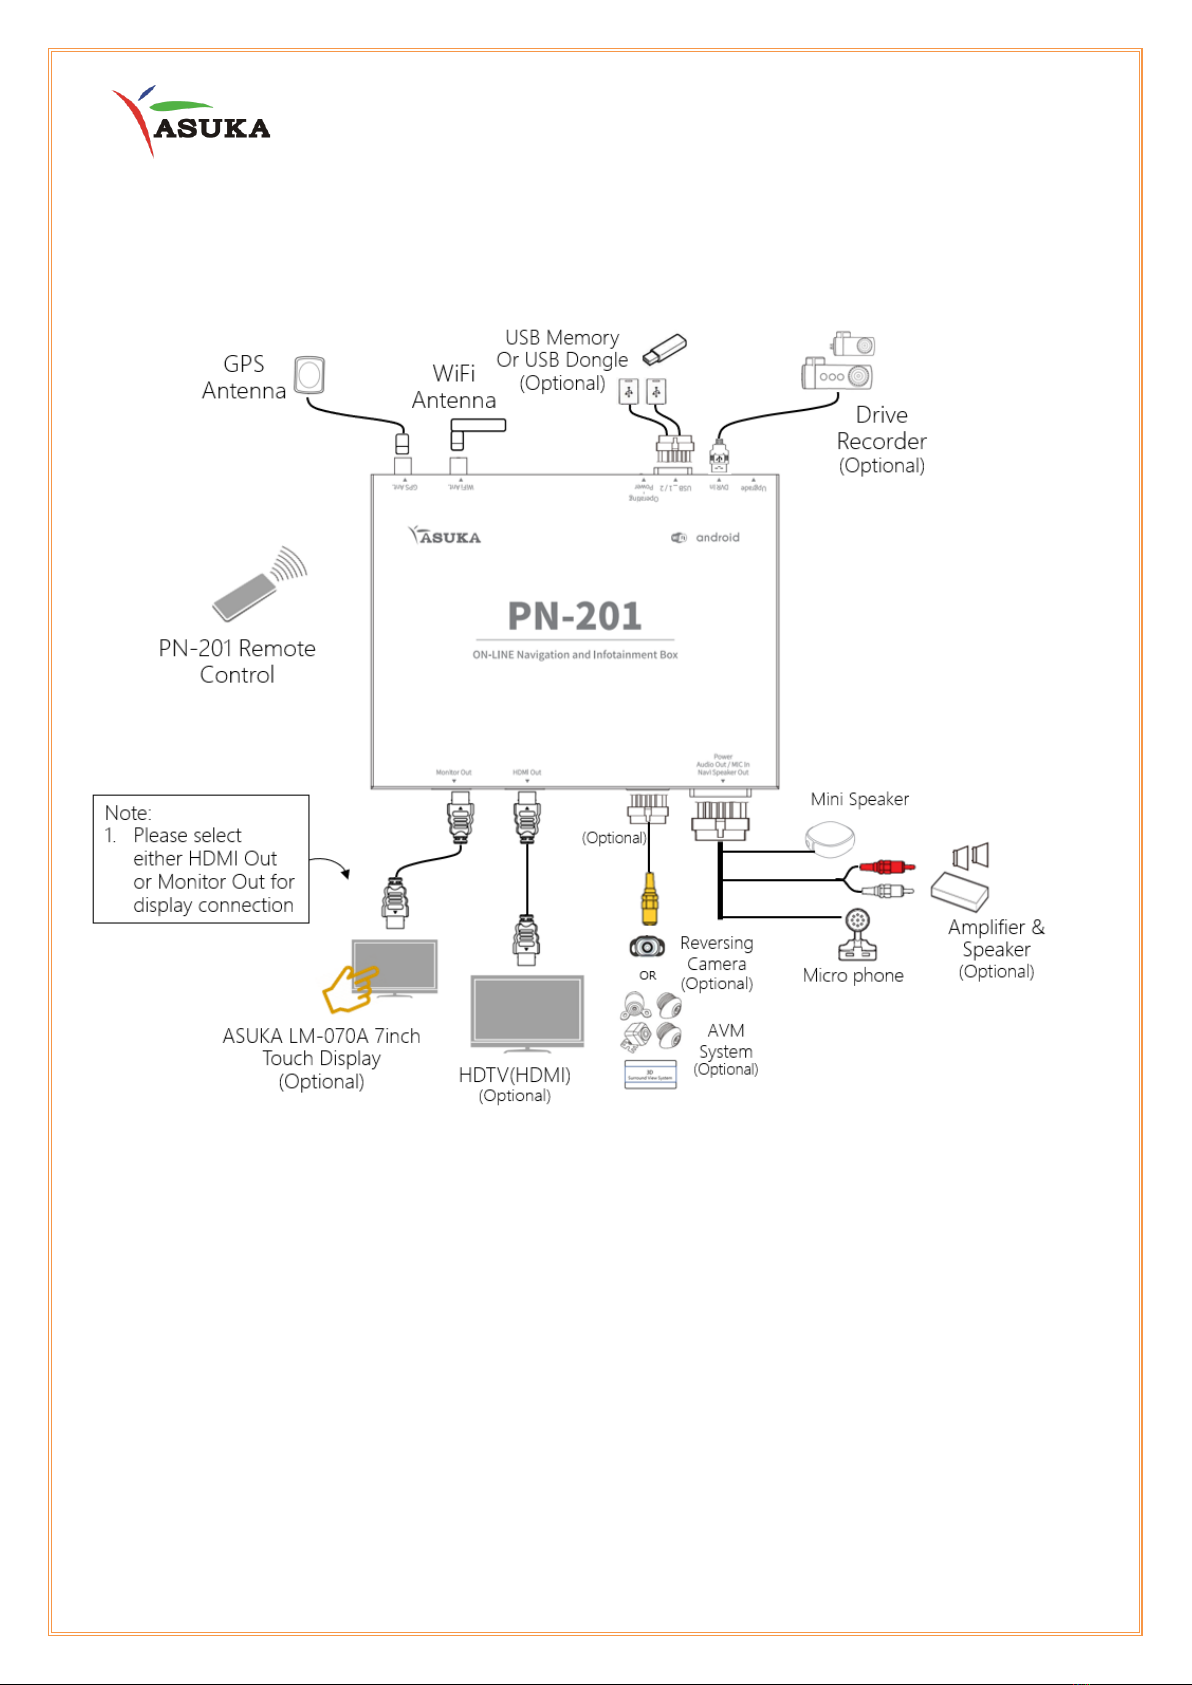
II. Connect Your Box.................................................................................5
II.1 Hardware..........................................................................................................................................................5
II.2 System Configuration .................................................................................................................................6
III. Quick Start Guide.................................................................................7
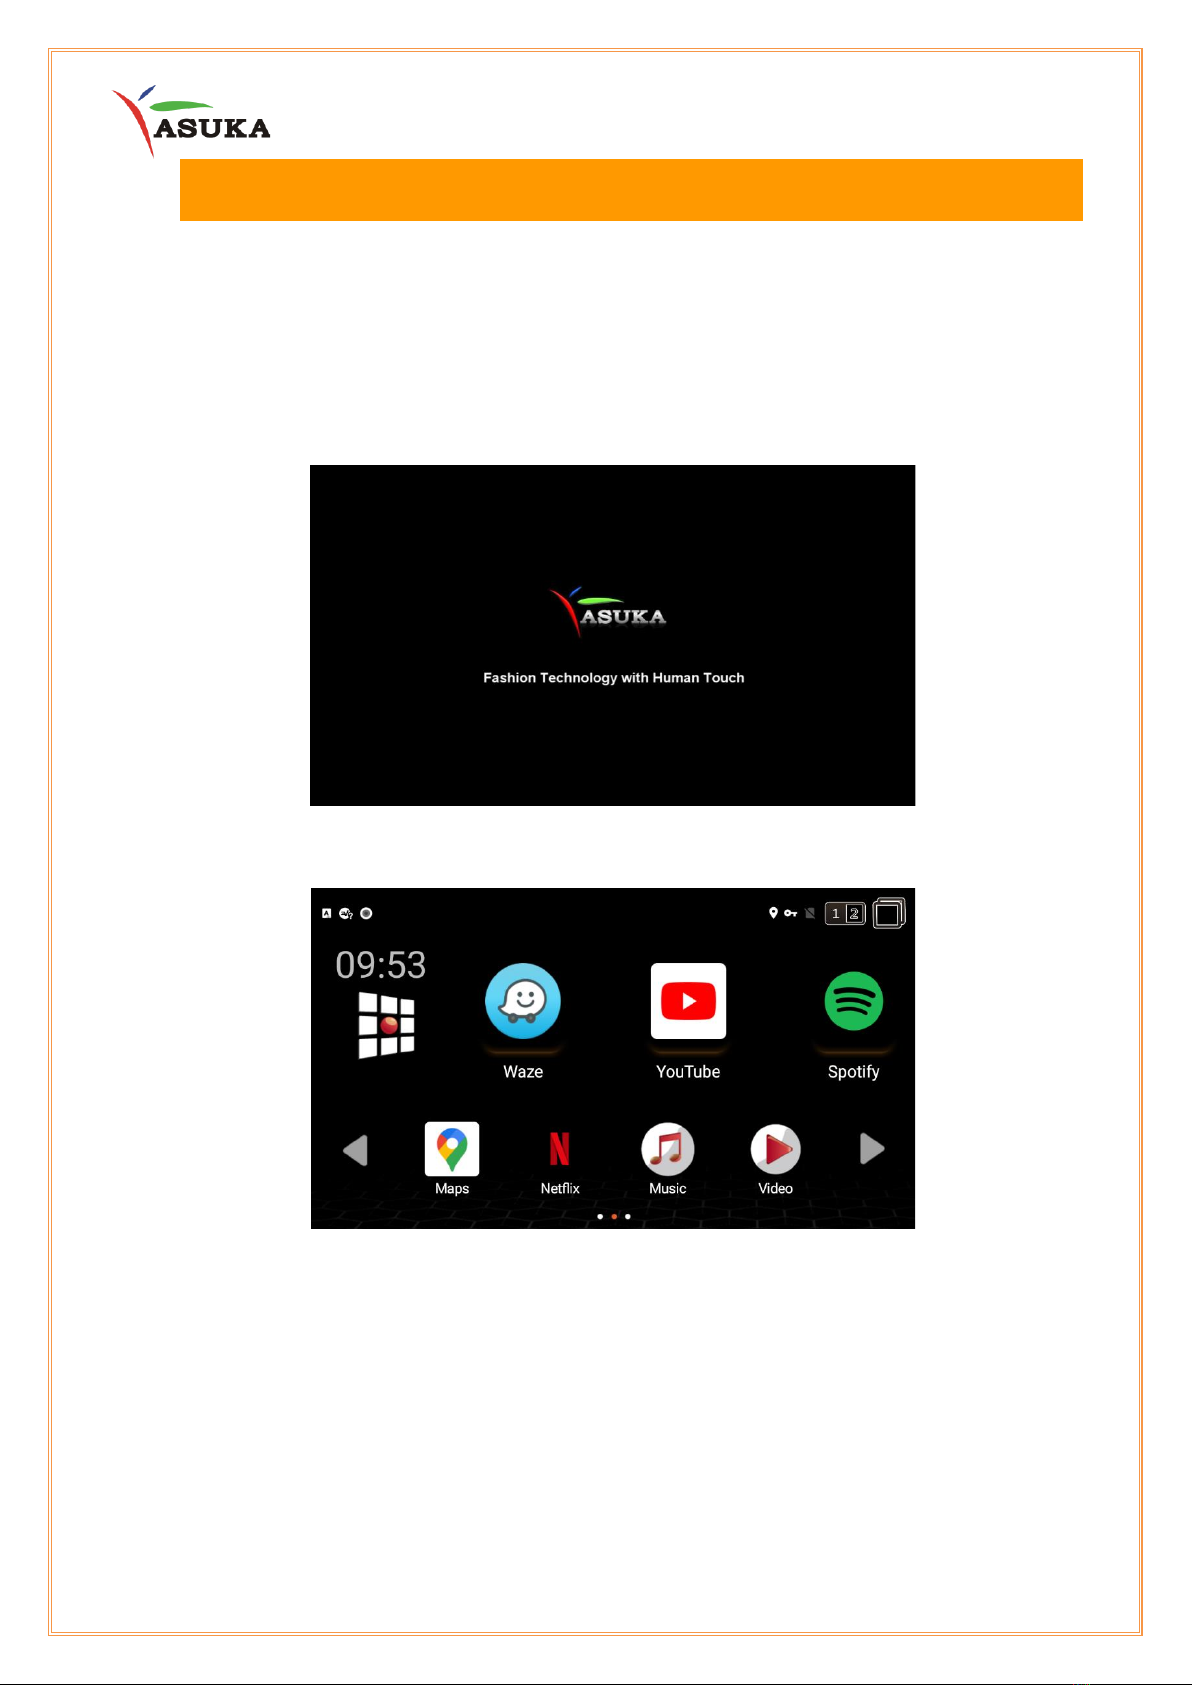
III.1 Turning the Power On................................................................................................................................7
III.2 User Interface................................................................................................................................................8
III.3 Common Operation...................................................................................................................................8
III.4 WiFi Connection .......................................................................................................................................11
IV. USB Music and Video Playback.........................................................13
IV.1 Preparing your USB memory...............................................................................................................13
IV.2 Music Playback..........................................................................................................................................13
IV.3 Video Playback ..........................................................................................................................................14
V. Monitor Adjustment..........................................................................15
V.1 Display Overscan Adjustment ..............................................................................................................15
V.2 Auto Rotation Setting .............................................................................................................................. 16
VI. Specification.......................................................................................18
VI.1 Technical Speciation ...............................................................................................................................18
VI.2 File Format Supporting List for USB Playback.............................................................................. 19
VII. Reference............................................................................................20
VII.1 Maintenance............................................................................................................................................. 20
VII.2 Troubleshooting......................................................................................................................................20
VIII. Customer Service...............................................................................21
VIII.1 (For Stefaan)............................................................................................................................................. 21

3
PRECAUTIONS
IMPORTANT
To ensure proper use, please read through this manual before using this product. It is especially
important that you read and observe WARNINGS and CAUTIONS in this manual. Please keep the
manual in a safe and accessible place for future reference.
WARNINGS:(To prevent accidents and damage)
DO NOT install any unit or wire any cable in a location where:
•It may obstruct the steering wheel and gearshift lever operations.
•It may obstruct the operation of safety devices such as air bags.
•It may obstruct visibility.
DO NOT operate the unit while driving.
•If you need to operate the unit while driving, be sure to look around carefully.
•The driver must not watch the monitor while driving.
CAUTION
For safety
•Do not raise the volume level too much, as this will make driving dangerous by blocking outside
sounds, and may cause hearing loss.
•Stop the car before performing any complicated operations.
For a longer service life, be sure to read the following cautions:
•If you have parked the car for a longtime in hot or cold weather, wait until the temperature in the car
becomes normal before operating the unit.
•Do not disassemble or modify the set in any way. Doing so may result in damage.
•If a problem should occur, have the set inspected at your store of purchase
•Small black and shiny spots inside the liquid crystal panel are normal for LCD products.

4
I. Introduction
ASUKA PN-201 is a revolutionary in-vehicle information and entertainment service
center. It can satisfy all users’ desire to access the internet to enjoy on-line
multimedia and navigation service which is beyond traditional broadcasting services &
pre-recorded media contents; it brings you more entertaining and smarter experience
than ever before.
Moreover, thanks to the design of comprehensive I/O interface, it allows to seamlessly
integrate your car security system or drive assistance system and helps driver visually
confirm the vehicle’s position and environment via PN-201’s display.
PN-201 Product Features
• ASUKA-style User-Defined User Interface
• On-line Entertainment & Pre-recorded Media Contents
• Support HDMI Output for Monitors in Motorhome
• Video Playback Capability up to 4K resolution
• Comprehensive I/O interface for peripherals integration

5
II. Connect Your Box
II.1 Hardware
(Note: Please connect either HDMI Out or Monitor Out for display)

6
II.2 System Configuration

7
III. Quick Start Guide
III.1 Turning the Power On
(1) Turn on the ACC or IGN of the vehicles.
(2) When the PN-201 is activated, you will see a startup screen before system booted.
(3) After system booted, the main menu will show up.
(4) Now you can operate by selecting any icon on the screen to activate the
corresponding function.

8
III.2 User Interface
III.3 Common Operation
(1) Operation by remote control
1. About PN-201 remote control:
The remote control of PN-201, which is also called remote air mouse, is offered as
an accessory for user to operate PN-201 remotely. As the air mouse hold by your
hand, via its design with built-in 6-axis inertial sensors, it can detect the motion of
your hand and to show a cursor on PN-201 screen. Hence, it allows people to
operate PN-201 intuitively like using computer mouse to operate computer.

9
2. Installation of remote control and its battery:
-Open the battery compartment and take out the USB dongle inside. Put two
AAA batteries into the remote, ensuring they are the correct way around.
-Simply plug the dongle into one of the available USB ports on PN-201.
-The remote will start working immediately. You can now point your remote at
the screen and move the cursor around with the movement of your hand.
-
3. Cursor on/off:
-Pressing the cursor on/off button will turn on and off the mouse cursor
function. As turned on, the cursor will start moving on screen along with your
hand movement.

10
4. Button function overview:
-Besides cursor on/off function, more function keys are available on the
remote described as below.
-Please turn off the cursor before operating other function keys.
-Please note the reaction of function key operation maybe different for
different Apps.
(2) Operation via ASUKA 7inch touch screen (Optional)
Touch
⚫Touch the screen gently to select the item on the screen.
Touch and Hold

11
⚫Touch the screen and keep your finger in place until display changes allow you to
drag the icon to the position you want it to be.
Swipe
⚫Swipe your finger left or right on the screen to change the page.
⚫Swipe your finger up or down on the screen to scroll the screen.
III.4 WiFi Connection
(1) Turn on the hotspot from the WiFi router or your mobile phone
(2) Select [Network & Internet] under [Settings].

12
(3) Switch on WiFi Function then available WiFi hotspots will show on list
(4) Select your WiFi hotspot and enter password
(5) If WiFi successfully connected, “Connected” indication will show under selected
hotspot.
(6) WiFi connection is ready! You can now sit back and enjoy the un-limited internet
service by PN-201.

13
IV. USB Music and Video Playback
IV.1 Preparing your USB memory
(1) Make sure your USB memory is in format of FAT32 or NTFS. If not, please format
your USB device on the PC.
(2) Save your favorite music and movie files in USB memory on the PC. The supported
multimedia file formats are listed on Chapter VI for reference.
(3) Plug the USB memory to USB1 or USB2 port of PN-201
IV.2 Music Playback
(1) Select and play [Music] app. The Music menu will show on screen.
(2) Select [Songs] to list all available music files saved in your USB memory.
(3) Select the desired file to start playing the music.
(4) Press the [PREVIOUS] / [NEXT] button to change the track
(5) Press the [PLAY/PAUSE] button to pause or resume music playing.
Note: Only music files will show under this mode. Video files will not appear.

14
IV.3 Video Playback
(1) Select and play [Video] app. The Video player menu will show on screen and list all
available video files saved in your USB memory
(2) Select the desired file to start playing the video.
(3) Long press the / button to fast rewind or fast forward the video track.
(4) Press / button to change the video channel.
(5) Press the [PLAY/PAUSE] button to pause or resume video playing.
Note: Only video files will show under this mode. Music files will not appear.

15
V. Monitor Adjustment
V.1 Display Overscan Adjustment
(1) Why overscan adjustment is needed?
- As PN-201 is connected to your HDTV TV and you’re not seeing the entire image on
it, the overscan adjustment function may help to recover the whole image for your
better visual experience.
- In the slightly exaggerated image below, you can see the full image on the left,
and the overscanned image on the right.
(3) Start to adjust overscan image:
- Enter the [Setting] menu of PN-201 and select [Display] to show display setting
option.
-Select [Display Overscan Adjustment] and then overscan setting interface will show
on screen.

16
- Adjust the over scanned image by and for four sides (Top, Bottom, Left and
Right) until the tip of 4 arrows can appear completely.
- Press [OK] to finish the setting.
V.2 Auto Rotation Setting
(1) Why Auto Rotation Setting is needed?
As connected with ASUKA display, normally PN-201 is forced to show landscape
image of all apps on display for better visual experience. However, some specific
TV apps such as VTM GO or RTL are available for channel switching only under
vertical mode. To well control those apps, you can turn on Auto Rotation function to
allow the vertical image showed on the display.
(2) For the image shown below you can see, under landscape display mode, there is no

17
response as to press the screen scaling icon to show vertical screen mode. Hence
there is not possible to switch the channel for some specific apps.
(3) Start to set Auto Rotation function
- First, please close those apps running on the background.
- Enter the [Setting] menu and select [Display] to show display setting option.
- Find the [Auto Rotation] setting and switch it to ON.
- Back to home menu and play your favorite apps again.

18
VI. Specification
VI.1 Technical Speciation
System
Operation System
Android 8.0
Processor
Octa-core ARM Cortex A53, Speed up to 1.5GHz
Memory
2GB DDR3 DRAM
Storage
32GB eMMC Flash Memory
Main
Function
User Defined User-Interface
YES
On-line Entertainment
YES (Preloaded on-line entertainment apps)
On-line Navigation
YES (Google Map and Waze preloaded)
USB Music and Video Playback
YES
Built-in GPS
YES
Built-in WiFi
YES (802.11a/b/g/n, 2.4GHz)
Overscan Adjustment
YES
Apps Auto Rotation Setting
YES (Available as connected with ASUKA display)
Split Screen
YES
I/O Interface
Microphone Input
YES
Audio(R/L) Out
YES (max. output level is 2Vpp)
Speaker Out
YES (Supported only for 1W@4Ohm speaker)
HDMI Out
YES
Monitor Out
YES (Only for connection with ASUKA display)
USB Port
YES, (2 USB port)
DVR Port
YES
Service Port
1.Available for reversing camera input, or around view
monitoring (AVM) input.
2.UART and IR control signal available for external
system integration which is upon customer's request
Power
Power input
DC +10V~16V
Environment
Operation Temperature
-20~70(Celsius Degree)
Storage Temperature
-30~80(Celsius Degree)

19
VI.2 File Format Supporting List for USB Playback
Music File Format
MP3,
WAV,
FLAC,
M4A,
AAC
Video File Format
H.264/AVC (up to 4K 3840x2160, 25fps),
H.265/HEVC (up to 4K 3840x2160 60fps),
MPEG1/2,
MPEG-4,
AVI,
MKV,
MP4,
FLV

20
VII. Reference
VII.1 Maintenance
(1) Do not use any solvent (for example, thinner, benzene, etc.), detergent, or
insecticide. This may damage the monitor or the unit.
(2) Cleaning the Liquid Crystal Display Screen:
The liquid crystal display screen tends to collect dust, so wipe it off occasionally
with a soft cloth. The surface is easily scratched, so do not rub it with hard objects. s
may damage the monitor or the unit.
VII.2 Troubleshooting
What appears to be trouble is not always serious. Please check the following points
before calling dealers/ASUKA.
General
1. No sound comes out of the
speakers.
(1) Adjust the volume to the optimum level.
(2) Check the cords and connections.
2. No picture is displayed on the
external monitor.
(1) Turn on the screen.
(2) Check the cords and connections.
(3) Select the correct input on the external monitor.
3.The internet apps does not
work
(1) WiFi was not well connected. Check the router or
hotspot.
(2) To connect the hot spot again. Refer to Chapter III.
USB
1.While playing a track, sound is
sometimes interrupted.
(1) The tracks are not properly copied into the USB
device. Copy the tracks again, and try to play
again.
2. USB playback does not start.
(1) The format of files is not supported by the unit.
Refer to the supporting file list in Chapter VI.
(2) USB is not in FAT32 or NTFS format. To format USB
by your PC.
Table of contents