AT&T 9345 User manual

900 MHz Cordless Telephone
with Caller ID/Call Waiting 9345
Please also read
Part 1 — Important
Product Information
USER’S MANUAL
Part 2
AT&T and the globe symbol are registered trademarks of AT&T Corp. licensed to Advanced American Telephones.
9345_book_1ATT 6/5/01 11:33 AM Page ii

© 2001 Advanced American Telephones. All rights reserved.
Printed in China. Issue 1AT&T 06/01
9345_book_1ATT 6/5/01 11:33 AM Page iii

CONTENTS
BEFORE YOU BEGIN . . . . . . . . . . . . . . 1
About Caller Identification .......... 1
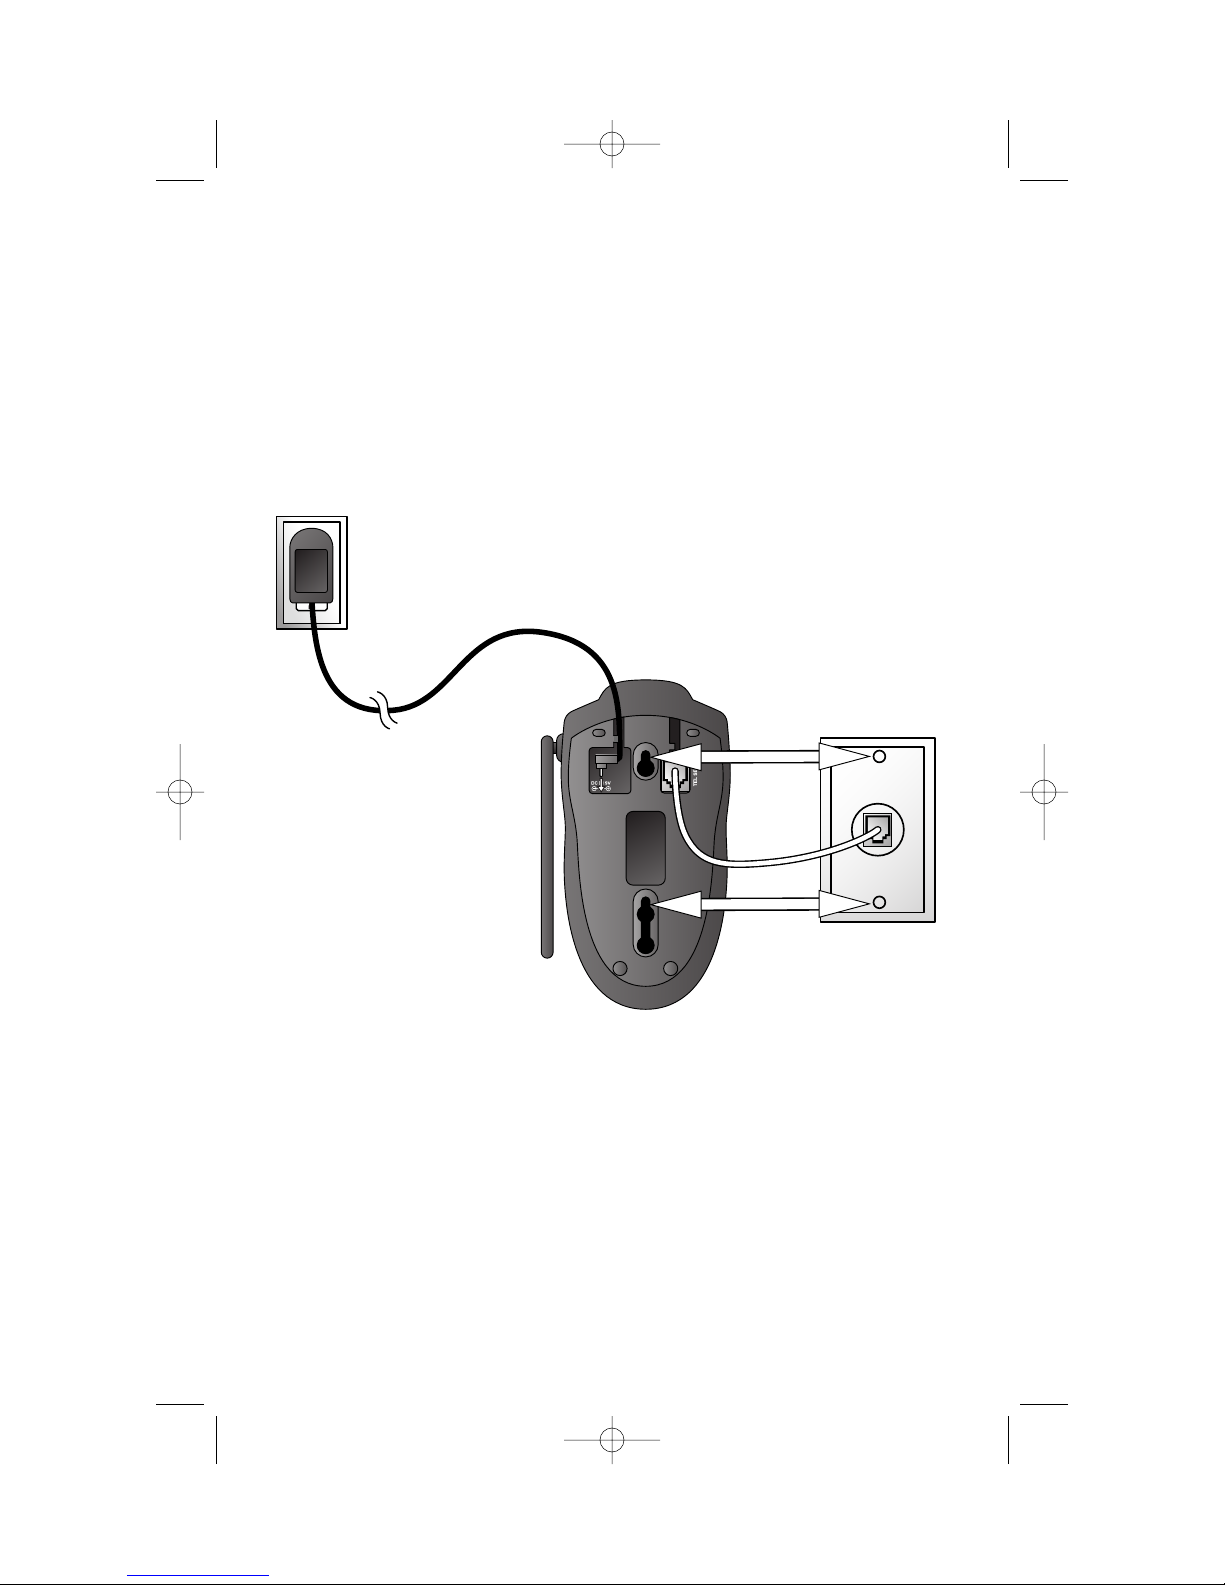
INSTALLATION . . . . . . . . . . . . . . . . . . . . . . . 2
Before You Install .......................... 2
Table/Desk Installation ................. 3
Wall Installation ............................ 5
TELEPHONE OPERATION . . . . . . . 6
Make a Call.................................... 6
Answer a Call ................................ 6
End a Call ...................................... 6
Change Channel............................ 6
Redial ............................................ 6
Handset Volume ............................ 6
Flash/Call Waiting.......................... 6
Hold .............................................. 6
Page/Handset Locator ................... 7
Handset Ringer Style/
Battery Save ............................... 8
Temporary Tone Dialing................ 8
Headset Jack.................................. 8
Operating Range ........................... 9
Display Screen Messages............... 9
TELEPHONE MEMORY . . . . . . . . . 10
Store Memory Numbers.............. 10
Edit Numbers Stored
in Memory ............................... 11
Delete Numbers Stored
in Memory ............................... 12
Dial Memory Numbers ............... 12
CALLER ID OPERATION . . . . . . . 13
About Call History ...................... 13
Review Call History .................... 13
Delete Records from
Call History.............................. 14
Dial a Displayed Number ............ 14
Store a Call History Record
in Memory ............................... 15
Display Screen Messages............. 16
BATTERIES . . . . . . . . . . . . . . . . . . . . . . . . . . 17
Charging the Handset
Battery Pack............................. 17
Replacing the Handset
Battery Pack............................. 18
IN CASE OF DIFFICULTY . . . . . . 19
9345_book_1ATT 6/5/01 11:33 AM Page iv

BEFORE YOU BEGIN
1
About Caller Identification (Caller ID)
This product has a Caller ID with Call Waiting feature that works with
service from your local phone service provider.
Caller ID with Call Waiting lets you see who’s calling before you answer the
phone, even when you’re on another call.
You may need to change your phone service to use this feature. Contact
your phone service provider if:
• You have both Caller ID and Call Waiting, but as separate services
(you may need combined service)
• You have only Caller ID service, or only Call Waiting service
• You don’t subscribe to any Caller ID or Call Waiting services.
You can use this product with regular Caller ID service, and you can use
this product’s other features without subscribing to either Caller ID or
combined Caller ID with Call Waiting service.
There are fees for Caller ID services, and they may not be available in all
areas.
This product can provide information only if both you and the caller are in
areas offering Caller ID service, and if both telephone companies use
compatible equipment.
9345_book_1ATT 6/5/01 11:33 AM Page 1

INSTALLATION
2
Before You Install
1 Choose a location for the base near an electrical outlet and a
telephone jack.
This phone requires a modular telephone jack and a standard electrical
outlet (110v AC) not controlled by a wall switch.
2 Install the handset battery.
b) Align two holes in
plug with socket
pins, and snap the
plug into place.
d) Replace
cover by
sliding it up
into place.
a) Remove battery
compartment
cover by pressing
on the
indentation
and sliding
downward.
c) Place battery pack
in compartment
with the wires in
the lower left
corner, along the
bottom of the
battery pack.
9345_book_1ATT 6/5/01 11:33 AM Page 2

INSTALLATION
3
3 Attach belt clip to the cordless handset (optional).
To attach To remove
Table/Desk Installation
Standard
electrical outlet
Modular
telephone
jack
1 Connect the
telephone
line cord.
2 Connect the
power cord.
9345_book_1ATT 6/5/01 11:33 AM Page 3

INSTALLATION
4
3 Charge the handset battery.
Place the handset in the base. Charge the battery for at least 16 hours
the first time.
4 Check for dial tone.
After the batteries are charged, pick up the handset and press P;
you should hear a dial tone.
5 Set the dial mode.
If you have touch tone service, the phone is ready to use as soon as
the batteries are charged.
If you have dial pulse (rotary) service, you’ll need to change the dial
mode.
• Press Gon the handset to enter programming mode.
• Press <or >until the screen displays DIAL TYPE: and the
currently selected mode.
• Press s. The current setting blinks.
• Press >to select TONE or PULSE.
• Press s, to save the displayed mode.
9345_book_1ATT 6/5/01 11:33 AM Page 4

INSTALLATION
5
a) Align holes on
base with
mounting studs
on wall jack.
b) Pull base down
on mounting
studs until it
locks into place.
4 Follow Steps 3–5 in Table/Desk Installation.
Wall Installation
1 Connect the telephone line cord.
2 Connect the power cord.
3 Mount the base on the wall.
Modular
telephone
jack
Standard
electrical outlet
9345_book_1ATT 6/5/01 11:33 AM Page 5

HEADLINE LEFT
HEADLINE L-SUB
6
TELEPHONE OPERATION
End a Call
Press O
— OR —
Place handset
in base.
Exit
programming.
Cancel a page.
Handset Volume
While on a call,
adjust volume
of what you hear.
Hold
Press to put a
call on hold.
Press again to
release hold
— OR —
Lift the handset
of an extension.
Answer a Call
Press any key
except O.
Change Channel
Switch to a clearer channel
while on a call.
Enter programming while not on a call.
Redial
Press P,then
press rto
call last number dialed
(up to 24 digits).
Make a Call
Press P, then
dial the number
— OR —
Dial the number (use
<to backspace and
correct digits), then
press Pto call.
Flash/
Call Waiting
Access special
telephone company
subscriber services.
9345_book_1ATT 6/5/01 11:34 AM Page 6

7
TELEPHONE OPERATION
Page/Handset Locator
Press to page the handset for up to
90 seconds. Press again to cancel,
or press Oon handset.
On steadily
when handset
is in use or is
charging in
base.
Flashes
when you have
unreviewed call
information.
If you subscribe
to telephone
company voice
mail with a
visual message
waiting signal,
light flashes
when you have
voice mail
waiting.
9345_book_1ATT 6/5/01 11:34 AM Page 7

8
TELEPHONE OPERATION
Handset Ringer Style/Battery Save
You can select from four different handset ringer styles, or turn the ringer
off and extend the battery life.
1Make sure the handset is off.
2Press Gto enter programming mode.
3Press >until the screen displays RINGER:.
4Press s. The screen displays the current setting.
5Press >to select 1,2,3,4,or OFF. You will hear a sample
of each ring.
6Press sto choose the displayed ringer setting.
Temporary Tone Dialing
If you have dial pulse (rotary) service, you can change from dial pulse
to touch tone dialing during a call by pressing *. This is useful if you
need to send touch tone signals for access to telephone banking or
long-distance services.
1Dial the number.
2Press *. Buttons pressed after this send touch tone signals.
3After you hang up, the phone automatically returns to
dial pulse (rotary) service.
Headset Jack
You can use this telephone hands-free when
you install any AT&T 2.5 mm headset,
purchased separately.
Plug the headset into the jack located
on the right side of the handset
(under the small rubber flap).
Do not force the connection,
but make sure the plug
fits securely.
9345_book_1ATT 6/5/01 11:34 AM Page 8

9
TELEPHONE OPERATION
Operating Range
This cordless telephone operates within the maximum power allowed by
the Federal Communications Commission (FCC). Even so, this handset and
base can communicate over only a certain distance — which can vary with
the locations of the base and handset, the weather, and the construction of
your home or office. For best performance, keep the base antenna fully
upright.
If you receive a call while you are out of range, the handset might not
ring — or if it does ring, the call might not connect when you press P.
Move closer to the base, then press Pto answer the call.
If you move out of range during a phone conversation, you might
hear noise or interference. To improve reception, move closer to the base.
If you move out of range without pressing O, your phone will be
left “off the hook.” To hang up properly, walk back into range, periodically
pressing O.
Display Screen Messages
Screen Displays: When:
NO LINE The base is not connected to the telephone line,
or the line is not working.
RINGING There is a call coming in.
CONNECTING The handset is waiting for a dial tone.
PHONE The handset is in use.
MESSAGE WAITING You have received telephone company voice mail.
PAGING The base is paging the handset.
9345_book_1ATT 6/5/01 11:34 AM Page 9

10
TELEPHONE MEMORY
This cordless phone can store 20 telephone numbers with names, each up
to 16 digits long. Entries are stored alphabetically. For consistency with
Caller ID entries, you may wish to enter last names first.
Note: Press Oat any time to exit memory.
Store Memory Numbers
1Press G. The screen displays DIRECTORY.
2Press s. The screen displays ENTER NAME.
3Using the chart below, enter up to 16 characters for the name
you’re storing with the number. Use <to backspace and make
corrections; use >to advance and add a space.
Presses
DialKey 123456
11
2ABC2
3DEF3
4GH I 4
5JKL5
6MNO 6
7PQR S 7
8TUV 8
9WX Y Z 9
00
**
#&’,-.#
9345_book_1ATT 6/5/01 11:34 AM Page 10

11
4When you finish entering the name, press s. The screen
displays ENTER NUMBER.
5Enter the telephone number. Use <to backspace and make
a correction. Press rto store a pause in the dialing
sequence.
6Press sto store your entry. The screen displays SAVING…
and you’ll hear a series of beeps confirming the entry.
Note: When memory is full the screen displays MEMORY FULL, an error
tone sounds, and you will not be able to store a new number until you
delete a stored number.
Edit Numbers Stored in Memory
1Press >(DIR). The screen displays DIRECTORY.
2Press <or >to scroll alphabetically through numbers
stored in memory
—OR—
Press the dial pad key for the first letter of the entry you
want to edit.
3When the screen displays the number you want to edit, press s.
Then press <or >until EDIT flashes.
4Press s. The screen displays the name and number. The flashing
cursor appears at the end of the name. Use <,>and the dial
pad keys to edit the name. Press sto move on to edit the
number.
5Press sto save the edited information. You’ll hear a series of
beeps confirming the change.
DIAL EEDDIITTERASE
973- -0123
/01 :40PM OLD28
TELEPHONE MEMORY
9345_book_1ATT 6/5/01 11:34 AM Page 11

12
TELEPHONE MEMORY
Delete Numbers Stored in Memory
1Press >(DIR). The screen displays DIRECTORY.
2Press <or >to scroll alphabetically through numbers
stored in memory
—OR—
Press the dial pad key for the first letter of the entry you
want to delete.
3When the screen displays the number you want to delete, press
s. Then press <or >until ERASE flashes.
4Press s. The screen displays ERASE NO YES and the number.
The current choice flashes.
5Press <or >until YES flashes.
6Press s. You’ll hear a series of beeps confirming the deletion.
Dial Memory Numbers
1Press >(DIR). The screen displays DIRECTORY.
2Press <or >to scroll alphabetically through numbers
stored in memory
—OR—
Press the dial pad key for the first letter of the entry you
want to dial.
3When the screen displays the number you want to dial, press s.
Then press <or >until DIAL flashes.
4Press s. The phone automatically dials the number.
DDIIAALLEDIT ERASE
973- -0123
/01 :40PM OLD28
DIAL EDIT EERRAASSEE
973- -0123
/01 :40PM OLD28
9345_book_1ATT 6/5/01 11:34 AM Page 12

13
CALLER ID OPERATION
About Call History
This phone assigns each incoming call a number from 1 to 50. The most
recent call will have the highest number. When the memory is full, the
oldest call information is deleted to make room for new incoming call
information.
For each call that comes in, the screen displays the following information
between the first and second rings:
• Your caller’s name (15 letters are sent by your telephone
company)
• The caller’s area code and telephone number
• The time and date of the call
• The position of the call in call history.
If you answer a call before the information appears on the screen, it will
not be in the call history.
Note: Press Oat any time to exit call history.
Review Call History
The screen displays call information for about 15 seconds after it has been
received.
1Press <(CID) to view call history.
2Use <and >to scroll through records in call history.
Indicates repeat call
Caller’s name
Caller’s
telephone
number
Date of call Time of call Position of call
in call history
9345_book_1ATT 6/5/01 11:34 AM Page 13

14
CALLER ID OPERATION
Delete Records from Call History
Delete a Specific Call
1Locate the record you want to delete from call history.
2Press s, then press <or >until ERASE flashes.
3Press s. The screen displays ERASE NO YES ALL and
the phone number. The current choice flashes.
4Press <or >until YES flashes.
5Press s. You’ll hear a series of beeps confirming the deletion.
Delete All Calls
1While viewing call history, press s, then press <or >until
ERASE flashes.
2Press s. The screen displays ERASE NO YES ALL and
the phone number. The current choice flashes.
3Press <or >until ALL flashes, then press s. The screen
displays ERASE ALL NO YES. The current choice flashes.
4Press <or >until YES flashes.
5Press s. You will hear a series of beeps confirming the deletion.
Dial a Displayed Number
1Locate the record in call history that you want to dial.
2Press s, then press <or >until DIAL flashes.
The phone number will be displayed in the format it was received.
3If you wish to change how the number is dialed, press #.
The screen displays any alternate dialing sequences available
for this call (area code + number; 1 + area code + number;
1+ number; number only).
4Press Pwhen the number is correctly displayed for dialing.
DDIIAALL PGM ERASE
973- -0123
/01 :40PM OLD28
DIAL PGM EERRAASSEE
973- -0123
/01 :40PM OLD28
DIAL PGM EERRAASSEE
973- -0123
/01 :40PM OLD28
9345_book_1ATT 6/5/01 11:34 AM Page 14

15
CALLER ID OPERATION
Store a Call History Record in Memory
1Locate the record in call history you want to store in memory.
2Press s, then press <or >until PGM flashes.
The phone number will be displayed in the format it was received.
3If you wish to change how the number is stored, press #.
The screen displays any alternate dialing sequences available
for this call (area code + number; 1 + area code + number;
1+ number; number only).
4Press sto store the call information in the memory location
displayed in the upper right corner
— OR —
Press <, then enter a two-digit memory location (01-20).
5Press s. You’ll hear a series of beeps confirming the number
was stored.
6If you try to store information in an already occupied location, the
screen displays
Press sto exit without replacing the number already stored in
that location
— OR —
Press >to display YES, then press sto replace the previous
number with the new one.
OVERWRITE? NO
973- -0123
/01 :40PM OLD28
DIAL PPGGMMERASE
973- -0123
/01 :40PM OLD28
9345_book_1ATT 6/5/01 11:34 AM Page 15

Display Screen Messages
Screen Displays: When:
PRIVATE NAME The other party is blocking name information.
PPP The other party is blocking number information.
PRIVATE CALLER The other party is blocking name and number
information.
UNKNOWN NAME Your phone company is unable to receive
information about this caller’s name.
UUU Your phone company is unable to receive
information about this caller’s number.
UNKNOWN CALLER Your phone company is unable to receive
information about this caller’s name and number.
EXTENSION IN USE An extension phone on this line is being used, so
call information cannot be received.
Err There is a problem with Caller ID transmission
from the telephone company.
16
CALLER ID OPERATION
9345_book_1ATT 6/5/01 11:34 AM Page 16

17
Charging the Handset Battery Pack
This battery should remain charged up to six days with the ringer turned
on and up to 12 days with the ringer off. A fully charged battery provides
an average talk time of about five hours.
The battery pack needs charging when:
• A new battery is installed in the handset.
• The phone beeps twice every 16 seconds.
• The screen displays LOW BATTERY and the low battery icon.
Place the handset in the base so the CHARGING light turns on. The battery
pack is typically fully charged in eight hours.
You can keep the battery fully charged by returning the handset to the
base after each use.
If you repeatedly get a low battery indicator, even after charging
overnight, the battery should be replaced.
CAUTION: To reduce the risk of fire or injury to persons or
damage to the telephone, read and follow these instructions
carefully:
• Use only Replacement Battery 3301 (SKU# 91076).
• Do not dispose of the battery in a fire. The cell might explode.
Check with local codes for special disposal instructions.
• Do not open or mutilate the battery. Released electrolyte is
corrosive and may cause damage to the eyes or skin. It may be
toxic if swallowed.
• Exercise care in handling batteries in order not to short the battery
with conducting materials such as rings, bracelets, and keys. The
battery or conductor may overheat and cause harm.
• Charge the battery provided with or identified for use with this
product only in accordance with the instructions and limitations
specified in this manual.
• Observe proper polarity orientation between the battery and
battery charger.
BATTERIES
9345_book_1ATT 6/5/01 11:34 AM Page 17
Table of contents
Other AT&T Cordless Telephone manuals
Popular Cordless Telephone manuals by other brands

Sony
Sony SPP-A9171 - Cordless Telephone With Answering... operating instructions

EnGenius
EnGenius EP800 user manual

Gigaset
Gigaset Gigaset 3010 Classic Service manual

Toshiba
Toshiba FT-H906 owner's manual

Motorola
Motorola C155 - Cell Phone - GSM Motomanual

Uniden
Uniden EXAI8580 - EXAI 8580 Cordless Phone Guide d'utilisation

Coby
Coby CT-P8250 Installation and operating guide

Uniden
Uniden EXT 1965 owner's manual

Grandstream Networks
Grandstream Networks WP820 Quick installation guide

Panasonic
Panasonic KX-TG3411BX operating instructions

Oregon Scientific
Oregon Scientific ThermoDECT Instruction

AEI COMMUNICATIONS
AEI COMMUNICATIONS VX-8208-SMBU QIG