AT&T TL88102 User manual

Quick start guide
TL88102/TL88102BK/TL88202
DECT 6.0 2-line cordless telephone/
answering system with caller ID/
call waiting
Scan the QR code for
support information

Congratulations
on your purchase of this AT&T product. Before using this AT&T product, please read
the Important safety information section on pages 1-3 of this manual.
Both the model and serial numbers of your AT&T product can be found on the
bottom of the telephone base. Save your sales receipt and original packaging in
case it is necessary to return your telephone for warranty service.
For customer service, please visit our website at https://telephones.att.com
or call 1 (800) 222-3111. In Canada, dial 1 (866) 288-4268.
Parts checklist
Your telephone package contains the following items.
Telephone line cord Power adapter for
telephone base
Telephone base
Belt clip
(1 for TL88102/
TL88102BK)
(2 for TL88202)
Quick start guide
Cordless handset
(1 for TL88102/
TL88102BK)
(2 for TL88202)
Charger for cordless
handset with power
adapter installed
(1 for TL88202)
Battery for cordless
handset
(1 for TL88102/
TL88102BK)
(2 for TL88202)
Battery
compartment
cover
(1 for TL88102/
TL88102BK)
(2 for TL88202)
Please refer to the online TL88102/TL88102BK/TL88202 DECT 6.0
2-line cordless telephone/answering system with caller ID/call waiting
Complete user’s manual for a full set of installation and operation
instructions at https://telephones.att.com/manuals.
Quick start guide
TL88102/TL88102BK/TL88202
DECT 6.0 2-line cordless telephone/
answering system with caller ID/call
waiting
Scan the QR code for
support information
THIS SIDE UP / CE CÔTÉ VERS LE HAUT
Battery Pack / Bloc-piles :
BT183342/BT283342 (2.4V 400mAh Ni-MH)
WARNING / AVERTISSEMENT :
DO NOT BURN OR PUNCTURE BATTERIES.
NE PASINCINÉRER OU PERCER LES PILES.
Made in China / Fabriqué en chine CR1349

1
Important safety information
This symbol is to alert you to important operating or servicing instructions
that may appear in this user’s manual. Always follow basic safety precautions
when using this product to reduce the risk of injury, re, or electric shock.
Safety information
fRead and understand all instructions in the user’s manual. Observe all markings on
the product.
fAvoid using a telephone during a thunderstorm. There may be a slight chance of
electric shock from lightning.
fDo not use a telephone in the vicinity of a gas leak. Under certain circumstances,
a spark may be created when the adapter is plugged into the power outlet, or
when the handset is replaced in its cradle. This is a common event associated with
the closing of any electrical circuit. In an inadequately ventilated environment,
the user should not plug the phone into a power outlet, nor put a charged
handset into the cradle where there are concentrations of ammable or ame-
supporting gases. A spark in such an environment could create a re or explosion.
Such environments might include: medical use of oxygen without adequate
ventilation; industrial gases (cleaning solvents; gasoline vapors; etc.); a leak of natural
gas; etc.
fDo not use this product near water or when you are wet. For example, do not use
it in a wet basement or shower, nor next to a swimming pool, bathtub, kitchen sink
and laundry tub. Do not use liquids or aerosol sprays for cleaning. If the product
comes in contact with any liquid, unplug any line or power cord immediately. Do not
plug the product back in until it has dried thoroughly.
fInstall this product in a protected location where no one can trip over any line or
power cords. Protect cords from damage or abrasion.
fIf this product does not operate normally, see the Troubleshooting section of the
online Complete user’s manual. If you cannot solve the problem, or if the product
is damaged, refer to the Limited warranty section (pages 32 - 34). Do not
open this product except as directed in your user’s manual. Opening the product or
reassembling it incorrectly may expose you to hazardous voltages or other risks.
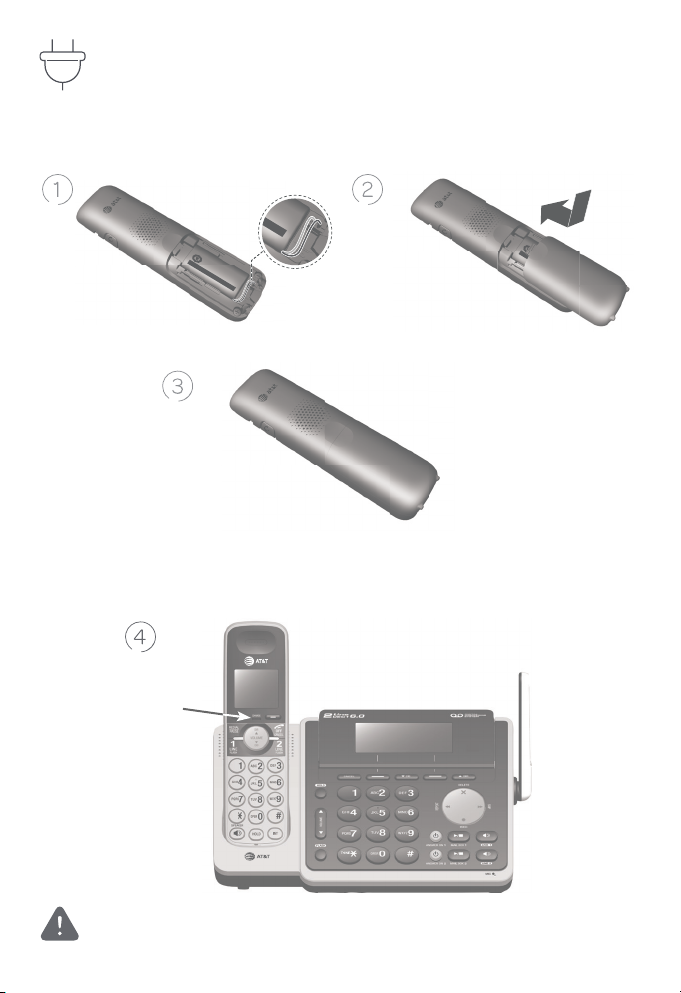
fReplace batteries, only as described in your user’s manual (Page 8). Do not burn
or puncture batteries — they contain caustic chemicals.
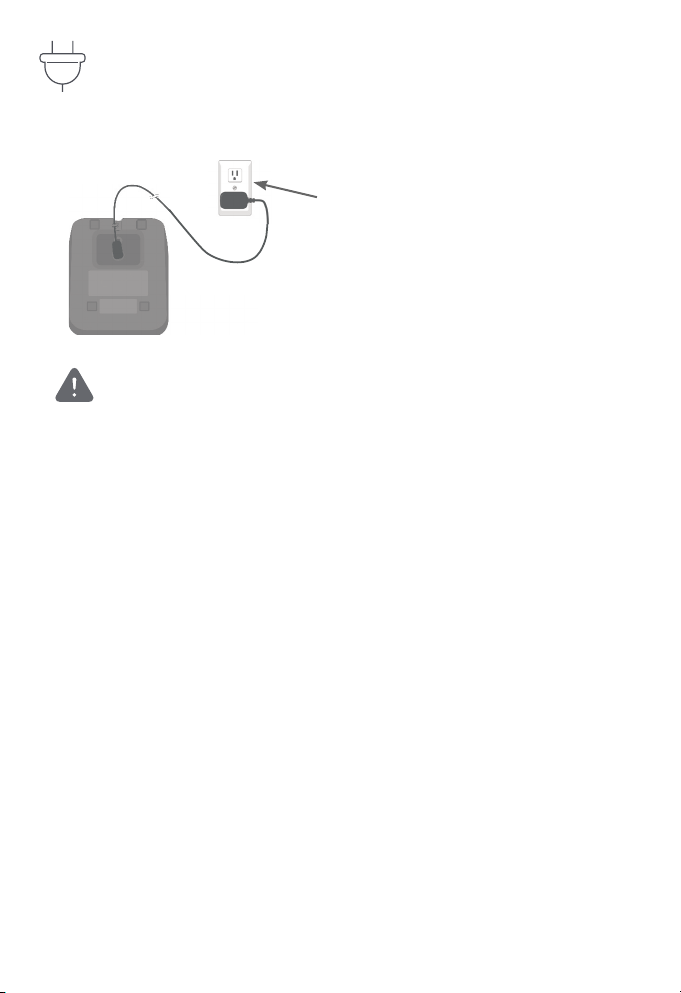
fThis power adapter is intended to be correctly oriented in a vertical or oor mount
position. The prongs are not designed to hold the plug in place if it is plugged into a
ceiling or an under-the-table/cabinet outlet.
fFor pluggable equipment, the socket-outlet shall be installed near the equipment
and shall be easily accessible.
CAUTIONS:
fUse only the power adapter provided with this product. To obtain a replacement,
visit our website at https://telephones.att.com or call
1 (800) 222-3111.In Canada, dial 1 (866) 288-4268.

2
Important safety information
CAUTION: To prevent risk of re or battery explosion, replace with
the correct battery type. Dispose of used batteries according to the
instructions.
fDisconnect the telephone line from the equipment before open the battery
door. Do not use the battery in following conditions:
fHigh or low extreme temperature during use, storage or transportation.
fReplacement of a battery with an incorrect type that can defeat a safeguard.
fDisposal of a battery into fire or a hot oven, or mechanically crushing or
cutting of a battery, that can result in an explosion.
fLeaving a battery in an extremely high temperature surrounding
environment that can result in an explosion or the leakage of flammable
liquid or gas.
fA battery subjected toextremely low air pressure that can result in an
explosion or the leakage of flammable liquid or gas.
fU
se only the supplied rechargeable battery or replacement battery (model
BT183342/BT283342).
To order, visit our website at
https://telephones.att.com,or call 1 (800) 222-3111. In
Canada, dial 1 (866) 288-4268.
fThe applied nameplate is located at the bottom or near of the product.
Especially about cordless telephones
fPrivacy: The same features that make a cordless telephone convenient create
some limitations. Telephone calls are transmitted between the telephone base
and the handset by radio waves, so there is a possibility that your cordless
telephone conversations could be intercepted by radio receiving equipment within
range of the cordless handset. For this reason, you should not think of cordless
telephone conversations as being as private as those on corded telephones.
fElectrical power: The telephone base of this cordless telephone must be
connected to a working electrical outlet which is not controlled by a wall switch.
Calls cannot be made from the handset if the telephone base is unplugged,
switched o or if the electrical power is interrupted.
fPotential TV interference: Some cordless telephones operate at frequencies
that may cause interference to TVs and VCRs. To minimize or prevent such
interference, do not place the telephone base of the cordless telephone near
or on top of a TV or VCR. If interference is experienced, moving the cordless
telephone farther away from the TV or VCR will oen reduce or eliminate the
interference.
fRechargeable batteries: This product contains nickel-metal hydride rechargeable
batteries. Exercise care in handling batteries in order not to create a short
circuit with conductive material such as rings, bracelets, and keys. The battery or
conductor may overheat and cause harm. Observe proper polarity between the
battery and the battery charger.
i

3
Important safety information
fNickel-metal hydride rechargeable batteries: Dispose of these batteries in a safe
manner. Do not burn or puncture. Like other batteries of this type, if burned or
punctured, they could release caustic material which could cause injury.
The RBRC Seal means that the manufacturer is voluntarily
participating in an industry program to collect and recycle nickel-
metal hydride rechargeable batteries when taken out of service
within the United States. These batteries may be taken to a
participating local retailer of replacement batteries or recycling
center. You may call 1-800-8-BATTERY® for locations accepting
spent Ni-MH batteries.
The RBRC Seal and 1-800-8-BATTERY® are registered trademarks of
Call2recycle, Inc.
Precautions for users of implanted cardiac pacemakers
Cardiac pacemakers (applies only to digital cordless telephones):
Wireless Technology Research, LLC (WTR), an independent research entity, led
a multidisciplinary evaluation of the interference between portable wireless
telephones and implanted cardiac pacemakers. Supported by the U.S. Food and
Drug Administration, WTR recommends to physicians that:
Pacemaker patients:
fShould keep wireless telephones at least six inches from the pacemaker.
fShould NOT place wireless telephones directly over the pacemaker, such as in a
breast pocket, when it is turned ON.
fShould use the wireless telephone at the ear opposite the pacemaker.
WTR’s evaluation did not identify any risk to bystanders with pacemakers from
other persons using wireless telephones.
Especially about telephone answering systems
Two-way recording: This unit does not sound warning beeps to inform the other
party that the call is being recorded. To ensure that you are in compliance with any
federal or state regulations regarding recording a telephone call, you should start
the recording process and then inform the other party that you are recording the
conversation.
SAVE THESE INSTRUCTIONS

4
Table of contents
Important safety information....................................................................................................1
Install...........................................................................................................................................................5
Handset overview............................................................................................................................10
Telephone base overview...........................................................................................................13
Initial basic settings........................................................................................................................16
Date and time ................................................................................................................................16
Record your own announcement.....................................................................................16
Number of rings............................................................................................................................17
Ringer volume................................................................................................................................17
LCD language .................................................................................................................................17
Voice language..............................................................................................................................18
Operate...................................................................................................................................................18
Directory ................................................................................................................................................21
Caller ID...................................................................................................................................................22
Review and dial a number in the call log......................................................................22
Erase missed calls indicator in the call log.................................................................22
Answering system ...........................................................................................................................23
About answering system and voicemail......................................................................23
Turn answering system on or o.....................................................................................24
Message alert tone....................................................................................................................24
Call screening.................................................................................................................................25
Message playback.......................................................................................................................25
For C-UL compliance.....................................................................................................................26
FCC Part 68 and ACTA..................................................................................................................30
FCC Part 15 ............................................................................................................................................31
Limited warranty..............................................................................................................................32
Technical specications...............................................................................................................35

5
Install
Telephone base
If you have a 2-line wall jack, install the telephone base, as shown in Option 1 below.
If you have separate wall jacks for each line, install the telephone base, as shown in
Option 2 on the next page.
Option 1: Installation with 2-line jack Plug one end of the
black telephone line
cord into the 2-line
telephone wall jack or a
DSL filter.
Plug the large end of the telephone
base power adapter into a power
outlet not controlled by a wall
switch.
A DSL filter (not
included) is required
if you have DSL
high-speed Internet
service.The DSL filter
must be plugged
into the telephone
wall jack.
Route the power adapter
cord through this slot.
Plug the small end of the
telephone base power adapter
into the power adapter jack on the
back of the telephone base.
Raise the
antenna. Plug the other
end of the black
telephone line
cord into the
LINE 1/L1+L2
telephone jack at
the back of the
telephone base.

6
Option 2: Installation with separate line jacks
Install
DSL filters (not
included) are
required if you
have DSL high-
speed Internet
service.
The DSL
filter must be
plugged into the
telephone wall
jack.
Plug one end of the clear telephone
line cord into the line 1 telephone wall
jack or a DSL filter.
Plug one end of the black
telephone line cord into
the line 2 telephone wall
jack or a DSL filter.
Plug the large end of the
telephone base power
adapter into a power
outlet not controlled by
a wall switch.
Raise the
antenna.
Route the power
adapter cord
through this slot.
Plug the small end of
the telephone base
power adapter into
the power adapter
jack on the back of the
telephone base.
Plug the other end of the
clear telephone line cord into
the LINE 1/L1+L2 telephone
jack at the back of the
telephone base.
Plug the other end of
the black telephone
line cord into the
LINE 2 telephone jack
at the back of the
telephone base.

7
Charger
Caution: Use only the power adapter(s) provided with this product. To obtain a
replacement, visit our website at
https://telephones.att.com or call 1 (800) 222-3111. In Canada, dial
1 (866) 288-4268.
Install
Plug the power adapter into a power
outlet not controlled by a wall switch.

8
THISSIDE UP / CE CÔTÉ VERS LE HAUT
BatteryPack / Bloc-piles :
BT183342/BT283342(2.4V 400mAh Ni-MH)
WARNING/ AVERTISSEMENT :
DONOT BURN OR PUNCTURE BATTERIES.
NEPAS INCINÉRER OU PERCER LES PILES.
Madein China / Fabriqué en chine BY1021
THIS SIDE
Battery Pack / Bloc
BT183342/BT283342
WARNING / AVERTISS
DO NOT BURN OR PUN
NE PAS INCINÉRER O
Made in China / Fa
Battery
Install the battery, as shown below.
Caution: Use only the supplied rechargeable battery or replacement battery
(model BT183342/BT283342).
Install
Charge your handset(s) before initial use. The battery is fully charged aer 16
hours of continuous charging. The CHARGE light on the top of the handset is on
during charging.
LEHAUT
21
CHARGE light

9
Install
Belt clip (optional)
Headset (optional)
For handsfree telephone conversation, you can use any industry standard 2.5mm
headset (purchased separately). For best results, use an AT&T 2.5mm headset. To
purchase a headset, visit our website at www.telephones.att.com or call
1 (800) 222-3111. In Canada, dial 1 (866) 288-4268.
To remove the belt clip:
Gently lift either of the
belt clip tabs outwards to
remove the belt clip from
the handset.
To attach the belt clip:
Snap the belt clip into
the slots on both sides
of the handset.
Lift the plastic
cover.
Plug a 2.5mm headset into the
jack on the side of the handset
(beneath the small plastic cover).
Side view of handset

10
Handset overview
Handset
1
CHARGE
indicator
ÌOn when the handset is charging in the telephone
base or charger.
2
REDIAL/PAUSE ÌPress repeatedly to view the last ten numbers dialed.
ÌPress and hold to insert a dialing pause while
entering numbers.
3LINE 1/FLASH ÌPress to make or answer a call on line 1.
ÌDuring a call, press to answer an incoming call on line
1 when you receive a call waiting alert.
4/SPEAKER ÌPress to make or join a call using the rst available line,
starting with line 1.
ÌPress to answer a call using the speakerphone.
ÌDuring a call, press to switch between speakerphone
and handset use.
5Sokey (2) ÌPress to select a menu item displayed above the key.
1
2
3
4
5
8
9
10
11
7
6

11
6OFF/
CANCEL
ÌPress to hang up a call.
ÌPress to cancel an operation.
ÌPress to return to the previous menu.
ÌPress and hold to exit the menu display.
ÌPress to delete a digit or character while entering a
number or name.
ÌPress and hold while the telephone is not in use to
erase the missed call indicator.
7
LINE 2/FLASH ÌPress to make or answer a call on line 2.
ÌDuring a call, press to answer an incoming call on line
2 when you receive a call waiting alert.
8pDIR/
VOLUME
ÌPress to show directory entries when the handset is
not in use.
ÌPress to scroll up while in menus.
ÌPress to move the cursor to the right while entering
names or numbers.
ÌPress to increase the listening volume when on a call.
ÌPress to increase the message playback volume.
qCID/VOLUME ÌPress to show caller ID log when the handset is not
in use.
ÌPress to scroll down while in menus.
ÌPress to move the cursor to the le while entering
names or numbers.
ÌPress to decrease the listening volume when on a
call.
ÌPress to decrease the message playback volume.
9# (pound key) ÌPress repeatedly to display other dialing options
when reviewing a caller ID log entry.
10 INT ÌPress to initiate an intercom conversation or transfer
a call.
11 HOLD ÌPress to put a call on hold.
Handset overview

12
Handset overview
Handset screen icons
Handset battery is charging (animated displayed).
Becomes solid when the battery is fully charged.
Flashes when the battery is low and needs charging.
1
1Line 1 is in use.
2
2Line 2 is in use.
1
1Handset ringer of line 1 is turned off.
1
2Handset ringer of line 2 is turned off.
1
1
2
Handset ringers of line 1 and line 2 are turned off.
1
1New voicemail received on line 1 from the telephone service
provider.
2
2New voicemail received on line 2 from the telephone service
provider.
2
1
2New voicemail received on lines 1 and 2 from the telephone
service provider.
1New answering system message(s) on line 1.
2New answering system message(s) on line 2.
1
2
New answering system messages on lines 1 and 2.
AnS1
ON
Answering system of line 1 is turned on.
AnS
ON
2
Answering system of line 2 is turned on.
AnS1
ON
2
Answering systems of line 1 and line 2 are turned on.
Speakerphone is in use.
A wired headset is being used.
NEW New missed call(s) in call log.
MUTE Microphone is muted.

13
Telephone base
1Sokeys (2) ÌPress to select a menu item displayed above the
key.
2
CANCEL ÌPress to cancel an operation.
ÌPress to return to the previous menu.
ÌPress and hold to exit the menu display.
ÌWhile the telephone base is ringing, press to
silence the ringer temporarily.
ÌPress to delete a digit or character while entering
a number or name.
ÌPress and hold while the telephone is not in use
to erase the missed call indicator.
3
qCID ÌPress to show caller ID log when the handset is
not in use.
ÌPress to scroll down while in menus.
ÌPress to move the cursor to the le while
entering names or numbers.
pDIR ÌPress to show directory entries when the
handset is not in use.
ÌPress to scroll up while in menus.
ÌPress to move the cursor to the right while
entering names or numbers.
Telephone base overview
1
2
3
4
5
6
7
8
9
10
11
12

14
4
HOLD ÌPress to put a call on hold.
5pVOLUMEqÌDuring a call, press to adjust the speakerphone
volume.
ÌPress to adjust the volume during message
playback.
ÌWhile the telephone base is ringing, press the
increase or decrease the ringer volume.
ÌWhen the telephone is not in use, press to adjust
the telephone base ringer volume for all lines.
6
FLASH ÌDuring a call, press to answer an incoming call
when you receive a call waiting alert.
7
# (pound key) ÌPress repeatedly to show other dialing options
when reviewing a call log entry.
8Large tilt
display
ÌMove the top of the display forward or backward
to adjust the angle of the screen for maximum
visibility.
9/REPEAT ÌPress to repeat the playing message.
ÌPress twice to play the previous message.
X/DELETE ÌPress to delete the message currently playing.
/SKIP ÌPress to skip to the next message.
/REC ÌPress to record a memo or an outgoing
announcement.
10 /LINE 1 ÌPress to make or answer a call on line 1.
/LINE 2 ÌPress to make or answer a call on line 2.
11
/MAIL BOX 1 ÌPress to start or stop message playback of the
mailbox of line 1.
/MAIL BOX 2 ÌPress to start or stop message playback of the
mailbox of line 2.
12
/ANSWER ON 1 ÌPress to turn the answering system of line 1 on
or o.
/ANSWER ON 2 ÌPress to turn the answering system of line 2 on
or o.
Telephone base overview

15
Telephone base overview
Telephone base screen icons
1
1Line 1 is in use.
2
2Line 2 is in use.
1
1
Base ringer of line 1 is turned off.
1
2Base ringer of line 2 is turned off.
1
1
2Base ringers of line 1 and line 2 are turned off.
1
1
New voicemail received on line 1 from the telephone service
provider.
2
2New voicemail received on line 2 from the telephone service
provider.
1
2
2New voicemail received on lines 1 and 2 from the telephone
service provider.
1New answering system message(s) on line 1.
2New answering system message(s) on line 2.
1 2 New answering system messages on lines 1 and 2.
NEW New missed call(s) in call log.
MUTE Microphone is muted.

16
Initial basic settings
Date and time
Note: Set the date/time before using the answering system.
Using a cordless handset or the telephone base:
1. MENU -> / -> Settings -> SELECT .
2. /-> Set date/time -> SELECT .
3. Enter the month (MM) -> SET -> Enter the day (DD) -> SET -> Enter the year
(YY)-> SET .
4. Enter the hour (HH) -> SET -> Enter the minute (MM) -> SET .
5. /-> AM or PM -> SET .
Aer you install your telephone or power returns following a power outage, the
telephone will prompt you to set the date and time. To skip setting the date and
time, press OFF/CANCEL on the handset or CANCEL on the telephone base.
We recommend you program your telephone system before use. The following
are a few examples of common features to set before using the telephone. Refer to
the Handset and telephone base settings and Answering system settings in the
Complete user’s manual for detailed instructions on setting all telephone features.
Record your own announcement
Your outgoing announcement plays when calls are answered by the answering
system. You can use the preset announcement to answer calls, or replace it with
your own recorded announcement.
Using a cordless handset:
1. MENU -> / -> Answering sys -> SELECT .
2. /-> Mailbox 1 or Mailbox 2 -> SELECT .
3. /-> Ans sys setup -> SELECT .
4. /-> Announcement -> SELECT .
5. Press 7to record.
6. Speak towards the handset to record your announcement and press 5to end
recording and save it.
Using the telephone base:
1. /REC -> / -> Announcement -> SELECT .
2. /-> Mailbox 1 or Mailbox 2 -> SELECT .
3. Speak towards the telephone base to record your announcement and press 5to
end recording and save it.

17
Number of rings
You can set the answering system to answer an incoming call aer 2, 4 or 6 rings.
You can also select toll saver. If you choose toll saver, the answering system answers
a call aer two rings when you have new messages, or aer four rings when there
are no new messages. This enables you to check for new messages and avoid
paying unnecessary long distance charges if you are calling from out of your local
area.
If you want the built-in answering system instead of the voicemail to answer a call,
you should set the answering system to answer a call at least two rings before the
voicemail is set to answer. Contact your telephone service provider for information
on your voicemail settings.
Using a cordless handset or the telephone base:
1. MENU -> / -> Answering sys -> SELECT .
2. /-> Mailbox 1 or Mailbox 2 -> SELECT .
3. /-> Ans sys setup -> SELECT .
4. /-> # of rings -> SELECT .
5. / to choose among 2, 4, 6or Toll saver -> SET .
Ringer volume
You can set the ringer volume level to one of the six levels, or turn the ringer o.
Using a cordless handset or the telephone base:
1. MENU -> / -> Ringers -> SELECT .
2. SELECT to select Ringer volume.
3. /-> Line 1, Line 2 or Lines 1&2 -> SELECT .
4. / to choose the desire level -> SET .
LCD language
Using a cordless handset or the telephone base:
1. MENU -> / -> Settings -> SELECT .
2. SELECT to select LCD language.
3. /-> English, Français or Español -> SET .
Initial basic settings

18
Voice language
Note: This feature is available in Canada version only.
You can select English or French as the voice language to be used for your
answering system’s voice prompts and for the voice caller ID announce feature. The
default voice language is English.
Using a cordless handset or the telephone base:
1. MENU -> / -> Answering sys -> SELECT .
2. /-> Mailbox 1 or Mailbox 2 -> SELECT .
3. /-> Ans sys setup -> SELECT .
4. /-> Voice language -> SELECT .
5. /-> English or Français -> SET .
Initial basic settings
Operate
Operation Steps
Making a call Using a cordless handset:
Press LINE 1, LINE 2 or /SPEAKER ->
Enter the telephone number.
Using the telephone base:
Press /LINE 1 or /LINE 2 ->
Enter the telephone number.
On-hook dialing
(predialing)
Using a cordless handset:
Enter the telephone number ->
Press LINE 1, LINE 2 or /SPEAKER to call.
Using the telephone base:
Enter the telephone number ->
Press /LINE 1 or /LINE 2 to call.
Answering a call Using a cordless handset:
Press LINE 1, LINE 2 or /SPEAKER.
Using the telephone base:
Press /LINE 1 or /LINE 2.
Other manuals for TL88102
2
This manual suits for next models
2
Table of contents
Other AT&T Cordless Telephone manuals