AT&T EL52103 User manual

Quick start guide
EL52103/EL52113/EL52203/
EL52213/EL52253/EL52303/
EL52313/EL52333/EL52353/
EL52403/EL52503
DECT 6.0 cordless telephone/
answering system with
caller ID/call waiting
TON E
TON E

Instructions
This quick start guide provides you with basic installation and operation instructions.
A limited set of features are described in abbreviated form.
Please refer to the complete online EL52103/EL52113/EL52203/EL52213/
EL52253/EL52303/EL52313/EL52333/EL52353/EL52403/EL52503 DECT 6.0
cordless telephone/answering system with caller ID/call waiting user’s manual for a
full set of installation and operation instructions at
http://telephones.att.com/manuals.
Before using this AT&T product, please read Important safety information on
pages 26-28 of this quick start guide.
Table of contents
Parts checklist........................................................1
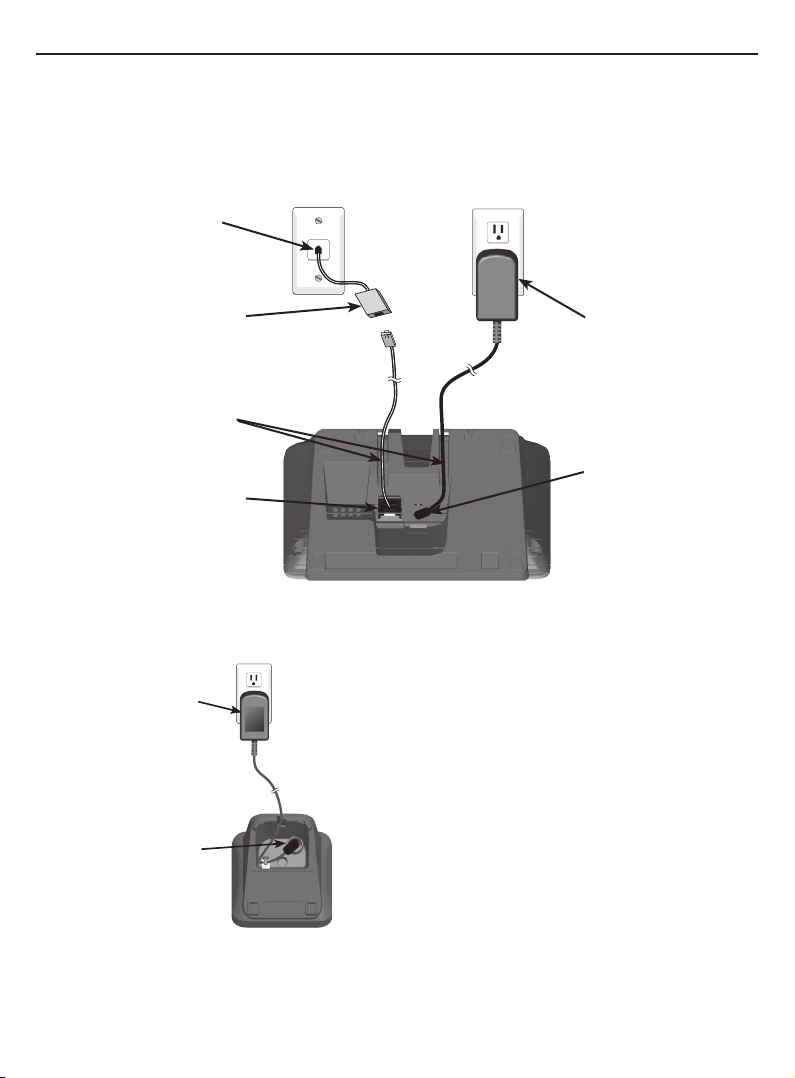
Installation .............................................................2
Battery installation..............................................3
Battery charging ...................................................4
Handset overview.................................................5
Telephone base overview.................................6
Menu overview.......................................................7
Feature summary..................................................7
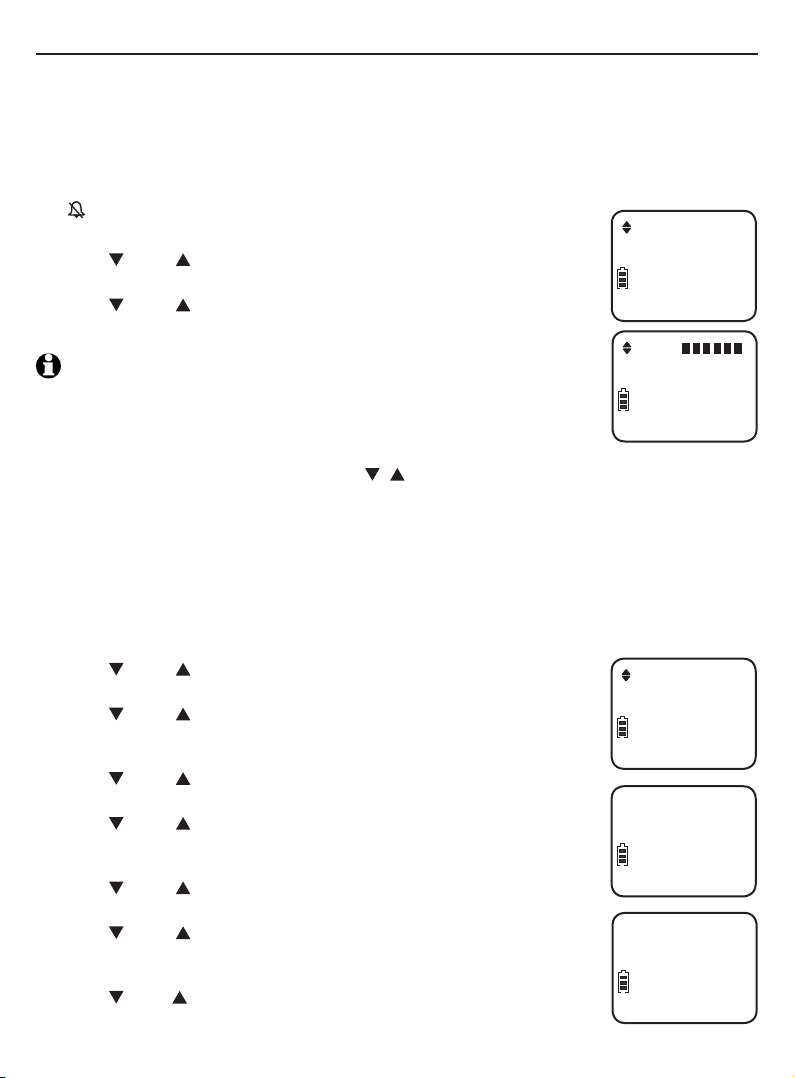
Telephone settings ..............................................8
Making, answering and ending calls...........9
Options while on calls....................................10
Handset locator..................................................11
Intercom.................................................................12
Directory ................................................................14
Speed dial ............................................................15
Caller ID.................................................................16
Answering system and voicemail..............17
Turn the answering system on or off......17
Announcement...................................................17
Number of rings.................................................18
Call screening .....................................................18
Message playback.............................................18
Delete all old messages ................................19
Remote access....................................................19
Adding and registering handsets ..............20
Deregistering handsets ..................................21
Troubleshooting ................................................. 22
Important safety information ......................26
For C-UL compliance.......................................29
FCC Part 68 and ACTA....................................32
FCC Part 15..........................................................33
Limited warranty................................................34
Technical specifications .................................36

Parts checklist
Your telephone package contains the following items. Save your sales receipt and
original packaging in the event warranty service is necessary.
Cordless handset
(1 for EL52103/EL52113)
(2 for EL52203/EL52213/
EL52253)
(3 for EL52303/EL52313/
EL52333/EL52353)
(4 for EL52403)
(5 for EL52503)
Charger for cordless handset
with power adapter installed
(1 for EL52203/
EL52213/EL52253)
(2 for EL52303/EL52313/
EL52333/EL52353)
(3 for EL52403)
(4 for EL52503)
Wall mount bracket
Battery compartment cover
(1 for EL52103/EL52113)
(2 for EL52203/
EL52213/EL52253)
(3 for EL52303/EL52313/
EL52333/EL52353)
(4 for EL52403)
(5 for EL52503)
Telephone line cordBattery for cordless handset
(1 for EL52103/EL52113)
(2 for EL52203/
EL52213/EL52253)
(3 for EL52303/EL52313/
EL52333/EL52353)
(4 for EL52403)
(5 for EL52503)
BT162342/BT262342
Power adapter for
telephone base
Telephone base
Quick start guide
Quick start guide
EL52103/EL52113/EL52203/
EL52213/EL52253/EL52303/
EL52313/EL52333/EL52353/
EL52403/EL52503
DECT 6.0 cordless telephone/
answering system with
caller ID/call waiting
TONE
TONE
TONE
1

2
Installation
Install the telephone base and charger, as shown below. If you subscribe to high-speed
Internet service (DSL - digital subscriber line) through your telephone line, you must
install a DSL filter on the DSL line. If you want to mount your telephone on a wall, use
the included wall mount bracket and refer to Wall mount installation in the online
user’s manual for details.
IMPORTANT INFORMATION:
Use only the power adapter(s) provided with this
product. To obtain a replacement, visit our website
at www.telephones.att.com or call
1 (800) 222-3111. In Canada, dial
1 (866) 288-4268.
Plug the large end
of the charger’s
power adapter into
an electrical outlet
not controlled by a
wall switch.
Ensure the small
end of the charger’s
power adapter is
plugged into the
power jack on
the bottom of the
charger.
Plug the large end
of the base power
adapter into an
electrical outlet not
controlled by a wall
switch.
Plug the small end
of the base power
adapter into the power
jack on the bottom of
the telephone base.
Plug one end of the
telephone line cord into
a telephone wall jack.
A DSL filter (not included)
is required if you have DSL
high-speed Internet service.
Route the cords
through the slots.
Plug the other end of
the telephone line cord
into the telephone line
jack on the bottom of
the telephone base.

3
TONE
TONE
Battery installation
Install the battery, as shown below.
IMPORTANT INFORMATION:
Use only the supplied rechargeable battery or replacement battery (model BT162342/
BT262342). To order, visit our website at www.telephones.att.com or call
1 (800) 222-3111. In Canada, dial 1 (866) 288-4268.
Plug the battery
connector securely
into the socket inside
the handset battery
compartment, matching
the orientation of the
engraved label.
1. Insert the supplied
battery with the label
THIS SIDE UP facing
up, as indicated.
2. Align the cover flat
against the battery
compartment, then
slide it upwards until
it clicks into place.
3.
Charge the handset by placing it
face up in the telephone base or
charger. The CHARGE light is on
when charging.
4. To replace the battery, press
the tab and slide the battery
compartment cover downwards.
Lift out the old battery and
disconnect it from the handset.
Follow the instructions to install
and charge a new battery.
CHARGE light
BT162342/BT262342
BT162342/BT262342
BT162342/BT262342
BT162342/BT262342
BT162342/BT262342
BT162342/BT262342

Battery charging
Once you have installed the battery, the screen indicates the battery status (see the
following table). If necessary, place the handset in the telephone base or charger to
charge the battery. For best performance, keep the handset in the telephone base
or charger when not in use. The battery is fully charged after 16 hours of continuous
charging. See Technical specifications on page 36 for battery operating times.
If the screen is blank, you need to charge the handset without interruption for at least
30 minutes to give the handset enough charge to use the telephone for a short time.
The screen shows Low battery until you have charged the battery without interruption
for at least 30 minutes. The following table summarizes the battery charge indicators
and actions to take.
Battery indicators Battery status Action
The screen is blank or shows
Put in charger.
Battery has no or very little
charge. The handset cannot
be used.
Charge without interruption
(at least 30 minutes).
The screen shows
Low battery and flashes.
Battery has enough charge
to be used for a short time.
Charge without interruption
(at least 30 minutes).
The screen shows HANDSET X
and the battery icon shows .
Battery is charged. To keep the battery charged,
place it in the telephone base or
charger when not in use.
notes:
If you are on a call in low battery mode, you hear 4 short beeps every 50 seconds.
If no battery is installed in the handset when you place it in the telephone base or charger, the
screen shows No battery. Follow the instructions in Battery installation on page 3 to install
the battery.
•
•
After you install your telephone or power returns following a power
outage, the handset will prompt you to set the date and time (see
page 8). To skip setting the date and time, press OFF/CANCEL.
Date: MM/DD/YY
ECO
4

Handset overview
TONE
CHARGE light
On when the handset is
charging in the telephone
base or charger.
CID/VOLUME
Press to scroll down while
in menus.
Press to decrease the
listening volume.
Press to show the caller ID
log when the handset is not
in use.
While entering names or
numbers in the directory,
press to move the cursor to
the left.
•
•
•
•
MENU/SELECT
Press to display the menu.
Once in the menu, press to
select an item or save an
entry or setting.
•
•
OFF/CANCEL
During a call, press to hang
up.
While using menus, press
to cancel an operation,
back up to the previous
menu, or exit the menu
display; or press and hold
to exit to idle mode.
Press and hold while the
handset is not in use to
erase the missed call
indicator.
•
•
•
QUIET#
Press and hold to set and
turn on the quiet mode, or
turn it off.
When reviewing a caller ID
log entry, press repeatedly
to view other dialing
options.
•
•
DIR/VOLUME
Press to scroll up while in
menus.
Press to increase the
listening volume.
Press to show directory
entries when the handset is
not in use.
While entering names or
numbers in the directory,
press to move the cursor to
the right.
•
•
•
•
/SPEAKER
Press to turn on the handset
speakerphone, press again to
resume normal handset use.
REDIAL/PAUSE
Press repeatedly to review
the last 10 numbers dialed.
While entering numbers,
press and hold to insert a
dialing pause.
•
•
TONE
Press to switch to tone dialing
temporarily during a call if you
have pulse service.
PHONE/FLASH
Press to make or answer
a call.
During a call, press to
answer an incoming call
when you receive a call
waiting alert.
•
•
MUTE/DELETE
During a call, press to mute
the microphone.
While predialing, press to
erase digits.
While reviewing the redial
list, directory, speed dial
list or caller ID log, press to
delete an individual entry.
•
•
•
INT
Press to initiate an intercom
conversation or transfer a call.
1
While reviewing a caller
ID log, press repeatedly to
add or remove 1 in front
of the caller ID log before
dialing or saving it to the
directory.
Press and hold to set or
dial your voicemail number.
•
•
5

6
X/DELETE
Press to delete the message currently
playing.
Press twice to delete all old messages when
the telephone is not in use.
•
•
Telephone base overview
/REPEAT
Press to repeat a message.
Press twice to play the previous message.
•
•
/SKIP
Press to skip a message.
/PLAY/STOP
Press to start or stop message playback.
During call screening, press to temporarily
turn the call screening on or off.
•
•
/HANDSET LOCATOR
Press to page all handsets.
Message window
Displays the number of messages or other
answering system information.
/ /-VOLUME+
When the telephone is not in use, press to
adjust the telephone base ringer volume.
During call screening or message playback,
press to adjust the listening volume.
•
•
/ANS ON/OFF
Press to turn the built-in answering system on
or off.

7
Menu overview
Use the menu to change the telephone settings.
Press MENU/SELECT in idle mode (when the handset is not in use) to enter the
main menu.
Press CID or DIR to scroll through menu items.
Press MENU/SELECT to select or save the indicated item.
-OR-
Press OFF/CANCEL to cancel an operation, back up to the previous menu or exit
the menu display. Press and hold OFF/CANCEL to cancel an operation and return
to idle mode.
Feature summary
Default settings are indicated by an asterisk (*).
Screen display Function Options
LCD language Set the display language as English, French or
Spanish.
English*
Français
Español
Voicemail # Set the speed dial voicemail number. Voicemail #
-
Clr voicemail Turn off the voicemail indicator. Reset VM Icon?
Key tone Set whether there are beeps when you press keys. On*
Off
Set date/time Set date and time of the telephone system. Date: MM/DD/YY
Time: HH:MM --
Home area code Set the telephone to recognize calls with the home
area code.
Home area code
---
Dial mode Set whether outgoing calls use pulse dialing or tone
dialing.
Pulse
Touch-tone*
Call screening Set whether incoming calls are played through the
speaker while they are being recorded.
On*
Off
# of rings Set how many times the telephone rings before the
answering system answers an incoming call.
6,5,4,3*,2,
Toll saver
Remote code Select a 2-digit number to allow remote access from
another telephone (away from your home
or office).
19*
Msg alert tone Set whether there is an audible message alert every
10 seconds when there are new messages.
On
Off*
Recording time Set how long a message can be recorded. 3 minutes*
2 minutes
1 minute
1.
2.
3.

8
Telephone settings
Use Feature summary on page 7 to find and set features. The following are a few
examples of common features to set. Refer to Handset settings and Answering
system settings in the online user’s manual for detailed instructions on setting all
telephone features.
Handset ringer volume
You can set the handset ringer volume level, or turn the ringer off. When the ringer is
off, and Ringer off appear on the handset screen.
Press MENU/SELECT when the handset is in idle mode.
Press CID or DIR to scroll to Ringers, then press MENU/SELECT
twice to select Ringer volume.
Press CID or DIR to sample each volume level.
Press MENU/SELECT to save your preference.
note: If the handset ringer volume is off, that handset ringer is silenced
for all incoming calls; however, that handset still plays the paging tone
when responding to the handset locator feature.
Telephone base ringer volume
When the telephone is not in use, press / /-VOLUME+ on the telephone base to
adjust the ringer volume.
Date and time
The answering system announces the day of the week and time of each message
received prior to playing it. If you subscribe to caller ID service, the day, month and time
are set automatically with each incoming call. However, the year must be set so that the
day of the week can be calculated from the caller ID information.
Press MENU/SELECT when the handset is in idle mode.
Press CID or DIR to scroll to Set date/time, then press
MENU/SELECT.
Press CID or DIR to select the month, then press
MENU/SELECT or enter the 2-digit number (01-12) using the
dialing keys.
Press CID or DIR to select the day, then press MENU/SELECT
or enter the 2-digit number (01-31) using the dialing keys.
Press CID or DIR to select the year or enter the 2-digit
number (00-99) using the dialing keys, then press
MENU/SELECT.
Press CID or DIR to select the hour, then press MENU/SELECT
or enter the 2-digit number (00-23) using the dialing keys.
Press CID or DIR to select the minute, then press
MENU/SELECT or enter the 2-digit number (00-59) using the
dialing keys.
Press CID or DIR to choose AM or PM. Press MENU/SELECT
to save.
1.
2.
3.
4.
1.
2.
3.
4.
5.
6.
7.
8.
Volume:
Ringer volume
ECO
ECO
Set date/time
ECO
Date: MM/DD/YY
ECO
Time: HH:MM - -
ECO

9
Making, answering and ending calls
Making a call
Press PHONE/FLASH or /SPEAKER and then dial the number
using the dialing keys.
-OR-
Enter the number using the dialing keys and then press
PHONE/FLASH or /SPEAKER to dial.
While pre-dialing a number, you can:
Press and hold REDIAL/PAUSE to insert a 3-second dialing pause
(a Pappears).
Press MUTE/DELETE or OFF/CANCEL to erase a digit.
Press and hold MUTE/DELETE or OFF/CANCEL to return to
idle mode.
Answering a call
Press PHONE/FLASH, /SPEAKER, or any dialing key (0-9,
or #).
Ending a call
Press OFF/CANCEL or put the handset in the telephone base or
charger to end the call.
Handset speakerphone
During a call, press /SPEAKER to switch between speakerphone and normal handset
use. Press OFF/CANCEL to hang up.
Temporary silencing
While the telephone is ringing, press OFF/CANCEL or MUTE/DELETE to silence the
ringer temporarily on that handset only. This turns off the ringer without disconnecting
the call. The next incoming call rings normally at the preset volume.
•
•
•
TONE
TONE
TONE
TONE
TONE
TONE

10
Options while on calls
Volume control
While on a call, press DIR/VOLUME to increase or press CID/VOLUME to decrease
the listening volume.
note: The handset volume setting and speakerphone volume setting are independent. Changing
one does not affect the other.
Join a call in progress
If a handset is already on a call and you would like to join the call, press
PHONE/FLASH or /SPEAKER on another system handset.
To exit the call, press OFF/CANCEL or place the handset in the telephone base or
charger. The call does not end until all handsets hang up.
notes:
This feature is only applicable to models with more than one handset.
For models with two to four handsets, all handsets can be used at the same time on an outside
call. For models with five handsets, you can use a maximum of four handsets. If the fifth
handset attempts to join the call, the handset screen shows Unable to call.
Chain dialing
While on a call, you can initiate a dialing sequence from numbers stored in the directory,
caller ID log or redial list. Doing this can be useful if you wish to access other numbers
(such as bank account numbers or access codes).
To initiate a dialing sequence from the directory, caller ID log or redial list while on a
call, access the number through the menu system:
While on a call, press MENU/SELECT, then scroll to Directory or Caller ID log.
Press MENU/SELECT.
-OR-
While on a call, press REDIAL/PAUSE to show the redial list.
Scroll to the desired number. If you are in directory, you can use the dialing keys to
find the desired directory enry (see Search by name in the online user’s manual for
more details).
Press MENU/SELECT to dial the displayed number.
Redial
Each handset stores the 10 most recently called numbers in the redial list.
To review and call numbers in the redial list, press REDIAL/PAUSE in idle mode. The
most recently called number appears on the screen.
To view up to 10 recently called numbers, press DIR, CID or REDIAL/PAUSE
repeatedly to scroll through the numbers in the list.
When the desired number appears, press PHONE/FLASH or /SPEAKER to dial
the number.
•
•
1.
2.
3.
1.
2.
3.

11
Handset locator
Use the handset locator to find misplaced handset(s).
To start the paging tone:
Press /HANDSET LOCATOR at the telephone base to
start the paging tone on all handsets for 60 seconds.
To stop the paging tone:
Press PHONE/FLASH, /SPEAKER,
OFF/CANCEL or any dialing key (0-9, or #) on
the handset(s).
-OR-
Press /HANDSET LOCATOR on the telephone base.
-OR-
Put the handset in the telephone base or charger.
•
•
•
•
TONE

12
Intercom
Make and answer an intercom call
You can make an intercom call between handsets.
Press INT on your handset when not in use.
If you have 2 handsets, your originating handset screen
shows Calling HS X, and the other handset screen shows
HS X is calling.
If you have more than 2 handsets, your originating handset
screen shows Intercom to. Use the dialing keys to select
the the destination handset. The destination handset screen
shows HS X is calling (X represents the handset number).
To answer the intercom call, press any dialing key (0-9,or #),
PHONE/FLASH,/SPEAKER or INT on that handset. Both
handset screens now show Intercom.
To end an intercom call, press OFF/CANCEL or place the
handset back in the telephone base or charger. Both handset
screens now show Intercom ended.
notes:
This feature is only applicable to models with more than one handset.
Before the intercom call is answered, you can cancel the intercom call by pressing
OFF/CANCEL or INT on your originating handset.
1.
•
•
2.
3.
•
•
Intercom to
ECO
Intercom
ECO
Calling HS X
ECO

13
Call transfer using intercom
You can transfer an outside call to another system handset.
During an outside call, press INT and proceed just as you would
make a normal intercom call. Once the other party has answered
the intercom call, you have the following options:
You can let the other handset join you on the outside call in
a three-way conversation. Press and hold INT on the
originating handset.
You can transfer the call. Press OFF/CANCEL or place the
handset back in the telephone base or charger. Your originating
handset screen shows Transferred. The other handset
automatically connects to the outside call.
Press INT on your originating handset to switch between the
outside call (Outside call appears on the screen) and the
intercom call (Intercom appears on the screen).
The called party can end the intercom call by pressing
OFF/CANCEL or placing the other handset back in the
telephone base or charger. The outside call continues with the originating handset.
notes:
This feature is only applicable to models with more than one handset.
To cancel the transfer and return to the outside call before the intercom call is answered, press
OFF/CANCEL,PHONE/FLASH or INT on your handset.
If the called party does not answer within 100 seconds, or if the handset is in use, on a call,
or out of range, the originating handset shows
Unable to call
on its screen and automatically
returns to the outside call.
•
•
•
•
•
•
•
Transferred
ECO
Outside call
ECO
Intercom
ECO

14
Directory
Directory overview
The directory is stored in the telephone base and shared by all handsets. It stores up to
50 entries. Changes made to the directory on any one handset apply to all. Only one
handset can review the directory at a time.
Create directory entries
Press MENU/SELECT in idle mode. Press CID or DIR to scroll to
Directory and then press MENU/SELECT.
Press MENU/SELECT to choose Add contact.
Use the dialing keys to enter the telephone number (up to 30
digits). Press MENU/SELECT to save the number in the display.
Enter the name when prompted. Use the dialing keys to enter
a name (up to 15 characters). Each time you press a key, the
character on that key appears. Additional key presses produce
other characters on that key. Refer to the Character chart
under Create directory entries of the online user’s manual for
information on entering special characters.
Press MENU/SELECT to store your new directory entry. The screen
shows Saved.
While entering names and numbers, you can edit them using the
following controls:
Press CID or DIR to move the cursor to the left or right.
Press MUTE/DELETE to erase a digit or character.
Press and hold MUTE/DELETE to erase all digits or characters.
While entering telephone numbers, press and hold REDIAL/PAUSE to enter a
3-second dialing pause (a Pappears).
While entering a name, press 0to add a space.
Review directory entries
Press DIR when in idle mode. The screen briefly shows the directory summary
followed by the first entry in the directory.
Press CID or DIR to browse through the directory or use the dialing keys (0-9) to
start a name search. Entries appear alphabetically by the first letter in the name.
note: If the telephone number in the directory exceeds 15 digits, a dash appears after the
14th digit, and the remaining digits are displayed after two seconds beginning with a dash.
1.
2.
3.
4.
5.
•
•
•
•
•
1.
2.
Enter number
888-883-2445_
ECO
Charlie Johnson_
ECO
Add contact
ECO

15
Dial a directory number
When the desired directory entry displays, press PHONE/FLASH or /SPEAKER
to dial.
Edit a directory entry
When the desired directory entry displays on the screen, press MENU/SELECT.
Edit the telephone number, then press MENU/SELECT.
Edit the name.
Press MENU/SELECT to save.
Delete a directory entry
When the desired directory entry displays on the screen, press MUTE/DELETE and then
press MENU/SELECT to confirm.
Speed dial
There are 9 speed dial locations (0and 2-9) where you can store telephone numbers
you wish to dial more quickly. Speed dial assignments can only be selected from the
existing directory entries. The speed dial locations are shared by all handsets. Changes
made apply to all handsets.
Enter a speed dial number
Press MENU/SELECT when the handset is in idle mode. Press CID
or DIR to scroll to Directory and then press MENU/SELECT.
Press CID or DIR to choose Speed dial, then press
MENU/SELECT.
Press CID or DIR to scroll to the desired speed dial location,
then press MENU/SELECT.
Press CID or DIR to scroll to the desired entry you wish to
assign to the selected speed dial location, or use the dialing keys
to start a name search.
When the desired directory entry displays, press MENU/SELECT.
Dial a speed dial number
When in idle mode, press and hold the desired speed dial location
(0or 2-9) to dial.
1.
2.
3.
4.
1.
2.
3.
4.
5.
•
Speed dial
ECO
0:<Unassigned>
ECO
Charlie Johnson
888-883-2445
ECO
ECO
0:Charlie Johnson

16
Caller ID
This product supports caller ID services offered by most telephone service providers.
Caller ID allows you to see the name, number, date and time of calls. The available
caller ID information will appear after the first or second ring.
Missed (new) call indicator
The telephone base stores the last 50 incoming calls as the caller ID information. When
a handset is in idle mode and has new or missed calls, the screen shows XX missed
calls. If you do not want to review the missed calls one by one, but still want to keep
them in the caller ID log, you can press and hold OFF/CANCEL for 4 seconds when
the handset is idle.
Review the caller ID log
When a handset is in idle mode, press CID.
Press CID or DIR to scroll through the list.
Press #(pound key) repeatedly to show different dialing options.
Press 1repeatedly if you need to add or remove 1 in front of the telephone
number before dialing or saving it in the directory.
Press PHONE/FLASH or /SPEAKER to dial the displayed telephone number.
Delete entries from the caller ID log
To delete one entry:
When viewing an entry, press MUTE/DELETE to delete the entry from the caller ID log.
To delete all entries:
On a handset, press MENU/SELECT in idle mode.
Press CID or DIR to scroll to Caller ID log, then press
MENU/SELECT.
Press CID or DIR to scroll to Del all calls, then press
MENU/SELECT twice. Once deleted, you cannot retrieve
the entries.
Store a caller ID entry in the directory
On a handset, press CID in idle mode.
Press CID or DIR to scroll through the list.
When the desired entry displays on the screen, press MENU/SELECT. The screen
shows Edit number. If necessary, modify the number (page 14).
Press MENU/SELECT to continue. The screen shows Edit name. If necessary, modify the
name (page 14).
Press MENU/SELECT to save.
1.
2.
•
•
3.
1.
2.
3.
1.
2.
3.
4.
5.
Del all calls
ECO

17
Answering system and voicemail
Your telephone has separate indicators for two different types of voice messages: those
left on its built-in digital answering system and those left on your service provider’s
voicemail (fees may apply). Your telephone’s built-in answering system messages and
voicemail messages are separate. Each alerts you to new messages differently.
If XX new messages displays on the handset screens and the message window
on the telephone base flashes, there are new messages recorded on the built-in
answering system. If you turn on Msg alert tone, the telephone base beeps every
10 seconds when there are new answering system messages. To listen to your
message(s), press MENU/SELECT twice on the handset (page 18) or press
/PLAY/STOP on the telephone base (page 18).
If and New voicemail display on the handset, your telephone service provider
is indicating that it has new voicemail for you. To listen to your voicemail, dial an
access number provided by your telephone service provider, followed by a security
code or PIN. Refer to Voicemail waiting (visual message waiting) indicator in the
online user’s manual for a full description of the voicemail indicators.
Some service providers bundle or combine multiple services like voicemail and call
waiting, so you may not be aware that you have voicemail. To check what services you
have and how to access them, contact your telephone service provider.
You can use the telephone answering system and voicemail together by setting your
built-in answering system to answer before voicemail answers. Refer to Using the
answering system and voicemail together in the online user’s manual for instructions.
Turn the answering system on or off
You can turn the answering system on or off by pressing the /ANS ON/OFF key on
the telephone base or through the Answer on/off menu in the handset.
note: You can turn the answering system on or off from either the handset or the telephone
base, but you can use only the handset to change the other answering system settings.
Announcement
The announcement is the greeting callers hear when calls are
answered by the answering system. The telephone has a default
announcement. You can use this announcement, or record your
own announcement up to 90 seconds.
On a handset, press MENU/SELECT in idle mode.
Press CID or DIR to scroll to Answering sys, then press
MENU/SELECT.
Press MENU/SELECT to scroll to Announcement. Follow the
screen and voice prompts to record a new announcement.
•
•
1.
2.
3.
Answering sys
ECO
Announcement
ECO

18
Number of rings
You can set the answering system to answer an incoming call after 6, 5, 4, 3, or 2rings.
You can also select Toll saver. If toll saver is selected, the answering system answers a
call after two rings when you have new messages, and after four rings when there are
no new messages. Unless you change it, the answering system answers an incoming call
after 3 rings.
To set the number of rings:
On a handset, press MENU/SELECT in idle mode.
Press CID or DIR to scroll to Answering sys, then press
MENU/SELECT.
Press CID or DIR to scroll to Ans sys setup, then press
MENU/SELECT.
Press CID or DIR to scroll to # of rings, then press
MENU/SELECT.
Press CID or DIR to scroll and choose among 6,5,4,3,2 or
Toll saver.
Press MENU/SELECT to save.
Call screening
If Call screening is on, the incoming messages can be played through the speaker on
the telephone base or the handsets. You can press PHONE/FLASH on the handset to
stop recording and speak to the caller.
Call screening at the handset:
If the answering system is turned on and there is an incoming call answered by the
answering system, the handset screen shows To screen call, press [SELECT]. Press
MENU/SELECT on the handset to screen the call.
Call screening at the base:
You can turn call screening on or off using the handset. When call screening is off, you
can temporarily turn on the call screening by pressing /PLAY/STOP or /VOLUME+
on the telephone base. The call screening will return to off for the next incoming call.
Message playback
If there are only new messages or there are both new and old messages, the system
plays only the new messages (in chronological order). If there are no new messages, the
system plays all old messages (in chronological order). When playback begins, the total
number of messages is announced.
You can play messages from either the telephone base or a handset.
On the telephone base, press /PLAY/STOP to listen to messages. Use the the
corresponding key on the telephone base to repeat, skip, delete, or adjust the volume
of messages.
On a handset, press MENU/SELECT twice to select Play messages. Use the
corresponding key, as indicated on the screen, to repeat, skip or delete a message.
1.
2.
3.
4.
5.
6.
# of rings
ECO
3
ECO
Other manuals for EL52103
5
This manual suits for next models
10
Table of contents
Other AT&T Cordless Telephone manuals
Popular Cordless Telephone manuals by other brands

Panasonic
Panasonic KX-TG2730S - 2.4 GHz DSS Expandable Cordless... operating instructions

Toshiba
Toshiba FT-8981 Service manual

Sony
Sony SPP-SS960 - Cordless 900 Mhz Telephone operating instructions

BT
BT ON-AIR 2000 CLASSIC user guide

BELGACOM
BELGACOM Twist 619 user manual

Siemens
Siemens Gigaset SL 740 operating manual