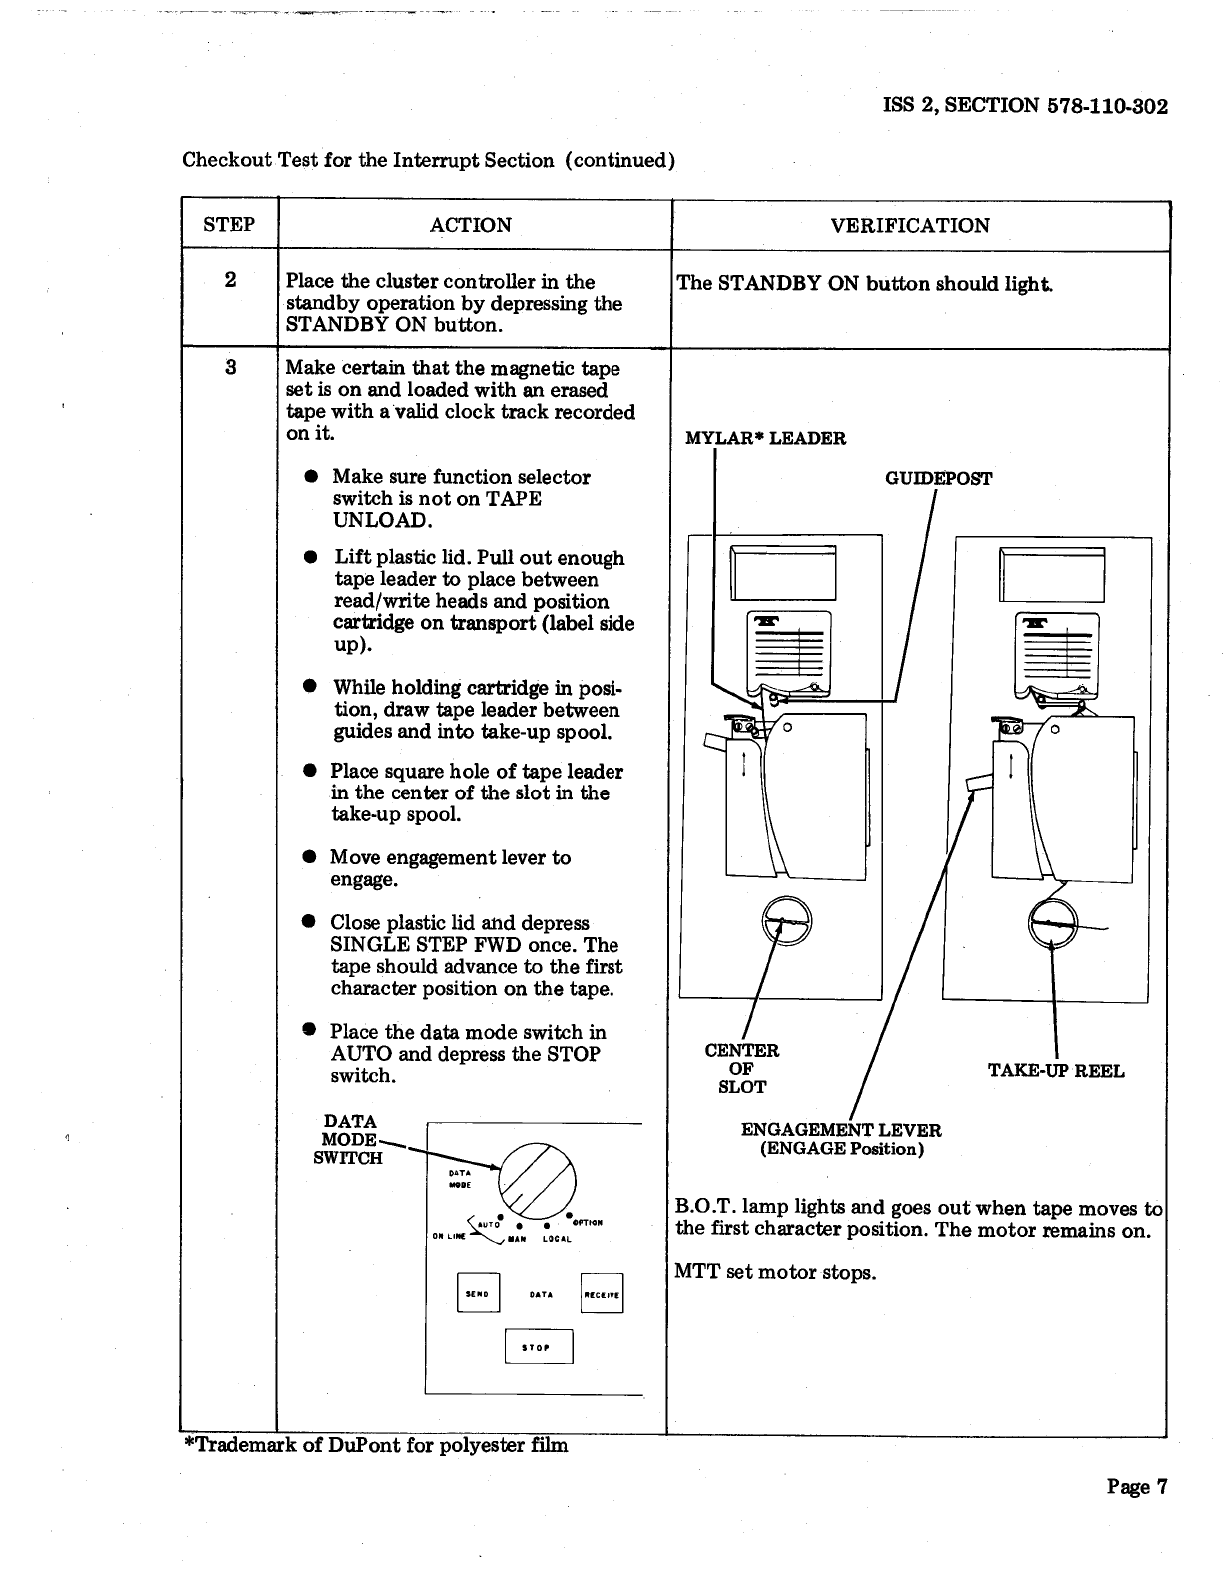
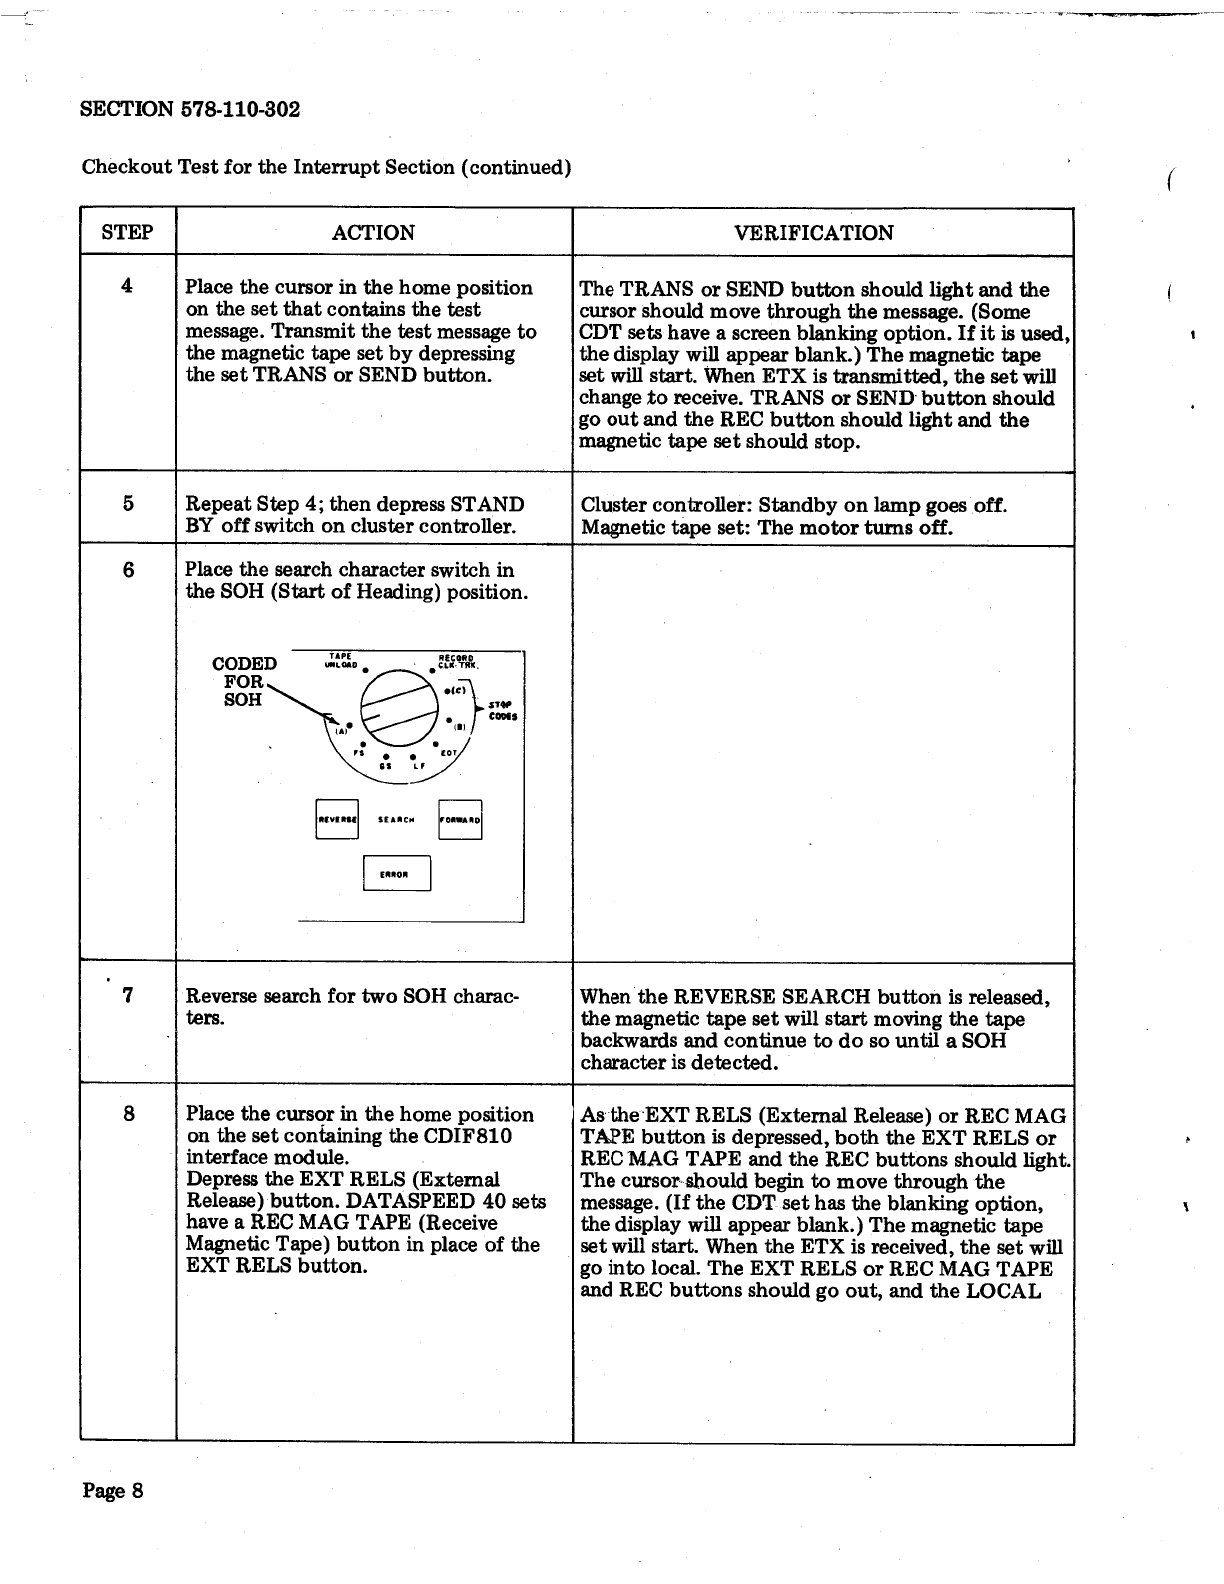
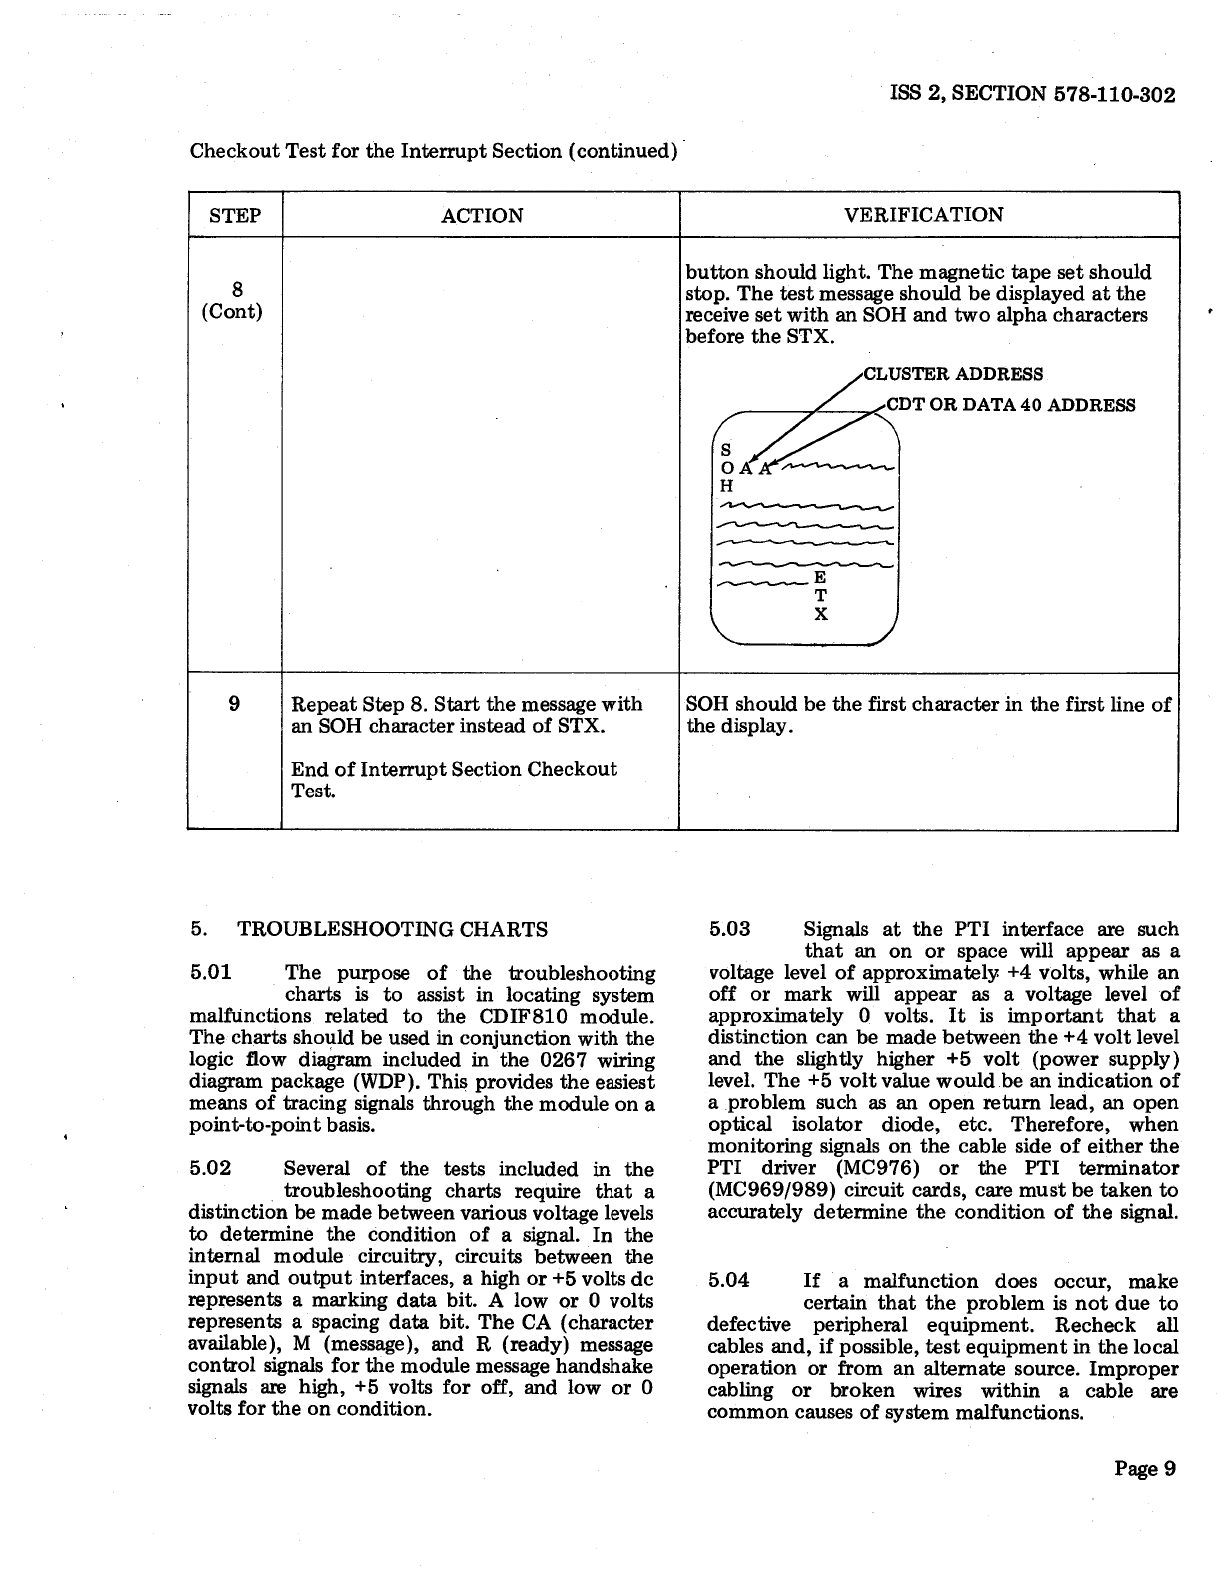
manuals.online logo
Brands
  1. Home
  2. •
  3. Brands
  4. •
  5. AT&T
  6. •
  7. Recording Equipment
  8. •
  9. AT&T Bell System CDIF810 Guide

AT&T Bell System CDIF810 Guide

BELL SYSTEM PRACTICES
AT&TCoStandard SECTION 578-110-302
Issue 2, February 1974.
COMMUNICATIONS DISPLAY
INTERFACE MODULE CDIF810
CHECKOUT AND TROUBLESHOOTING
1.
2.
3.
4.
5.
CONTENTS
GENERAL
EQUIPMENT
CHECKOUT PROCEDURE
CHECKOUT TESTS
POWER FAIL URE .
BASIC TROUBLESHOOTING
PROCEDURE
RECEIVE SECTION ..
INTERRUPT SECTION
TROUBLESHOOTING CHARTS
FOR OPERATION WITH CDT
SET (Charts 1 Through 5)
FOR OPERATION WITH
"DATASPEED*" 40 SET
PAGE
1
2
2
4
4
4
5
6
9
12-34
(Charts 6 Through 10) . . . . . 36-58
1. GENERAL
1.01 This section contains procedures to
checkout and troubleshoot the
CDIF810 interface module when installed with
either a 2511 CDT or DATASPEED 40 terminal.
Checkout tests, test arrangement diagrams, and
trouble related charts are provided to aid in
isolation of an operational difficulty.
1.02 Issue 1 of this section was a limited
printing edition and was not made
available nor generally distributed on a system
wide basis. This reissuf' includes the latest trouble-
shooting information available at the time of this
printing. This is the first standard printing avail-
able for Bell System distribution.
*Registered Trademark of AT&TCo.
1.03 The checkout procedures and trouble-
shooting charts are written to enable
isolation of a trouble to module circuit cards,
interconnecting cabling, or the peripheral equip-
ment connected to the module.
1.04 If a trouble is isolated to a module
circuit card, the troubleshooting charts
will recommend the card be replaced. Before
replacing the card, use a known good circuit card
in that location to check that the original trouble
is corrected. If a trouble is not corrected using the
substituted part, the original card should be
reinstalled and the good part returned to mainte-
nance stock.
WARNING: ALL POWER TO THE
MODULE MUST BE OFF WHENEVER A
CIRCUIT CARD IS REMOVED OR
REPLACED.
1.05 If any of the circuit card assemblies are
found defective, they should be
returned to the nearest WE Service Center or
Teletype Corporation Product Service Center for
repair or replacement.
1.06 It is intended that the 1097SD logic
flow diagram provided in 0267WDP be
used in conjunction with this section when
troubleshooting the CDIF810.
1.07 Teletype Change Notice (TCN) infor-
mation has been reviewed and does not
affect the content of this document. However,
information contained in TCN 1516 and TCN
1581 does affect the TP322501 (Issue 1 and 2)
and TP322986 (Issue 1 only) module circuit card
assemblies respective to wiring changes.
1.08 In interest of brevity, reference to a
2511 CDT or DATASPEED 40 will be
listed as a send/receive device or set whenever the
procedure or instruction is applicable to either
set.
Prepared for American Telephone and Telegraph Company by Teletype Corporation
© 1971 and 1974 by Teletype Corporation
All rights reserved
Printed in U.S.A. Page 1
SECTION 578-110-302
2. EQUIPMENT
2.01 · The following test equipment is
required for troubleshooting the inter-
face module:
(a) A Tektronix 422-type oscilloscope or
its equivalent
(b) A calibrated KS14510 volt-ohmmeter
or its equivalent.
2.02 It is suggested that the ·recommended
volt-ohmmeter be properly set for the
appropriate scale by the user before attempting to
make a measurement. The ohms scale may be
used for point.to-point checks of module wiring,
cabling, and interconnecting cords after circuit
cards are removed from the circuit wiring being
checked. ·
WARNING: NEVER USE A VOLT-
OHMMETER TO CHECK VOLTAGE OUT-
PUT OR CONTINUITY OF THE MICRO-
LOGIC ELEMENTS ON A CIRCUIT CARD.
ONLY AN OSCILLOSCOPE OR LOGIC
PEN SHOULD BE USED FOR MICRO-
LOGIC SIGNAL OR VOLTAGE CHECKS
OR PERMANENT DAMAGE MAY OCCUR
TO A MICROLOGIC DEVICE.
2.04 The CDIF810 module was designed for
use in a 2550 Cluster Controller Station
arrangement. It provides a means of data recovery
for the station standby magnetic tape set when a
system-down time occurs due to a central proc-
essor or line problem. During a system
malfunction, the cluster controller is operated in
standby which allows the peripheral equipment to
send to the MTT set.
2.05 When the system is restored to opera-
tion with the central processor, the
main editing send/receive device, either a CDT or
DATASPEED 40, locally retrieves the stored data
from the tape cartridge in the MTT set (Interrupt
Operation) makes deletions or additions, and then
sends the data to the central processor.
2.06 Operation testing of the module
requires that it be interconnected with
the associated station equipment. All devices
connected to the module should be in good
operating order before any checkout procedures
Page 2
are begun. Refer to the associated checkout
procedures for the interconnected equipment.
2.07 Interconnection diagrams to a CDT or
DATASPEED 40 Send/Receive device
are provided in Figures 2 and 3 respectively.
Cable wiring diagrams and other information are
provided in Installation Section 578-110-202.
'-..r
2.08 The spare parts listed in Table A are
necessary for troubleshooting and
repair of the module. Figure 1 provides a circuit
card location chart for verification of correct
circuit card installation. The view is from the
wired side of the module which also lists all
connector identifications.
2.09 Table B provides a listing of trouble-
shooting sections for the equipment
interconnected to the CDIF810.
3. CHECKOUT PROCEDURE
3.01 Checkout tests are provided to assure
that the module or system
is
in proper
working order. The checkout tests are divided
into three columns: step, action, and verification.
The step column denotes the progression in
performing the test. The action column denotes
arrangements and test conditions. The verification
column denotes what should occur with respect
to the action column.
3.02 With the exception of the preliminary
de power input check, consider the
following before proceeding to checkout opera-
tion.
(a) All circuit cards must' be firmly seated
in their appropriate connectors.
(b) All cable connectors must
be
securely
connected. When a cable connection to
an external device
is
installed, make sure
that the interconnecting cable meets all
interface requirements listed in the cable
. diagrams in 578-110-202.
(c) All equipment connected to the inter-
face module should function in accord-
ance with the module operation
requirements ..
ISS 2, SECTION 578-110-302
D
J8203
l
t;..,
1-
:::>z
G:
..JoO
OoD.
JB 101
DD
J8303 JB301
o~·~
JB403 JB402 JB401
a:
~
i
ffi
I-
;:
a.
CONNECTOR-
IDENTIFICATION
...
a:
~
z
i
a:
l&I
I-
IO IO
j;i
ii;
...
j;i
\
,.,
ii; N
;;;
ii;
(Wiring Side)
Q
Cl)
0
Cl)
~
~ONNECTOR-PIN
It)
0
...
0
a
,.,
Not.e: Trouble chart references·to ZB (wired side) 317-34 refer to
connector receptacle 317 pin 34. Likewise, JB301-A5 refers to
connector JB301-row A pin 5.
PART
NUMBER
TP322501
TP322969
TP322976
TP322986
TP147307
TP328022
TP335611
Figure 1 - CDIF810 Identification Chart
TABLE A
MAINTENANCE PARTS
DESCRIPTION
Interrupt Cont.ention Control Circuit Card
PTI Terminator Circuit Card
PTI Driver Circuit Card
3-Charact.erRecognizer Circuit Card
Strap
Screw (used on circuit cards)
Cable Assembly
lSET
1
1
1
1
15
10
1
QUANTITY
5SETS
1
2
2
1
15
10
1
10 SETS
1
3
3
1
15
10
2
Page 3
SECTION 578-110-302
TABLEB
SECTION EQUIPMENT CONTENT
575-100-350 DATAPSEED 40 FIMP
575-100-352 BIS Station Arrangements FIMP
578-101-300 2511 CDT TS
578-110-202 CDIF810 I
578-150-100 2550 Cluster Controller D&O
578-150-300 2550 Cluster Controller TS
578-300-300 4210MTT
999-300-114 4210MTT
4. CHECKOUT TESTS
4.01 Test arrangement connections to the
4210 Magnetic Tape Terminal (MTT)
Set, 2511 CDT or DATASPEED 40, 2550 Cluster
Controller, and the CDIF810 module are pro-
vided in Installation Section.578-110-202.
4.02 Wherever a small m precedes an abbre-
viation of the word seconds, it means
that the time is in milliseconds, thousandths of a
second, or 10-3 power. If a small µ symbol
precedes the word or abbreviation of the word
second, the time is given in microseconds, mil-
lionths of a second, or 10-6 power.
POWER FAIL URE
4.03 All direct current voltage to operate the
module is furnished from the CDPS802
low voltage power supply. The voltages used are
+5 volts de, +12 volts de, -12 volts de, and voltage
return (circuit common).
4.04 If the power supply is suspected of
causing a trouble, check for the follow-
ing: power·cable is plugged into module securely
at connector JB301, ON-OFF power supply
control is in ON position, and that any fuses in
the power supply are not blown.
4.05 With power supply and equipment
turned on (set interlocks in bypass,
etc), use an oscilloscope or a voltmet.er and check
for the following de voltage levels to the station
controller JB301 connector.
Page4
TS
How to
Operate
CONNECTOR JB301 TERMINAL
Frame Ground C6
Voltage Return
(common) A5, B5, and C5
+5 volts ±10% • Al and Bl
+12 volts ±10% A3
-20 volts ±10% B9
4.06 If an oscilloscope is used to monitor
logic signals in the troubleshooting
charts, all circuit card receptacles in the module
have signal ground (voltage common) on pin 36
and +5 volts de (+Vee) on pin 35.
BASIC TROUBLESHOOTING PROCEDURE
4.07 The following checks should be made
prior to troubleshooting:
(a) Check that optional features are in
accordance with the system pro-
gramming requirements (data transfer rates,
codes, formats, SID programming, etc).
(b) Check that no terminal pins are bent
over and touching or are damaged.
4.08 Reminder: Circuit cards have integrated
circuit (IC) packages and other
components that are low voltage and low power
devices. They can be permanently damaged if
subjected to voltages in excess of their rating.
NEVER ATTEMPT TO REMOVE A CIRCUIT
CARD WHEN POWER IS ON. After power is off,
wait approximately 20 or 25 seconds; then only if
necessary, remove the circuit card. This insures
that the power supplies in the equipment have
drained sufficiently. Oily skin and other body
chemicals present on your fingers may also cause
circuit card terminals to become resistive after
short periods of time - DO NOT TOUCH CARD
CONTACT AREAS.
(
ISS 2, SECTION 578-110-302
RECEIVE SECTION
4.09 Checkout Test for the Receive Section
STEP ACTION VERIFICATION
1 Interconnect the module cabling to the
associated devices as shown in the
respective cabling diagram in Section
578-110-202.
~
2 Condition the cluster controller for (Depress TEST button on the cluster controller
test operation as described in Section control panel; the button lights.)
578-150-100.
3 Tum on all related equipment power The POWER and LOCAL buttons should light on
switches. The CDT and/or DATA- the 2510 CDT. Only the LOCAL buttons should
SPEED 40 set should turn on and the light on the 2511 CDT and the DATASPEED 40.
LOCAL button(s) should light.
4
Prepare a test message at another Prepare Address Heading:
send/receive device connected to the
/CLUSTER CONTROLLERADDRESS
cluster controller. The message
heading should be prefixed with an
/ _ ........_CDT OR DATA 40 ADDRESS
address heading (A is used in the
j I s- -SELECT RECEIVER
sample display) that will direct it to A A DC2 0
~
rOHORSTX
the CDT or DATASPEED 40 con-
H
nected to the CDIF810 module.
~
MESSAGE
Always end all messages with the
~
ending character ETX.
~
-ETX
ENDING CHARACTER
r-_DISPLAY SCREEN
5 At the send/receive device connected The cursor should be in home and no characters
to the CDIF module, be sure that the should be displayed.
screen is clear and that the cursor is in
home position (line one and character
one positions).
If
not, place set in
LOCAL and depress HOME and
CLEAR buttons.
6 Depress REC (Receive) button on the REC button should light and LOCAL button
set connected with the CDIF810 should extinguish.
module.
7 Place the send/receive set containing The TRANS (Transmit) or SEND button should
the test message into transmit by illuminate and the cursor should move through the
depressing TRANS or SEND button. · message. (With CDT only, if the blanking option is
used, the display will appear blank.)
Page 5
SECTION 578-110-302
Checkout Test for the Receive Section (continued)
STEP ACTION
8
Both sets should stop after the ETX is
transmitted.
End of Receive Section Checkout
Test.
INTERRUPT SECTION
4.10 Checkout Test for the Interrupt Section
STEP ACTION
1 Prepare a test message on one of the
sets connected to the cluster con-
troller. A few lines of U* pref°ixed
with an SOH and terminated with an
ETX would be sufficient.
Page6
VERIFICATION
The set that transmitted the message should go
from transmit or send to receive (or to local
depending upon set option programming). The
TRANS or SEND button should go out and the
REC button should light. The set that received the
message should go from receive to local. The REC
button should go out and the LOCAL button
should light. Both displ:;lysshould be the same
except that the address heading
will
be missing on
the receiving set.
RECEIVING SET
s
o- ...... ...~..._......]
H .
.
~
MESSAGE
-.E
T
X
VERIFICATION
PREPARED MESSAGE
s
o.~
] ME~AGE
H,.
~
,.,.
~
------------E
T
X
Checkout Test for the Interrupt Section (continued)
STEP ACTION
2 Place the cluster controller in the
standby operation by depressing the
STANDBY ON
button.
3
Make certain that the magnetic tape
set
is
on and loaded with an erased
tape with a valid clock track recorded
on it.
• Make sure function selector
switch
is
not on TAPE
UNLOAD.
• Lift plastic lid. Pull out enough
tape leader to place between
read/write heads and position
cartridge on transport (label side
up).
• While holding cartridge in posi-
tion, draw tape leader between
guides and into take-up spool.
•Place square hole of tape leader
in the center of the slot in the
take-up spool.
•Move engagement lever to
engage.
•Close plastic lid and depress
SINGLE STEP FWD once. The
tape should advance to the first
character position on the tape .
• Place the data mode switch in
AUTO and depress the STOP
switch.
DATA
MODE-
SWITCH
LOCAL
B
DATA
lmm•I
8
*Trademark of DuPont for polyester film
ISS 2, SECTION 578-110-302
VERIFICATION
The STANDBY ON button should light.
MYLAR* LEADER
GUIDEPOST
CJ
~
CENTER
OF
SLOT
TAKE-UP
REEL
ENGAGEMENT LEVER
(ENGAGE Position)
B.O.T. lamp lights and goes out when tape moves to
the first character position. The motor remains on.
MTT set motor stops.
Page 7
SECTION 578-110-802
Checkout Test for the Interrupt Section (continued)
STEP ACTION
4 Place the cursor in the home position
on the set that contains the test
message. Transmit the test message to
the magnetic tape set by depressing
the set TRANS or SEND button.
5 Repeat Step 4; then depress STAND
BY off switch on cluster controller.
6
7
8
Page 8
Place the search character switch in
the SOH (Start of Heading) position.
CODED
FOR
SOH
IO(V[Ofll
SUoCH
1,...... 1
Reverse search for two SOH charac-
ters.
Place the cursor in the home position
on the set conf.aining the CDIF810
interface module.
Depress the EXT RELS (External
Release) button. DATASPEED 40 sets
have a REC MAG TAPE (Receive
Magnetic Tape) button in place of the
EXT RELS button.
VERIFICATION
The TRANS or SEND button should light and the
cursor should move through the message. (Some
CDT sets have a screen blanking option. If it
is
used,
the display will appear blank.) The magnetic tape
set
will
start. When ETX is transmitted, the set
will
change to receive. TRANS or SEND' button should
go out and the REC button should light and the
magnetic tape set should stop.
Cluster controller: Standby on lamp goes off.
Magnetic tape set: The motor turns off.
When.
the REVERSE SEARCH button is released,
the magnetic tape set will start moving the tape
backwards and continue to do so until a SOH
character is detected.
Asthe·EXT RELS (External Release) or REC MAG
TAJ?Ebutton
is
depressed, both the EXT RELS or
REC MAG TAPE and the REC buttons should light.
The cursor-.should begin to move through the
message. (If the CDT set has the blanking option,
the display
will
appear blank.) The magnetic tape
set will start. When the ETX is received, the set will
go into local. The EXT RELS or REC MAG TAPE
and REC buttons should go out, and the LOCAL
{
Checkout Test for the Interrupt Section (continued)
STEP
8
(Cont)
9
ACTION
Repeat Step 8. Start the message with
an SOH character instead of STX.
End of Interrupt Section Checkout
Test.
5. TROUBLESHOOTING CHARTS
5.01 The purpose of the troubleshooting
charts is to assist in locating system
malfunctions related to the CDIF810 module.
The charts should be used in conjunction with the
logic flow diagram included in the 0267 wiring
diagram package (WDP). This provides the easiest
means of tracing signals through the module on a
point-to-point basis.
5.02 Several of the tests included in the
. troubleshooting charts require that a
distinction be made between various voltage levels
to determine the condition of a signal. In the
internal module circuitry, circuits between the
input and output interfaces, a high or +5 volts de
represents a marking data bit. A low or O volts
represents a spacing data bit. The CA (character
available), M (message), and R (ready) message
control signals for the module message handshake
signals are high, +5 volts for off, and low or 0
volts for the on condition.
ISS 2, SECTION 578-110-302
VERIFICATION
button should light. The magnetic tape set should
stop. The test message should be displayed at the
receive set with an SOH and two alpha characters
before the STX.
CLUSTER ADDRESS
S //CDT OR DATA 40 ADDRESS
01\.~
H
~
~
-
~
---- E
T
X
SOH should be the first character in the first line of
the display.
5.03 Signals at the PTI interface are such
that an on or space will appear as a
voltage level of approximately. +4 volts, while an
off or mark will appear as a voltage level of
approximately O volts. It is important that a
distinction can be made between the +4 volt level
and the slightly higher +5 volt (power supply)
level. The +5 volt value would be an indication of
a problem such as an open return lead, an open
optical isolator diode, etc. Therefore, when
monitoring signals on the cable side of either the
PTI driver (MC976) or the PTI terminator
(MC969/989) circuit cards, care must be taken to
accurately determine the condition of the signal.
5.04 If a malfunction does occur, make
certain that the problem is not due to
defective peripheral equipment. Recheck all
cables and, if possible, test equipment in the local
operation or from an alternate source. Improper
cabling or broken wires within a cable are
common causes of system malfunctions.
Page9
SECTION 578-110-302
5.05 The following charts refer to the
CDIF810 interface module receive·
section.
Chart 1 - Receiving CDT Does Not Receive
Data
Chart
2 -
Data Received by CDT is Garbled
5.06 The following charts refer to the
CDIF810 interface module standby
operation.
Chart
3 -
EXT REL (External Release)
Button or REC (Receive) Button Does Not
Illuminate
Chart 4 - Magnetic Tape Set Does Not Start
or Improper Operation
Page 10
Chart 5 - MTT Data Received by CDT
is
Garbled
Chart 6 - Receiving DATASPEED 40 Does
Not Receive Data
Chart 7 - Data Received by the DATA-
SPEED 40 i~Garbled
Chart 8 - REC MAG TAPE Button or REC
Button Does Not Illuminate on DATA-
SPEED 40
Chart
9 -
Magnetic Tape Set Does Not Start
or Improper Operation
Chart 10 - MTT Data Received by the
DATASPEED 40 is Garbled
ISS 2, SECTION 578-110-302
CDDC802 (A Module)
Note 1: All CDIF810
module connectors and
circuit card receptacles
are identified as JB and
ZB respectively.
Note 2: All CDT CDDC
module connectors and
circuit card receptacles
are identified as JA and
ZA respectively.
201B3
DATASET
Figure 2- CDIF810 Connector and Cable Location Diagram With
CDT Hook-Up Arrangement
4~WIRE
TELEPHONE
LINE
Page 11
SECTION 578-110-302
FOR OPERATION WITH CDT SET (Charts 1 Through 5)
CHART 1
STEP
1
2
3
4
Page 12
RECEIVING CD'f DOES NOT RECEIVE DATA
(Cluster Controller in Test Operation)
ACTION
At the CDIF module, set a
voltmeter to measure +5
volts de and connect+
probe to JB201 pin A3.
Connect - lead to pin A5 of
JB301.
Depress REC button.
NORMAL INDICATION
AND
PROCEDURE
At receive CDT, voltage
reading is 0.
PROBLEM OR
CORRECTIVE
PROCEDURE
Voltage goes to +4 volts. If Receive CDT not selectable:
voltage is higher than +4 (a) Check for B option on CDT
volts, see 5.03. at ZA316 card.
1097SD-B1 •,,'OPrIDNA
OPTIONB
~
MC969 PTI TERMINATOR
n n
(b) Check for continuity on cable
from JA303-A3 to JB201-A3,
Figure 2.
Move + probe of voltmeter Voltage at 0.
to JB101-A3 (Figure 1) and
depress LOCAL button.
Depress REC button.
DD
D:S
Voltage goes to +4-volts.
1097SD-B1
.._i/___ _,/
Trace selectable signal through the
B module (Figure 1) at the
following points:
+4 volts from JB201-A3 to
ZB115-14.
0 volts fr0m ZB115-32 to
ZB113-31.
0 volts from ZB113-29 to
ZB117-32 .
+4 volts from ZB117-11 to
JB101-A3.
STEP
4
(Cont)
5
ISS 2, SECTION 578-110-302
CHART 1
RECEIVING CDT DOES NOT RECEIVE DATA (Continued)
. (Cluster Controller in Test Operation)
ACTION
NORMAL INDICATION
AND
PROCEDURE
PROBLEM OR
CORRECTIVE
PROCEDURE
Move + probe of voltmeter Voltage at 0.
to JBl0l-Al
The following t.est requires
the cluster controller be
operated in test operation.
Select one of the other CDT
sets as a send device and
prepare the following t.est
message for sending to the
CDT with the CDIF810
module.
ACTION
Place the send CDT in local and prepare the
following test message:
CLUSTER ADDRESS
STATION ADDRESS
I s
0 U*U*· • · ·=
2H
= 20 Blank Lines
.E
(i
\_______./
DISPLAY SCREEN
Note: Address of cluster controller
and station may be different than that
shown; check local programming
listing.
Make certain that MC969 card in
ZBll 7 of B module is pro-
grammed for B option.
Check for continuity on PTI
return from ZB115 -13 to
JB201-A8 and A9.
NORMAL INDICATION
AND PROCEDURE
When the operating problem is corrected,
the receive CDT with the CDIF810 should
receive the data as shown:
s
0 U*U* - · · · · · · =
H
E
T
X
20 Blank Lines
DISPLAY SCREEN
Not.e: Aft.er the message is received,
the CDT will change. from receive to
local.
Page 13
SECTION 578-110-302
STEP
6
Page 14
CHART 1
RECEIVING CDT DOES NOT RECEIVE DATA (Continued)
(Cluster Controller in Test Operation)
ACTION
Depress TRANS button on
CDT used for transmit
device.
TRANS
D-
DD
NORMAL INDICATION
AND
PROCEDURE
At B module connector
JB101-Al, voltage goes
from
O
to
+4
volts (only
when sender is in transmit).
(View
of
Wired Side)
PROBLEM OR
CORRECTIVE
PROCEDURE
Sender CDT message signal not
getting through cluster controller,
see Section 578-101-300.
Cluster controller problem: Go to
Section 578-150-300 and check
for the message signal. If signals
are good, change D-50 cable to
cluster
1/0
port.
Check that message heading is
addressing the correct CDT; check
that message is not displayed at
another set.
STEP
ISS 2, SECTION 578-110-302
CHART 1
RECEIVING CDT DOES NOT RECEIVE DATA (Continued)
(Cluster Controller in Test Operation)
ACTION
NORMAL INDICATION
AND
PROCEDURE
PROBLEM OR
CORRECTIVE
PROCEDURE
6 Move
+
probe of voltmeter Voltage to receive CDT at Check for message signal through
+ll volts when sending CDT B module at the following points:
is in transmit.
(Cont) to JB201-Al.
7
1097SD-Bl
Move the
+
probe of the Voltage at 0 volts with set
voltmeter to JB201-A2 and in local.
depress LOCAL button.
Note: The message
signal at JB201-Al
must be high (+5 volts)
when all subsequent
signals are checked for
condition.
Depress set REC button. Voltage goes from 0 to +4
volts.
Move the + probe of the Voltage at 0 with set in
voltmeter to JB101-A2 and local.
depress LOCAL button.
+4 volts from JBlOl-Al to
ZB117-10
0 volts from ZBll 7-19 to ZB11~6
0 volts from ZB113-19 to
ZB115-19
+4 volts from ZB115-10 to
JB201-Al.
Check for continuity on PTI
return from ZBll 7-17 to
JB101-B9.
Receive CDT ready signal .
problem - refer to Section
578-101-300.
Bad cable from JA303-A2 to
JB201-A2.
Page 15
SECTION 578-110-302
STEP
CHART 1
RECEIVING CDT DOES NOT RECEIVE DATA (Continued)
(Cluster Controller in Test Operation)
ACTION
NORMAL INDICATION·
AND
PROCEDURE
PROBLEM OR
CORRECTIVE
PROCEDURE
7
Depress REC button on the Voltage goes from Oto +.4 "B" module problem - trace the
ready signal through the following
points:
(Cont) set. volts.
8
Page 16
J:JIJ
.DB
This completes the check
for CDT device message
signaling (handshake). In
the following checks, the
signals will be pulsing;
Set oscilloscope as follows:
Vertical Sensitivity
5 volts/division
+4 volts from JB201-A2 to
ZB115-15
0 volts from ZB115-34
to
ZB113-33
0 volts from ZB113-27 to
ZB117-34
+4 volts from ZB117-15
to
JB101-A2.
Check PTI return signals between
JB201-A8 and A9
to
ZB115-13.
therefore,
an
oscilloscope is .Horizontal Sweep Rate
required. 500 :µseconds/division
Connect the oscilloscope Observe action of signal:
probe
to
pin 16 of ZB115.
Connect scope ground
to Signal stays
at O
volts The CDT is not requesting charac-
ters. Check for next character
pin 13 of ZB115.
SCOPE
GROUND
13 J. 14
15
f j l.l!
11 8 • I1.-_SCOPE
11 6
i
28
PROBE
-
I '
,.......,..........--.----r- _________
1
signal in CDT - see 578-101-300.
1--t-----1---,1---,1--lt--i"'""""'--+--+~
Check interconnecting cable
t--it-i-+-+
➔
-+-...+t+..+o""I
continuity from JA303-A10 to
Oi---4-+-+-+-..+--+-+-~---II
JB201-A10.
1097SD-Bl
S~al is pulsating from
Oto
Problem could be either bad send
+4 volts CDT or bad data.
Remove cards from CDIF810
module at ZB114 and ZB116 to
isolate remote input (MTT).
(
•
STEP
8
(Cont)
ISS 2, SECTION 578-110-302
CHART 1
RECEIVING CDT DOES NOT RECEIVE DATA (Continued)
(Cluster Controller in Test Operation)
ACTION
NORMAL INDICATION
AND
PROCEDURE
PROBLEM OR
CORRECTIVE
PROCEDURE
,.......,.--.----,..----.----.----.----T""""""T"""-.----.
1Trace incoming data from cluster
controller by monitoring JB101
...,_,~-+-+-+--+--+--+--+--ti pins Bl through BB to ZBll 7 pins
f+-4 1 through 8 (0 volts is marking and
1-.J-,f+o++l-1--E-1-i~f-.l--ll +4 volts is spacing).
Qi---!.....+---4----l----i--1--4--4--1--11
r---,...-+--+-+-+--+--+--+--+--t1 Trace data from ZB117 pins 21
..................___.___.__...._._........___.__.___,1through 28 to ZB115 pins 21
through 28 (+5 volts is marking
and Ovolts is spacing).
Signal stays at +4 volts.
Trace data from ZB115 pins 1
throu,gh 8 to JB201 pins Bl
through BS ( 0 volts is marking .
and +4 volts is spacing).
Move scope probe as indicated in
action column.
Move scope ground to Observe signal level:
JB101 pin AS and connect
probe to JBl0l pin Al0. Signal level stays at Ovolts Next character (NC) request from
receive CDT not getting through B
1097SD-B1 module. Trace NC signal as
follows:
+4 volt signal at ZB115-33 to
t--t------l.......+--+--+--+--+--+--+---1i ZB113-15
t-ii--t-t<-i--it--++-.+-~~~1 +5 volt signal at ZB113-16 to
o ZB117-33
................... ___.____.___._........___.___.__.___, 1 0 volt signal at ZBll 7-16 to
JBl0l-Al0.
Check PTI return on ZB115-13 to
JB201 pins AB and A9 .
.Signal level is at +4 volts. Move to Step 9.
Page 17
SECTION 578-110-302
STEP
9
10
Page 18
CHART 1
RECEIVING CDT DOES NOT RECEIVE DATA (Continued)
(Cluster Controller in Test Operation)
ACTION
Move scope ground to
JB101-B.9 and connect
probe to JB101-B10.
Move oscilloscope ground
to JB201-A9 and connect
probe to JB201-B10.
NORMAL INDICATION
AND
PROCEDURE
Observe action of signal:
PROBLEM OR
CORRECTIVE
PROCEDURE
Signal level stays at either OBad D-50 cable from cluster con-
volts or +5 volts troller (CC) 1/0 port to receive
CDT.
No character available signal from
cluster controller- refer to CC
wiring diagram 11078D sheets B99
and Bll 7.
Signal is pulsating from Oto CA signal is being received from
+5 volts. the cluster controller - move to
Step 10.
Observe signal level:
Signal level stays at either
O
Check that CA signal is going
or +5 volts through the B module at the
following points:
1--1~--+-+-+-+--+--+--+--!I A +4 volt signal should be present
Hl-l·++++ti-l-""':++++t-~-+-+-II
at JB101-B10 to ZB117 pin 9
0~~--+-+-+-..-.. ......... -1i A
O
volt signal should be present at
-----·-+--+--+--+-+---{I
ZBll 7-29 to ZB115 pin 29
or A +4 volt signal should be present
.......-.---.---.---.--.---.....-- ......... 1
at ZB115-9
to
JB201-B10.
11-51..-+--+--+--+-+-+-+-~1--11 Check PTI returns at ZBll 7-17 to
1<-t-+-t+t--+-+f-+-lf+t-++--f-.---tl
JB101-B9
01--11--+--+-+-+--+---+--+--+--II
Signal level is pulsing from Signal is passing through B module
0 to +4 volts to CDT. CDT
is
bad or cable-from
JB201-B10 to JA303-B10
is
open.
~---.---....--.~~--·
Also, check for PTI signal-return
1-4t--1---~~,-.-..t--t--+--+---t
1
between JB201-B9 to JA303-B9.
01--1~--+---4---+-+--+--+--+--II
(
•
STEP
1
2
ISS 2, SECTION 578-110-302
CHART 2
DATA RECEIVED BY CDT IS GARBLED
(Cluster Controller in Test Operation)
ACTION
Note:
If
the CDT has the
view while transmit or view
while receive option
installed (screen does not
blank during transmit or
receive operation). make
certain that the CDT has a
MC646 card in module
position ZA304.
If
possible, transmit the test
message
to
a different CDT
in the cluster arrangement
to
verify that the send CDT
is working properly. A
sample test message is given
in Step 5 of Chart 1. (In
place of the test message
text, include three lines of
U and three lines of *.)
Readdress the test message
for the CDT connected
to
the B module (CDIF810).
Transmit the message from
the send CDT.
TRANS
NORMAL INDICATION
AND
PROCEDURE
Check accuracy of received
data at the other receive
CDT:
Received data is garbled
Received data is correct.
Use an ASCII code chart
and determine what bit
levels were received or not
received in place of the
three lines of U (bits 1, 3..5,
and 7 marking) and the ·
three lines of* (bits 2, 4, 6,
and
8
marking). Determine
error pattern:
Marking bits received as
space bits.
PROBLEM OR
CORRECTIVE
PROCEDURE
Send CDT or cluster controller
problem - refer to Section
578-101-300 or 578-150-300
respectively.
Go to Step 2.
Remove cards in B module posi-
tion ZB116 and ZB114 one at a
time and check if either one is
causing the problem by resending
the message. If the problem is
eliminated with one of the cards
out, replace that card.
Page 19
SECTION 578-110-302
CHART2
DATA RECEIVED BY CDT IS GARBLED (Continued)
(Clust.erController in Test Operation)
NORMAL INDICATION PROBLEM OR
AND CORRECTIVE
STEP ACTION PROCEDURE PROCEDURE
2 Spacing bits received as Use an oscilloscope and trace mark
(Cont) mark bits or space data bit signals received
from JB101 pins Bl through B8 to
1<;)97SD-Bl ZBll 7 pins 1 through 8 (a +4 volt
signal is space and a Ovolt signal is
mark). From ZBll 7 pins 21
through 28 to ZB115 pins 21
through 28 (0 volts is space and +5
volts is mark). From ZB115 pins 1
through 8 to JB201 pins Bl
through BS (0 volts is marking and
+4 volts is spacing). If any of the
signals are not present, replace the
circuit card in the respective
connector.
Random bit level errors Replace MC969 in card position
received. ZB117.
Replace MC976 in card position
ZB115.
Page 20

Popular Recording Equipment manuals by other brands

dbx DriveRack VENU 360 owner's manual

dbx

dbx DriveRack VENU 360 owner's manual

X-10 PRO ActiveHome CM11A Setup instructions

X-10

X-10 PRO ActiveHome CM11A Setup instructions

Roger Technology R85/60 Series Instruction and warnings for the installer

Roger Technology

Roger Technology R85/60 Series Instruction and warnings for the installer

Evh 5150III 50S 6L6 owner's manual

Evh

Evh 5150III 50S 6L6 owner's manual

NAIM Recording Equipment instructions

NAIM

NAIM Recording Equipment instructions

Bose Volume Control User Interface installation guide

Bose

Bose Volume Control User Interface installation guide

Denon DN-700R quick start guide

Denon

Denon DN-700R quick start guide

ASTi Telestra user guide

ASTi

ASTi Telestra user guide

Bticino TERRANEO T5562B instruction sheet

Bticino

Bticino TERRANEO T5562B instruction sheet

Teleco T-MATE quick start guide

Teleco

Teleco T-MATE quick start guide

Extron electronics Inline CIA116-1 Operation manual

Extron electronics

Extron electronics Inline CIA116-1 Operation manual

Mackie HDR 24 installation guide

Mackie

Mackie HDR 24 installation guide

Behringer VIRTUALIZER DSP1000 user manual

Behringer

Behringer VIRTUALIZER DSP1000 user manual

HMS Networks Intesis IN485HIT001R000 installation manual

HMS Networks

HMS Networks Intesis IN485HIT001R000 installation manual

Studio Technologies 5204 user guide

Studio Technologies

Studio Technologies 5204 user guide

Odyssey 7Q user manual

Odyssey

Odyssey 7Q user manual

Nuoptix Stereo Optical Recording System owner's guide

Nuoptix

Nuoptix Stereo Optical Recording System owner's guide

Lenze 9300 Servo PLC manual

Lenze

Lenze 9300 Servo PLC manual

manuals.online logo
manuals.online logoBrands
  • About & Mission
  • Contact us
  • Privacy Policy
  • Terms and Conditions

Copyright 2025 Manuals.Online. All Rights Reserved.