Audiodesign PRO PMU 501HS User manual

PROFESSIONAL SPEAKERS, AMPLIFIERS AND ACCESSORIES
Audiodesign Srl
Via dell’industria, 28 - 42025 CAVRIAGO (RE)
+39 0522 941444
www.audiodesign-pro.com
Avvertenze Specifiche per le batterie al litio:
Prima di ogni utilizzo, ricaricare sempre sia il trasmettitore che il ricevitore.
In caso di non utilizzo, ricaricare almeno una volta al mese.
Ricaricare quando il LED di carica lampeggia.
Scollegare dall’alimentore una volta ricaricato.
Utilizzare solo alimentatori com potenza da 0.5 a 1 A.
La sostituzione della batteria deve essere effettuata da personale specializzato.
Servizio post vendita
Tutti i prodotti Audio Design PRO sono conformi alle direttive in vigore e sono
esaminati e testati prima di lasciare la fabbrica e, se usati correttamente,
funzioneranno correttamente per diversi anni. Tuttavia, se doveste rilevare un
problema, procedete come segue:
Contattate il rivenditore dove avete acquistato il prodotto e descrivetegli le difettosità
rilevate.
Se non è possibile risolvere il problema con il rivenditore, ritornate il prodotto,
preferibilmente nell'imballo originale o comunque con un imballo tale da proteggerlo,
corredato dalla documentazione di acquisto.
Lo stesso rivenditore provvederà poi a inoltrarlo presso il nostro servizio assistenza.
Microfono ad archetto con trasmettitore
incorporato UHF 20 canali e ricevitore con Jack 6.3 mm
Mod PMU 501HS
Litium battery care:
Before using the product, take care to recharge both transmitter and receiver.
Recharge in any case each month.
Recharge when LED is flashing.
Once recharged, disconnect from power supply.
Use power supply with power from 0,5 to 1 A
The battery can be replaced only from authorized technicians.
Headset microphone with integrated transmitter
UHF 20 Ch and receiver on Jack 6.3 mm.
Mod PMU 501HS
MANUALE D’USO
OWNER MANUAL
Microfono ad archetto Wireless PMU 501HS
2
Complimenti per aver scelto un microfono ad archetto, wireless Audiodesign-Pro Mod PMU 501HS.
Si tratta di un prodotto innovativo che consente l’utilizzo diretto del microfono ad archetto (UHF), sia
con un mixer (ingresso Line In) sia direttamente con qualsiasi diffusore amplificato.
Caratteristiche Principali
Thank you for purchasing an AudioDesign PMU 501HS wireless head set microphone. This item
allow an easy connection both to a mixer and to a powered enclosure.
Main Features
Microfono ad archetto Wireless PMU 501HS
3
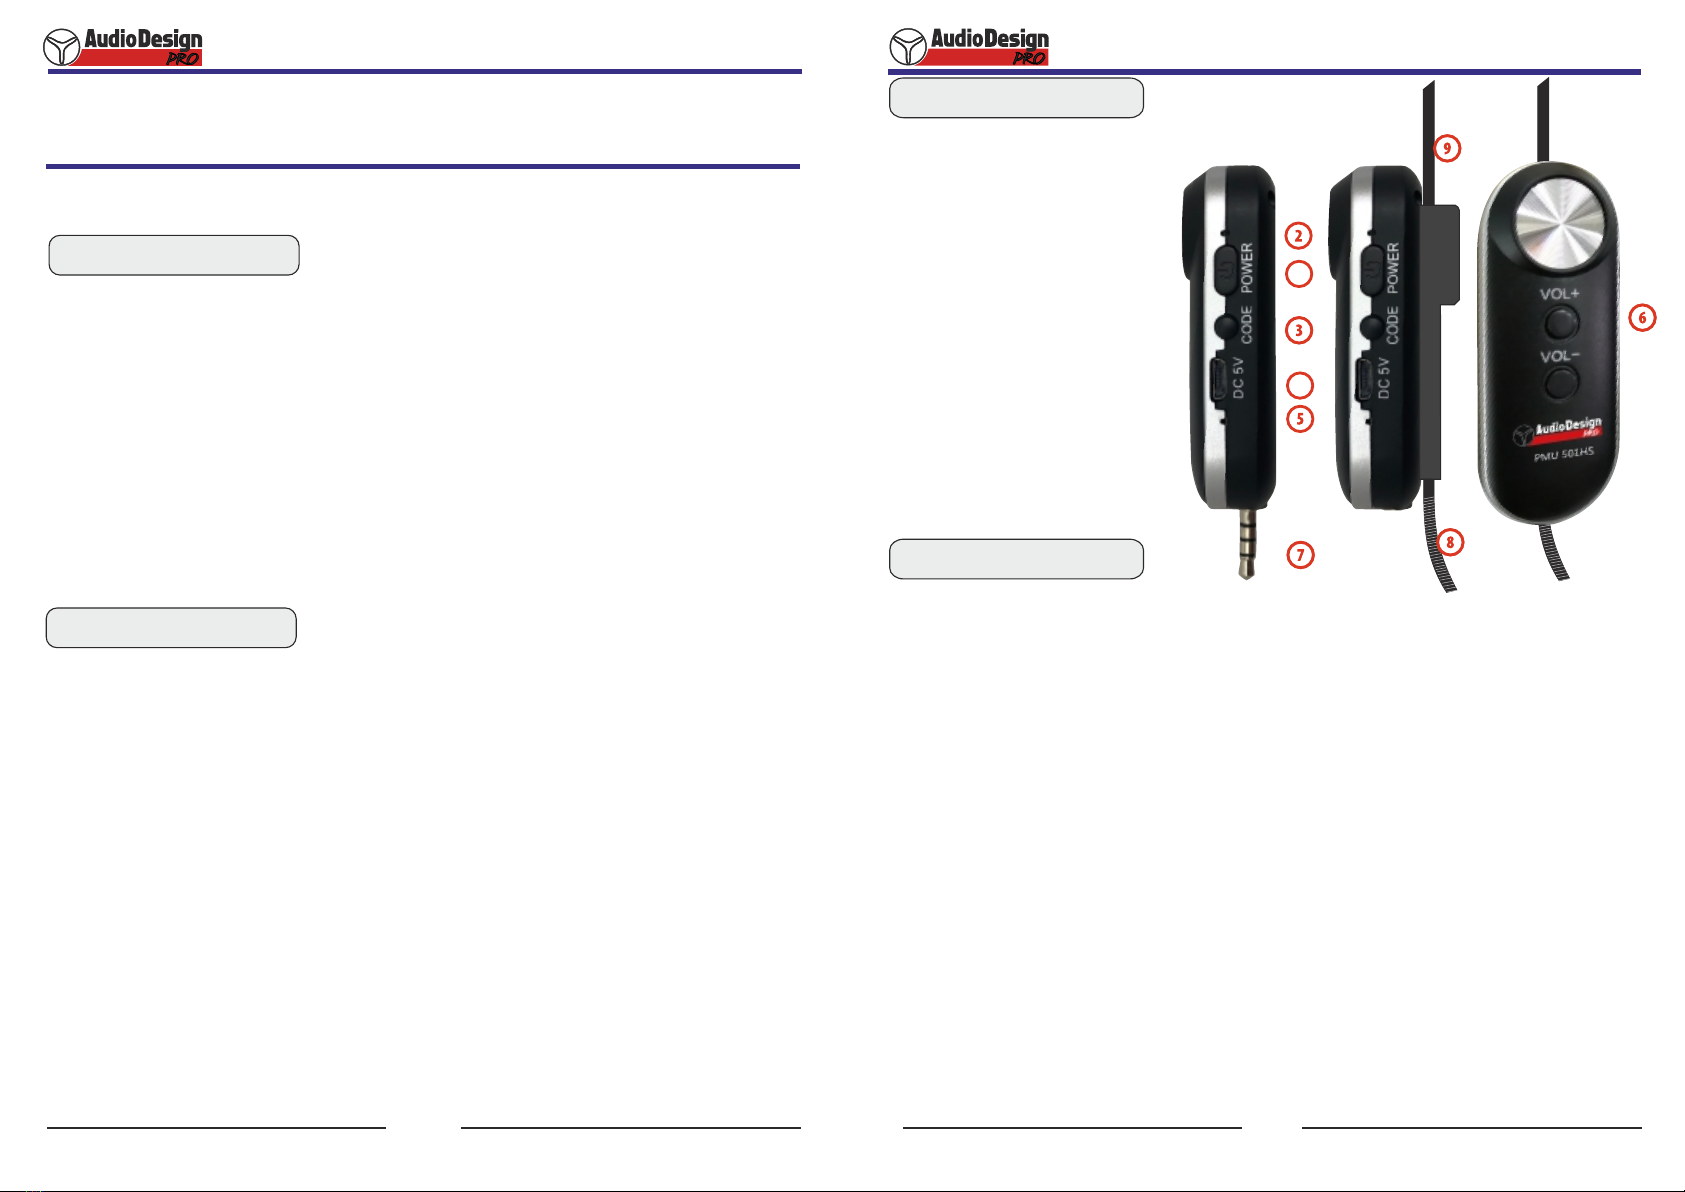
1. Pulsante di accensione. Premere brevemente per accendere e a lungo per
spegnere.
2. LED. Blu quando si accende, se la luce lampeggia indica la necessità di
ricaricare.
3. Pulsante per cambiare la frequenza di trasmissione. Normalmente la
sincronizzazione è automatica ma se non dovesse avvenire o se si desidera
utilizzare più microfoni contemporaneamente, procedere come segue:
Accendere trasmettitore e ricevitore contemporaneamente. Premere a lungo il
pulsante sull’archetto fino a che il LED power inizia a lampeggiare indicando che il
trasmettitore è in modalità sincronizzazione. Premere il pulsante sul ricevitore e il
LED di segnalazione lampeggerà per 3 volte per indicare la disponibilità alla
sincronizzazione. Completare la procedure premendo nuovamente il pulsante
sull’archetto. Il LED smetterà di lampeggiare e il ricevitore emetterà un suono per
indicare che la sincronizzazione è avvenuta correttamente. Se si desidera
utilizzare fino a 5 archetti, ripetere la procedura con il prossimo archetto.
4. Presa USB per la ricarica della batteria
5. LED di verifica RF oppure di segnalazione della ricarica, luce verde
durante la ricarica, si spegne a fine carica.
6. Controlli del volume + / -
7. Ricevitore con connessione Jack 3.5. Se il dispositivo a cui ci si deve
connettere ha una connessione 6,3, utilizzare l’adattatore fornito. Si può installare
su un mixer o direttamente in un diffusore amplificato.
8. Parte flessibile dell’archetto con capsula microfonica integrata.
9. Parte rigida dell’archetto. Termina con una protezione in gomma.
1
4
Connessione trasmettitore
ricevitore automatica.
Frequenza di lavoro: 670-690 Mhz
Canali: 20
Potenza di trasmissione 10dbM
Microfono a condensatore
Batterie 3.7 V - 400 mA al Litio
Risposta in frequenza: 50-15.000
Hz
Alimentatore: USB 5V 500 mA-1A
Distanza di lavoro: 30 m
Cavo USB --> micro USB incluso
Adattatore Jack 3,5 --> Jack 6,3
incluso
Fino a 5 sistemi possono essere
utilizzati contemporaneamente.
Connessioni e controlli
Self pairing between Transmitter and Receiver.
Working Frequency: 670 - 690 Mhz
Channels: 20
Transmission power: 10dbM
Condenser Microphone
Batteries: 3.7 V - 400 mA al Litio
Frequency Response: 50-15.000 Hz
Power Supply: USB 5V 500 mA-1A
Working distance: 30 m
USB --> micro USB cable included
Jack 3,5 --> Jack 6,3 adapter included
Up to 5 systems can be used at same time.
Connections and controls
1. Power switch: Short press to switch on, Long press to switch off.
2. LED. Blue when is on, if flashing need to be charged.
3. Code: Usually matching is automatic. Should it fail or if you need to
use up to 3 units at same time, proceed as follows: turno on the receiver and
the headset ad same time. Long press the headset march Code and the power
lamp will start flashing showing that the transmitter is ready for matching.
Press the Code switch on the receiver and the lamp will flash 3 times to show
that matching have been done. Press once again the Code button on the
headset to confirm. The LED will stop flashing and the receiver will emit a
sound to confirm a successfull pairing. If you want to connect more units,
repeat the procedure up to a maximum of 5 units.
4. USB connection for battery charge.
5. RF / Charging control LED. When charging the LED is green, at the
end, it switch off.
6. + / - Volume Control
7. Jack 3.5 receiver connection. If the connecting device need a 6,3 mm
Jack connection, use the adapter included. Can be connected to a mixer or
directly to a powered enclosure.
8. Flexible part of the head set including the capacitor microphone.
9. Fixed part of the head set. The edge is protected by a rubber terminal.
Microfono ad archetto Wireless PMU 501HS
Other Audiodesign Recording Equipment manuals


