Atlantic British 8844 User manual

An Atlantic British Exclusive! With the genuine motors unavailable for
nearly a year, we decided to develop this all-inclusive kit designed and
engineered to replace your failed heater motor flawlessly. This motor
replacement (recommended replacement at 150,000 miles) offers top-notch flow perform-
ance for your heating, with ample heat for frigid winter temps!
EXCLUSIVEEXCLUSIVEEXCLUSIVE
KITKIT
KIT
®
Parts
included
in Kit
#8844:
Part/Kit:
Part #: Page:
Blower Motor
Blower Wheel
(already assembled to motor)
Mounting Ring
3 - 10-24 Nylon Insert
Lock Nuts
10 - 11
"
Cable Ties
2 Feet of Electrical Solder
2 - 1-1/2
"
Pieces of
3/8
"
Heat Shrinkable Tubing
3 - #10 External Tooth
Lock Washer
Mounting Bracket
(has 10-24 x 1 screw, lock washer and
10-24 lock nut included)
Gasket Kit
Item #BTR3761
2 - Pop Rivets
Item #8662
8844
HEATER BLOWER MOTOR KIT FOR
RANGE ROVER CLASSIC 1990 - 1994
1 OF 48
www.AtlanticBritish.com • 800-533-2208 • Fax 518-664-6641 • Phone 518-664-6169
Atlantic British Ltd.
®

Dash and Heater Box Removal
Tools Needed:
Electric Hand Drill
1/8 inch drill bit
3/16 inch drill bit
Soldering Iron
Heat Gun
#2 Phillips Screwdriver
#1 Phillips Screwdriver
Flat blade screwdriver
Upholstery Tool for prying
10 mm deepwell socket
3/8 inch socket
9/16 inch 3/8 drive flex socket
Large diagonal cutters (for clipping the braces on the molded motor mount)
Small diagonal cutters
Snap ring tool
Posi-Drive Screwdriver
5/32 Allen Wrench
3/8 open end wrench
Grinder or Dremel Tool
Radio Removal Tool
Pop Rivet Tool
Estimated Time:
9 to 10 hours
Preparation:
Make sure you have a container to hold all of the hardware you will be removing
Move the front seats as far back as possible
Make sure you know the codes for the radio and disconnect the battery
Part/Kit: HEATER BLOWER MOTOR KIT FOR
RANGE ROVER CLASSIC 1990 - 1994
Page #: 2 OF 48
Part #: 8844
INSTRUCTIONS
www.AtlanticBritish.com • 800-533-2208 • Fax 518-664-6641 • Phone 518-664-6169
Atlantic British Ltd.
®
Procedure:
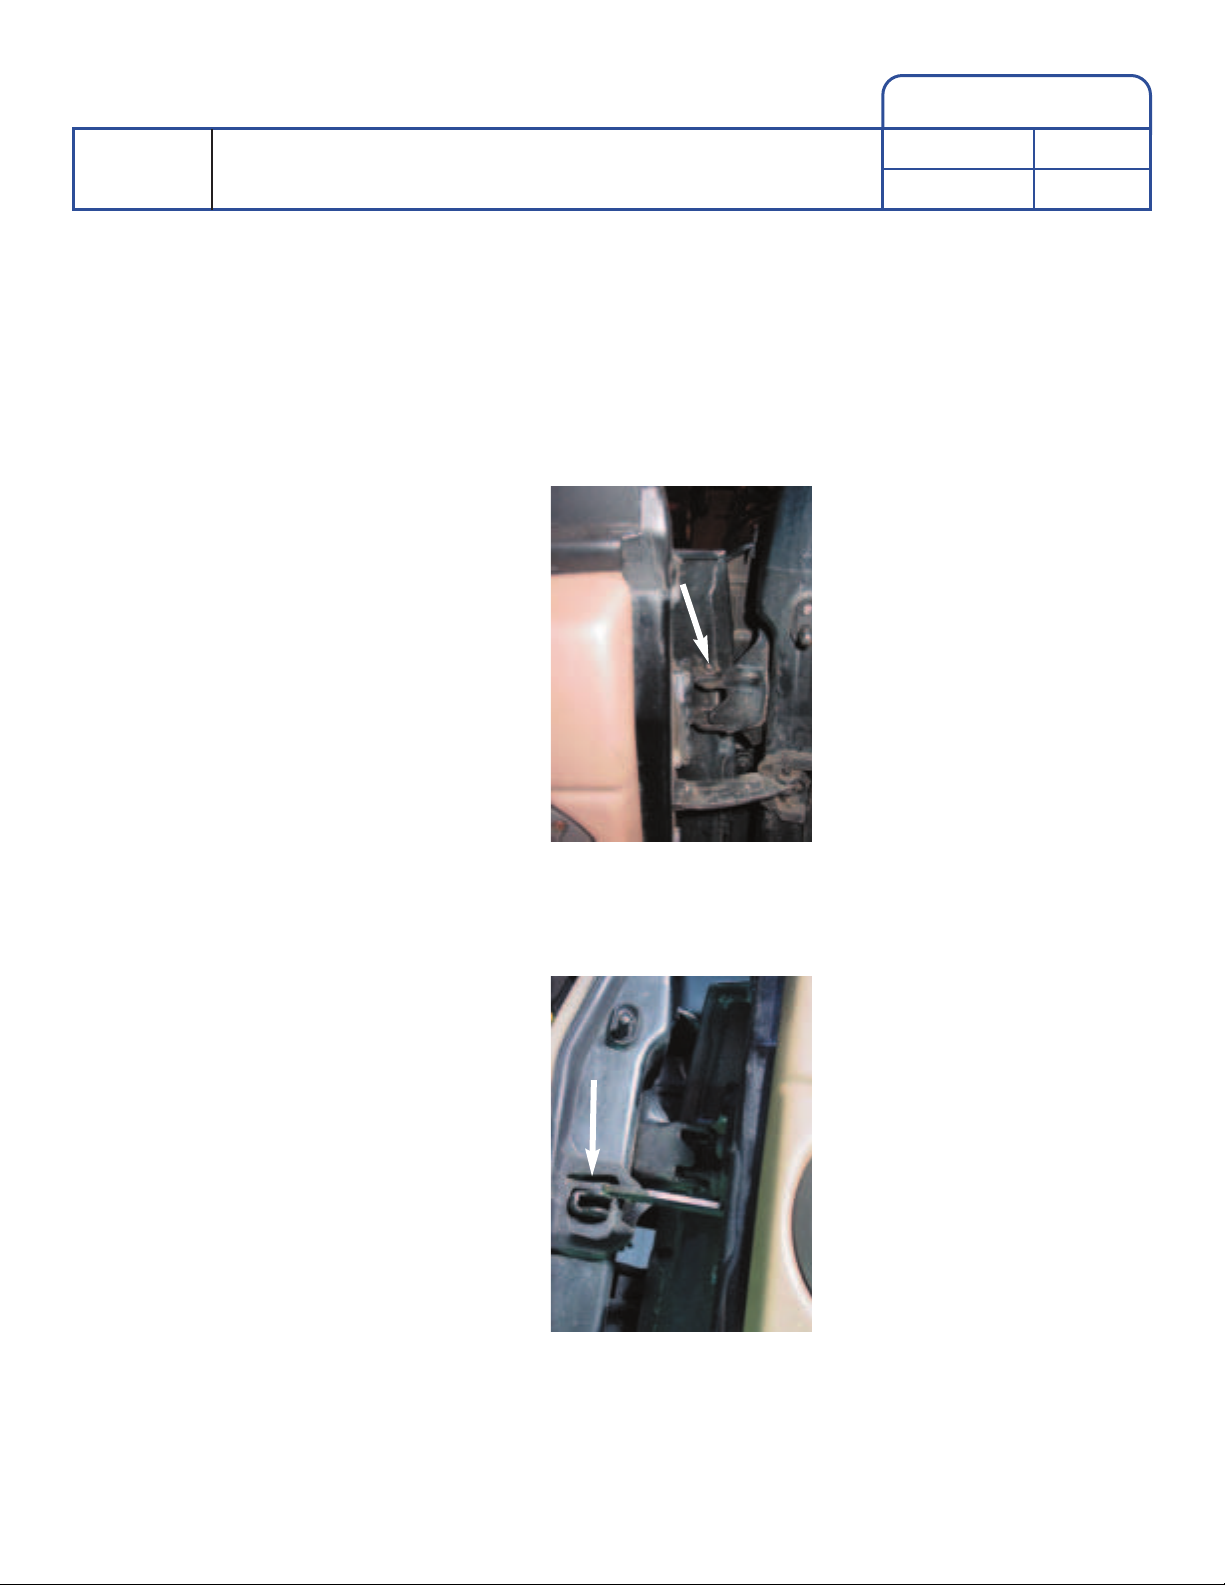
Door Removal: (Makes working in and around the dash much easier)
For the Left (Drivers) side
1. Remove the retaining clip from the top most and bottom most door hinge posts.
(See photo 1)
2. Remove the roll pin from the door check bracket (photo 2)
Part/Kit: HEATER BLOWER MOTOR KIT FOR
RANGE ROVER CLASSIC 1990 - 1994
Page #: 3 OF 48
Part #: 8844
INSTRUCTIONS
(photo 1)
(photo 2)
www.AtlanticBritish.com • 800-533-2208 • Fax 518-664-6641 • Phone 518-664-6169
Atlantic British Ltd.
®

3. Remove the foot rest from the left foot-well and remove the 2 push posts to remove the
foot-well kick panel. (See photo 3)
4. Disconnect the connectors for the door electrics (See photo 4, picture is from the right
side) and feed through the opening in the frame.
5. Lift the door off of the hinges.
6. Repeat for the right hand side. (There will be no foot rest.)
Part/Kit: HEATER BLOWER MOTOR KIT FOR
RANGE ROVER CLASSIC 1990 - 1994
Page #: 4 OF 48
Part #: 8844
INSTRUCTIONS
www.AtlanticBritish.com • 800-533-2208 • Fax 518-664-6641 • Phone 518-664-6169
Atlantic British Ltd.
®
(photo 3)
(photo 4)
Lower Left Foot-Well Panel removal:
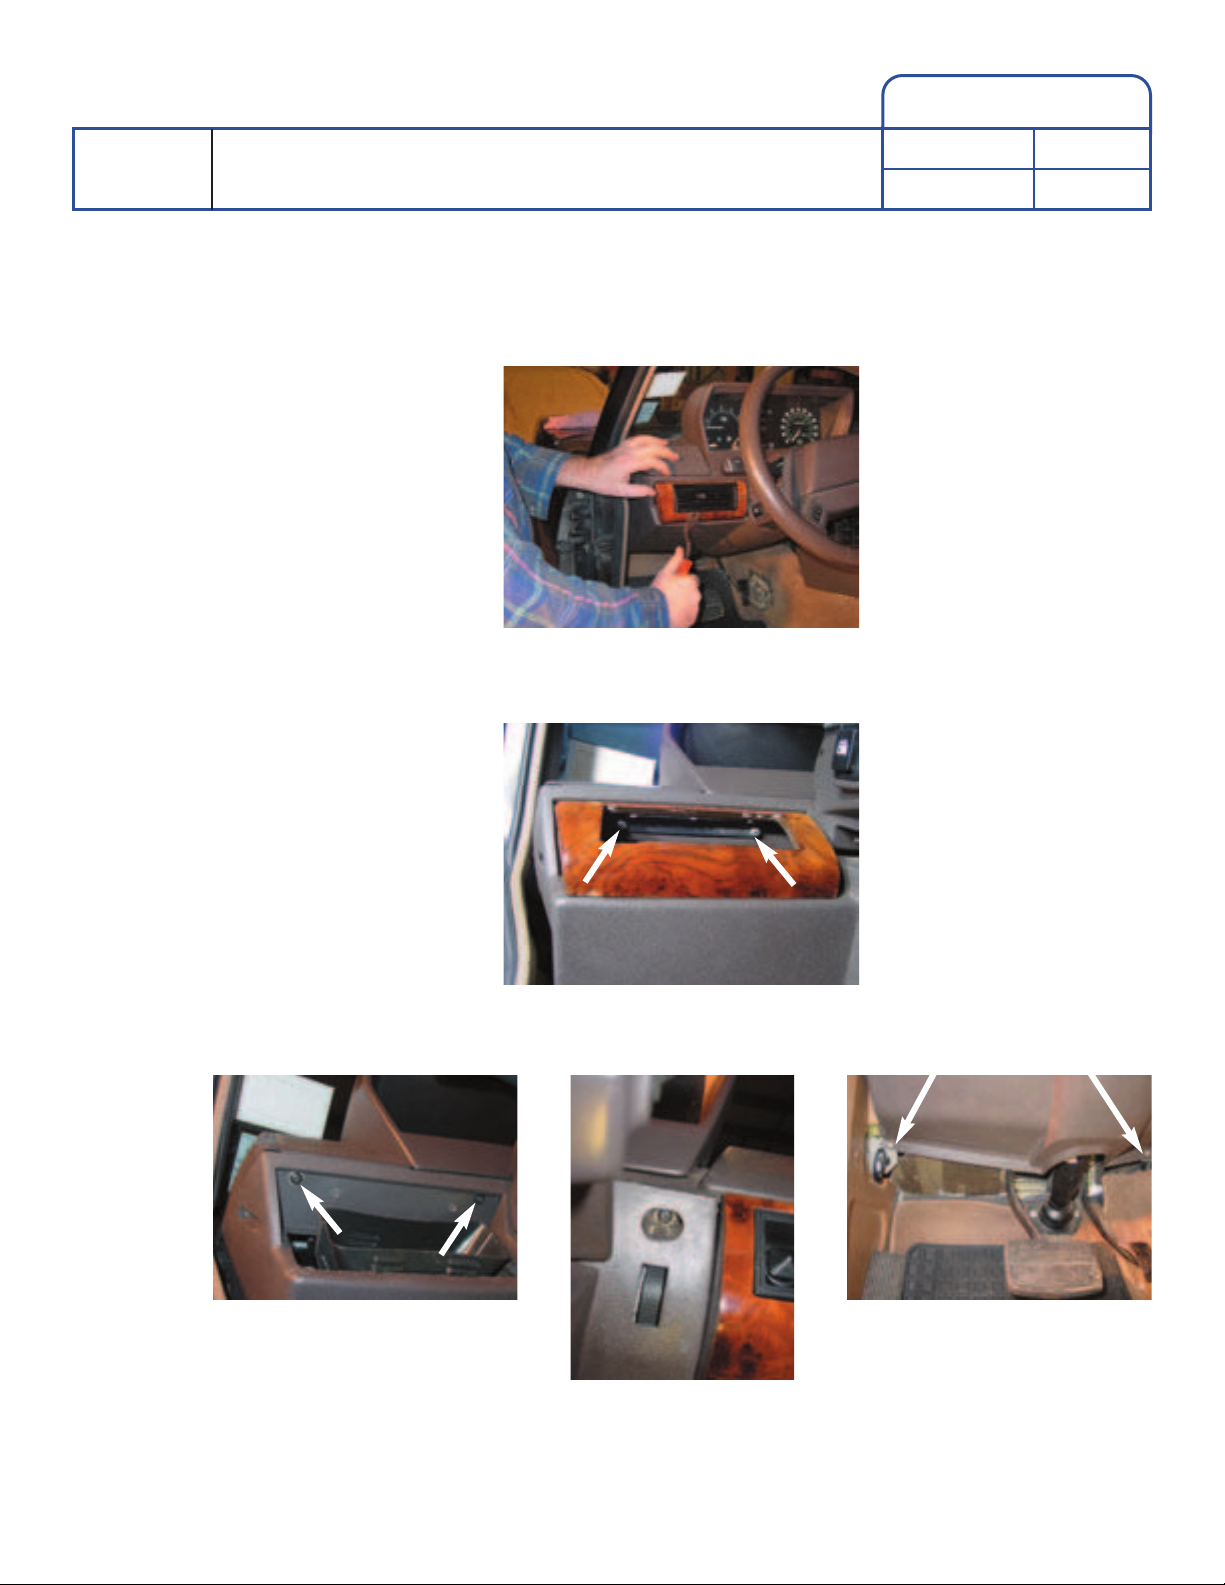
1. Pop out the louver to the left of the steering column. (photo 5)
2. Remove the left fascia by taking the 2 screws out shown in photo 6.
3. Remove the 8 screws securing the panel. (See photos 7, 8, and 9)
Part/Kit: HEATER BLOWER MOTOR KIT FOR
RANGE ROVER CLASSIC 1990 - 1994
Page #: 5 OF 48
Part #: 8844
INSTRUCTIONS
www.AtlanticBritish.com • 800-533-2208 • Fax 518-664-6641 • Phone 518-664-6169
Atlantic British Ltd.
®
(photo 5)
(photo 8)
(photo 7) (photo 9)
(photo 6)

4. The panel will drop down. Unplug the connector to the control for the Instrument Panel
illumination (photo 10) and take the bulb check unit out of the bracket (photo 11)
5. The panel can now be removed. (photo 12 shows panel removed)
Part/Kit: HEATER BLOWER MOTOR KIT FOR
RANGE ROVER CLASSIC 1990 - 1994
Page #: 6 OF 48
Part #: 8844
INSTRUCTIONS
www.AtlanticBritish.com • 800-533-2208 • Fax 518-664-6641 • Phone 518-664-6169
Atlantic British Ltd.
®
(photo 10)
(photo 11)
(photo 12)
Dash Fascia Removal:
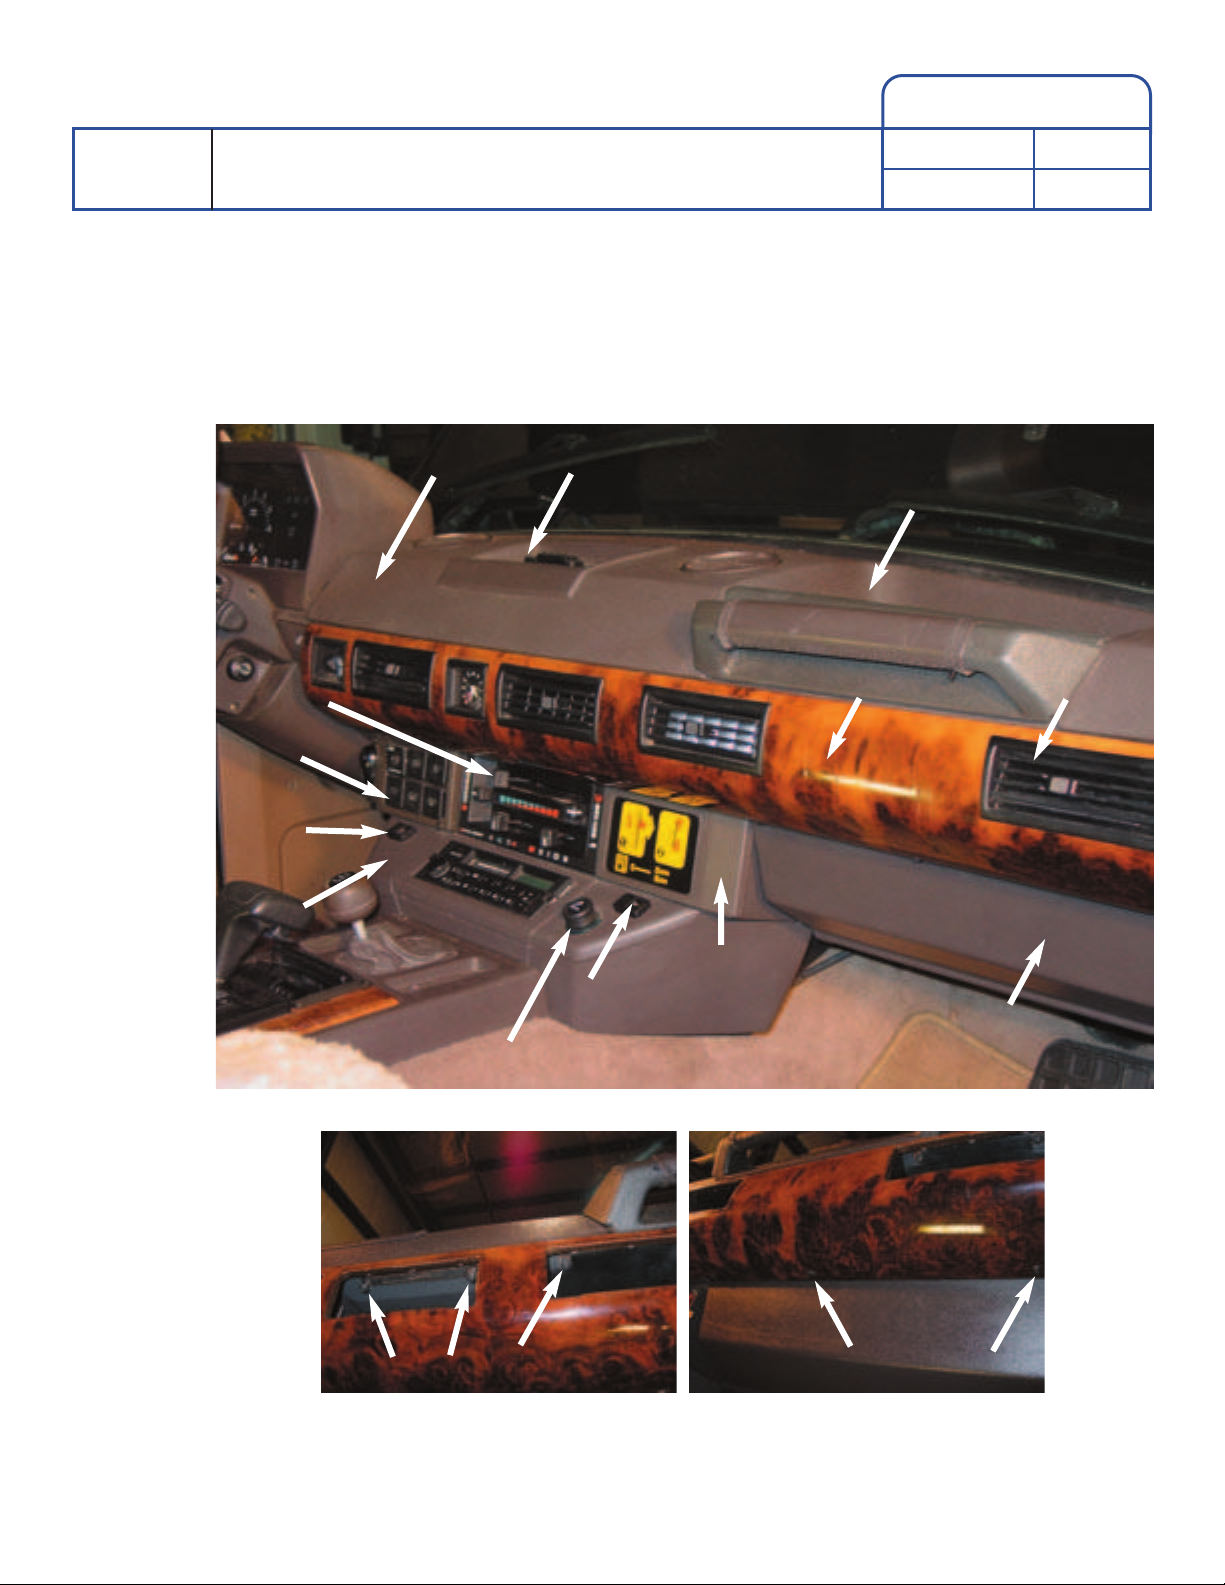
1. Pop out all of the louvers from the fascia. (The fascia and louvers can be seen on photo
13) Locate the screws securing the fascia to the dash (See photos 14 and 15) Remove all
13 screws (photo 16)
Part/Kit: HEATER BLOWER MOTOR KIT FOR
RANGE ROVER CLASSIC 1990 - 1994
Page #: 7 OF 48
Part #: 8844
INSTRUCTIONS
www.AtlanticBritish.com • 800-533-2208 • Fax 518-664-6641 • Phone 518-664-6169
Atlantic British Ltd.
®
(photo 14) (photo 15)
(photo 13)
DASH TOP CENTER DASH RECESS
RIGHT DASH RECESS
FASCIA
AC PLENUM
FUSE COVER
RIGHT
HEATED
SEAT
LEFT
HEATED
SEAT
CIGAR LIGHTER
HEATER
CONTROL
BEZEL
AUXILIARY
SWITCH
PANEL
RADIO
SURROUND
LOUVERS (5) TOTAL

2. Unplug the connectors for the clock and mirror controls. (photos 17 and 18)
Note: Vehicles without wood-grain fascia will also need the mirror control
switches popped out.
The fascia can now be removed.
Part/Kit: HEATER BLOWER MOTOR KIT FOR
RANGE ROVER CLASSIC 1990 - 1994
Page #: 8 OF 48
Part #: 8844
INSTRUCTIONS
www.AtlanticBritish.com • 800-533-2208 • Fax 518-664-6641 • Phone 518-664-6169
Atlantic British Ltd.
®
(photo 16)
(photo 17)
(photo 18)

Dash Top Removal:
1. Find and mark the 3 screws holding the dash top from underneath (these screws need to
be identified so they are not confused with the screw locations for the fascia when you
reassemble the dash). The location of these screws is shown in photo 19. Remove these
screws.
2. Remove the 4 screws underneath the mat in the right hand recess (behind “grab bar”).
(photo 20)
Part/Kit: HEATER BLOWER MOTOR KIT FOR
RANGE ROVER CLASSIC 1990 - 1994
Page #: 9 OF 48
Part #: 8844
INSTRUCTIONS
www.AtlanticBritish.com • 800-533-2208 • Fax 518-664-6641 • Phone 518-664-6169
Atlantic British Ltd.
®
(photo 19)
(photo 20)
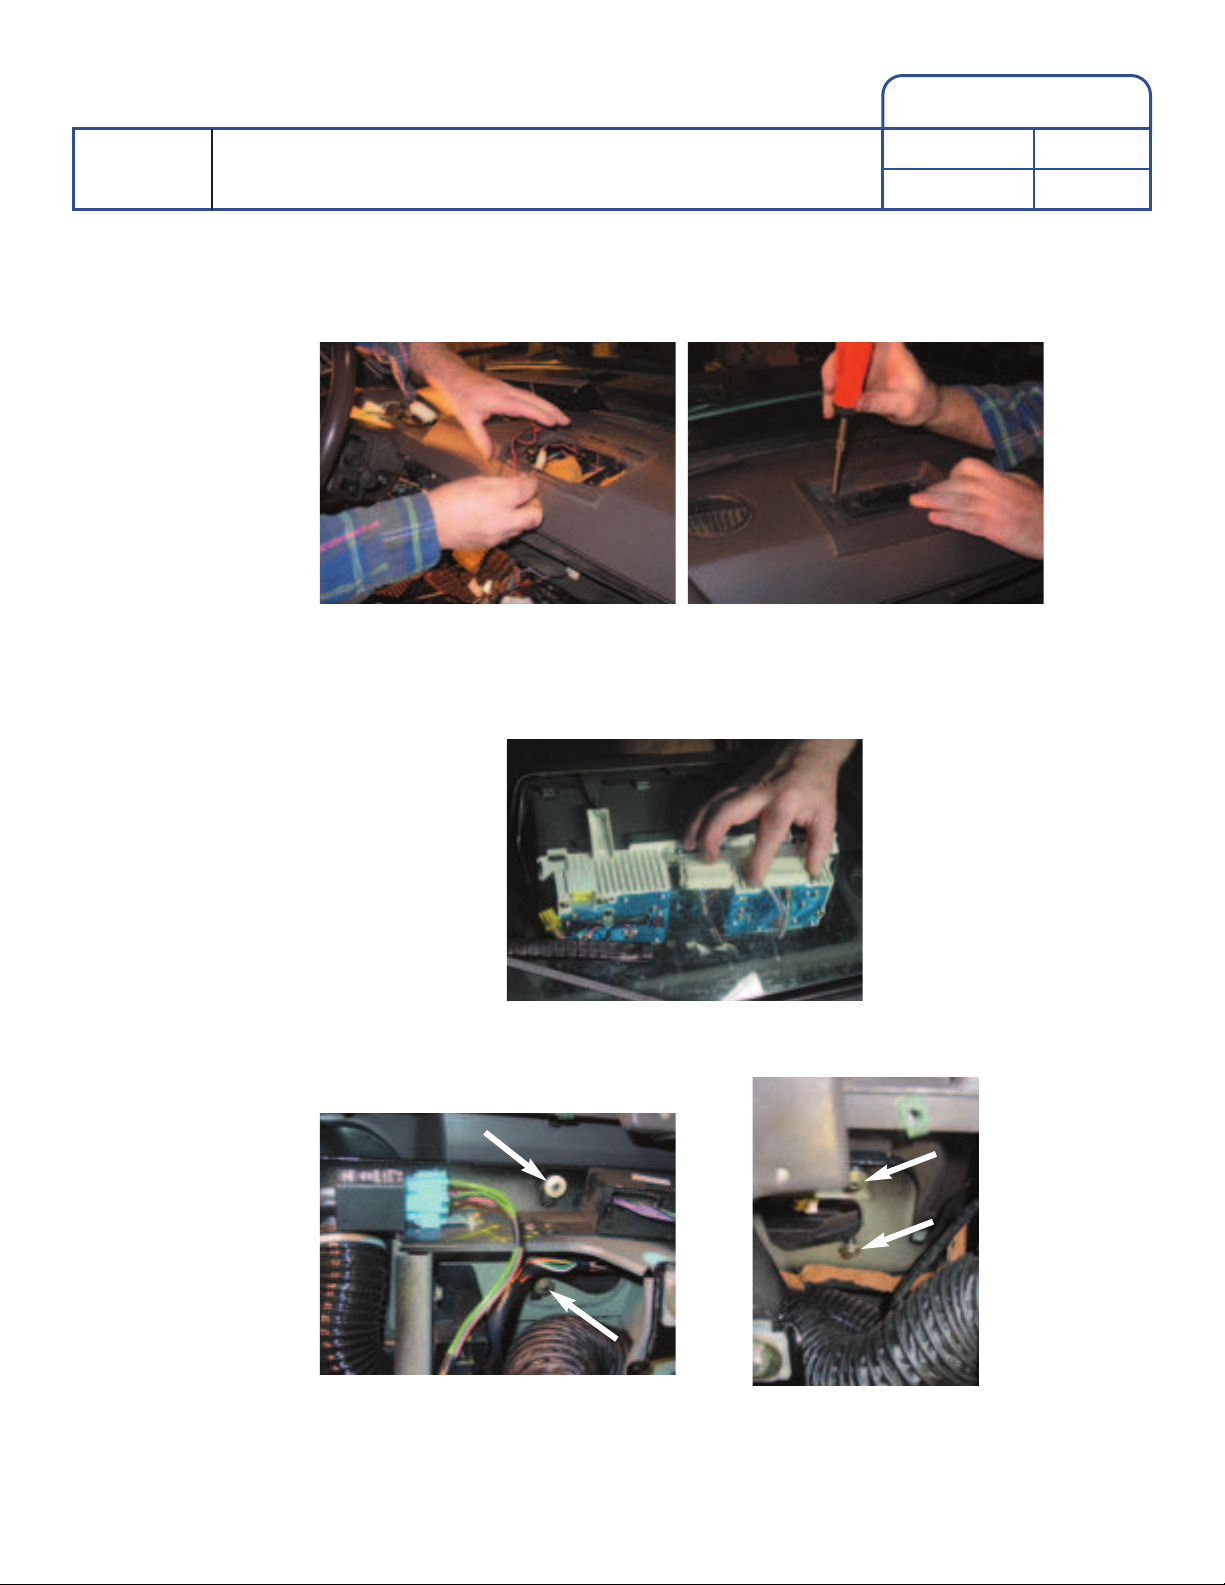
3. Remove the 4 screws underneath the mat in the center of the dash. This tray will lift up
and you can unplug the connector to the alarm LED. Remove this tray. (photo 21 and 22)
Remove the Instrument Panel by:
4. Snap off the hood covering the rear of the panel
5. Unplug the 3 connectors from the back of the instrument panel (shown in photo 23).
6. Remove the 4 nuts/washers securing the instrument panel from underneath the dash.
(location shown in photos 24 & 25)
Part/Kit: HEATER BLOWER MOTOR KIT FOR
RANGE ROVER CLASSIC 1990 - 1994
Page #: 10 OF 48
Part #: 8844
INSTRUCTIONS
www.AtlanticBritish.com • 800-533-2208 • Fax 518-664-6641 • Phone 518-664-6169
Atlantic British Ltd.
®
(photo 21) (photo 22)
(photo 24) (photo 25)
(photo 23)
Note: In some vehicles, the cruise control amplifier needs to be removed
from the right hand stud.
Instrument Panel can now be lifted from behind the steering wheel.
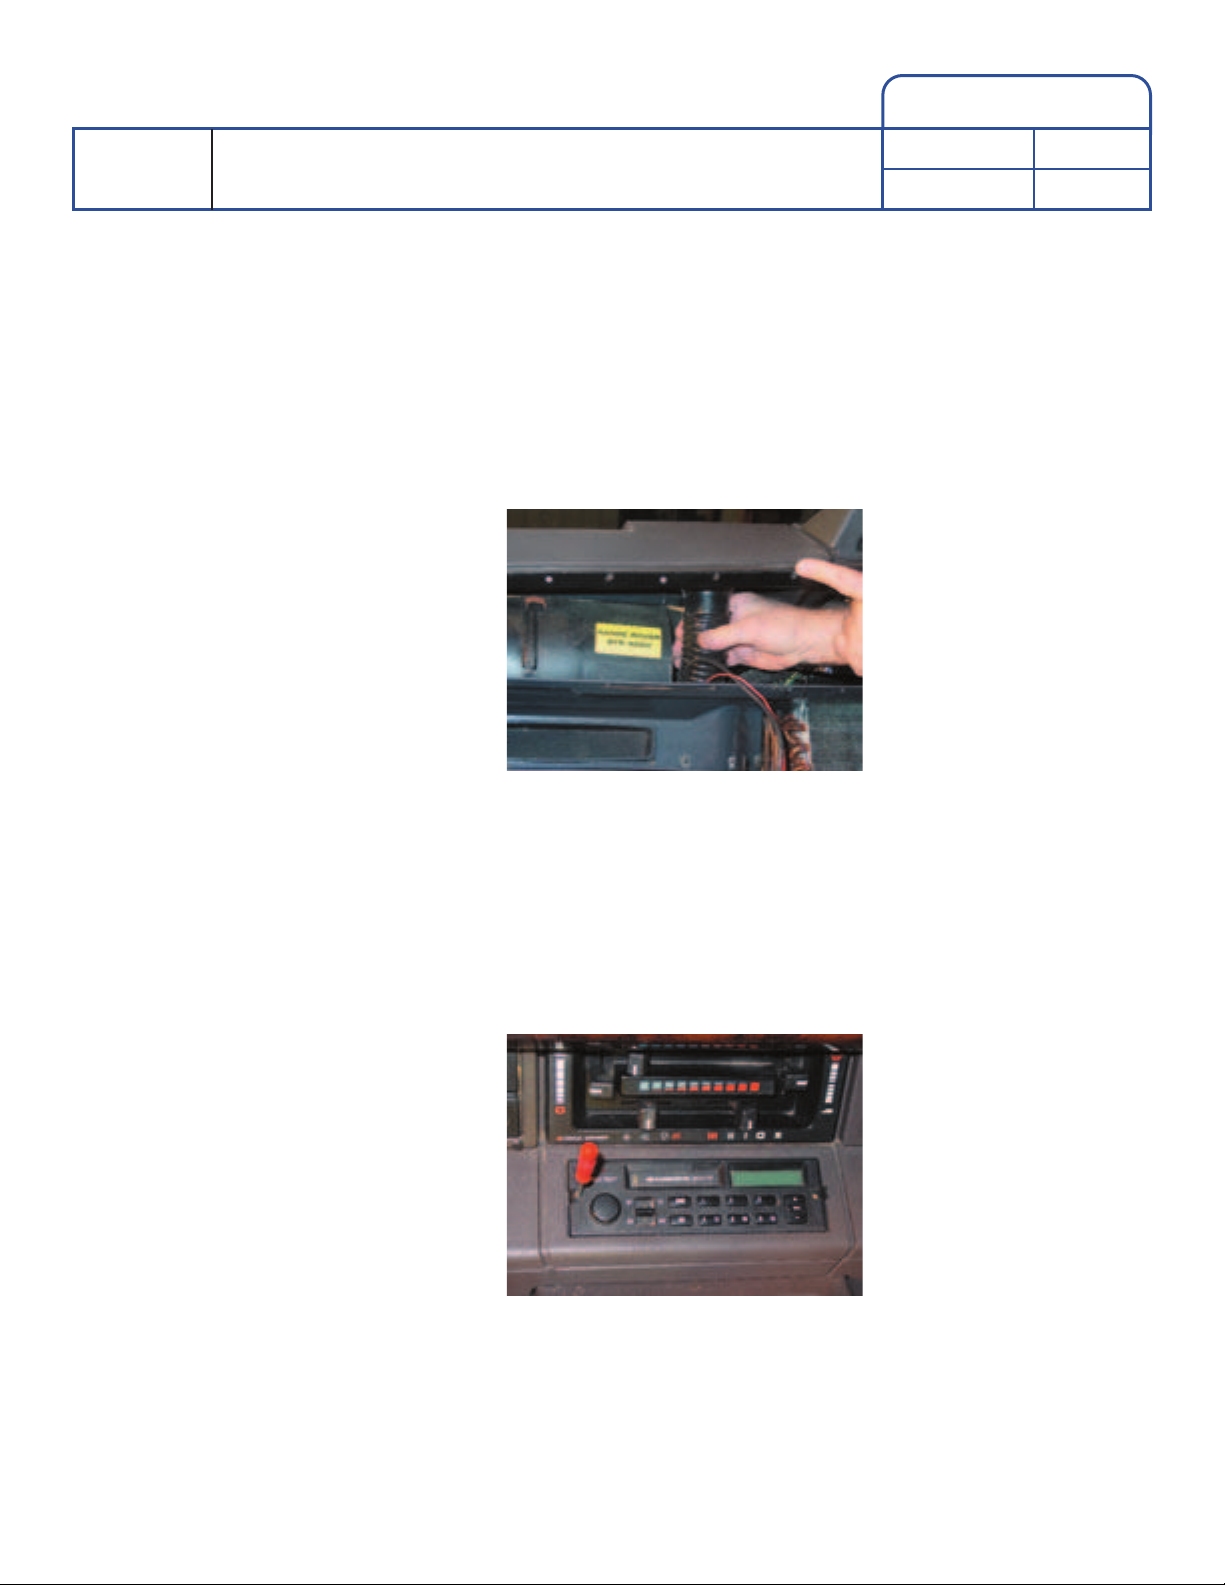
7. Lift up the front of the dash top and remove the foam insulation and disconnect the 4
defroster hoses by first clipping the tie wraps holding the hoses in place. (photo 26 shows
the rightmost defroster hose)
8. Maneuver the dash top out of place and remove from the vehicle.
Radio “Surround” Removal:
1. Take the radio out by using special tool and rotating counter-clockwise the 2 screws until
the radio will come out. The screws are underneath the little “doors” to the left and right
of the unit. (photo 27)
Part/Kit: HEATER BLOWER MOTOR KIT FOR
RANGE ROVER CLASSIC 1990 - 1994
Page #: 11 OF 48
Part #: 8844
INSTRUCTIONS
www.AtlanticBritish.com • 800-533-2208 • Fax 518-664-6641 • Phone 518-664-6169
Atlantic British Ltd.
®
(photo 26)
(photo 27)

2. Lift the radio out and unplug all of the connectors. Since the connectors for the speakers
can be interchanged, you will need to take careful notes about the locations of these
connectors. (photo 28)
3. Remove the heater control knobs (photo 29) and the 2 screws holding the panel in place
(photo 30). Pull the panel down and unplug the 4 lamp connectors (photo 31). Remove
the heater bezel from the vehicle.
Part/Kit: HEATER BLOWER MOTOR KIT FOR
RANGE ROVER CLASSIC 1990 - 1994
Page #: 12 OF 48
Part #: 8844
INSTRUCTIONS
www.AtlanticBritish.com • 800-533-2208 • Fax 518-664-6641 • Phone 518-664-6169
Atlantic British Ltd.
®
(photo 28)
(photo 31)
(photo 29) (photo 30)

4. Remove the 4 screws surrounding the fuse cluster to the right of the radio. (photo 32)
5. Being careful not to break the four plastic posts, pry the auxiliary switch panel (Locate
with photo 33) from its location. Unplug all of the color coded switches (photo 34) and
remove the panel.
6. Remove the lower screw to the right of the steering wheel column (location shown in
photo 35)
Part/Kit: HEATER BLOWER MOTOR KIT FOR
RANGE ROVER CLASSIC 1990 - 1994
Page #: 13 OF 48
Part #: 8844
INSTRUCTIONS
(photo 32)
(photo 35)
(photo 33) (photo 34)
www.AtlanticBritish.com • 800-533-2208 • Fax 518-664-6641 • Phone 518-664-6169
Atlantic British Ltd.
®

7. Remove the 2 screws securing the AC blower cover from the passenger foot well and
remove the cover from the vehicle. (photo 36)
8. Remove the nut (shown in photo 37) from the passenger foot well.
9. Unplug the connectors for the Seat Heater switches, the EAS switches (3, if equipped),
and the cigar lighter and maneuver the radio surround out of the vehicle. (photos 38 and 39)
Part/Kit: HEATER BLOWER MOTOR KIT FOR
RANGE ROVER CLASSIC 1990 - 1994
Page #: 14 OF 48
Part #: 8844
INSTRUCTIONS
www.AtlanticBritish.com • 800-533-2208 • Fax 518-664-6641 • Phone 518-664-6169
Atlantic British Ltd.
®
(photo 36)
(photo 37)
(photo 38) (photo 39)

Heater Box Removal:
1. Unplug the connectors from the back of the heater controls. (Shown in photo 40) Make
sure to take note of the connector (it is easiest to just mark one of the connectors)
locations so they are not interchanged during reassembly.
2. Unplug the Green & Black wires from the recirculation flap solenoid and disconnect the
vacuum hose. (Shown in photo 41)
Part/Kit: HEATER BLOWER MOTOR KIT FOR
RANGE ROVER CLASSIC 1990 - 1994
Page #: 15 OF 48
Part #: 8844
INSTRUCTIONS
www.AtlanticBritish.com • 800-533-2208 • Fax 518-664-6641 • Phone 518-664-6169
Atlantic British Ltd.
®
(photo 40)
(photo 41)
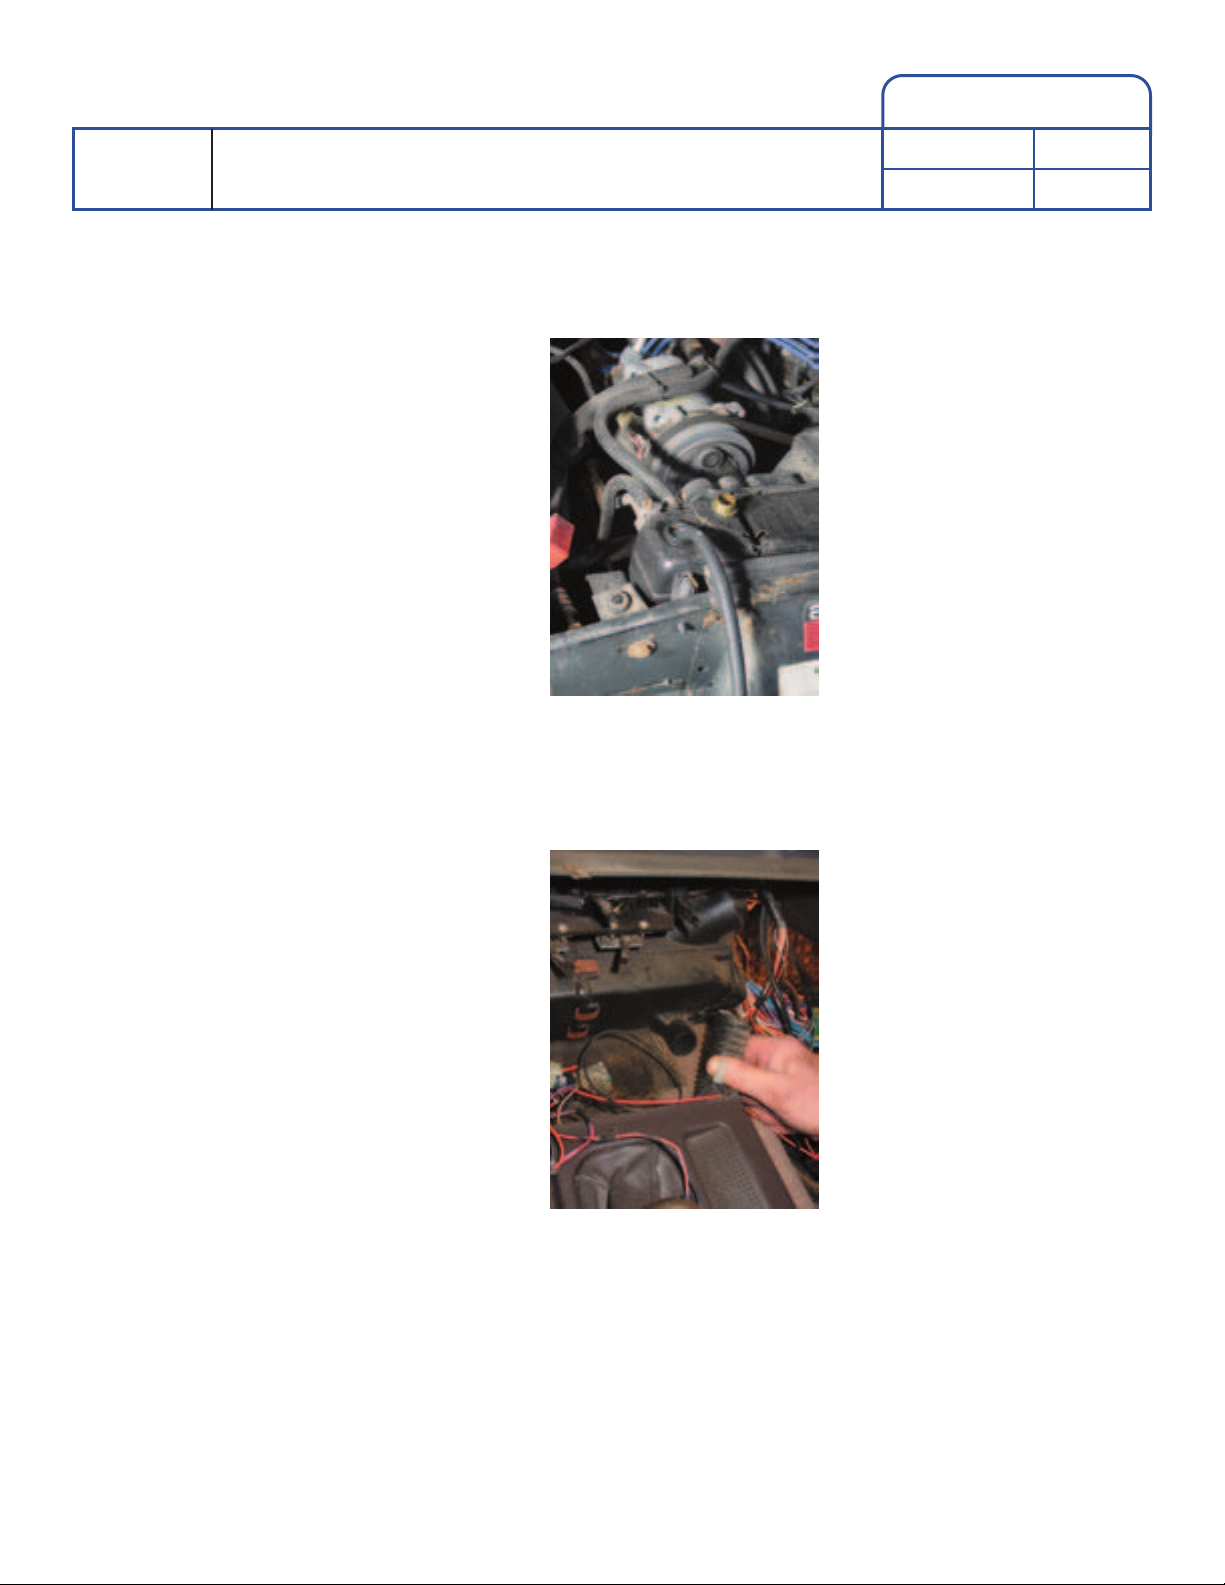
3. Drain the cooling system by using a siphon hose inserted into the plug on the radiator.
(Shown in photo 42)
4. While the antifreeze is draining, pull the 4 defroster hoses out (clip the cable ties
securing the hoses in place), and disconnect the hoses for the rear heat. (Shown in
photo 43)
4a. Remove wiring and grommet for mirrors and clock from AC Plenum.
Part/Kit: HEATER BLOWER MOTOR KIT FOR
RANGE ROVER CLASSIC 1990 - 1994
Page #: 16 OF 48
Part #: 8844
INSTRUCTIONS
www.AtlanticBritish.com • 800-533-2208 • Fax 518-664-6641 • Phone 518-664-6169
Atlantic British Ltd.
®
(photo 42)
(photo 43)

5. Remove the nut securing the AC plenum unit in place (shown in photo 44).
6. Use a blanket to protect the console and lower the AC plenum unit so it rests in the
passenger wheel well and on the console. It should be in a position so it does not
interfere with the heater box removal.
7. Unplug the heater assembly connector and the AC thermostat connector with green wires.
(Shown in photos 45 and 46 respectively)
Part/Kit: HEATER BLOWER MOTOR KIT FOR
RANGE ROVER CLASSIC 1990 - 1994
Page #: 17 OF 48
Part #: 8844
INSTRUCTIONS
www.AtlanticBritish.com • 800-533-2208 • Fax 518-664-6641 • Phone 518-664-6169
Atlantic British Ltd.
®
(photo 44)
(photo 45)
(photo 46)

8. Disconnect the 2 heater hoses, noting their locations so they are not interchanged upon
reassembly, from the firewall in the engine compartment. (Shown in photo 47) You
might want to place a catch basin underneath the vehicle to catch any antifreeze that
might spill out.
9. Remove the 4 bolts securing the heater box to the vehicle firewall. (The 2 bolts in the drivers
side wheel well are shown in photo 48 and the passenger side wheel well in photo 49.)
10. Tilt the top of the heater box out and maneuver the unit out of the vehicle.
11. The state of the vehicle at this point is shown in photo 50.
Part/Kit: HEATER BLOWER MOTOR KIT FOR
RANGE ROVER CLASSIC 1990 - 1994
Page #: 18 OF 48
Part #: 8844
INSTRUCTIONS
www.AtlanticBritish.com • 800-533-2208 • Fax 518-664-6641 • Phone 518-664-6169
Atlantic British Ltd.
®
(photo 47)
(photo 50)
(photo 48) (photo 49)

Heater Box Rebuild
1. Remove the right and left plastic footwell ducts. (shown after removal in photo 51)
2. Remove the gaskets surrounding the fresh air inlet and the blower output. (See photos 52
and 53)
3. Drill out the 2 rivets on the left half of the heater enclosure holding the heater control
assembly to the plastic heater housing with a 3/16 inch drill bit. (See photos 54 and 55)
Part/Kit: HEATER BLOWER MOTOR KIT FOR
RANGE ROVER CLASSIC 1990 - 1994
Page #: 19 OF 48
Part #: 8844
INSTRUCTIONS
www.AtlanticBritish.com • 800-533-2208 • Fax 518-664-6641 • Phone 518-664-6169
Atlantic British Ltd.
®
(photo 51)
(photo 52) (photo 53)
(photo 54) (photo 55)
VENT OUTLET
INLET
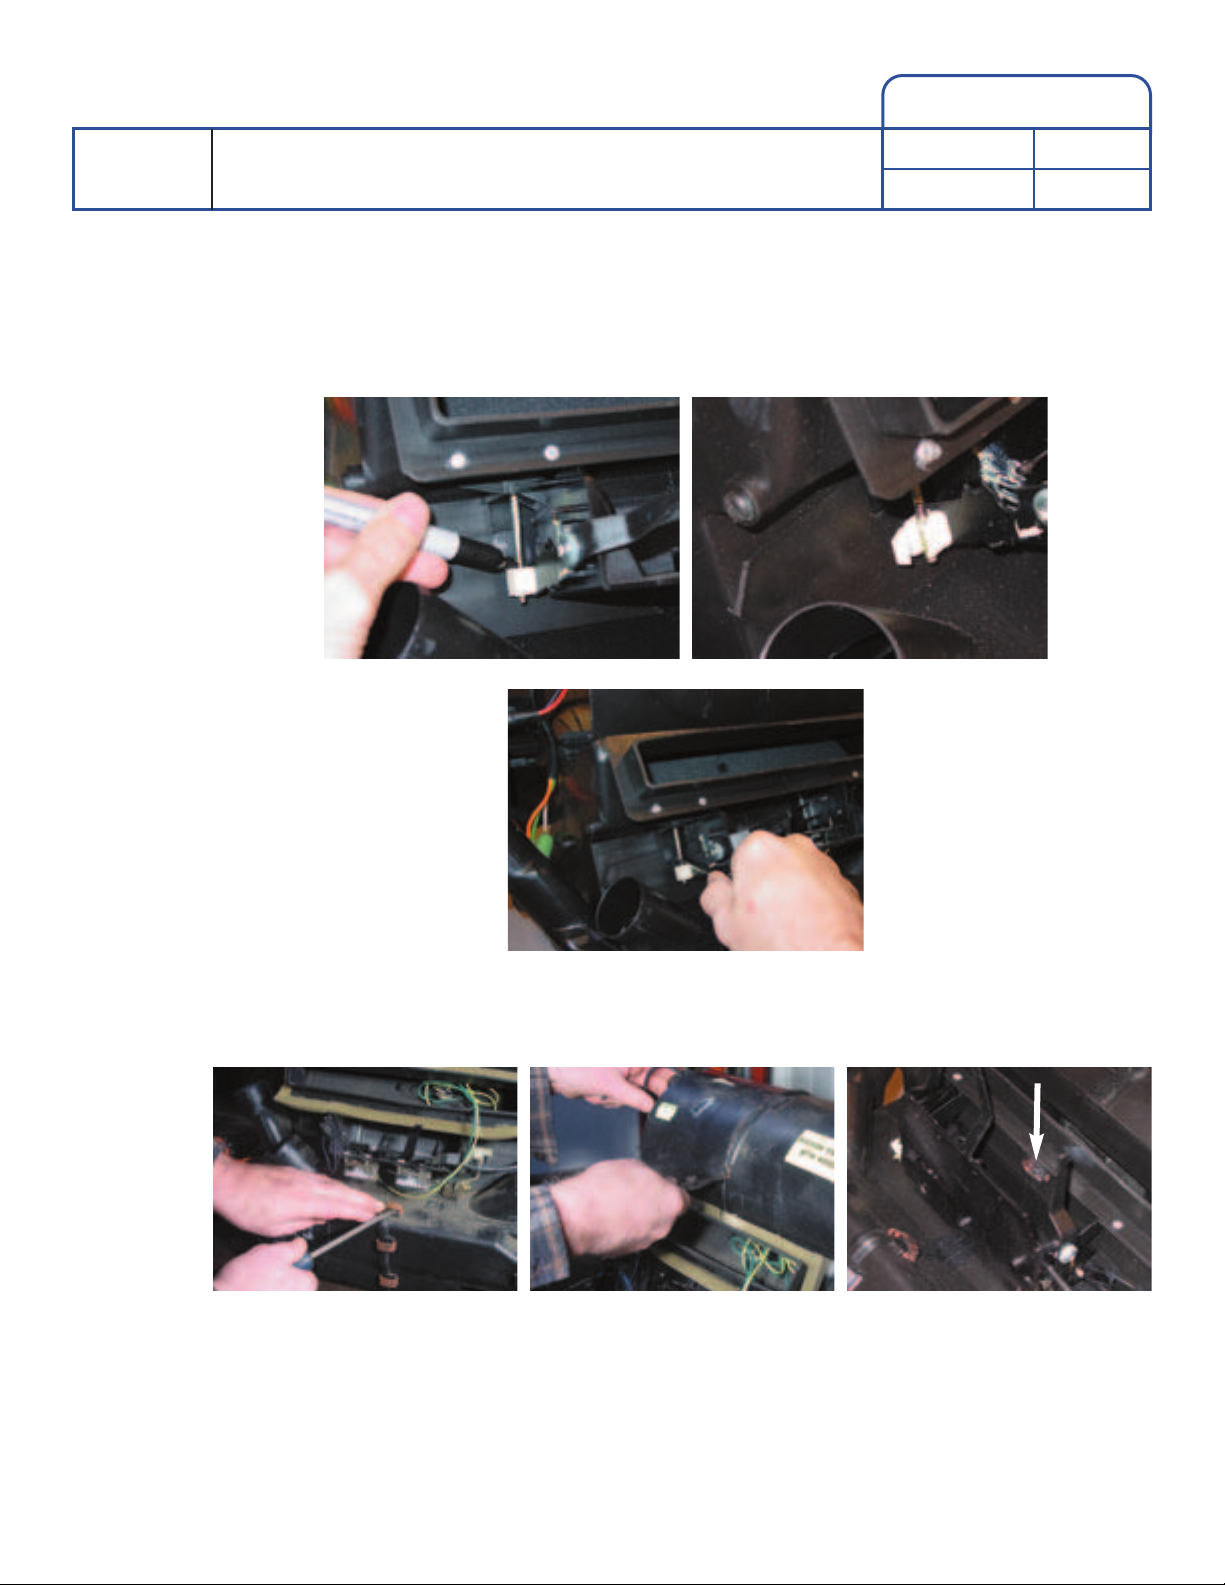
4. Release the adjuster on the left side of the heater control cluster, marking it first so you
know the correct position for reassembly. (Photo 56 shows the marking, photo 57 shows
the retaining door popped open, and photo 58 shows the shaft being dislocated from the
plastic block).
5. Remove the 10 clips and the 2 snap rings holding the halves together. Note: There is a
clip hidden behind the heater control cluster. (See photos 59, 60 and 61)
Part/Kit: HEATER BLOWER MOTOR KIT FOR
RANGE ROVER CLASSIC 1990 - 1994
Page #: 20 OF 48
Part #: 8844
INSTRUCTIONS
www.AtlanticBritish.com • 800-533-2208 • Fax 518-664-6641 • Phone 518-664-6169
Atlantic British Ltd.
®
(photo 56) (photo 57)
(photo 58)
(photo 60)(photo 59) (photo 61)
Table of contents
Popular Automobile Part manuals by other brands

Murphy
Murphy Pull/Push DC Solenoids RP2307B owner's manual

Holland
Holland FW3110 operating manual

ReadyLift
ReadyLift 69-2070 manual

Edelbrock
Edelbrock Edelbrock Header 6525 installation instructions

Edelbrock
Edelbrock Pro-Flo 3 Quick reference guide

K&N Engineering
K&N Engineering Filtercharger 57-9004 installation manual


Jonsered
Jonsered Front Rider FR13 Spare parts

Edelbrock
Edelbrock 72000 Installation and maintenance instructions

Edelbrock
Edelbrock Ford Mustang 63-5221 installation instructions

AUTOTECH
AUTOTECH 10.215.455K installation instructions

Edelbrock
Edelbrock 67362 installation instructions

Edelbrock
Edelbrock Q-Jet 1932 installation instructions