ATLAS BIOTECNOLOGIES AB2 User manual

ENGLISH 1 – 14
TÜRK 15 – 28
ATLAS BIOTECNOLOGIES
Laboratory Supplies Trade & Industry Ltd.
Asagi ovecler Mah. 1305. sok. No:5/1
Cankaya ANKARA, TURKEY
Tel: +90 (312) 473 22 92
Fax : +90 (312) 473 22 91
Web: www.atlasbiyo.com

2
AB C D EF
3
1
B
C
D
E
A
N
F
G
J
I
C
D
L
A1
A2

CONTENTS
1 - INTRODUCTlON
2 - SETTING THE VOLUME
3 - ASPIRATING AND DISPENSING LIQUIDS
4 - PRE-RINSING
5 - DENSE AND VISCOUS LIQUIDS
6 - PIPETTE TIPS
7 - RECOMMENDATIONS
8 - RECALIBRATION
9 - TROUBLESHOOTING
10 - CLEANING AND STERILIZATION
11 - PIPETTE KIT
12 - SPARE PARTS
1 - INTRODUCTION
The pipette is a volumetric instrument designed to mea-
sure and transfer liquids precisely and safely. It can
measure and transfer volumes from 0.1 μl to 10000 μl
depending on the model.
The pipettes are equipped with a digital counter which
shows the pipetting volume. The volume setting is done
by turning the pipetting pushbutton knob (Fig. 1A2) or
the black adjustment knob (Fig. 1B) in the right direction.
The volume range is shown on the pipetting pushbutton
(Fig. 1A1).
The volume range from 0.1 μl to 10000 μl is cove
red by
10 pipette models.
ENGLISH
The liquid is aspirated into disposable tips attached to
the pipette shaft (Fig. 1C). Disposable tips ensure maxi-
mum safety
and eliminate possibility of cross-contamina-
tion of the liquid
samples.
To protect the user from contaminated tips the pipette
is
equipped with a built-in tip ejector,
(Fig.1D).
The construction of the ejector enables the user to set up
the length. The adjustable tip ejector accommodates
every variety of tips available on the market. When using
narrow tubes, it may be necessary to remove the tip
ejector. It is simply removed by pulling down.
Tip ejector disassembly (Fig. 5A)
To remove the tip ejector press the tip ejector button and
turn the ejector cap clockwise to the very end and next
slide from the arbor.
Tip ejector assembly (Fig. 5B)
When the tip ejector button is pressed pull the tip ejector
on the shaped end of the arbor to the very end and next
turn counterclockwise until it is latched.
Adjusting of the Tip Ejector Length (Fig. 5C)
Adjust the tip ejector length by turning the ejector cap
after removing the ejector pushbutton. To lengthen the
tip ejector turn the ejector cap clockwise. To shorten the
tip ejector length turn the ejector cap counterclockwise.
Model Volume range [μl]
AB2 0.1 - 2
AB10 0.5 - 10
AB20 2 - 20
AB50 5 - 50
AB100 10 - 100
AB200 20 - 200
AB250 50 - 250
AB1000 100 - 1000
AB5000 500 - 5000
AB10000 1000 - 10000
AB2, AB10
Measurement and transfer of micro-volumes,
DNA sequencing and enzyme-assay applications.
AB20, AB50, AB100,
AB200, AB250, AB1000
Measurement and transfer
of general aqueous solution, acids and bases
AB5000, AB10000
Measurement and transfer of large volumes.
21

ENGLISH
43
The pipette is a high quality instrument which offers
excellent accuracy and precision.
The accuracy and precision (repeatability) of liquid vol-
ume depend on the quality of tips used. The values for
accuracy and precision given in the table below were
obtained using A.B.T. tips.
The accuracy and precision are obtained, using a gravi-
metric method, performing at least 10 measurements of
distilled water
at a temperature of 20±1°C, according to
EN ISO
8655 standard.
The pipette design enables the user to perform the
recalibration process according to the rules presented in
section 8.
Model Cat. no. Volume
[μl]
Accuracy
[%]
Precision
[%]
Tip
μl
AB2 5661
0.2
1.0
Max 2.0
± 12.0
± 2.7
± 1.5
± 6.0
± 1.3
± 0.7 10 μl
AB10 5662
Min 0.5
5.0
Max 10.0
± 4.0
± 1.0
± 0.5
± 2.8
± 0.6
± 0.4
AB20 5663
Min 2
10
Max 20
± 3.0
± 1.0
± 0.8
± 1.5
± 0.5
± 0.3
200 μl
AB50 5667
Min 5
25
Max 50
± 2.5
± 1.0
± 0.8
± 2.0
± 0.6
± 0.4
AB100 5664
Min 10
50
Max 100
± 1.6
± 0.8
± 0.8
± 0.80
± 0.24
± 0.20
AB200 5665
Min 20
100
Max 200
± 1.2
± 0.8
± 0.6
± 0.60
± 0.25
± 0.20
AB250 5660
Min 50
125
Max 250
± 1.0
± 0.8
± 0.6
± 0.4
± 0.3
± 0.3
300 μl
AB1000 5666
Min 100
500
Max 1000
± 1.6
± 0.7
± 0.6
± 0.40
± 0.20
± 0.15
1000 μl
AB5000 5668
Min 500
2500
Max 5000
± 1.2
± 0.6
± 0.5
± 0.50
± 0.20
± 0.15
5000 μl
AB10000 5669
Min 1000
5000
Max 10000
± 2.5
± 0.8
± 0.5
± 0.6
± 0.3
± 0.2
10000 μl
2 - SETTING THE VOLUME
The counter displays three figures to be read from top to
bottom. Additional to the figures on the lower wheel are
printed graduations to enable a volume setting in the
range increment of each pipette model.
Examples of the meaning of the black and red figures:
The volume of the pipette is set by the knob in the pipet-
ting pushbutton (Fig. 1A2) or by the black adjustment
knob (Fig. 1B). To attain the maximum accuracy, set
volume
must be approached from a higher value by
diminishing counter readings.
Model Counter
readings
Set
volume Increment
AB2
—
|
1
|
—
|
2
|
—
|
5
|
—
1.25 μl 0.002 μl
AB10
—
|
0
|
—
|
7
|
—
|
5
|
—
7.5 μl 0.02 μl
AB20
—
|
1
|
—
|
2
|
—
|
5
|
—
12.5 μl 0.02 μl
AB50
—
|
0
|
—
|
3
|
—
|
8
|
—
38 μl 0.2 μl
AB100
—
|
0
|
—
|
7
|
—
|
5
|
—
75 μl 0.2 μl
AB200
—
|
1
|
—
|
2
|
—
|
5
|
—
125 μl 0.2 μl
AB250
—
|
2
|
—
|
4
|
—
|
5
|
—
245 μl 0.2 μl
AB1000
—
|
0
|
—
|
7
|
—
|
5
|
—
0.75 ml 2 μl
AB5000
—
|
1
|
—
|
2
|
—
|
5
|
—
1.25 ml 10 μl
AB10000
—
|
0
|
—
|
7
|
—
|
5
|
—
7.5 ml 20 μl

ENGLISH
65
•If the desired volume is lower than set volume shown
by the counter, the operator should turn the pipetting
pushbutton (Fig. 1A2) or the black adjustment knob
(Fig. 1B) to the direction diminishing counter readings
to the required volume. Before achieving the required
volume slowly rotate the knob and observe carefully
diminishing reading to avoid accidentally passing the
setting value.
•If the desired volume is higher than set volume shown
by the counter, the operator should turn the pipetting
pushbutton (Fig. 1A2) or the black adjustment knob
(Fig. 1B) increasing the value until the lower figure
wheel comes 1/3 of a turn beyond the required setting
and then slowly backward until the setting reaches the
desired volume. Make sure not to pass the setting
value.
If the knob is accidentally turned too far, the process
must be repeated. The desired volume must always be
set from the higher value in the order of decreasing value.
3 - ASPIRATING AND DISPENSING LIQUIDS
Place a tip on the shaft of the pipette. See section 6 for
the appropriate tip. Press the tip on firmly using a slight
twisting motion to ensure a positive, airtight seal.
Important: Never aspirate liquids into the pipette
without a tip attached.
Aspiration
Press the pushbutton to the first positive stop, (Fig. 2A).
Holding the pipette vertically, immerse the tip into the
sample liquid. The depth to which the tip is immersed in
the sample liquid depends on the model.
Release the pushbutton slowly and smoothly to aspirate
the sample, (Fig. 2B). Wait one second and then with-
draw the tip from the liquid. When the pipette tip is
immersed not as deeply as the recommended depth or
Model Immersion depth (mm)
AB2 ≤1
AB10 ≤1
AB20, AB50, AB100 2 ÷ 3
AB200, AB250, AB1000 2 ÷ 3
AB5000 3 ÷ 6
AB10000 5 ÷ 7
when the pipetting pushbutton is rapidly released air
may enter the disposable tip.
Avoid touching the orifice of the tip.
Dispensing
•Place the end of the tip against the inside wall of the
vessel at an angle of 10 to 40 degrees.
•
Press the pushbutton smoothly to the first stop, (Fig. 2C).
Wait one second.
•Press the pushbutton to the second stop to expel any
remaining liquid, (Fig. 2D).
•
Keeping the pushbutton depressed to the very end,
remove the pipette by drawing the tip
against the inside
surface of the receiving vessel.
•
Release the pushbutton to its starting position, (Fig. 2E).
•
Eject the tip by pressing the tip ejector button, (Fig. 2F).
Remember to change the tip whenever a different kind
of liquid is to be sampled.
4 - PRE-RINSING
When pipetting liquids of higher viscosity or lower
surface
tension than water (e.g. sera or organic solvents), a film
of liquid is formed on the inside wall of the pipette tip.
This film can create an error. Since the film remains rela-
tively constant in successive pipetting operations with
the same tip, this error can be avoided by forming the
film before transferring the first sample. This is done by
aspirating a sample and dispensing it back into the same
vessel. Since the film is already formed, all of the follow-
ing samples will have better accuracy and repeatability.
This pre-rinsing operation should be repeated when the
volume to be aspirated is changed or when a new tip is
used.
5 - DENSE AND VISCOUS LIQUIDS
The pipette specifications of accuracy and precision are
based on pipetting distilled water. The handling of liquids
with physical qualities of density, viscosity and surface
tension differing extremely from water may need a gravi-
metrically checked compensation of the volume setting.
Normally the degree of error resulting from heavy or vis-
cous liquids is negligible if the pipetting is done slowly
and carefully. It is most important to give the liquids

ENGLISH
87
some time to follow the change of pressure by holding
the pipette tip in its position for at least 2 sec. after the
aspiration and the blow out stroke.
If in extreme cases this method of operation does not
result in accurate values, a compensation could be
achieved as follows:
Weigh the liquid pipetted when the pipette is set to the
nominal value. Then calculate the set-off from the nomi-
nal value:
Corr: val. = 2 x nom. val. -
- weight of the sample
- density of liquid
Check this operation once again and correct if neces-
sary. Note the corrected value for further pipetting the
same kind of liquid.
6 - PIPETTE TIPS
A.B.T. tips are made from high performance polypropy-
lene and their quality guarantees the precision and accu-
racy associated with the pipette
. Strict control is main-
tained throughout
the manufacturing process to ensure
the highest quality.
The use of inferior quality tips will seriously degrade the
performance of the pipette.
Tips 10
These tips are used for volumes between 0.1 μl and 10 μl
.
They are used with the AB2 and AB10 models.
Tips 200
These tips are used for volumes between 2 μl and 200 μl.
They are used with the AB20, AB50, AB100 and AB200
models.
Tips 300
These tips are used for volumes between 50 μl and 250 μl.
They are used with the AB250 models.
Tips 1000
These tips are used for volumes between 100 μl and
1000 μl. They are used with the AB1000 models.
Tips 5000
These tips are used for volumes between 500 μl and
5000 μl. They are used with the AB5000 models.
Tips 10000
m
-
γ
m
γ
These tips are used for volumes between 1000 μl and
10000 μl. They are used with the AB10000 models,
which are equipped with a white pushbutton.
7 - RECOMMENDATIONS
Observing the following recommendations will ensure
maximal possible accuracy and precision of liquid sam-
pling.
•Make sure to operate the pipette slowly and smoothly.
•The depth of immersion in the sample liquid should be
the minimum necessary and should remain constant
during aspiration.
•The pipette should be held in a vertical position.
•
Change the tip when volume setting is changed or when
a different liquid is to be aspirated.
•Change the tip if a droplet remains on the end
of the tip
from the previous pipetting operation.
•Each new tip should be pre-rinsed with the liquid to be
pipetted.
•Liquid should never enter the pipette shaft. To prevent
this:
-
Press and release the pushbutton slowly and smoothly.
- Never turn the pipette upside down.
- Never lay the pipette on its side when there is liquid in
the tip.
•
Never force the volume setting beyond its recommended
limits.
•When pipetting liquids with temperatures different from
the ambient temperature, it is recommended to pre-
rinse the tip several times before use.
•Do not pipette liquids with temperatures above 70°C.
•When pipetting acids or corrosive solutions which emit
vapours, it is recommended to disassemble the shaft
and to rinse the piston and seal with distilled water after
finishing the pipetting operation.
8 - RECALIBRATION
Pipettes are calibrated by gravimetric method, using tips
and distilled water, at the temperature 20±1°C, accord-
ing to EN ISO 8655 standard.
If during pipette operation you find that the accuracy
error (the difference between the real aspirated volume

Temperature [°C] Pressure [kPa]
95.0 101.3 105.0
20
1.0028 1.0029 1.0029
21
1.0030 1.0031 1.0031
22
1.0032 1.0033 1.0033
23
1.0034 1.0035 1.0036
24
1.0037 1.0038 1.0038
25
1.0039 1.0040 1.0040
Model
Range
of the pipette
volumes [μl]
Preset
volume
[μl]
Permissible
volumes
[μl]
Volume change
ΔV for full turn
of the
calibration key
[μl]
(24 increments)
AB2 0.1 - 2 0.2 0.176 - 0.224 0.06
AB10 0.5 - 10 0.5 0.48 - 0.52 0.33
AB20 2 - 20 21.94 - 2.06 0.63
AB50
5 - 50
5
4.875 - 5.125 2.50
AB100 10 - 100 10 9.84 - 10.16 2.50
AB200 20 - 200 20 19.76 - 20.24 6.30
AB250
50 - 250 50 49.5 - 50.5 6.30
AB1000 100 - 1000 100 98.4 - 101.6 25.00
AB5000 500 - 5000 500 494 - 506 125.00
AB10000
1000 - 10000
1000 975 - 1025 250.00
ENGLISH
109
and the preset volume) exceeds the permissible value
given in the table in section 1, the pipette recalibration
procedure should be carried out.
Before starting the recalibration it is necessary to check
whether the following requirements have been fulfilled
during error determination:
•the ambient temperature, and the temperature of the
pipette, tips and water was identical
•the density of the liquid used is close to that of distilled
water
•the balance with appropriate sensitivity has been used.
•mg/μl conversion factor has been taken into account
•the requirements given in sections 3 and 7 have been
fulfilled
If the above conditions are satisfied and the accu
racy error
for selected volume given in section 1 exceeds the per-
missible value, the pipette recalibration procedure
should be carried out.
The recalibration can be performed within one full turn
of the key to the right or to the left only.
Recalibration conditions:
•Ambient temperature and the temperature of the
pipette, tips and liquid should be within
the range 20-
25°C and stabilised during weighing
within ±0.5
°
C
•Measurements should be conducted using distilled
water
•Balance sensitivity should be suitable for the volume to
be controlled
Recalibration procedure:
•Set the dose volume depending on the pipette volume
according to the following table:
Volume checked [μl] Balance sensitivity [mg]
0,1 - 10 ≤0,001
10 - 100 ≤0,01
> 100 ≤0,1
•Perform 5 aspirations, weigh each one and calculate
the average value of the aspirations.
•Calculate average aspirated volume in [μl] multiplying
the average aspiration amount [mg] by the distilled water
density coefficient [μl/mg], which depends on tempera-
ture and pressure according to the following table:
If the average aspirated volume exceeds the permissible
value, the following should be done:
•Remove the pipetting pushbutton, (Fig. 4A),
Warning: The pipetting pushbutton consists of 2 parts:
the knob (Fig. 1A2) and the pushbutton (Fig. 1A1). After
removal of the pushbutton, both parts are separated.
•Holding the volume setting knob to protect it against
rotation, insert the calibration key into the cuts of the
calibration screw, (Fig. 4B),
•Turn the key clockwise to reduce the aspirated volume,
or counter-clockwise to increase the volume, (Fig. 4C).

ENGLISH
1211
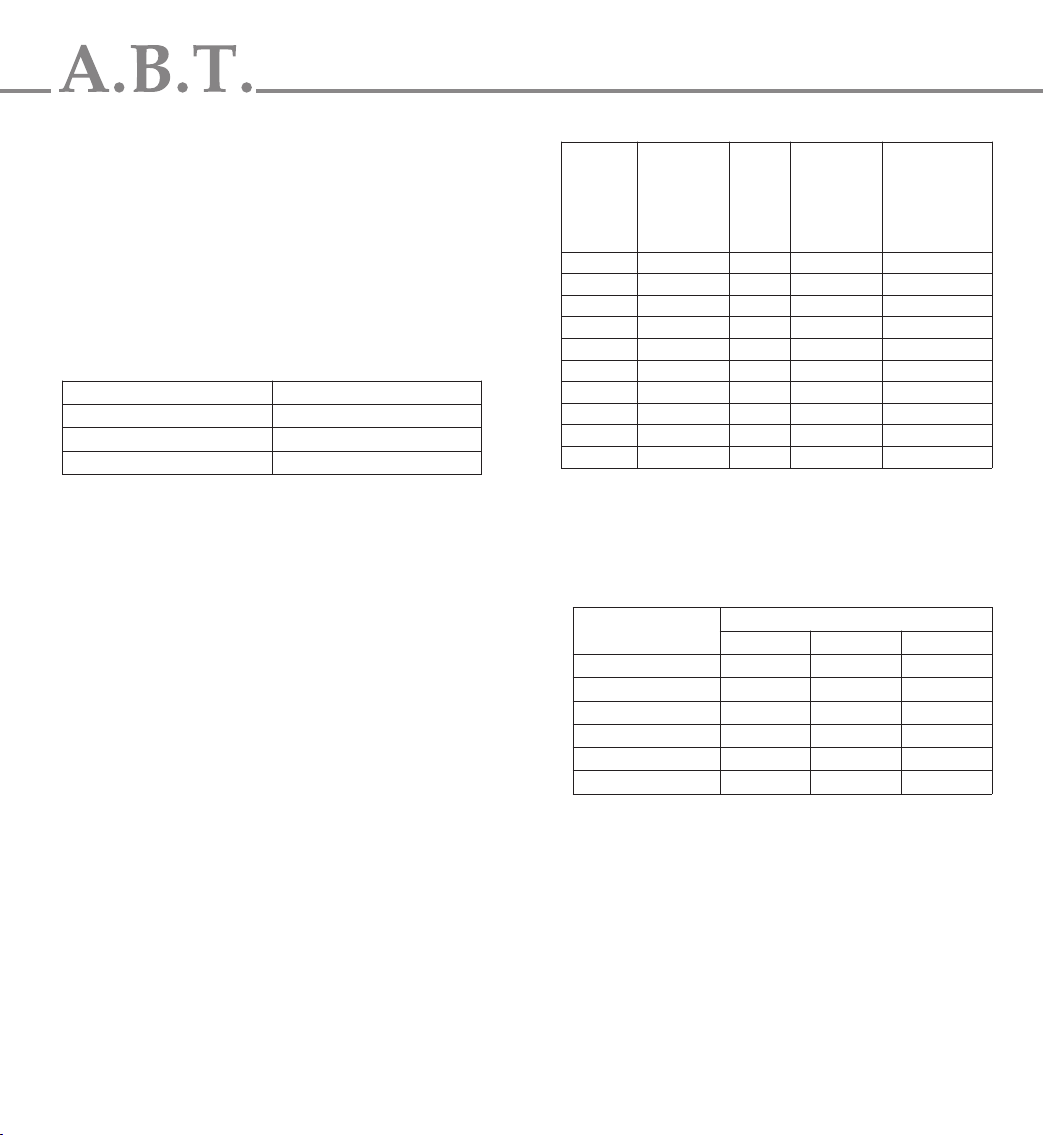
One full turn of the calibration key changes the pipette
aspiration volume by the amount given in the table.
•
Take out the key and fix the pipetting pushbutton (Fig. 4D).
The pushbutton should be fixed by placing first the knob
on the arbor (Fig. 1A2) and then the pushbutton (Fig. 1A1).
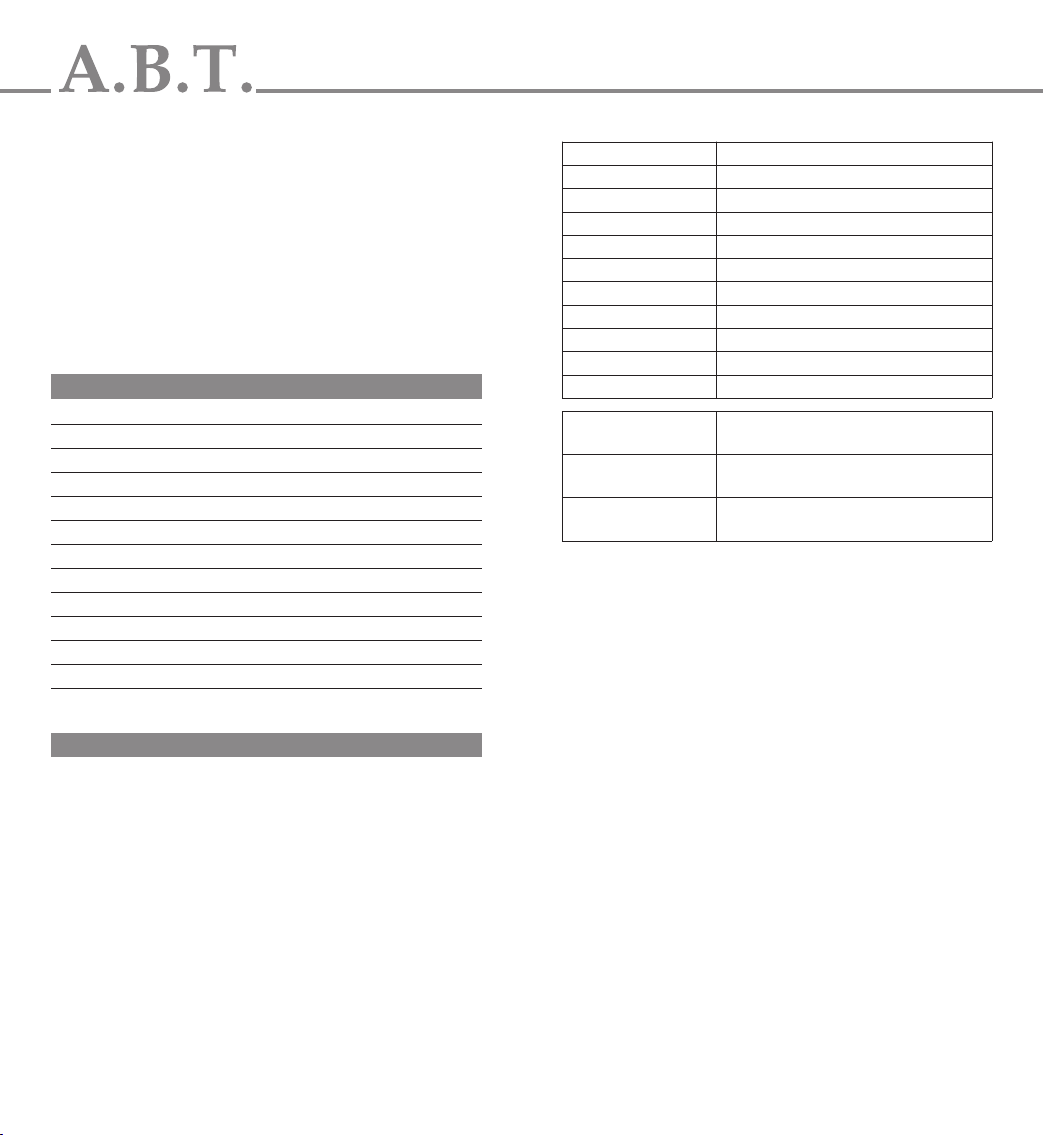
Determine the average aspirated volume. The average
volume should be within the permissible range given in
the table. If the volume exceeds the values stated, the
recalibration procedure should be repeated.
In case of pipetting the liquids with physical properties
considerably different from those of water, follow the
rules given in section 5.
9 - TROUBLESHOOTING
If you notice an improper pipette operation identify the
cause and eliminate the fault. Doing this, follow the
instruction in the sequence provided. Replacement of
elements into new ones may be required only exception-
ally, and should not occur under normal pipette use.
Droplets of liquid remain in the pipette tip.
• The tip is emptied too fast.
Decrease the speed of pressing the pipette push-
button.
•The tip wettability has increased due to extensive use.
Replace the tip with a new one.
Droplets of air appear in the liquid aspirated into the tip.
• The pipette tip immersion is too shallow.
Immerse the tip deeper according to the instruc-
tions.
•The pipette tip is incorrectly pressed onto the pipette
shaft.
Press the pipette firmly.
•The tip is damaged or worn out due to extensive use.
Replace the tip with a new one.
The pipette incorrectly aspirates the liquid or liquid
drops out from the tip.
•The pipette tip is incorrectly pressed onto the pipette
shaft.
Press the pipette tip firmly.
• The shaft nut is loose (Fig. 3F).
Tighten the shaft nut.
•The sealing surface of the shaft is cracked or scored.
Remove the tip ejector. Unscrew the shaft nut,
inspect the shaft and the piston assembly. Replace
the damaged parts (see section 12). When reassem-
bling the pipette, the nut should be hand tightened.
In the models AB10 and AB20, the damage of
the shaft
may also cause a damage of the piston assembly.
Replace the damaged parts (see section 12).
When reassembling the pipette, the nut should be
hand tightened.
•
Damage of the piston or seal due to prolonged
use with
the aggressive liquids.
Disassemble the pipette as described above.
Replace the piston, seal and O-ring (see section 12).
Rinse the inside of the shaft in distilled water and dry.
Lubricate the seal and O-ring with the lubricant.
The replacement of the piston requires con
ducting
of calibration procedure.
Note: The parts of AB10 pipette should be lubricat-
ed evenly with the minimum amount of lubricant.
• The pipette is reassembled improperly.
Disassemble the pipette and reassemble it, obser-
ving the proper sequence of steps (Fig. 3).
• No lubricant on the sealing elements.
Remove the tip ejector. Unscrew the shaft nut,
remove the shaft, piston assembly, seal and O-ring.
Rinse the removed parts in distilled water and dry
thoroughly. Lightly lubricate the inside surfaces of
the seal and the O-ring with the lubricant. Reas-
semble the pipette in the reverse order.
•Contamination of the inside of the pipette caused by
extensive aspiration of chemically aggressive liquids or
because liquid got inside the pipette.
Remove the tip ejector. Unscrew the nut, remove
the shaft, piston assembly, seal and
O-ring. Rinse
the removed parts with distilled
water and dry thor-
oughly. Lightly lubricate the inside surfaces of the
seal and the O-ring with the lubricant. Reassemble
the pipette in the reverse order.
Note: All parts may be autoclaved at a temperature of
121°C for 20 minutes at pressure 1 bar.
The handle and the outside of the pipette may be
cleaned using a cloth damped in isopropanol.

ENGLISH
1413
If the pipette malfunction persists after carrying out the
above steps, send the pipette to your A.B.T. service
representative.
Before returning the pipette, make sure that it is free from
any chemical, radioactive or microbiological contamina-
tion that might pose any danger during transportation and
repairing. Clean the pipette as thoroughly as possible.
10 - CLEANING AND STERILIZATION
Cleaning
External surfaces of the pipetting pushbutton, the ejector
pushbutton, the handgrip, the shaft nut and the adjust-
ment knob may be cleaned using a cloth dampened in
isopropyl alcohol. The remaining parts removed from the
pipette during pipette disassembly may be washed with
distilled water or isopropyl alcohol.
Sterilization:
The pipette can be sterilized in the autoclave at 121°C for
20 minutes. After sterilization, the pipette should be dried
and cooled to room temperature.
It is recommended:
- to sterilize the pipettes in autoclave with an initial vacu-
um and drying cycle,
- prior to sterilization unscrew the shaft nut slightly in the
AB10-AB1000 pipettes. After autoclaving these parts
should be screwed tight again.
The precision of the results should not alter if the pipetting
process and autoclaving are carried out as described
in this manual. Because a slight change in the
accuracy
of the dosage may occur, it is recommended to:
- check the calibration of the pipette after the initial first,
third and fifth autoclaving cycles and then after every 10
autoclaving cycles.
11 - PIPETTE KIT
The pipettes are delivered in the kits including:
• Pipette
• Instruction manual
• Calibration key
•Lubricant
•Ejector cap (10000 μl pipette)
12 - SPARE PARTS
All the spare parts and accessories indicated in Fig. 1, 3, 4:
A: Pipetting pushbutton A1: Pushbutton A2: Knob
B: Adjustment knob
C: Shaft
D: Ejector
F: Shaft nut
G: Piston assembly
I: O-ring
J: Seal
K: Calibration key
N: Ejector pushbutton
Spare parts and accessories can be ordered from your
A.B.T. representative (type of pipette and name of the
part for this pipette should be specified).
.
Warning: The replacement of the piston requires
conducting of calibration procedure according to
section 8.
All rights reserved. Product described in this manual is subject
to availability and technical modification. Errors excepted.
A.B.T. reserves the right to improve, enhance or otherwise modify
its products without prior notification.

1615
İÇERİK
1 - GİRİŞ
2 - HACMİN AYARLANMASI
3 - SIVILARIN ÇEKİLİP BIRAKILMASI
4 - ÖN DURULAMA
5 - YOĞUN ve VİSKÖZ SIVILAR
6 - PİPET UÇLARI
7 - ÖNERİLER
8 - TEKRAR KALİBRASYON
9 - SORUN GİDERME
10 - TEMİZLİK ve STERİLİZASYON
11 - PİPET KİTİ
12 - AYRI PARÇALAR
1 - GİRİŞ
Pipetler, sıvıların doğru ve güvenli bir şekilde ölçülüp
aktarılmasıiçin tasarlanmışvolümetrik araçlardır.
Kullanılan modele bağlıolarak 0.1 μl ‘den 10000 μl hacme
kadar aktarım yapılabilir.
Pipetler alınan sıvıhacmini gösteren dijital bir sayıcıile
yapılmıştır. Hacim ayarıpipetin basma düğmesine ait ufak
parçanın (Şekil. 1A2) veya siyah ayarlama parçasının
(Şekil . 1B) döndürülmesi ile yapılır. Hacim aralığıpipetin
basma düğmesinin üzerinde görülmektedir (Şekil. 1A1).
Hacim aralığı0.1 μl - 10000 μl olarak 10 pipet modeli var-
dır. Sıvılar pipet şaftına takılan atılabilir pipet uçlarıvası-
tasıyla çekilir. Atılabilir uçlar azami güvenlik ve herhangi
bir çapraz kontaminasyona maruz kalma riskini önlemek-
tedirler.
Kontamine olmuşpipet uçlarından korunmak için pipetler-
de uçlarıuzaklaştırılmasınısağlayan parça bulunmaktadır
(Şekil. 1D). Ejektörün yapısıkullanıcıya uzaklık ayarla-
masıyapmasınıda sağlamaktadır. Ayarlanabilir ejektörler
her bir pipet ucu model için mevcut durumdadır. Dar tüp-
lerle çalışılırken uç ejektörünün aşağıçekilerek uzaklaştı-
rılmasıgerekebilir.
Uç ejektörünün ayrılması(Şekil.5A)
Uç ejektörünü ayırmak için uç ejektör düğmesine basılır
ve ejektör başlığısaat yönünde sonuna kadar çevrilir ve
kirişkısmından sürgülenir.
Uç ejektörünün takılması(Şekil. 5B)
Uç ejektör düğmesine basıldığında uç ejektörü kirişe
doğru itilerek saat yönünün tersinde tam olarak yerleşene
kadar döndürülür.
Uç Ejektörünün Uzunluğunun Ayarlanması(Şekil 5C)
Tip ejektör uzunluğu ejektör basma düğmesi ayrıldıktan
sonra ejektör başlığının saat yönünde döndürülmesiyle
ayarlanır. Uç ejektörünü uzatmak için ejektör başlığısaat
yönünde kısaltmak için ise saat yönünün tersi yönde
çevirmek gereklidir.
Pipetler mükemmel hassasiyet ve kesinlik sunan yüksek
kaliteli araçlardır. Alınan sıvıhacmindeki kesinlik ve has-
sasiyet (tekrarlanabilir) kullanılan pipet uçlarının kalitesine
Model Hacim Aralığı[μl]
AB2 0.1 - 2
AB10 0.5 - 10
AB20 2 - 20
AB50 5 - 50
AB100 10 - 100
AB200 20 - 200
AB250 50 - 250
AB1000 100 - 1000
AB5000 500 - 5000
AB10000 1000 - 10000
AB2, AB10
Mikrohacimlerin ölçümü ve aktarımı, DNA dizileme
ve enzim aktivasyonu uygulamaları
AB20, AB50, AB100,
AB200, AB250, AB1000
Genellikle sulu çözeltilerin, asit ve bazların
ölçüm ve aktarımı
AB5000, AB10000
Measurement and transfer of large volumes.
Büyük hacimlerin ölçümü ve aktarımı
TÜRK

1817
bağlıolarak değişebilir. A.B.T uçlarıkullanılarak elde edil-
mişkesinlik ve hassasiyet verileri aşağıdaki tabloda gös-
terilmiştir.
Gravimetrik metod kullanılarak elde edilen kesinlik ve
hassasiyet verileri en az 10 defa distile su (20±1°C) ile
yapılan ölçümlerle gerçekleştirilmiştir. Pipet tasarımıkul-
lanıcıya bölüm 8’de belirtilen talimatlarla beraber yeniden
kalibrasyon yapmasınıda sağlamaktadır.
2 - HACMİN AYARLANMASI
Sayaç en üstten en alta okunmak üzere 3 şekil göster-
mektedir. Şekillere ek olarak aşağıda dönen kısımda
basılmışolan bölmeler hacim ayarlamasınısağlamaktadır.
Siyah ve kırmızışekillerin açıklamasıörneklendirilecek
olursa:
Model Katalog
No
Hacim
[µl]
Kesinlik
[%]
Hassiyet
[%]
Uç
µl
AB2 5661
0.2
1.0
Max 2.0
± 12.0
± 2.7
± 1.5
± 6.0
± 1.3
± 0.7 10 µl
AB10 5662
Min 0.5
5.0
Max 10.0
± 4.0
± 1.0
± 0.5
± 2.8
± 0.6
± 0.4
AB20 5663
Min 2
10
Max 20
± 3.0
± 1.0
± 0.8
± 1.5
± 0.5
± 0.3
200 µl
AB50 5667
Min 5
25
Max 50
± 2.5
± 1.0
± 0.8
± 2.0
± 0.6
± 0.4
AB100 5664
Min 10
50
Max 100
± 1.6
± 0.8
± 0.8
± 0.80
± 0.24
± 0.20
AB200 5665
Min 20
100
Max 200
± 1.2
± 0.8
± 0.6
± 0.60
± 0.25
± 0.20
AB250 5660
Min 50
125
Max 250
± 1.0
± 0.8
± 0.6
± 0.4
± 0.3
± 0.3
300 µl
AB1000 5666
Min 100
500
Max 1000
± 1.6
± 0.7
± 0.6
± 0.40
± 0.20
± 0.15
1000 µl
AB5000 5668
Min 500
2500
Max 5000
± 1.2
± 0.6
± 0.5
± 0.50
± 0.20
± 0.15
5000 µl
AB10000 5669
Min 1000
5000
Max10000
± 2.5
± 0.8
± 0.5
± 0.6
± 0.3
± 0.2
10000 µl
Pipet hacmi pipet basma düğmesindeki küçük parça ile
(Şekil. 1A2) veya siyah ayarlama parçasıile ayarlanır. En
yüksek hassasiyete ulaşmak için pipetin hacim en yüksek
kapasitesine ayarlanır ve sayaçtaki değer indirilerek iste-
nilen hacme ayarlanmasıgerekmektedir.
•Eğer istenilen hacim sayaçta görülen hacimden düşük
ise kullanıcıpipet basma düğmesini (Şekil 1A2) ya da
siyah ayarlama parçacığınıgerekli hacme ulaşılıncaya
kadar azaltılarak döndürülmelidir (Şekil 1B). İstenilen
hacme gelinmeden önce parçacık yavaşça döndürülüp
dikkatli bir şekilde sayaç düşük hacme getirilmelidir.
Model Sayaç
Okuması
Hacim
AyarlamasıEnkreman
AB2
—
|
1
|
—
|
2
|
—
|
5
|
—
1.25 µl 0.002 µl
AB10
—
|
0
|
—
|
7
|
—
|
5
|
—
7.5 µl 0.02 µl
AB20
—
|
1
|
—
|
2
|
—
|
5
|
—
12.5 µl 0.02 µl
AB50
—
|
0
|
—
|
3
|
—
|
8
|
—
38 µl 0.2 µl
AB100
—
|
0
|
—
|
7
|
—
|
5
|
—
75 µl 0.2 µl
AB200
—
|
1
|
—
|
2
|
—
|
5
|
—
125 µl 0.2 µl
AB250
—
|
2
|
—
|
4
|
—
|
5
|
—
245 µl 0.2 µl
AB1000
—
|
0
|
—
|
7
|
—
|
5
|
—
0.75 ml 2 µl
AB5000
—
|
1
|
—
|
2
|
—
|
5
|
—
1.25 ml 10 µl
AB10000
—
|
0
|
—
|
7
|
—
|
5
|
—
7.5 ml 20 µl
TÜRK

2019
•Eğer istenilen hacim sayaçta görülen hacimden yüksek-
se kullanıcıpipet basma düğmesini ya da siyah ayarla-
ma parçacığınıdöndürmelidir. Dönen kısım İstenilen
hacmin 1/3 ‘i kadar geçtiğinde yavaşta geriye döndürü-
lüp istenilen hacme ulaşılmasısağlanır.
Eğer parçacık çok fazla döndürülürse işlem tekrar edilme-
lidir. İstenilen hacim her zaman yüksek hacimden düşürü-
lerek ayarlanır.
3 - SIVILARI ÇEKME ve BIRAKMA
Pipet ucunu pipet şaftına takınız (Bkn. Bölüm 6). Uca
yavaşça bastırıp döndürerek sıkılaşmasınısağlayınız.
Önemli: Pipet ucunu takmadan asla sıvıçekmeyiniz.
SıvıÇekme
Basma düğmesine ilk “pozitif dur” a kadar basınız (Şekil
2A). Pipeti dikey bir şekilde tutarak ucu sıvıya batırınız.
Basma düğmesini yavaşça serbest bırakın ve sıvıyıçeki-
niz (Şekil 2B). Bir saniye bekledikten sonra ucu yavaşça
sıvıdan çekiniz.
Pipet ucu gerektiği kadar batırılmadığızaman hava
kabarcığıiçeri kaçabilir. Böyle bir durumda pipet ucu
değiştirilebilir. Pipet ucuna dokunulmamalıdır.
Sıvının aktarılması
• Pipet ucunu 30-40 derecelik açıyla tutarak aktarım yapı-
lacak tüpün kenarına doğrultunuz.
• Basma düğmesine basarak ilk dura kadar aktarım yapı-
nız (Şekil. 2C). Bir saniye bekleyiniz.
• Herhangi bir sıvıkalıntısıolmamasıiçin ikinci dura
kadar basınız (Şekil. 2D).
• Basma düğmesine sonuna kadar basılıhalde tutarak
pipeti uzaklaştırınız.
• Basma düğmesini başlangıç pozisyonuna getiriniz
(Şekil. 2E).
Model Immersiyon Derinliği (mm)
AB2 ≤1
AB10 ≤1
AB20, AB50, AB100 2 ÷ 3
AB200, AB250, AB1000 2 ÷ 3
AB5000 3 ÷ 6
AB10000 5 ÷ 7
•
Ejektör düğmesine basarak ucu uzaklaştırınız (Şekil. 2F).
• Farklıbir sıvıya daldırılacağızaman pipet ucunu değiş-
tirmeyi unutmayınız.
4 - ÖN DURULAMA
Daha yüksek visközitede veya yüzey gerilimi sudan daha
düşük olan sıvıların pipetlenirken pipet ucunun duvarında
çekilen sıvıfilm oluşturabilir. Bu film hataya sebebiyet verir.
Aynıpipet ucuyla yapılan işlemlerde bu hatayıengellemek
için ilk örnek alınıp aktarılmadan önce filmin oluşturulması
sağlanır. Aynıtüp içinde sıvıçekilip bırakılarak bu işlem
sağlanır. Film daha önceden olduğu için sonraki örneklerde
hata payıdüşer. Bu ön durulama işlemi çekilecek hacim
miktarıdeğiştirildiğinde ya da yeni bir pipet ucu kullanıldığı
zaman tekrar edilmelidir.
5 - YOĞUN ve VİSKÖZ SIVILAR
Kesinlik ve hassasiyet özellikleri distile su ile yapılan
pipetleme baz alınarak belirtilir. yoğunluğun fiziksel niteli-
ğiyle beraber, viskozite ve yüzey gerilimi sudan çok farklı
olan Sıvıların alınmasında hacim ayarının gravimetrik
olarak yapılmasıgerekir. Normalde hata derecesi ağır ve
visköz sıvılarda pipetleme işlemi yavaşise göz ardıedile-
bilir. Ayrıca çekme ve bırakma sırasında en az 2 saniye
beklemek de önemlidir. Bu metod kesin değerler vermez-
se aşağıdaki yaklaşımlar kullanılabilir:
Pipetlenen sıvılar tartılarak nominal değer pipette ayarlanır.
Corr: val. = 2 x nom. val. -
- Örneğin ağırlığı
- sıvının yoğunluğu
Bu işlemi bir defa daha tekrar edip doğruluğunu kontrol
ediniz. Diğer pipetleme işlemi için sağlamasıyapılmış
değeri not ediniz.
6 - PİPET UÇLARI
A.B.T. pipet uçlarıyüksek performans sağlayan poliprop-
lenden yapılmışolup kesinlik ve hassasiyet kalite garanti-
si pipetle beraber verilir. Pipetlerin kötü kullanımıölçüm
performansınıetkilemektedir.
10’luk Uçlar
Bu pipet uçları0.1 μl ve 10 μl arasındaki hacimler için
kullanılır. AB2 ve AB10 modelleri için uygundur.
m
-
γ
m
γ
TÜRK

2221
200’lük uçlar
Bu pipet uçları2 μl ve 200 μl arasındaki hacimler için kul-
lanılır. AB20, AB50, AB100 ve AB200 modelleri için
uygundur.
300’lük uçlar
Bu pipet uçları50μl ve 250 μl arasındaki hacimler için
kullanılır. AB250 modelleri için uygundur.
1000’lik uçlar
Bu pipet uçları100 μl ve 1000 μl arasındaki hacimler için
kullanılır. AB1000 modelleri için uygundur
5000’lik uçlar
Bu pipet uçları500 μl ve 5000 μl arasındaki hacimler için
kullanılır. AB5000 modeli için uygundur.
10000’lik uçlar
Bu pipet uçları1000 μl ve 10000 μl arasındaki hacimler
için kullanılır. AB1000 modelleri için uygundur. AB10000
modeli için uygundur.
7 - ÖNERİLER
Sıvıörneklerin aktarımında aşağıdaki tavsiyeleri uygula-
manız ölçümün hassasiyetini ve kesinliğini arttırmaktadır:
• Pipetin yavaşça ve düzgün bir şekilde ayarlanmışoldu-
ğundan emin olun.
•Sıvıörneğe batma derinliği mümkün olduğunda az
olmalıdır ve çekim sırasında sıvıiçerisinde kalmalıdır.
• Pipet dikey olarak tutulmalıdır.
• Hacim değiştiğinde ya da farklıbir sıvıalınacağızaman
pipet ucu değiştirilmelidir.
• Önceki pipetleme işleminden kalan herhangi bir damla-
cık var ise pipet ucu değiştirilmelidir.
• Her bir yeni pipet ucu ön durulamadan geçirilmelidir.
•Sıvıasla pipet şaftına temas etmemelidir. Bundan
korunmak için:
• Basma düğmesine yavaşça basın ve bırakın.
• Asla pipeti ters yüz etmeyin.
• Asla pipeti sıvıçekilmişhaldeyken yatırmayınız .
• Tavsiye edilen değerler dışında pipet hacminin üst
değerlere zorlamayınız.
•Sıvıların pipetlenmesi sırasındaki sıcaklık değişimlerine
dikkat ediniz.
• 70°C üzerindeki sıvılarıpipetle çekmeyiniz.
• Asitlerin veya korosif solüsyonların pipetleme işlemi bit-
tikten sonra şaft ve piston distile su ile temizlenmedir.
8 - TEKRAR KALİBRASYON
Pipetler gravimetrik metod ile kalibre edilir (20°C ± 1 de
distile su kullanılarak EN ISO 8655 standardına göre)
eğer pipetleme sırasında herhangi bir ölçümsel hata fark
ederseniz pipet kalibrasyonunu tekrar etmeniz gerekmek-
tedir. (Kabul edilen değerler tabloda verilmiştir)
Tekrar kalibrasyona başlamadan önce hataya sebebiyet
verebilecek olan bütün faktörleri gözden geçiriniz:
• Ortam sıcaklığıve pipetin sıcaklığı,pipet uçlarının
doğru olup olmadığı
• Kullanılan sıvının yoğunluğunun distile suyun yoğunlu-
ğuna olan yakınlığı.
•İstenilen hacimden sapma tablodaki aralıkta olup olma-
dığı
• mg/µl faktörünün doğru hesaplandığı
• Bölüm 3 ve 7 deki gerekliliklerin yapılıp yapılmadığı
Eğer yukarıdaki koşullar sağlanıp bölüm 1 de verilen kabul
edilen değerler aşılıyorsa pipetin tekrardan kalibre edilmesi
gerekmektedir.
Bir tam tur dönüşile tekrar kalibrasyon yapılabilir. Bu
dönüşsağa veya sola tam tur döndürerek yapılır.
Tekrar kalibrasyon koşulları:
• Ortamın ve pipetin sıcaklığı, uçların ve sıvının sıcaklığı
ile beraber 20-25°C olmalıdır.
• Ölçümler distile su kullanılarak ayarlanmalıdır.
• Denge hassasiyeti, kontrol edilecek hacim için uygun
olmalıdır.
Tekrar kalibrasyon prosedürü:
• Tabloya göre hacim miktarınıayarlayın:
Kontrol Edilen Hacim [µl] Denge Hassasiyet [mg]
0.1 - 10 ≤0.001
10 - 100 ≤0.01
> 100 ≤0.1
TÜRK

2423
• Perform 5 aspirations, weigh each one and calculate
the average value of the aspirations.
• Calculate average aspirated volume in [µl] multiplying
the average aspiration amount [mg] by the distilled water
density coefficient [µl/mg], which depends on temperature
and pressure according to the following table:
Uyarı:Pipetleme basma düğmesi 2 parçadan oluşur: par-
çacık (Şekil. 1A2) ve basma düğmesi (Şekil. 1A1). Basma
düğmesinin ayrılmasından sonra her iki parça birbirinden
ayrılır.
• Hacimin değişmesini engellemek için ayarlama parçası-
nısabit tutun.
• Kalibrasyon anahtarınıkalibrasyon vidasinbin dişlilerine
yerleşrin (Şekil. 4B),
•
Anahtar saat yönüne doğru çevrilerek alınan hacim azal-
tılır, hacmi arttırmak için tersi yöne çevrilir (Şekil. 4C).
Model Hacim
Aralıkları[µl]
Ön
ayarlı
Hacim
[µl]
Kabul
edilebilen
hacim
[µl]
Kalibras yon
anahtarının bir
tam tur dönü-
şünde meydana
gelen hacim
değişimi ΔV
AB2 0.1 - 2 0.2 0.176 - 0.224 0.06
AB10 0.5 - 10 0.5 0.48 - 0.52 0.33
AB20 2 - 20 2 1.94 - 2.06 0.63
AB50 5 - 50 5 4.875 - 5.125 2.50
AB100 10 - 100 10 9.84 - 10.16 2.50
AB200 20 - 200 20 19.76 - 20.24 6.30
AB250 50 - 250 50 49.5 - 50.5 6.30
AB1000 100 - 1000 100 98.4 - 101.6 25.00
AB5000 500 - 5000 500 494 - 506 125.00
AB10000 1000 - 10000 1000 975 - 1025 250.00
Sıcaklık [°C] Basınç [kPa]
95.0 101.3 105.0
20 1.0028 1.0029 1.0029
21 1.0030 1.0031 1.0031
22 1.0032 1.0033 1.0033
23 1.0034 1.0035 1.0036
24 1.0037 1.0038 1.0038
25 1.0039 1.0040 1.0040
• Kalibrasyon anahtarının bir tam tur dönüşü pipet çekim
hacmini tabloda verildiği gibi değiştirir.
•
Anahtar çıkartılır ve basma düğmesi yerine takılır (Şekil.
4D). Önce parçacık sonra basma düğmesi takılır (Şekil.
1A1).
Ortalama çekilen hacim belirlenir. Bu hacim kabul edilen
değerlerin aralığında olmalıdır. Tersi durumda tekrar
kalibrasyon işlemi tekrar edilmelidir.
Fiziksel özellikleri sudan çok farklıolan sıvılar için bölüm 5
te verilen talimatlara bakınız.
9 - SORUN GİDERME
Eğer pipetin çalışmasında bir aksaklık fark ederesiniz
aşağıdaki talimatlarıyerine getiriniz:
Pipetteki sıvıkalıntıları;
• Pipet ucu çok hızlıbir şekilde boşaltılır.
Pipetin basma düğmesine yavaşça basınız.
•Aşırıkullanıma bağlıpipet ucundaki ıslanabilirliğin art-
ması;
pipet ucunu yenisiyle değiştirin.
Pipet ucunda çekilen sıvıyla beraber hava kabarcıkla-
rının bulunması;
• pipet ucunun çekilmek istenilen sıvıya yeterli derinlikte
daldırılmaması.
Pipet ucunu gerektiği ölçüde sıvıya daldırınız.
•
Pipet ucunun yanlışbir şekilde pipet şaftına bastırılması,
pipete düzgün bir şekilde basınız.
•Aşırıkullanıma bağılıolarak pipet ucunun hasar görmüş
olması,
pipet ucunu değiştiriniz.
• Pipetin sıvıçekiminde hata olmasıveya çekilen sıvının
pipet ucundan damlaması;
pipet ucunun pipet şaftına doğru olarak takılmaması.
• Pipet şaftına ait vidanın çok gevşek olması(Şekil. 3F);
şaftısıkılaştırınız.
•
Şaftın sızdırmaz yüzeyinin çatlamasıveya hasar görmesi;
pipet ucunun ejektörünü çıkartınız. Şaftın vidalarını
sökünüz, şaft ve pistonlarıkontrol ediniz. Hasar
gören parçalarıayırınız (Bkn. Bölüm 12). Pipeti tek-
rar topladığınızda vidalarıiyice sıkılaştırınız. AB10
ve AB20 modellerinde şafttaki hasar pistonu da
etkilemektedir. Hasar gören parçalarıayırınız (Bkn.
TÜRK

2625
Bölüm 12). Pipeti tekrar topladığınızda vidalarıiyice
sıkılaştırınız.
• Piston hasarıveya kuvvetli asitler gibi agresif sıvıların
devamlıolarak çekilmesine bağlıyapışma;
Pipeti aşağıda gösterildiği gibi parçalara ayırınız.
Pistonu, contayıve 0-halkasınıayırınız (Bkn. Bölüm
12). Şaftın içini distile su ile yıkayıp kurulayınız.
Contayıve O-halkasınıyağlayınız. Piston değiştiril-
diğinde pipetin yeniden kalibre edilmesi gerekmek-
tedir.
Not: AB10 pipetlerinin parçalarıminimum miktarda
yağlanmalıdır.
• Pipetin hatalıbir şekilde yeniden birleştirilmesi
durumunda pipet tekrardan parçalara ayrılır ve yeni-
den toplanır (Şekil. 3).
•
Conta parçalarında hiçbir yağlayıcımaddenin olmaması;
pipet ucu ejektörünü çıkartınız. Şaft vidasını, pisto-
nu, contayıve O-halkasınıçıkartınız. Çıkartılan par-
çalarıdistile su ile yıkayıp kurulayınız. Contanın ve
O-halkasının iç kısımlarınıhafifçe yağlayınız. Pipeti
sondan başlayarak toplayınız.
• Agresif sıvıların aşırıçekimi veya pipetin içinde sıvıkal-
masına bağlıolarak pipette kontaminasyonun olması;
Pipet ucu ejektörünü çıkartınız. Vidayıgevşetip
şaftı, pistonu, contayıve O-halkasınıçıkartınız.
Çıkartılan parçalarıdistile su ile yıkayıp kurulayınız.
Contanın ve O-halkasının iç kısımlarınıhafifçe yağ-
layınız. Pipeti sondan başlayarak toplayınız.
Not: Pipetin tüm parçalarıotoklavlanabilir (121°C 20
dakika 1 bar basınç altında).
Pipetin dıştemizliği isopropanol ile ıslatılmışbez ile
silinerek yapılabilir.
Yukarıdaki öneriler uygulandığıhalde pipetteki aksaklık-
lar devam ederse pipetlerinizi A.B.T. servislerine teslim
ediniz. Pipetleri servise iade etmeden önce herhangi bir
kimyasal, radyoaktif veya mikrobiyolojik kontaminasyo-
nun olmadığından emin olunuz. Pipetleri mümkün oldu-
ğunca temiz tutunuz.
10 - TEMİZLEME ve STERİLİZASYON
Temizleme
Pipet basma butonunu dışyüzeyi, basma düğmesinin
ejektörü, pipet sapı, şaft vidasıve ayarlama parçasıisop-
ropil alkol ile ıslatılmışbez ile temizlenebilir. Pipetin kalan
parçalarıpipet parçalara ayrılmışdurumdayken distile su
veya isopropil alkol ile yıkanabilir.
Sterilizasyon
Pipetler 121°C’ de 20 dakika otoklavlanabilir. Steriliza-
syon sonrasıpipetler kurulanıp oda sıcaklığında soğutul-
maya bırakılmalıdır.
Öneri:
Pipetleri başlangıçta vakumlamalıve kurutmalıotoklavla-
ma yapılırken ,
Önce şaft vidasıgevşetilir (AB10 ve AB1000 modellerin-
de).
Otoklavlama işlemi sonrasıbu parçalar yeniden sıkı
bir şekilde vidalanmalıdır.
Sonuçlardaki hassasiyet bu kullanım klavuzuna uyularak
yapılan pipetlemede ve otoklavlamada değişmemelidir.
Bunun için, pipet kalibrasyonunu birinci, üçüncü ve beşinci
otoklavlamanın başlangıcında ve daha sonra her 10 otok-
lavlama işleminde birer defa kontrol ediniz.
11 - PİPET KİTİ
Bu kit ile beraber temin edilmişolan pipetler;
• Pipet
• Kullanım klavuzu
• Kalibrasyon anahtarı
•Yağlayıcı
• Ejektör başlığı(10000 μl pipet için) ihtiva ederler.
TÜRK

2827
12 - AYRI PARÇALAR
Bütün ayrıparçalar ve aksesuarlar Şekil 1, 3 ve 4’ te göste-
rilmiştir.
A: Pipetleme basma düğmesi
A1: Basma düğmesi
A2: Parçacık
B: Ayarlama parçacığı
C: Şaft
D: Ejektör
F: Şaft vidası
G: Piston
I: O-halkası
J: Conta
K: Kalibrasyon anahtarı
N: Ejektör basma düğmesi
Ayrıparçalar ve aksesuarlar A.B.T. temsilciliklerinden
temin edilebilir (pipet tipi ve ilgili pipete ait parçanın adı
belirtilmelidir)
TÜRK

3029
45
4A 4B 4C 4D
5C5B5A

Made in EU
This manual suits for next models
9
Table of contents
Languages:
Popular Laboratory Equipment manuals by other brands

Opentrons
Opentrons Thermocycler Module GEN2 instruction manual

Velp Scientifica
Velp Scientifica AM4 instruction manual

Biosan
Biosan Bio RS-24 User instructions

TSI Instruments
TSI Instruments 3783 Firmware update instructions

BANDELIN
BANDELIN SONOPULS User instructions

Thermo Scientific
Thermo Scientific SHKE8000 Series Maintenance manual

Optika Italy
Optika Italy B-290 Series instruction manual

Agilent Technologies
Agilent Technologies Bravo Platform user guide

ZIVE LAB
ZIVE LAB ZIVE SP2 Hardware manual

D-Link
D-Link DKT-200 Quick installation guide

AB Sciex
AB Sciex QTRAP 4500 LC/MS/MS system System user's guide

THORLABS
THORLABS LCC3111H user guide