Atlas IED IED1522LR User manual

AtlasIED.com
TELEPHONE: (800) 876-3333
SUPPORT@ATLASIED.COM
1601 JACK MCKAY BLVD.
ENNIS, TEXAS 75119 U.S.A.
©2022 Atlas Sound LP. The Atlas “Circle A”, Soundolier, and Atlas Sound are trademarks of Atlas Sound L.P. IED is a Registered Trademark of Innovative Electronic Designs LLC. All rights reserved.
All other Trademarks are property of their respective owners. No endorsement is implied. Due to continual product development, specifications are subject to change without notice. ATS007246 RevA 12/22
Quick Start Guide
IED1522LR Logic / Relay Module
AtlasIED.com
TELEPHONE: (800) 876-3333
SUPPORT@ATLASIED.COM
1601 JACK MCKAY BLVD.
ENNIS, TEXAS 75119 U.S.A.
Please note that this guide applies to Rev2 of the device, easily distinguished by the AtlasIED logo on the front, rather than the previous version that
displayed the IED logo in the same area.
Welcome
Thank you for choosing AtlasIED and the IED1522LR Logic / Relay Module. The IED1522LR Logic / Relay Module is a cost effective interface module
that operates as an integral part of an AtlasIED GLOBALCOM®system.
It is a web-enabled, programmable relay device for a wide variety of remote control and automation applications. It has two electro-mechanical relays
and two optically-isolated inputs. The relays can be controlled remotely using actions configured in the GLOBALCOM®GCK Application (Version 14.6 or
later). The optically-isolated inputs can be used to trigger actions or as logic monitor points that will register faults in the system.
The module receives its power over IEEE 802.3af PoE and communicates with other system devices over the Ethernet network.
Basic Setup Procedure
Consult the table below to begin the basic setup procedure for the relay module:
In order to prepare the IED1522LR for a GLOBALCOM installation, follow the steps below to set a static IP address:
1. Connect unit to power and network.
2. Set up a computer on the same network as the input module. To do this, set the IP address of the computer to 10.2.150.x (where “x” can be any
unused address between 1 and 174) with a netmask of 255.0.0.0.
3. Configure the IED1522LR using a web browser. To do this, enter http://10.2.150.175/setup.html. The login username is admin and the password
is iednet (all lowercase).
4. Set the permanent IP address, subnet mask, and (optionally) the gateway address in the setup page under the Network tab.
5. Submit the changes via the Submit button on the web page.
6. Reset the IED1522LR via either the Reset button on the web page or by removing and re-applying power to the unit.
7. Next, set the computer back to its original or desired network settings for the installation and verify that the IED1522LR can be accessed at its new
(permanent) IP address.
8. Proceed to connect logic inputs and relay outputs as needed for the application.
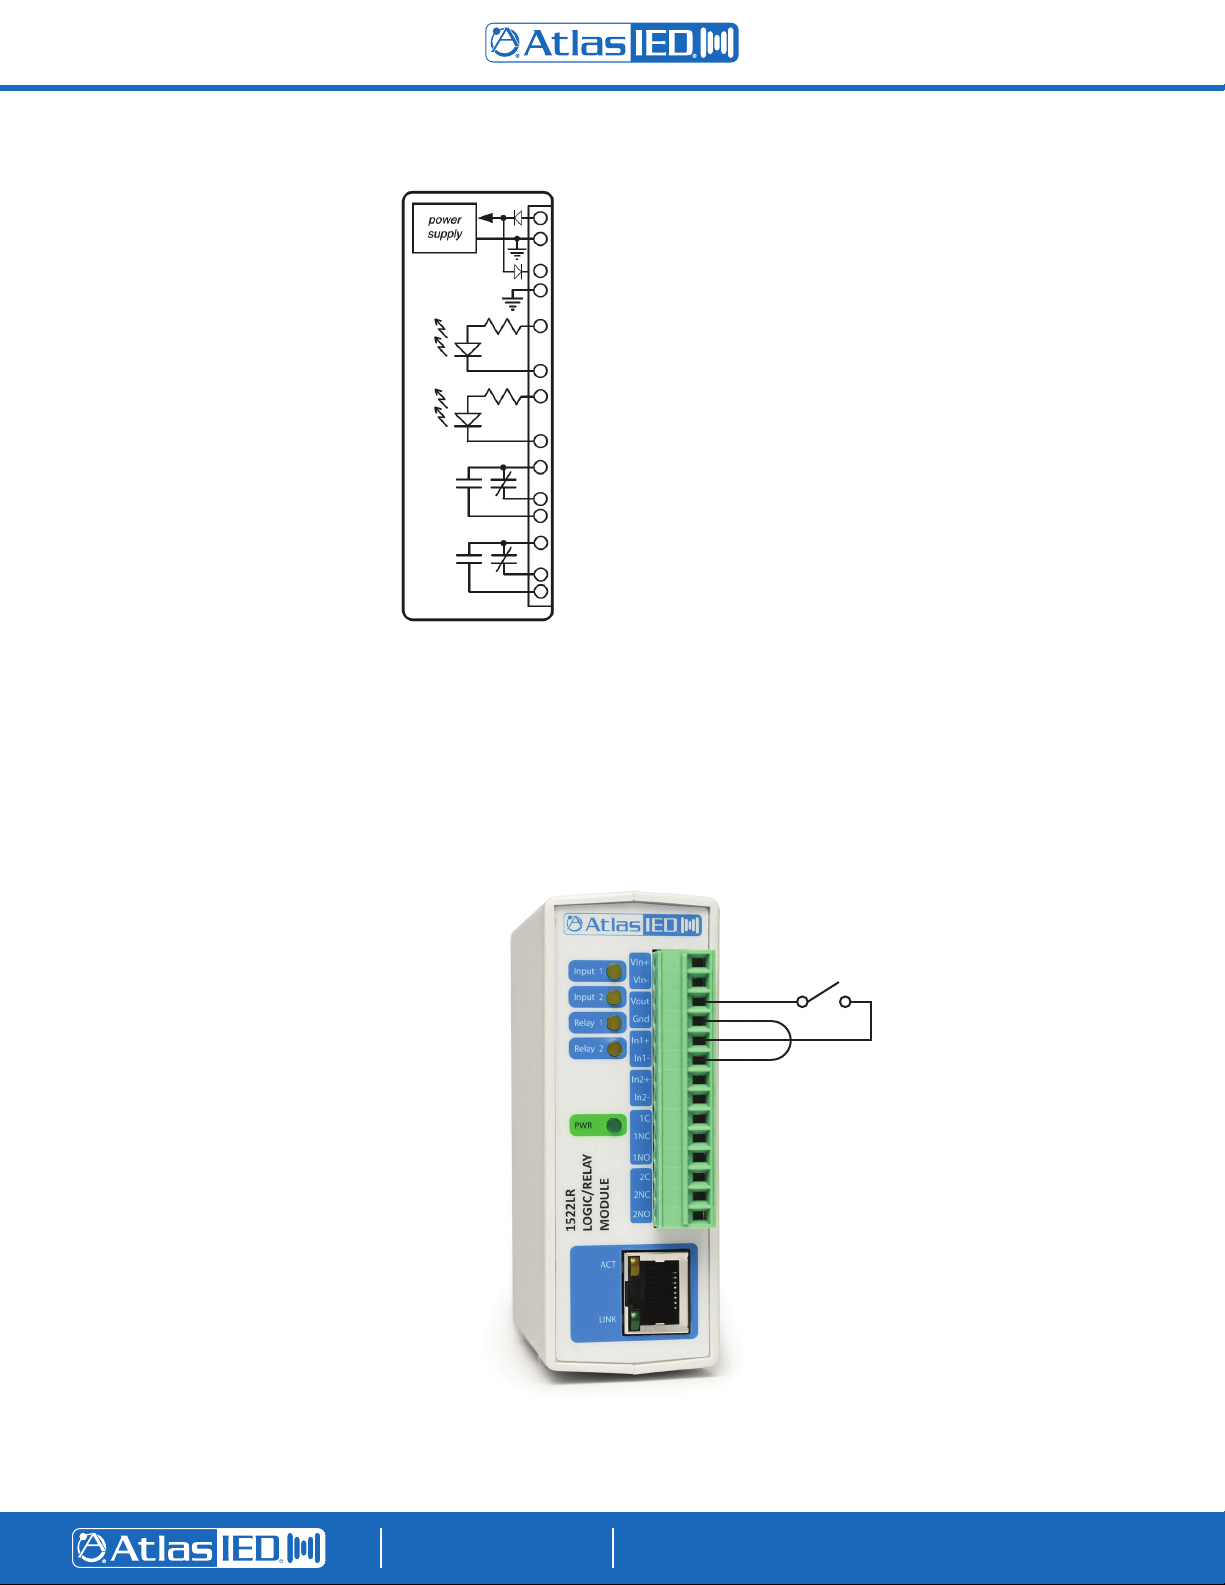
See the next page for the IED1522LR Pinout Diagram.
Out of Box Default Settings
IP Address 10.2.150.175
Subnet Mask 255.0.0.0
Control Web Address http://10.2.150.175
Setup Web Address http://10.2.150.175/setup.html
Setup Username admin
Setup Password iednet (all lowercase)
Control Password No password set

AtlasIED.com
TELEPHONE: (800) 876-3333
SUPPORT@ATLASIED.COM
1601 JACK MCKAY BLVD.
ENNIS, TEXAS 75119 U.S.A.
©2022 Atlas Sound LP. The Atlas “Circle A”, Soundolier, and Atlas Sound are trademarks of Atlas Sound L.P. IED is a Registered Trademark of Innovative Electronic Designs LLC. All rights reserved.
All other Trademarks are property of their respective owners. No endorsement is implied. Due to continual product development, specifications are subject to change without notice. ATS007246 RevA 12/22
Making Logic Connections
The logic inputs on the IED1522LR are opto-isolated, which means they require a voltage differential to activate, not a simple open/closed condition. If
connecting to dry contacts, a “wetting voltage” will have to be applied. The IED1522LR has a built-in power supply and connections to supply just such
a voltage. The proper way to connect a dry contact is to connect the power supply ground to the minus logic input and then connect the power supply
voltage output to the plus logic input via the contact. This wiring arrangement is shown in the diagram below.
IED1522LR Pinout Diagram
Vin+ Power Supply Input +
Vin– Power Supply Input –
Vout Vin - 0.7V (or 11V with PoE)
Gnd Ground (common)
In1+ Optically-Isolated Input 1 +
In1– Optically-Isolated Input 1 –
In2+ Optically-Isolated Input 2 +
In2– Optically-Isolated Input 2 –
1C Relay 1 Common
1NC Relay 1 Normally Closed
1NO Relay 1 Normally Open
2C Relay 2 Common
2NC Relay 2 Normally Closed
2NO Relay 2 Normally Open
Vout
Gnd
In1+
Dry Contact
In1–

AtlasIED.com
TELEPHONE: (800) 876-3333
SUPPORT@ATLASIED.COM
1601 JACK MCKAY BLVD.
ENNIS, TEXAS 75119 U.S.A.
©2022 Atlas Sound LP. The Atlas “Circle A”, Soundolier, and Atlas Sound are trademarks of Atlas Sound L.P. IED is a Registered Trademark of Innovative Electronic Designs LLC. All rights reserved.
All other Trademarks are property of their respective owners. No endorsement is implied. Due to continual product development, specifications are subject to change without notice. ATS007246 RevA 12/22
Lost IP Address
Initially, the IED1522LR is assigned the default IP address of 10.2.150.175. If the IP has been set to something else and one does not know the IP
address of a IED1522LR, use the reset button default settings as described below.
Reset Button
Note: Pressing the Reset Button changes the default settings to those listed in the table below, rather than the Out of Box Default Settings shown on
the first page.
In the event that the IP address or passwords are forgotten, the IED1522LR may be restored to its reset button settings shown above. To do this, first
remove the power from the unit. Next, carefully insert a thin object (such as a toothpick) through the small hole in the bottom of the unit to press the
small button that is located inside the unit (see image above). When the object is inserted, a tactile feel can be detected as the button is depressed.
While holding the button down, apply power and wait for about 10 seconds. After about 10 seconds, release the button. Now all settings will be as
shown in the table above.
CAUTION – Do NOT use metal objects for this function.
After the unit has been reset, you must configure the network settings and password by using the table above for the unit to work with GLOBALCOM.
The setup password, “password” must be changed to “iednet”.
Reset Button Default Settings
IP Address 192.168.1.2
Subnet Mask 255.255.255.0
Control Web Address http://192.168.1.2
Setup Web Address http://192.168.1.2/setup.htm
Setup Username admin
Setup Password password
Control Password No password set
Reset Button Access Hole
Table of contents