ATMIZONE Atmizoo VapeSnail User manual

VapeSnail
user manual

This is the VapeSnail
English 2
The VapeSnail is Atmizone’s new rebuildable atomizer concept for Billet Box and Boro
compatible AIOs. With its amazing potential, real time access to deck, real time fixed air flow
swap ability, easy refill system, easy rebuilding and complete package overall, the VapeSnail
is much more than just another rebuildable, introducing a unique RTA experience to the users
of Boro compatible AIOs.
- Air flow tuning via 5 fixed AFC Tubes (pre-installed Pos. Tube with air hole D=4.0mm and
alternative AFC Tubes 2/2.5/3/3.5mm) plus 4 MTL Pins (1/1.2/ 1.5mm/1.8mm pinned inside
the Pos. Tube with D=4.0mm), all replaceable real time with full tank and rebuilt deck.
- M2.5mm pan head phillips post screws.
- PCTG Tank allowing real time access to Deck.
- 12.6mm post-to-post space, ~8.5mm post-to-post net space, ~8.0mm coil space.
- Max. net coiling height ~6.0mm (C & C Reducer out) / ~5.2mm (C & C Reducer in)
- Chimney inner D ~4.0mm (C & C Reducer out) / ~2.5mm (C & C Reducer in)
- Height 39.60mm [min] / Weight ~34g
Features and specs
What’s in the box
- 1 x VapeSnail RTA with 510 Aux. Base (1 x Chamber & Chimney Reducer pre-installed)
- 1 x Set of spares (2 x Post Screws, 1 x O-ring Kit, 4 x AFC Fixed Tubes, 4 x MTL Pins, 1 x
Tool )
- 1 x Set of User Guide / Warranty Card

The parts of the VapeSnail
English 3
Tank
Chimney
Post
Screws
Chamber
& Chimney
Reducer
Deck
(Neg. Post)
Pos. Tube
Insulator
510 Aux.
Base
Tool
Pos. Tube
AFC Fixed
Tubes
MTL Pins
Pos. Post
Insulator
Pos. Post
Materials List
- SS316 foodgrade metal
parts
- PEEK Thermoplastic
Insulators
- PCTG bpa free Tank
- SS304 Post Screws
- Foodgrade gaskets and
o-rings
- Semi-synthetic fabric
Absorbent Pad
Refill Cover
O-Rings 9x1
O-Ring 6x1
O-Ring 3x1
O-Rings 5.5x1
O-Rings 2x1
Deck Gasket
Condensations
Plug
with Absorbent Pad

Vaping on the VapeSnail
Grip on the tank section and pull up to access
the deck (1a). Remove Plug (1b) and unscrew
Pos. Tube off the deck (1c). Then screw the
510 Aux Base until fully in place (1d).
To unscrew the Pos. Tube off the deck
(1c) use the custom Tool.
The two small, half circle cut outs on
the rims of the Deck serve as leads for your
coiling rod to align the coil properly (2a). They
also allow some extra space if you need to
lower your setup right above the air hole.
Coiling! Fasten your coil down on the posts.
You can either fasten the coil legs on
the left side of each post screw (2b - traditional
way) for coils with more wraps / extra length,
or on the right side of each post screw (2c) for
more typical coils and overall shorter coils
with less wraps.
English 4
To remove a full tank and access deck,
you have to turn the VapeSnail upside down. If
not, the Tank will empty. Having it upside
down, you can only access deck if liquid level is
lower from the rim where chimney meets
deck. Keep it upside down until back in the
AIO.

Vaping on the VapeSnail
Air Flow Tubes and Pins.
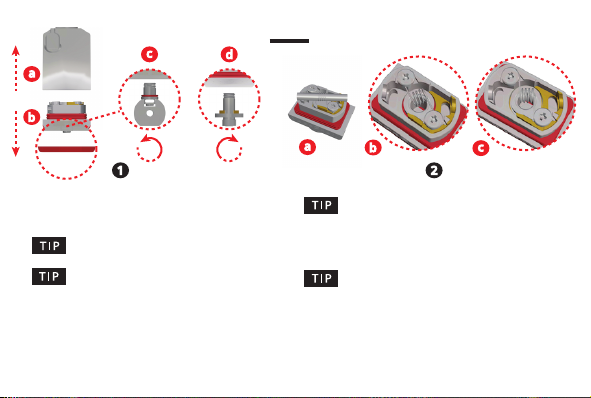
You can adjust your air flow by installing
any of the AFC Tubes with the help of the Tool.
Preinstalled Pos. Tube (D=4.0mm) can also
host the MTL Pins (4b). The Tubes not only
control air flow right under coil but also serve
as adjustable positive pole of the VapeSnail.
Normally you screw them in all the way, but
they can be adjusted lower if needed (4c.
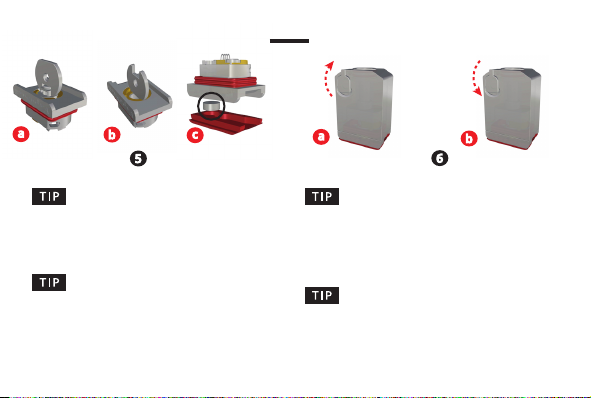
You can change AFC Tube (and
consequently MTL Pin as well) any time, even
with full Tank and a build on the Deck. When
you do this, always grip the VapeSnail in one
hand to make sure that the Tank will not open
accidentally.
English 5
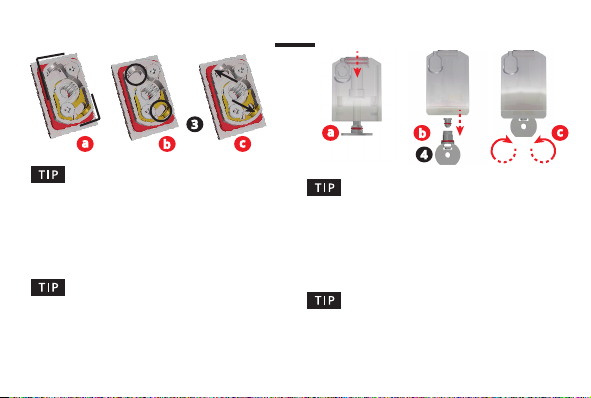
Wicking and the use of C & C Reducer.
Trim legs of cotton along the rims of the
deck (3a - black marking as minimum length).
Legs should be long enough to reach the wells
(3b), as this prevents the wick collapsing when
soaked with juice. Also the cotton should be
enough to ensure it will stand behind juice
slots (3c) and hold liquid intake at proper
levels. Don’t overdo, but also don’t be stingy.
The VapeSnail comes with the C & C
reducer pre-installed. This creates a restricted
chamber and a narrow Chimney suitable for
MTL builds. If you want to remove it, just insert
your coil core guide through the top part and
push down (4a).

Vaping on the VapeSnail
The Tool and the Plug.
The Tool is a custom multi-purpose tool
which will help you with installation of AFC
Tubes (5a), assembly - disassembly of Pos.
Tube Insulator (5b), but also to remove -
restore the 510 adapter of your Billet Box /
Boro compatible AIO.
Refilling the Tank and more info.
To refill, open the liquid port by lifting
the refill cover (6a). Top up, then secure the
refill cover back into place (6b). It is suggested
to refill the Tank only when the VapeSnail is
insided the AIO. This ensures that the tank
section will be securely attached to the deck
section and prevent accidents.
English 6
The Plug (5c) is a custom gasket which
helps so that you will have minimum
condensations (if any) inside your AIO. Its
sealing function is supported by the Absorbent
Pad (5c in circle), which absorbs any condensa-
tions piling up inside the air channel.
If you are using the VapeSnail in an AIO
with air intake through its door panels, the
Plug should not be installed as it will hinder air
flow. With some AIOs you will need to adjust
the height of the AFC Pos Tube (see step 4).
Table of contents
Other ATMIZONE Electronic Cigarette manuals