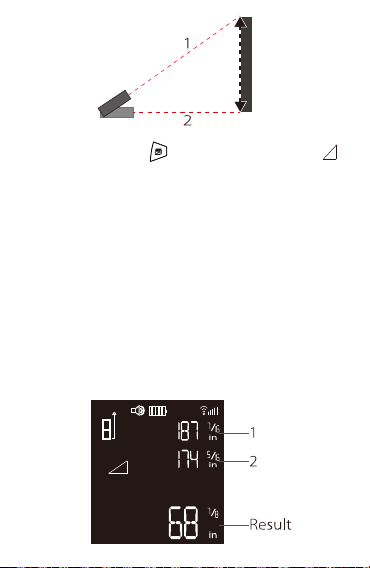
8.Measured value 2
9.Measured value 3
10.Summary Line (Final Value)
Getting Started
Use only AAA batteries (1.5 V) for the Bauihr T203
Laser Distance Meter.
1.Open the battery compartment cover on the back.
2.Insert the batteries into the instrument, observing
the correct poles.
3.Close the battery compartment cover.
Operation
1.Switching T203 On and Off
ON: Hold down the ON/READ button ( ) for 2
seconds to switch T203 on.
OFF: Hold down the OFF/Return button ( ) for 2
seconds to switch the laser instrument off.
The laser automatically switches OFF after 3 minutes
of inactivity.
2.Return
Press the OFF/Return button ( ) once to undo the
last action.
3.Changing Display Units
Press and Reference / Unit Button ( ) for 2 seconds
to change the display units. Available Units are Feet,
Meter and Inches.
Measurements
The Bauihr T203 Laser Distance Meter has a
measuring range of 164 ft(50 m) maximum. Use in
bright sunlight may decrease the range of the meter.
The reflective properties of the surface may also
decrease the range of the meter.
Single Distance Measurement
1.Switch on the laser instrument.
2.Direct the laser point at the target
3.Press the ON/READ button( ). And the measured
value is displayed.
Continuous Measurement,Max and Min
Measurement
1.Press and Hold ON/READ Button ( ) until the
continuous measurement active.
2.In continuous measurement mode, the measured
value is updated approximately every 0.5 seconds.
The corresponding minimum and maximum values
are displayed dynamically.
3.Press and Hold ON/READ Button ( ) again to stop
continuous measurement.
Adding/Subtracting Measurements
1.Press +/- Button ( ) to add the next measurement
to the previous one.
2.Press +/- Button ( ) again to subtract the next
ON
READ
OFF
Return
measurement from the previous one.
3.Press OFF/Return Button ( ) to cancel the last
action.
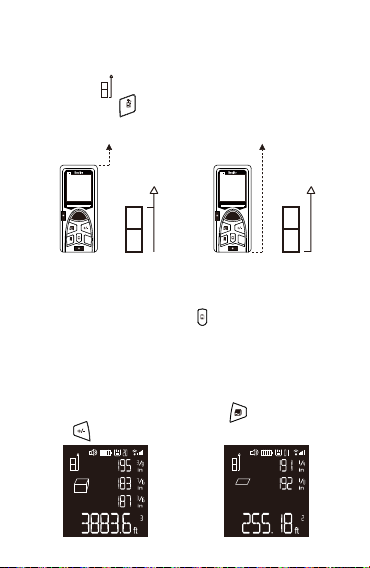
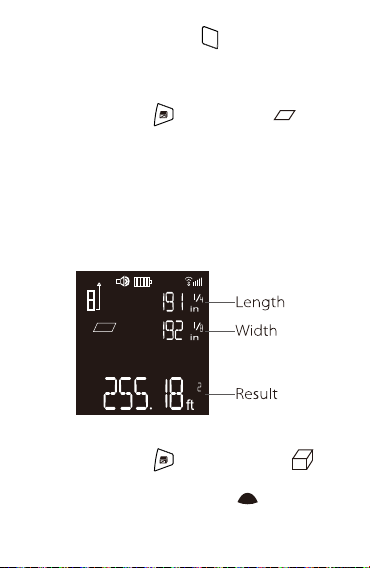
Area Measurement
1.Press Area Button ( ). The symbol ( ) appears
in the display.
2.Press ON/Measurement Button to take the first
measurement (e.g. length).
3.Press ON/Measurement Button again to take the
second measurement (e.g. width).
4.The result of the area calculation is displayed in the
summary line.
Volume Measurement
1.Press Area Button ( ) twice until the ( )
symbol appears in the display.
2.Press ON/Measurement Button( )to take the first
measurement (length).
3.Press ON/Measurement Button again to take the