ATORCH S1 User manual

S1 Electricity measure Smart control
Programmable Socket
(lnstruction Manual)
This equipment is used for Smart on-off control, safety
protection control, Prog ra mmable control, I nternet of Th i n gs
data transmission and wireless control, accumulative power,
calculation of electricity billAnd measure detailed parameters
such as current voltage, current, power and frequency

This product is divided into Bluetooth version and smart WIFI version, please check
the user manual and purchase in detail!
This product user manual is suitable for different types of sockets such as CN Plug ,
USPlug, EU Plug, UKPlug, FRPlug,AU Plugandsoon!
Functiontitlebar .....
Various measuremenl
parameters
Time and online icon
(Display running time when
not connecled to the lnternet
, display calendar,when '
conneeted to the lnternet)
Power supply indicaior
Normal powersupply, this lighl
Button- ........-...'.....
ATORCH-M . ON/OFF/Auto switch
Multifunctional display bar
Temperature display
(display lhe lnternal temperature
when noi connected to the Internel,
'- and displaythe network
temperaiure when connected)
Bluetooth indicator
(when you purchase the Blueiooth
'' version, this light will display the
Blueiooth status, the WIFI version
will not display)
Button +
Shorl press to switch the switch
' mode, long press to swiich ihe
inteface backwards.When the
number rs flashing, shofr press to
increase, long press to continuously
Button M setting key/menu key
' Shod press io flash the set number
/repeated shod press to switch the
number position/long press to enter
ihe background seiting
Shod press to swilch the '_
O:O
long press to switch thernteriace
forward. When the number is
, shod press to decrease, ong press
to continuously decrease
Outpul sockel interface
CN/EU/U K/US/FR/AU
eg. plug options '
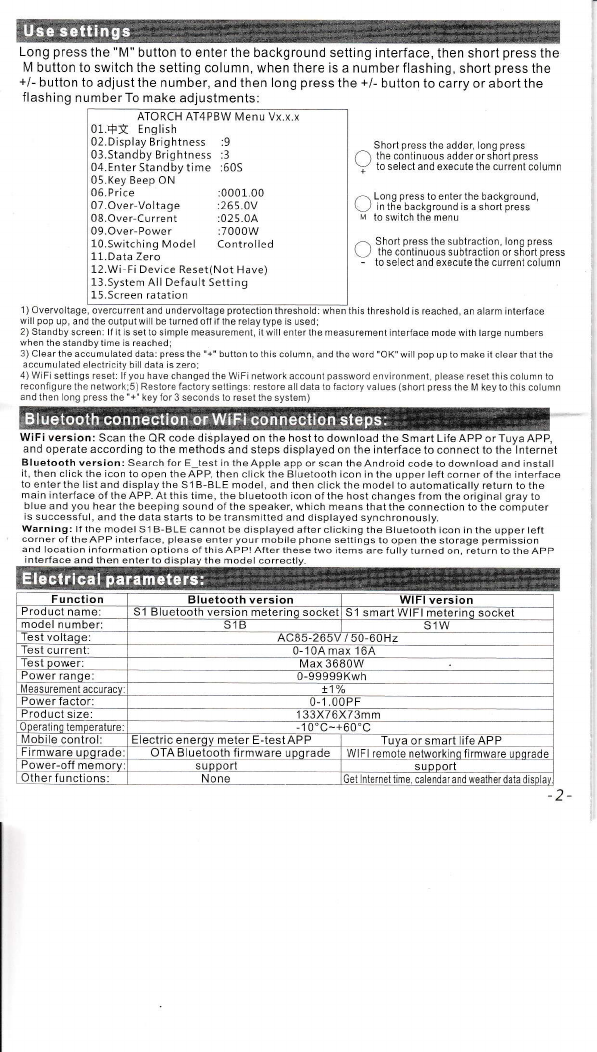
lntroduction tqthe qperatiqn of func{ion interfiace switching and
measurement interface value setting:
Tum on the power as shown in the figure above, the displaywill light up, long press the "+" or'L" button
to switch the display interface of each function forward or backward. Long press the "M" key to enter the
settinginterfaceof thesystembackground. Shortpressthe "M" keyonthefontend interface,theset
conesponding number flashes, and thenshort pressthe+l keys toadjustthevalue.Whileflashing,
continue to short press the "M" keyto switch the numberofdigits and then adjustthe following numbers.
When the flashing stops, the system will automatically save and display OK, long press the "M" key to
save immediately; ln normal times, short press the "+/-" key to switch between "normally open-normally
closed-auto" and other switching modes.
lntrcduction to the operation of the background setting interface:
After long press the "M" key to enter the background interface, short press the "M" key to cycle
down to switch the desired setting menu in a mlor-changing manner. After changing the mlor
ofthe selected menu, short press the "+/-" keyto adjust the cunent value once or long press to
continuously adjustthe olnent value. When in the background interface, long press the "M"
key to quickly exit ttre background setting interface and quickly retum to the foreground
func'tion measurement interface. _ 1, -

Long press the "M" button to enter the background setting interface, then short press the
M button to switch the setting column, when there is a numberflashing, short press the
+/- button to adjust the number, and then long press the +/- button to carry or abort the
flashing number To make adjustments:
ATORCH AT4PBW lvlenu Vx.x.r
01.*I English
02.DisplayBrightness :9
03.Standby Briqhtness :3
04.Enter Standby time i605
05.Key Beep ON
06.Price :0001.00
07.Over Voltage :265.0V
08.Over-Current :025.0A
og.Over-Power :7000W
l0.SwitchingModel Controlled
11.Data Zero
12.Wi Fi Device Reset(Not Have)
13.System All Default Setting
15.Screen ratation
1 ) Overvoltage, overcurrent and underyoltage protection threshold: when lhis threshold is reached, an alarm intedace
will pop up, and the oulput will be lurned off ifthe relay type is used;
2) Standby screeni lf it is set to simple measurement, it will enter the measurement lnterface mode with large numbers
when the siandby time is reached;
3) Clear the accumulated data: press the "+" buiion to ihis column, and the word "OK" will pop up to make it clear that lhe
accumulated elecricity bi I data is zero;
4) WlFi settings reset: lf you have changed ihe WiFi network accouni password environmenl, please resei this column to
reconfigure the network;5) Restore factory settings: restore all data to factory values (shod press the M key to this column
and then long press the "+" key for 3 seconds to reset the system)
WiFi version: Scan the QR code displayed on the host to download the Smart Life APP or Tuya APP,
and operate according to the methods and steps displayed on the interface to connect to the Internet
Blueloolhversion:SearchforE testintheAppleapporscantheAndroidcodetodownloadandinstall
ii, then click the icon to open the APP, then click the Bluetooth icon in the upper left corner of the interface
to enier the list and display the S 1 B-BLE model, and then click the model to automatically return to the
main interface of the APP. At this time, the bluetooth icon of the host changes from the original gray to
blue and you hear the beeping sound of ihe speaker, which means that the connection to the computer
is successful, and the data starts to be transmitted and displayed synchronously.
Warning: lf the model S1 B-BLE cannot be displayed after clicking the Btuetooth icon in the upper teft
corner of the APP interface, please enter your mobile phone settings to open the storage permission
and Iocation information options of this APP! After these two items are fully turned on. return to the APP
Short press the adder, long press
f ) the continuous adder or short press
Y to select and execute tle current columr
A Long press to enter the backqround,
L,/ in the background rs a short press
M toswitchthemenu
Sl^orl press lhe sJblraclion, lonq press
L, the coniilJous suolraction or sl"ort press
- to select and execute the curenl column
interface and then enter to display the model corre

Long press the " + " key to go to the security protection pagq short press the "M" key, and the
voltage hundred digits ofthe overvoltage automatic power-off barwill flash, then short press
the " + " or "-" keys to adjust the value, short press the "M" key again, the voltage tens will flash
and can be adjusted. Continue with this method, flashing the value ofthe over-current power
column and can be adjusted, after the adjustment is completed, long press the "M" keyto save
orflash to stop the system to automatically save. The set protection threshold value can be
increased by 5-10% according to your application value, so as to ensure normal use and also
have the power-off protection function (the set protection value will also run in the background
of other interfaces). When the input voltage orthe power value ofthe current flow exceeds the
threshold you se( the qystem will instantly cut off the power and use the horn to prompt and
at the same time display an alarm message on the display for you to check. At this time, if the
user's button signal or infrared remote control signal is not received, the product will continue
to power off. Until the user releases the danger and presses any key or remote control key on
the host the system will return to the protection interface and automatically be in the off state,
waiting for the userto reset or restart the power
Long press the "+" button to go to the smart power-off category A page and select the "on"
state, observe and record the charging power value ofthe charged device once after it is fully
charged; Then, add 2-5W on the basis ofthis value, which is the powervalue of how many
watts ofyour full automatic power-off setting is less than the continuous value and turn on
the "auto" gear In this way, when the system detects that the current power value is less than
the powervalue you set and continues forthe recharge time you set, the system displays the
power-off icon and cuts offthe power output thereby protecting your device(Ihe longerthe
duration you set, the longer the subsequent charging time is when it is fully charged, so as to
ensure that the device can be fuliy charged and at the same time double-monitoring to achieve
accurate and automatic power.offfor safe charging protection).
Tips for viewing the progress bar and countdown in the lower riglrt comer of the display
intedace:
When the system detects that the measured powervalue is less than the powervalue you set
the system starts counting down, and the progress bar is calculated according to the duration
ratio you set The progress bar decreases and changes colorfrom yellow to red until the end of
the power failure. When the powervalue measured by the system is greaterthan the power
value you set at a ceftain moment, the countdown will be cleared immediately, and the
progress barwill fill up instantly, and then a new round of detection will be performed.
Long press the "+ " button to go to the smart power-off type B page and seiect the "on" state.
Observe and record the minimum power value of the connected device when it is powered on.
Then, subtract 5-25W on the basis ofthis value. This is how many watts of power should be set
foryour connection and turn it on to the 'auto" gear: In this way, when the system detects that
the current power value is greater than the power value you se!, it willjudge that your device
has been powered on. At this time, the system starts to count down to the duration value you
set, and the system determines that you may have forgotten to turn offthe device because you
left home and automatically cut offthe powet so as to achieve the purpose of people - 3 -

accidentally forgetting to turn off the equipment and causing the equipment to run for a long
time when no one is lef! which consumes huge electric energy and causes huge loss risks.
When the power is automatlcally disconnected, the system horn will beep several timeg and
at the same time, a red power-off information interface will be displayed. At this time if the
system detects any key signal or your devices remote control signal and mobile phone App
and other key signals, it can resurrect and return to the smart power-off interface, and
automatically turn on the power again and start the next round of smart power-off process.
This feature comes from a real story A worker who travels frequently, carelessly forgot to
turn offthe air conditioner at home before a business trip. The air conditioner was turned on
for a few months during the business trip. After returning home, he found that he had used
thousands of kilowatt-hours of electricity and caused a loss ofthousands ofyuan.
Long press the " +" button to go to the timing power supply page, set the time you are expected
to be fully charged by the charging device, and then press the "+" [utt6n 16 enter the automatic
mode. The system is powered on and the countdown reaches the time you set. When the system
automatically cuts offthe power output on time, the speaker emits a beep and the display ihows
a red cut off interface.
This feature can be used to intermittently add oxygen to fish ponds or household fish tanks, to
provide intermittent power supply to electric fans to achieve a natural wind-like atmospherg
and to provide intermittent power supply to some exhaust fans to save electricity bills, and to
program time for other devices that require intermittent power supply and then be automatically
controlled by their time axis. The opening or closing time can be set to any time you need
according to different situations. In some occasions that do not need to use electricity for a long
time, you can use this product to change it to any time, with intermittent power supply, thereby
saving power and reducing costs.
Timing power supply page: The power supply will be disconnected the countdown
operation ends according to the time set by the user;
Cycle timing srvitch: according to the different switch duration set by the use[ the countdown
is turned ofl-on off automatic cvcle oower suoolu
Countdown swikh page: Accdrdin! to the diffdrent switch duration set by the user
a countdown is turned on and then turned off
The product can realize electricity statistict
power off when overuoltage and overcurrent power are encountered; or the socket output is
connected to you Home appliances such as refrigerators, washing machineq induction cookerg
etc., statistics their power consumption and calculate their electricity consumption
and other detailed information.
APP software and download address: http://www.atorch.cn
(Please refer tothe officialwebsite for more details)
Safety warning: The input of this product is strong electricity. Do not touch
the metal parts with electricity during use- Be sure to pay attention to safety_4_
This manual suits for next models
2
Table of contents
Popular Accessories manuals by other brands

Johnson Controls
Johnson Controls SEN-600-1 installation instructions

Titanium
Titanium TT-ACC-IR-15 electrical connections

Hyundai
Hyundai HHA221803 user manual

Russell Hobbs
Russell Hobbs RHEK600 Instructions & warranty

Brunswick
Brunswick MAX Operation & service manual

Meister
Meister RCS-20GS-A+RC10 operating instructions