Attwood MotorGuide X5-55 Installation guide

Operation
Maintenance
Installation
Warranty
Manual
2017 Mercury Marine X5-55/X5-70/X5-80/X5-105

EU Compliance Statement
Attwood Corporation hereby declares that the MotorGuide X5 trolling motor is
in compliance with the essential requirements and other relevant provisions of
the 99/5/EC R&TTE directive.
CE Declaration
Manufacturer: Attwood Corporation
Product: MotorGuide X5 Series
Model: includes all 12, 24, and 36 volt DC models
Council Directive 2004/108/EC ‑ Electromagnetic Compatibility
•EN 55012:2008; A1:2010 ‑ Vehicles, boats and internal combustion
engines.
Council Directive 98/96/EC ‑ Maritime Equipment Directive
•EN 60945:2002+C1:2008 ‑ Maritime navigation and radiocommunication
equipment and systems (Motor systems)
• CISPR16 ‑ Conducted and Radiated Emissions
• EN61000‑4‑2:2008 ESD
• EN61000‑4‑3:2006 Radiated Immunity
• EN61000‑4‑4:2004 EFT
• EN61000‑4‑5:2005 Surges
• EN61000‑4‑6:2008 Conducted Susceptibility
• EN61000‑4‑8:2001 Magnetic Field Immunity
• EN6100‑4‑11:2004 Voltage Dips and Interrupts
Council Directive 2006/42/EC ‑ Machinery
•EN ISO 12100 ‑ Safety of machinery ‑ General principles for design, risk
assessment and reduction

Thank You
Thank you for choosing MotorGuide, one of the finest trolling motors available.
Years of experience have been committed to the goal of producing the finest
quality products. This led to MotorGuide's reputation for strict quality control,
excellence, durability, long‑lasting performance and being the best at providing
after‑the‑sale service and support.
Please read this manual carefully before operating your motor. This manual
has been prepared to assist you in the operation, safe use, and care of your
trolling motor.
Again, thank you for your confidence in MotorGuide.

Boater's Responsibilities
The operator (driver) is responsible for the correct and safe operation of the
boat and safety of its occupants and general public. It is strongly recommended
that each operator (driver) read and understand this entire manual before
operating the trolling motor.
Be sure at least one additional person on board is instructed in the basic
operation of the trolling motor in case the driver is unable to operate the boat.
Protecting People in the Water
WHILE YOU ARE TROLLING
It is very difficult for a person in the water to take quick action to avoid a boat
heading in their direction, even at slow speeds.
21604
Always slow down and exercise extreme caution any time you are boating in an
area where there might be people in the water.
WHILE THE BOAT IS STATIONARY
!WARNING
A spinning propeller, a moving boat, or any solid device attached to the boat
can cause serious injury or death to swimmers. Stop the trolling motor
immediately whenever anyone in the water is near your boat.
Shut off the trolling motor before allowing people to swim or be in the water
near your boat.
Passenger Safety Message
Whenever the boat is in motion, observe the location of all passengers. A
sudden reduction in boat speed, such as a sharp change of boat direction,
could throw them off the boat.
Safe Boating Suggestions
In order to safely enjoy the waterways, familiarize yourself with local and other
governmental boating regulations and restrictions, and consider the following
suggestions.
Use flotation devices. It is the law to have an approved personal flotation
device of suitable size for each person aboard and have it readily accessible.
GENERAL INFORMATION

Do not overload your boat. Most boats are rated and certified for maximum
load (weight) capacities, refer to your boat capacity plate. If in doubt, contact
your dealer or the boat's manufacturer.
Perform safety checks and required maintenance. Follow a regular
schedule and ensure all repairs are made properly.
Never be under the influence of alcohol or drugs while boating (it is the
law). Alcohol or drug use impairs your judgment and greatly reduces your
ability to react quickly.
Passenger boarding. Stop the trolling motor whenever passengers are
boarding or unloading.
Be alert. The operator of the boat is responsible by law to maintain a proper
lookout by sight and hearing. The operator must have an unobstructed view
particularly to the front. No passengers, load, or fishing seats should block the
operators view when operating the boat.
Underwater hazards. Reduce speed and proceed with caution whenever
navigating in shallow water.
Tripping hazards. To avoid a trip hazard, route all cables and wiring neatly
and out of the way.
Report accidents. Boat operators are required by law to file a Boating
Accident Report with their state boating law enforcement agency when their
boat is involved in certain boating accidents. A boating accident must be
reported if 1) there is loss of life or probable loss of life, 2) there is personal
injury requiring medical treatment beyond first aid, 3) there is damage to boats
or other property where the damage value exceeds $500.00 or 4) there is
complete loss of the boat. Seek further assistance from local law enforcement.
GENERAL INFORMATION

X5‑55/X5‑70/X5‑80/X5‑105 MotorGuide Trolling Motor
CABLE STEER MODELS
a - Top housing
b - 53.3 cm (21 in.) mount bracket
c - Latch release handle
d - Foot pedal
e - Momentary on button
f - 3‑position switch
g - Speed control knob
h - Battery cables
i - 61 cm (24 in.) mount bracket (optional)
j - Propeller
k - Lower unit
l - Composite column
m - Bracket door knob
a
b
58588
c
d
e
f
g
h
i
j
k
l
m
PRODUCT OVERVIEW

HAND-OPERATED MODELS
a - Top housing
b - Extendable speed control tiller handle
c - Serial number decal
d - Battery cables
e - Latch release handle
f - 53.3 cm (21 in.) mount bracket
g - Composite column
h - Propeller
i - Lower unit
j - Bracket door knob
k - Steering tension collar
l - Depth adjustment collar
62253
a
b
c
d
e
f
g
h
j
k
l
i
PRODUCT OVERVIEW

Specifications
NOTE: Freshwater models are abbreviated as
FW
. Saltwater models are
abbreviated as
SW
.
Model Control Type Volts
Speeds
Forward/
Reverse
Sonar Peak
Thrust
Shaft
Length
X5‑55
FW
Foot pedal/
cable steer FW 12 V Variable No 24.9 kgf
(55 lbf)
114.3 cm
(45 in.)
X5‑55
FW
Foot pedal/
cable steer FW 12 V Variable Yes 24.9 kgf
(55 lbf)
114.3 cm
(45 in.)
X5‑70
FW
Foot pedal/
cable steer FW 24 V Variable No 31.8 kgf
(70 lbf)
114.3 cm
(45 in.)
X5‑70
FW
Foot pedal/
cable steer FW 24 V Variable Yes 31.8 kgf
(70 lbf)
114.3 cm
(45 in.)
X5‑80
FW
Foot pedal/
cable steer FW 24 V Variable No 36.3 kgf
(80 lbf)
91.4 cm
(36 in.)
X5‑80
FW
Foot pedal/
cable steer FW 24 V Variable No 36.3 kgf
(80 lbf)
114.3 cm
(45 in.)
X5‑80
FW
Foot pedal/
cable steer FW 24 V Variable Yes 36.3 kgf
(80 lbf)
114.3 cm
(45 in.)
X5‑80
FW
Foot pedal/
cable steer FW 24 V Variable No 36.3 kgf
(80 lbf)
127.0 cm
(50 in.)
X5‑80
FW
Foot pedal/
cable steer FW 24 V Variable Yes 36.3 kgf
(80 lbf)
127.0 cm
(50 in.)
X5‑80
FW
Foot pedal/
cable steer FW 24 V Variable No 36.3 kgf
(80 lbf)
152.4 cm
(60 in.)
X5‑80
FW
Foot pedal/
cable steer FW 24 V Variable Yes 36.3 kgf
(80 lbf)
152.4 cm
(60 in.)
X5‑80
FW
Extendable
hand/
twist‑tiller
FW 24V Variable No 36.3 kgf
(80 lbf)
127.0 cm
(50 in.)
X5‑80
SW
Extendable
hand/
twist‑tiller
SW 24V Variable No 36.3 kgf
(80 lbf)
127.0 cm
(50 in.)
X5‑80
SW
Extendable
hand/
twist‑tiller
SW 24V Variable No 36.3 kgf
(80 lbf)
152.4 cm
(60 in.)
X5‑105
FW
Foot pedal/
cable steer FW 36 V Variable No 47.6 kgf
(105 lbf)
114.3 cm
(45 in.)
X5‑105
FW
Foot pedal/
cable steer FW 36 V Variable Yes 47.6 kgf
(105 lbf)
114.3 cm
(45 in.)
PRODUCT OVERVIEW

Model Control Type Volts
Speeds
Forward/
Reverse
Sonar Peak
Thrust
Shaft
Length
X5‑105
FW
Foot pedal/
cable steer FW 36 V Variable No 47.6 kgf
(105 lbf)
127.0 cm
(50 in.)
X5‑105
FW
Foot pedal/
cable steer FW 36 V Variable Yes 47.6 kgf
(105 lbf)
127.0 cm
(50 in.)
X5‑105
FW
Foot pedal/
cable steer FW 36 V Variable No 47.6 kgf
(105 lbf)
152.4 cm
(60 in.)
X5‑105
FW
Foot pedal/
cable steer FW 36 V Variable Yes 47.6 kgf
(105 lbf)
152.4 cm
(60 in.)
X5‑105
SW
Extendable
hand/
twist‑tiller
SW 36 V Variable No 47.6 kgf
(105 lbf)
127.0 cm
(50 in.)
X5‑105
SW
Extendable
hand/
twist‑tiller
SW 36 V Variable No 47.6 kgf
(105 lbf)
152.4 cm
(60 in.)
PRODUCT OVERVIEW

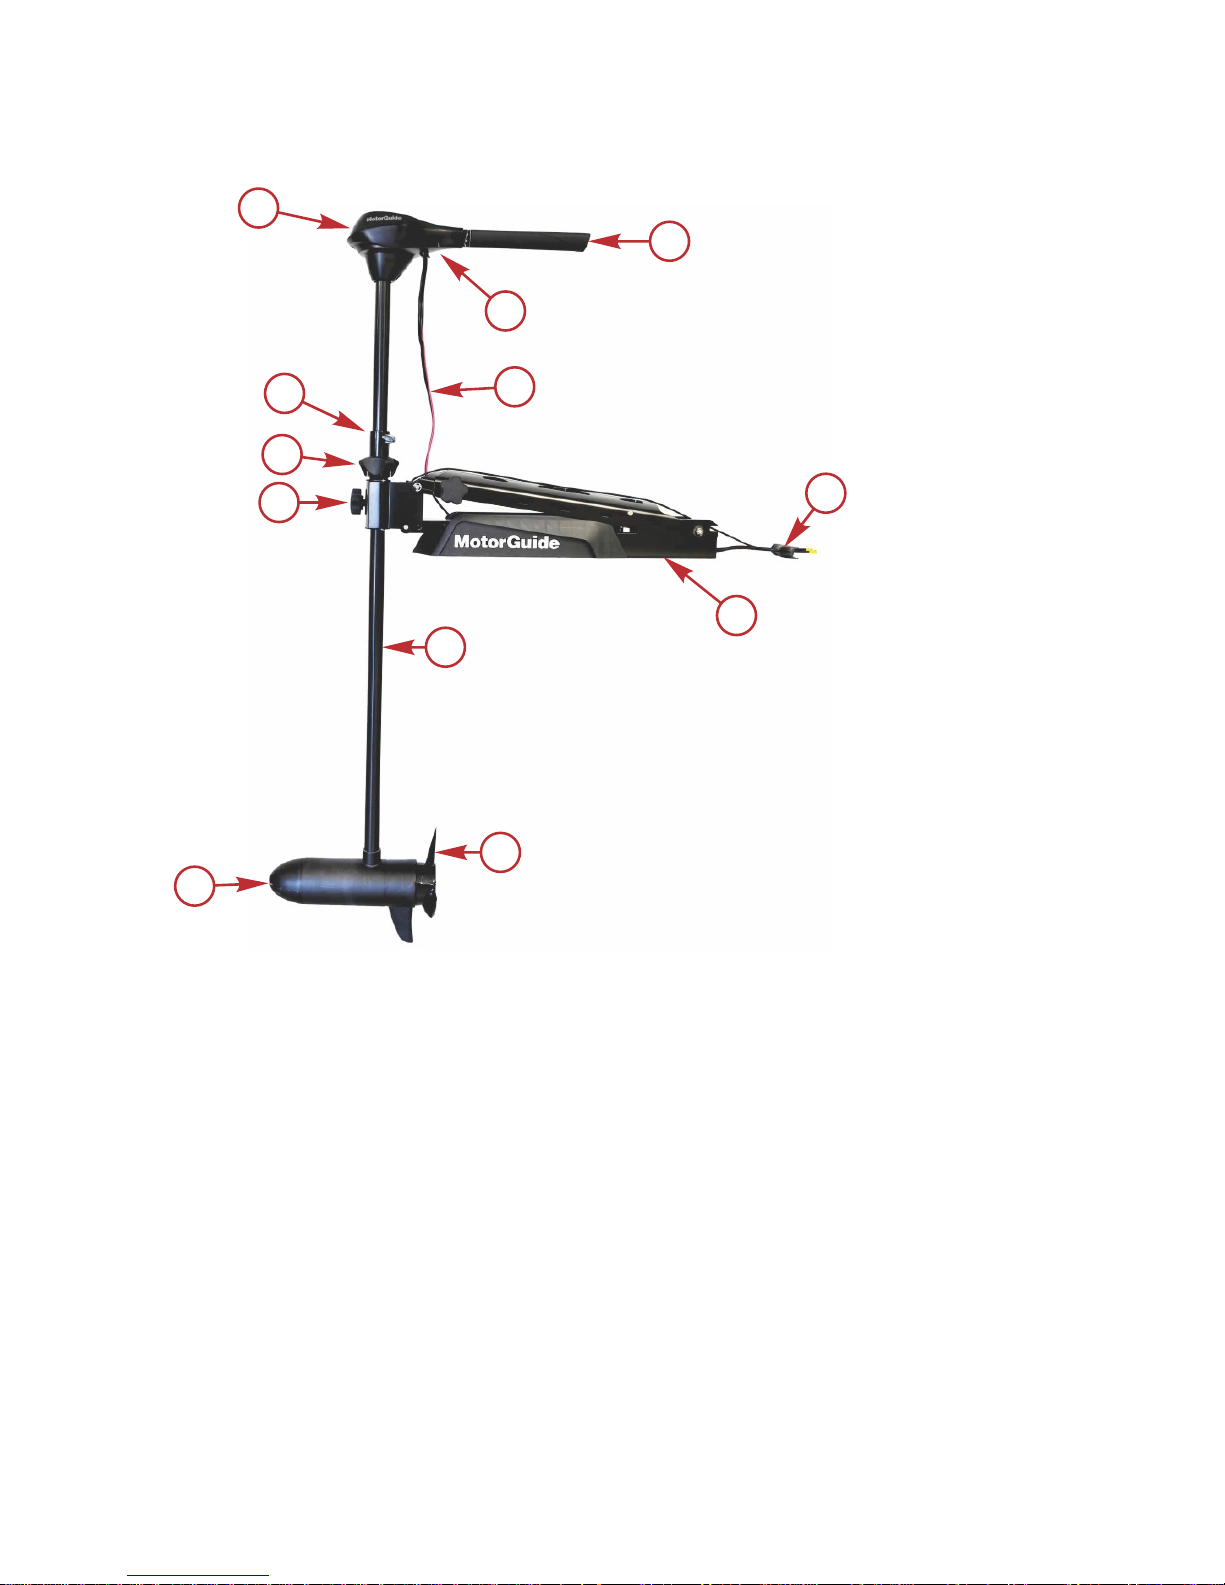
Wiring and Battery Information
!WARNING
An operating or charging battery produces gas that can ignite and explode,
spraying out sulfuric acid, which can cause severe burns. Ventilate the area
around the battery and wear protective equipment when handling or servicing
batteries.
!WARNING
Performing service or maintenance without first disconnecting the battery can
cause product damage, personal injury, or death due to fire, explosion,
electrical shock, or unexpected motor starting. Always disconnect the battery
cables from the battery before maintaining, servicing, installing, or removing
motor components.
Recommended Practice and Procedures
IMPORTANT: Unplug the trolling motor after each use and when charging the
battery.
• Do not use the main engine battery to power the trolling motor. Use a
dedicated trolling motor battery or battery bank.
• Ensure that the batteries are enclosed and secured within a battery box to
prevent accidental shorting of the battery terminals.
• Route the trolling motor wires on the opposite side of the boat from other
boat wiring.
• Connect boat accessories directly to the main engine battery.
• Do not charge the trolling motor batteries while the trolling motor is in the
deployed (down) position.
Battery Recommendations
• Use 12‑volt, deep cycle marine batteries. The number of batteries required
varies according to the model of your trolling motor. Refer to Battery
Connection.
• As a general rule, deep cycle batteries with a higher amp‑hour rating or
reserve capacity rating will provide longer run times and better
performance.
• Install a manual reset circuit breaker in line with the trolling motor positive
leads within 1.8 m (6 ft) of the batteries.
• Do not extend the included 10‑gauge battery cables more than 1.8 m (6 ft)
for a total of 3 m (10 ft). If longer battery cables are required, MotorGuide
offers accessory 8 mm² (8‑gauge) battery cables.
• Use nylock nuts to secure the battery cables to their terminals. Using wing
nuts to secure the battery cables can cause loose connections.
WIRING AND BATTERY INFORMATION

• Do not power any depth sounders or fish finders from the trolling motor
battery. Connecting electronic equipment to the trolling motor batteries
can cause electrical interference. Any depth sounders or fish finders must
be powered from the engine starting or accessory battery.
Recommended MotorGuide Accessory Description
8‑gauge battery cable and terminals with 50‑amp manual reset circuit breaker
50‑amp manual reset circuit breaker
60‑amp manual reset circuit breaker
Battery Precautions
!WARNING
An operating or charging battery produces gas that can ignite and explode,
spraying out sulfuric acid, which can cause severe burns. Ventilate the area
around the battery and wear protective equipment when handling or servicing
batteries.
When charging batteries, an explosive gas mixture forms in each cell. Part of
this gas escapes through holes in the vent plugs and may form an explosive
atmosphere around the battery if ventilation is poor. This explosive gas may
remain in or around the battery for several hours after it has been charged.
Sparks or flames can ignite this gas and cause an internal explosion, which
may shatter the battery.
The following precautions should be observed to prevent an explosion:
1. Keep flames away and do not smoke near batteries being charged or
which have been charged recently.
2. Do not disconnect the battery cables while the trolling motor is operating,
because a spark usually occurs at the point where a live circuit is broken.
Always use care to prevent reverse polarization when connecting or
disconnecting cable clamps on chargers. Poor connections are a common
cause of electrical arcs, which cause explosions.
3. Do not reverse the polarity of battery terminal to cable connections.
Wire and Cable Routing
• Route the trolling motor wires on the opposite side of the boat from other
boat wiring.
• The trolling motor should be connected to its own dedicated battery.
• Sensitive electronics, such as depth finders, should be connected to a
separate battery.
• Marine engines should have their own dedicated starting battery.
• All batteries should have a common ground.
WIRING AND BATTERY INFORMATION

Wire Color Code Abbreviations
Wire Color Abbreviations
BLK Black BLU Blue
BRN Brown GRY or GRA Gray
GRN Green ORN or ORG Orange
PNK Pink PPL or PUR Purple
RED Red TAN Tan
WHT White YEL Yellow
LT or LIT Light DK or DRK Dark
Battery Connection
!WARNING
Before working around electrical system components, disconnect the battery
cables from the battery to prevent injury or damage to the electrical system
due to an accidental short circuit.
!CAUTION
Disconnecting or connecting the battery cables in the incorrect order can
cause injury from electrical shock or can damage the electrical system.
Always disconnect the negative (‑) battery cable first and connect it last.
NOTICE
Failure to operate the trolling motor within the recommended voltage
specifications can cause product damage. Do not exceed the maximum
supply voltage.
IMPORTANT: Refer to the decal on the head of the trolling motor to determine
the voltage requirements of your trolling motor.
12-VOLT BATTERY CONNECTION
1. Starting with the negative (–) lead, disconnect the battery cables from the
engine starting or accessory battery.
2. Install a 50‑amp (good) or 60‑amp (best) manual reset circuit breaker in
line with the trolling motor power cable positive (+) lead and the trolling
motor battery positive (+) terminal.
3. Connect the positive (+) trolling motor lead to the positive (+) trolling
motor battery terminal.
4. Connect the negative (–) trolling motor lead to the negative (–) trolling
motor battery terminal.
5. Connect a common ground bond from the trolling motor battery negative
(–) terminal to the engine starting battery negative (–) terminal.
WIRING AND BATTERY INFORMATION

6. Starting with the positive (+) lead, reconnect the battery cables to the
engine starting or accessory battery.
a - Power cables to trolling motor
b - Manual reset circuit breaker
c - Trolling motor battery
d - Engine starting or accessory battery
e - Power cables to engine
f - Common ground bond
24-VOLT BATTERY CONNECTION
1. Starting with the negative (–) lead, disconnect the battery cables from the
engine starting or accessory battery.
2. Install a 50‑amp (good) or 60‑amp (best) manual reset circuit breaker in
line with the trolling motor power cable positive (+) lead and the trolling
motor battery B positive (+) terminal.
3. Connect the positive (+) trolling motor lead to the positive (+) terminal on
trolling motor battery B.
4. Connect a jumper wire (reference gray) between the negative (–) terminal
on battery B to the positive (+) terminal on battery A.
IMPORTANT: The jumper wire should be the same wire gauge as the
negative (–) and positive (+) power cables.
5. Connect the trolling motor negative (–) lead to the negative (–) terminal on
battery A.
RED
BLACK
REDRED
a
b
c
e
f
d
45086
BLACK
WIRING AND BATTERY INFORMATION

6. Starting with the positive (+) lead, reconnect the battery cables to the
engine starting or accessory battery.
24-volt battery connection
a - Power cables to trolling motor
b - Manual reset circuit breaker
c - Jumper wire (not supplied)
d - Negative (–) battery terminal
36-VOLT BATTERY CONNECTION
1. Starting with the negative (–) lead, disconnect the battery cables from the
engine starting or accessory battery.
2. Install a 50‑amp (good) or 60‑amp (best) manual reset circuit breaker in
line with the trolling motor power cable positive (+) lead and the trolling
motor battery C positive (+) terminal.
3. Connect the positive (+) trolling motor lead to the positive (+) terminal on
trolling motor battery C.
4. Connect a jumper wire (reference gray) between the negative (–) terminal
on battery C to the positive (+) terminal on battery B.
IMPORTANT: The jumper wire should be the same wire gauge as the
negative (–) and positive (+) power cables.
5. Connect a jumper wire (reference gray) between the negative (–) terminal
on battery B to the positive (+) terminal on battery A.
6. Connect the trolling motor negative (–) lead to the negative (–) terminal on
battery A.
RED
BLACK
a
b
c
d
37824
GRAY
c
Battery A
Battery B
WIRING AND BATTERY INFORMATION

7. Starting with the positive (+) lead, reconnect the battery cables to the
engine starting or accessory battery.
36-volt battery connection
a - Power cables to trolling motor
b - Manual reset circuit breaker
c - Jumper wire (not supplied)
d - Negative (–) battery terminal
RED
BLK
37825
GRY
c
Battery B
Battery C
Battery A
GRY
c
a
b
c
d
WIRING AND BATTERY INFORMATION

Mount Bracket Installation
a - X5 bow mount bracket
b - Latch release handle
c - Bracket door knob
1. Select an appropriate area on the deck of the boat to install the mount.
Ensure that the forward mounting screws will not penetrate the hull.
IMPORTANT: Choose an area on the boat deck that allows a 7.6 cm (3 in.)
clearance between the bow of the boat and the column of the trolling motor.
a - Clearance 7.6 cm (3.0 in.)
2. Place the bow mount base on the surface of the boat deck. Use the
mount base as a template to mark the locations of the front mounting
holes and the rear mounting holes on the mount base.
a
b
c58592
58593
a
a
TROLLING MOTOR INSTALLATION AND OPERATION

IMPORTANT: A minimum of four mounting bolts are required to mount the
trolling motor to the boat. Spread the mounting bolts as far apart as practical
for the most secure mounting.
58594
Mount bracket mounting holes (5 per side)
3. Drill the mounting holes with a 7 mm (1/4 in.) diameter drill bit. Remove
any debris.
IMPORTANT: Use a countersink drill bit or a larger drill bit to countersink the
holes on fiberglass boats to prevent cracking.
4. Insert the rubber isolators between the base of the mount and the boat
mounting surface. Place the tie‑down strap under the mount bracket,
hook‑and‑loop side down, with the buckle facing toward the outside of the
boat.
a - Velcro tie‑down strap
b - Buckle
58597
a
b
TROLLING MOTOR INSTALLATION AND OPERATION

5. Install the stainless steel washers and nylon locknuts onto the mounting
screws underneath the boat deck. Tighten them securely with a P3
screwdriver and a 7/16 in. wrench.
IMPORTANT: If necessary, shim the rubber washers with 25 mm (1 in.)
outside diameter stainless steel washers to create a level mounting surface.
IMPORTANT: The mount bracket must lay flush against the rubber isolators
before being bolted to the deck or the mount will bind, making it difficult or
impossible to unlatch.
a - Mount bracket
b - Mounting screw
c - Rubber isolator
d - Deck
e - Washer
f - Nylon locknut
6. Once installed, the bracket should fasten securely and evenly, with the
latch pins in the slots, and release with a light, quick pull on the rope
handle.
Permanent Foot Pedal Mounting (Optional)
1. Determine a suitable location for the foot pedal with the trolling motor
deployed and in the stowed position. Ensure that there are no
obstructions beneath the boat deck that would interfere with the mounting
screws, such as bulkheads or boat wiring.
2. Once a suitable location is chosen, mark the mounting holes, using the
foot pedal as a template.
3. Use a 3 mm (7/64 in.) drill bit to drill holes through the boat deck.
a
b
c
d
e
f
58753
TROLLING MOTOR INSTALLATION AND OPERATION

4. Use four #8 x 2 in. stainless steel screws to secure the foot pedal to the
boat deck.
54589
Installing the Motor into the Bow Mount
1. Turn the bracket door knob counterclockwise to loosen and open the
bracket door.
2. Place the motor column into the bracket and close the door.
3. Turn the bracket door knob clockwise to tighten the motor column in the
bracket.
4. Hand‑operated models: Adjust the depth adjustment collar and steering
tension collar to the desired settings.
Cable steer models
a - Bracket door knob
b - Bracket door
a
b
58600
TROLLING MOTOR INSTALLATION AND OPERATION

Hand-operated models
a - Depth adjustment collar
b - Steering tension collar
c - Bracket door knob
d - Bracket door
Removing the Motor from the Bow Mount
1. Turn the bracket door knob counterclockwise to loosen and open the
bracket door.
2. Remove the motor column from the bracket and close the door.
Connecting the Sonar Display to the Trolling Motor
NOTE: This procedure applies only to models equipped with integrated sonar.
This sonar display connection procedure applies to trolling motor models with
internal sonar that offer built‑in 200/83 kHz sonar transducers compatible with
Eagle®, Garmin®, Humminbird®, Lowrance®, and Vexilar® brand sonar
displays.
The trolling motor is equipped with a Lowrance 7‑pin plug. Adapters are
available to connect other brands of sonar displays to the trolling motor. Match
the cable connector to the sonar port on the back of the sonar display. Power
up the unit to ensure that the sonar cable is connected securely.
a - Harness—to nose cone sonar
b - Lowrance 7‑pin plug—to sonar display
Transducer adapter cables available from MotorGuide Part Number
Lowrance 7‑to‑6‑pin adapter 8M4001959
Vexilar 3‑pin adapter 8M4001960
Garmin 6‑pin adapter 8M4001961
Humminbird 7‑pin adapter 8M4001962
a
b
c
d
62254
58602
ab
TROLLING MOTOR INSTALLATION AND OPERATION
This manual suits for next models
3
Table of contents
Other Attwood Outboard Motor manuals