Audia Flight Strumento No.1 User manual

Strumento n° 1
Owner’s Manual
1
rel. 1.1

Audia Flight congratulate you and thank you for choosing one of its
products to make your sound system.
The Strumento No. 1 preamplifier has been patiently designed with the
intention of being one of the best equipment available and capable of
powering any speaker on the market today. This ambition is of course
requisitioned all the know-how of the brand and demanded fidelity to
the principles of the most developed, the application of the most
powerful techniques and the use of the best components. Its production
does not suffer any compromise was made with an extreme attention
and care.
You can be assured of having a device that will serve you and give you
many years of musical enjoyment only.
This manual is intended to advise you and help you get your amp the
best possible.
2

3
SAFETY INSTRUCTIONS
Before you start using your Strumento No. 1 preamplifier, please read the
operating instructions and safety precautions outlined below:
1) Always make sure the unit is unplugged before connecting or
disconnecting any other device or the audio system in case of
intervention on these devices.
2) Your device comes with a three-wire power cord (AC voltage of 110
V or 220). To prevent electrical shock, all three drivers must be used.
If your outlet does not accept the type plug fitted to the cord, you need
an adapter and if so, make sure it meets the required safety standards
and above all it establishes a connection to earth . If in doubt about the
integrity of your electrical system call in the assistance of a qualified
professional.
3) The use of an extension cord sector is not recommended for this
product. If an extension is required, ensure its compliance with safety
rules and its ability to withstand the intensity of current required to
power your device.
4) Never use flammable or combustible chemicals for cleaning.
5) Do not attempt to open the device, in under no circumstances use it
without removing all the packing materials or elements covering the
unit.
6) Do not spill nor spray any liquids directly on the device.
7) Never push objects through openings in the unit.
8) Never remove a fuse.
9) Never replace a fuse with one of size or type than those specified.
10) Never attempt to repair the unit yourself. In case of problems, contact
your dealer.
11) Never expose your device to temperatures too high or too low.
12) Do not leave electrical appliances within the reach of children.

4
TRANSPORT AND UNPACKING
Do not return the package containing the device, paying attention to signs of
normal direction of transport. Before opening the package, bring it near the
planned installation location for the unit.
Remove the “keys” around the box, leave the other side of the box from the
base.
The device is surrounded by a cover and a second envelope containing a
desiccant.
Package Contents: Strumento No. 1 comes with a detailed instruction
manual, a power cord shielded, communication cable with other devices
Audia Flight, a remote control, batteries and a tool for their replacement.
We recommend you keep the packaging for possible transport. In the case
where the unit is packed again, be sure to try reseating all internal
components. Audia Flight not be held responsible for any incident or
damage to the aircraft or persons, resulting from poor packaging.
LOCATION
Place the unit on a solid shelf away from vibration and heat sources. Do not
expose to direct sunlight making it difficult to read the display. Do not
place it near sources emitting light that might disturb the good reception of
remote control commands.
In the case of an asymmetric binding of the preamplifier, make sure it does
not exceed one meter between the reader or between the amplifier, to avoid
background noise. This distance is more important in the case of a balanced
connection.

OUTPUT CONNECTIONS
Do not short-circuit the output of the unit, never connect the left and right
outputs together, it can damage the circuitry of the output stage in Class A.
On the rear of the preamplifier, you have three outputs (OUTPUT): two
symmetrical format, taken on two pairs, XLR 1 and XLR 2, and a format of
an asymmetric pair of RCA jacks.
Using a pair of cables terminated with XLR connectors for balanced
transmission or by praying for RCA unbalanced use, connect the left and
right channel outputs of a Strumento No. 1 respectively to left and right
channels of the input of a stereo amplifier.
The same pair of wires may connect the two channels of this output to the
input of each of the two mono blocks dedicated to each of the two channels.
Several outputs can be used simultaneously.
The use of interconnect cables of the highest quality is strongly
recommended.
The polarity of the pin XLR connectors output is shown on the diagram
below:
Keypad of the outputs of each channel has still an output "REC" on RCA, it
is a fixed output level, the signal of the selected input, for connection to a
recording device.
5
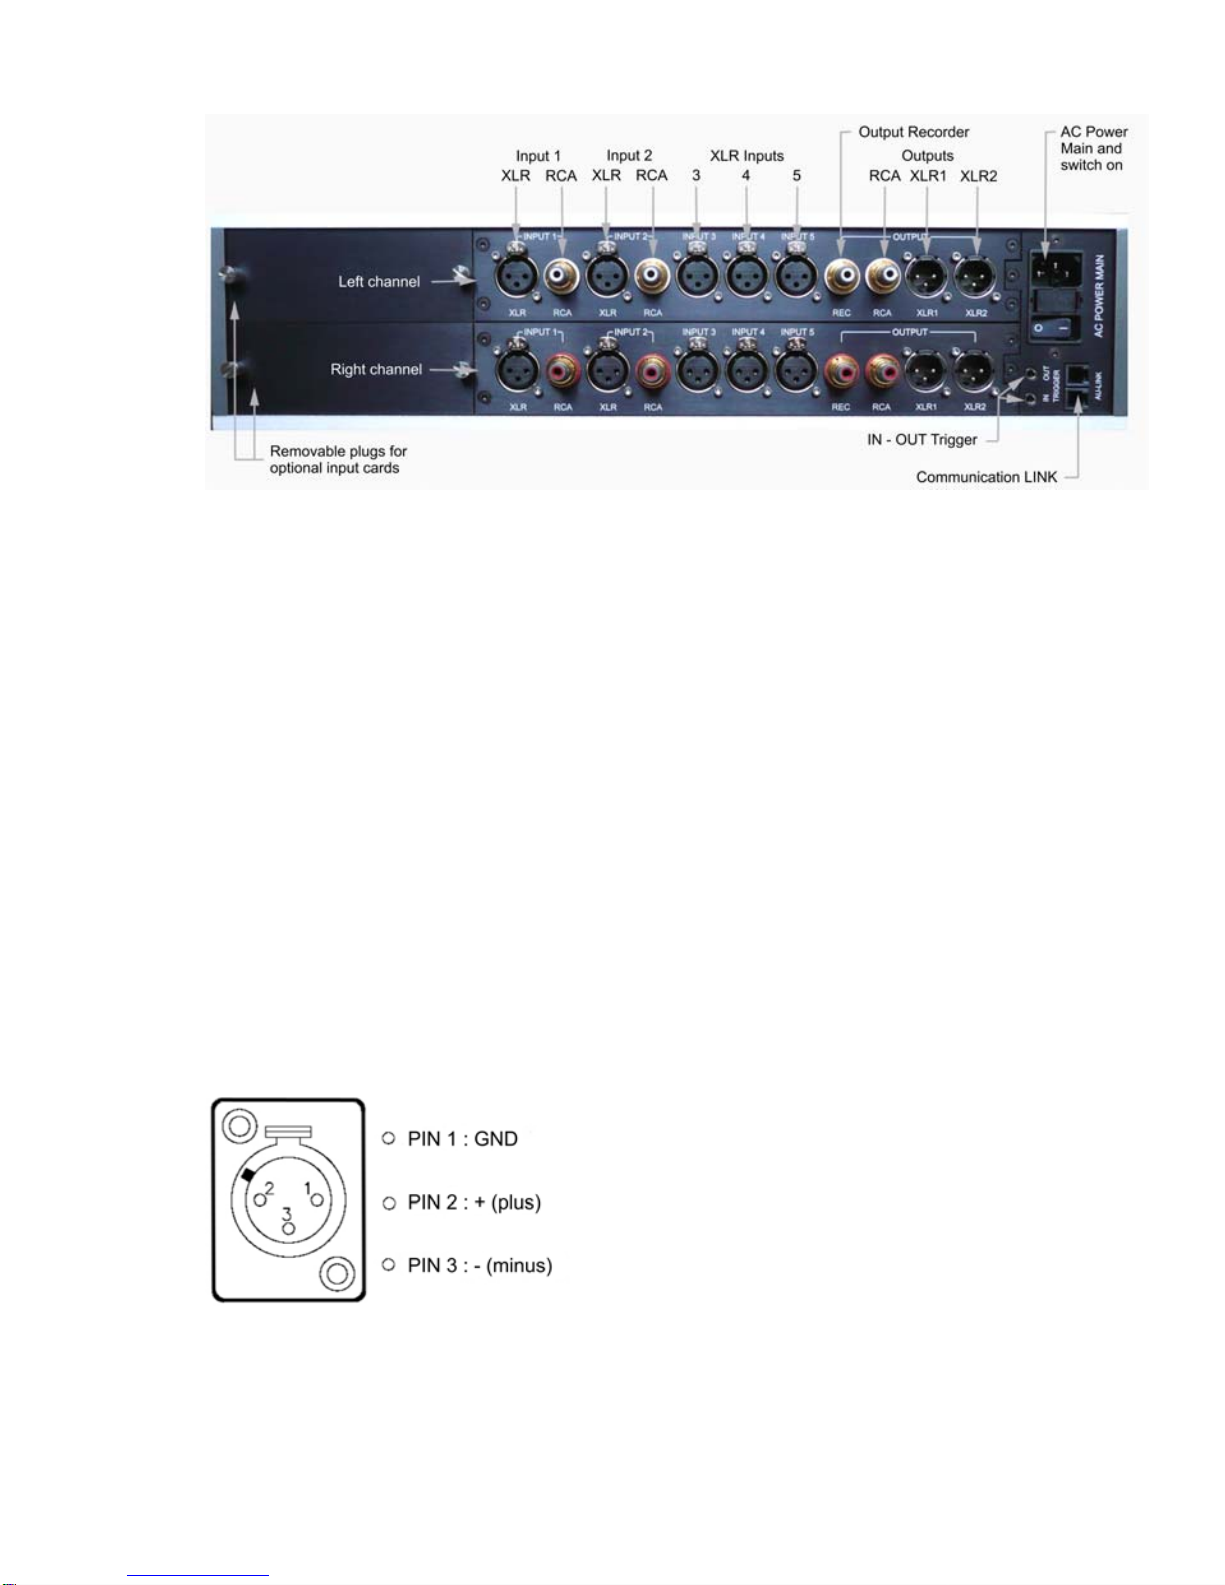
INPUT CONNECTIONS
Before connecting, make sure your device and other devices in your system
are turned off.
Audia Strumento No. 1 preamplifier has 5 stereo inputs, high-level and
variable gain:
• 2 inputs (INPUT 1 and INPUT 2) whose format is selectable balanced or
unbalanced for each by the «SET » (see below) to enable the XLR balanced
if the connection is chosen or activate RCA if it is the unbalanced
connection is chosen.
• 3 other inputs (INPUT 3, INPUT 4 and INPUT 5) in symmetrical single
format on XLR.
Using cables terminated with the proper jacks, connect the left and right
channels for each source respectively to left and right of the entrance to the
Strumento No. 1 preamplifier dedicated to this source.
Cable modulation of the highest quality are recommended for these
connections.
The polarity of the pin XLR input is shown on the diagram below:
6

7
COMMUNICATION LINK
If you have multiple Audia Flight units equipped with outlets suitable, you
can link them together and synchronize their firing and transmitting data or
service. This requires connect one end digital RJ45 cable provided in one of
the two jacks to the back of the unit and similarly, the other end in a socket
at the rear of Audia Flight unit the other. Perform these connections, all
devices off.
Never use the cable for another use or for a device that would not be an
Audia Flight.
In case of a connection between Strumento No. 1 and Audia Flight cd
players (CD ONE CD TWO or THREE CD) or power amplifier like
Strumento No. 4, it is best to place the switch located next to the catch the
latter position "slave" and select the preamplifier as "master" in the menu of
its function «SET ».
COMMUNICATION BETWEEN AUDIA FLIGHT AND
OTHER BRANDS
On the rear of Strumento No. 1 you will find two plugs called "Trigger",
format 3.5mm jack.
This connection allows devices from different manufacturers have adopted
this mode of communication and equipped with the necessary control taken
a formal position or standby simultaneously.

AC MAINS CONNECTION
Make sure the mains voltage of your system is right for which your machine
is designed and printed on the bottom of the unit. Plug the shielded power
cord supplied on the rear socket of Strumento No. 1 and then switch the
mains switch of the socket on the "I" position. The light from the center of
the "ON" button in front panel lights indicating the standby state. The
device is ready for operation after pressing the "ON" key to producing the
front for a few seconds the display on the screen:
followed by the first line display of the number of the selected entry (# 1 by
default) and the second line level, in dB, the output signal (- 90 dB, by
default, the highest low).
For proper functioning and safety of persons and property, it is essential that
your system be fitted with an effective earth whose absence may cause
malfunction. Preamplifier and other system devices must be connected.
8

FUNCTIONS AND CONTROLS
• In normal mode, the display shows on the first line the input selected and
on the second line the volume of the output.
• The volume knob on the front panel adjusts the volume in 0.5 dB steps for
each action on a range of - 90 dB minimum level at + 10 dB, maximum. It
is also used to navigate through menus accessed by different modes of the
buttons on the front.
• ON / OFF
With each new setting, the indicator light in the center of the “ON” button
turns off while the screen displays the status in which the unit will
automatically place: one that preceded his sleep.
Pressing the button again "ON" the level is reset to the minimum (- 90 dB)
and then the screen turns off: the device is put into standby. To turn it off
completely it is necessary to commutate the switch on the rear panel in
position "O".
• Input selector
The input selection is done by pressing the "input" button of the front and
turning the volume knob, clockwise to scroll on the display, the entries in
order of their number increasing or opposite direction for a sweep down.
The selected entry is one that, after a few moments, is displayed.
9

Selection can also be performed by the remote by pressing the "INPUT"
button, the scan by using the « + », in ascending or "–", in descending order,
and, after remaining displayed a few moments on the selected entry.
• Balance control :
By pressing the "balance" button, the display shows, in percentage the
output level of each channel. By turning the volume knob clockwise, the
level of the left channel and the corresponding percentage decreases also
when the level of the right channel is maximum. By turning in opposite
direction, the level decreases from the straight path, indicated by the lower
rate corresponding thereto. The setting is saved after a few minutes without
change.
Key and function are available on the remote control, adjustment is effected
by using the « + » or « – ».
• Mute
By pressing the "mute" button, the volume gradually decreases to a
minimum (- 90 dB). Pressing again the button, the volume gradually returns
the value it had previously and shown on the display.
Key and function are available on the remote.
10

• Set
This button provides access to several modes, additional functions or
facilities of use of the preamplifier. The first action of this key gives access
to the first mode SET GAIN INPUT, the following are accessible by rotating
the volume knob clockwise or the « + » button on the remote. Entry into a
mode is done by pressing the SET button, the navigation button or the
volume keys « + » or « – » on the remote. The confirmation of the choice is
made by a new action on SET. The validation of the choices is effective
after a few moments when the display returns to the first mode and then to
the normal screen.
Here is the chart of the various modes and their meanings summary:
11

• mode « SET GAIN INPUT» :
by pressing once on «SET » mode access SET GAIN INPUT is given further
support by confirming the SET mode where the gain of each input can be
increased or decreased in 1 dB steps, until 6 dB maximum, in order to
equalize their levels.
The input number flashes pending confirmation of an intervention on this
entry by pressing SET again or move to higher-order entry for the volume
button or the « + » button. Then what is the value of increased blinking
pending confirmation by the SET or modified by the volume button or « + »
or « – ». After pressing SET and a few moments, the setting is stored and
the display returns to normal.
• mode «SET XLR / RCA »:
this mode enables, for the inputs 1 and 2 only, either the XLR to a balanced
connection with the source or the RCA jacks for unbalanced use.
Upon entering this mode, the input number flashes action pending
confirmation by the SET button or change the entry by pressing the volume
button or « + » or « – ». The selected format, RCA or XLR, appears on the
first line of the screen, right. Just confirm the action by the SET or modify it
by pressing the volume button or « + » or « – » and validate to the selected
entry. The other input can be configured as the first, or not, the same way,
otherwise the display returns to normal.
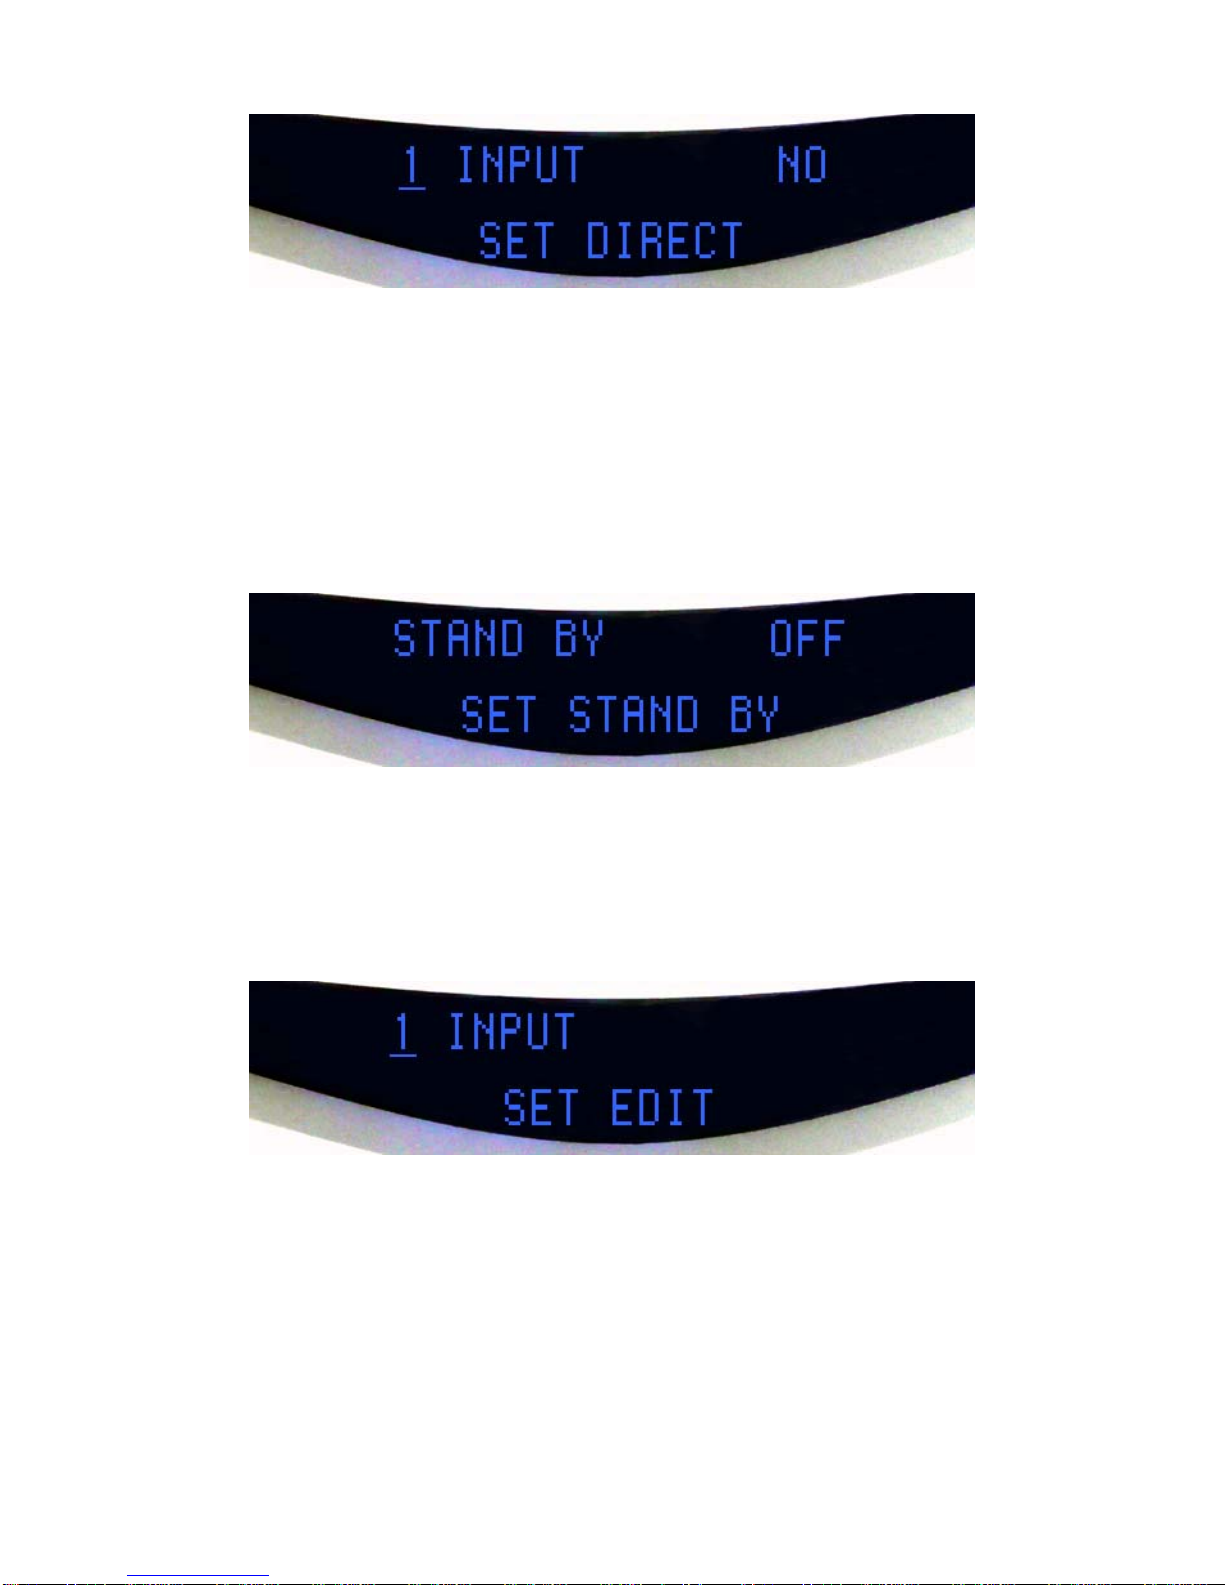
• mode «SET DIRECT » :
this mode allows you to configure one or more entries in direct connection
with the source.
CAUTION: the signal level of this input is no longer attenuated by the
preamplifier; its maximum level and is therefore likely to be excessive as
the speakers to the listener!
12
Upon entering this mode, the input number flashes. To set this entry, press
SET otherwise operate the volume button or « + » or « – » to go to another
entrance. Right on the first line of the screen displayed is NO, meaning that
by default, the input is not direct. By pressing the volume button or « + » or
« – » display becomes YES and the selected input is then directly after
sunset for validation and return to normal display.
• mode « SET STAND BY»
this mode gives the possibility to maintain the preamplifier circuits
energized when the unit is in standby, ON or OFF (default).
The choice is made by pressing the volume button or the « + » or « – » on
the remote. Validation is done by SET action after a few moments without
modification.
• mode « SET EDIT » :
By this function you can rename each input on up to 13 alphanumeric
characters.
13
Upon entering this mode, the input number flashes per share pending
confirmation SET or choosing another entry by pressing the volume button
or « + » or « – ». It is then the first character flashes; action on the volume
button or « + » or « – » characters scroll until the choice is validated by the
SET action. This action flashes the next character to the validation of its
selection as the previous one.
Once all 13 characters (or spaces) selected and validated, the display returns
to the choice of entry and in the absence of any instructions, valid in the
configuration back to normal.

• mode « SET LINK » :
in this mode, it is possible to decide the priority given to Strumento No. 1 is
as MASTER or as a SLAVE when connected to other AUDIA FLIGHT
devices by connecting by AU-LINK.
MASTER priority is recommended for the preamplifier while the sources or
their amplifier Audia Flight will switch placed near the taken-Link on the
SLAVE position.
• mode « LOAD DEFAULT »:
This mode allows you to undo any configuration selected by the SET menu
and so reset the device back in its original state at the factory.
The screen is awaiting confirmation of the display by pressing NO SET to
keep all configurations in the SET menu is obtained confirmation of YES
turning the knob or pushing the volume buttons « + » or « – » on the
remote control.
• The last mode in the SET menu is displaying the software version
management SOFT(ware).
14

REMOTE CONTROL
You will find on the remote control all the functions on the front. The menu
navigation is done with the « + » button that corresponds to the rotation of
the volume knob clockwise or « – » button corresponding to the rotation of
the volume knob in the opposite direction.
The remote control has a button « DIM » added to adjust the
• brightness of the display :
by pressing the « DIM » DIMMING the display on the bottom line followed
by an number between 0 and 8 evaluate the brightness of the display. The
action on the « + » button increases the brightness of the display on the
screen to a maximum of 8. The action of the « – » key decreases the screen
brightness to completely extinguish the minimum 0.
A reduction in the efficiency of the remote is a sign of low battery. To
replace (2 x 1.5 V AAA), open the bottom of the remote control by
loosening the screws using the tool provided and while observing the
correct polarity for the new batteries.
15

16
LISTENING TIPS
Even if the unit has already been run in for 50 hours, during which
conformity and operating tests are also carried out, we advise you to go on
with the running in for 100 hours or more.
Remember that for running in is meant operating in presence of signal.
The Strumento N.1 preamplifier is capable of revealing extremely subtle
nuances and details of recorded music; to maximize the performance of
your reproduction system, we advise you to optimize all associated
components and interconnections.
CARE AND MAINTENANCE
To remove dust on the box, use a feather duster. Do not attempt
to clean the surfaces brushed with alcohol or any other similar
solvent, using a simple wetted microfiber cloth possibly to
remove stains.

Technical Data
Inputs 2 balanced XLR or unbalanced RCA + 3 balanced XLR
Outputs 2 balanced XLR and 1 unbalanced RCA
Gain range from -90 dB to +10 dB, step 0,5 dB
Frequency response 1 Hz ÷ 1 MHz (1 W, –3 dB)
Slew-Rate > 200 V/µs (on 8 ohms)
THD < 0,05 %
S/N Ratio 105 dB
Input impedance Balanced or Unbalanced: 15 kohms, 10pF
Output impedance 5 ohms
Main voltage AC 100, 110/115, 220/230, 240 V; 50/60 Hz
Power consumption Power consumption max : 50W
Dimensions and weigth 450 x 120 x 450 mm (wxhxd) - 28 kg
Shipping dimensions and weigth 580x300x580mm (wxhxd) - 38 Kg
Strumento n° 1
17

18
Table of contents
Other Audia Flight Amplifier manuals


Popular Amplifier manuals by other brands

Bouyer
Bouyer SA 3126 manual

Command Technologies
Command Technologies COMMANDER VHF-2000 manual

Videotec
Videotec SW164OSM operating instructions

Kenwood
Kenwood KAC-823 instruction manual

Extreme Networks
Extreme Networks PPA108A user manual

XTE Electronic
XTE Electronic Digital Technology XTDT3200 user manual


