Audina SPARO Assembly instructions

Fitting Guide
for
Professional Hearing
Healthcare Providers
165 East Wildmere Avenue • Longwood, FL 32750 USA • Tel: 800.223.7700 • www.audina.net

1
table of contents
SPARO Diagram ..................................................................................................................2
Selecting the Correct Sound Tube Size ................................................................................3
Measuring Sound Tube Length ............................................................................................4
Choosing the Correct Ear Bud ............................................................................................6
Attaching and Removing the Ear Bud ..................................................................................6
Removing and Attaching the Sound Tube on the SPARO ....................................................7
How to Place the SPARO on the Ear ..................................................................................8
Cleaning the Sound Tubes ..................................................................................................9
How to Change the Microphone Filters ............................................................................10

23
Rear Microphone
The sound tubes are available in 4 different lengths and 2 different insertion depths. The ear
buds are available in 3 different sizes. You will notice on the sound tubes, there are red (right)
or blue (left) codes identifying the combination and the ear in which it belongs.
Tool Sightline Code Tube Tube
Number on Length Insertion
Tube Depth
0 0A X-Short Deep
0 0B X-Short Shallow
1 1A Short Deep
1 1B Short Shallow
2 2A Medium Deep
2 2B Medium Shallow
3 3A Long Deep
3 3B Long Shallow
Selecting the Correct Sound Tube Size:SPARO Diagram:

45
Choosing the most suitable tube length is important to the patient's comfort and fit. Use the “tube
measurement tool” to determine the correct length of sound tube for each patient.
The left (blue) and right (red) markings indicate which of
the patient's ears to measure. To ensure the correct length
is chosen, the horizontal line is a reminder that the
measurement tool must be held horizontally. At the same
time, the tube measurement tool must touch the skin
where the top of the pinna attaches to the head. Four
sightlines (0-1-2-3) indicate which tube length you should use for an accurate fitting. See the
table on page 3 for the coordinating tube codes.
Step-by-step Instructions:
Place your head at the same horizontal level as the
patient's head, so you are able to look straight into the
patient's ear.
Measuring Sound Tube length:
Hold the tube measurement tool so your thumb is
placed in the red colored area on the tool's right side
for the right ear or in the blue area on the tool's left
side for the left ear.
Place the measurement tool on the top of the
ear and in contact with the skin where the
top of the pinna attaches to the head, while
keeping the horizontal line horizontal.
Among the four sightlines (0-1-2-3), choose the one that
will fit the upper side of the ear canal. Note the
marking of the chosen sightline.
In this example “0” is the right choice.
1
2
3
4

6
7
Perform an otoscopic examination of the patient's ear canal size. Based on
the examination, choose an ear bud from the sizes available in the fitting kit
whose diameter and insertion depth is suitable for the ear canal. The ear
bud should fit snugly and comfortably into the opening of the patient's ear
canal.
If you are unsure of what ear bud to use, try a
small one first. In case of feedback or if it sits
too loosely in the ear canal, remove it and
attach the larger ear bud to the sound tube.
To attach the ear bud, push it onto the sound tube until it touches the
plastic ring.
To remove the ear bud, hold it between the thumb and index finger and pull
straight off, disconnecting from the sound tube.
Choosing the Correct Ear Bud:
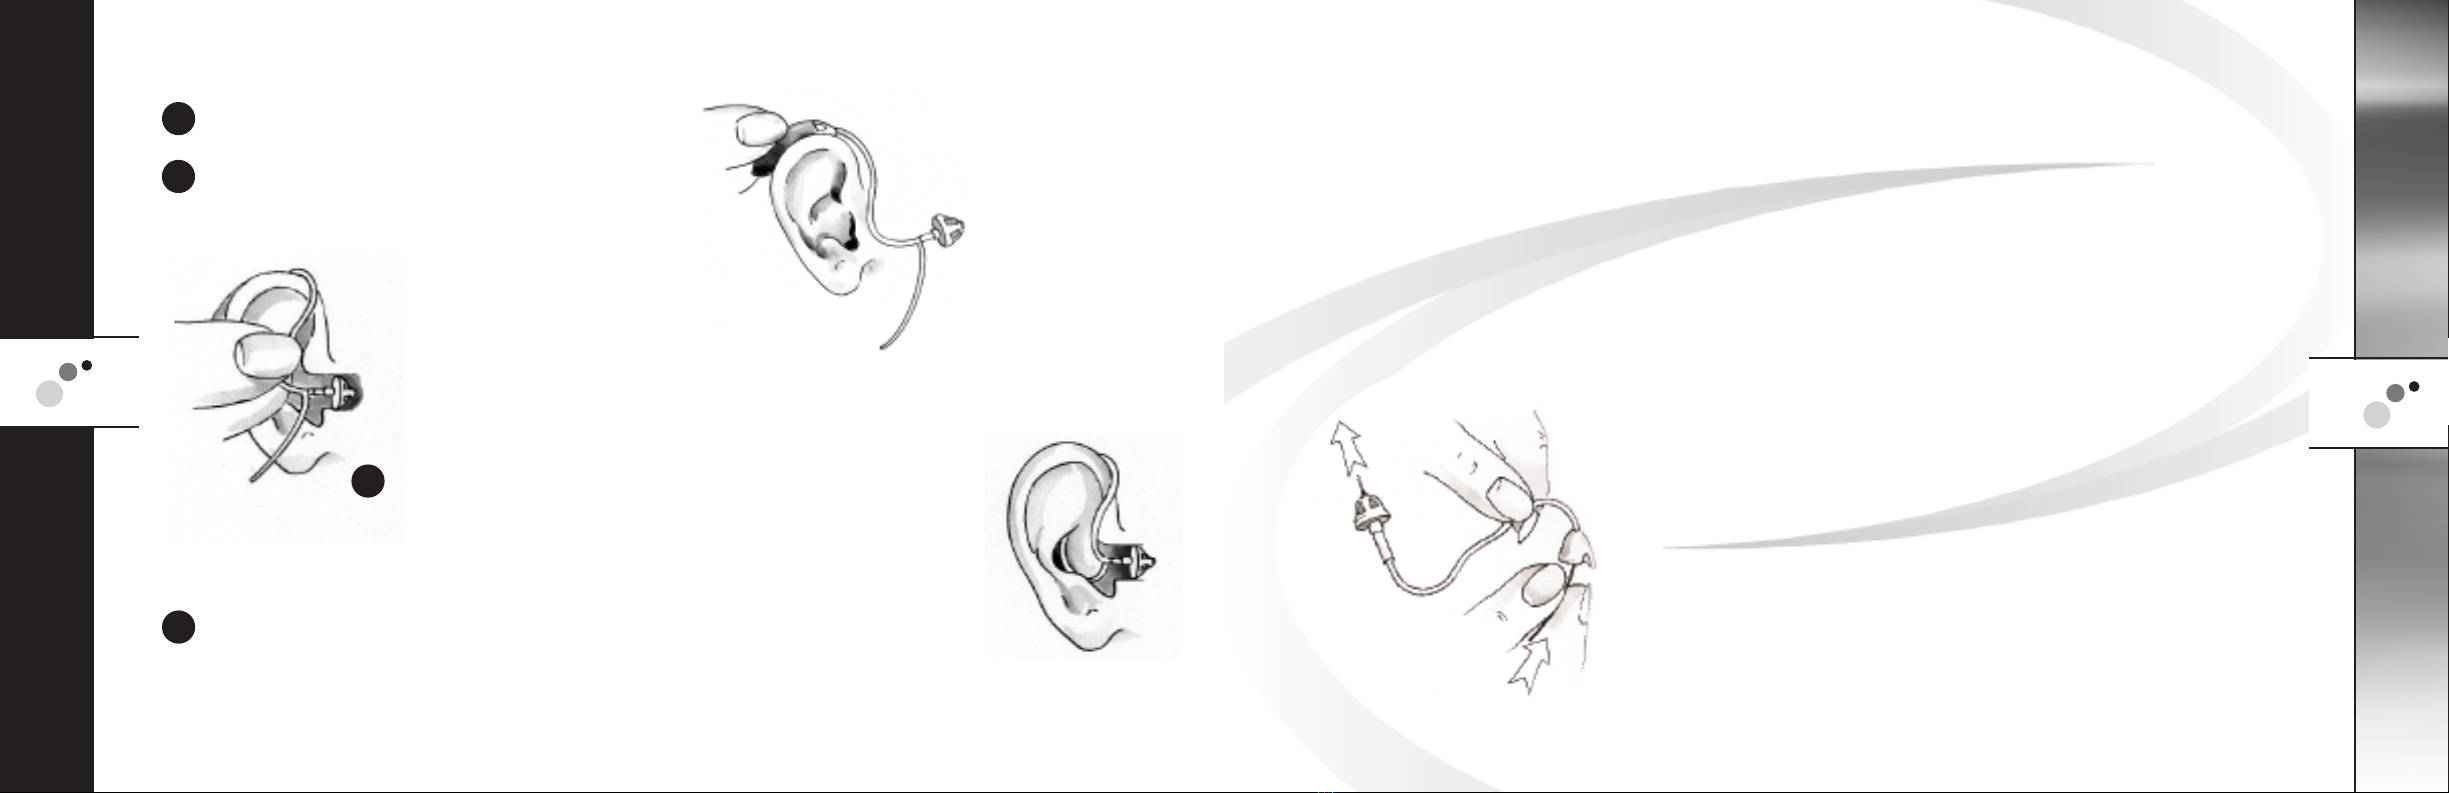
Remove the sound tube from the hearing
instrument by gently twisting the sound tube 90°
(may turn clockwise or counter-clockwise) as
shown in the illustration and pull straight out,
away from the body of the SPARO.
Re-attach the sound tube onto the body of the
instrument by holding the sound tube in one hand
and the hearing instrument in the other hand.
Using the alignment tabs on the body of the
instrument and the matching recessed
rectangles on the sound tube coupler, line-
up the sound tube and the connecting end
of the instrument, push the sound tube
straight on to the instrument body. No need
to rotate the sound tube when re-attaching.
Removing and Attaching the Sound Tube
on the SPARO:
Incorrect fit
Correct fit
Attaching and Removing the Ear Bud:
8
Position the SPARO over the top of the ear.
Grasp the sound tube where it bends near the
ear bud and push gently into the ear canal.
The ear bud should be placed far enough into
the ear so that the sound
tube lies flush with the
head. When the ear bud is
placed appropriately, the
sound tube should lie flat against the side of the head. You should not
see the sound tube sticking out when you look “face to face” with the
patient when the correct sound tube length is used.
Position the retention guard into the bowl of the
concha. If the retention guard is too long, you may cut
the length slightly. Be careful to not shorten the guard
too much as it may affect the retention in the ear.
If the device whistles, the most likely reason is the ear bud is not placed
correctly in the ear canal. Another reason might be the sound tube
connection to the instrument has become loose, in which case the sound tube must be
changed or the instrument settings are not optimal. Another reason could be build-up ear
wax in the ear canal.
How to Place the SPARO on the Ear:
9
Remove the sound tube from the hearing instrument by gently twisting the tube 90° (may turn
clockwise or counter-clockwise) and pulling it off, away from the main instrument as described
on page 7.
Use a damp cloth to clean the exterior of the sound tube and bud. Use the cleaning rod
(provided in storage case) to clean the sound tube and bud. Lightly “push” the cleaning rod
through the sound tube, inserting at the opening where the tube attaches to the body of the
instrument and push out through the bud.
Do not rinse or submerge these parts in water, there is a risk of
damage if a water drop becomes trapped in the sound tube.
If this should occur, it will prevent sound from coming
through the tube and may be harmful to the instrument's
electronics.
Re-attach the sound tube onto the body of the instrument
by holding the sound tube in one hand and the hearing
instrument in the other hand. Line-up the sound tube and
the connecting end of the instrument, push the sound tube
straight on to the instrument body. No need to rotate the
sound tube when re-attaching. Refer to page 7 for illustration.
Cleaning the Sound Tubes:
1
2
3
4

10
Rotate the sound tube 90° (may turn clockwise or
counter-clockwise) to gain access to the
Microphone filter (you may remove the sound tube
completely by pulling straight off after turning 90
degrees.
Using a suitable tool, gently insert the tool through
the opening of the filter, being careful not to damage
the microphone suspension. Gently pry the microphone
filter out away from the body of the instrument.
How to Change the Microphone Filter:
1
2
3
4
Locate smooth flat side of replacement filter and
align with the opening in housing with smooth
side facing outward (wrong side has a recessed
center).
Press replacement filter into place evenly to sit
flush with the housing opening.
Rotate sound tube coupler back into original position
or push straight onto instrument body if you removed
the sound tube completely in Step 1.
11
5
Other manuals for SPARO
1
Table of contents
Other Audina Hearing Aid manuals


