Audio Control DQ-61 User manual

page 1
Six Channel Line Output Converter with Signal Delay, Equalization
and AccuBASS®for interfacing with factory installed audio systems
The DQ-61 is your gateway to amazing
sound from a factory head unit. It is a com-
pact six channel, high-performance, line level
converter with independent multi-channel
equalization and signal delay to custom tune
the system. AudioControl’s patent
pending AccuBass®system corrects
for the factory bass roll-off present in
so many of today’s cars. In short; the
DQ-61 can make every car sound its
very best.
Key Features of The DQ-61
Here are some of the unique features of the AudioControl DQ-61:
8VHUIULHQGO\6LJQDO'HOD\WRFRQWUROWKHDFRXVWLFDODOLJQPHQWEHWZHHQWKH
left and right channels plus the front and subwoofer channels
,QGLYLGXDOHTXDOL]DWLRQFRQWUROVIRUWKHIURQWUHDUDQGVXEZRRIHUFKDQQHOV
for simple yet precise system tuning
6L[FKDQQHOVRIDFWLYHVSHDNHUOHYHOLQSXWV±DFFHSWXSWRZDWWVSHU
channel
$FFX%$66$XGLR&RQWURO¶VSDWHQWHGSHQGLQJSURFHVVLQJWRFRUUHFWWKH
bass roll-off in factory source units
$&5'DVK&RQWURO5HPRWHDOORZVIRUFRQWURORIWKHVXEZRRIHUOHYHOSOXV
processing bypass
,QWHUQDO&KDQQHO6XPPLQJ±(DV\LQWHUIDFHZLWKIDFWRU\LQVWDOOHGDPSOL¿
ers with built-in crossovers
'LVFUHWH,QSXWand Output level controls
*72VLJQDOVHQVLQJLQSXWVVHOHFWDEOHWRWXUQWKH'4RQDXWRPDWL
FDOO\DQGJLYH\RXDYROWWULJJHUWRWXUQRQ\RXUDPSOL¿HU
%XOOHWSURRI\HDUZDUUDQW\ZKHQLQVWDOOHGE\DQDXWKRUL]HG$XGLR&RQWURO
GHDOHU
®Making Good Sound Great®
®

Quick Install Guide
If you are a seasoned audio enthusiast and are chomping at the bit to begin
\RXUH[SHULHQFHZLWKWKH'4ZHRIIHUVRPH4XLFN,QVWDOO*XLGHOLQHVEHORZ
to help maximize your experience. Please refer to the system diagrams on page
8 as good guidelines.
1Physically mount the DQ-61 in a location that keeps it away from bever-
DJHVSLOOVIRRGFUXPEVDQGFXULRXV¿QJHUV<RXZLOOZDQWWRVHOHFWDORFDWLRQ
WKDWDOORZV\RXDFFHVVWRWKHWRSSDQHOFRQWUROV,QPDQ\FDVHV\RXFDQ¿QG
IDFWRU\VSHDNHUOHDGVLQWKHUHDURIWKHYHKLFOHRUDWWKHIDFWRU\DPSOL¿HUWKDW
are easy to access.
27KH'4QHHGVWREHLQVWDOOHGLQWKHVLJQDOSDWKEHWZHHQ\RXU2(0
VRXUFHXQLWRUIDFWRU\DPSOL¿HUDQGDQDIWHUPDUNHWDPSOL¿HUDQGRU
SURFHVVRUVDo not connect the DQ-61 between the factory head unit and
WKHIDFWRU\DPSOL¿HU/RFDWHWKHDPSOL¿HGspeaker wires that are coming from
\RXUIDFWRU\VRXUFHXQLWDQGRUDPSOL¿HUDQGFRQQHFWWKHPWRWKHVSHDNHUOHYHO
inputs on your DQ-61.
Note: If your source unit has front, rear, and subwoofer speaker-level out-
puts, connect them to the three sets of inputs on your DQ-61. If the source unit
only has front and rear outputs, the Auto Mode circuitry in your DQ-61 auto-
matically routes the Channel 2 input channels to the (Channel 3) subwoofer
channels.
38VH5&$FRQQHFWLQJFDEOHVWRFRQQHFWWKH5&$RXWSXWVRIWKH'4WR
\RXUDIWHUPDUNHWDPSOL¿HUV,IWKLVLVQRWREYLRXVWR\RXTXLFNO\SDFNXS
your DQ-61 and run to your nearest authorized AudioControl dealer to have
WKHPSHUIRUPWKHLQVWDOODWLRQ<RXZLOOWKDQNXVODWHU
4Connect +12 volt power, ground and turn-on wires as needed. Don’t forget
the fuse! Note: The DQ-61 has a 12-volt trigger input but normally you will
MXVWOHWWKH*72WXUQRQFLUFXLWWDNHFDUHRIWKDWE\LWVHOI
5&RQQHFW\RXUDPSOL¿HUWULJJHULQSXWWRWKHYROWWULJJHURXWSXWRIWKH
DQ-61
6Turn your amp gains fully down before turning on the system.
7Turn on the system and level match your DQ-61 to your source unit and
DPSOL¿HUV
8On the chassis of the DQ-61, set Signal Delay Mode to Set-Up.
98VLQJWKH'DVK&RQWURODGMXVWWKHVLJQDOGHOD\EHWZHHQWKH/HIWDQG5LJKW
FKDQQHOVIRURSWLPXPVRXQG&KHFNRXWRXU<RX7XEHYLGHRIRUDVVLVWDQFH
07DSWKH$&5'DVK&RQWURODQGDGMXVWWKHVLJQDOGHOD\EHWZHHQWKHIURQW
and subwoofer outputs.
On the chassis, change Signal Delay Mode to Normal.
page 2

6HWWKHHTXDOL]DWLRQFRQWUROVIRUWKH
front, rear, and subwoofer channels. While
your ears are a good reference point, we rec-
ommend using an audio analyzer whenever
possible.
$GMXVWWKH$FFX%$66VHWWLQJIRUPD[L-
mum bass.
6LWEDFNDQGHQMR\WKHVRXQG
If you have gotten to this point and you have no questions, then “Congratula-
tions” With that said we certainly encourage you to set aside some time to grab
a beverage or two and read through this entire manual as there is a tremendous
amount of useful information. Plus we took the time to write it so it must be
important.
We now interrupt your reading of this manual to highlight a very important
feature of all AudioControl autosound products…
Our Bulletproof Warranty
AudioControl autosound products are designed and assembled at our factory
LQWKH3DFL¿F1RUWKZHVWMXVWRXWVLGHRIDOLWWOHWRZQFDOOHG6HDWWOH%\QDWXUH
our products are rather sophisticated so we spend a good deal of time training
our dealers and their installation team. We do this so you will get the best pos-
sible results from your AudioControl components.
To reinforce this point, if you have an Authorized AudioControl dealer install
\RXU'4ZHZLOOH[WHQGWKHQRUPDORQH\HDUZDUUDQW\WRDIXOO),9(\HDUV
parts and labor. Complete details of this warranty
are listed at the end of this manual and on our
website at www.audiocontrol.com.
We now return you to your
regularly scheduled reading.
page 3
AudioControl Real Time Analyzer

➎
page 4
A Guided Tour of DQ-61
➊Speaker-level Inputs: The DQ-61 has six speaker-level inputs. These
inputs get their signals from the speaker-level outputs of your factory-installed
VRXUFHXQLWRUDPSOL¿HU,I\RXUVRXUFHXQLWKDVIURQWUHDUDQGVXEZRRIHUVLJ-
nals, connect them to the corresponding inputs on your DQ-61. If your source
XQLWRQO\KDVIURQWDQGUHDUVLJQDOVWKH$XWR0RGHFLUFXLWU\RIWKH'4ZLOO
URXWHWKH&KDQQHOVLJQDOVWRWKH&KDQQHOVXEZRRIHURXWSXWV
➋ Input Level Controls: The DQ-61 is capable of receiving high wattage
VLJQDOVIURPIDFWRU\LQVWDOOHGVRXUFHXQLWVDQGRUDPSOL¿HUV7KHLQSXWOHYHO
controls allow you to adjust the input signal levels for maximum audio perfor-
mance of the DQ-61.
➊
➋
➌
➍

page 5
➐
➓
➌Equalization Controls: To custom tune your system, the DQ-61 gives
\RXGHGLFDWHGHTXDOL]DWLRQFRQWUROVIRUWKH)URQW5HDUDQG6XEZRRIHURXWSXWV
6HHWKHVHFWLRQRQEqualization Optimization, page 9 for more details on how
to set these for optimum performance.
➍AccuBASS®Settings: This patent pending circuit compensates for the
bass roll-off characteristics of many factory installed source units. The Thresh-
old and LevelFRQWUROVOHW\RXGHWHUPLQHZKHQWKH$FFX%$66®circuit engages
DQGZKDWOHYHORIFRUUHFWLRQWRDSSO\6HHSDJHIRUPRUHLQIRUPDWLRQ
➏
➒
➑

page 6
➎Signal Delay Mode: This allows the user to put the DQ-61 into a Set-Up
mode and adjust the signal delay settings using the dash control. Turn knob to
the right until the Set-Up/('FRPHVRQ:KHQGRQHWXUQNQREWRWKHOHIW
Normal setting for regular music listening.
➏Ground:&RQQHFWWRDJRRGYHUL¿HGFKDVVLVJURXQGWKHEDWWHU\FRPHVWR
PLQG:DUQLQJ)DFWRU\JURXQGZLUHVW\SLFDOO\KDYHPXOWLSOHGHYLFHVFRQ-
nected to them so it is not recommended to use them.
➐+12V Power:&RQQHFWWRDJRRGVRXUFHRIYROWSRZHUWKHEDWWHU\
FRPHVWRPLQG
➑Remote In: In some unusual installations, you may not want to use the
*72WRWXUQRQ\RXUV\VWHPGXHWRVHFRQGDU\IXQFWLRQVZLWKIDFWRU\LQ-
stalled source unit. For these cases the DQ-61 can be turned on remotely with a
+12-volt trigger.
➒Remote Out: Outputs 12 volts with 1 amp of current when the DQ-61
is powered up, so you can turn on external devices like signal processors and
DPSOL¿HUVZLWKWKLVZLUH
➓ Maximized Indicator:7KLVEULJKWO\FRORUHG/('LQGLFDWHVZKHQWKHVLJ-
nal level coming into your DQ-61 is just below clipping. When properly level
PDWFKHGWKLV/('VKRXOGÀLFNHURFFDVLRQDOO\ZKHQ\RXUV\VWHPLVSOD\LQJDW
its maximum volume level.
Power: If you have connected all of your power wires correctly, this light
should be bright red when your system turns on.
Remote Level Control (ACR-3): In the Set-Up mode this control allows
for setting the signal delays, and in the Normal mode, it gives the user control
RYHUWKH6XEZRRIHU&KOHYHORXWSXW$GGLWLRQDOO\LQWKHNormal mode, when
you tap this switch you will bypass the equalization, signal delay , and Accu-
%$66SURFHVVLQJRI\RXU'4VR\RXFDQFRPSDUHWKHVRXQG
Pre-Amp Outputs:7KHVH5&$SOXJVVKRXOGEHFRQQHFWHGWRWKHQH[W
FRPSRQHQWDIWHUWKH'4VXFKDVDFURVVRYHURUDPSOL¿HU'RQRWFRQQHFW
DQ\VSHDNHUVGLUHFWO\WR\RXU'4'H¿QLWHO\GRQ¶WFRQQHFWWRDQ\KRPH
DSSOLDQFHVOLNH\RXUEOHQGHURUWRDVWHU
Output Level Controls: These knobs allow you to adjust the signal level
IURP\RXUVRXUFHXQLWWRPDWFKWKHLQSXWRI\RXUDIWHUPDUNHWDPSOL¿HUV
Channel Summed Indicators:7KHVHJUHHQOLNHRXUJUDVV/('LQGL-
cators let you know which channels are being summed into the main inputs.
8QGHUWKHFRYHURI\RXU'4DUHMXPSHUVWKDWZLOODOORZ\RXWRVXPVHOHFWHG
FKDQQHOVLQWRWKHPDLQDQGUHDUFKDQQHOV

Under the Covers - Internal Jumpers
<RXFDQRSWLPL]H\RXU'4XVLQJPRVWRIWKHFRQWUROVPRXQWHGRQWKHWRS
of the chassis. However, we recognize there are situations where advanced users
PD\KDYHWKHQHHGWRFRQ¿JXUHWKH'4IRUVSHFL¿FDSSOLFDWLRQV7KHUHIRUH
we have provided a few setting that are located under the chassis top for limited
access.
➊ Output Summing Jumpers:6RPHIDFWRU\LQVWDOOHGDXGLRV\VWHPVLQFOXGH
VHSDUDWHDPSOL¿HUVWKDWRXWSXWOLPLWHGEDQGZLGWKVLJQDOVWKDWDUHDFWLYHO\FURVVHG
over and are connected
directly to tweeters, mid-
UDQJHVDQGRUZRRIHUV)RU
optimum performance you
ZLOOZDQWWRFRPELQHRU
VXPWKHVHVHSDUDWHVLJQDOV
into a single full range sig-
nal. The DQ-61 facilitates
this internally via simple
jumper settings that allow
you to select which input
signals will be summed into
the Front/Main outputs.
An additional feature is that once you move the Summing jumpers to On, the
audio signal coming from the Main Output will also come out of the Channel 2
Output. When the jumper is moved to the “On” position for a selected channel,
the corresponding indicator light on the front of the DQ-61 will turn green The
shipped-from-the-factory setting is in the OFF or non-summed position.
➋GTO™ Signal Sense: In selected situations, factory installed audio sys-
tems may turn ON or “wake up” due to convenience features like doors chimes,
alarms, and cell phone signals triggering the source. To prevent these from turn-
LQJ\RXUDXGLRV\VWHPRQXQH[SHFWHGO\\RXFDQE\SDVVWKH*72FLUFXLWE\
PRYLQJWKH*72MXPSHUDQGXVHDVZLWFKHGYROWVLJQDOFRQQHFWHGWRWKH
Remote InWHUPLQDO7KH'4VKLSVWKH*72LQWKHOn position.
➌Ground Isolation Selector: Alternator noise may appear in a system be-
FDXVHWKHVRXUFHXQLWDQGDPSOL¿HUVDUHXVLQJGLIIHUHQWJURXQGLQJVFKHPHV7R
KHOSLQWKLVVLWXDWLRQZHKDYHSURYLGHGDOWHUQDWLYHJURXQGLQJFRQQHFWLRQV0DNH
sure your system is turned OFF before you move these jumpers. We ship them in
the isolated position, which usually gives the best results.
➍AutoMode:6RPHFDUVKDYHORZOHYHORURWKHUXQXVXDOVLJQDOVRQWKHLU
VSHDNHUOHDGVWKDWPD\QRWWULJJHUWKH$XWR0RGHFLUFXLWDQGUHVXOWLQVLJQDO
switching. When this occurs you can manually turn off the AutoMode function.
This is done by moving the internal AutoMode jumper to “Defeat”.
page 7
➊➋➌
➍

System Diagrams for The DQ-61
Typical DQ-61 Installation
DQ-61 Installed with The Epicenter
DQ-61 Installed with a 6XS
page 8

The DQ-61 Has A Number Of Great Features
Signal Delay Operation
Because of speaker placement limitations and the seating position in a
car the driver of the vehicle is in an incorrect acoustic alignment with the
speakers. The following steps will help set up delaying the appropriate
speakers for just a few milliseconds, so the DQ-61 is able to allow the
different signals to arrive at the same time putting the driver in perfect
acoustical alignment.
1For best performance and ease of set-up, go to our website at www.
DXGLRFRQWUROFRPDQGGRZQORDGWKH'46HW8S$SSIRU\RXU$SSOH
L3KRQHRUL3DG,W¶V)5((DQGZLOOKHOSWDNHDOOWKHJXHVVZRUNRXWRI
setting up the delay. However, if you do not have access to an iPhone or
iPad you can set up the delay just by using your own two ears.
2After you have made all your power and ground connections, plug in
DOO\RXULQSXWVDQGRXWSXWVWXUQWKH6LJQDO'HOD\NQRERQWKHFKDVVLVDOO
the way to the right to go into Set-Up Mode<RXZLOOQRWLFHWKDWZKHQ
\RXDUHLQ6HW8SPRGHWKHEOXHOLJKWZLOOEOLQNRQWKH$&5GDVK
remote.
3<RXZLOOQHHGWRPDNHVXUHWKDWDOO\RXUGHOD\VHWWLQJVDUHDW]HUR
6WDUWZLWKWKH/HIWWR5LJKWVHWWLQJWKH5HGOLJKWRQWKHUHPRWHZLOOEH
VROLGDQGWXUQWKHNQREFRPSOHWHO\&/2&.:,6(XQWLO\RXQRORQJHU
KHDUDQ\0XWH&OLFNV2QFH\RXKDYHYHUL¿HG\RXU/HIWWR5LJKWLVVHWWR
]HUR\RXZDQWWRQRZVHW\RXU6XEWR)URQWGHOD\DW]HUR6LPSO\SXVK
WKHGDVKUHPRWHWRVZLWFKIURP/HIWWR5LJKWWR6XEWR)URQW$WWKLVWLPH
the blue light will continue to blink and the red light will turn off. Again,
WXUQWKHNQRE&/2&.:,6(XQWLO\RXQRORQJHUKHDUDQ\0XWH&OLFNV
<RXKDYHQRZVHWDOORIWKHGHOD\LQWKH'4WR]HUR
page 9

Normal Mode (Dash Knob Controls Sub Out)
Blue On Red On
Blue On Red Off
Both Lights ON
6LJQDO'HOD\(QJDJHG
(TXDOL]HU(QJDJHG
$FFX%$66®(QJDJHG
Blue Light Only
6LJQDO'HOD\'LVHQJDJHG
(TXDOL]HU'LVHQJDJHG
$FFX%$66®Disengaged
Set-up Mode (Dash Knob Controls Signal Delay)
Blue Flashing Red On
Blue Flashing Red Off
Blue Light Flashing, Red Solid
6LJQDO'HOD\$GMXVWPHQW/HIWWR5LJKW
Blue Light Flashing, Red Light Off
6LJQDO'HOD\$GMXVWPHQW6XEWR)URQW
page 10

4Now you are going to want to choose your source material to listen
to while setting the delay. Choose a song that has very strong vocals and
limited instruments. This will make it much easier to “move” the image
from down at your left knee where it currently exists to up on the center
of the dash where it needs to be.
5Left / Right delay3XVKRQWKHGDVKUHPRWHXQWLOWKHEOXH/('LV
EOLQNLQJDQGWKHUHG/('LVVROLG:LWKWKHVRXUFHPDWHULDOSOD\LQJ
VORZO\WXUQWKHGDVKFRQWURONQRE&2817(5&/2&.:,6((DFKGH-
WHQWLQWKHUHPRWHUHSUHVHQWVDQDPRXQWRIWLPHLQPLOOLVHFRQGVWKDW\RX
DUHGHOD\LQJWKH/HIW)URQW6SHDNHU:HKDYHDGGHGDVPDOO0XWH&OLFN
along with the detent on the remote to help you determine your amount
RIGHOD\.HHSLQPLQGWKDWLI\RXWKLQN\RXKDYHJRQHWRRIDU\RXFDQ
always start over. Just turn the knob all the way clockwise to start back
at zero and slowly turn counter clockwise until you reach your desired
result.
6Front/Subwoofer Delay2QFH\RXKDYHGLDOHGLQ\RXU/HIW5LJKW
delay, it’s time to set up the sub. Push on the dash remote to switch delay
modes and verify that the blue light continues to blink but the red light is
RII([DFWO\OLNH\RXGLGVHWWLQJXSWKHIURQWOHIWVSHDNHUVWDUWE\VORZO\
turning the knob &2817(5&/2&.:,6( to add delay to both of the
IURQWVSHDNHUV<RXZLOOQRWLFHZLWKHDFK0XWH&OLFNRIWKHUHPRWHWKH
sub will move forward toward the driver. Again, if you think you have
gone too far or missed that ‘sweet spot’ you can always start over by just
turning the knob back all the way clockwise and repeat the process again.
2QFH\RXKDYHHYHU\WKLQJZKHUH\RXZDQWLW\RXDUHGRQH(DV\ULJKW"
1RZMXVWJREDFNWRWKH6LJQDO'HOD\NQRERQWKH'4DQGWXUQLW
counter clockwise back to Normal mode and you are ready to move to
the next step of set-up.
Equalization Optimization
When it comes to music, everyone has his or her own particular taste.
6RPHSHRSOHZDQWSRXQGLQJEDVVDQGFULVSEORRGFXUGOLQJKLJKV2WKHUV
PD\SUHIHUD³ÀDW´UHVSRQVHZKDWHYHUWKHKHFNWKDWLV$WWKHHQGRI
the day, most people just want their system to sound balanced and “just
like it did in the store” or similar to their buddy’s car. The following
equalization guidelines should help you achieve your own personal audio
nirvana.
1For optimum performance, get your hands on a test compact disc
WKDWFRQWDLQVSLQNQRLVHDQGDJRRGTXDOLW\57$UHDOWLPHDQDO\]HUZH
happen to know someone who makes a really good one. If you cannot
ORFDWHDQ57$\RXSUREDEO\ZDQWWRKDYH\RXUDXWKRUL]HG$XGLR&RQWURO
GHDOHUSHUIRUPWKHHTXDOL]DWLRQDGMXVWPHQWVDVWKH\ZLOOKDYHRQH<RX page 11

FDQFHUWDLQO\DGMXVW\RXU'4XVLQJ\RXUHDUVKRZHYHUDQ57$ZLOO
give you the best results.
2Begin playing pink noise through your system and place the micro-
phone for your analyzer on a microphone stand in the drivers seat. Take
a careful look at the “curve” on your analyzer and how one frequency
combines with the next. There is no one curve that will satisfy every per-
son, as we all have different tastes. How else can you explain Liberace
RUULFHFDNHV"7KHNH\LVWRXVH\RXU'4WRKHOSEDODQFH\RXUV\VWHP
from one frequency to the next and give your speakers the sparkle, sizzle,
detail or punch that the acoustics of the car have compromised.
3<RXZLOOZDQWWRVWDUWHTXDOL]LQJE\UHPRYLQJRUFXWWLQJDQ\ODUJH
bumps, peaks, or areas with too much energy at a particular frequency.
Next, boost the ranges that do not have enough energy. We strongly rec-
ommend that you cut or decrease energy before you boost.
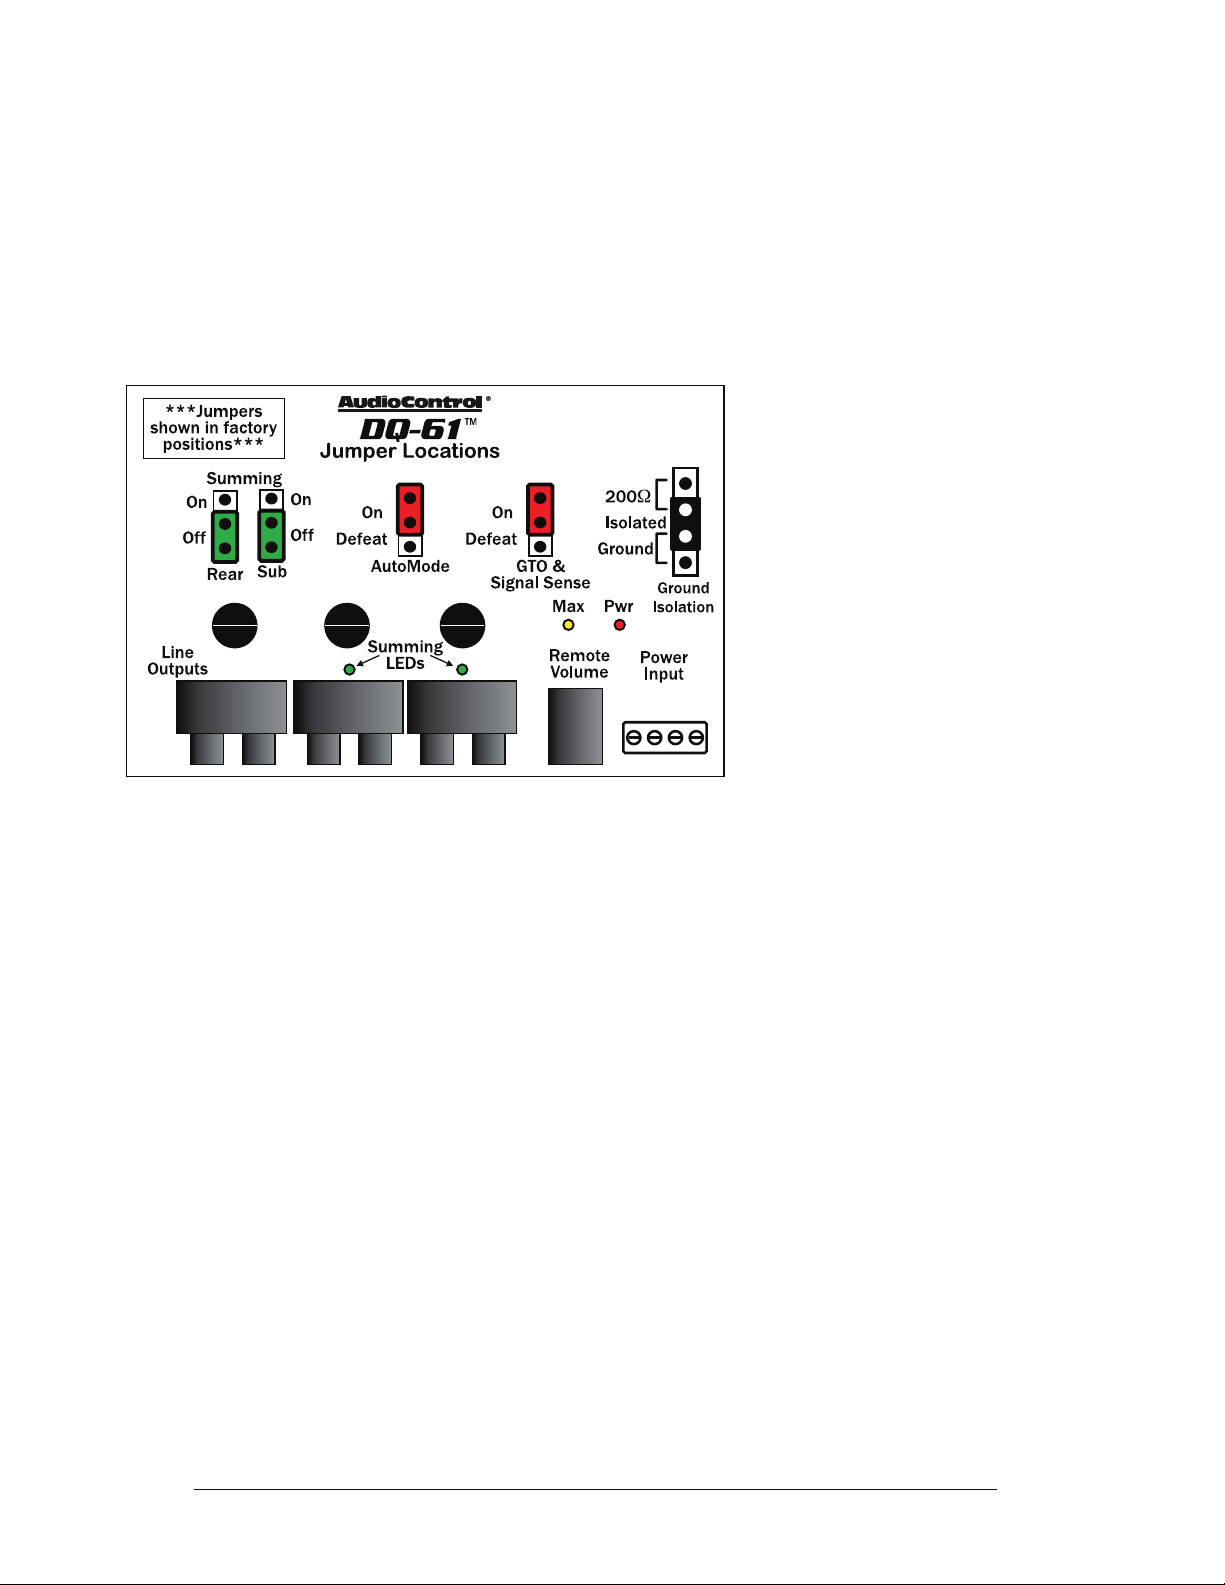
4Although the plethora of knobs on your DQ-61 can be intimidating,
fear not as they were designed to give enough control to maximize your
systems performance but not enough to get you in trouble. Here is an
explanation of the key areas you should focus on:
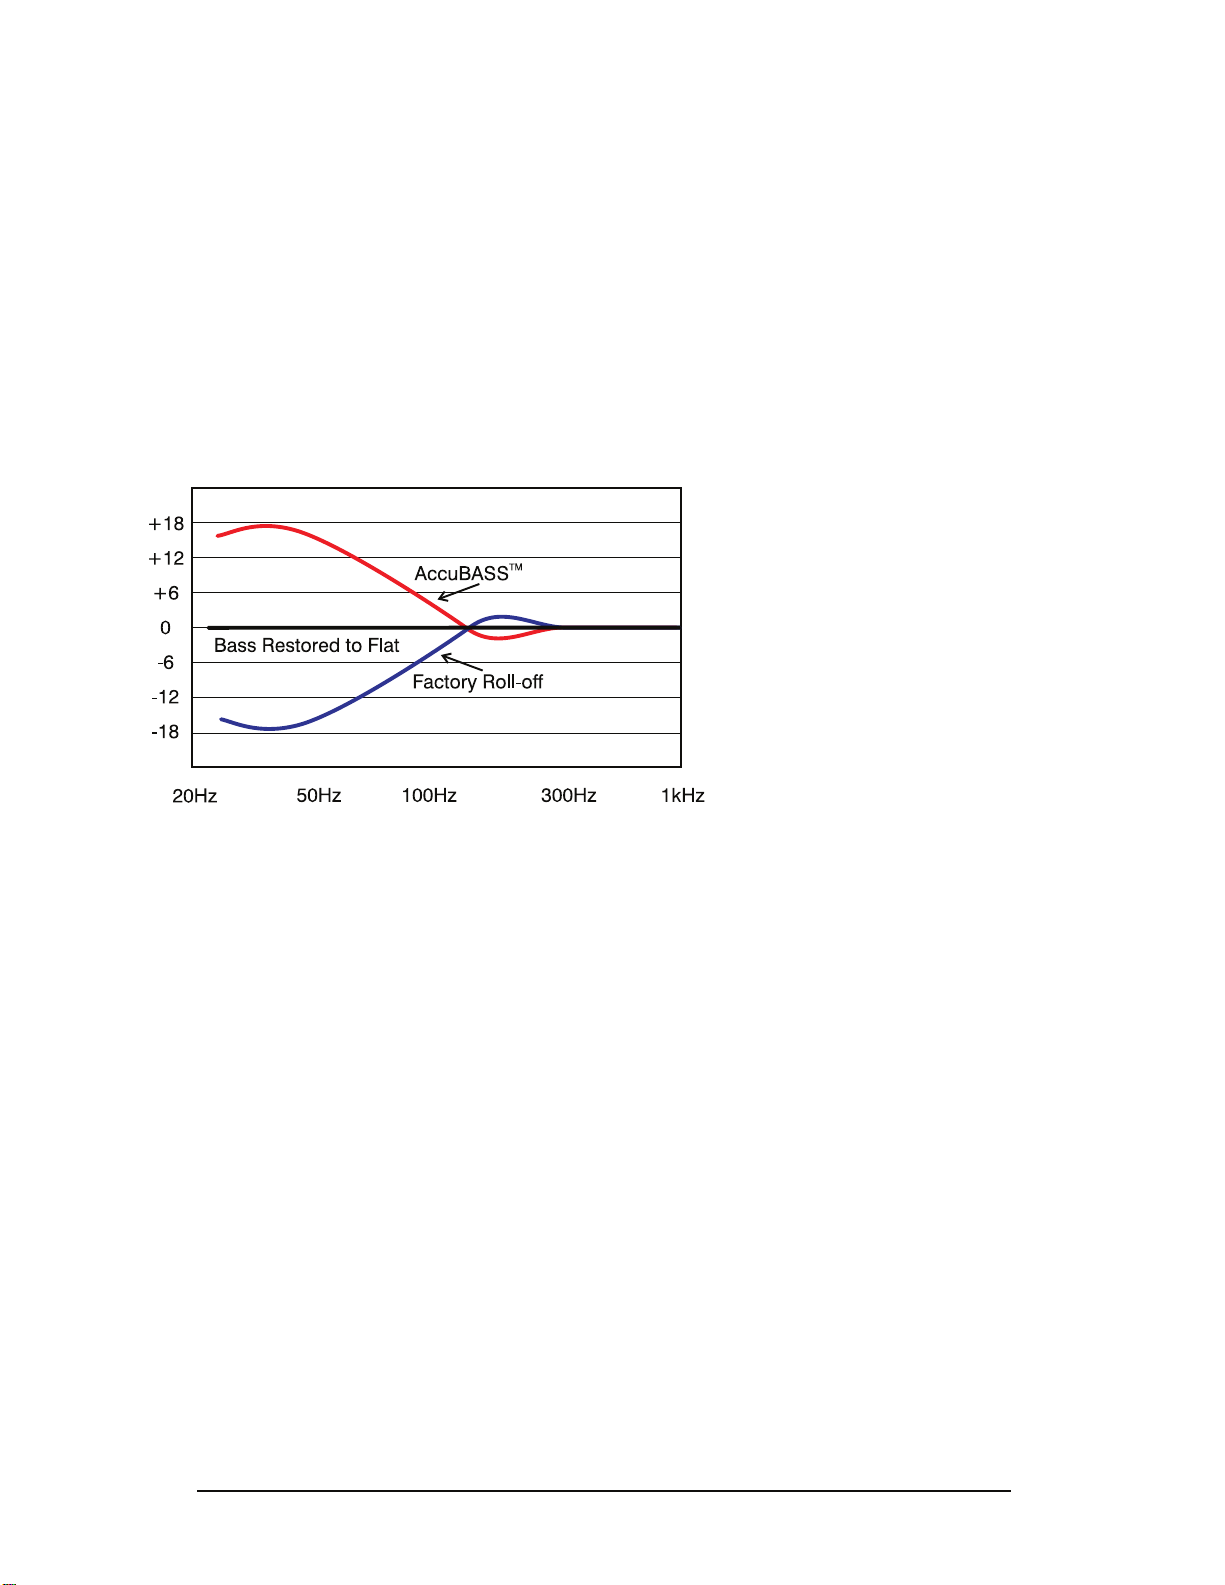
Sub-bass: 100 Hz and below – A car without bass is like a day with-
out sunshine... unless you live where we do because most of the days in
WKH3DFL¿F1RUWKZHVWGRQRWKDYHVXQVKLQH7KLVDUHDLVRQHRIWKHPRUH
FULWLFDODOWKRXJKLWLVDOVRRQHRIWKHPRVWGLI¿FXOWWRSURSHUO\UHSURGXFH
0RVWSHRSOHSUHIHUWKHLUEDVVIUHTXHQFLHVWREHWRG%ORXGHUWKDQWKH
rest of their system, although there are some crazy folks that prefer their
bass substantially louder. The key in this area is to have enough speak-
ers and power to produce the amount of bass you desire but don’t use the
controls on the DQ-16 to try and force your speakers to produce sounds
they can’t. Too much bass boost creates a condition called “speakerus
explodus”, which is not pretty to hear or watch.
Midbass: 100 Hz to 300Hz – The phrase, “too much of a good thing”
can certainly apply to the midbass frequencies. This is the transition area
of the audio spectrum that is an octave above your sub-bass frequencies
DQGVHYHUDORFWDYHVEHORZ\RXUPLGUDQJH0RVWDXWRVRXQGV\VWHPVKDYH
too much midbass due to the fact that speakers mounted in the doors
or kick panels cause resonance’s or peaks in the response curve. These
peaks in the midbass can actually mask or block sounds in the all-impor-
tant midrange area causing your system to sound dull or lifeless.
Midrange: 300Hz to 3Khz – 0XVLFDOLQVWUXPHQWVYRFDOVPLGUDQJH
percussion and many things we associate with imaging and staging hap-
page 12

pen in this area of the bandwidth. For that reason you will want to keep
this area as smooth and balanced as possible. Too much boosting can
make you feel like your listening to your system in a tile bathroom. Not
enough energy the midrange sounds empty and dry.
Treble: 3KHz and Up – If midrange is the cake, then these high or
XSSHUIUHTXHQFLHVDUHFRQVLGHUHGWKHIURVWLQJ0DQ\DXWRVRXQGV\VWHPV
start a gradual decline in this area which is why speaker placement is
very important. The DQ-61 only gives you a few controls in this area
because too much boosting can really make a speaker sound un-natural.
Signal Summing Inputs and Parallel Outputs
7KH'4KDVWKHFDSDELOLW\WRFRPELQHWRJHWKHUPXOWLSOHRU
LQSXWVLJQDOVIURPWKHIDFWRU\VRXUFHXQLWLQWRFKDQQHOV6RPHIDFWRU\
DXGLRV\VWHPVSURGXFHDFWLYHO\FURVVHGRYHUVLJQDOVIURPWKHDPSOL¿HU
feeding signals to the tweeter, midrange, and woofer. The DQ-61 lets
you take all of those signals and sum them together to get a high qual-
LW\IXOOUDQJHSUHDPSVLJQDO6LPSO\PRYHWKHVXPPLQJMXPSHUIRUWKH
GHVLUHGFKDQQHOLQWRWKH³2Q´SRVLWLRQ,IWKHJUHHQ/('IRUWKDWFKDQQHO
is on, you know it is being summed into the main output. Additionally,
when you Sum signals together, the signals coming from Front/Main
and Rear/Ch2 are now paralleled providing dual full range signals. This
SURYLGHVORWVRIÀH[LELOLW\LQ\RXUV\VWHPGHVLJQ
AutoMode Inputs:<RXU'4LVHTXLSSHGZLWK$XGLR&RQWURO¶V
XQLTXH$XWR0RGHFLUFXLWLQSXWWKDWDOORZVIRUWKHRear/Channel 2 input
VLJQDOWRDXWRPDWLFDOO\IHHGWKH6XE&KDQQHORXWSXWVZKHQWKHUHLVQR
VLJQDOSUHVHQWRQ&KDQQHO7KLVDOORZV\RXU'4WRDFFHSWIURQWDQG
UHDULQSXWVFKDQQHOVDQGJLYH\RXWKUHHRXWSXWFKDQQHOV)URQW5HDUDQG
6XE
Remote Level Control - ACR-3
7KH$&5LVDPXOWLIXQFWLRQUHPRWHWKDWXVHGIRUPDNLQJWKHLQLWLDO
signal delay adjustments in the Set-Up mode and then providing level
FRQWURORYHUWKH&KDQQHO6XEZRRIHURXWSXWLQWKHNormal mode. This
allows you to balance the bass level with the rest of the system and then
LQFUHDVHRUGHFUHDVHDVQHHGHG$QDGGLWLRQDOIHDWXUHRIWKH$&5GDVK
UHPRWHLVWKDWLWDOORZVWKHVLJQDOSURFHVVLQJRIWKH'4HTXDOL]D-
WLRQVLJQDOGHOD\DQG$FFX%$66WREHVZLWFKHGLQDQGRXWRIWKHDXGLR
circuit. That means that you can hear the system with and without the
processing and hear the difference that the tuning makes in the sound of
your system.
page 13

Dash Control Assembly
Dash Control Placement And Mounting
7KH$&5GDVKFRQWUROPD\EHPRXQWHGXQGHUWKHGDVKXVLQJLWVRZQ
bracket or through a custom hole in the dash. It should be within reach of
WKHGULYHUDQGLQDVSRWZKHUHWKH/('LVSODLQO\YLVLEOH
Bracket Installation
The dash control mounts with two screws, which attach to
WKHXQGHUVLGHRIWKHGDVKERDUG6OLGHXQGHUWKHGDVKDQG
place the dash control in its mounting po-
sition, mark the two mounting holes,
drill pilot holes, and secure with two
screws.
Custom Installation
)RUWKDWFXVWRP¿QLVKHG
look, the dash control can
EHÀXVKPRXQWHGGLUHFWO\
RQWKHGDVKERDUGRUDQ\ZKHUHHOVH
5HIHUHQFLQJWKH¿JXUHDERYHGLVDVVHPEOHWKHGDVKFRQWUROIURPWKH
mounting bracket.
6WDUWE\SXVKLQJWKH/('IURPLWVKROGHUIROORZHGE\
removing the circuit board and rotary control from the bracket. Drill a
KROHLQWKHGDVKERDUGIRUWKHFRQWURODORQJZLWKDKROHIRUWKH
ORFNWDEDQGDKROHIRUWKH/('KROGHU5HDVVHPEOHWKHGDVKFRQ-
trol components on the dashboard.
Block Diagram of the DQ-61
)HHOLQJORVW"+HUH¶VDQLQWHUQDO³URDGPDS´WRKHOS\RXRXW7KLVVLPSOL-
¿HGEORFNGLDJUDPLVDPDSRIWKHSDWKV\RXUVLJQDOVWDNHLQVLGHWKH'4
61. With this diagram you can follow each input through the processor.
If you do have an issue with the hook-up of your DQ-61 and need to call
for technical assistance, please have this diagram available so we can help
you trace the problem and get your system up and running and sounding
as awesome as we know it can.
page 14

page 15
Head Unit
+12
volt
Remote
On
GT0
111
Signal
Sense
r-----------------------------------------------------------------------------~Remote
Turn
On
;J
Main
+/-15dB
l'
;)Channel2
+/-15dB
l'
Output
+12v
turn
on for
other
products
;)Channel3
+/-15dB
l'

AccuBASS
®
)DFWRU\LQVWDOOHGDPSOL¿HUVDQGZRRIHUVDUHJHQHUDOO\QRWGHVLJQHGWRUHSUR-
GXFLQJEDVVDWPHGLXPWRKLJKYROXPHV&DUPDQXIDFWXUHUV¿OWHUWKHEDVVRXW
of the signal as you increase the volume in an effort to protect factory-installed
VSHDNHUV7KDW¶VZK\ZHGHYHORSHGWKHSDWHQWSHQGLQJ$FFX%$66
®
circuit.
$IWHUDTXLFNDQGHDV\RQHWLPHVHWWLQJWKH$FFX%$66
®
circuit takes over the
EDVVMXVWDVWKHIDFWRU\V\VWHPUROOVRII<RXJHWVPRRWKVHDPOHVVURFNVROLG
bass response regardless of volume
Setting AccuBASS For Optimum Bass Performance:
After you have hooked up
the system and are playing
music, play some tracks
with good bass lines, and
set the volume at low.
1On the DQ-61, set the
$FFX%$66LevelWR
DQGVHWDOOWKH(4FRQWUROV
WRÀDW
2Turn the Threshold
DOOWKHZD\GRZQDSSUR[L-
PDWHO\
3*UDGXDOO\LQFUHDVHWKH
volume on your factory source unit until you hear the bass start to drop out in
UHODWLRQWRWKHKLJKIUHTXHQFLHV6WRSDQGJRWRWKHQH[WVWHS
4
Turn the Threshold control clockwise until you hear the bass come back up.
58VHWKHOHYHOFRQWUROWR¿QHWXQHWKHDPRXQWRIEDVVUHPL[\RXZDQW
6PRRWKPRUHRUOHVV
<RX¶UHGRQH1RZHYHU\WLPH\RXUVRXUFHXQLWJHWVWRWKDWOHYHOWKH
$FFX%$66
®
ZLOOWDNHRYHUDQGUHHTXDOL]HWKHEDVV6PRRWKVHDPOHVVEDVVDW
all volumes, and with the level control you can even give it a little extra kick if
\RXZDQW<RXUPXVLF\RXUZD\
AudioControl’s patent pending AccuBASS circuit
correcting for bass roll-of
page 16

The WARRANTY
3HRSOHDUHVFDUHGRIZDUUDQWLHV/RWVRI¿QHSULQW0RQWKVRIZDLWLQJ
around. Well, fear no more, this warranty is designed to make you rave about
us to your friends. It’s a warranty that looks out for you and helps you resist
the temptation to have your friend, “...who’s good with electronics”, try to
repair your AudioControl product.
*RDKHDGDQGUHDGWKLVZDUUDQW\DQGWKHQWDNHDIHZGD\VWRHQMR\\RXU
new DQ-61 before going on line to register your unit at audiocontrolregis-
tration.com. We also look forward to your comments while you are register-
ing your DQ-61. “Conditional” doesn’t mean anything ominous. The Federal
Trade Commission tells all manufacturers to use the term to indicate that
certain conditions have to be met before they’ll honor the warranty. If you
meet all of these conditions, we will warranty all materials and workman-
VKLSRQWKH'4IRURQH\HDUIURPWKHGDWH\RXERXJKWLW¿YH\HDUVLI
it is installed by an authorized United States AudioControl dealer:H
ZLOO¿[RUUHSODFHLWDWRXURSWLRQGXULQJWKDWWLPH+HUHDUHWKHFRQGLWLRQDO
conditions:
<RXKDYHWRJRWRZZZDXGLRFRQWUROFRPZDUUDQW\DQGUHJLVWHU\RXU
'4ZLWKLQGD\VDIWHUSXUFKDVH
<RXPXVWNHHS\RXUVDOHVUHFHLSWIRUSURRIRISXUFKDVHVKRZLQJZKHQ
and from whom the unit was bought. We’re not the only ones who require
this, so it’s a good habit to get into with any major purchase.
<RXU'4PXVWKDYHRULJLQDOO\EHHQSXUFKDVHGIURPDQDXWKRUL]HG
$XGLR&RQWUROGHDOHU<RXGRQRWKDYHWREHWKHRULJLQDORZQHUEXW\RXGR
need a copy of the original sales slip.
<RXFDQQRWOHWDQ\ERG\ZKRLVQ¶W$WKH$XGLR&RQWUROIDFWRU\%
somebody authorized in writing by AudioControl to service your DQ-61. If
DQ\RQHRWKHUWKDQ$RU%PHVVHVZLWK\RXU'4WKDWYRLGV\RXUZDU-
ranty.
7KHZDUUDQW\LVDOVRYRLGLIWKHVHULDOQXPEHULVDOWHUHGRUUHPRYHG
or if the DQ-61 has been used improperly. Now that may sound like a big
ORRSKROHEXWKHUHLVDOOZHPHDQE\LW8QZDUUDQWHGDEXVHLV$SK\VLFDO
GDPDJHGRQ¶WXVHWKH
'4IRUDFDUMDFN%LPSURSHUFRQQHFWLRQVYROWVLQWRWKHSRZHU
MDFNFDQIU\WKHSRRUWKLQJ&VDGLVWLFWKLQJV7KLVLVWKHEHVWSURGXFW
we know how to build, but if you mount it to the front bumper of your car,
VRPHWKLQJZLOOJRZURQJ,IDQDXWKRUL]HG8QLWHG6WDWHV$XGLR&RQWUROGHDOHU
LQVWDOOVWKH'4WKHZDUUDQW\LV¿YH\HDUV$VVXPLQJ\RXFRQIRUPWR
WKURXJKDQGLWUHDOO\LVQ¶WDOOWKDWKDUGWRGRZHJHWWKHRSWLRQRI¿[LQJ
your old unit or replacing it with a new one.
page 17

LEGALESE SECTION
This is the only warranty given by AudioControl. This warranty gives you
VSHFL¿FOHJDOULJKWVWKDWYDU\IURPVWDWHWRVWDWH3URPLVHVRIKRZZHOOWKH
DQ-61 will perform are not implied by this warranty. Other than what we
have covered in this warranty, we have no obligation, express or implied.
Also, we will not be obligated for direct or indirect consequential damage to
your system caused by hooking up the DQ-61. Failure to register warranty
information negates any service claims.
page 18

™Making Good Sound Great®
®
31
DQ-61 SPECIFICATIONS
$OOVSHFL¿FDWLRQVDUHPHDVXUHGDW9'&VWDQGDUGDXWRPRWLYHYROW-
DJH$VWHFKQRORJ\DGYDQFHV$XGLR&RQWUROUHVHUYHVWKHULJKWWRFRQ-
WLQXRXVO\FKDQJHRXUVSHFL¿FDWLRQVOLNHRXU3DFL¿F1RUWKZHVWZHDWKHU
although we are working on it.
0D[LPXPVSHDNHUOHYHOLQSXW ..............................ZDWWVSHUFKDQQHO
0D[LPXPRXWSXWOHYHO............................................................... 9UPV
Output gain ............................................................................... G%
Frequency response ............................................................ +]N+]
Total harmonic distortion..............................................................
Input Impedance ..................................................................... .RKPV
(TXDOL]DWLRQ)UHTXHQFLHV
)URQW5HDU.. +]+]+]+]N+]N+]N+]
6XE2XWSXW.. +]+]+]+]+]+=+]
6LJQDO'HOD\
/HIW5LJKW0D['HOD\........................................................... PV
)URQW6XE0D['HOD\ ............................................................ PV
Output Impedance .................................................................. 2KPV
Power supply .......................................+LJKKHDGURRP3:0VZLWFKLQJ
Power draw ..................................................................................P$
5HFRPPHQGHGIXVHUDWLQJ .......................................................... 2 Amps
5HPRWHWULJJHUPD[RXWSXWFXUUHQW..............................................1 Amp
6L]H ........................................................................´:[´'[´
Weight.............................................................................................. OEV
$XGLR&RQWURO,QF$OOULJKWVUHVHUYHG
$XGLR&RQWURO0DNLQJ*RRG6RXQG*UHDW'4$FFX%$66*72
DQG$XWR0RGHDUHDOOWUDGHPDUNVRI$XGLR&RQWURO,QF7KLVPDQXDOZDV
conceived, designed, and written on a muggy and overcast day in the
3DFL¿F1RUWKZHVWZKLFKLVZKDWWKHORFDOVIURP6HDWWOHFDOO³VXPPHU´
WK$YHQXH:HVW
0RXQWODNH7HUUDFH:$86$
3KRQH)D[
www.audiocontrol.com

DQ-61
ReJJJote
NORMAL
MODE
r
(Dash
Knob
Controls
Sub
Out)
Both
Lights
ON
•
Signal
Delay
Engaged
•
Equalizer
Engaged
I •
AccuBASS
®
Engaged
Bo
th
Lights
On
Blue
Light
Only
•
Signal
Delay Disengaged
C::t •
Equalizer
Disengaged
•
AccuBASS
®
Disengaged
Aud
-
c:
Blue Light O
nl
y ®
vvww.audiocontrol.com
Other manuals for DQ-61
2
Table of contents
Other Audio Control Media Converter manuals

Audio Control
Audio Control LCQ-1 User manual

Audio Control
Audio Control DQ-61 User manual

Audio Control
Audio Control LC6i User manual

Audio Control
Audio Control DQ-61 User manual

Audio Control
Audio Control LC6i User manual

Audio Control
Audio Control LC2i User manual

Audio Control
Audio Control LC7i User manual

Audio Control
Audio Control LC7 User manual

Audio Control
Audio Control LC1i User manual

Audio Control
Audio Control LC6 User manual