Audio Control EPIC-150 User manual

tm
In-Dash Bass Processor/SPL Meter
Owner’s Enjoyment Manual
Congratulations on your purchase of the world’s first in-dash
bass restoration processor with an SPL (sound pressure level)
display. Whether this is your first product from the rainforest
dwellers of AudioControl or you are already a firm believer, you
will definitely enjoy the EPIC-150. Remember, it comes from
AudioControl, the experts at bass enhancement and building SPL
displays and measurement tools.
Now before you start salivating too much just thinking about
what the EPIC-150 can add to your system, take a few minutes to
sit back, have a latté, decaffeinated if necessary, and read through
this manual. It contains lots of useful facts and information (and
besides, we spent a lot of time writing it)!!
Features Of The EPIC-150
Here are some of the cool features that are enclosed in this
magicalbox:
22410 70th Avenue West • Mountlake Terrace, WA 98043
Phone 425-775-8461 • Fax 425-778-3166 • www.audiocontrol.com
®
• Patented bass restoration circuit
• SPL display up to 150 dB
• Battery Voltage indicator
• Speaker level inputs
• Para-BASS Controls
• Balanced differential inputs

page 2
FEATURES AND HIGHLIGHTS
Patented Bass Restoration: The EPIC-150 contains the most popular
bass maximization circuitry in the world made famous by The Epicenter.
This circuit accurately recreates and injects low frequency information
back into the signal path. What that means in everyday terms is that the
EPIC-150 will give more bass impact to your best compact discs, MP3
tracks or even your old tapes (if you happen to have any lying around).
US Patent #4,698,842.
SPL display: AudioControl designs and manufactures a complete line
of professional real time analyzers/SPL meters and microphone calibra-
tors that are used by professional sound contractors, studio engineers and
are the standard measurement tools for sound-off organizations like
IASCA and USAC. It is that background that lets us equip the EPIC-150
with a 150 dB capable microphone and SPL display.
Battery Voltage Indicator: The EPIC-150 gives you the option of
measuring the SPL output of your system and it also allows monitoring of
the battery voltage of your system. Wonder why your SPL is a little
lower this week versus last? Many times you should check your cars
electrical system to make sure it is still putting out like it used to.
Speaker Level Inputs: If you are like most people and like the look and
features of your factory installed source unit but feel it’s lacking power
(and bass), we have good news. The EPIC-150 has a unique high imped-
ance speaker level input that will interface with most factory installed
source units (even Bose) and let you add amplifiers and speakers to your
hearts content. However, unlike some of the cheesy LOC’s (line output
converters) available, the EPIC-150 offers a very high fidelity sound
quality input.
Para-BASStm Equalization: The EPIC-150 will increase your bass,
and control it. The EPIC-150 uses our Para- BASS equalization circuit to
help shape the enhanced bass to match with your speaker system.
Bulletproof Warranty: The most important feature of all. Every
AudioControl product is selflessly designed and manufactured by the
occupants of our rainforest factory. We take every effort to ensure that
you will have many years of enjoyment out of your
EPIC-150. To ensure the performance of your
new toy, we highly recommend that you allow
your authorized AudioControl dealer to
perform the installation. Not only do they
have all the right knowledge and tools, but also in the unlikely

page 3
chance the EPIC-150 should fail, we will back it with a limited five years
parts and labor warranty. Should you choose to install it yourself we will
still give you one-year parts and labor warranty. To activate your war-
ranty, you need to FILL OUT AND SEND IN YOUR
WARRANTY CARD!
We also recommend that you save your invoice or sales
slip as proof of installation and ownership. Not only is it
necessary for warranty purposes, but should your EPIC-
150 turn up “missing” some day while you are out
watching the salmon run, you will find insurance
companies very unforgiving without proof of pur-
chase.
We interruptyourreadingofthis manual to provide theimpatient
peoplewith “Quick Install”information andguidelines:
The AudioControl EPIC-150 was designed to produce bass like you
have never heard before. With that said it is important to take the follow-
ing precautions during its use.
1. If you have an equalizer in your system, turn down any bass
tone controls and initally use the EPIC-150 to pump up your
bass. Otherwise, the results could be, shall we say... interesting.
2. You will want to reduce any bass tone control, loudness con-
trol, or other secondary bass controls prior to turning on the
EPIC-150. Once your system is up and running, you may then
opt to use them again, although we doubt it!
3. Good bass response requires an appropriate choice of speakers
and amplification. Since the bass frequencies always require more
power and cone area than higher frequencies...BE PREPARED.
Small speakers (smaller than 6x9 or 8”) and lack of power will be
detrimental to your system (and themselves).
Now back to your previously interrupted Owner’s Enjoyment Manual

page 4
Quick Install Information
The EPIC-150 needs to be installed in the signal path between a source
unit and an external amplifier(s). Although it can be installed after an
equalizer, it must be installed BEFORE A CROSSOVER.
Once this is done, you need to hook up + 12 volt power, -12 volt
ground, remote turn-on, and connect the illumination wire. If you need to
know more, then read on. Heck if you don’t think you need to know
more, you should still read on, because you can never know too much.
FACTORY SETTINGS
ShippedShipped
ShippedShipped
Shipped
OptionsOptions
OptionsOptions
Options PP
PP
Page #age #
age #age #
age #
Para-BASS
FrequencyCenter 40Hz 27Hz-63Hz 9
Para-BASS Bandwidth Wide Range from 30Hz-250Hz 9
Input Grounding Balanced Unbalanced 7
Ground Isolation Isolated 200ohm or Ground 7
Choice of beverage Micro-brew Latté 16
Note: Moving jumpers or adjusting the Para-BASS controls can
change these configurations.
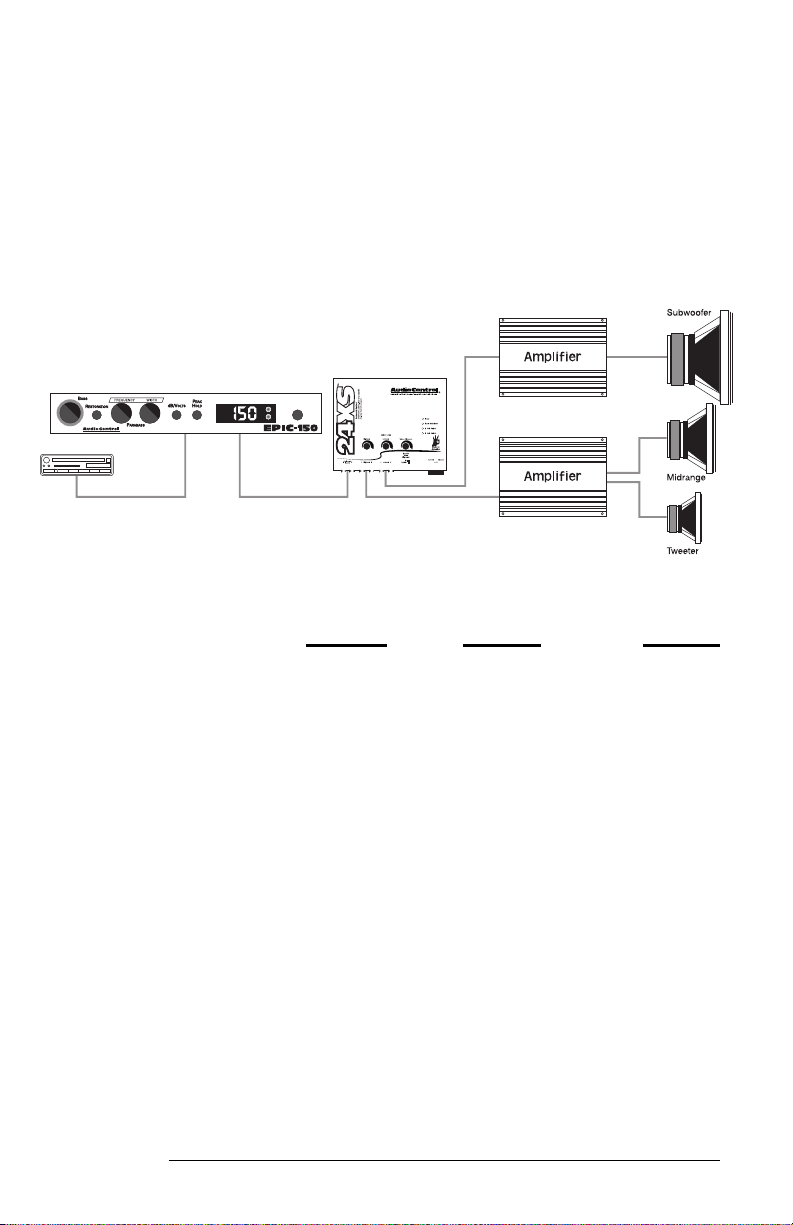
Figure 1: Basic EPIC-150 System

page 5
Figure 2: EPIC-150 Front Panel
A GUIDED TOUR OF THE EPIC-150
The Front Panel
ÊBass Restoration Control a.k.a. “The Knob”: This knob controls
how much of the restored bass is added to your audio signal. Being that it
is a knob, this means you can SLOWLY increase or decrease the amount
of processed bass. (Read as: LISTEN FIRST, CRANK SECOND!)
ËRestoration: By pushing in this switch you engage the bass restora-
tion circuit.
ÌPara-BASS Controls: These two knobs control the Para-BASS
equalization functions of the EPIC-150. The “Frequency” knob allows
you to select the center frequency that you want the EPIC-150 bass
maximization circuit to affect. The “Width” knob adjusts how wide of a
range around the center frequency the EPIC-150 will affect.
ÍdB/Volts: Although this sounds like a new heavy metal group, this
switch allows you to select whether the display on your EPIC-150 is
showing SPL levels in dB (decibels) or electrical levels in volts. Rock on!
ÎPeak Hold: If you ever got high score on Space Invaders but nobody
was there to watch, you know what this switch is for. When engaged, the
display on your EPIC-150 will show the highest SPL or voltage reading
that it measured (as long as your EPIC-150 is turned on).
➏
SPL/Voltage Display: This super bright display will show either the
sound pressure levels or battery voltage depending on where the dB/Volts
switch is set.
ÐBass Restoration Indicator: If this light is flashing, your car should
bebump’n!
ÑÑ
ÑÑ
ÑHigh SPL Warning Indicator: Since you will probably brush over
our warning about SPL and potential hearing damage, this indicator light
comes on at 120 dB to give you a gentle warning about how loud your
system is.
ÒÒ
ÒÒ
Ò150 dB Microphone: Behind this tiny little hole is the microphone
element that measures your systems SPL. Should you wish to have very
low readings make sure you cover this opening.
ÊËÌÍ
ÎÏÐ ÑÑ
ÑÑ
ÑÒÒ
ÒÒ
Ò

page 6
TheTop View
ÊPower Connections: This nifty connector is a godsend to anyone
who has tried to wire up their gear with their head crammed under the
dash. You can wire up the power, ground, remote turn-on, and illumina-
tion from the convenience of the driver’s seat and then casually plug it in
the back of your EPIC-150.
Ë
Outputs: These RCA connectors should be connected to the next
component after the EPIC-150, such as a crossover, equalizer, or ampli-
fier. Just remember, for maximum performance the EPIC-150 must go
before any crossovers!
ÌInputs: The EPIC-150 has two sets of quick inputs, MAIN and
SPEAKER LEVEL. These inputs should get their signals from the main
source unit/head unit and should attach to either RCA jacks or speaker
leads that are coming out of your source unit.
Í
Î
Ï
Figure 4: Top view of EPIC-150
ÊËÌ

page 7
Selector
ÍInput Selector: For most systems you can leave this jumper set in
the BALANCED position. In some systems, the source unit may look for
a ground through the RCA connection to the amplifier and create a
ground loop, which in turn can cause a whine in your system (we are not
talking about Pinot Noir). In that event, you should go ahead and change
the jumpers to the UNBALANCED position.
ÎIllumination Selection: These jumpers let you switch the backlight
illumination from green to amber. Given our devotion to protect the
Rainforest, the EPIC-150 is shipped in the green mode.
ÏGround Isolation Selector: Occasionally alternator whine may
appear in a system because the source unit and amplifier are using
different grounding schemes. To help in this situation, we have provided
alternative grounding connections. Make sure your system is turned OFF
before you move these jumpers.
The Story Behind The Epicenter Bass
Restoration Technology
Now that you have purchased the EPIC-150 you may ask yourself,
“Why would I need to restore bass?” The truth is that during the record-
ing process, low frequency information can be “mixed” down or filtered
out during the recording process. It’s not that recording engineers are out
to get you; in fact they are looking out for your best interest and are
concerned that many speakers systems can not handle “truly” low bass
information.
The patented circuit inside the EPIC-150 is designed to reproduce the
low frequency information by looking at the upper frequency ranges and
detecting musical harmonics. These harmonics then allow The Epicenter
circuitry to drop a few octaves and reproduce the “missing” bass notes.
The bottom line is that The Epicenter technology gives you deep, body
shuddering, heart stopping bass. Can you handle it?
Figure 5: How
The Epicenter
Circuitry Works

page 8
How Much Do You Really Know
About SPL Levels ?
Before you go out and design yourself a 140 dB plus SPL monster, you
might want to consider the following:
Nuclear Explosion 200 dB +
Airplane Engine take off at 100 feet 140 dB
Jack Hammer 130 dB
Normal conversation speech 60 dB
If you have dreams of rocking around your neighbor-
hood, blowing away Mr. Rogers and all your friends with decibel levels of
150 or higher, you might think twice. In fact, in many areas if your place
of employment is louder than 85 dB, your boss is obligated to provide you
with ear protection. Therefore, should you choose to expose yourself to
SPL greater than 100 dB by cranking up your system, you should utilize
some sort of ear protection.
Now we don’t want to rain on your parade or discourage you from
“letting it loose”, but do be careful with your ears because like your brain
cells, once your hearing is gone, it don’t come back. Of course always
avoid inhaling, especially through your ears. Since many of you get
caught listening to your music, we have equipped your EPIC-150 with a
warning LED that comes on when it measures sound pressure levels
greater than 120 dB. Above 120 dB you must use hearing protection to
avoiddamage!
INSTALLING THE EPIC-150
Up to this point everything you have read has served to educate you on
the operations of the EPIC-150. We are sure that you are chomping at the
bit to install the EPIC-150 so we recommend you read the following
sections very carefully.
Placement & Mounting Of The EPIC-150
Placement: By definition, the EPIC-150 in-dash processor was de-
signed to be installed on or near the dashboard of most cars. Regardless
of where you “physically” install the EPIC-150, it needs to be placed in
the signal path as close to your source unit as possible; definitely BE-
FORE any crossover circuit.
Mounting: The EPIC-150 is flexible enough to mount almost any-
where, although somewhere on the dash or in a center console is the most
logical. You will want to be able to access it while you are sitting in the

page 9
driver’s seat of your vehicle. The EPIC-150 is designed to be mounted
almost anywhere in a vehicle, although it is recommended to avoid hot
spots like the firewall, engine compartment, or tail pipe. The mounting
location must also be safe from water seepage or areas with bad seals
(rubber gaskets, not sleek furry mammals who eat salmon). If there are
old (or new) water stains, stay away.
We have provided brackets to assist you in mounting the EPIC-150
chassis under your dashboard or wherever you may choose. The screw
holes on the EPIC-150 chassis also allow for easy installation underneath
a radio or with a dash kit. It is of utmost importance to mount the EPIC-
150 securely to avoid any undue stress or breakage from over acceleration
or braking.
B. EPIC-150 Power Wiring
• ENLIGHTENING INFO • Disconnect the negative terminal of your
car’s battery before working on any electrical connections. Failure to do
so could lead to a dramatic spark in your life.
Remote Turn-On: Connect a 22 to 18 gauge wire from the head-unit’s
remote turn-on to the “Remote” connector on the EPIC-150.
Positive (+12V) Connection: Insert an 18 gauge or larger wire into the
connector labeled “Power” on the nifty connector of your EPIC-150.
Connect it to a good, fused (1 amp), constant source of 12 volts (we
suggest the battery.)
Ground Connection: Use the same gauge wire as you did for the
positive connector and run it from the “Ground” connector on the EPIC-
150 to the negative terminal of the battery, a ground buss, or a verified
ground location. The factory head unit ground is NOT recommended.
Illumination: The connector labeled “Illumination” on your EPIC-150
controls the backlighting of your unit. If you run a wire from this connec-
tor to a switched 12-volt source, such as the “Remote” turn on wire on
your source unit, you light up the backlighting on the EPIC-150. A better
idea is to connect the illumination wire to a factory dash light dimmer and
Figure 6: EPIC-150 with mounting brackets

page 10
you now have the ability to dim the backlighting of the EPIC-150 with your
dashlights.
C. EPIC-150 Audio Wiring
Planning: As you may already have guessed, there are numerous ways
to configure the EPIC-150 in your audio system. Spend a little quality
time planning out your system and even sketching it out on paper if you
can. The following diagrams are just a few of the system options:
Figure 7: EPIC-150 with EQX
Figure 8: EPIC-150 with THREE.1
Figure 9: EPIC-150 with factory installed source unit

page 11
Figure 10: EPIC-150 with EQS and 4-channel source unit
Adjusting the PAdjusting the P
Adjusting the Para-BASS Controlsara-BASS Controls
ara-BASS Controlsara-BASS Controls
ara-BASS Controls
The bass response in a system is affected by four factors (1) the acous-
tics of the vehicle, (2) the location of the speakers, and (3) the music on
the tape, CD, or source unit, and (4) amplifiers, speakers and speaker
enclosures. Because of the variations in the recording process, we
developed the EPIC-150 to help restore any low frequencies lost during
the recording process. However, the acoustics of various environments are
different. With this in mind our coffee-laden engineers developed the
unique Para-BASS TM system.
The “Frequency” control allows you to select a center frequency (the
frequency most affected) between 27 and 63 Hz. The “Width” control
then allows you to control the shape of the filter centered on the “Fre-
quency”. You will want to use a real time analyzer or a good set of ears
to set this control.
TROUBLESHOOTING
No Power: If the Power LED on your EPIC-150 will not turn on, check
to make sure that the power wire and remote turn on wires are connected
or a fuse has not blown.
No Bass Restoration: When your system is playing and yet you don’t
hear any difference in the sound, trying turn the knob clockwise. If you
still don’t hear any affect, then check to make sure that you have the
EPIC-150 in the right part of the signal chain. It must be installed
BEFORE any crossovers in the system.
Note: If you are using a source unit with a built in crossover or proces-
sor, you must run a full range output to the EPIC-150’s inputs.
Sounds Distorted: Should your system sound distorted or your speak-
ers are moving way too much, you should decrease the amount of bass
restoration by turning the dash control knob counter clockwise.

page 12
No Display: The display on your EPIC-150 should always be showing
either the systems SPL or the battery voltage. If the display is showing
nothing, see the above section on “No Power”.
IF YOU LIKE THE EPIC-150, YOU’LL LOVE...
The EQL Concert Series is our
award winning dual bandwidth, trunk
mount equalizer. Thirteen full octave
and 1/2-octave spaced bands help tame
even the most wicked acoustical
environment, your car. Need a cross-
over and an equalizer. The EQX
Concert Series is just the ticket.
The 3XStm is a 4 channel, 2-way
crossover with breathtakingly steep
24dB per octave slopes. If perfor-
mance is important to you, then you
will appreciate the 3XS.
If more signal voltage is necessary in
your system, don’t feel alone. Many
customers have added Overdrive or
Matrix line drivers and felt like they
had new amplifiers in their systems.
Do you want to make your home
audio system sound just as good as
your car audio system? Good news!
AudioControl makes a complete line of
products signal processors that do the same amazing things for your home
audio or theater system.

page 13
And now a word from the legal department...
THE WARRANTY
People are scared of warranties. Lots of fine print. Months of waiting
around. Well, fear no more, this warranty is designed to make you rave
about us to your friends. It’s a warranty that looks out for you and helps
you resist the temptation to have your friend, “...who’s good with elec-
tronics”, try to repair your AudioControl product. So go ahead, read this
warranty, and then take a few days to enjoy the EPIC-150 before sending
in the warranty card and comments.
“Conditional” doesn’t mean anything ominous. The Federal Trade
Commission tells all manufacturers to use the term to indicate that certain
conditions have to be met before they’ll honor the warranty. If you meet
all of these conditions, we will warrant all materials and workmanship on
the EPIC-150 for one year from the date you bought it (five years if it is
installed by an authorized United States AudioControl dealer). We will fix
or replace it, at our option, during that time.
Here are the conditional conditions:
1.You have to fill out the warranty card and send it to us within 15
days after purchasing the EPIC-150.
2.You must keep your sales receipt for proof of purchase showing
when and from whom the unit was bought. We’re not the only
ones who require this, so it’s a good habit to get into with any
major purchase.
3.Your EPIC-150 must have originally been purchased from an
authorized AudioControl dealer. You do not have to be the
original owner, but you do need a copy of the original sales slip.
4.You cannot let anybody who isn’t: (A) the AudioControl factory;
(B) somebody authorized in writing by AudioControl to service
your EPIC-150. If anyone other than (A) or (B) messes with
your EPIC-150, that voids your warranty.
5.The warranty is also void if the serial number is altered or
removed, or if the EPIC-150 has been used improperly. Now
that sounds like a big loophole, but here is all we mean by it.
Unwarranted abuse is: (A) physical damage (don’t use the EPIC-
150 for a jack stand); (B) improper connections (120 volts into

the power jack can fry the poor thing); (C) sadistic things. This
is the best mobile product we know how to build, but if you
mount it to the front bumper of your car, something will go
wrong.
6. If an authorized United States AudioControl dealer installs the
EPIC-150, the warranty is five years.
Assuming you conform to 1 through 6, and it really isn’t all that hard to do,
we get the option of fixing your old unit or replacing it with a new one.
LEGALESE SECTIONLEGALESE SECTION
LEGALESE SECTION
This is the only warranty given by AudioControl. This warranty gives
you specific legal rights that vary from state to state. Promises of how
well the EPIC-150 will perform are not implied by this warranty. Other
than what we have covered in this warranty, we have no obligation,
express or implied. Also, we will not be obligated for direct or indirect
consequential damage to your system caused by hooking up the EPIC-150.
Failure to send in a properly completed warranty card negates any
service claims.

THE EPIC-150 SPECIFICATIONS
All specifications are measured at 14.4 VDC (standard automotive
voltage). As technology advances, AudioControl reserves the right to
continuously change our specifications, like our weather, although we are
working on it.
Maximum input level ....................................................................15 Vrms
Maximum output level ............................................................. 13.5 Vpeak
Frequency response ................................................. 10Hz-100kHz;+/-1dB
Total harmonic distortion ............................................................... 0.003%
Signal to Noise ratio ..................................................................... - 130dB
Balanced input noise rejection............................................................ 60dB
Microphone acoustical level............................................. 50 dB to 150 dB
High SPL Warning..........................................................................120 dB
Input Impedance......................................................................... 10 Kohms
Output Impedance ...................................................................... 150 Ohms
Power supply .......................................................... High headroom PWM
Power draw .....................................................................................300mA
Recommended fuse rating ................................................................1 Amp
Size ........................................................................6.75" W x 5" D x 1" H
Weight .................................................................................................2 lbs
Patent Number ........................................................................... 4,698,842
© 2001, AudioControl, a division of Electronic Engineering and
Manufacturing, Inc. All rights reserved
AudioControl, Making Good Stereo Sound Better, Performance Match,
The Epicenter, EQL, EQX, and EPIC-150 are all trademarks of Elec-
tronic Engineering and Manufacturing, Inc.
This literature was conceived, designed, and written on a bleak, windy,
and dreary rain-drenched day at our home in the Pacific Northwest
Rainforest. The wheat beer was cold and so was the weather.
P/N 9130610

®making good stereo sound better®
22410 70th Avenue West
Mountlake Terrace, WA 98043
Phone 425-775-8461 • Fax 425-778-3166
www.audiocontrol.com
®
Table of contents
Other Audio Control Music Equipment manuals