Audio Control Concert avr-8 User manual

AudioControl
ConCert avr-6
ConCert avr-8
Home Theater Surround Sound Receiver
User Experience Manual
Making Good Sound Great®
®®
22410 70th Avenue West • Seattle, WA 98043 USA
Phone 425-775-8461 • Fax 425-778-3166
www.audiocontrol.com
©2013. All Rights Reserved
®
system
Home Theater


22410 70th Avenue West • Seattle, WA 98043 USA
Phone 425-775-8461 • Fax 425-778-3166
www.audiocontrol.com
©2013. All Rights Reserved
system
Home Theater
Home Theater Surround Sound Receiver
User Experience Manual
ConCert avr-8
ConCert avr-6
AudioControl
Making Good Sound Great®
®®
®

4®
ConCert avr-8 / avr-6
This page was intentionally left blank. Please enjoy it!

5
®ConCert avr-8 / avr-6
table of Contents
IntroduCtIon ...............................................7
Key features and HIgHlIgHts ..................................8
a guIded tour of tHe ConCert avr-6 / avr-8
Front Panel Features .................................11
Rear Panel Features .................................12
Remote Control ....................................14
Set-Up & Configuration ..............................18
Unit Placement.....................................18
Speaker Considerations and Placement ..................18
Power Wiring. . . . . . . . . . . . . . . . . . . . . . . . . . . . . . . . . . . . . . .19
Audio Connections..................................19
Video Connections ..................................20
navIgatIng tHe set-upMenus
Initial Display Configurations..........................23
Input Configuration .................................24
General Setup ......................................27
Auto Setup ........................................29
Speaker Types ......................................30
Speaker Distance ...................................31
Speaker Levels .....................................31
Video Inputs .......................................31
Video Outputs......................................32
Surround Modes ....................................33
Zone Settings ......................................34
Network ..........................................35
playIng audIo fIles vIa networK audIo & usb sourCes .........36
autoMatIon IntegratIon .....................................38
troublesHootIng .............................................
warranty ...................................................
speCIfICatIons ................................................

®
6ConCert avr-8 / avr-6
Another page left intentionally blank.

®7
ConCert avr-8 / avr-6
Greetings from the rainforest
On behalf of everyone at AudioControl we want to congratulate you on
your selection of the Concert AVR-6 / AVR-8 Home Theater Surround
Sound Receiver. Whether this is your first venture into home theater or
you are a long time seasoned audio veteran, you will truly enjoy the perfor-
mance of our amazing sounding receivers.
While there are many components involved in creating a truly awesome
home theater from room design, speaker placement, and ultimately system
calibration, selecting the proper products is always very critical. For that
reason AudioControl created the Concert AVR-6 / AVR-8 to provide
maximum enjoyment and flexibility which all contribute to a truly awesome
home theater experience.
AudioControl’s passion for high quality, meticulous attention to detail
and professional sound heritage shows itself in the dozens of awards we
have won for our designs, products and service. This manual is designed
to help you get the most from your Concert AVR-6 / AVR-8 home theater
receiver. Even though you’re dying to plug it in and start pushing buttons,
please read through this user guide and learn about the Concert AVR-6 /
AVR-8.
Any component that does as much as the Concert AVR-6 / AVR-
8, deserves all the explanation it can get. Given the complicated nature of
the Concert AVR-6 / AVR-8, we also recommend you visit our website for
updates to this manual. Continued technology changes/improvements will
require more information. (www.audiocontrol.com - click “Home Theater”)
Enjoy the experience.
Your Friends At AudioControl
IntroduCtIon

®
8ConCert avr-8 / avr-6
Key Features Of the Concert AVR-6 / AVR-8
While the AudioControl Concert AVR-6 / AVR-8 is equipped with a large
number of features and functions that were designed to maximize your
theater experience, we want to draw your attention to a few that deserve
extra attention. These will be the features you will want to mention to your
friends, family and co-workers to impress them when they ask you about
the home theater components you have auditioned.
UltraHD 4k Scaling and Pass Thru
Your Concert AVR-6 / AVR-8 has been equipped to deliver stunning UHD
resolution – 3840x2160 – 4 times the pixel density of a 1080p signal from
any source. Just set the resolution to 4k in the Video Settings menu and
connect to a 4k UltraHD display, then sit back and enjoy!
Video Bypass
Out of the box, the Concert AVR-6 / AVR-8 is configured with the video
bypass on. This enables high definition and 3D HDMI video signals to pass
through directly to the display device, leaving the Concert AVR-6 / AVR-
8 to make good sound great. With Video Bypass on, analog video inputs,
such as component or composite, will still be passed through the scaler
for upconversion and output via HDMI. Please keep in mind that when
the Concert AVR-6 / AVR-8 is in Video Bypass mode, on screen volume
overlays, audio mode changes, base/treble adjustments etc…will not be
displayed. Pressing “Menu” however will engage the video scaler and yield a
menu screen to your display so that you can make adjustments if necessary.
HDMI Inputs and Outputs
The Concert AVR-6 / AVR-8 is equipped with numerous, individual audio
and video inputs and outputs, including a large number of HDMI (High-
Definition Multimedia Interface) inputs and outputs. The new generation
HDMI inputs will allow the Concert AVR-6 / AVR-8 to interface with Blu-
Ray players, satellite and cable decoding boxes plus traditional DVD play-
ers that also have HDMI connectors. HDMI is an uncompressed all digital
interface standard used on many home theater products. This format can
be used for sending audio, video, and control
signals over short distances.
The dual HDMI outputs are assignable to
allow for priority switching via the display
device. Component and composite signals
can also be automatically upconverted, scaled
to their maximum potential resolutions and
output through the HDMI ports.
Key features and HIgHlIgHts
AudioControl

®9
ConCert avr-8 / avr-6
Powerful and Cool Running Class H Amplication
The Concert AVR-8 utilizes AudioControl’s legendary Class H amplifier
topology to powerfully drive even the most demanding speaker systems.
Known for pristine sonics, cool operating temperatures, and ultra reliability,
this highly efficient amplifier design literally “sips” current, which helps it
to satisfy even the “greenest” of customers. Despite it’s minimal current
draw, the Class H design is powerful enough to drive 120 watts per channel
(840 watts total), with all channels being driven into 8 ohms. The Concert
AVR-8 also has the additional ability of driving into lower impedance’s
when necessary.
Dolby™ Volume
A constant annoyance for home theater users has been the significant
differences in volume levels as you switch between channels or sources on
your televisions and in your home entertainment systems. Variances in vol-
ume levels in DVD and Blu-ray Disc™, digital music files, compact discs,
and broadcast entertainment programming each compound the problem,
forcing you to reach for the remote controls to adjust. Dolby Volume lets
you select a preferred listening level and enjoy all of your entertainment
sources at the same volume level. For complete information on Dolby Volume
,
go to
www.dolby.com/us/en/consumer/technology/hometheater/dolby-volume.html
Multiple Surround Sound Formats
The Concert AVR-6 / AVR-8 supports the latest surround codecs of Dolby
True HD and DTS-HD Master along with traditional formats of Dolby
Digital 5.0 and DTS High Resolution. A powerful 32 bit DSP processor en-
ables the Concert AVR-6 / AVR-8 to decode all current discrete surround
digital formats available for 5.1, 6.1 and 7.1. In addition your Concert
AVR-6 / AVR-8 has the capabilities to process two channel signals using
Dolby Pro Logic II, Pro Logic IIx and DTS Neo to provide multi-channel
output.
Audio Return Channel
Connect either of the 2 HDMI outputs to an HDMI 1.4 display device
ARC (Audio Return Channel) enabled input to receive the audio signals
from the sources connected directly to the display. The ARC source selec-
tion on your Concert AVR-6 / AVR-8 is labeled Display.
Multi-Zone Operations For 2nd Zone
Since we know your audio and experiences may extend beyond one room,
the Concert AVR-6 / AVR-8 is equipped with outputs for a secondary
zone. This means you could be enjoying your home theater in one room
and another member of the family could be listening to their favorite CD
Key features and HIgHlIgHts

®
10 ConCert avr-8 / avr-6
Key features and HIgHlIgHts
in another room. The Second Zone is also equipped with a video output so
you can expand your video options even more.
Inputs For Networked Audio and USB Sources
The Concert AVR-6 / AVR-8 is designed to operate with most of today’s
traditional source units, like CD and DVD players. Additionally it can re-
ceive audio signals over a computer network via an Ethernet input or from
a USB source. You will want to contact a professional audio integrator for
more information on properly using these functions.
Extensive Automation Integration
An automation system is what really pulls most high-end home theaters
together. It puts the full power of the system at your fingertips. While the
Concert AVR-6 / AVR-8 will operate with a number of IR remote controls,
it is equipped with a dedicated RS-232 control (labeled “Control”) and an
extensive command library to control all aspects of the Concert AVR-6 /
AVR-8. Using this port requires a fair amount of programming and automa-
tion skills which are typically best done by professional custom installations
companies. Check out the AudioControl dealer locator on our web site for
more info: www.audiocontrol.com
Award-Winning Quality
The Concert AVR-6 / AVR-8, like all AudioControl Perfection Theater
components, is backed with a comprehensive five-year parts and labor war-
ranty. This comes from a company that has been designing and manufac-
turing performance audio components in the USA since 1977.
We Want to Hear From You
Before you get too entrenched in the features of your Concert AVR-6 /
AVR-8, we encourage you to take a moment and visit the AudioControl
web site at www.audiocontrolregistration.com and register your new Con-
cert AVR-6 / AVR-8. It allows us to keep a record of your purchase of the
Concert AVR-6 / AVR-8. Needless to say when you are in the pleasure
business like we are, we love to hear from our customers so feel free to
include some comments. You will also want to keep your own record of
the serial number and put your sales receipt or invoice in a safe place. This
is very important in the unlikely event that the Concert AVR-6 / AVR-8
needs to be serviced or for proof of ownership if somebody takes a fancy to
your theater system in the middle of the night. Insurance companies have
no imagination when it comes to components like the Concert AVR-6 /
AVR-8 being part of the theater system. This concludes the “gentle re-
minder” section of this manual.

®11
ConCert avr-8 / avr-6
guIded tour of tHe ConCert avr-8 / avr-6
u v wy
xz~
{|}
Front Panel Features
uMENU - Pressing this button will allow ac-
cess to the Set-Up Menu functions of the Con-
cert AVR-6 / AVR-8.
v INPUT (+ and – buttons) - These but-
tons allow the user to select an audio and video
source for playback or scroll through the OSD
(On-Screen Display) when using the menus.
wSELECT - Used in conjunction with the
Set-up Menu function, this button allows you to
enter selections you have made.
xINFO - User can select the information that
appears on the display of the Concert AVR-6 /
AVR-8 and also is used in navigating the OSD
(On-Screen Display).
yMODE - User can select between Stereo
and surround modes that are available from the
source unit and also is used in navigating through
the OSD (On-Screen Display).
zDIRECT - When using two-channel analog
inputs, this button defeats all digital signal pro-
cessing and directs the two-channel analog input
from the selected source to the front outputs. Use
this button when you want to do some serious
quality two-channel listening.
{DISPLAY - This cool blue display allows
you to see the basic functions of your Concert
AVR-6 / AVR-8. It is important that you have
an external display device connected to one of the
rear video connectors for complete viewing of all
menus during set-up.
|ZONE - Allows user to select between the
Main Zone and Zone 2.
}MUTE - Need to answer the phone, but still
keep an eye on the TV? Just press the Mute but-
ton to turn off the sound. Press it again and the
audio gracefully ramps back up to where you were
so rudely interrupted.
~MASTER VOLUME CONTROL KNOB -
This nice polished knob lets you adjust the volume
in selected zones (Main and Zone 2).

®
12 ConCert avr-8 / avr-6
uMAIN POWER SWITCH - The only time to
turn OFF the Concert AVR-6 / AVR-8 with this
switch is when the system will not be used for some
time. Normally this switch is left on. When this
switch is turned off, you cannot turn the Concert
AVR-6 / AVR-8 On or Off via any other method.
vVOLTAGE SELECTION - The Concert
AVR-6 / AVR-8 is designed to operate with either
110-120V volt or 220-240V line voltages. You will
want to set this switch to match up with your local
power voltages.
wPOWER CONNECTION - All good AC power
flows in here.
xZONE 2 VIDEO OUTPUT - This second zone
output enables viewing a source independently of the
main theater system.
yDIGITAL AUDIO CONNECTIONS - The
Concert AVR-6 / AVR-8 features assignable coaxial
and optical digital audio inputs and outputs. While
we have labeled them with the names of typical
source units, these connections as assignable via the
internal menus.
Rear Panel Features
guIded tour of tHe ConCert avr-8 / avr-6
zANALOG AUDIO INPUTS AND OUTPUTS
- Connect the appropriate analog two channel stereo
outputs and inputs from your source units here.
{ANTENNA CONNECTIONS - These inputs
should be connected to the AM and FM antennas
that are supplied with your Concert AVR-6 / AVR-8.
For optimum reception you may want to consider a
roof mounted external antenna.
|CONTROL PORT - Use this connection to con-
trol the Maestro M4 with an automation system.
}NETWORKED AND USB AUDIO INPUTS -
Your Concert AVR-6 / AVR-8 has the ability to ac-
cept audio files via an Ethernet connection or from a
USB mass storage device.
~12 VOLT TRIGGER OUTPUTS - These three
outputs provide a +12 volt signal to control the
power amplifiers, source units, video projector, screens
and curtains in the theater. The Main Trigger output
is active whenever the Concert AVR-6 / AVR-8 is
turned on; the Video Trigger 2 is active whenever a
video source is selected.
u
w
z ~{
y
v
x|}
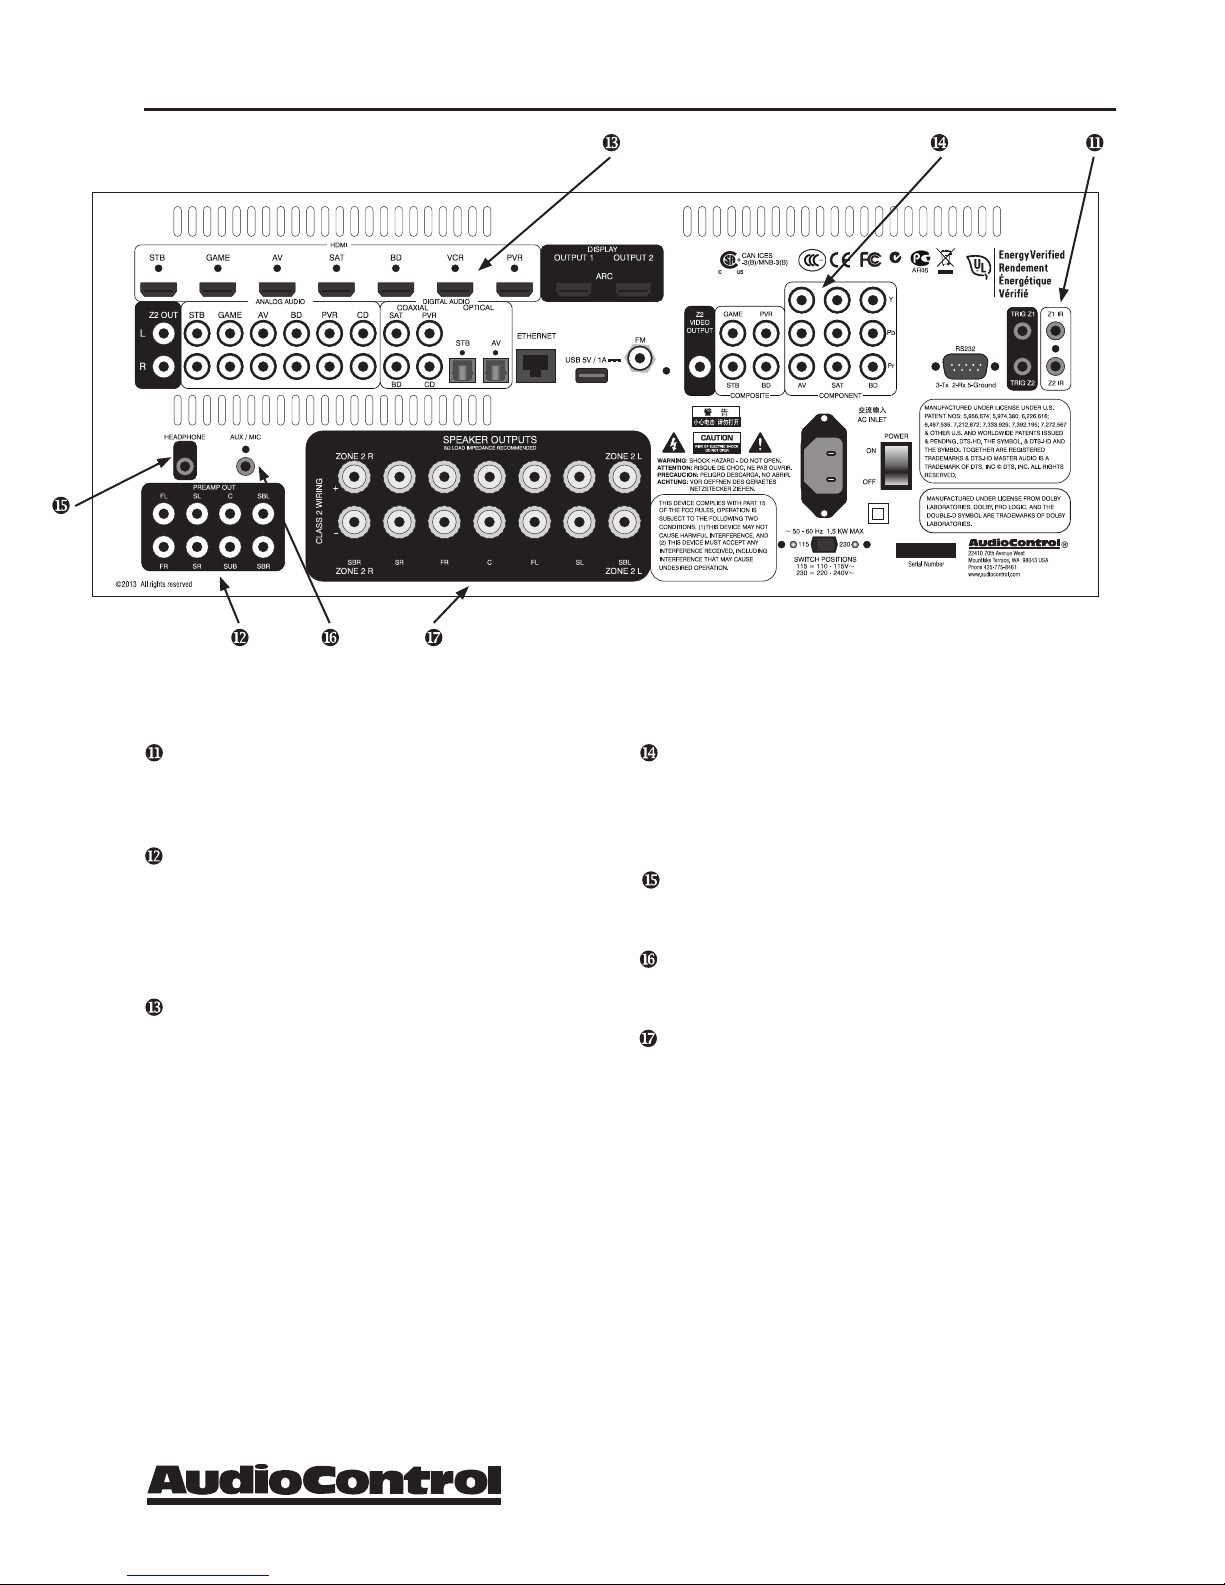
®13
ConCert avr-8 / avr-6
guIded tour of tHe ConCeret avr-8 / avr-6
IR (INFRARED) INPUTS -These jacks enable
use of external IR sensors and emitters for installa-
tions where it is not desirable (or practical) to use the
front panel IR.
MAIN AUDIO OUTPUTS - These RCA
outputs can feed external power amplifier(s), should
you choose to not use the amplifier built-in to your
Concert AVR-6 / AVR-8. (Our customers tell us that
our AudioControl Savoy 7-channel amplifier works
great in these situations).
HDMI INPUTS & OUTPUTS - These inputs
allow the Concert AVR-6 / AVR-8 to accept digital
audio and video signals from source units equipped
with HDMI (High Definition Multimedia Interface)
outputs. Make sure your HDMI cables are properly
inserted into these connectors and that there no
sharp “pulls” on the cable that may prevent your con-
nectors from making a complete connection.
COMPOSITE AND COMPONENT INPUTS -
These are for the video inputs and outputs from your
source units. If you are planning on using the second
zone video outputs, you should ALWAYS connect a
Composite video input from each source.
HEADPHONE CONNECTOR - This jack ac-
cepts an 1/8” input for using headphones with imped-
ance ratings of 32 to 600 ohms.
AUX INPUT - This Aux input is used in conjunc-
tion with the auto-setup microphone. Additionally it
can also accept either analog or optical digital signals.
SPEAKER CONNECTIONS - These 5 way
binding posts allow you to connect the main speakers
for your two, five, or seven channel systems. Make
sure that the red (positive/+) wires are connected to
the red (positive/+) connector on the back if your
Concert AVR-6 / AVR-8. Likewise the black (nega-
tive/-) wires should be connected to the black (nega-
tive/-) connectors on the back of the Concert AVR-6
/ AVR-8 to maintain proper speaker polarity.

®
14 ConCert avr-8 / avr-6
Control app for the Concert AVR-6 / AVR-8
The Concert AVR-6 / AVR-8 ships with the HTR-1 remote however you
have another convenient option for set up! Download a remote for your
iPad! Just search iTunes for the “AudioControl Remote” and
download it to your iPad.
To set up your Concert AVR-6 / AVR-8 with the app, connect
your AudioControl receiver to your home network using an
Ethernet cable. Make sure you have a display (TV or projec-
tor) connected. Press the menu button and go to the General
Settings window (one down from the Input Configuration).
Navigate to the bottom of this settings page and under “Con-
trol” select “IP”. Now open the AudioControl Remote app and
select your receiver from the menu.
Important note: your iPad and your Concert AVR-6 / AVR-8
receiver must be on the same network. There is a video tuto-
rial at the app page in iTunes – likewise on our website if you
need more info about how the app works.
And another important note – the app is designed for the iPad
only.
HTR-1 Remote Control
The AudioControl HTR-1 Home Theater Remote is an eight device
“universal” IR remote controller with back-lit buttons. You can set up the
remote for full control of your AudioControl receiver plus various AV
sources and displays via the extensive library of device codes found on our
web site. The HTR-1 is also a “learning remote” which means that you can
capture the codes of your existing remotes if you find that the library does
not contain the codes for your device.
Being that the HTR-1 can control your Concert AVR-6 / AVR-8 as well as
many other AV sources and displays, many of the buttons have more than
one function depending on which device/source or mode you are using the
remote in. We will ease into the complexities of the remote’s multi-function
modes after a quick description of the basic features below.
Please note: Device code library, instructions on programming the remote
and more control and automation documents are available on our website
at: http://www.audiocontrol.com/t35/c5568/1033/Support.html
Control of your ConCert avr-8 / avr-6

®15
ConCert avr-8 / avr-6
Remote Features:
Multifunction Remote - It can control up to 8 devices! Automati-
cally configures to the mode of control of the source selected per the
source buttons.
LED indicator - This red LED will blink when a key is pressed. It will
also blink multiple times when a device code is input for programming
or signal the beginning and end of a programmed sequence.
Back-lit Keys - The keys are back-lit to make it easy for you control
your AV devices in a dimly lit room.
Low Voltage Indicator - The red LED will flash 5 times after a normal key
press to tell you that new batteries are needed.
Other useful items:
Time Out - After entering into the programming state of the remote,
30 seconds after the last button is pressed, the remote returns to nor-
mal operation.
Stuck Key Timeout - If the remote has slipped into the cushions of your
couch and a button is pushed in for more than 30 seconds, the remote will
stop sending IR information to conserve the battery. It will resume normal
operation after the button has been released.
General Functions:
The Device or Source keys allow you to switch between your various inputs
on the AVR-6 /AVR-8. After pressing the device key, the remote actually
changes it’s configuration - it now is the source’s remote control. So if you
have programmed the STB with the learned codes from an Apple TV re-
mote – after pressing the AV button, the remote buttons will automatically
configure to the Apple remote key-map as programmed. Volume control
remains locked to the Concert AVR-6 / AVR-8 “AMP” mode however.
This is so that anytime you press these keys, you are controlling the Volume
or Mute state of the AVR-6 /AVR-8 regardless of the device you are con-
troller (BluRay or your Cable box for instance).
Multifunction Remote
LED Indicator
Control of your ConCert avr-8 / avr-6

®
16 ConCert avr-8 / avr-6
Buttons/Functions in the Amp Device Mode:
Pressing the AMP button puts the remote into the mode for controlling the
functions of the Concert AVR-6 / AVR-8. This allows to access the menus,
adjust bass/treble, turn Room EQ on or off, cycle through decode modes
etc...
Please note: Not all buttons have a function in AMP mode.
#ID Button Description
1Power Single press - toggles your Concert
AVR-6 / AVR-8 on or back to standby.
Press and hold - Forces both Zones to Standby
2Eject Access Room EQ settings menu
30-9 keys These number keys change the input source of
the Concert AVR-6 / AVR-8 without chang-
ing the mode of the remote.
0 -SAT input
1 -STB input
2 -AV input
3 -TUNER input
4 -BD input
5 -GAME input
6 -VCR input
7 -CD input
8 -AUX input
9 -DISPLAY (ARC) input
4DISP Adjusts the Front panel Display brightness levels
5MODE (RPT) Cycle through the available decode mode.
6DIRECT Stereo Direct mode toggle button. This turns
off any processing on your analog input source
so that there is a direct path form the input to
the amp.
7TRIM Brings up the speaker trim menu and allows
you to temporarily adjust the trim level of
the speakers in your particular configuration.
These temporary adjustments are independent
of the speaker levels set in the Speaker Level
Menu settings. Being a temporary adjustment,
when putting the Concert AVR-6 / AVR-8
to standby, these trim adjustments are not
retained. However if you switch away from the
input, these adjustments are retained.
#ID Button Description
8 FAV+ Rewind. When using the tuner, the currently
displayed station can be added to your favor-
ites when using the internet radio.
9 SYNC Access LipSync menu - < & > keys allow you
to make your adjustments
10 INFO Cycle through the info displayed on the front
panel display.
11 EFFECT Dolby Volume on/off toggle
12 SUB Access Subwoofer trim menu for temporary
control – left right arrow keys allow for adjust-
ment. These adjustments are not retained as a
permanent setting
13 MENU Access the main system menu for your
Concert AVR-6 / AVR-8
14 UP/DOWN/LEFT/RIGHT OK
Allows for navigation on any menu in the
Concert AVR-6 / AVR-8
15 HOME Returns to top level menu when using the
network source/radio menu
16 BASS Access bass setting menu - applies discretely to
current input.
17 TREBLE Access treble setting menu - applies discretely
to current inputs
18 MUTE Mute toggle button
Control of your ConCert avr-8 / avr-6

®17
ConCert avr-8 / avr-6
1
4
8
9
10
15
16
17
22
23
26
27
30
31
2
3
5
6
7
12
11
13
14
18
19
20
21
25
24
29
28
33
32
#ID Button Description
19 VOL + Increase volume
20 VOL – Decrease Volume
21 AMP Returns remote to Concert AVR-6 / AVR-8
(AMP) control mode
22 TUN Select TUNER input and changes remote to
control the tuner interface
23 AUX Select AUX input
24 NET Select Network/Ethernet source and changes
remote to network control
25 USB Select USB input source and changes remote
to USB control
26 BD Select BluRay input and changes remote to
BluRay/DVD control
27 AV Select the AV Input and changes remote to
AV control
28 VCR Select VCR input and changes remote to
VCR control
29 GAME Select Game input
30 STB Select STB (Set Top Box – cable box usually)
as input and change remote to STB control
31 SAT Select Satellite input and changes remote to
satellite receiver control
32 PVR Select PVR (personal video hard disk re-
corder) and changes remote to PVR control
33 CD Select CD input
Control of your ConCert avr-8 / avr-6

®
18 ConCert avr-8 / avr-6
Set-up and Conguration
Unit Placement
The Concert AVR-6 / AVR-8 can be placed almost anywhere in your audio
equipment stack. It is good practice to ensure that the equipment location
is properly ventilated and to make certain not to block the ventilation slots
on any other component. Avoid placing the Concert AVR-6 / AVR-8 di-
rectly over large power amplifiers or any other component that generates a
lot of heat. Unless they are made by AudioControl, some amplifiers can get
pretty hot and have big power transformers that can induce hum into other
audio components like Concert AVR-6 / AVR-8.
Front LCR (Left, Center, Right) Speakers
To present the most realistic sound stage, all three of the front speakers
must be tonally balanced. Ideally, these speakers should be identical
models. This ensures that the sound doesn’t change as it pans across
the screen. Place the speakers at the seated ear level. Whenever
possible, the three front speakers should also be placed at the same
horizontal level for best imaging.
Side Surround Speakers
The surround speakers provide the reverberant, or ambient, sound effects
in a multi-channel theater audio system. These speakers should be placed
on the sidewalls approximately 36” above the seated ear height of the lis-
teners. If you are using surround speakers, which have a dipole sound pat-
tern, they should be mounted in-line with the main seating position. If the
surrounds are direct radiator, they should be just behind the main listening
seat.
Rear (Back) Surround Speakers
Some software provides extra channels that are used in 7.1 mode systems
to provide extra depth in the sound field. Place these speakers approxi-
mately 36” above the seated ear height of the listeners. Additionally, they
should be mounted close together on the rear wall of the theater facing the
screen.
Subwoofer(s)
The subwoofer is a large speaker that provides the bottom end “kick” in
the system. Depending on the size of your listening space, you may require
more than one subwoofer to get the bass volume levels that you desire.
Make certain you remember to include the size of all spaces that are open
to the theater in determining how many harmony subwoofers you need.
set-up& ConfIguratIon

®19
ConCert avr-8 / avr-6
Connection Tips
Even if you’re an electronics veteran, this part may seem repetitive, but
some things can never be repeated too many times.
•Turnoffallcomponentsbeforemakinganyconnections.
•Whenmakingconnections,makesurethat“leftgoestoleft”and“right
goes to right.” The obvious and time-honored way to assure this is to assign
RED plugs to Right and WHITE/GREY/BLACK plugs to the left. Yellow is
usually used for video cables or digital audio connections.
•Whereverpossible,keeppowercordsawayfromsignalcables(i.e.,inputs
from disk players, VCRs, etc.) to prevent induced hum. Bundle all power
cords down one side of your equipment cabinet and all the signal cables
down the other.
•Usehighqualityinterconnectcables.We’renotgoingtogetintothede-
bate about whether $100 per meter interconnects improve the sound and
picture quality of your system. We do know from experience however that
really, REALLY cheap connections can cause problems.
•Don’tstandinabucketofwaterwhenworkingwithelectricity.
Power Wiring
Like many of today’s intelligent home electronics, the Concert AVR-6 /
AVR-8 should be plugged into an unswitched AC outlet so that it always
has power. This allows the RS-232 and remote control features to work
even when the Concert AVR-6 / AVR-8 is in standby. We always recom-
mend the use ofa high quality surge protection device to keep all of your
electronics safe from the evils of spikes on power systems.
Audio Connections
Most of the sources will have two audio connections to the Concert AVR-
6 / AVR-8; an analog 2-channel connection, a digital audio connection
plus HDMI. Whenever possible, connect both types of audio signals to the
Concert AVR-6 / AVR-8. This will provide the digital audio signal neces-
sary for high-quality digital surround sound along with the analog audio
for tape recording plus it provides the necessary analog signals for the zone
audio outputs.
Don’t worry if your satellite receiver has a coaxial digital output and the
Concert AVR-6 / AVR-8 SAT input is optical. Refer to the advanced con-
figuration section on page 26 of this manual for more information regard-
ing assigning a digital input to the optical or coaxial connection.
set-up& ConfIguratIon
INSTALL TIP *

®
20 ConCert avr-8 / avr-6
Video Connections
Choosing your video
There are four video signal connection formats ranging from Good to Best;
Composite, Component Video and HDMI digital video. Depending on
the particular source unit you are using, you may have the option of more
than one of these video connections. Whenever possible con-
nect as many as possible as the processor in your Concert AVR-6
/ AVR-8 will identify the best format and route that to your
main HDMI, or Zone 2 composite video outputs. Because of the
higher bandwidths involved with video signals, the quality of
the interconnect cables you choose is important especially with
HDMI. We recommend using HDMI cables labeled as High
Speed with Ethernet to ensure the appropriate bandwidth for the
system when transporting high bandwidth content such as 1080p
or 4k video. Video connections should always be made with
cables specifically designed for video. Don’t be tempted to grab some extra
audio RCA cables lying around. Without the proper 75 ohm cabling, your
picture quality will suffer from smear, ghosting or noise. It is always a good
idea to make certain that the video and audio signal cables are routed away
from any power wiring.
Video Transcoding
To simplify your installations, the Concert AVR-6 / AVR-8 provides video
transcoding which routes the Composite signals, and Component video
signals to the HDMI outputs of your Concert AVR-6 / AVR-8 regardless
of video bypass selection. As we mentioned before it is best to connect all
analog and digital audio/video signals form your source units to your Con-
cert AVR-6 / AVR-8 to allow proper use of the Main and Secondary.
set-up& ConfIguratIon
Types of video connections
INSTALL TIP *
This manual suits for next models
1
Table of contents
Other Audio Control Stereo Receiver manuals


