Audio Pro Business SP-1 User manual

1
INSTALLATION MANUAL
Installationsmanual
Bedienungsanleitung
Manuel d’utilisation
Manual del propietario

© AUDIO PRO AB SVERIGE
Audio Pro® , Audio Pro logotypen, är registrerade
varumärken av Audio Pro AB, Sverige. Audio Pro Business.
Alla rättigheter reserverade. Audio Pro följer ean policy om
ständig produktutveckling. Specifikationer kan ändras utan
föregående meddelande.
© AUDIO PRO AB SWEDEN
Audio Pro® , the Audio Pro logotype are all registered
trademarks of Audio Pro AB, Sweden. Audio Pro Business.
All rights reserved. Audio Pro follows a policy of continuous
advancement in development. Specifications may be
changed without notice.

Installation manual 4-9
Installationsmanual 10-15
Bedienungsanleitung 16-21
Manuel d’utilisation 22-27
Manual del propietario 28-33

4
ENGLISH
GENERAL INSTALLATIONS NOTES
• Always try to have the TX-1 transmitter placed in the
“middle” of the installation and at the same height as
the SP-1, SP-3 speakers are placed.
• If the source is placed far away from the TX-1 it is
possible to use an active USB extender cable (normally
available up to 20m) to achieve best possible placement
of the TX-1.
• The VOL-1 should ideally also be placed in the same
height as the TX-1 and SP-1, SP-3.
• The SP-1, SP-3 and SUB-1, SUB-3 in wired mode uses
a balanced audio signal so a cable with 3 conductors
(+,g,-)are necessary to make the installation.
• Be aware that it is only possible to go from a wireless
speaker and then continue with wired installation. It is
not possible to go from wired speaker and then make it
wireless to the next speaker in line.
• In wireless mode the SUB-1, SUB-2 subwoofer can be put
on a separate zone volume, making it is easy to match
the subwoofer volume to the rest of the system.
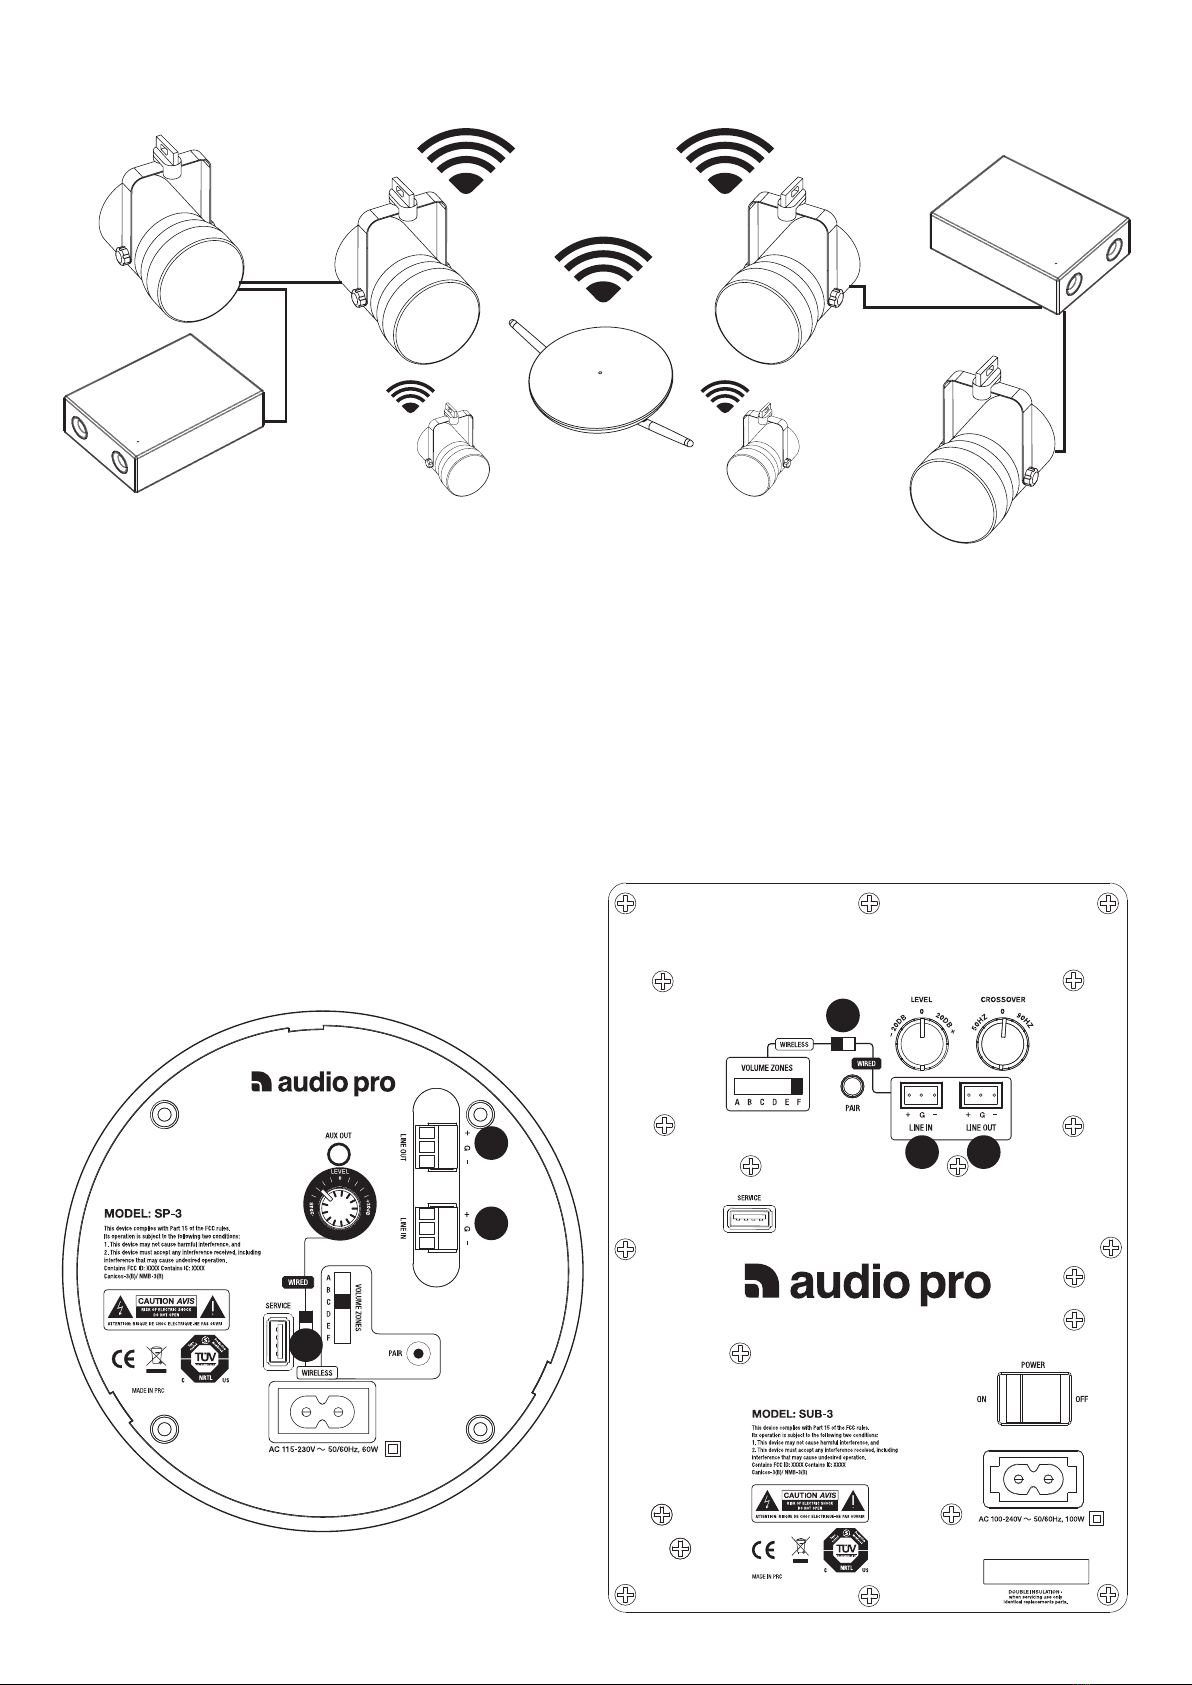
• GENERAL INSTALLATION NOTES
• NETWORK OVERVIEW
• APB PRODUCT RANGE
• WIRELESS INSTALLATION
• WIRELESS + WIRED INSTALLATION
• TROUBLESHOOTING
NOTE: Installations examples on last pages in manual.
VOLUME ZONES A–F
Each VOL-1 can have up to 6 different volume zones (A-F).
Individuallly set volume in each zone. Master volume controls
all zones.
PAIRING
There can be a maximum of 31 units in one setup.
When pairing, the TX-1 is open for 20 minutes more every-
time you pair a new unit.
For more technical specifications, visit www.audioprobusiness.com
FEATURES
• 6 volume zones
• No time delay
• RF band 1.9 GHz
• Range 20–100 m
A
B
C
E
A
D
C

5
SP-1, SP-3 WIRELESS LOUDSPEAKER
Equipped with the GLOBAL trac Multi adapter GA 69 which
suits almost every 3-phase tracks on the market. Made for
mounting direct into the tracks for optimum convenience.
The unit receives it´s audio signal wirelessly from the TX-1
transmitter, but there is also a wired option from any APB unit.
AUDIO PRO BUSINESS UNITS
This is an overall general description of the Audio Pro Business units.
For product specifications of the products please see the specific user manual that comes with each of the products.
SPW-5, WIRELESS LOUDSPEAKER
Wall/ceiling-mounted unit.
SUB-1, SUB-3 WIRELESS SUBWOOFER
For best performance the unit should be mounted on the
wall with the included wall bracket, if possible on the same
height as the SP1, SP3 speakers. The unit receives it´s audio
signal wirelessly from the TX-1 transmitter, but there is also
a wired option from any APB unit.
TX-1, WIRELESS TRANSMITTER
Connect the unit directly to a music streaming box via
analogue 3,5 mm Line In. The unit also connects directly to
Mac or PC via USB and is used as an external soundcard.
VOL-1 WIRELESS VOLUME CONTROL UNIT
The unit controls the different zone volumes
and the master volume.
WB-1, WB-3 WALLBRACKET/TABLE STAND
Optional wall bracket/table stand for SP-1, SP-3 loud-
speaker. Use if location do not have tracks for power.
Comes with power cord to connect to AC outlet.

6
WIRELESS INSTALLATION
1. SET ALL SPEAKERS TO WIRELESS INPUT.
2. (Connect all units to their power source.)
PRESS PAIR ON TX-1. (It stays in pair mode in 20 minutes after last paired unit)
3. PRESS PAIR ON ALL UNITS YOU WANT TO PAIR.
4. SET VOLUME ZONE "A" TO "F" ON EACH SPEAKERS.
(if desired, otherwise keep same Volume Zone on all speakers)
1
1
3
3
4
4
43
2
VOL-1
TX-1
SP-1, SP-3SUB-1, SUB-3

7
5. PLACE COMPONENTS
• Place TX-1 as high as possible.
• Place VOL-1 as high as possible.
• Secure SP-1, SP-2 in tracks (or on wall using wallbracket), preferably on same height as TX-1.
• Place SUB-1, SUB-2 on wall using wallbracket, preferably on same height as TX-1.
6. CONNECT TX-1 TRANSMITTER TO A SOUND SOURCE
• A. Music streaming box/other analogue music source
Connect to analogue 3,5 mm output. TX-1 will need to be connected to supplied USB power supply.
• B. Computer
Mac setup
1. Insert TX-1 via USB extension cord to a free USB socket.
2. Go to System Preferences, choose Sound under Hardware.
3. Click Sound Output in menu, choose “AudioPro TX-1”.
PC setup
Please do following setup before using music playing software.
1. Connect TX-1 to PC via USB.
For some PC computers you may need to perform these settings:
2. Click Start button, go to Control Panel and choose "Sound".
3. Under playback of audio, default unit, choose “AudioPro TX-1”.
7. SETTING DIFFERENT VOLUME IN THE VOLUME ZONES
• Use VOL-1 to set each volume zone individually. Choose volume zone A to F or Master volume.
(Master volume effects all zones.)
8. CHECK WIRELESS STATUS
• All components has a LED light to indicate wireless status.
• Blue light: wireless connection ok.
• Red light: wireless connection fail (or standby).
8
WIRELESS + WIRED INSTALLATION
1
2
3
1
2 3
REAR OF SP-1, SP-3
REAR OF SUB-1, SUB-3
COMBINE WIRELESS WITH WIRED TRANSMISSION
1. System must be wireless from source with TX-1 and to at least one speaker or subwoofer.
2. Speaker receiving wireless signal has input set to WIRELESS.
3. From speaker receiving wireless signal, connect balanced cable to LINE OUT.
4. Set input to WIRED on speaker receiving signal by cable, and connect cable to LINE IN.
Continue this set-up for all speakers using wired signal.
NOTE:
• Number of speakers added in a WIRED chain is infinite.
• Volume Zone and volume level set on the speaker receiving wireless signal will effect speakers connected by cable.
Set speaker (receiving WIRED signal) volume control to 0 to have same level.
• When set to WIRED input, volume level on wired speaker can be adjusted -20 dB to +20 dB to fine tune volume levels
on that specific speaker.
1. Wireless/Wired input switch
2. Line in, + /Ground/ -
3. Line out, + /Ground/ -

9
TROUBLESHOOTING -IF YOU HAVE PERFORMANCE ISSUES
HOW FAR APART ARE THE TRANSMITTER AND RECEIVER?
If distance between the transmitter and receiver is too far, the, connection might be lost. Try placing the transmitter and
receiver in closer proximity.
ARE THERE WALLS BETWEEN THE TRANSMITTER AND LOUDSPEAKERS?
If your premises has thick concrete walls, or walls of plaster with wire lath, the wireless range will decrease.
Try placing transmitter and speakers in the same room.
ARE THE UNITS PAIRED?
CONSTANT BLUE LED means that it is connected to TX-1.
FLASHING BLUE LED means it is in paring mode - make sure that TX-1 also is in pairing mode.
FLASHING RED LED means that it is searching but did not find any TX-1.
RED LED means it is in standby mode.
WINDOWS 7 AND MAC OS, SOUND OUTPUT
When connecting the TX-1 transmitter to a computer using Windows 7 or Mac OS, you need to select the sound output.
Go to: system settings, find sound settings, and select AudoPro TX-1 as your sound output.
Other manuals for SP-1
1
This manual suits for next models
3
Table of contents
Other Audio Pro Business Speakers manuals


