Audio Research reference dac User manual

Reference DAC
H I G H D E F I N I T I O N ®


3
Thank You.
Thank you for choosing the
Reference DAC to be a part of
your high performance music
listening system. Since 1970,
Audio Research has been creating
some of the world’s nest
audio equipment. Each piece is
handcrafted in Minnesota, and has
been designed to provide many
years of listening enjoyment.
We understand you are eager
to begin listening; however,
please take a few minutes to
read through this guide for
useful information concerning
the operation of your new
DAC. Once installed, please
allow an appropriate break-
in period to fully appreciate
the benets this amplier will
provide to your system.
After reading the user guide, if
you have any further questions
regarding your DAC, contact
your dealer or Audio Research
customer service - they will be
happy to help you make the
most of your new component.
Happy Listening!

4
Warnings
Illustrations and Diagrams
Front and Rear Panel
Menu Tree
Icons
Installation
Before operating the Reference DAC
In Your System
A note about Vacuum Tubes
Connections
Input Connectors
Output Connectors
Control Connectors
5
6
7
10
11
12
12
13
13
13
Operation
Start-Up
Shut-Down
Break-in
Front Panel Controls
Settings Menu
Input Operation
Troubleshooting Guide
Software Installation
Windows PC Software Installation
Note to Mac OS Users
Removal of Previous Driver Versions
14
14
14
15
16
19
21
22
22
29
Maintenance
Vacuum Tubes
Servicing
Cleaning
Disposal and Recycling Guidelines
About Fuse Replacement
Warranty
Commpatibility and Connectivity
Specications
32
32
32
32
32
33
34
35
Contents

5
Warnings
To prevent re, or shock hazard, do not
expose your Reference DAC to rain or
moisture.
Do not place objects containing
water on top of this unit.
This unit contains voltages which can cause
serious injury or death. Do not operate with
cover removed. Refer servicing to your
authorized Audio Research dealer or other
qualied personnel.
The detachable power cord on your
Reference DAC is equipped with a heavy
gauge, 3-conductor cable and a standard
three-prong grounding plug. For absolute
protection, do not defeat the ground power
plug. This provides power line grounding
of the Reference DAC chassis to provide
absolute protection from electrical shock.
For continued protection against re hazard,
replace the fuse only with the same type
and rating as specied at the fuse holder.
If the unit is to be operated in an enclosure
such as an equipment rack, make certain
that adequate airow above and to each
side of the unit is provided, and ensure that
the ventilation fans on the back panel are
not obstructed.
The appliance coupler at the rear of this unit
must be accessible for emergency power
disconnect.
This unit is RoHS compliant.
A note about packaging...
Save all packaging in a dry place away from
re hazard. Your Reference DAC compact
disc player is a precision electronic
instrument and should be properly
cartoned any time shipment is made. You
may not have occasion to return your
unit to the factory for service, but if that
should prove necessary, or other occasion
requiring shipment occurs, the original
packaging will protect your Reference DAC
from unnecessary damage or delay.

6
INPUT
VOLUME
POWER <SELECT EXIT>MUTE
DIGITAL MEDIA BRIDGE REFERENCE DAC HIGH DEFINITION
USB MEM
1.5A FUSE
SLO-BLO
T1A (230V)
WARNING
TO PREVENT FIRE AND SHOCK HAZARD, DO NOT
EXPOSE THIS DEVICE TO RAIN OR MOISTURE.
UNIT MUST BE OPERATED IN A HORIZONTAL POSITION.
-DO NOT OPERATE WITH COVERS REMOVED-
UNIT CONTAINS VOLTAGES WHICH MAY BE HAZARDOUS.
+12V REMOTE
TRIGGER OUT
VOLTS
SERIALt
140W MAX 50/60 HZ
CAUTION
FOR CONTINUED PROTECTION AGAINST
FIRE HAZARD REPLACE FUSE ONLY
WITH SAME TYPE AND RATING
WiFi
ANTENNA
TOSAES/EBUBNCRCAUSB2.0HS ETHERNET
iPod
RS-232 IR
INPUT
RIGHT CHANNEL LEFT CHANNEL
PLYMOUTH, MINNESOTA
MADE IN U.S.A.
REFERENCE DAC
DIGITAL MEDIA BRIDGE
DIGITAL INPUTS
ANALOG OUTPUTS
EXIT
BAL L BAL R
INVERT
MONO
POWER
VOL DN VOL UP
PAUSE
PLAY
SAMPLE
MUTE
FILTER
HOURS
REFERENCE DAC
INPUT
SHUFFLE REPEAT
H I G H D E F I N I T I O N ®

7

8

9
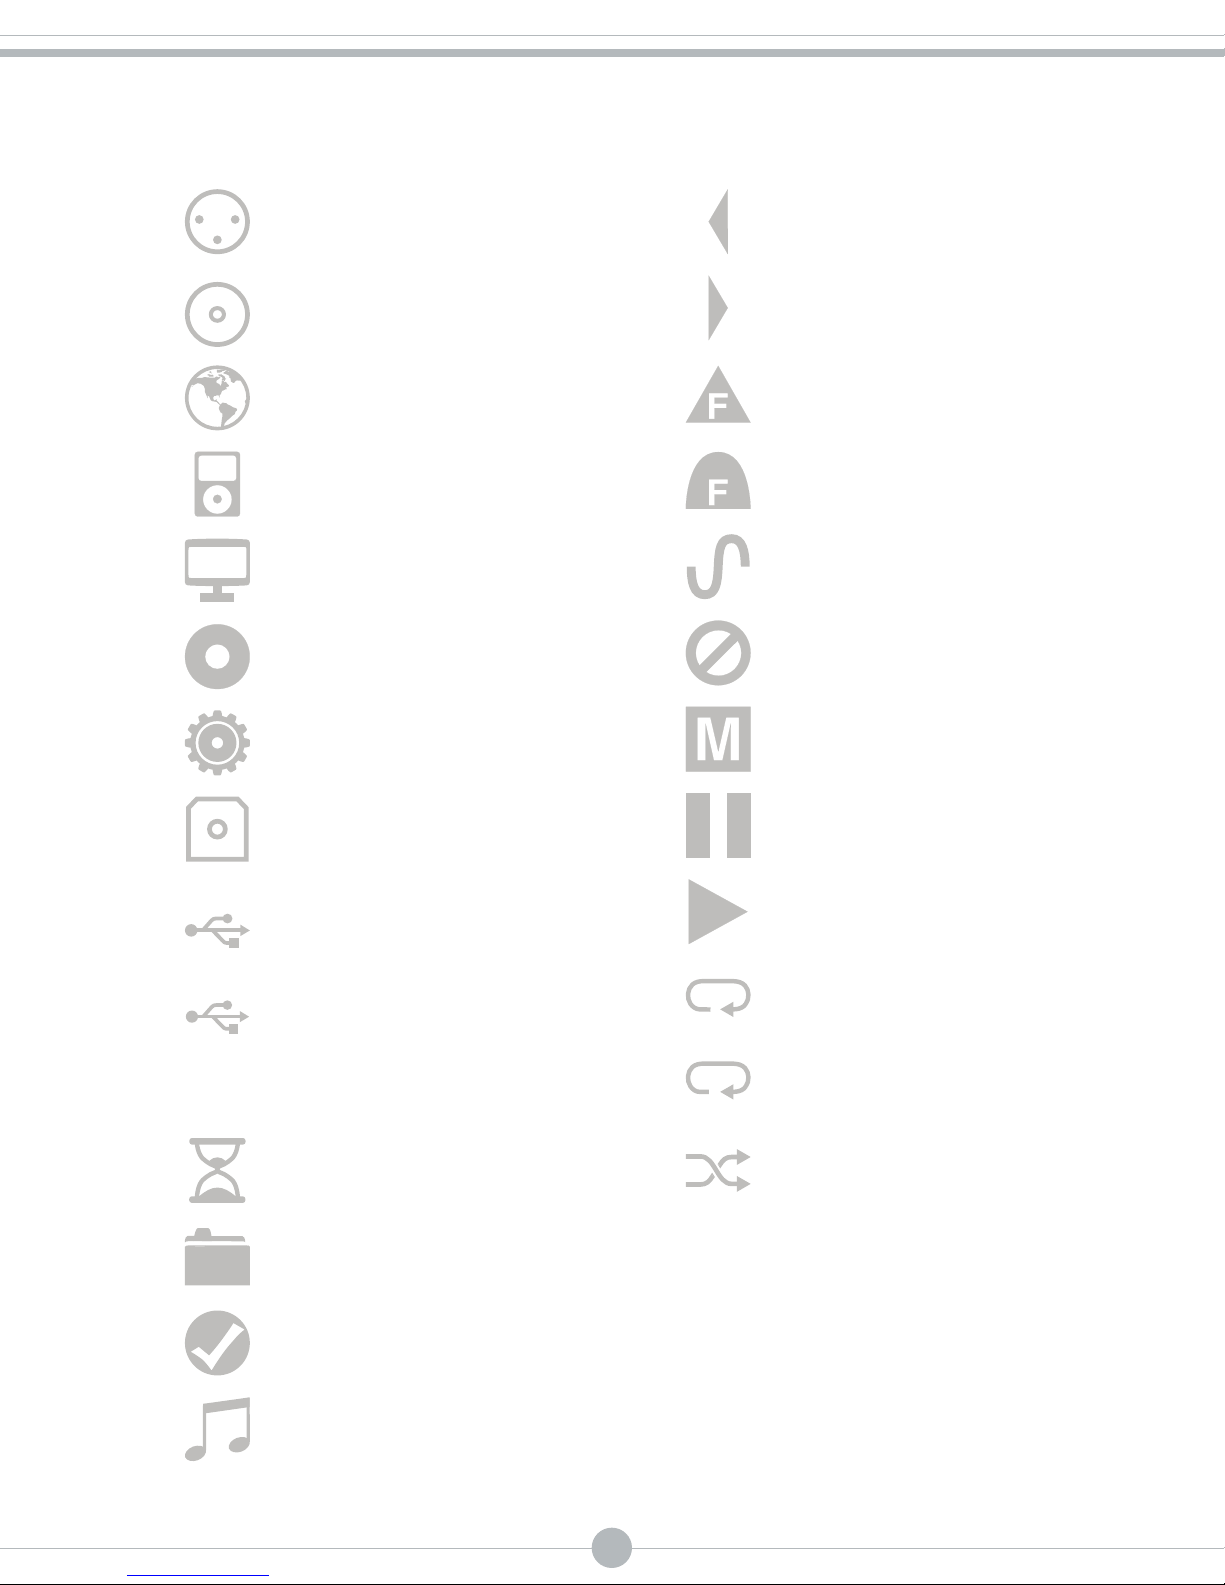
10
Play
Pause
Mute
AES/EBU
BNC
RCA
Media Server
iPod
Internet Radio
MEM
USB Stick
HS
USB 2.0 HS
Toslink
1Repeat One
Balance Left
Balance Right
Invert
Sharp Filter
Soft Filter
Mono
Repeat All
Shue
Selected
Loading
Music File/Album
Song/Station
Settings
Status BarMain Menu
Functional
Icons

11
FRONT
REAR
TUBE LOCATIONS
TOP VIEW
V6
V5
V4
V3
V2
V1
Installation of Vacuum Tubes
This unit has been shipped with the vacuum
tubes in a protective foam block inside
a separate box. Using a phillips-head
screwdriver to loosen the fastening screws,
remove the top cover and set aside.
After removing the top cover open the box
of vacuum tubes and see the accompanying
illustrated sheet for instructions on
installing the tubes for your Reference
DAC in their proper locations in the power
supply and audio section. Note that the
numbers written on each tube correspond
to a ‘V’ number printed on the circuit board
next to each tube socket. Insert each tube
rmly, carefully aligning the tube pins with
the corresponding socket holes.
Do not attempt to install or remove any
vacuum tubes unless this unit is turned
o and disconnected from the A.C. power
outlet. Unit should be connected to the
A.C. outlet and turned on only after all
vacuum tubes have been installed and
appropriate panels have been replaced
and fastened. See owner’s manual for
installation instructions.
Before replacing vacuum tubes, turn o unit,
disconnect from A.C. outlet and allow
installed tubes to cool before attempting
to remove them. Hot tubes may cause
burns or other injury if not allowed to cool
before removal.
When removing or installing tubes, do
not touch tube socket contacts or other
components as the circuit may retain
sucient levels of voltage and current to
cause injury or death.Contact your dealer
or Audio Research Customer Service (763-
577-9700) if you have any questions about
installing or replacing vacuum tubes in this
unit.
Installation

12
Installation
The ‘ambient’ operating temperature should
never exceed 120° F or 49° C. Improper
installation will cause premature tube
failure and will aect your warranty,
as well as the service life of the unit.
It is normal for a vacuum tube component
to run quite warm, and if used for
prolonged periods, hot to the touch.
All components within are, however,
operated at safe, conservative levels
and will not be improperly aected
thereby, providing the requirements
outlined above are adhered to.
A Note about Vacuum Tubes
The vacuum tubes in your Reference
DAC have been burned in, tested and
electrically matched to provide the
best performance and reliability of your
DAC. That said, vacuum tubes must be
replaced from time to time. The 6H30
tubes in the Reference DAC should have
an expected life of approximately 4,000
hours, while the 6550WE tube in the power
supply should have a life expectancy of
approximately 2,000 hours. These life
expectancies are only approximate.
In your system
To insure normal component life and safe
operation this unit must be operated
only in an upright position. Adequate
airow and proper cooling can occur
only if there is no restriction above and
behind the unit and on either side.
The special non-marring elastomer feet
provide adequate spacing and stability
only on a smooth, hard surface, and
also assist to isolate the DAC from
spurious vibrations. For upright stability
and best performance, never operate
the unit while it is sitting on a soft
surface such as a thick rug or carpet.
Due to its weight, this DAC must be
supported on a surface specically
rated for such a load. Check with the
manufacturer of your support system to
be sure it is rated to handle this weight.
If the unit is to be operated in an enclosure
such as an equipment rack, make certain
that adequate airow above and to
each side of the unit is provided.

13
Input Connectors
The Reference DAC provides seven
connections on the rear panel (USB 2.0HS,
RCA, BNC, AES/EBU, Toslink, Ethernet and
iPod) and one connection on the front
panel (USB Mem).
Digital Inputs
USB 2.0HS: Connect a USB cable from your
computer to the Reference DAC.
RCA (SPDIF): Connect an RCA cable from
a disc transport or other digital device
equipped with an RCA digital output
connector.
BNC (SPDIF): Connect a BNC cable from
a disc transport or other digital device
equipped with a BNC digital output
connector.
AES/EBU: Connect an AES/EBU cable from
a disc transport or other digital device
equipped with an AES/EBU digital output
connector.
Toslink: Connect a Toslink optical cable
from a digital device equipped with a
Toslink output.
Ethernet: Connect an RJ-45 cable to a home
network or other compatible system for
use with the Media Server interface and to
supply access to the internet for Internet
Radio service.
iPod: Connect the USB end of a cable
with the Apple 30-pin connector for use
with an iPod, iPad or iPhone. NOTE: This
connection is designed for use with an iPod,
iPad, or iPhone only.
USB Mem: Insert a USB memory stick into
the front slot on the Reference DAC to
access music les loaded on the memory
stick. NOTE: This connection is designed
for use only with a memory stick or
compatible mass storage device.
Output Connectors
One pair of balanced and single-ended main
outputs are provided.
Control Connectors
12V In/Out Remote Power Jacks: The +12V
DC input/output jacks provide the ability
to remotely turn on and o other linked
components such as power ampliers
having similar capabilities.
RS-232 Connection: The RS-232 connection
allows for control via systems such as
Crestron or other automation systems.
IR Input: The IR input allows a wired IR
connection to the Reference DAC. This
connection will defeat the front panel IR
receiver.
Connections

14
Operation
Start Up
1. Secure all rear-panel connections
between Reference DAC, preamplier or
power amplier(s), and input sources.
2. Plug three-prong power cord from
rear of chassis into grounded A.C. wall
outlet. The Power switch defaults to ’o’
when the unit is plugged into a power
receptacle.
3. Press power switch (either remote or
front panel). The display will remain
black for approximately 8 seconds, after
which the Reference DAC splash screen
will appear. Once the splash screen is
gone, the main menu page is displayed,
and a countdown timer will show
the seconds until the unit is ready for
operation. After countdown, the unit will
be in Mute.
4. Select input source, unmute and select
volume level.
Note
The Reference DAC is equipped with a
variable output and volume control. If
you are using this unit in conjunction with
a preamplier, please set the volume to a
static location and use the volume control
on the preamplier. A volume setting
of 66 is equivalent to Line Out on most
components.
Shut Down
1. Activate ‘Mute’ function.
2. Set Volume level to 0.
3. Turn o power amplier(s) and
preamplier.
4. Press Power switch to ‘o’.
Turn o input sources.
Break-in
All quality stereo equipment benets from
a break-in period; during this time, the
various components, wiring and solder
connections change as electrical signals
pass through them. While your Reference
DAC will sound fantastic out of the box,
it will only improve with continued use.
Note
The Reference DAC should be the rst
component turned on in your system
(along with any additional sources). If
the Reference DAC is turned on after the
amplier, and the preamplier is also
powered, it will amplify any extraneous
turn-on noises the preamplier or other
source components might generate, which
could potentially damage the loudspeakers.
Good operating practice dictates that
the amplier should be turned on last,
and turned o rst in an audio system.

15
Front Panel Rotary Controls
The Reference DAC has two microprocessor-
driven rotary controls.
The rotary control on the left adjusts Volume
(output level) up or down for both L and R
channels. Volume control is also selectable
via Vol UP and Vol DN buttons on the
remote control. Volume adjustment is
indicated in the display window by numeric
digits on 0–103 scale.
Do not turn volume up beyond normal
listening levels when ‘Mute’ is engaged to
avoid unexpected or possibly damaging
sound levels.
The rotary control (on the right) selects any
of the inputs on the Reference DAC, and is
also a navigator through the settings and
front panel interface.
Front Panel and Remote Control Buttons
Power On/O: Supplies power from A.C.
wall outlet to DAC; indicated by active
display window.
After pressing the Power button to turn
on unit, the display will remain black for
approximately 8 seconds, after which the
Reference DAC splash screen will appear.
Once the splash screen is gone, the main
menu page is displayed, and a countdown
timer will show the seconds until the unit
is ready for operation. After countdown,
the unit will be in Mute.
Left/Right Arrows (< >): Used during
menu navigation. The Right arrow (>) will
advance the Reference DAC to the next
screen or selection, and the Left arrow (<)
will go back one screen or menu selection.
Function also on remote control (Left and
Right arrows on navigation pad).
Operation
Mute: When activated, electrically mutes
all output of the DAC; indicated by ‘Mute’
in display window. This control should be
activated before switching inputs, changing
connections or shutting down your audio
system to help protect your amplier and
speakers from unexpected signal pulses.
When deactivated, ‘Mute’ disappears
from the display window allowing normal
operation. Function also on remote
control.
The Reference DAC also has automatic
muting to help protects system
components during A.C. power
interruptions or low line voltage. When
sensing these conditions, the preamp
automatically goes into ‘Mute’ and disables
all outputs. The Reference DAC will reset
itself and begin the initial startup sequence
as described under ‘Power On/O’.
Note that automatic muting is only designed
to protect against power line interruptions
or severe voltage drop. It will not mute in
the event of subsonic transmissions from
a faulty input source, amplier failure or
speaker malfunction.
Select: Pressing the Select button engages
the highlighted input on the screen, or
advances the Reference DAC to the next
screen when using the settings menus. It
also is used to select folders and tracks
when using an i-device or media server,
or stations for the internet radio tuner.
Function also on remote control (center
button of navigation pad).
Exit: Toggles the Reference DAC from the
current screen to the main menu/input
selection screen.

16
Volume Up/Down: Using rotary control on
front panel or VOL UP/VOL DN buttons
on remote, increases/decreases overall
volume level of both channels equally
for whichever input has been selected.
Caution: do not turn up volume beyond
normal listening levels when “Mute” is
engaged to avoid unexpected or possibly
damaging sound levels. It is a good idea to
reduce volume whenever changing program
sources, even when muted.
Input: Moves the selection bar up or down
on the display. Turn the Input knob to the
left or right to highlight an input, and then
press the ‘Select’ button to choose that
input. Also use the Input knob to move
the selection bar to the desired function or
folder when navigating the settings menu
or music folders. Function also on remote
(Up and Down arrows on navigation pad).
Remote Control only Functions
Filter: Selects between Sharp or Soft digital
lter algorithms.
Mono: Sums L and R input for mono output
from any source selected.
Sample: Selects between the native sample
rate of the incoming signal or integer-
based upsampling (Ethernet client board,
Media server, iPod, internet radio, USB
stick, max is 88.2 and 96kHz, SPDIF inputs,
max is 176.4 and 192kHz, and USB2.0HS,
upsampling is selected in the computer;
not done in hardware).
Invert: Inverts absolute phase of the output
signal.
Input: Toggles through the dierent digital
inputs.
Repeat: Toggles the Reference DAC between
Repeat All and Repeat One track and no
repeat.
Shue: Toggles the Shue feature on and
o. Shue instructs the Reference DAC
to randomly select tracks from a device or
folder.
Note
Repeat and Shue only function with the
following inputs: Media Server, Ipod Dock,
USB Input.
Hours: When pressed, displays number of
operating hours vacuum tubes have been in
service.
Warning
After replacing tubes, this function should be
reset to ‘0’ only by a qualied technician.
Hours display can be reset to ‘0’ by pressing
black button labeled located on upper
right corner of circuit board directly behind
display window. The unit must be “On” to
reset function – the service technician must
be careful to avoid any contact with other
circuit components during reset operation.
Contact Audio Research customer service
(763-577-9700) for information regarding
this procedure.
Operation

17
Settings Menu
Once the unit has been powered on and
completes the initialization sequence, the
main menu will be displayed. Navigate
to the bottom of the input list (using the
‘Input’ knob on the front panel, or the
down arrow on the remote) and select
‘Settings’. There are four options for setup
and functional aspects of the Reference
DAC: Network, User Interface, Playback,
and General.
Network
Establishing a Wireless or Ethernet connection
Network Setup
Two options will be displayed: Wired or
Wireless. The current selection will have
a check mark next to it; if you choose the
unchecked option, the unit will restart and
cycle through the initialization sequence.
For a wired setup, once you have selected
wired, the following screen will let you
select Automatic (DHPC) or Static IP
Address. The preferred setup is to choose
Automatic (DHPC); on the following
screen select Proxy o and then conrm by
pressing the center navigation button. Use
Static IP Address if you need the Reference
DAC to have a constant xed IP address on
your network.
For a wireless setup, once you have selected
wireless, the following screen will give
you the option for Scan or WPS (Wi-Fi
Protected Setup). Scan will reveal any
existing wireless networks accessible by the
Reference DAC. To sign in to any network
on this list, scroll to it and select it.
If a password is required, the following
screen will allow you to enter it (use the
up and down arrows to scroll through the
characters, and the right arrow to advance
to the next space. Pressing the center
navigation button after completing the
password will make the connection). WPS
oers both PIN and push button support.
Network Info
This section will explain how the Reference
DAC is connected and how it appears
within your network.
Default UPnP Server
Use this feature to always direct the
Reference DAC to a specic location on
your network. If you specify a default
server, the Reference DAC will immediately
go to that location when the Media Server
input is selected.
Renderer Name
This section allows the Reference DAC to be
given a renderer name as displayed on a
network.
Operation

18
User Interface
Edit and change display features
Edit names
Several inputs on the Reference DAC can be
programmed to have customized names:
USB 2.0HS, AES/EBU, BNC, RCA, and TOS.
To change an input name, select the name
you want to change and use the navigation
pad to enter the new name (up and down
arrows select characters, right and left
arrows move the cursor back and forth).
Once you have entered in the new name,
press the center navigation button.
Display Timeout
The display on the Reference DAC is set
by default to always remain illuminated
(timeout is ‘O’). This function allows
various timeouts to be chosen, from
10 seconds to one hour. To change the
timeout, simply select the appropriate time
out and press the center navigation button.
The currently selected timeout will have a
check next to it.
Playback
Control shufe and repeat
Two options, Repeat and Shue, are in
the Playback section. Select Repeat to
choose to repeat one, all or no tracks.
Select Shue to choose to shue tracks
or albums or no shue. The currently
selected item will have a check next to it.
Note
Repeat and Shue are also both directly
accessible from the remote control.
General
Functional and Software information
Reset Settings
Reset your Reference DAC to the original
factory settings.
Software Update
Check for any software updates for your
Reference DAC (internet connection
required).
Info
Displays current version of software loaded
on the Reference DAC.
Legal
Website to view all legal documents related
to the various licenses utilized by the
Reference DAC.
Operation

19
Input Operation
Media Server
1. Ensure you have an Ethernet cable
connected to the Reference DAC, or you
have established a wireless connection.
2. From the Main Menu, use the navigation
buttons on the remote (or the Input
knob on the front panel) to scroll to
Media Server. Press the center navigation
button, or ‘Select’ on the front panel.
3. Navigate through the menu structure to
choose the desired folder(s), selecting
each folder of your choice. Once you have
reached the song level of the menu, you
will see notes appear next to each song
title.
4. Select the song of your choice. The
Reference DAC will begin to play music
from this point (assuming there are other
songs following the one you have chosen,
the Reference DAC will continue until the
nal song).
5. For further features such as repeat and
shue, please see page 12.
iPod/iPhone/iPad
1. Connect the cable supplied with your
Apple iPod, iPhone, or iPad to the input on
the rear panel labeled ‘iPod’, with the 30-
pin connector inserted into your device or
dock. Ensure the cable is seated rmly at
both connections.
2. From the main menu, use the navigation
buttons on the remote (or the Input knob
on the front panel) to scroll to iPod dock.
Press the center navigation button, or
‘Select’ on the front panel.
1. Navigate through the menu structure to
choose the desired folder(s), selecting
each folder of your choice. Once you have
reached the song level of the menu, you
will see notes appear next to each song
title.
2. Select the song of your choice. The
Reference DAC will begin to play music
from this point (assuming there are other
songs following the one you have chosen,
the Reference DAC will continue until the
nal song).
3. For further features such as repeat and
shue, please see page 12.
4.
USB Input (front Input)
1. Insert USB stick or other mass storage
USB device into the front slot labeled
‘USB Mem’. Ensure the device is seated
properly.
2. From the main menu, use the navigation
buttons on the remote (or the Input knob
on the front panel) to scroll to USB Input.
Press the center navigation button, or
‘Select’ on the front panel.
3. Navigate through the menu structure to
choose the desired folder(s), selecting
each folder of your choice. Once you have
reached the song level of the menu, you
will see notes appear next to each song
title.
4. Select the song of your choice. The
Reference DAC will begin to play music
from this point (assuming there are other
songs following the one you have chosen,
the Reference DAC will continue until the
nal song).
5. For further features such as repeat and
shue, please see page 12.
Operation

20
USB 2.0HS Input
1. Install the included software on your
PC or Mac (see additional instructions
regarding software installation on page
14).
2. Connect a USB cable from the computer
to the input labeled USB 2.0 HS on the
rear panel of the Reference DAC.
3. From the main menu, use the navigation
buttons on the remote (or the Input knob
on the front panel) to scroll to USB 2.0HS
Input. Press the center navigation button,
or ‘Select’ on the front panel.
4. Launch the appropriate software program
on your computer for music playback.
AES/EBU, RCA, BNC and Toslink Inputs
1. Connect the appropriate cable from
your source to the Reference DAC.
Ensure the cable is seated rmly at both
connections.
2. From the main menu, use the navigation
buttons on the remote (or the Input
knob on the front panel) to scroll to
the appropriate Input. Press the center
navigation button, or ‘Select’ on the front
panel.
3. Begin music playback from source
component.
Internet Radio
1. From the main menu, use the navigation
buttons on the remote (or the input
knob on the front panel) to scroll to the
Internet Radio input. Press the center
navigation button, or ‘Select’ on the front
panel.
2. Navigate through the dierent folders,
selecting the appropriate choices.
3. Once you have reached radio station
options, notes will appear next to the
name of the station. Select the station of
your choice to begin playback.
Operation
Other manuals for reference dac
1
Table of contents
Other Audio Research Media Converter manuals


Popular Media Converter manuals by other brands

Tripp Lite
Tripp Lite B116-002A owner's manual

BZB Gear
BZB Gear BG-HDMI4K-SC user manual

Wyrestorm
Wyrestorm NetworkHD 200 series Technical reference guide

Black Box
Black Box SP385A-R3 user manual

Phase Technologies
Phase Technologies Phase Perfect PT007 Operation & installation manual

Black Box
Black Box IC108A Specifications


