Audio Research DAC8 User manual

OWNER’S MANUAL
REVISION 1.3
Model DAC8
DIGITAL to ANALOG CONVERTER
3900 ANNAPOLIS LANE NORTH / PLYMOUTH, MINNESOTA 55447-5447 / PHONE: 763-577-9700 FAX: 763-577-0323.
www.audioresearch.com

MODEL DAC8
2
TABLE OF CONTENTS
PREFACE ............................................................................................................................................4
INTRODUCTION ........................................................................................................................................... 4
ADDITIONAL FEATURES......................................................................................................................4
DAC8 HD AUDIO DEVICE SOFTWARE DRIVERS.....................................................................................5
COMPUTER SYSTEM REQUIREMENTS .................................................................................................5
OUTPUT CONNECTORS.......................................................................................................................5
INPUT CONNECTORS ..........................................................................................................................5
DESCRIPTION OF FRONT PANEL CONTROLS.........................................................................................5
INSTALLATION INSTRUCTIONS............................................................................................................6
OPERATING / START-UP PROCEEDURE................................................................................................6
WINDOWS PC SOFTWARE INSTALLATION INSTALLATIONS...................................................................6
MAC SOFTWARE INSTALLATION INSTRUCTIONS................................................................................10
SETTING THE SAMPLE RATE ON MAC OS X ........................................................................................12
USING THE DAC8 CONTROL PANEL ...................................................................................................13
SETTING THE SAMPLE RATE OR NATIVE MODE IN WINDOWS ............................................................14
SETTING NATIVE MODE IN MAC OS X................................................................................................16
GETTING THE MOST OUR OF YOUR DAC8..........................................................................................16
S/PDIF, USB 2.0 HS and MUSIC MANAGEMENT .................................................................................16
DAC8 REMOTE CONTROL..................................................................................................................17
MUSIC MANAGEMENT REMOTE CONTROL .......................................................................................17
FCC and SAFETY WARNINGS .............................................................................................................17
PACKAGING .....................................................................................................................................17
SERVICING .......................................................................................................................................18
CLEANING........................................................................................................................................18
WARRANTY .....................................................................................................................................18
SPECIFICATIONS...............................................................................................................................19
S/PDIF CONNECTIONS ......................................................................................................................20
USB 2.0 HS CONNECTION .................................................................................................................21
TROUBLESHOOTING GUIDE ..............................................................................................................22

MODEL DAC8
3
DAC8 FRONT PANEL
DAC8 REAR PANEL
DAC8 REMOTE CONTROL

MODEL DAC8
4
PREFACE:
Please take time to carefully read and understand the following instructions before you install or
attempt to operate this equipment. Becoming familiar with the product and its correct operating
procedures will help assure you of maximum musical enjoyment and reliable operation. The effort you
invest now will be well rewarded in the years ahead.
INTRODUCTION:
Thank you for purchasing our new DAC8 Digital to Analog Converter. You will notice we have enhanced
the USB capability in the DAC8 by upgrading to USB 2.0 HS (high speed) which runs at 480Mbps. USB 2.0
HS has a lower jitter specification than USB 2.0 FS (full speed 12mbps), consequently the DAC8 is
capable of reproducing music with higher resolution than products communicating at USB 2.0 FS speeds.
In addition, the DAC8 employs a low jitter Dual Master Oscillator design which will provide superior
digital to analog conversion via the USB 2.0 HS input as well as via the more traditional S/PDIF, RCA,
BNC, OPT and AES inputs. Our USB 2.0 HS audio interface is optimized for all 6 popular sample rates
currently in use; 44.1, 48, 88.2, 96, 176.4 and 192kHz.
In the past, S/PDIF was the default interface mode for High Resolution music files at 176.4 and 192kHz.
But, now, with Audio Research’s Dual Master Oscillator, USB 2.0 HS interface and our Quad D/A
converter design, USB audio is elevated to the status once dominated by S/PDIF.
Consequently, regardless of whichever digital input you select the Audio Research DAC8 promises to
provide a superior listening experience.
ADDITIONAL FEATURES:
In addition to the High Performance USB design, the DAC8 features:
“DAC8 HD Audio Device” software drivers, which allow listening to your music in its native
sample rate as well as assuring BIT PERFECT, low jitter, data transfer from your PC to your DAC8.
Because PC and Mac operating systems do not adequately support sample rates over 96kHz,
ARC has developed ASIO drivers to make the USB audio experience sonically transparent, at all
sample rates.
Sample Rate measuring function: Measures and displays on the front panel the correct digital
sample rate being sent to the DAC8. This works in USB as well as S/PDIF mode. Consequently,
at a glance, you always know exactly which sample rate is being decoded.
Quad D/A converters: To lower the noise floor and increase the dynamic range, ARC designed in
two D/A converters per channel. Instead of using one D/A in stereo mode we use one D/A in
each channel. Each D/A is in MONO mode improving the stereo separation, lowering the noise
floor and increasing the dynamic range an additional 3dB.
Dual MO’s: When the time base of any DAC is not an integer multiple of the digital music
sample rate, decoding and quantization errors occur. Consequently, the DAC8 uses two low
jitter Master Oscillators; one supporting 44.1, 88.2 & 176.4kHz sample rates and the other
supporting 48, 96 & 192 kHz sample rates. The DAC8 automatically selects the correct MO the
instant digital music is detected at the selected input.
All inputs are galvanically isolated from the source to reduce or eliminate noise and/or jitter
from entering the DAC8.

MODEL DAC8
5
The Analog amplifiers in the DAC8 have received the same attention to detail as the digital
section. Each channel of the DAC8 uses a true direct coupled differential amplifier with a
bandwidth in excess of 90kHz.
To lower the noise floor even more and further improve sonics, the DAC8 employs an R-Core
power transformer, sonically superior in this application to its more traditional iron core
equivalent.
DAC8 HD AUDIO DEVICE SOFTWARE DRIVERS:
The DAC8’s USB driver software provides your computer with special high speed audio drivers not
supplied by MS Windows or Mac OS. The ARC USB drivers are specially designed to assure low jitter BIT
PERFECT data transfer between the server/computer and the DAC8 at all sample rates. Our drivers
setup the USB interface to guarantee bandwidth, independent of active bulk transfers from the hard
drive. Using the ARC icon in your PC’s input tray you can set the DAC8 to any sample rate from 44.1 to
192kHz and allow the music server/management software to either up or down convert your music to
the selected sample rate; you can also bypass the sample rate conversion process and play your music in
Native mode.
Audiophiles can use custom sample rate conversion algorithms or other file formats provided by third
party suppliers such as Windows Media Player, Media Monkey, FooBar, iTunes, J Rivers Media Center
and many others to optimize your music experience. Remember, the DAC8 was designed to always be
in “Native” mode so your DAC8 will never modify or re-sample the music files you send it.
COMPUTER SYSTEM REQUIREMENTS:
The software drivers that shipped with your DAC8 will install on any PC computer or Mac computer with
an Intel processor. On PC’s the DAC8 is compatible with Windows operating systems, XP, Vista or
Windows 7. On the Intel/Mac computers the DAC8 software drivers are compatible with OS 10.4 and
higher. For USB operation, on either platform, the DAC8 requires a dedicated USB 2.0 HS (high speed
480Mbps) port.
OUTPUT CONNECTORS:
RCA connectors: connect to unbalanced (RCA) inputs of your preamplifier or integrated amp.
XLR connectors: connect to balanced (XLR) inputs of your preamplifier or integrated amp.
INPUT CONNECTORS:
USB 2.0 HS, RCA, BNC, XLR, OPT (TOSLINK FIBER).
DESCRIPTION OF FRONT PANEL CONTROLS:
POWER ON/OFF: Supplies power from AC wall outlet to DAC8 when in "On" position, as
indicated by illuminated green "Power" LED. When “Off”the DAC8 is in sleep mode.
INPUT SWITCH: Allows user to select one of five possible digital sources indicated by front
panel input LEDs (USB, RCA, BNC, XLR, OPT).
SAMPLE RATE INDICATOR: When a digital source is properly connected to one of the inputs and
that input is selected, one of the “SAMPLE RATE" LEDs (44.1, 48, 88.2, 96, 176.4, 192kHz) will
light indicating LOCK. The DAC8 goes into MUTE when an input with no signal is selected.
MUTE:Selecting Mute (indicated by illuminated Mute LED) mutes or unmutes the output of the
DAC8.
INVERT: Inverts absolute phase of output signal when LED is lit.

MODEL DAC8
6
INSTALLATION INSTRUCTIONS:
While the DAC8 does not dissipate an unusual amount of heat, it is important that it be provided with
reasonable airflow to assure long, trouble-free operation. In addition, the following installation
guidelines will help insure maximum sonic performance as well as reliable service.
1. Upright and horizontal mounting is suggested if extended operation (longer than one hour)
is contemplated.
2. Do not "stack" the DAC8 on top of a power amplifier.
3. Do not place or operate your DAC8 on a soft or irregular surface such as a rug. This will
prevent proper ventilation.
4. Never operate your DAC8 without the top and bottom covers installed. These are required
both for safety as well as shielding from interference (except in service operations).
OPERATING/START-UP PROCEDURE:
1. Make sure power switch is set to "Off” position.
2. Secure all rear-panel connections between DAC8, preamplifier, and digital input source(s).
Refer to the S/PDIF and USB 2.0 HS CONNECTIONS diagrams at the end of this document for
input and output connection ideas.
3. Plug 3-prong power cord from the rear of the DAC8 into a grounded AC wall receptacle.
4. Turn power switch to "On”. The green "Power" LED will light, indicating your DAC8 is ready
for operation.
WINDOWS PC SOFTWARE INSTALLATION INSTRUCTIONS:
Installation of the DAC8 HD Audio Device drivers is only necessary if you intend to use the USB 2.0 HS
input on your DAC8. Software installation is not necessary if you only intend to use the S/PDIF or
AES/EBU inputs.
Place the installation disk you received with your DAC8 into your computer and double click the SETUP
icon. The disk should auto load and start the install function; follow the on screen prompts as you install
the DAC8 HD Audio device drivers.

MODEL DAC8
7
Press NEXT when the WELCOME window appears.
When asked to accept or decline the License Agreement; check the ACCEPT box and press NEXT.
The installer will automatically place the HD Audio Device Drivers in your Program files. Press the
INSTALL button to continue.

MODEL DAC8
8
In several spots the computer may prompt you to “Install, Continue or Don’t Install” the HD Audio
Drivers. Select “allow, continue or Install this driver software anyway” each time you are prompted.
You will be informed when the installation has completed successfully; press NEXT to continue.

MODEL DAC8
9
At the end of the installation the install program will ask you to disconnect and reconnect your DAC8 to
the computer via the USB port and turn it on. On Vista and Windows 7, Windows will detect the new
DAC8 hardware and load on the new drivers automatically; on XP, Windows will pop-up with a NEW
HARDWARE FOUND panel; follow the Windows prompt instructions and your new DAC8 HD audio
device drivers will install. The install prompts will occur twice before the install is complete. Now you
can press FINISH and the installation will be complete. Normally restarting your PC at this point is not
required but If you do not see the “DAC8 OUT 1/2" listed in the SOUND panel after installation you
should do a restart of your PC; see page 14 for details.

MODEL DAC8
10
MAC SOFTWARE INSTALLATION INSTRUCTIONS:
Installation of the DAC8 HD Audio Device drivers is only necessary if you intend to use the USB 2.0 HS
input on your DAC8. Software installation is not necessary if you only intend to use the S/PDIF or
AES/EBU inputs.
Place the installation disk you received with the DAC8 into your Mac computer and open the install file
on your desk top. Click on the “AUDIO_RESEARCH_DAC8.mpkg” icon in the folder.
Follow the on screen prompts as you install the DAC8 HD Audio device drivers. Press the CONTINUE
button when you see the Welcome panel.

MODEL DAC8
11
When the installer asks you if you want to do a Standard install, press the INSTALL button.
At the completion of the install you should see the INSTALL SUCCEEDED panel. Press the CLOSE button
and the installation will be complete. RESTART your Mac to complete the installation.

MODEL DAC8
12
After installation, go to your DOCK and click on the SYSTEM PERFERENCES and click on SOUND. Make
sure AUDIO RESEARCH CORP DAC8 has been selected. If not, go into the SOUND panel and click on the
AUDIO RESEARCH CORP DAC8 name and close out the panel. Remember, to see the DAC8 name in the
SOUND panel you must have the DAC8 ON and connected to the USB port.You are now ready to call
up iTunes or any other music management program and enjoy your NEW DAC8. Note: DO NOT SET THE
VOLUME CONTROL IN THE SOUND PANEL TO MAX VOLUME AS THIS WILL OVER DRIVE THE DAC8 AND
CAUSE DISTORTION.
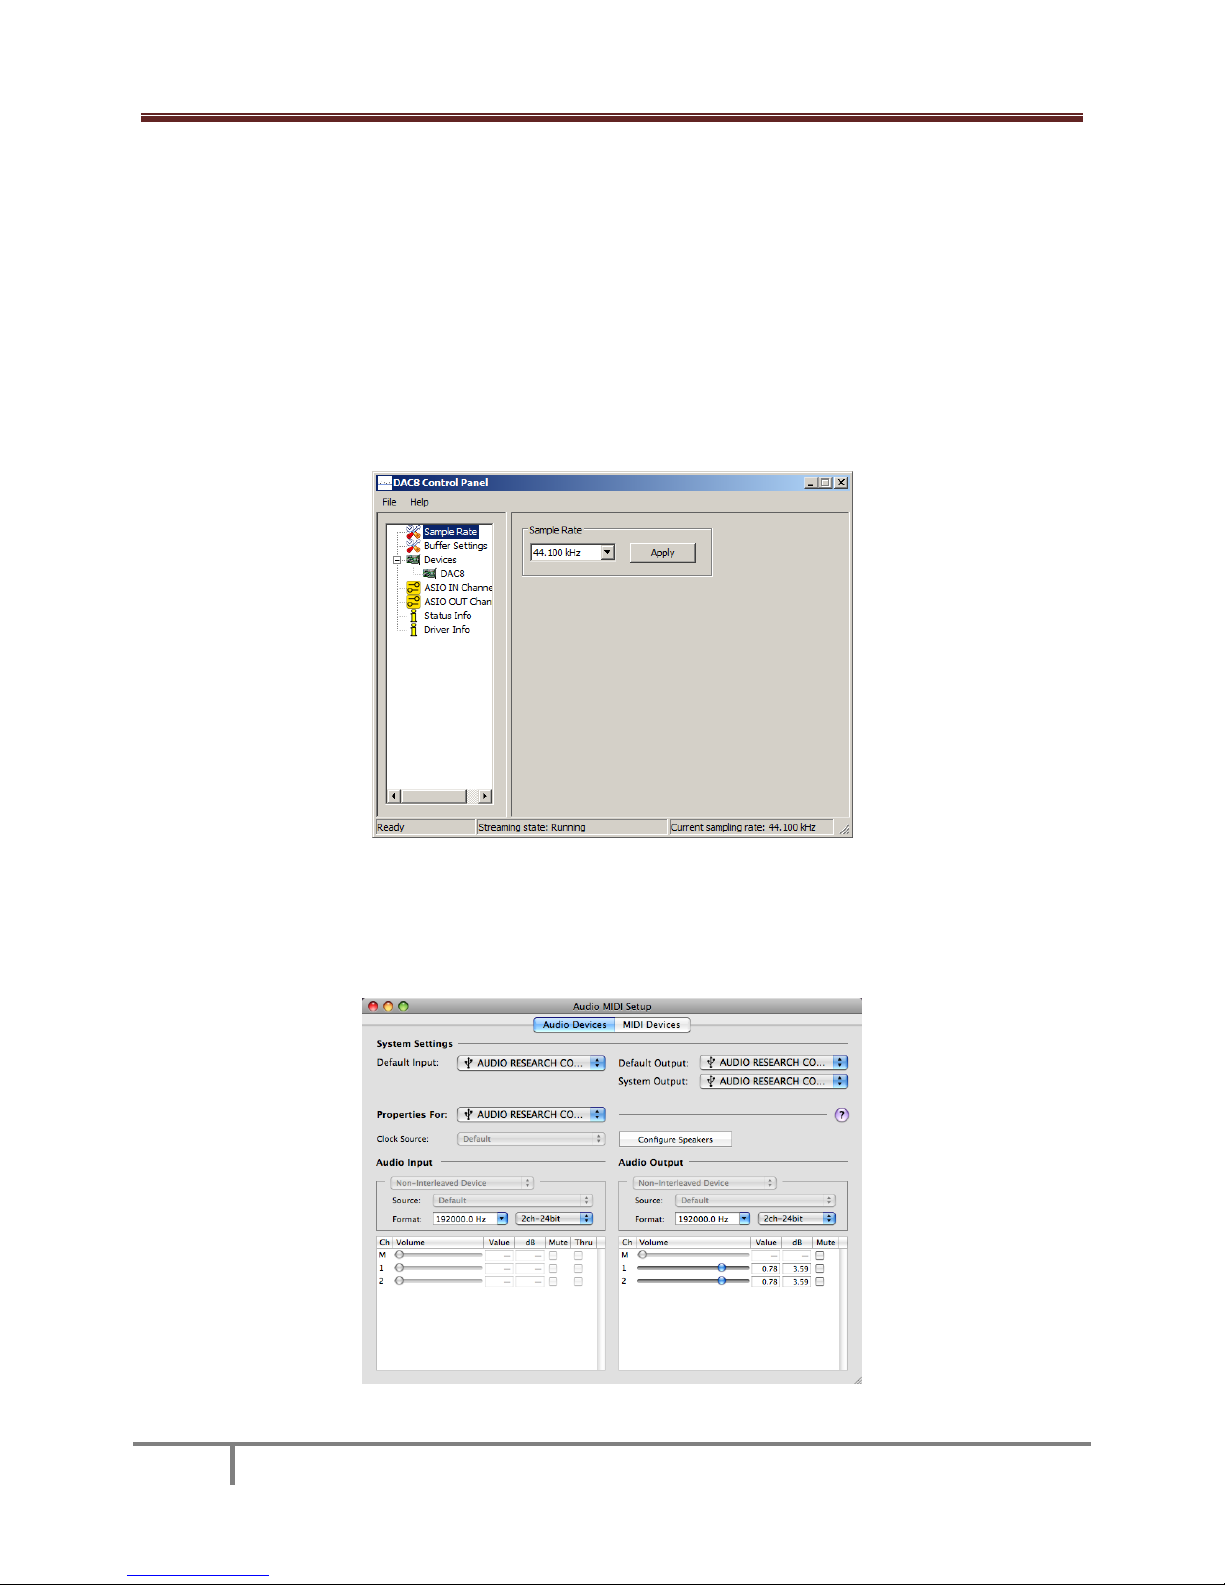
SETTING THE SAMPLE RATE ON MAC OS X:
Now go into the FINDER then GO then UTILITIES and select AUDIO MIDI SETUP. Once in the Audio MIDI
Setup panel click on the PROPERTIES FOR: selection box and select AUDIO RESEARCH CORP DAC8. Then
do the same for the SYSTEM OUTPUT: and DEFAULT OUTPUT: selection boxes. Remember, to see the
DAC8 name in the Audio MIDI Setup panel you must have the DAC8 ON and connected to the USB port.
Next go into the AUDIO OUTPUT section of the panel and select the desired FORMAT (SAMPLE RATE)
from the list; 44100, 48000, 88200, 96000, 176400, 192000.0Hz. Also, 2ch-24bit should be showing in
the window to the right. If you plan to play mostly 44.1 ripped CD’s then select 44.1, 88.2 or 176.4kHz.
This will select the correct Master Oscillator in the DAC8 for CD’s.
MODEL DAC8
13
USING THE DAC8 CONTROL PANEL:
In Windows when you installed the DAC8 software an icon for the DAC8 HD Audio Device control panel
was placed in your computer’s input tray. Double click the icon and select one of the 6 sample rates
listed, 44.1, 48, 88.2, 96, 176.4 or 192kHz; then press Apply and then close the window by clicking the X
in the upper right corner of the window. The only time you need to go back to this window is when you
want to change the sample rate mode. Also, as long as the DAC8 is connected to your computer when
you turn it on, the last sample rate you selected will be resent to the DAC8. Remember, whenever you
want to change the Sample Rate you must exit the music management program you are using, call up
the DAC8 control panel, make the Sample Rate change, and recall your music management program and
start playing music.
The Mac OS does not allow change of the Sample Rate by the hardware ASIO driver. With the Mac the
AUDIO MIDI SETUP Utility has control over the sample rate sent to the DAC8. Remember, the DAC8 is
always in Native mode so it will always lock on and indicate whatever sample rate is being sent by the
computer. See the Mac installation instructions for details.

MODEL DAC8
14
SETTING THE SAMPLE RATE OR NATIVE MODE IN WINDOWS:
If your music server or music management software does not allow you to connect to the DAC8 HD
Audio Device drivers directly you can easily tell Windows Vista or Windows 7 operating systems to
honor Native mode for your music file. While in Vista or Windows 7 call up the Windows control panel
and select the Sound panel. You should see the DAC8 Device driver in the list of playback devices.
Select the DAC8 driver and press the SET DEFAULT button near the bottom of the panel, then double
click the DAC8 picture in the panel and go to the next figure. If you do not see the DAC8 OUT 1/2 listed
in the sound panel after installation, first make sure your DAC8 is connected to your PC via a high
quality USB cable and plugged into an appropriate AC outlet. If that has been done and you still do
not see the DAC8 listed in the SOUND panel, you should do a restart of the PC.

MODEL DAC8
15
Once you have double clicked the DAC8 driver and pressed the ADVANCED button you will see the
Exclusive Mode properties. If the “Allow application to take exclusive control of the device” is selected
then the “DAC8 Control Panel” will select the sample rate.
Otherwise, for NATIVE MODE, “uncheck”the “Allow application to take exclusive control of this device”,
press APPLY, then close the window. Now whatever sample rate your music was stored at will be sent
to the DAC8. If this step does not allow your music management software to take control of the
sample rate being sent to the DAC8 you should simply use the DAC8 control panel to set the DAC8
sample rate to that of the music you are playing.

MODEL DAC8
16
SETTING NATIVE MODE IN MAC OS X:
Mac OS X does not allow the music manager, such as iTunes or SongBird to change the Sample Rate on a
song by song basis. For example, if you set the sample rate of the DAC8 in the AUDIO MIDI SETUP panel
to 176400.0Hz then iTunes will up-sample a 44.1 CD to 176.4kHz and send it to the DAC8; the 176.4 LED
will be lit. To play a 44.1 CD at 44.1kHz, simply set the sample rate in the Audio MIDI Setup Utility to
44100.0kHz. See section SETTING THE SAMPLE RATE ON MAC OS X: for details.
To play your music in BIT PERFECT mode at its NATIVE Sample Rate you will need to purchase and install
software from a third party such as PURE MUSIC®, PURE VINYL® or AMARRA®. These software packages
provide BIT PERFECT music transfer to the DAC8 and allow the NATIVE sample rate to be sent to the
DAC8 on a song by song basis.
GETTING THE MOST OUT OF YOUR DAC8:
The DAC8 has many new features that can be enhanced when used with some of the top MUSIC
MANAGEMENT software packages and computer to S/PDIF conversion hardware. Please take a moment
to read through this section and see if you’re getting the most out of your DAC8 setup.
S/PDIF, USB 2.0 HS and MUSIC MANAGEMENT:
The DAC8 was designed to provide your high-end audio system with BIT PERFECT 24 bit audio at sample
rates not possible from a CD or SACD player. Red Book CD’s are recorded at 16 bits, 44.1kHz sample
rates; your DAC8 is capable of playing back digital music recorded at 24bits and sample rates up to
192kHz. With your DAC8 you can:
Take the S/PDIF output from your current CD or DVD player and enjoy the sonic benefits of the
Quad DAC architecture, low jitter dual master oscillators and high bandwidth direct coupled
differential amplifiers while playing your favorite CD’s.
It is also possible to take the S/PDIF output from many of the multiroom home audio systems
that are on the market. AppleTV®, Sonos® and many others provide wired/wireless multiroom
music management systems that have S/PDIF outputs that work well with the DAC8.
If you want to play back S/PDIF music at a higher resolution and sample rate, you can assemble
a HD music server computer system. Your Audio Dealer or the HRx web site at
http://www.referencerecordings.com/HRxSETUPS.asp can give you ideas on how to construct a
high resolution music server that will provide an S/PDIF signal to the DAC8.
If you desire to play high resolution music files via the USB 2.0 HS interface to the DAC8, all you
do is connect your computer to the DAC8 via a good quality high speed USB 2.0 (480Mbps) cable
and install the DAC8 HD Audio Device drivers. Once connected you are ready to sit back and
enjoy your favorite tunes.
A large part of the digital music experience is managing and organizing your music for fast and
accurate playback through the DAC8 to your audio system. There are several software music
managers available to enhance your music experience; on PC’s, J Rivers Media Center®,
Mediamonkey® and FooBar® are three that provide the ability to connect to the DAC8’s HD
Audio Device drivers for BIT PERFECT music playback in its Native mode. Others such as
iTunes®, SongBird® and Windows Media Player® are excellent media managers that will play
your music through the “Windows Sound Control” interface. To assure BIT PERFECT data
transfer with these music managers follow the instructions in the “SETTING THE SAMPLE RATE
OR NATIVE MODE” section. The resources at http://www.computeraudiophile.com/ and other

MODEL DAC8
17
digital music web sites can help you select a media manager and provide other information
aimed at enhancing your music enjoyment.
DAC8 REMOTE CONTROL:
With the DAC8 you received an IR remote to turn POWER On/Off, INVERT, MUTE and SELECT INPUTS:
USB, RCA, BNC, AES and OPT. If you are playing via the USB interface you can also START/
PAUSE/PLAY/NEXT/PREVIOUS the music with most software music managers.
MUSIC MANAGER REMOTE CONTROL:
Several of the newer music manager software packages such as iTunes® and Mediamonkey® allow you
to pick your music and control the playback functions remotely, with your iPhone®, iTouch® or iPad®.
Follow the instructions provided by Apple® or Melloware’s® Monkey Tunes® to set these functions up
on your computer and to load the app onto your iPhone®, iTouch® or iPad®. Other music server
packages, such as J Rivers Media Center®, offer a Media Center Remote Kit for a nominal fee.
FCC and SAFETY WARNINGS:
This equipment has been tested and found to comply with the limits for a class B digital device, pursuant
to Part 15 of the FCC Rules. These limits are designed to provide reasonable protection against harmful
interference in a residential installation. This equipment generates, uses, and can radiate radio
frequency energy and, if not installed and used in accordance with the instructions, may cause harmful
interference to radio communications. However there is no guarantee that interference will not occur
in a particular installation. If this equipment does cause harmful interference to radio or television
reception, which can be determined by turning the equipment off and on, the user is encouraged to try
to correct the interference by one or more of the following measures:
oRe-orient or relocate the receiving antenna.
oIncrease the separation between the equipment and the receiver.
oConnect the equipment into an outlet on a circuit different from that to which the
receiver is connected.
oConsult the dealer or an experienced radio/TV technician for help.
To prevent fire or shock hazard, do not expose this product to rain or moisture.
This unit operates on voltages which can cause serious injury or death. Do not operate with covers
removed. Any necessary servicing should be carried out by your authorized Audio Research dealer or
other qualified electronics technician.
The power cord on this unit is safety-tested and is equipped with a proper grounding plug. If used
normally, it will provide a safe earth ground connection to the chassis. Defeating the grounding plug or
replacement of the plug or power cord, or any unauthorized modification of the active circuitry or
controls of this unit automatically voids warranty coverage, and could cause injury or death.
For safe operation and protection against fire hazard, replace fuses only with those of the same type
and rating as those supplied with this unit.
PACKAGING:
Save all packaging accompanying this product. You have purchased a precision electronic instrument,
and it should be properly cartoned any time shipment becomes necessary. It is very possible that this
unit could be damaged during shipment if repackaged in cartoning other than that designed for it. The

MODEL DAC8
18
original packaging materials help protect your investment from unnecessary damage, delay and added
expense whenever shipment of this unit is required.
SERVICING:
Because of its careful design and exacting standards of manufacture, your DAC8 should normally require
only minimal routine service to maintain its high level of performance.
CAUTION: Your DAC8 contains sufficient levels of voltage and current to be lethal. Do not tamper with a
component or parts inside the unit. Refer any needed service to your authorized Audio Research dealer
or other qualified technician. Should service be necessary, please contact your Audio Research dealer
or Audio Research Customer Service at (763) 577-9700 (CST).
CLEANING:
To maintain the new appearance of this unit, occasionally wipe the front panel and top cover with a soft,
damp (not wet) cloth to remove dust. A mild, non-alkaline soap solution or dilute isopropyl alcohol may
be used to remove fingerprints or similar smudges. Cleaners containing abrasives should not be used as
they will damage the anodized finish of the front panel. A small, soft paint brush is effective in removing
dust from bevels, the recessed nameplate and other features of the front panel.
DISPOSAL AND RECYCLING GUIDELINES:
To dispose of this electronic product, do not place in land fill. In accordance with the European Union
Waste Electrical and Electronic Equipment (WEEE) directive effective August 2005, this product may
contain regulated materials which upon disposal require special reuse and recycling processing. Please
contact your dealer or importing distributor for instructions on proper disposal of this product in your
country. Or, contact Audio Research Corporation (763-577-9700) for the name of your importing
distributor and how to contact them. Packing and shipping materials may be disposed of in a normal
manner.
LIMITED WARRANTY:
Audio Research Corporation products are covered by a 3-Year Limited Warranty or a 90-Day Limited
Warranty (vacuum tubes). This Limited Warranty initiates from the date of purchase, and is limited to
the original purchaser, or in the case of demonstration equipment, limited to the balance of warranty
remaining after original shipment to the retailer or importer.
In the United States, the specific terms, conditions and remedies for fulfillment of this Limited Warranty
are listed on the warranty card accompanying the product in its shipping carton, or may be obtained
from the authorized retailer or from the Audio Research Customer Service Department. Outside the
United States, the authorized importing retailer or distributor has accepted the responsibility for
warranty of Audio Research products sold by them. The specific terms and remedies for fulfillment of
the Limited Warranty may vary from country to country. Warranty service should normally be obtained
from the importing retailer or distributor from whom the product was purchased.
In the unlikely event that technical service beyond the ability of the importer is required, Audio Research
will fulfill the terms and conditions of the Limited Warranty. Such product must be returned at the
purchaser's expense to the Audio Research factory, along with a photocopy of the dated purchase
receipt for the product, a written description of the problem(s) encountered, and any information
necessary for return shipment. The cost of return shipment is the responsibility of the purchaser.

MODEL DAC8
19
DAC8 SPECIFICATIONS
OUTPUT, ANALOG (STEREO)
Balanced XLR 6.6V RMS (16.4dBV) max.
Single-Ended RCA 3.3V RMS (10.4dBV) max.
OUTPUT IMPEDANCE
500 Ω Bal, 250 Ω SE
FREQUENCY RESPONSE
0.5Hz –90kHz, +0 -3dB
20Hz –20kHz, +0 -.15dB
SIGNAL TO NOISE RATIO
>114dB
TOTAL HARMONIC DISTORTION
0.015%
IMD + NOISE
0.013%
QUAD DAC RESOLUTION
24 bits each
CHANNEL SEPARATION
105dB
INPUTS, DIGITAL, ALL GALVANICALLY
ISOLATED
USB 2.0 HS (480Mbps) 44.1 to 192kHz
RCA 75Ω SPDIF, 44.1 to 192kHz
BNC 75Ω SPDIF, 44.1 to 192kHz
XLR 110Ω SPDIF, AES/EBU 44.1 to 192kHz
OPT 660nM Toslink Fiber 44.1 to 96kHz
MASTER OSCILLATOR
22.579mHz ±20Hz, for 44.1, 88.2 & 176.4kHz
24.576mHz±20Hz, for 48, 96 & 192kHz
INTRINISIC JITTER
<10pS
POWER SUPPLY
2 Transformers, 7 Regulators
POWER REQ. (detachable power cord)
100-125VAC 60Hz (200-250VAC 50/60Hz)
18W max, Sleep Mode 4W
COMPLIANCE
FCC & CE
FRON PANEL DISPLAY
POWER ON, MUTE, INVERT, INPUT SELECT,
SAMPLE RATE BEING PLAYED
FRONT PANEL CONTROL FUNCTIONS
POWER: on/off, INVERT: output polarity,
INPUT: select (advance), MUTE: outputs
INFRARED REMOTE CONTROL FUNCTIONS
POWER: on/off, MUTE: outputs, INPUT: USB,
RCA, BNC, XLR, OPT, USB: play/pause,
previous, next, stop. INVERT: output polarity
DIMENSIONS
19” (48cm) W x 5.25” (13.4cm) H x 10”
(25.4cm) D. Handles extend 1.5” (3.8cm)
forward of the front panel. Rear connectors
extend .75” (1.9cm)
WEIGHT
11.5lbs. (5.2kg) Net; 18lbs. (8.2kg) Shipping
Specifications subject to change without notice.
©2010 Audio Research Corporation.

MODEL DAC8
20
Table of contents
Other Audio Research Media Converter manuals


