Audio-Techica ATH-M20xBT User manual

ATH-M20xBT
Wireless Headphones
User Manual
English

4
Notes on use
Be sure to read the connected device’s user manual before use.
Audio-Technica will not be liable in any way for any loss of data in the unlikely event that such losses should occur
while using the product.
On public transportation or in other public places, keep the volume low so as not to disturb other people.
Minimize the volume on your device before connecting the product.
When using the product in a dry environment, you may feel a tingling sensation in your ears. This is caused by static
electricity accumulated on your body, not by product malfunction.
Do not subject the product to strong impact.
Do not store the product in direct sunlight, near heating devices, or in hot, humid, or dusty places. Additionally, do
not allow the product to get wet.
When the product is used for a long time, the product may become discolored due to ultraviolet light (especially
direct sunlight) and wear.
If the product is placed in a bag while the USB charging cable is still connected, the USB charging cable may
become caught, severed, or broken.
Make sure to hold the plug when connecting and disconnecting the USB charging cable. The USB charging cable
may become severed or an accident may occur if you pull on the cable itself.
When you are not using the USB charging cable, disconnect it from the product.
Do not charge the battery if the terminal of the USB charging cable is bent, loose, or damaged. Doing so may cause
heat generation, smoke emission, fire or electric shock.
This product can be used to talk on the phone only when using a mobile telephone network. Support for telephony
apps that use a mobile data network is not guaranteed.
If you use the product near an electronic device or transmitter (such as a mobile phone), unwanted noise may be
heard. In this case, move the product away from the electronic device or transmitter.
If you use the product near a TV or radio antenna, noise may be seen or heard in the television or radio signal. In this
case, move the product away from the TV or radio antenna.
To protect the built-in rechargeable battery, charge it at least once every 6 months. If too much time passes between
charges, the life of the rechargeable battery may be reduced, or the rechargeable battery may no longer be able to be
charged.
Do not charge the product if water or foreign matter is inside the battery jack or USB charging cable. Doing so may
cause corrosion, heat generation, smoke, fire, or other malfunction or electric shock in the battery jack or USB
charging cable.
Charge the product in a well-ventilated place (10 to 35°C (50 to 95°F)) away from direct sunlight. Otherwise, the
battery may deteriorate, possibly resulting in shorter periods of continuous use or may fail to charge.
If the product is wet with sweat, wipe off any moisture with a dry cloth before charging.

5
For a more comfortable Bluetooth communication
experience
The effective communication range of this product varies depending on obstructions and radio wave conditions. For a
more enjoyable experience, please use the product as close as possible to the Bluetooth device. To minimize noise and
sound disruptions, avoid placing your body or other obstacles between the product’s antenna (L side) and the Bluetooth
device.
R L
1
1
Antenna
6
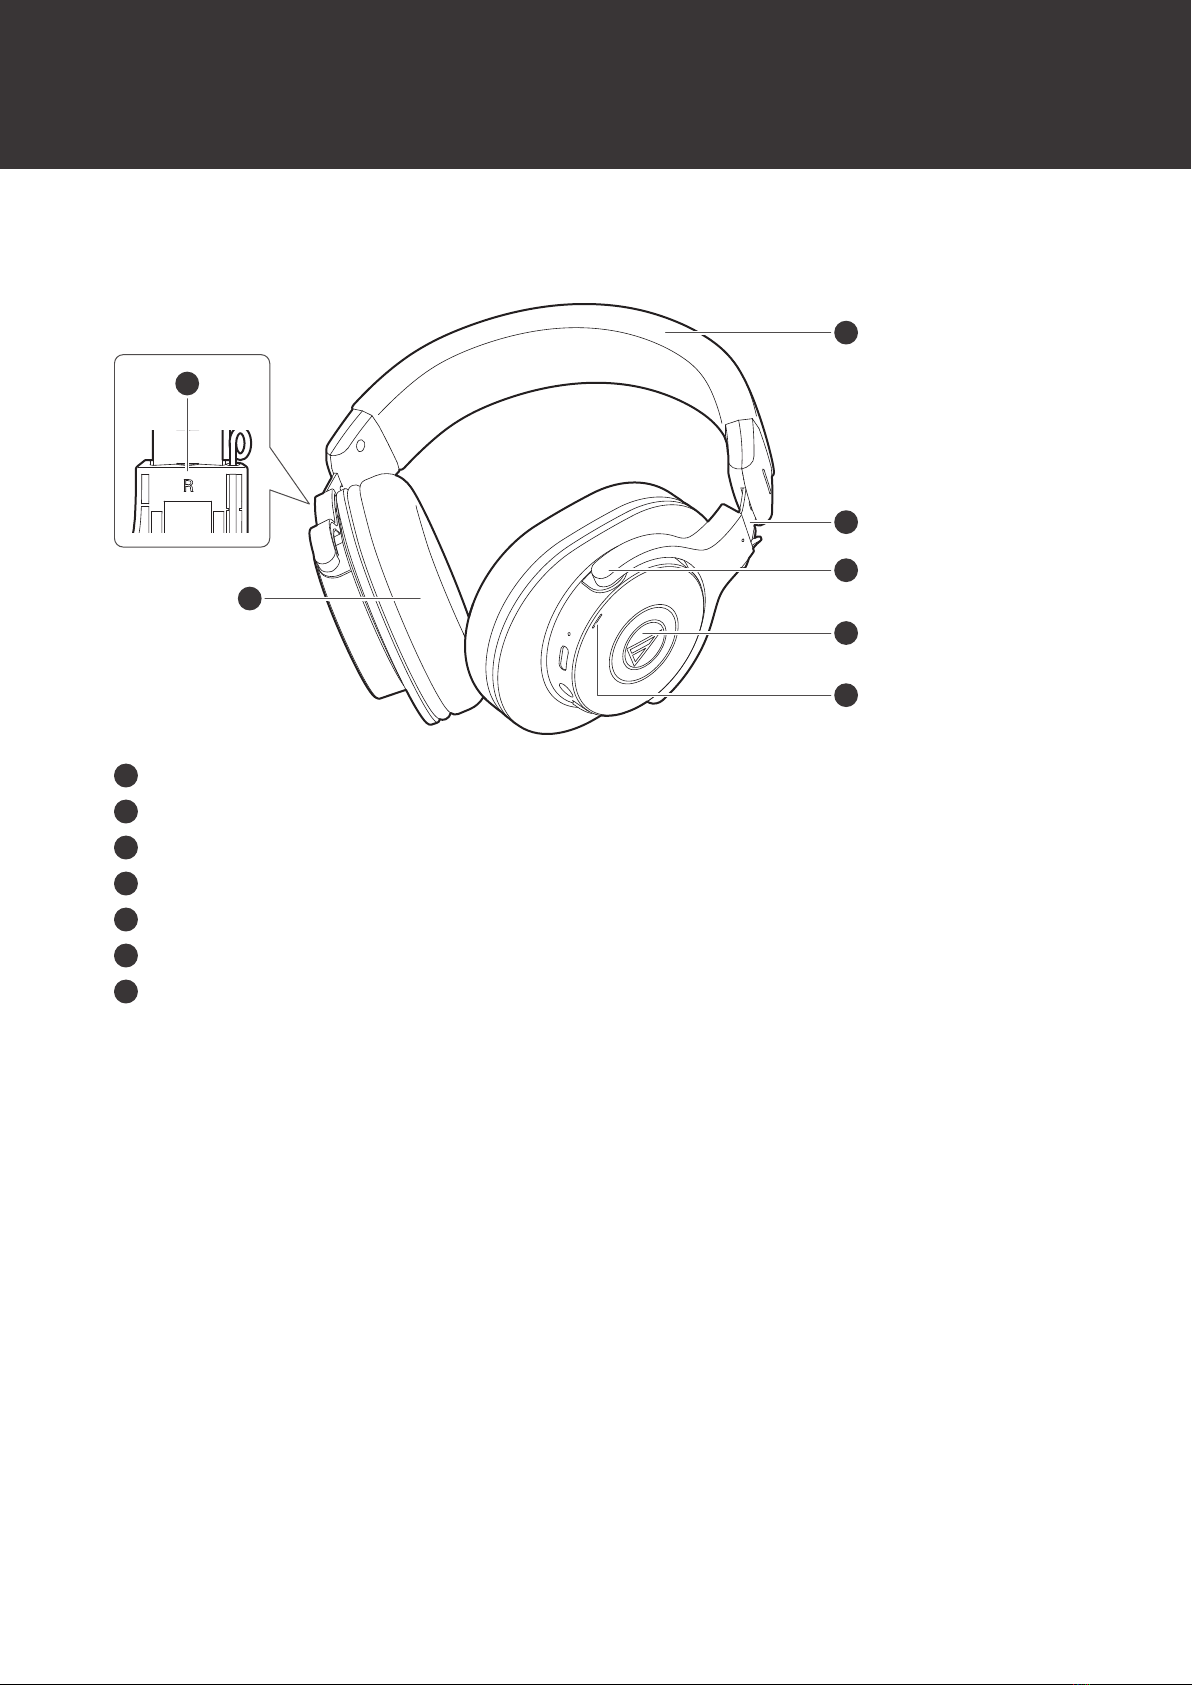
Part names and functions
Headphones
4
6
5
2
1
3
7
1
L/R (left/right) indicator
2
Earpad
3
Headband
4
Slider
5
Arm
6
Housing
7
Indicator lamp
Displays the operating status and battery level of the product.

Part names and functions
7
Operation area
2 3 4
1
5
1
Microphone
2
Battery jack
Use to connect the included USB charging cable and charge the product.
3
Connector jack
Use to connect the included cable for wired connections.
4
Power supply / control button
Use to turn the power supply ON/OFF, play/pause music, and answer phone calls.
5
Volume buttons
Use to adjust the volume up or down (+/–).
Accessories
2
1
1
USB charging cable (30cm (12"), USB Type-A / USB Type-C™)
2
Cable (1.2 m (3.9’) / 3.5 mm (1/8”) gold-plated stereo mini-plug (3 pole/Lshaped))
8
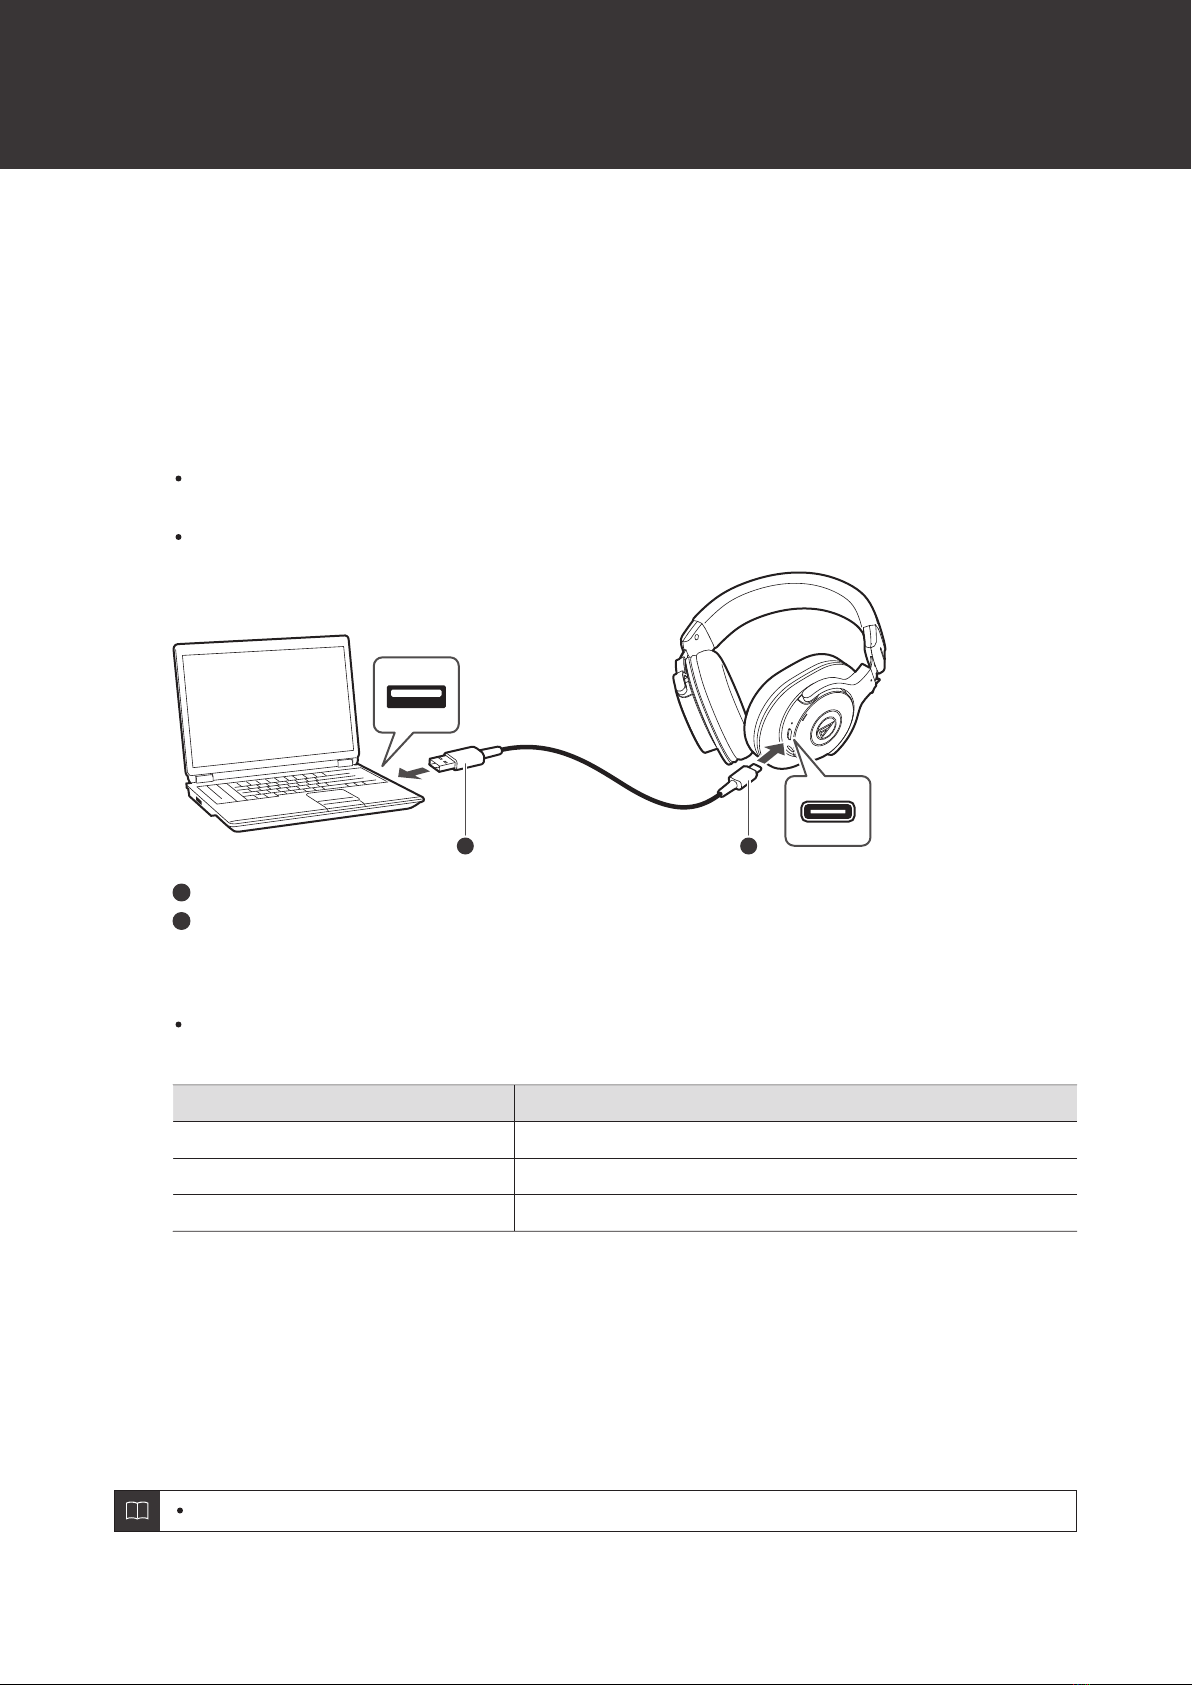
Charging the battery
Fully charge the battery when using for the first time.
When the rechargeable battery is running low, the voice guidance will play the message “Low battery”, and the
indicator lamp will flash in red. Charge the battery as soon as possible.
It takes about 4 hours maximum to charge the battery fully. (This time may vary depending on usage conditions.)
Charge the product in a well-ventilated place (10 to 35°C (50 to 95°F)) away from direct sunlight. Otherwise, the battery
may deteriorate, possibly resulting in shorter periods of continuous use or may fail to charge.
1Connect the included USB charging cable (USB Type-C side) to the battery jack.
The included USB charging cable is designed for exclusive use with the product. Do not use any other USB
charging cable.
When inserting the USB charging cable into the USB port or battery jack, insert it directly (horizontally).
1 2
1
USB Type-A
2
USB Type-C
2Connect the included USB charging cable (USB Type-A side) to the computer to start charging.
While charging, the indicator lamp lights as follows. (It may take several seconds for the indicator lamp to
light.)
Indicator lamp Status
Lit red Charging
Off Charging complete
Flashing red Charging error[1]
[1] The headphones may be hot. Allow the temperature of the product to cool sufficiently before charging in a well-ventilated place (10 to 35°C
(50 to 95°F)) away from direct sunlight.
3When charging is complete, disconnect the USB charging cable (USB Type-A side) from the
computer.
4Disconnect the USB charging cable (USB Type-C side) from the product’s battery jack.
If you start to charge while the product is on, it will automatically turn off.

Charging the battery
9
When charging, make sure to use the included USB charging cable. The product may not charge with
cables other than the included USB charging cable.

10
Power supply ON/OFF
Turning on the product
1Press and hold the power supply/control button (about 2 seconds).
The indicator lamp lights in white, and then flashes. Voice guidance is played.
It may take several seconds for the indicator lamp to light.
See "Voice guidance" (p. 19) for more information on voice guidance.
Turning off the product
1Press and hold the power supply/control button (about 2 seconds).
The indicator lamp lights in white, and then turns off.

11
Connecting via Bluetooth
To connect the product to a Bluetooth device, the product needs to pair (register) with the device.
Pairing a Bluetooth device
Read the user manual for the Bluetooth device.
Place the Bluetooth device within 1 m (3.3') of the product to perform pairing correctly.
Wear the product to hear voice guidance during pairing.
1Starting with the product turned off, turn it on.
The indicator lamp will light in white, and then flash in white.
2Use your Bluetooth device to begin the pairing process and search for the product. When your
Bluetooth device finds the product, “ATH-M20xBT” will be displayed on the device.
For information about using your Bluetooth device, refer to the device’s user manual.
3Select “ATH-M20xBT” to pair the product and your Bluetooth device.
Some devices may ask for a passkey. In this case, enter “0000”. The passkey may also be called a passcode,
PIN code, PIN number, or password.
Bluetooth ON
ATH-M20xBT
The voice guidance will play the message “Bluetooth connected”, and the indicator lamp will flash
slowly in white. This indicates pairing was successfully completed.
Pairing with Fast Pair
In one touch, the product enables quick, effortless Bluetooth pairing with your Android devices. You can even check to
see where you last placed it.

Connecting via Bluetooth
12
1Turn on the Bluetooth function on an Android device configured with a Google account.
2Turn on the product and bring the product close to the Android device.
For information about using your Bluetooth device, refer to the device’s user manual.
3Touch the pairing notification that appears on your Android device.
The voice guidance will play the message “Bluetooth connected” when pairing is complete. The
indicator lamp will begin flashing slowly in white.
About pairing
When connecting a new Bluetooth device, you need to pair it with the product. Once the Bluetooth device and the
product are paired, you do not need to pair them again. The product supports multipairing, in which a connection history
is saved. However, in the following cases you will need to pair again even if the Bluetooth device was paired once:
If the product is deleted from the Bluetooth device’s connection history.
If the product is sent out for repair.
If the product is reset.
Multipoint function
The product supports multipoint, which allows two Bluetooth devices to be connected at the same time. While you are
listening to music with one device, you can answer a call that comes in from the other device. It is convenient if you have
two smartphones, for example.
Audio-Technica does not guarantee the operation of all combinations of Bluetooth devices.
Connecting using multipoint
1Pair with the first Bluetooth device.
2After pairing with the first device, turn off its Bluetooth feature.
3Pair with the second Bluetooth device.
4Turn on the Bluetooth feature of the first Bluetooth device.
If the product does not connect, restart its power.
Up to two Bluetooth devices can be connected at the same time with multipoint. To connect a third
Bluetooth device, disconnect one of the connected devices.
Table of contents


