Audio3 Warbler User manual

Manual
v1.10
Audio3
Warbler
Free-field Audiometer

2 3
WelcomeContents
Thank you for purchasing the Audio3 Warbler free-field audiometer. We
believe it is one of the finest audiometric devices available and hope you
will enjoy using it.
Audio3 is owned and operated by hearing research scientists who study
hearing loss (NIHL). We are dedicated to reducing the prevalence of
hearing loss and improving the diagnosis and treatment of hearing
loss. Our primary concern is hearing health. The Warbler is unique
among audiometers; it is easy to use, beautifully made and features Ling
sounds and narrow-band music stimuli in addition to warble tones and
Freshnoise. It is also highly accurate.
This manual gives you all the instructions you will need to get the most
from your Warbler.
Further information may be found at the Audio3 web site, audio-3.com.
Warm Regards,
Managing Director
Contents ..................................................................2
Welcome..................................................................3
In the Box.................................................................4
Safety .......................................................................5
User Interface Overview........................................................................... 6
Getting Started ......................................................6
Charging the Battery.................................................................................7
Checking Warbler on Arrival...................................................................8
The Hood........................................................................................................9
The Display ................................................................................................. 10
Operating the Warbler........................................................................... 12
User Controls Flow Diagram................................................................ 14
Overview of Stimuli................................................................................. 16
Stimuli....................................................................16
Tone............................................................................................................... 17
Warbletone & Freshnoise...................................................................... 18
Sounds ......................................................................................................... 20
Ling sounds................................................................................................ 22
Songs ............................................................................................................ 24
Scale .............................................................................................................. 26
Calibration Overview.............................................................................. 28
Calibration.............................................................28
Calibration Materials and Setup ........................................................ 29
Calibration Charts .................................................................................... 30
Calibration Procedure ............................................................................ 31
Technical Specications........................................................................ 32
Specications .......................................................32
Regulatory Symbols................................................................................ 33
Recycling..................................................................................................... 34
EMC Compliance...................................................................................... 34
Manufacturer Declaration.................................................................... 35
Warranty / Service ...............................................36
References.............................................................37
Parts .......................................................................39
Contents
Welcome
4 5
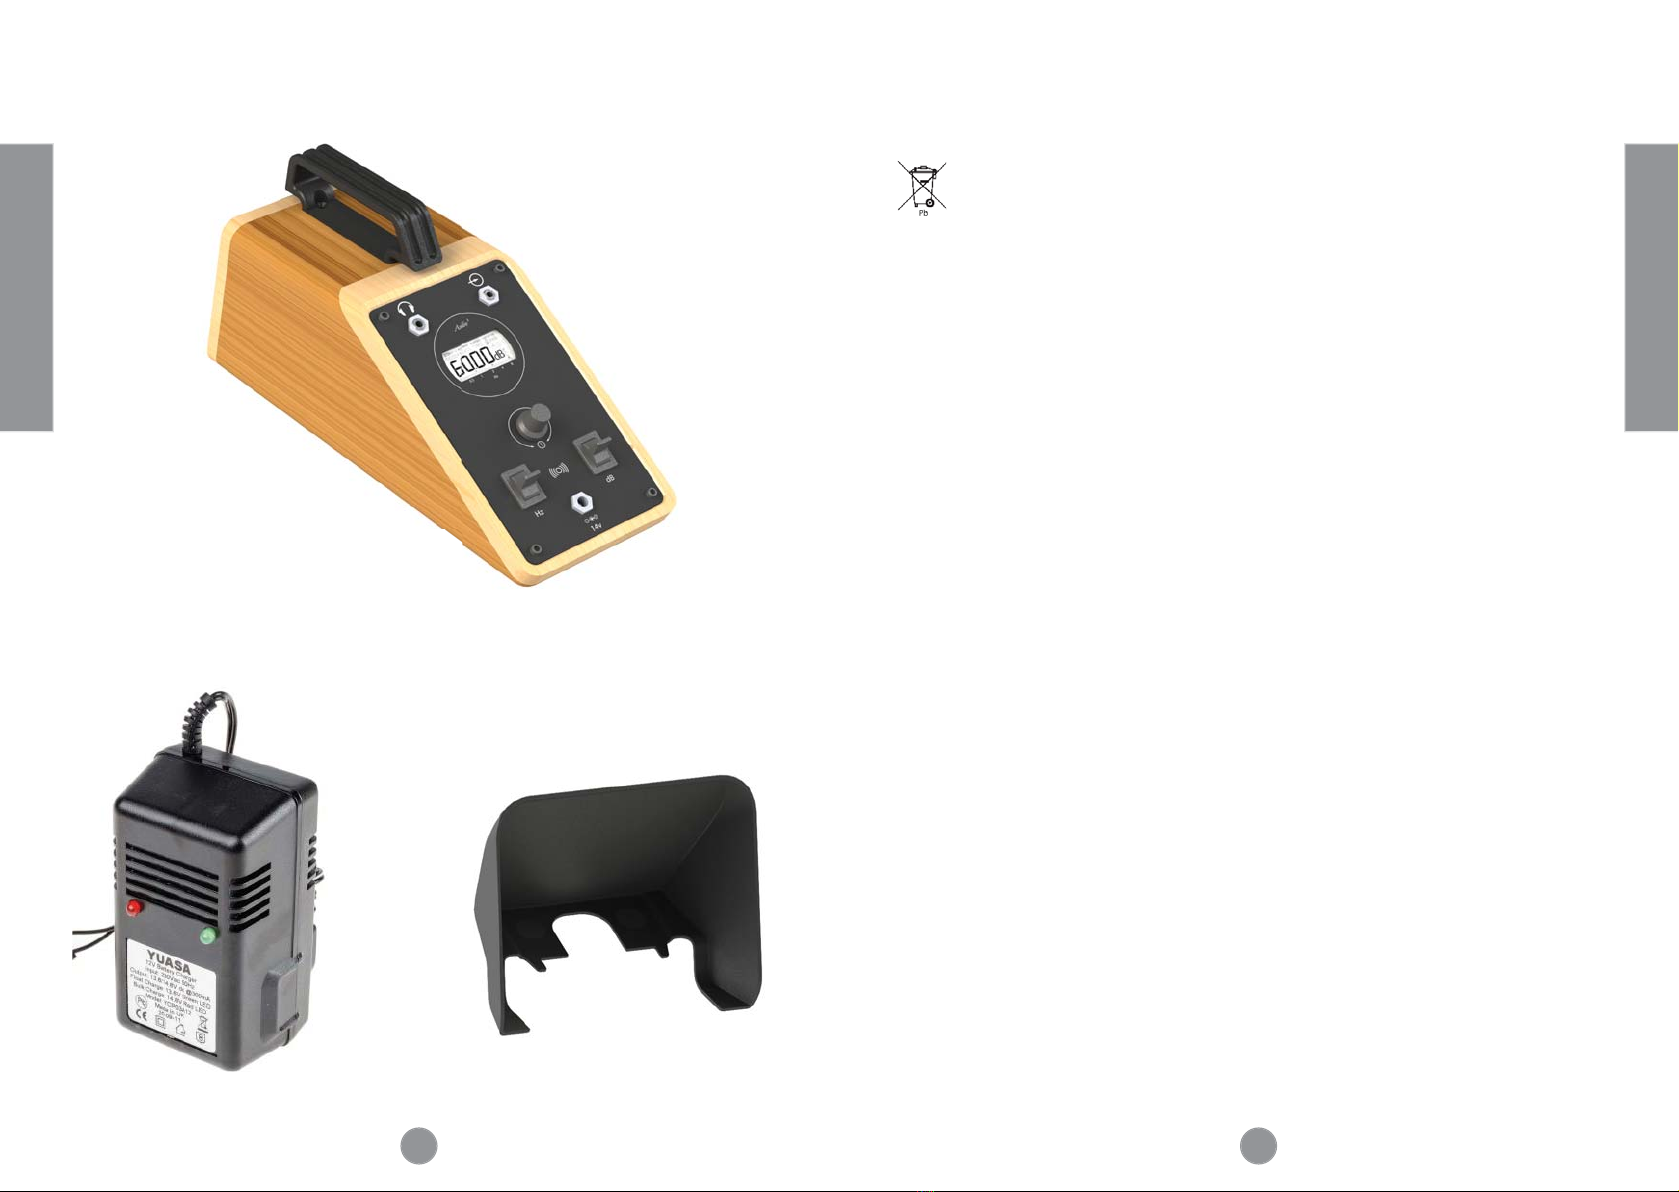
In The Box Safety Information
Important Safety Information
1. Disposal
Do not dispose of the Warbler in municipal waste. e device contains a lead-acid battery and special
collection must be used as denoted by the wheelie bin symbol.
2. Water and moisture
Keep your Warbler dry, water and moisture can damage it. e Warbler tolerates 5% to 95% relative humidity.
3. Heat
Keep your Warbler away from ames and heat producing appliances such as radiators, stoves, toasters, etc. e Warbler
tolerates -25 to 50 °C (-13 to 122 °F).
4. Climate
e Warbler has been designed for use indoors. Extreme heat, cold or humidity can damage the unit. To prevent possible
damage from a power surge, do not plug the unit into a mains-connected charger during lightning storms.
5. Cleaning
e Warbler wooden case only requires an occasional wipe with a so, lint-free cloth. Use can use alcohol wipes or other
antibacterial wipes. Do not use harsher chemical solvents, household cleaning agents or polishes. ese chemicals can
damage it. e glass lens may be cleaned using a so, lint-free cloth dampened with a non-abrasive household glass cleaner.
6. Charging and Storage
To charge your Warbler, connect it to mains power via the included charger. Only use a CE-marked 12v lead acid battery
charger with <500mA output to charge the Warbler, use of another charger could damage the device. During periods of
non-use, store the Warbler in a cool (< 30 °C), dry place (< 50 % humidity). It should be charged at least once a year to
retain its calibration information and to help extend the battery’s lifespan.
7. Choking Hazards
Eort have been made to minimize choking hazards, however, removable socket dust-caps or retaining screws could
become separated from the device. Please insure that no such small stray parts are within reach of children.
8. Abnormal smell
If any abnormal smell or smoke is detected coming from the unit, immediately unplug the unit, turn it o, and contact
your dealer—do not reconnect the equipment.
9. Servicing
Parts of this low voltage (12v) device are eld-serviceable by technicians with knowledge of electrical safety and ESD
issues.
10. Safety compliance
is equipment has been designed to meet the IEC/EN 60601-1 international electrical safety standard. Operation is
subject to the following two conditions: (1) is device may not cause harmful interference, and (2) this device must
accept any interference received, including interference that may cause undesired operation.
Safety
In the Box
charger
Warbler
hood
6 7
Getting Started
Charging the Battery
Getting Started
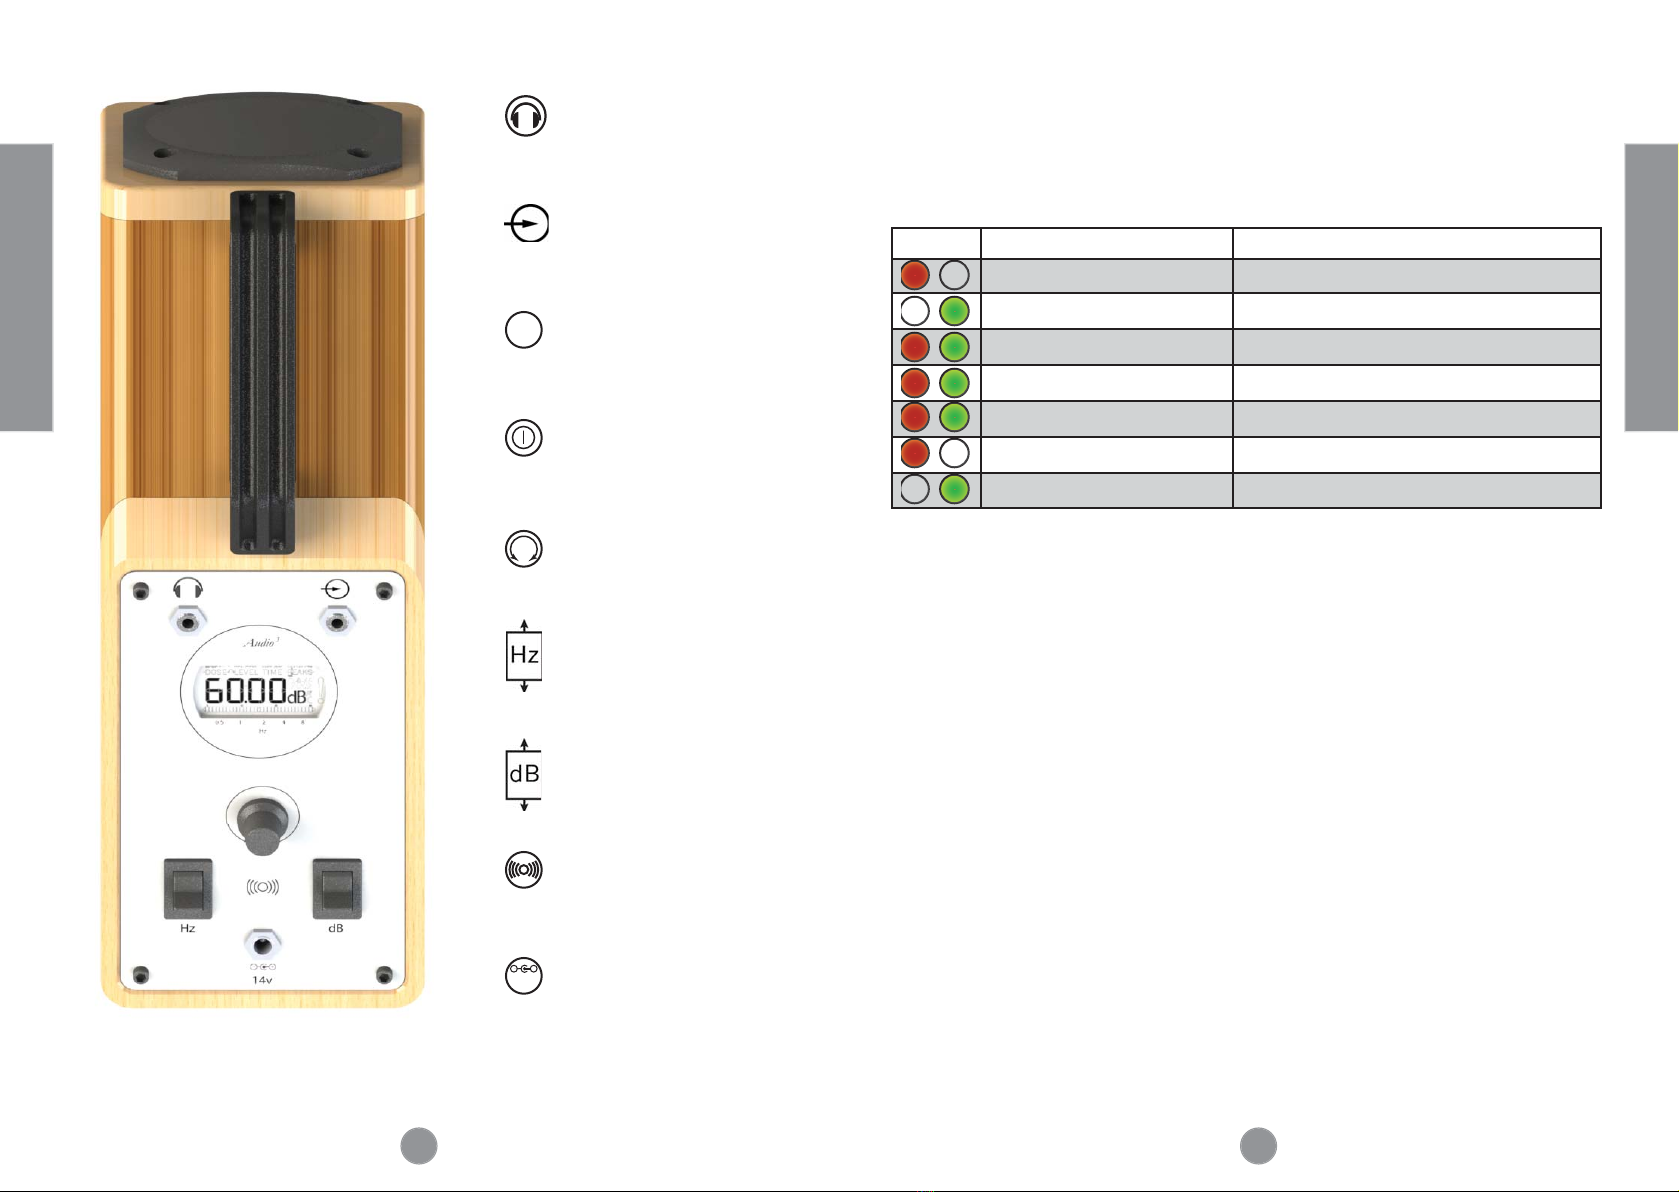
User Interface Overview
3.5mm headphone jack
(headphone audiometry)
3.5mm auxiliary source
jack
Display
(battery level + settings)
Push selector knob
(on/o )
Rotary selector knob
(choose sound)
Frequency toggle
(inc. / dec. frequency)
Level toggle
(inc. / dec. level)
Touch switch
(present signal)
Charging Port
(power / charging)
LCD
14v
+-
Before using the Warbler, charge its battery using the included charger. It takes
several hours to recharge. e included charger has a microprocessor to correctly
charge the battery, the status of the charger is indicated by its LED indicators:
LEDs Description Charger status
Steady Red charging
Steady Green charge complete
Steady Red, Steady Green no battery connected
Steady Red, Flashing Green reverse polarity error
Flash Red, Flash Green short circuit
Flash Red battery low voltage (trickle charge)
Flash Green timeout (forced end of charging)
How long will the battery last?
e battery will last for about 5 under continuous use. Each bar on the battery
indicator represents 20% capacity or 1 hour. When the battery drops to 10%, the
Warbler will turn o automatically.
Will I need to replace the battery?
e Warbler has a battery protection circuit that disconnects the battery when
its voltage is too low. is prevents the battery from being damaged and reduces
the number of times the battery will need to be replaced. Still, you may need to
replace the battery aer 5 years or 300 charge cycles.
Note: If the battery protection circuit has been tripped, the device will not turn
on again until it is connected to the included charger.
WARNING: e battery should only be replaced by a qualied technician.
Please contact Audio3 at audio-3.com or your local sales oce to arrange to
replace the battery.
FL
FLFL
FL
FL
Table 1 Charger Status LEDs
Figure 1 Positions of Controls and Indicators
8 9
Getting Started
Getting Started
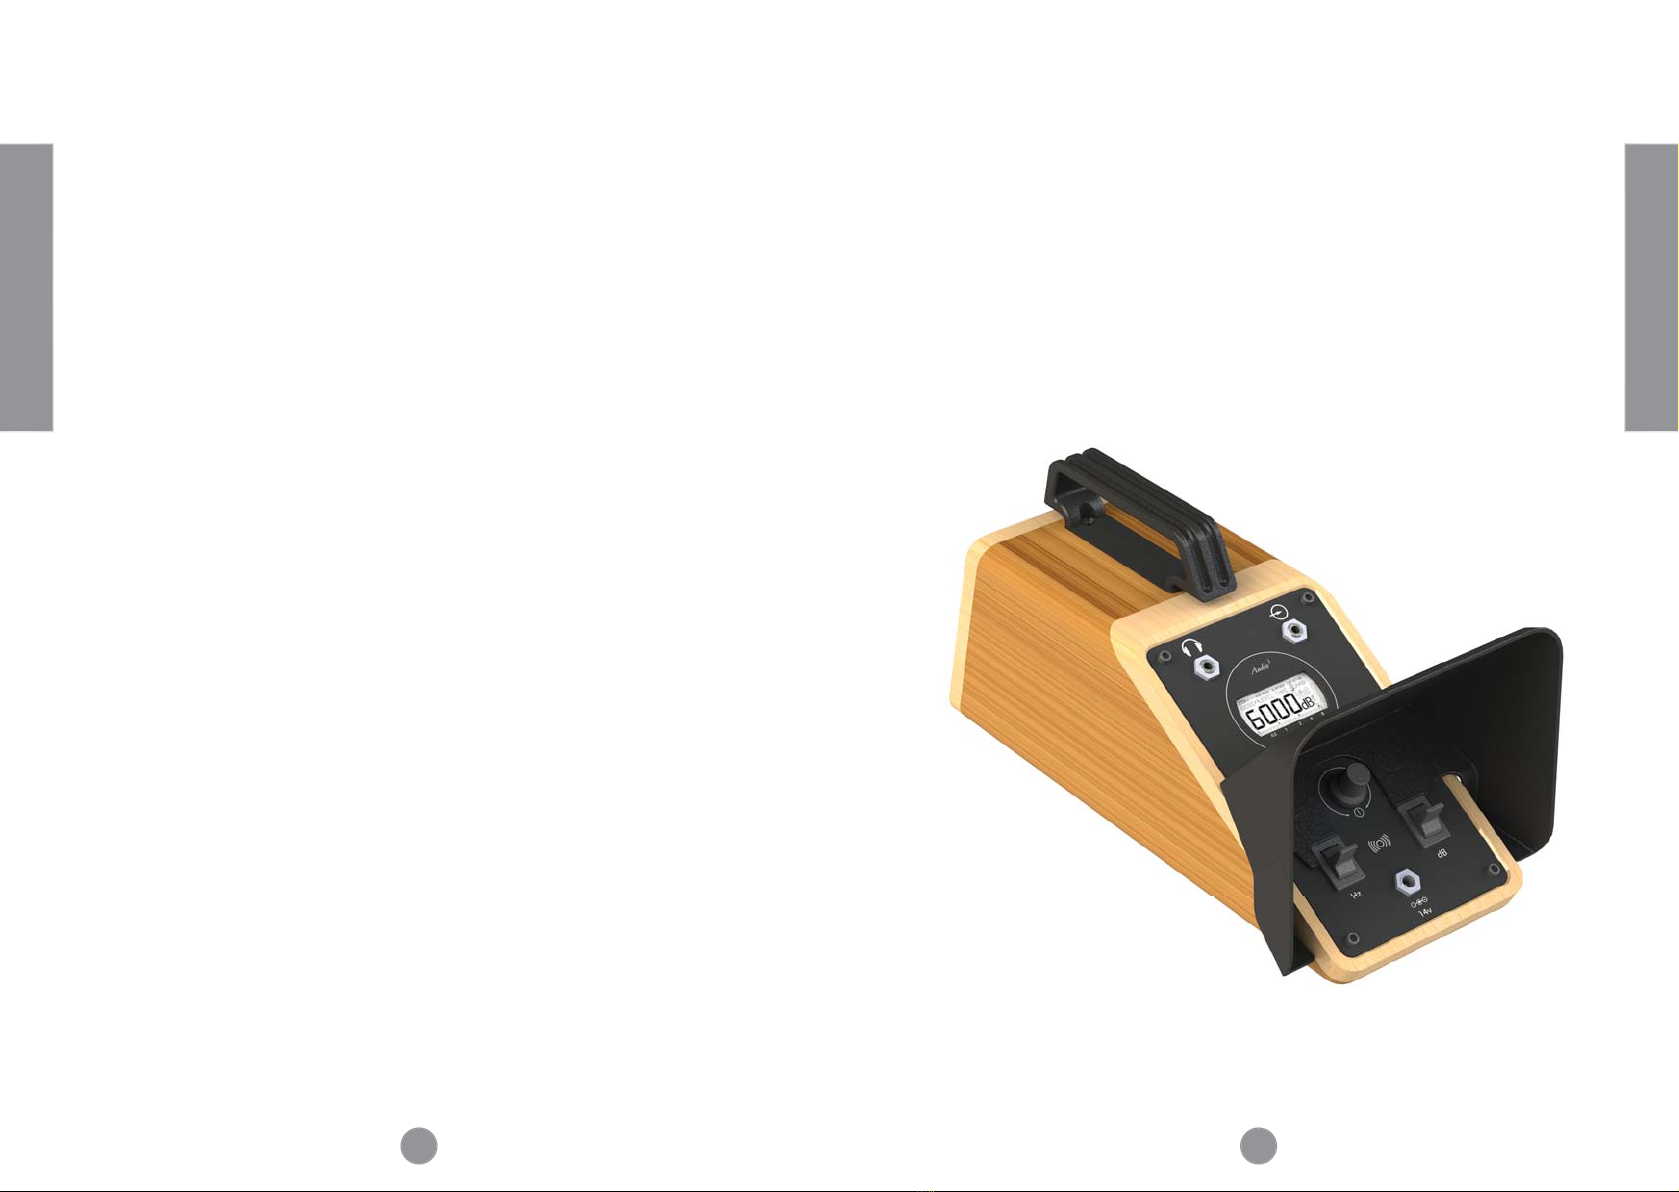
The Hood
Checking Warbler on Arrival
Purpose of the Hood
e Warbler is provided with a hood (optional). e hood is designed to hide the
operator’s hand movements in order to remove any potential visual cues related to
the presentation of sound stimuli. Audio3 recommends using the hood to avoid
having reactions to visual cues being interpreted as auditory ones.
Attaching the Hood
e hood attaches to the device with magnets as shown.
Verifying Operations
On arrival, charge Warbler by pluggin it into an approved 12v Lead acid battery
charger as decribed in the previous “Charging the Battery” section. Take this
time to read this whole manual and familiarize yourself with the operation of the
Warbler before doing the verication below.
Once charged verify that the user controls and the LCD are working properly..
Turn the unit on, present stimuli and verify that all the mechanical switches are
working by operating them and satisfy yourself that the frequency toggle, level
toggle and sound type knob all produce the correct sound output and LCD
display output as described in this manual.
e device should arrive recently calibrated. If you do not have access to a sound
level meter, a quick way to insure that the calibration is accepatble is to ask a person
normal-hearing person with known good audiometry to listen and determine
that the sounds coming from the speaker is the same perceptual loudness while
changing the stimulus frequency. Note that WarbleTone and FreshNoise stimuli
should sound as loud as each other at each frequency too.
To make sure the headphone jack is outputting properly attach standard dynamic
headphones to the 3.5mm jack and listen as you present stimuli through the
headphones. We do not provide headphones so these sounds are uncalibrated.
Finally to test the auxiliary input plug a mono (le only) or stereo source (le
channel) into the source jack. e sound source should automatically switch to
that one. Check that you can change the level with the level toggle. e Frequency
toggle and sound type knob will do nothing when an auxiliary source is connected.
Figure 2 Picture of the Warbler with hood attached
10 11
Getting Started
The Display
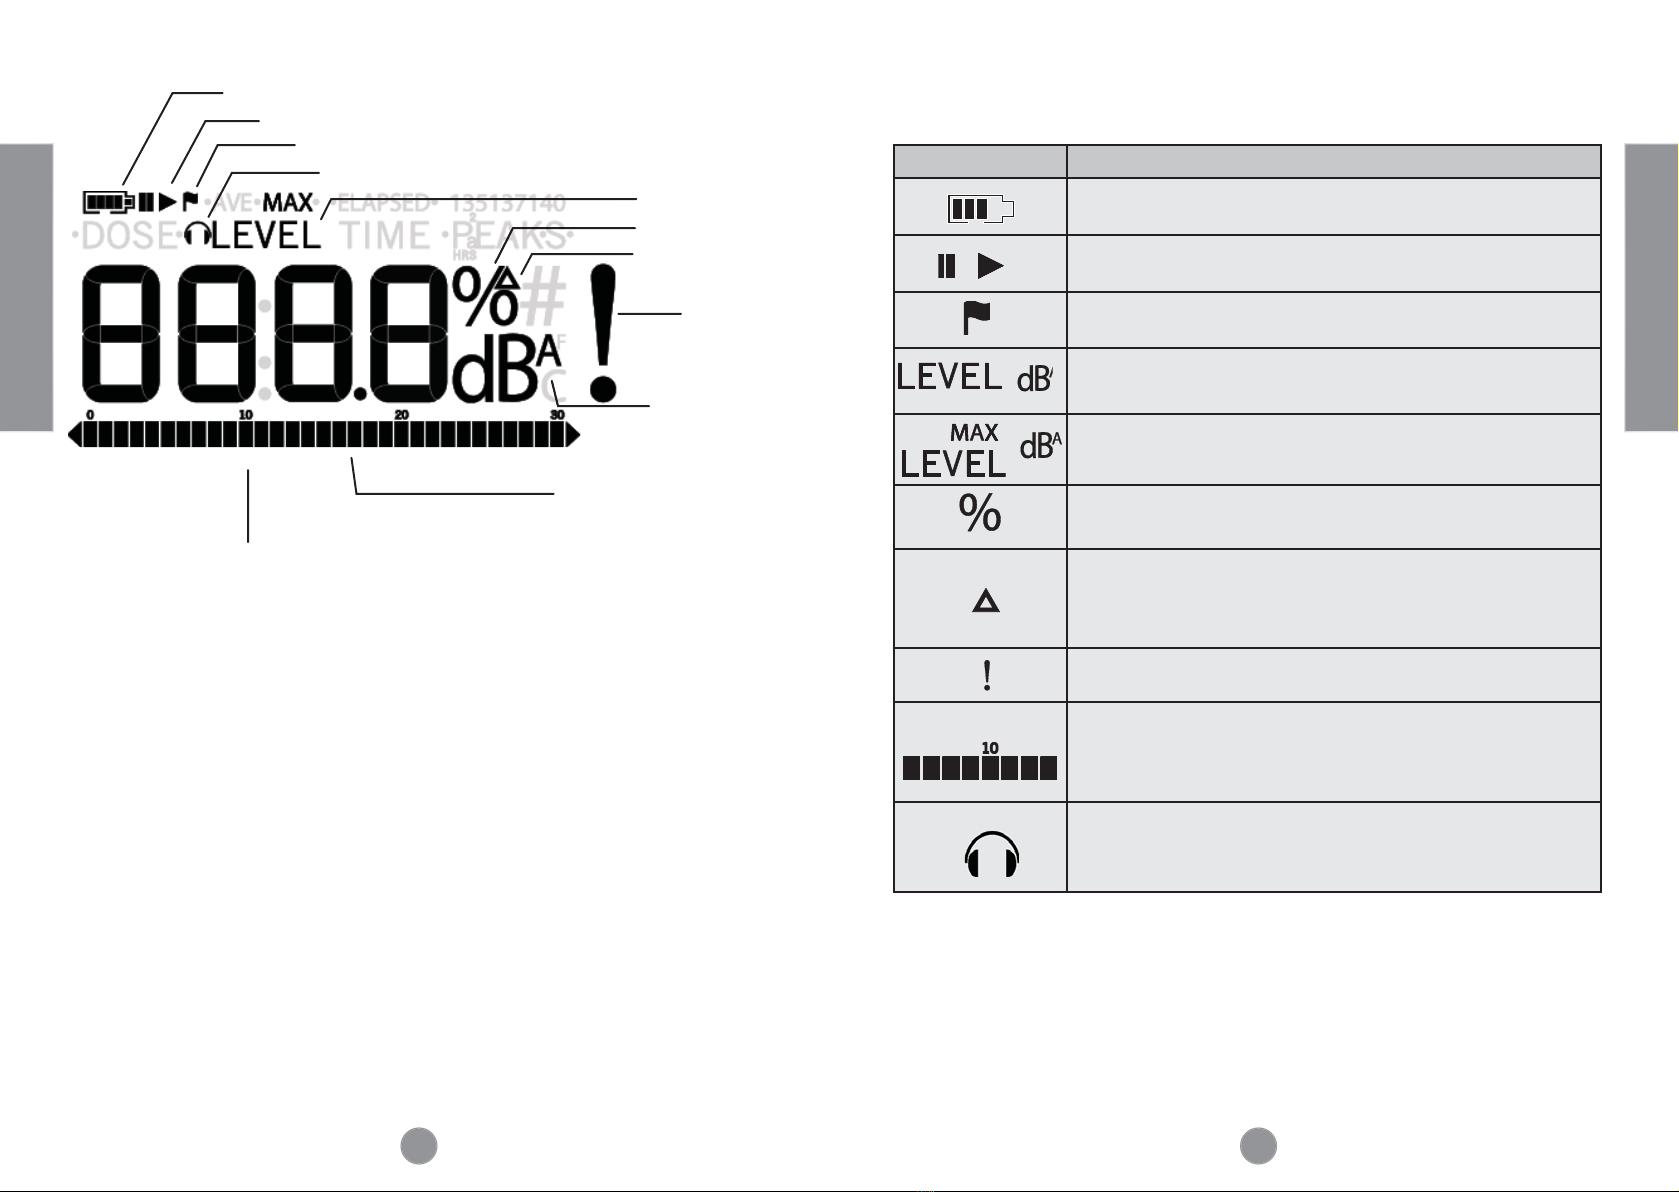
battery indicator
play / pause
event ag
frequency indicator
bar graph
% modulation
level and type
calibration or
stepsize delta
dBHL or
dBA units
subject
response
(unused)
headphone output
*note: Range is 250Hz to 8kHz (‘10’ position =1kHz)
On the main page, the Warbler’s LCD displays the sound level (dB HL when dB is
shown or dBAmax). If the frequency is changed the new frequency is briey (1s)
displayed on the main page. In addition the frequency bar graph will display qualitative
frequency information.
e display uses special characters for unusual functions (% as units for modulation
depth, as units for level stepsize or calibration osets, ags for errors, and ! for subject
responses).
Figure 3 Description of the LCD Display
Display Explanation
battery Level (each bar ~ 1 hr)
pause (no sound), play (sound is being presented)
Warbler error ag
sound level is displayed in dB HL (Tone, Warbletone,
Freshnoise)
sound level is displayed in maximum dBA weighting
(Songs, Ling sounds etc.)
AM modulation depth is displayed (Tone, Warbletone,
Freshnoise)
display shows sound level stepsize for toggle usually set to
5 dB (in calibration mode it shows the oset from factory
calibration)
subject response button is depressed (future release)
qualitative frequency content bargraph of the selected
sound (e.g. locations of formant peaks for Ling sounds)
headphone output selected (loudspeaker is muted)
Getting Started
Table 2 List of Display icons

12 13
Operating the Warbler
Switching on and o
To turn the Warbler on push the centre selector knob and release. To turn the
Warbler o press and release again.
Note: e Warbler automatically switches o aer 8 minutes of non-use or when
its battery capacity drops below 10%. If the battery gets very low you must connect
it to the supplied charger before the unit will turn on again.
Presenting a Stimuli
To present the last used stimulus touch the touch switch. e light under your
nger should light and the LCD will display a play arrow. If a headphone icon
appears on the LCD the output is being directed to the headphones.
Changing the Frequency
e frequency is adjusted by using the frequency up/down toggle. e frequency
will be displayed on the screen for 1s or until another button is pressed. Note:
While frequency is displayed on the LCD the selector knob can be depressed and
simultaneously rotated anti-clockwise to decrease and ne-tune the frequency.
To return to the standard audiometric frequencies depress and rotate the selector
knob clockwise until the frequency reaches its upper limit.
Changing the Level
e sound level is changed (typically in 5 dB increments) by using the level up/
down toggle. For Tones, Warble Tones and Freshnoise stimuli, the displayed level
is in dB HL (typically calibrated at 50 cm). For other stimuli the level displayed
is in dBAmax (the maximum dBA level (1s) that occurs during the whole stimuli,
see calibration section for more information).
Getting Started
Getting Started
Changing the Stimuli
From the main LEVEL page, rotate the centre selection knob to display and select
the desired sound stimulus. e selected sound will be displayed on the screen for
1s or until another button is pressed. Note: the last used sound will be used on
startup, and the display will show what sound is active on startup.
Changing the Output Transducer
From the device ‘o ’ press and hold the centre selector knob while simultaneously
rotating it to select the desired transducer (‘SPr’=speaker, ‘Ph L’=le headphone,
‘Ph r’=right headphone, ‘Ph b’= both headphones). When headphones are
selected a small headphone icon is displayed on the LCD. Release the knob to go
to use the Warbler with the selected transducer.
Changing the AM Modulation Depth %
Rotate the centre knob to display the sound selection. While the sound selection
is displayed, depress and simultaneously rotate the centre knob. A % sign will be
displayed. Rotate the knob to select the desired modulation depth (0=default to
100=full modulation). Release the knob to choose the displayed AM modulation
depth. Note: On startup the AM modulation is automatically returned o or 0%.
Changing the Level Stepsize
From the main LEVEL page, depress the selector knob and simultaneously rotate
it to change the level stepsize. A sign will be displayed. Rotate the knob to the
le or right to select the desired stepsize (5 dB= audiometric default). Release the
knob to choose the displayed stepsize. Each level toggle will now increment of
decrement the sound level by that stepsize.

14 15
Getting Started
User Controls Flow Diagram
Getting Started
+/-5%
Press Knob
Toggle (Hz)
Rotate Knob
Toggle (dB)
SOUND
LEVEL
FREQ
TUNING AM
+/- 0.5 dB
STEPSIZE
+/- dB
O
Type
Auto-O
(8 min)
Auto
(1s)
Note: Amplitude
Modulation is
ignored for Ling,
Environment or
Music Stimuli
Note: In calibration
mode the Stepsize is
xed to 0.5 dB, and
the knob adjusts
calibration instead.
+/- Hz
+/- Hz
KEY
Hold Down and Rotate
dB
dB
Hz
dB Hz
Hz
Hz
Auto
(1s)
Phones/Spkr
OUTPUT
Frequency
Adjustments
Sound
Adjustments
Level
Adjustments
To calibrate, rst
select desired trans-
ducer, then hold both
toggles up while
releasing knob.
CALIBRATE
Figure 4 User Control Flow

16 17
Stimuli
Overview of Stimuli
Accurate and reliable audiometry requires the skill of a trained audiologist. is
skill extends to selecting the appropriate stimuli for the situation. For example,
free-eld audiometry may be required for children who are too young to wear
headphones but tones are not appropriate in the free-eld due to room nodes--
Warbletones or Freshnoise should be used there. In other examples: children with
delayed social and communication skills may respond better to recognizable songs
while CI users may need stimuli that are centred on a single electrode’s mapped
frequency while measuring amplitude modulation detection. It is up to the
audiologist to determine the correct stimuli and protocol for their situation and
measurement needs. e Warbler provides a full range of stimuli.
Table 3 Stimuli Types
# Type Freqs. Level Use
1 Tone audiometric dBHL headphones
2 Warbletone audiometric dBHL free-eld
3 FreshNoise audiometric dBHL free-eld
4 Sounds various dBAmax children
5 Ling sounds various dBAmax speech
6 Twinkle Twinkle band-limited dBAmax children
7 Wheels on the Bus band-limited dBAmax children
8 5 Little Ducks band-limited dBAmax children
9omas Train band-limited dBAmax children
10 Scale band-limited dBAmax adults/demo
Stimuli
Tone
Tone stimuli are designed to be used for standard headphone audiometry.
Audio3 does not recommend using Tones with the loudspeaker as this can
create peaks and nulls due to room nodes within the testing room and a
poor audiometry result.
Table 4 Tone Accuracy when Calibrated
Min Typ Max
Frequency (%) -1.0 0 +1.0
Amplitude* (dB) -2.0 0 +2.0
THD+N (%) 0.001 0.005 0.01
*Amplitude accuracy assume high-quality calibration equipment is used.
THD+N noise levels will also depend on the headphones used.
Tone frequencies can be reduced by 50% from their default audiometric
frequencies. To do this switch to the desired frequency using the fre-
quency toggle and then, while the frequency is still displayed on the LCD
screen, rotate the center knob counterclockwise to the desired frequen-
cy. e new tuning will aect all frequencies. is change will remain in
eect until it is returned to the default tuning. is feature is useful for
exploring the frequency space in more detail.

18 19
Warbletone & Freshnoise
Stimuli
Warbletones and Freshnoise are designed to be used as free-eld or dif-
fuse-eld audiometric stimuli over the loudspeaker. e Warbletone gen-
erates frequency content using FM modulation while Freshnoise generates
its frequency content as a continuous narrow-band noise. In the Audio3
Warbler, these stimuli share the same frequency spectra and the same cal-
ibrated levels. You will get a consistent result whether using Warbletone or
Freshnoise and these stimuli are considered interchangeable. Which one
you choose to use is a matter of clinical judgment.
Table 5 Warbletone and Freshnoise Frequency Chart
Centre
Frequency
(Hz)
ERB
(Hz)
Freq.
Deviation
(%)
Low
Freq.
Cuto
(Hz)
High
Freq.
Cuto
(Hz)
Bandwidh
(Hz)
250 51.7 28.8 214.0 286.0 72.0
500 78.7 24.0 440.0 560.0 120.0
750 105.7 20.5 673.1 826.9 153.75
1000 132.6 17.0 915.0 1085.0 170.0
1500 186.6 13.0 1402.5 1597.5 195.0
2000 240.6 11.0 1890.0 2110.0 220.0
3000 348,5 9.0 2865.0 3135.0 270.0
4000 456.4 8.0 3840.0 4160.0 320.0
6000 672.3 8.0 5760.0 6240.0 480.0
8000 888.2 9.25 7630.0 8370.0 740.0
Figure 5 Frequency Response of Warbletone and Freshnoise
e gure opposite shows the measured frequency responses of the Warbletone
and Freshnoise sounds.
Warbletone & Freshnoise
Stimuli
0.1 1 10 0.1 1 10
-80
-60
-40
-20
0
250
-80
-60
-40
-20
0
500
-80
-60
-40
-20
0
750
-80
-60
-40
-20
0
1000
-80
-60
-40
-20
0
1500
-80
-60
-40
-20
0
2000
-80
-60
-40
-20
0
3000
-80
-60
-40
-20
0
4000
-80
-60
-40
-20
0
6000
-80
-60
-40
-20
0
8000
Frequency (kHz)
Relative Magnitude (dB)
20 21
Sounds
Stimuli
Environmental sounds are designed to be used as free-eld or diuse-eld
non-audiometric stimuli over the loudspeaker for engaging attention.
ese stimuli have a range of frequency spectra. ey are calibrated to
maximum dBA sound pressure levels. ey are not used for quantitative
audiometry.
Table 6 Environmental Sounds
Sound LCD
cork pop ‘PoP’
cat purr ‘Purr’
“Well hello!” ‘hELo’
Sheep bleat ‘bAA1’
Lamb bleat ‘bAA2’
gaggle of geese ‘9E5E’
applause ‘AplS’
laughing child ‘LAFF’
wind chimes ‘Chi’
forest birds ‘bird’
Figure 6 Frequency Response of Environmental Sounds
egureoppositeshowsthemeasured frequency responsesoftheEnvironmental
sounds.
Sounds
Stimuli
-80
-60
-40
-20
0
Cork Pop
-80
-60
-40
-20
0
Cat Purr
10
-80
-60
-40
-20
0
Well Hello
-60
-40
-20
0
Old Sheep Bleat
-80
-60
-40
-20
0
Young Sheep Bleat
-80
-60
-40
-20
0
Gaggle of Geese
-80
-60
-40
-20
0
Applause
-80
-60
-40
-20
0
Laughing Child
0.1 1 10
-80
-60
-40
-20
0
Wind Chimes
0.1 1 10
-80
-60
-40
-20
0
Forest Birds
Frequency (kHz)
Relative Magnitude (dB)

22 23
Stimuli
Ling sounds
Ling speech sounds are designed to be used as free-eld or diuse-eld
non-audiometric stimuli over the loudspeaker. ey are used for speech
sound discrimination (3 vowels and 2 consonants). ese stimuli have a
range of frequency spectra. ey are calibrated to maximum dBA sound
pressure levels. ey are not therefore used for quantitative audiometry.
Table 7 Ling Sounds
Ling sounds
Sound
Lcd
‘Ee’ ‘EE’
‘Oo’ ‘oo’
‘Ah’ ‘Ah’
‘Sh’ ‘Sh’
‘Ss’ ‘SS’
Figure 7 Frequency Response of Ling sounds Sounds
e gure opposite shows the measured frequency responses of the environmental
sounds.
Stimuli
Ling sounds
-80
-60
-40
-20
0
Ee
-80
-60
-40
-20
0
Oo
-80
-60
-40
-20
0
Ah
-80
-60
-40
-20
0
Sh
-80
-60
-40
-20
0
Ss
Frequency (kHz)
0.1 1 10
Relative Magnitude (dB)

24 25
Songs
Stimuli
Songs are designed to be used as free-eld or diuse-eld non-audiomet-
ric stimuli over the loudspeaker. e songs are band-limited as described
in the table below. e frequency toggle switch selects the band.
Table 8 Song Stimuli Types
#Song Lcd
1 Twinkle Twinkle ‘StAr’
2 Wheels on the Bus ‘buS’
3 5 Little Ducks ‘ducS’
4omas Train ‘tho’
5 Scale (see next page) ‘ScLE’
Table 9 Song and Scale Band-Limited Frequency Chart
Lcd
Frequency
(Hz)
Low
Freq.
Cuto
(Hz)
High
Freq.
Cuto
(Hz)
Bandwidth
(Hz)
250 <100 500 400
500 <100 750 600
750 500 1000 500
1000 750 1500 750
1500 1000 2000 1000
2000 1500 3000 1500
3000 2000 4000 2000
4000 3000 >10000 7000
6000 4000 >10000 6000
Full <100 >10000 9900
Figure 8 Frequency Response of Band-Limited Songs and Scale
e gure opposite shows the frequency content allowed through the band-
limiting lters. White noise was used as the input to the lters for this plot but
the actual nal spectrum for a given stimulus will depend on the song or scale
segment played.
Songs
Stimuli
-80
-60
-40
-20
0250
-80
-60
-40
-20
0500
-80
-60
-40
-20
0750
-80
-60
-40
-20
01000
-80
-60
-40
-20
01500
-80
-60
-40
-20
02000
-80
-60
-40
-20
03000
-80
-60
-40
-20
04000
-80
-60
-40
-20
06000
-80
-60
-40
-20
0Full
0.1 1 10 0.1 1 10
Frequency (kHz)
Relative Magnitude (dB)
26 27
Stimuli
Scale
e chromatic scale stimulus is designed to be used as a demo stimu-
lus over the loudspeaker or headphones. It demonstrates the eect that
band-limiting a complex tone (comprised of several harmonics) can have
on its pitch. When the scale is band-limited only the harmonics that are
within the band are heard and, for some notes, these may not include the
fundamental frequency or enough harmonics to decode the intended
pitch. Explore the eect for yourself. It uses the same bands as the Songs
stimuli. e frequency toggle switch selects the band.
Table 10 Scale Frequency Chart
Note 1st
Harmonic
2nd
Harmonic
3rd
Harmonic
4th
Harmonic
C3 130.8 261.6 392.4 523.2
C# 138.6 277.2 415.8 554.4
D 146.8 293.7 440.4 587.2
D# 155.6 311.1 466.8 622.4
E 164.8 329.6 494.4 659.2
F 174.6 349.2 523.8 698.4
F# 185.0 370.0 555.0 740.0
G 196.0 392.0 588.0 784.0
G# 207.7 415.3 623.1 830.8
A 220.0 440.0 660.0 880.0
A# 233.1 466.2 699.3 932.4
B 246.9 493.9 740.7 987.6
C4* 261.6 523.3 784.8 1046.4
*e scale continues to C4 (all frequencies double in next octave)
Figure 9 Harmonic Frequencies of Complex Scale Notes
e gure opposite shows the frequency responses of the chromatic scale notes
‘A3’ and ‘C4’, revealing their harmonic structure. e shaded and unshaded
background areas represent band-limiting lters that can be applied (same as the
Songs band-limits).
Stimuli
Scale
-80
-70
-60
-50
-40
-30
-20
-10
0
A3
0.1 1.0 10
-80
-70
-60
-50
-40
-30
-20
-10
0
C4
Frequency (kHz)
Relative Magnitude (dB)
28 29
Calibration Overview
Calibration
Free-eld and/or headphone calibration should be performed prior to use
and every year thereaer. Once calibrated, the Warbler can produce an ac-
curacy of +/- 2.5 dB HL in the free-eld (Warbletone and Freshnoise) and
+/- 2 dB over headphones (Tones, Warbletone and Freshnoise).
e Warbler has calibration settings for each stimulus-type/frequency/
transducer combination. Calibrations need only to be done at 70 dB SPL
as the Warbler is extremely linear. erefore the total number of calibra-
tion measurements required for an exhaustive device calibration is 285.
Table 11 Stored Calibration Values
#Type Num
Freqs.
Transducers
(Speaker LR
phones)
To ta l C a l.
Type
1 Tone 10 3 30 dB HL
2 Warbletone 10 3 30 dB HL
3 Freshnoise 10 3 30 dB HL
4 Sounds 10 3 30 dBAmax
5 Ling sounds 5 3 15 dBAmax
6 Twinkle Twinkle 10 3 30 dBAmax
7 Wheels on the Bus 10 3 30 dBAmax
8 5 Little Ducks 10 3 30 dBAmax
9omas Train 10 3 30 dBAmax
10 Scale 10 3 30 dBAmax
Note: If the Warbler’s tone detuning option is used, those frequencies will not be accurately calibrated. So not use the AM
modulation during calibration or the correct calibration will not be achieved.
Audiometric signals are calibrated in dB HL because these signals have
been validated using a standard reference group of young adults. Other
signals are calibrated in dBAmax, which is the maximum dBA value over
consecutive 1 second intervals (slow) reached during the sample.
Calibration
Calibration Materials and Setup
For accurate free-eld audiometry, calibration should be carried out in the
same environment where the audiometry will be performed.
(1) You will need a calibrated (ANSI S1.40 2006) Class I sound-level meter.
(2) For headphone calibration Audio3 Ltd recommends using an IEC 318
coupler (IEC 60318-1 2009; IEC 60318-2 1998; ANSI S3.7 1995) in combi-
nation with Sennheiser HDA200 headphone. Other standard combinations
may also be used. e appropriate reference equivalent threshold sound
pressure level (RETSPL) should be applied in accordance with standard
audiometer calibration such as ANSI 3.6 (2018) or ISO 389-5 (2006).
(3) For free-eld or diuse-eld (loudspeaker) calibration you will need a
tripod that can hold the sound level meter. e meter should be positioned
with a free-eld microphone placed at the centroid of a putative subject’s
head and pointed on-axis toward the Warbler’s angled loudspeaker. (If a
pressure-eld microphone is used, a 90˚ grazing angle should be used).
For maximum accuracy 1m should be used but if this is considered too far
for best practice audiometry in children, the device can also be calibrated
at 50.0cm (the factory calibration is done at 50.0 cm). For Warbletone and
Freshnoise the included calibration chart should be used, for dBAmax the
sound level meter should be set to capture the dBAmax value on its slow
setting.
30 31
Calibration
Calibration Charts
Table 12 Loudspeaker Freshnoise and Warbletone Calibration Chart
Frequency
(Hz)
Calibration
Level
(dB HL)
RETSPL
(dB)
Required
Level
(dBZ
SPL)
250 70.0 11.0 81.0
500 70.0 3.5 73.5
750 70.0 1.0 71.0
1000 70.0 0.5 70.5
1500 70.0 -1.0 69.0
2000 70.0 -1.5 69.5
3000 70.0 -4.0 66.0
4000 70.0 -5.0 65.0
6000 70.0 -0.5 69.5
8000 70.0 5.5 75.5
Table 13 Headphone Tone Calibration Chart for IEC 218/HDA200
Frequency
(Hz)
Calibration
Level
(dB HL)
RETSPL
(dB)
Required
Level
(dBZ
SPL)
250 70.0 18.0 88.0
500 70.0 11.0 81.0
750 70.0 6.0 76.0
1000 70.0 5.5 75.5
1500 70.0 5.5 75.5
2000 70.0 4.5 74.5
3000 70.0 2.5 72.5
4000 70.0 9.5 79.5
6000 70.0 17.0 87.0
8000 70.0 17.5 87.5
Calibration
Calibration Procedure
Start Calibration
End Calibration
Set Stimuli
Set Transducer
Set Frequency
Present Stimuli
Adjust Calibration
while
Hold both Toggles up
while pressing knob
Hz
Figure 10 Calibration
Procedure
(1) Setup all materials and equipment as described
in previous materials and setup section.
(2) Enter calibration mode by holding both toggles
up while pressing the centre knob and rotating to
select the transducer. Release the knob. ‘CAL” will
be displayed.
(3) Rotate the centre knob to choose the sound
stimuli to calibrate.
(4) Return to the LEVEL page and insure the level
is set to 70 dB HL (this is the default). If it isn’t use
the toggle to adjust to 70 dB.
(5) Set the Frequency to calibrate using the Fre-
quency (Hz) toggle.
(6) Use the presentation touch switch to present
the stimuli while adjusting the calibration ‘delta’
(from factory default) by depressing while rotating
the center knob until the correct level of output
is indicated on the sound level meter (in 0.5 dB
steps).
(7) Once you have calibrated all sounds and
frequencies, turn o the warbler to nalize the cal-
ibration by pressing and releasing the centre knob.
(8) e calibration is stored. Note: To return to
factory default values, use the same procedure to
set the calibration delta value to 0.0 dB.

32 33
Technical Specications
Table 14 Technical Specications
Dimensions 28cm x 10cm x 14cm (L x W x H)
Weight 1.370 kg
Battery Sealed Lead Acid 12v
Power 14v
Fuse 750mA (PTC resettable fuse)
Acoustic Output (Speaker) 0-80 dB HL
Acoustic Noise Floor 20 dBA
Acoustic Resolution +/- 0.5 dB
Acoustic Calibrated Accuracy +/- 2.0 dB
Linearity 0.02%
THD+N 0.005%
Headphone Impedance Range > 16 Ω
Enclosure Material Wood
Temperature Range 0°C to 40°C
Humidity Range 0-90%
Specifi cations
Regulatory Symbols
Figure 11 Sample Warbler Underside Label
Audio Ltd.
A3WB2
1
1
Handheld Freeeld Audiometer
10%
700 hPa
2021-02-01
750mA PCT 14V - 500mA
3
Warbler
MADE IN LONDON, UK
Audio3 Ltd, 3 Sedley Court
48 Sydenham Hill
London, UK
90%
5°C
1060 hPa
45°C
+-
Pb
Table 15 Regulatory Symbols
Manufacturer
Date of Manufacture
Batch code
Reference
Serial number
Aected by dampness - store in a dry place
10% - 90% relative humidity limits
700hPa - 1060hPa atmospheric pressure limits
+5˚C to 45˚C temperature limits
Operating Instructions
Refer to the accompanying documentation
e device contains lead and must be disposed of in a separated waste collection. Directive for waste of
electrical and electronic equipment (WEEE)
Type BF device - the part connected to the patient is oating ground (headset option - not supplied)
14 VDC Voltage Supply
750mA positive temperature coecient fuse
Specifi cations

34 35
Directive 2012/19/EU (WEEE) promotes the re-use, recycling sounds and
other forms of recovery of electrical waste to reduce disposal. e in the
“Symbols” table section indicates that this equipment cannot be disposed
of in the household waste. is equipment is subject to sorted waste collec-
tion. When nished with the Warbler, it must be recycled at an appropriate
collection point which can handle electrical waste including the contained
lead-acid battery.
Recycling
EMC Compliance
Table 16 Electromagnetic Emissions Compliance
Guidelines and manufacturer’s declaration - Electromagnetic emissions (EN55011:2009+ A1:2010)
Warbler is intended for use in the electromagnetic environment specied below. e user should ensure that the
environment meets these minimum requirements.
Emissions test Compliance
CISPR 11 RF emissions Group1
CISPR 11 RF emissions ClassB
Harmonic emissions
IEC 61000-3-2
Covered by 3rd party battery charger CE mark
Volta g e uctuations and icker emissions
IEC 61000-3-2
Covered by 3rd party battery charger CE mark
Table 17 Electrostatic Immunity Compliance
Guidelines and manufacturer’s declaration - Electromagnetic immunity
Warbler is intended for use in the electromagnetic environment specied below. e user should ensure that the
environment meets these minimum requirements.
Immunity Test Test level IEC 60601 Level of Compliance
Electrostatic discharge (ESD)
IEC 61000-4-2: 2009
±2 kV, ±4 kV, ±8 kV contact
±2 kV, ±4 kV, ±8 kV, ±15 kV
air
±2 kV, ±4 kV, ±8 kV contact
±2 kV, ±4 kV, ±8 kV, ±15 kV air
Radiated RF
IEC 61000-4-3
±3 V/m from 80 MHz to
2.7GHz 80% AM at 1kHz
±3 V/m from 80 MHz to 2.7GHz
80% AM at 1kHz
Power frequency (50/60 Hertz)
magnetic eld
IEC 61000-4-8: 2010
30 A/m
(50/60 Hz)
30 A/m
(50/60 Hz)
Specifi cations
is device has been designed to meet or exceed the medical device CE regula-
tory requirements 60601-1 for safety, usability and EMC and RF emissions and
immunity, however, portable and RF communication equipment can still aect
it. If abnormal performance is observed additional measures may be necessary
such as re-orientation or relocation of the equipment.
Manufacturer Declaration
Table 18 Test Specications for Immunity to RF Wireless Communications
Test Frequency
(MHz)
Band
(MHz)
Service Modulation Maximum
Power (W)
Distance
(m)
Immunity Test
Level (V/m)
385 380-390 TETRA 400
Pulse
Modulation
(18 Hz)
1.8 0.3 27
450 430-470 GMRS 460
FRS 460
FM +/- 5 kHz
deviation 1
kHZ deviation
2 0.3 28
710
704-787 LTE Band
13, 17
Pulse
modulation
217 Hz
0.2 0.3 9745
780
810
800-960
GSM 800/900
TETRA 800
IDEN 820
CDMA 850
LTE Band 5
Pulse
modulation
18 Hz
2 0.3 28
870
930
1720
1700-1900
GSM 1800
CDMA 1900
GSM 1900
DECT
LTE Bands 1,
3, 4, and 25
UMTS
Pulse
modulation
217 Hz
2 0.3 28
1845
1970
2450 2400-2570
Bluetooth
WLAN
802.11 b/g/n
RFID 2450
LTE Band 7
Pulse
modulation
217 Hz
2 0.3 28
5240
5100-5800 WLAN
802.11 a/n
Pulse
modulation
217 Hz
0.2 0.3 9
5500
5785
Specifi cations

36 37
Worldwide Guarantee
is warranty entitles you to have the unit repaired or replaced free of charge,
during the rst two years aer purchase, at any authorised Audio3 distributor
provided that it was originally purchased from an authorised dealer or distributor
and you completed product registration online (www.audio-3.com). e warranty
covers parts, labour and materials but does not cover defects arising from accident,
misuse, abuse, wear and tear, neglect or unauthorised adjustment and/or repair.
We cannot accept responsibility for damage or loss occurring during transit.
The Warranty Covers:
Parts and labour costs for two years from the purchase date. Aer two years
you must pay for both parts and labour costs. e warranty does not cover
transportation costs at any time. e equipment should be packed in the original
packing and returned to your authorized dealer. It should be sent carriage prepaid
by a reputable carrier – not by post. No responsibility can be accepted for the unit
whilst in transit and customers are therefore advised to insure the unit against loss
or damage whilst in transit.
Service Contract
Service contracts from Audio3 Ltd are available to cover the recommended
periodic (every 2 years) calibration and battery or other parts replacement where
required. Contact customer support for more information.
Audio3Customer Support
3 Sedley Court, 48 Sydenham Hill, London, SE26 6LX, United Kingdom
audio-3.com
Warranty / Service
Warranty and Service References
References
Warbler is RoHS compliant and complies with 2006/95/EC Low Voltage
Directive and 2004/108/EC EMC Directives of the European Union, via:
IEC60601-1-2:2014, EN60601-1-2:2015 parts radiated emissions, radiated
immunity swept and table 9, ESD, magnetic immunity.
EN60645-1:2017 radiated immunity type 4 tone audiometer.
IEC 61000-4-2:1995, Electromagnetic compatibility (EMC) – Part 4: Testing
and measurement techniques – Section 2: Electrostatic discharge immunity test.
Basic EMC publication.
IEC 61000-4-3:1995, Electromagnetic compatibility (EMC) – Part 4:
Testing and measurement techniques – Section 3: Radiated, radio-frequency,
electromagnetic eld immunity test.
IEC 61000-6-1:1997, Electromagnetic compatibility (EMC) – Part 6: Generic
standards –Section 1: Immunity for residential, commercial and light-industrial
environments.
IEC 61000-6-2:1999, Electromagnetic compatibility (EMC) – Part 6-2: Generic
standards –Immunity for industrial environments.
CISPR 61000-6-3:1996, Electromagnetic compatibility (EMC) – Part 6:
Generic standards–Section 3: Emission standard for residential, commercial and
light-industrial environments.
BS EN ISO 389-1:2000. Acoustics. Reference Zero for the Calibration of
Audiometric Equipment. Part 1: Reference Equivalent reshold Sound Pressure
Levels for Pure Tones and Supra-aural Earphones. (Identical to ISO 389-1:1998.)

38 39
BS EN ISO 389-2:1997. Acoustics. Reference Zero for the Calibration of
Audiometric Equipment. Part 2: Reference Equivalent reshold Sound Pressure
Levels for Pure Tones and Insert Earphones. (Identical to ISO 389-2:1994.)
BS EN ISO 389-4:1999. Acoustics. Reference Zero for the Calibration of
Audiometric Equipment. Part 4: Reference Levels for Narrow-band Masking
Noise. (Identical to ISO 389-4:1994.)
BS EN ISO 389-5:2005. Acoustics. Reference Zero for the Calibration of
Audiometric Equipment. Part 8: Reference Equivalent reshold Sound Pressure
Levels for Pure Tones and Circumaural Earphones. (Identical to ISO 389-8:2004)
ANSI S3.6 (2018) American National Standard Specication of Audiometers.
References
Parts
,7(012
3$57180%(5
'(6&5,37,21 47<
9HQGRU
3DUW1R
(QFORVXUH
:DUEOHU%RG\
$[LV5RXWLQJ/WG
6HHGUDZLQJ
&RQWURO3DQHO
&RQWURO3DQHO$VVHPEO\
,Q+RXVH
6HH'UDZLQJ
+DQGOH
+DQGOH'3ULQW3$1\ORQ
'3ULQW8.
$V67/ILOH
)DFHSODWH*DVNHW
*DVNHW
'HOWD5XEEHU/WG
6HH'UDZLQJ
0[&RXQWHUVXQN
0[PP&RXQWHUVXQN6FUHZ
56
0:DVKHU 0:DVKHU
56
0/RFNQXW 0/RFNQXW
56
/DEHO /DEHO
)RRW )RRW
56
0[%XWWRQ+HDG
0[PP&DSKHDG6FUHZ
56
/RXGVSHDNHU /RXGVSHDNHU
'LJLNH\ )562+01'
6SHDNHU0RXQW
'3ULQW3$1\ORQ
'3ULQW8.
$V67/ILOH
566SHDNHU*ULOO 6SHDNHUJULOO
'LJLNH\ *5,//((61'
/RXGVSHDNHU*DVNHW
*DVNHW
'HOWD5XEEHU/WG
6HH'UDZLQJ
%DWWHU\
/HDG$FLG%DWWHU\
)DUQHOO
0[&DS+HDG
0[PP&DSKHDGVFUHZ
56
+RRG$VVHPEO\ +RRG$VVHPEO\
,Q+RXVH
6HH'UDZLQJ
5(9,6,216
=21(
5(9
'(6&5,37,21
'$7(
$33529('
'UDZLQJFUHDWHG
1+
&$3+($'6&5(:6&+$1*(')5200[
$ $
% %
& &
' '
( (
) )
* *
+ +
'5$:1
&+.'
$339'
0)*
4$
81/(6627+(5:,6(63(&,),('
',0(16,216$5(,10,//,0(7(56
685)$&(),1,6+
72/(5$1&(6
/,1($5
$1*8/$5
),1,6+
'(%855$1'
%5($.6+$53
('*(6
1$0(
6,*1$785(
'$7(
0$7(5,$/
'21276&$/('5$:,1*
5(9,6,21
7,7/(
':*12
6&$/(
6+((72)
$
:(,*+7
1+
:DUEOHU$VVHPEO\
:DUEOHU$VVHPEO\
Parts
Table of contents


