AudioXperts 4TV 5122 User manual

5122
5.1 Channel Audio Entertainment System
UUSER MAN AL
English
Designed and Engineered by

2
Congratulations!
Thank you for selecting the 4TV 5122 Audio Entertainment
System by AudioXperts. This owner’s manual provides you with
important information on setting up and enjoying your new music
and surround sound system.
Please keep this manual and all packaging materials stored in a
safe place in case you need access to them at a later date.
Key Features:
v6PRNHGJODVVDQGDOXPLQXPHQFORVXUHV
v&RQYHQLHQWWRSêPRXQWHGWRXFKVHQVLWLYHFRQWUROV
v'ROE\'LJLWDODQG'76GHFRGLQJ
v0XVLF0RYLHDQG(QKDQFHGê'LDORJXHOLVWHQLQJPRGHV
v%OXHWRRWK®ZLWK&65®aptX®codec for crystal clearIXOO
bandwidth wireless music streaming.
v/HYHO&RUUHFWSURYLGHVOLVWHQHUVZLWKFRQVLVWHQWOHYHO
while watching TV
v,QVWDQWFRQQHFWLRQIRU$SSOH®AirPort Express (sold separately)
v$SSOH®DXGLR86%LQSXW
v1RDGGLWLRQDOUHPRWHQHHGHG/HDrns your TV’s remote control.
v:LUHOHVV6XEZRRIHU
v&RQVROH:HLJKWZLWK6ZLYHO%DVHOEVNJ
v6XEZRRIHU:HLJKWZLWK6ZLYHO%DVHOEVNJ
Technical Specications
v:SHDN:506Total System Power
v7KUHHyPPIDEULFGRPHWZHHWHUVIRUOHIWFHQWHUULJKW
v6L[SDWHQWêSHQGLQJ+$5TGULYHUVIRUOHIWFHQWHUULJKW
v)RXUSDWHQWêSHQGLQJ+$5T. drivers for dipole surround
v(LJKWyPP66+2ZRRIHUVIRUSRZHrful
subwoofer performance
v,QSXWV'LJLWDO2SWLFDO&2$;$QDORJ5&$y
PP0LQLê6WHUHR86%$XGLR
v&RQVROH'LPHQVLRQV+[:['y[êy[êy
[[PP
v&RQVROH'LPHQVLRQVZLWK6ZLYHO%DVH+[:['êy[
êy[êy[[PP
v6XEZRRIHU'LPHQVLRQV+[:['êy[êy[ê
y[[PP
What’s included:
v&RQVROHDQG6XE
v6ZLYHO%DVHDQG+DUGZDUH
v3RZHU&DEOH
v4XLFN6WDUW*XLGH
v8VHU0DQXDO
v'LJLWDO2SWLFDO&DEOH
v$QDORJ5&$$XGLR&DEOH
v86%WRêSLQ$SSOH&RQQHFWRU&DEOH
NOTE:1RDGGLWLRQDOUHPRWHFRQWUROQHHGHG
4TV learns your TV.
v6XEZRRIHU)HHW
&RQVROHZLOOKROGXSWROEVNJZLWKVZLYHOEDVH
OEVNJZLWKRXWVZLYHOEDVH
v
For the latest product information, please visit:
www.audioxperts.com/support
3
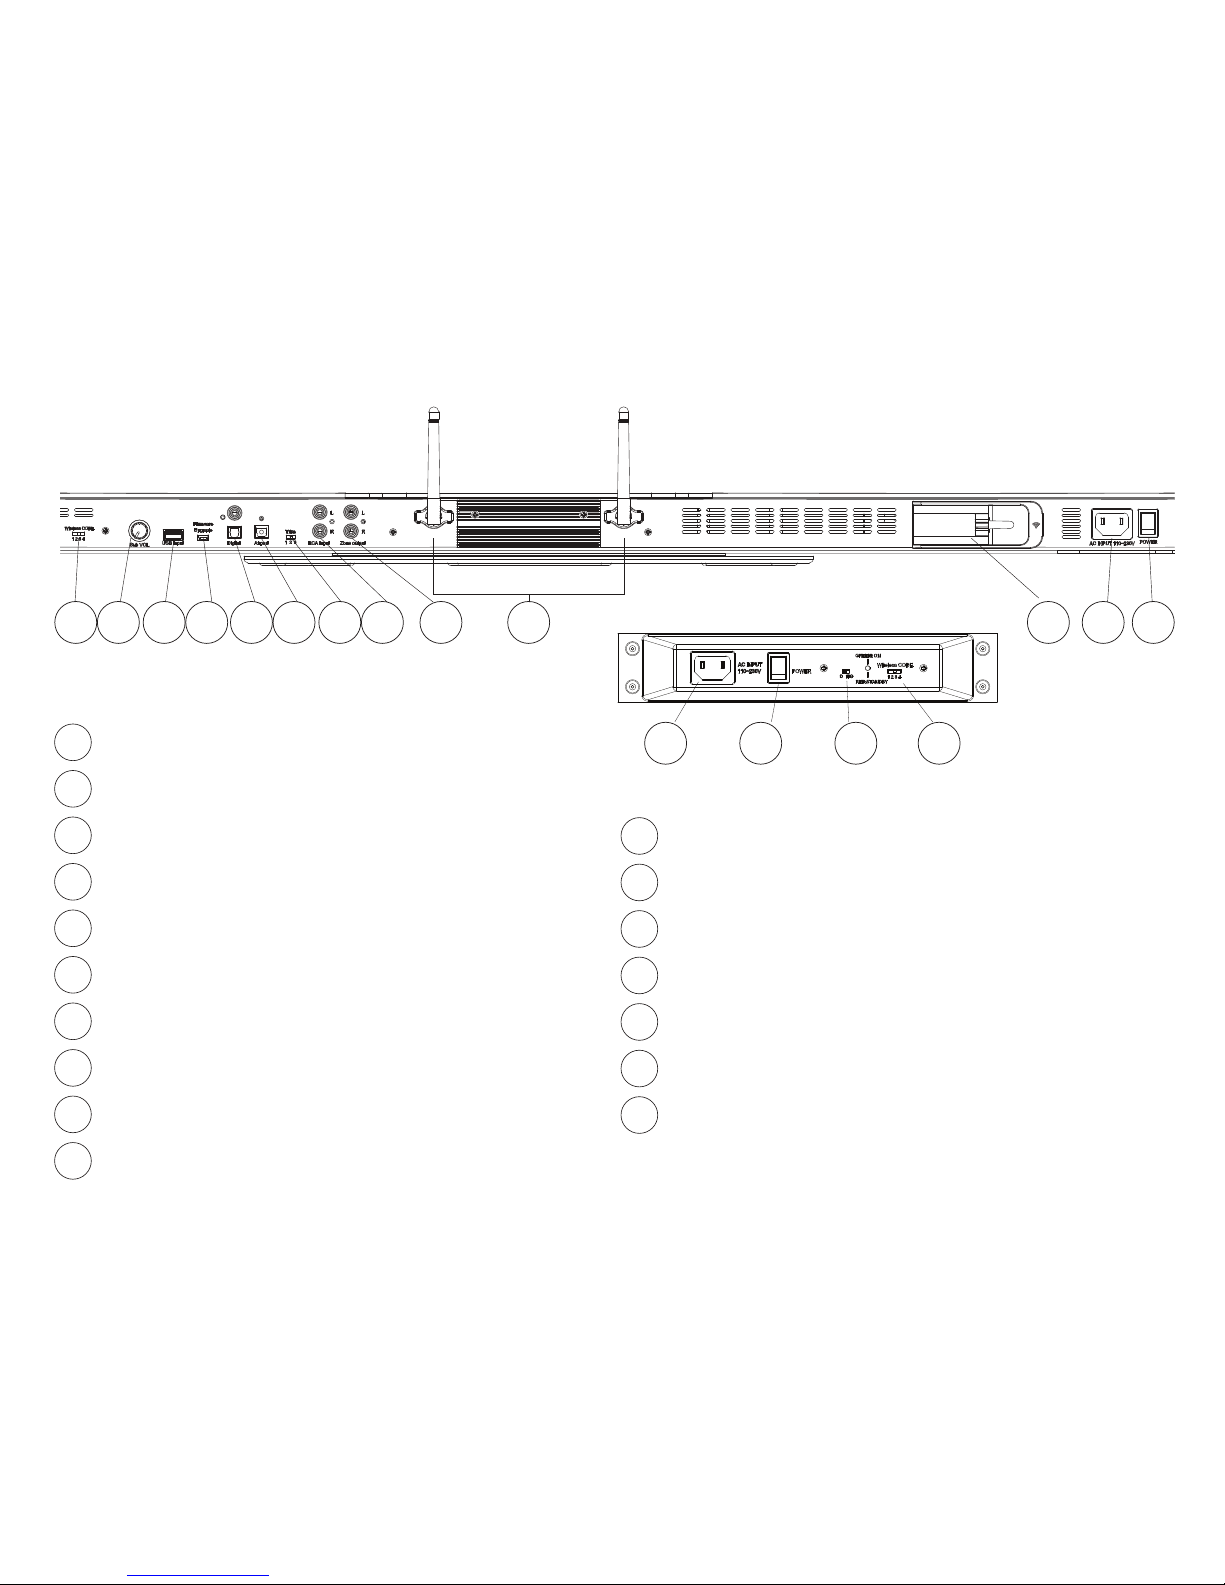
R ear Connection Panel
Wireless CODE - Set to same channel as Sub
Sub Volume - Control subwoofer volume level.
iPod/iPhone/iPad (USB) – Connection of compatible Apple devices.
Firmware – Software upgrades.
Digital - Digital optical and COAX cable input connections
Airport – Audio connection for AirPort Express (sold separately).
Trim – Adjusts input signal level.
RCA Input – Analog RCA cable input connection.
Zone Output – Audio output for 2nd zone.
Antenna 1 – Antenna for Bluetooth wireless.
Antenna 2 – Antenna for Wireless Sub.
5122 Sub
1
1
23 4 5 6 7 8 9 10 11 12 13
7
6
5
4
3
2
10
9
8
AirPort Express Connector – Power connection for
the AirPort Express (sold separately).
AC Input – Connect to wall outlet.
Power Switch – Main system power on and off.
AC Input - Connect to wall outlet
Power Switch - Power on and off
Phase Switch - 0 or 180 degrees
Wireless CODE - Set to same channel as Console
15
14
13
12
11
17
16
5122 Console
14 15 16 17
4
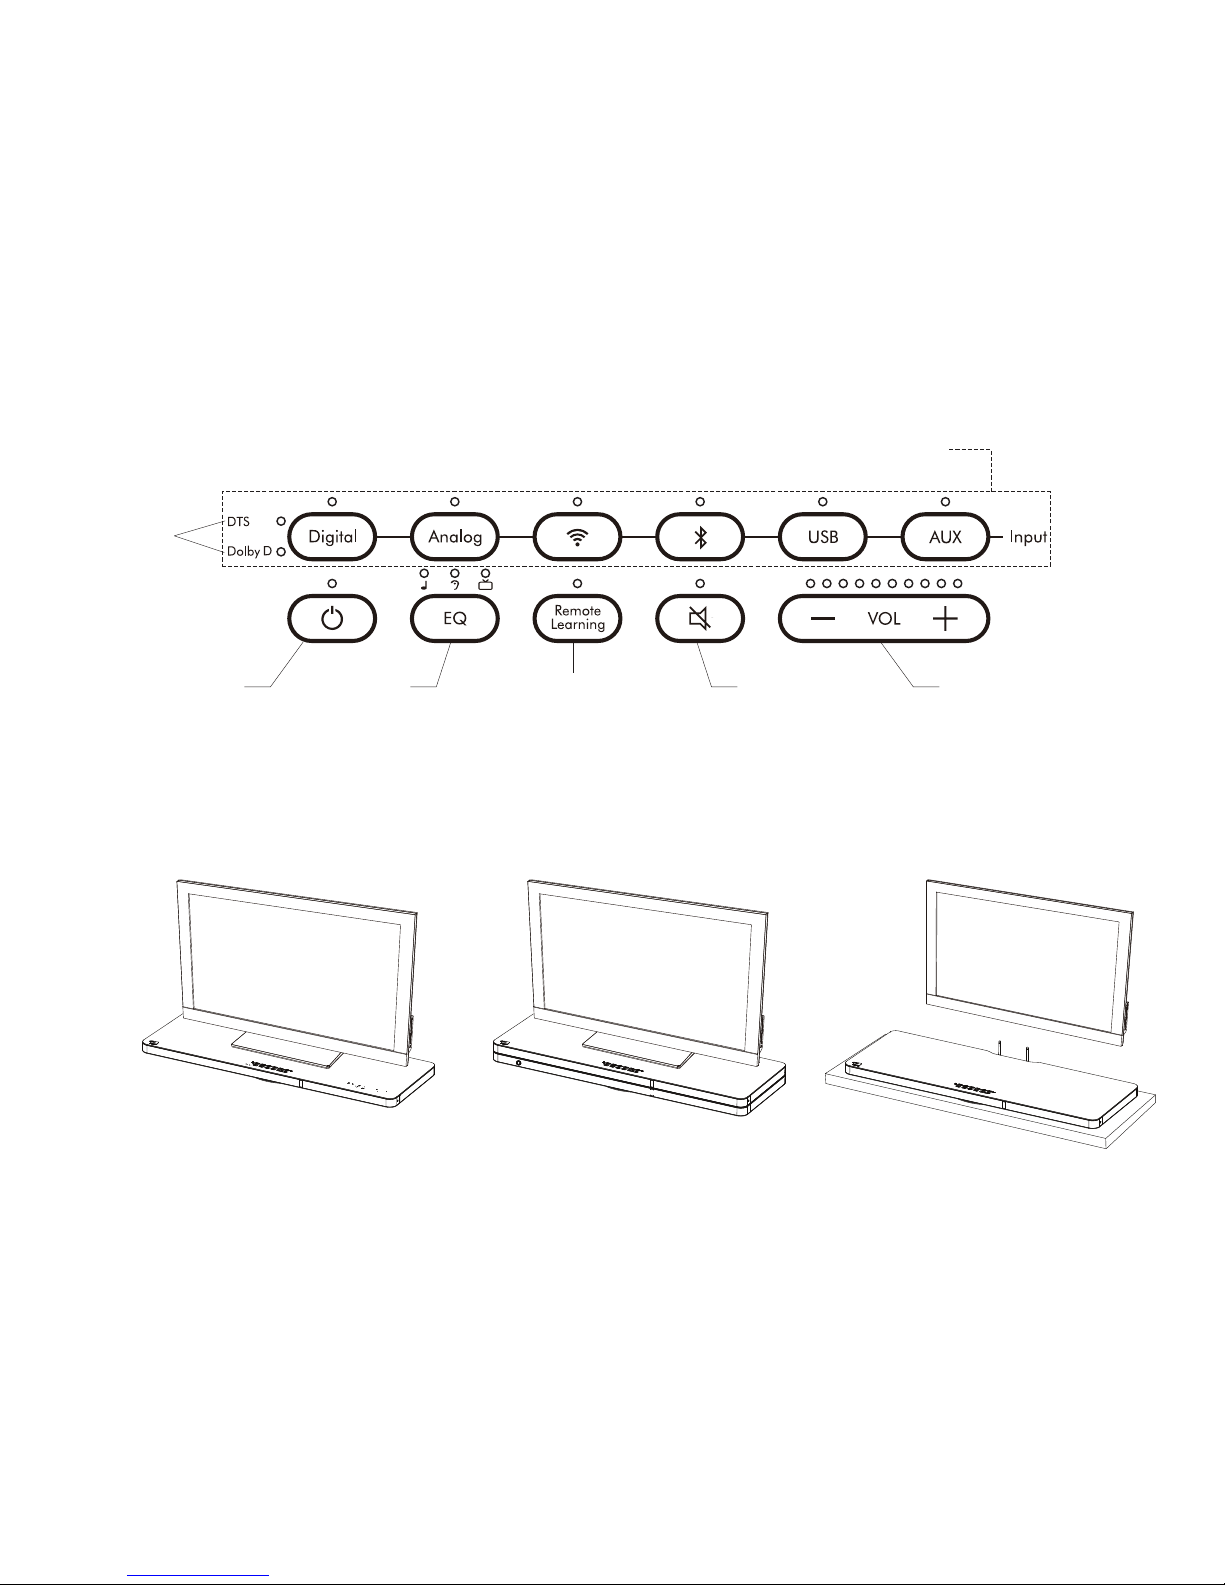
Control Panel
Digital
Format
Selection
Input selection
Power / Standby Power / StandbyMuteEQ Selection
--Music
--Dialogue
--Movies
Remote Learning
Programming
FindaLocation
The 4TV Audio Entertainment Console is designed to be placed under your TV or on a shelf below a wall-mounted TV.

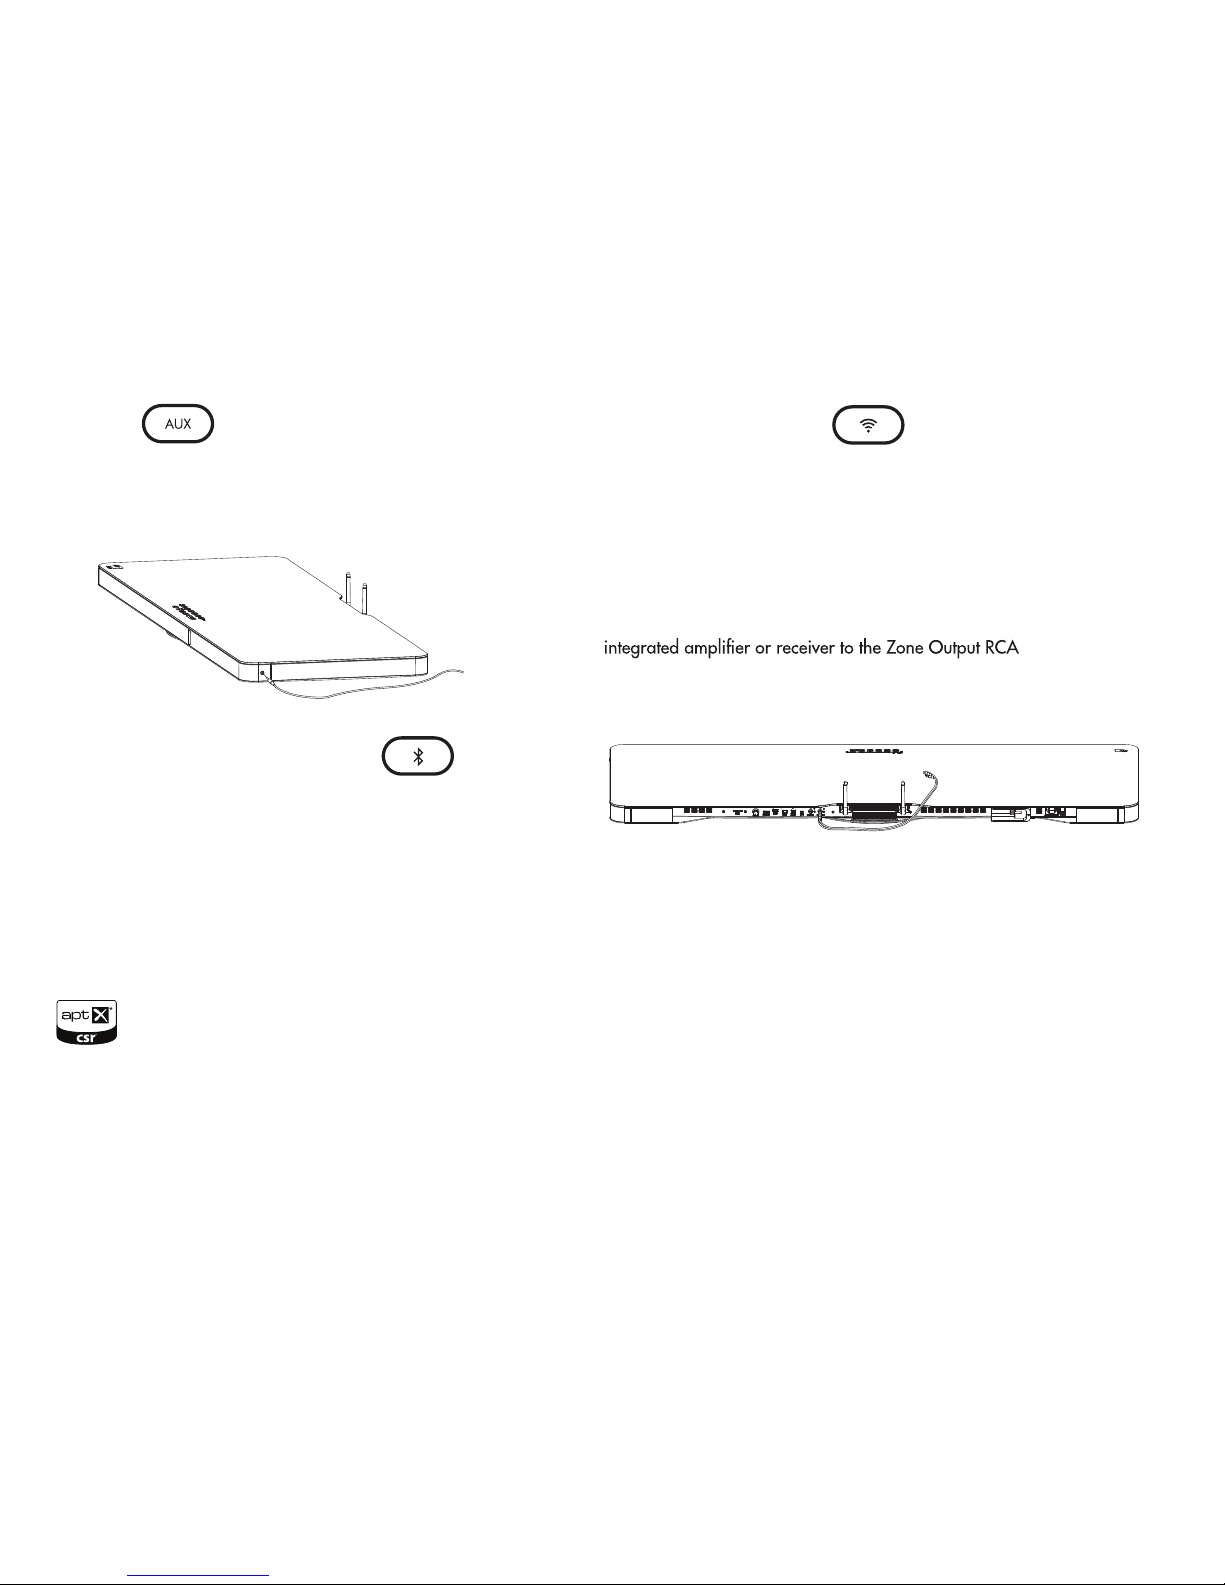
)RUYHUWLFDOSRVLWLRQLQJDWWDFKHGWKH
included feet to the subwoofer as shown.
A single screw conveniently fastens
each foot.
2QFHWKHIHHWDUHDWWDFKHGWKHVXEFDQEH
placed against a wall or even hidden away
behind a couch.
.
F ind a location for the Wireless Subwoofer
,QWKHKRUL]RQWDOSRVLWLRQWKHZLUHOHVVVXEZRRIHUFDQEHSODFHGGLUHFWO\XQGHUWKHFRQVROHRUSRVLWLRQHGXQGHUDFRXFKRURWKHUIXUQLWXUH
Set the Wireless Subwoofer Channel
6HWWKH:LUHOHVV&KDQQHO6ZLWFKRQWKHFRQVROHDQGWKH
VXEZRRIHUWRWKHVDPHQXPEHU,I\RXUHFHLYHDQ\LQWHUIHUê
HQFHRUFRQQHFWLRQLVQRWPDGHWU\VHWWLQJERWKXQLWVWRDQ
alternate number.
Wireless CODE
1234
Wireless CODE
1234
&RQVROH
Sub
5

Attach S wivel Base
The included swivel base allows you to angle the 4TV console to
your listening area. If desired, attach the swivel base with the
supplied screw on the bottom of the 4TV console using a Phillips
head screwdriver as shown.
Make your Connections
Power
Connect the included power cord to a nearby power outlet on console
and wireless subwoofer.
Audio
Best Connection: Digital Optical (or Digital COAX)
6
Good Connection: Analog RCA Connectors
Setup your TV Audio
When using the digital connection option, set your TV’s audio
settings to send “bitstream”via the Digital Optical output on
your TV’s connection panel. An alternative option would be
to connect your disc player directly to the 4TV.
Once wire connections are complete, press the Digital or Analog
button on the 4TV control panel to select the correct input.
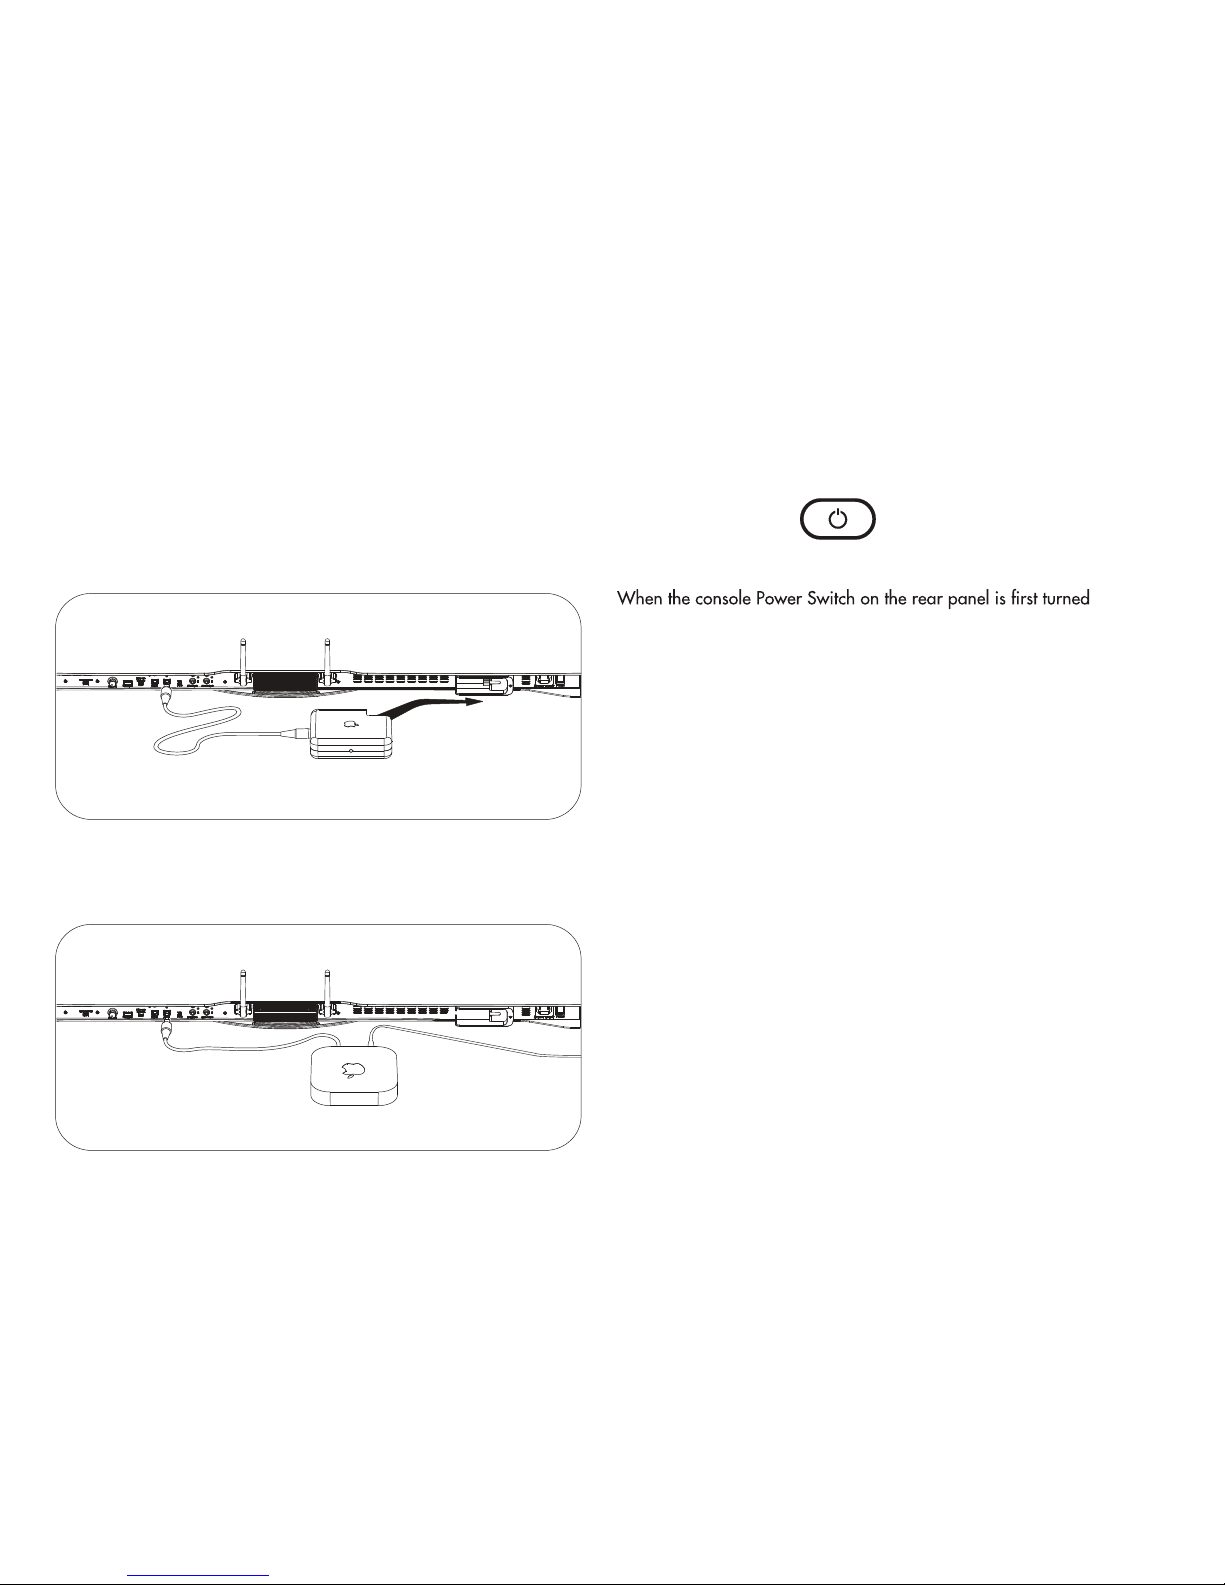
Apple Airport E xpress (old & new versions)
To connect an original Airport Express (sold separtely) to the 4TV,
simply slide it into the Power Port as shown.
To connect the new Airport Express (sold separately) to the 4TV:
Once power connection is complete, connect your digital optical
audio cable from the Airport Express (sold separately) to the
digital optical input labeled “Airport”.
Turn on the Console
on, press the Power button on the 4TV control panel to turn the
console on. The Power button light will go from red to blue and
the blue control panel status lights will illuminate as well.
After playing the unit, all the LEDs will go out. If no audio signal is
introduced for 10 minutes, the unit goes into a low power sleep
state and the LED comes back on a solid red.
To turn the console on from a solid red state, approach the front
of the console and it will activate the proximity sensor. The solid
red LED will change to slowly blinking red.
Now the Power button can be used to turn on the console. A
remote control may be used to turn the console on at any time.
7

S etting Volume L evel
Press the Volume - button to lower the system volume. Press the
Volume + button to make the system volume louder.
Adjus ting the S ubwoofer Volume
The subwoofer volume level is best set up by turning the volume
control on the subwoofer to about 3/4 full, then adjust with the
console’s rear mounted subwoofer volume knob to the amount of
bass you desire. Bass output may vary due to room environment
and location of the 4TV.
S etting the Trim S witch (Optional)
Use the rear mounted trim switch to adjust the level of input from
your TV or other audio device. Some TVs or devices may have a
weak output signal or the signal strength may be too strong and
can create noise. There are 3 positions on the switch to allow you
to adjust to the optimal setting.
Mute
To mute the system volume, press the “Mute” button on the control
panel.
P rogram your R emote C ontrol (P rogram Volume +)
Step 1. Press the Remote Learning button on the 4TV control
Step 2. Press the Volume + button on the 4TV control panel to be
learned. The Remote Learning and Volume + buttons will light.
Step 3. While pointing your TV or Cable/Sat remote control to
the 4TV, press the Volume + button on the remote control 4times
to be learned. The Remote Learning light and the Volume + light
Note:
8
Sub VOL
Trim
1 2 3
Repeat Steps 1 to 3 to program
otherremote control functions.
(i.e. Volume Down, Power, and Mute)
4

Watching TV or Movies
The 4TV features a Movie Mode for full surround sound
reproduction. To engage the Movie Mode, simply press EQ button
on the control panel until the blue light is over the “TV” icon
Listening to Music
The 4TV features a dedicated music listening mode for true stereo
audio reproduction. To engage the Music Mode, simply press
EQ button on the control panel until the blue light is over the
“Note” icon
Enhanced Dialogue Mode
The 4TV features an Enhanced Dialogue Mode for enhanced
dialogue perception of movie and television sound. To engage the
Enhanced Dialogue Mode, simply press EQ button on the control
panel until the blue light is over the “Ear ” icon.
iPod/iPhone/iPad (USB)
Connect a compatible iPod , iPhone , or iPad to the USB input on
the back input panel of the 4TV. To select this input press the USB
button on the control panel.
Play music on your iPod, iPhone, or iPad.
The USB connector is compatible with the following Apple
products:
Made for:
iPod touch (4th generation)
iPod touch (3rd generation)
iPod touch (2nd generation)
iPod touch (1st generation)
iPod nano (6th generation)
iPhone 4S
iPhone 4
iPhone 3GS
iPhone 3G
iPad (3rd generation)
iPad 2
iPad 8
9
®® ®
Aux Input
Connect your audio device using a 3.5mm mini stereo cable to the
input on the right side of the 4TV. To select this input press the AUX
button on the control panel.
Using Bluetooth Wireless Music Streaming
Press the “Bluetooth” button on the Control Panel. The blue light
will blink. The LED blinks fast when it is looking for a previously
paired device. Press the Bluetooth button for about 10 seconds
until the LED blinks slowly (this is the pairing mode). Then place
your Bluetooth-enabled Smartphone or computer in pairing mode
to look for the 4TV and then select.
Once paired the blue light with turn solid. Now that your device
is paired, play music on your device and the 4TV should play.
Using Apple AirPort Express
After connecting your AirPort Express (sold separately) to the rear
panel, press the “wireless/connect symbol” button on the control
panel to engage the audio.
Zone Output
To send audio to another room, simply connect and
analog connectors on the back panel of the 4TV.
10

L imited Warranty Information
- Five Years Parts and Labor
- Two Years Over the Counter Exchange
The AudioXperts warranty protects the original owner,
provided the AudioXperts product was purchased within the
continental United States, Alaska or Hawaii from an
authorized dealer. In all instances a copy of the original
“dated” bill of sale must be presented whenever warranty
service is required.
The warranty is limited to AudioXperts product and does not
cover damage to any associated equipment. The warranty
does not cover the cost of removal or reinstallation of the
product. The warranty becomes void if the serial number has
legal rights, and you may also have other rights, which vary
from state to state.
NOTE: Repair of AudioXperts products must be made by an
authorized dealer or service center. Unauthorized repair will
void the warranty and is done at the risk of the owner.
If S ervice is R equired
Finished Goods RA Requests:
Authorized Warranty/Service Centers, Tech Support and Parts:
(855)4MY - XPRT (469-9778) x 22, or
email: support@audioxperts.com or
visit our website atwww.audioxperts.com
©2013 AudioXperts, Inc. AudioXperts and 4TV are are
registered trademarks of AudioXperts, Inc. iPhone, iPod, iPod nano,
iPod touch, AirPort Express are trademarks of Apple Inc.
registered in the U.S. and other countries. iPad is a trademark of
Apple Inc. Dolby Digital is a registered trademark of Dolby Laboratories.
DTS is a registered trademark of Digital Theater Systems,
are registered trademarks of Bluetooth SIG. SRS and TruVolume
are trademarks of SRS Labs Inc. The aptX® software is copyright
CSR plc or its group companies. All rights reserved. The aptX®
mark and the aptX logo are trade marks of CSR plc or one of its
group companies and may be registered in one or more jurisdictions.
rights reserved. Unauthorized use is strictly prohibited.
RF Exposure Warning
This equipment must be installed and operated in accordance with provided instructions and the antenna(s) used for this transmitter must be installed to provide a separation
distance of at least 20 cm from all persons and must not be co-located or operating in conjunction with any other antenna or transmitter. End-users and installers must be provide
with antenna installation instructions and transmitter operating conditions for satisfying RF exposure compliance.Radio Frequency (RF) Exposure Information The radiated output
power of the Wireless Device is below the Industry Canada (IC) radio frequency exposure limits. The Wireless Device should be used in such a manner such that the potential for
human contact during normal operation is minimized. This device has also been evaluated and shown compliant with the IC RF Exposure limits under mobile exposure conditions.
(antennas are greater than 20cm from a person’s body)
Radio Frequency (RF) Exposure Information
The radiated output power of the Wireless Device is below the Industry Canada (IC) radio frequency exposure limits. The Wireless Device should be used in such a manner
such that the potential for human contact during normal operation is minimized. This device has also been evaluated and shown compliant with the IC RF Exposure limits
under mobile exposure conditions. (antennas are greater than 20cm from a person's body).
11

'ROE\
0DQXIDFWXUHGXQGHUOLFHQVHIURP'ROE\/DERUDWRULHV
'ROE\DQGWKHGRXEOHê'V\PERODUHWUDGHPDUNVRI
'ROE\/DERUDWRULHV
'76
0DQXIDFWXUHGXQGHUOLFHQVHXQGHU863DWHQW1RV
RWKHU86DQGZRUOGZLGHSDWHQWVLVVXHG
SHQGLQJ'76WKH6\PERO'76DQGWKH6\PEROWRJHWKHUDUH
UHJLVWHUHGWUDGHPDUNV'76'LJLWDO6XUURXQGDQGWKH'76ORJRVDUH
WUDGHPDUNVRI'76,QF3URGXFWLQFOXGHVVRIWZDUH¿'76,QF$OO
5LJKWV5HVHUYHG
12


4TV-2112 Ultimate
4TV-5112 Performance
12a
2b
Best: Digital Optical
RCA Phono
3
QUICK START GUIDE
GUIDE DE DEMARRAGE RAPIDE
..alternative
Designed and Engineered by
Main Power
Alimentation secteur
FIRST FOLD
SECOND FOLD
FIRST FOLD
SECOND FOLD
Optional

5
Digital Ana log
DTS
Dolby
6
Program Your Remote Control
Programmez votre telecommande
7
8
EQ
VO L
learning
Remote
learning
Remote VO L
4
9
Repeat Steps 7 to 9 to program Volume Down, Power,
and Mute.
Repetez les etapes 7 a 9 pour le programme Volume Bas,
la puissance et Silence.
learning
Remote VO L

Waking Up the “Sleeping” 4TV Console
All 4TV Consoles include a Standby (sleep) feature, which is designed to conserve
electrical power when the system is not in use.
During use of the 4TV Console, the LEDs on the Control Panel will go
out after 30 seconds. If no audio signal is introduced for 10 minutes,
the unit goes into its power conservation Standby (sleep) mode and the
Power Button LED on the Control Panel comes back on a solid red.
Please follow these instructions to switch the 4TV Console from
Standby (sleep) to Active:
Most Common Method – Make the Console Active
by pressing the designated “Power” button on the
remote control that has been “learned” by the 4TV
console.
Alternative Method: If for some reason you do not have the option of
using a remote control, simply approach or wave your hand near the
Sensor Window located in the front of the Console. This action will
activate the proximity sensor, which enables the console to switch from
Standby (sleep) to Active. The solid red LED will change to slowly
blinking red.
Now press the Power Button on the Control Panel to turn on the
Console.
Power Button
Sensor Window
Other manuals for 4TV 5122
1
Table of contents


