Audison prima APSP TACOMA User manual

APSP TOYOTA TACOMA
rev. 1.1
INSTALLATION
MANUAL


TOYOTA TACOMA /
INSTALLATION MANUAL
3
Table of Contents
1. PRODUCT DESCRIPTION .......................................................................................................................................................5
2. PACKAGING CONTENTS ........................................................................................................................................................6
3. TECHNICAL SPECIFICATIONS ..............................................................................................................................................7
4. CONNECTIONS LAYOUT FOR LEFT-HAND DRIVE VEHICLES ......................................................................................8
5. REMOVAL OF DASH SPEAKERS ...........................................................................................................................................9
6. REMOVAL OF FRONT LEFT SEAT, LEFT DOOR SILL AND LEFT KICK PANEL .........................................................10
7. AP TACOMA P&P HARNESS CABLES ROUTING ............................................................................................................ 11
8. INSTALLATION OF AP5.9 bit................................................................................................................................................13
9. INSTALLATION OF APBX 8 DS SUBWOOFER ..................................................................................................................14
10. INSTALLATION OF AP 2 WIDE RANGE .............................................................................................................................. 15
11. INSTALLATION OF AP 690 WOOFER .................................................................................................................................16
12. RE-ASSEMBLY OF UNINSTALLED COMPONENTS ........................................................................................................18
13. UPLOAD OF THE TUNING FILE............................................................................................................................................18
14. NOTES ......................................................................................................................................................................................18
15. TROUBLESHOOTING..............................................................................................................................................................19

TOYOTA TACOMA /
INSTALLATION MANUAL
4
Introduction
Congratulations for purchasing an Audison product. Your satisfaction is the rst requirement that
our products must meet: the same satisfaction felt by those who long for experiencing the car audio
emotion. This manual was drawn up to provide the main instructions required to install and use the
system properly.
Before the installation, carefully read all the instructions in this manual and in the manuals included
in the packaging of the individual components. Failure to comply with these instructions may cause
unintentional harm or damage to the system components or to the vehicle.
Warranty
For the warranty conditions please visit our website www.audison.eu or contact your Audison specialized centre.
Safe sound
USE COMMON SENSE AND PRACTICE SAFE SOUND. PLEASE REMEMBER THAT LONG EXPOSURE TO
EXCESSIVELY HIGH SOUND PRESSURE LEVELS MAY DAMAGE YOUR HEARING. SAFETY MUST BE AT
THE FOREFRONT WHILE DRIVING.

TOYOTA TACOMA /
INSTALLATION MANUAL
5
1. PRODUCT DESCRIPTION
The APSP TACOMA was specifically designed for TOYOTA TACOMA (*), it allows the correct installation of the
AP5.9 bit** (Amplifier with DSP), AP 690 (Front Woofer), AP 2 (Front Wide range), APBX 8 DS (Rear Subwoofer)
and comprises:
1. a pair of Front Woofers adapters, connectors and gaskets for a perfect integration.
2. a pair of Front Wide range adapters, connectors and gaskets for a perfect integration.
3. Tacoma P&P Harness, a specific cable for the car and the kit, designed according to the Plug&Play philosophy
to be connected to the original connectors supplied with the car, without needing to change the original wiring.
4. a pair of specific subwoofer brackets for a perfect and safe installation of the APBX 8 DS (optional).
WARNING: before starting the installation make sure the kit APSP TACOMA is compatible with your
TOYOTA TACOMA version.
All the information contained in this manual refer to the left-hand drive Gen 3 Toyota Tacomas from 2016.
1
Remark:•Allthekitcomponentshavebeendesignedtobesecuredtotheoriginalxingpointsofthevehicle.
• The removal of the car upholstery may cause damage to the metal clips, making it necessary to replace them.
• Make sure all the gaskets supplied with the speakers are correctly positioned and working perfectly.
• Connectors are fragile components and must be handled with care.
• After installation and before restarting the system, make sure the equalization of the vehicle’s radio is flat.
• Install the kit components by following the instructions provided to ensure they do not prevent airbags or other
safety devices of the vehicle from working correctly.
• Use suitable quality equipment to simplify, speed up and achieve optimal installation.
These installation instructions are updated to revision 01. Additional documents can be downloaded from the website www.audison.eu.
Should a malfunction occur during the kit installation, check the “TROUBLESHOOTING” section at the end of this manual. If you
have consulted the aforesaid section and are still unable to solve the problem, please visit the www.audison.eu website or contact
yourAudisonauthorizedspecializedcentreortheofcialassistanceviaemail:[email protected].
*Tacoma is a registered Toyota trademark.
** We recommend the use of Prima Tower Kit for a perfect and safe installation.
TOYOTA TACOMA /
INSTALLATION MANUAL
6
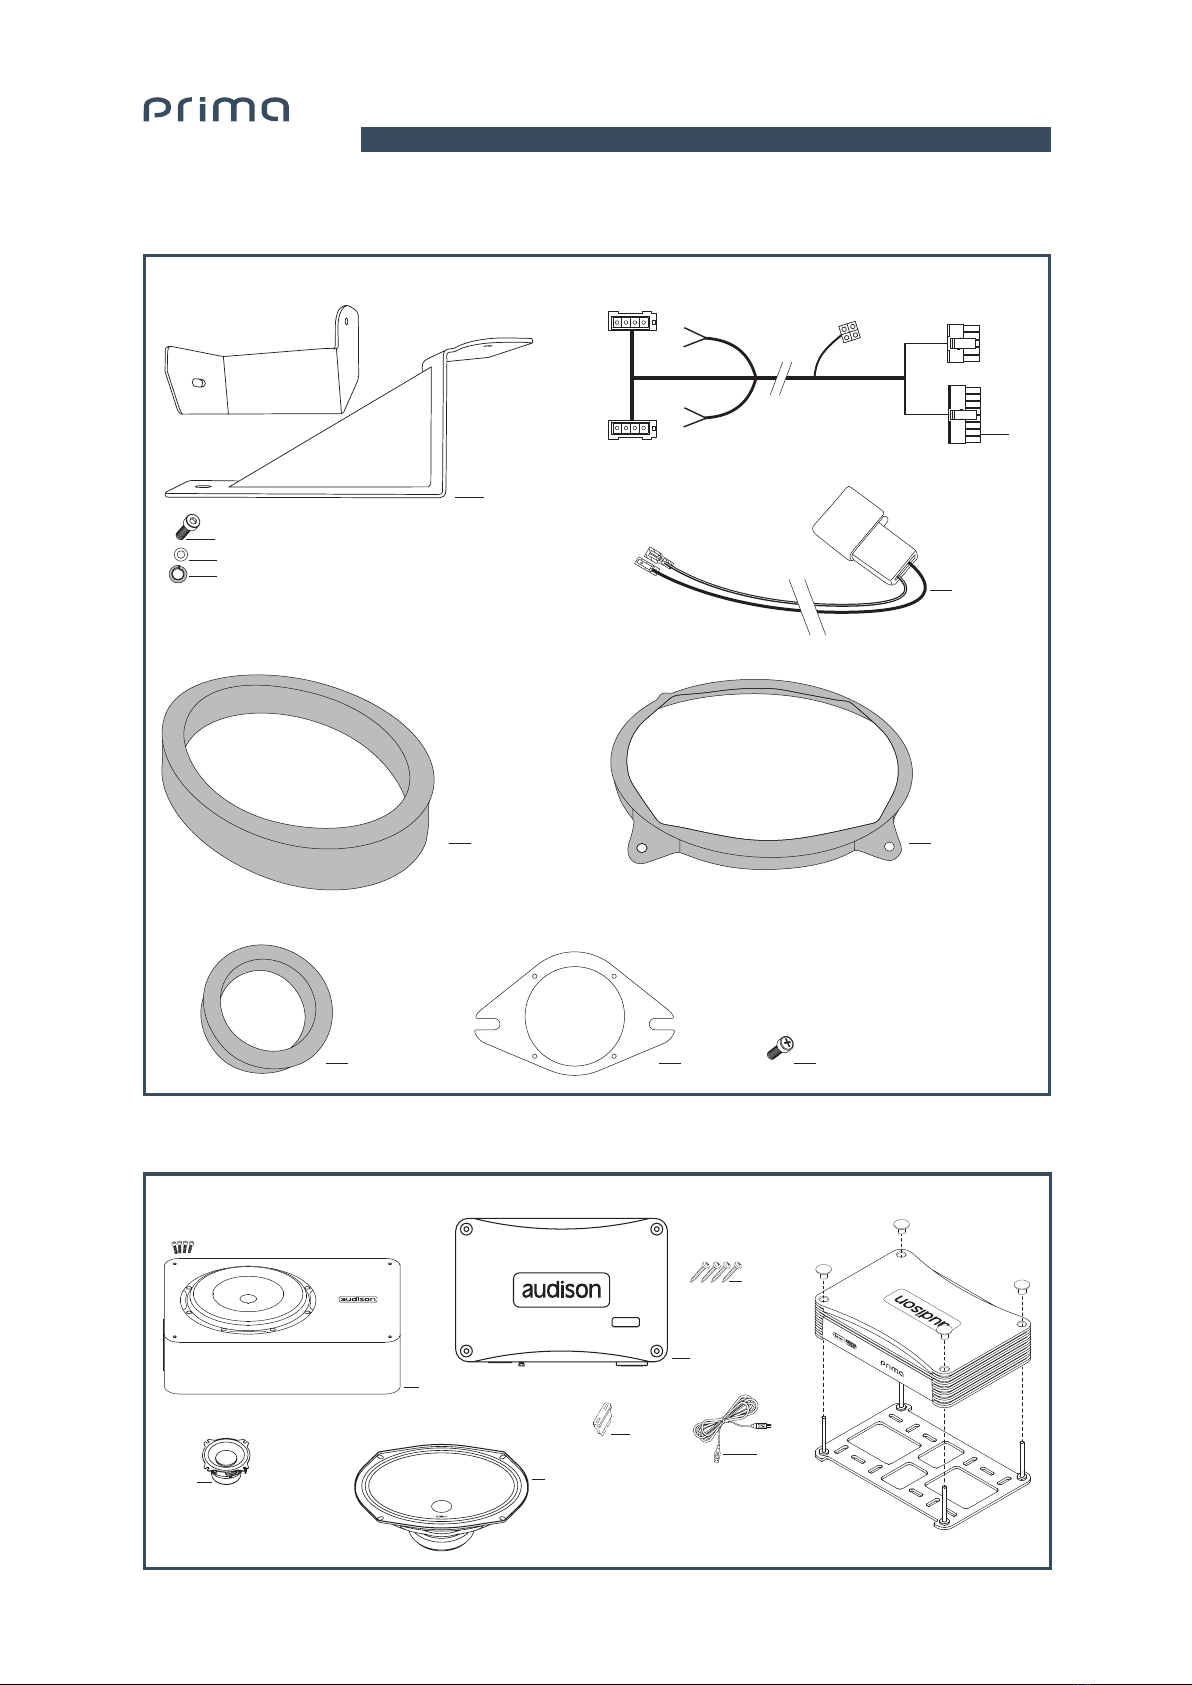
2. PACKAGING CONTENTS
Optional
x 2x 2
x 2 x 2 x 8
APBX 8 DS TACOMA SUB BRACKETS
SR TOYOTA TACOMA 2016-> FRONT WFFOAM RINGS FOR TACOMA AP 690
FOAM RINGS FOR TACOMA AP 2 SR TOYOTA TACOMA 2016-> FRONT WIDE RANGE
SCREWS FOR AP 2
AP TACOMA P&P HARNESS
SC TOYOTA TACOMA FRONT WF
x 1
x 2
x 2
x 1
APBX 8 DS
2
AP5.9 bit
x 1
SCREWS
4,2 mm x 50 mm
0.17 in. x 1.97 in.
FUSE 30A
x 1
1,8 m / 70.87 in.
USB CABLE
x 1
x 2
x 4
x 1
x 2
AP 5.9 bit
30 A
x 2
x 2
AP 2
AP5.9 bit
PRIMA TOWER KIT
AP 690
TOYOTA TACOMA /
INSTALLATION MANUAL
7
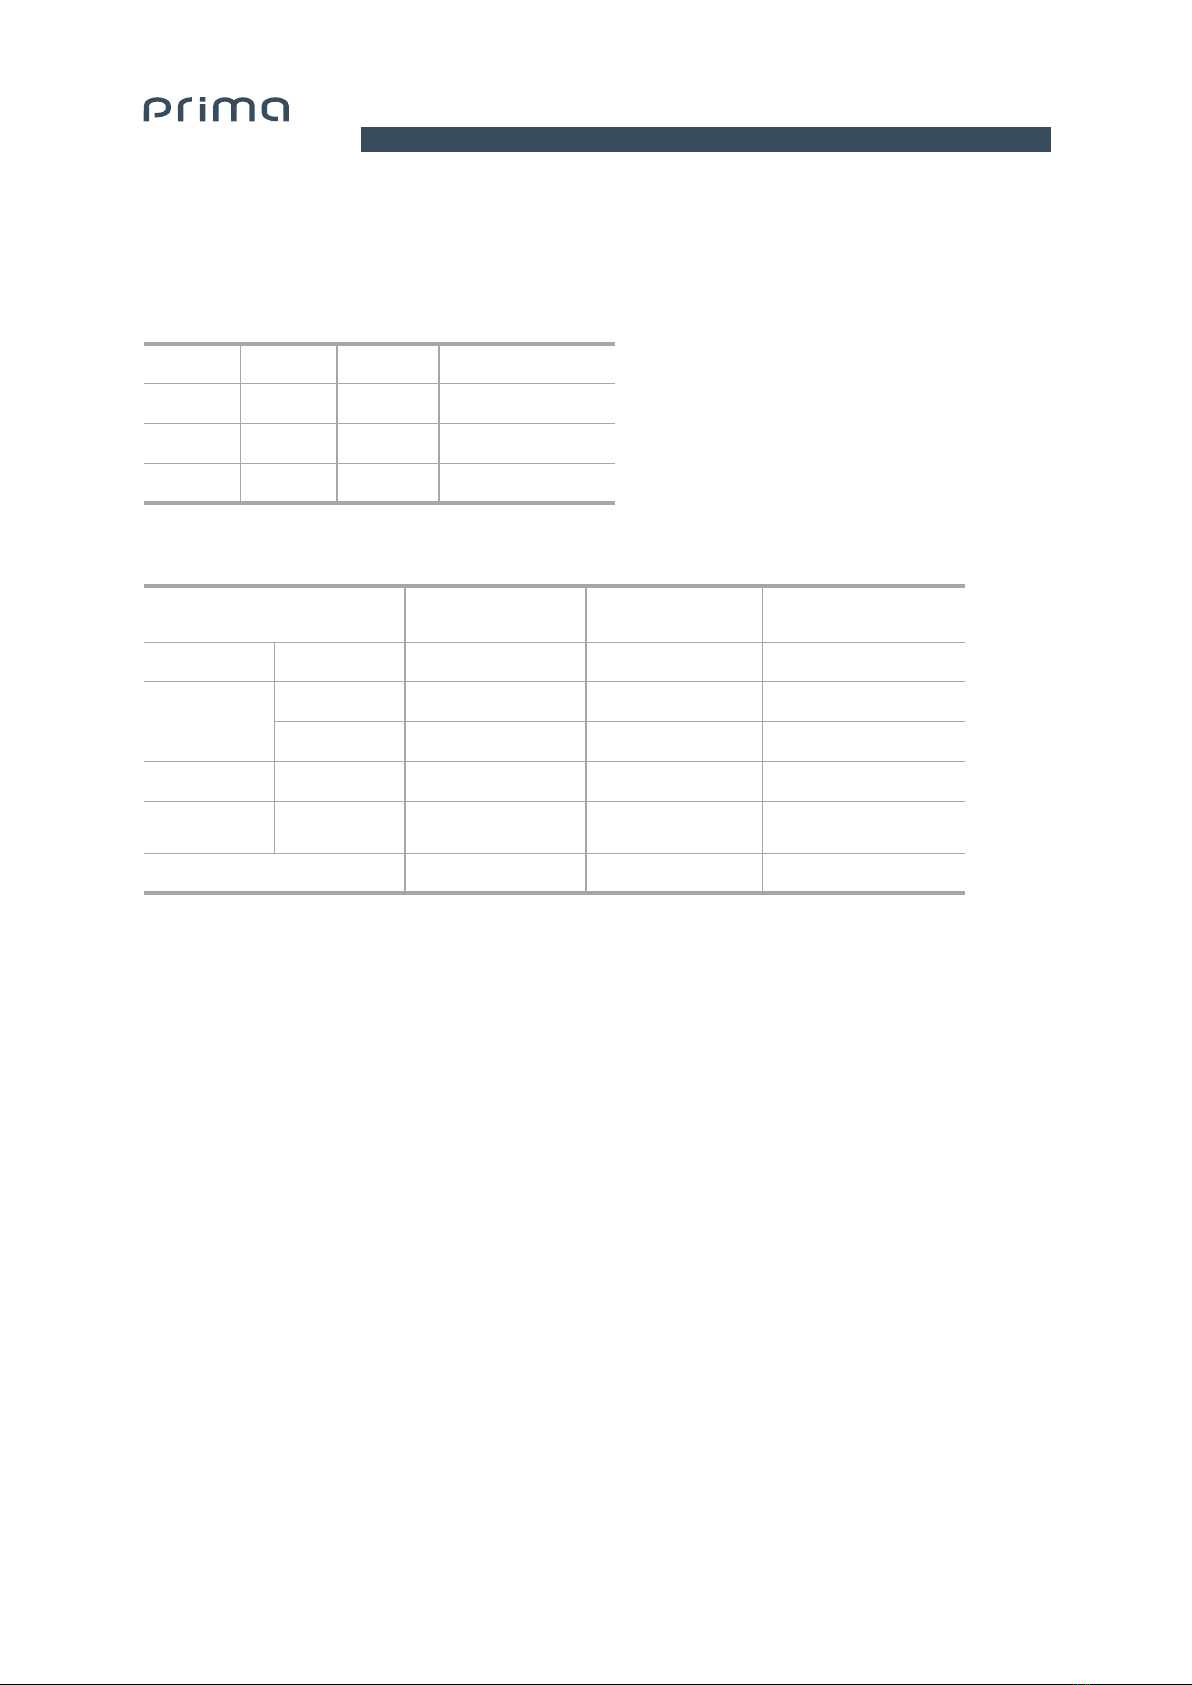
3. TECHNICAL SPECIFICATIONS
Remark:
Please refer to the user’s manual of the AP5.9 bit for detailed information about the product, its installation and for the use of the “AP Prima PC
Software”. All information is available on the website www.audison.eu.
3
Channel Mode Speaker Power
1-2 Stereo AP 2 2x20WRMS@4Ω
3-4 Stereo AP 690 2x50WRMS@4Ω
5Mono APBX 8 DS 1x350WRMS@2Ω
Component AP 690 (optional)
Front Woofer
AP 2 (optional)
Wide Range
APBX 8 Ds (optional)
Subwoofer
Size Inches 6x9 2 8
Power Handling
W (peak) 300 50 500
W (continuous) 100 25 250
Impedance Ω4 4 4 + 4
Fequency
Response Hz 40 ÷ 5k 150 ÷ 20k -
Crossover Digital Digital Digital
AP5.9 bit OUTPUT CHANNEL MAP
TECHNICAL SPECIFICATIONS
TOYOTA TACOMA /
INSTALLATION MANUAL
8
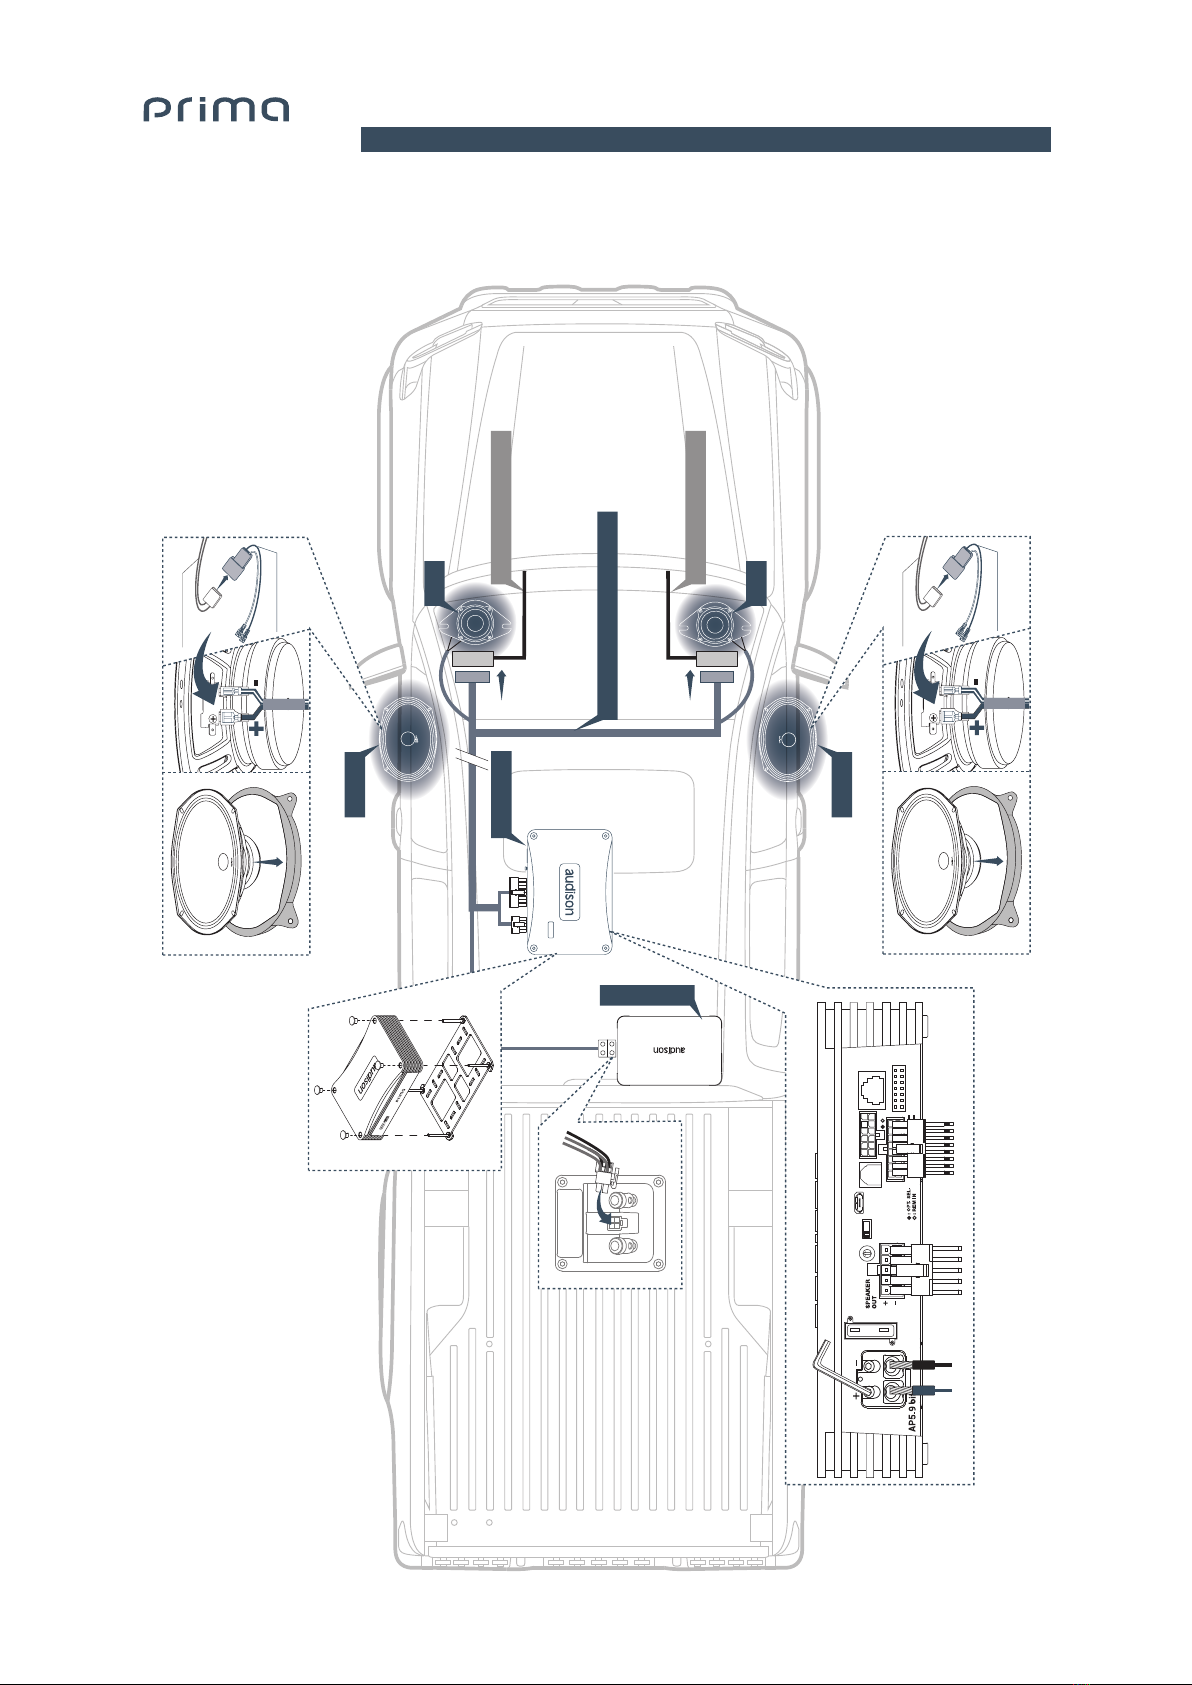
T
OEM CONNECTOR
AP5.9 bit
APBX 8 DS
AP 690
OEM CONNECTOR
AP 690
AP 5.9 bit
USB OPTICAL IN DSP OUT
INPUTS
30A
1 2 3 4 5 6
DRC
ASP
REM OUT
MASTER ENABLE
UPGRADE
PRESETS
OFF ON
01
2
3
4
5
6
7
POWER - 12V
AP5.9 bit
SC TOYOTA TACOMA
FRONT WOOFER
OEM CONNECTOR
provided
SC TOYOTA TACOMA
FRONT WOOFER
OEM CONNECTOR
provided
AP 2
AP 2
AP Tacoma P&P Harness
4. CONNECTIONS LAYOUT FOR LEFT-HAND DRIVE VEHICLES
4

TOYOTA TACOMA /
INSTALLATION MANUAL
9
5. REMOVAL OF DASH SPEAKERS
WARNING: the information below refers to the left-hand drive 4-door version. Remove the key from the car’s
ignition and pull the lever to release the bonnet. Close the doors and wait for 5 minutes, then open the
bonnet and disconnect the negative pole from the vehicle’s battery.
Fig. 1b
Fig. 2b
Fig. 1a
Fig. 2a
5
5.1.1 Remove the A-pillar trim and then remove dash speaker grilles (g.1a/1b).
5.1.2 Unplug dash speakers and remove from vehicle (g.2a / 2b).
5.1 Removal of dash speakers

TOYOTA TACOMA /
INSTALLATION MANUAL
10
6. REMOVAL OF FRONT LEFT SEAT, LEFT DOOR SILL AND LEFT KICK PANEL
6.1.1 Lift the cover and pull it out. (Fig.3a/3b).
6.2.1 Pull the footrest straight out (g.4a) and lift the Kick Panel and pull it out (g.4b).
6.3.1 Remove seat track cover (g.5a), remove the 4 bolts and front seat assembly (g.5b).
6
6.1 Remove Front Left Door sill
6.2 Remove Front Left Kick Panel
6.3 Remove Front Left Seat
Fig. 3bFig. 3a
Fig. 4b
Fig. 5b
Fig. 4a
Fig. 5a

TOYOTA TACOMA /
INSTALLATION MANUAL
11
7
7. AP TACOMA P&P HARNESS CABLES ROUTING
7.1.1 Ground to Toyota OEM ground bolt in kick panel (Fig6).
7.1.2 Positive from battery direct (Fig7).
7.1 Amplifier power wiring (not included) routing
7.2 Instructions for cables routing from the Driver seat to the left and right side of the dashboard (Fig.8).
Fig. 7
Fig. 8
Fig. 6
GROUNDGROUND
A
B
C
DE
F
G
TOYOTA TACOMA /
INSTALLATION MANUAL
12
7
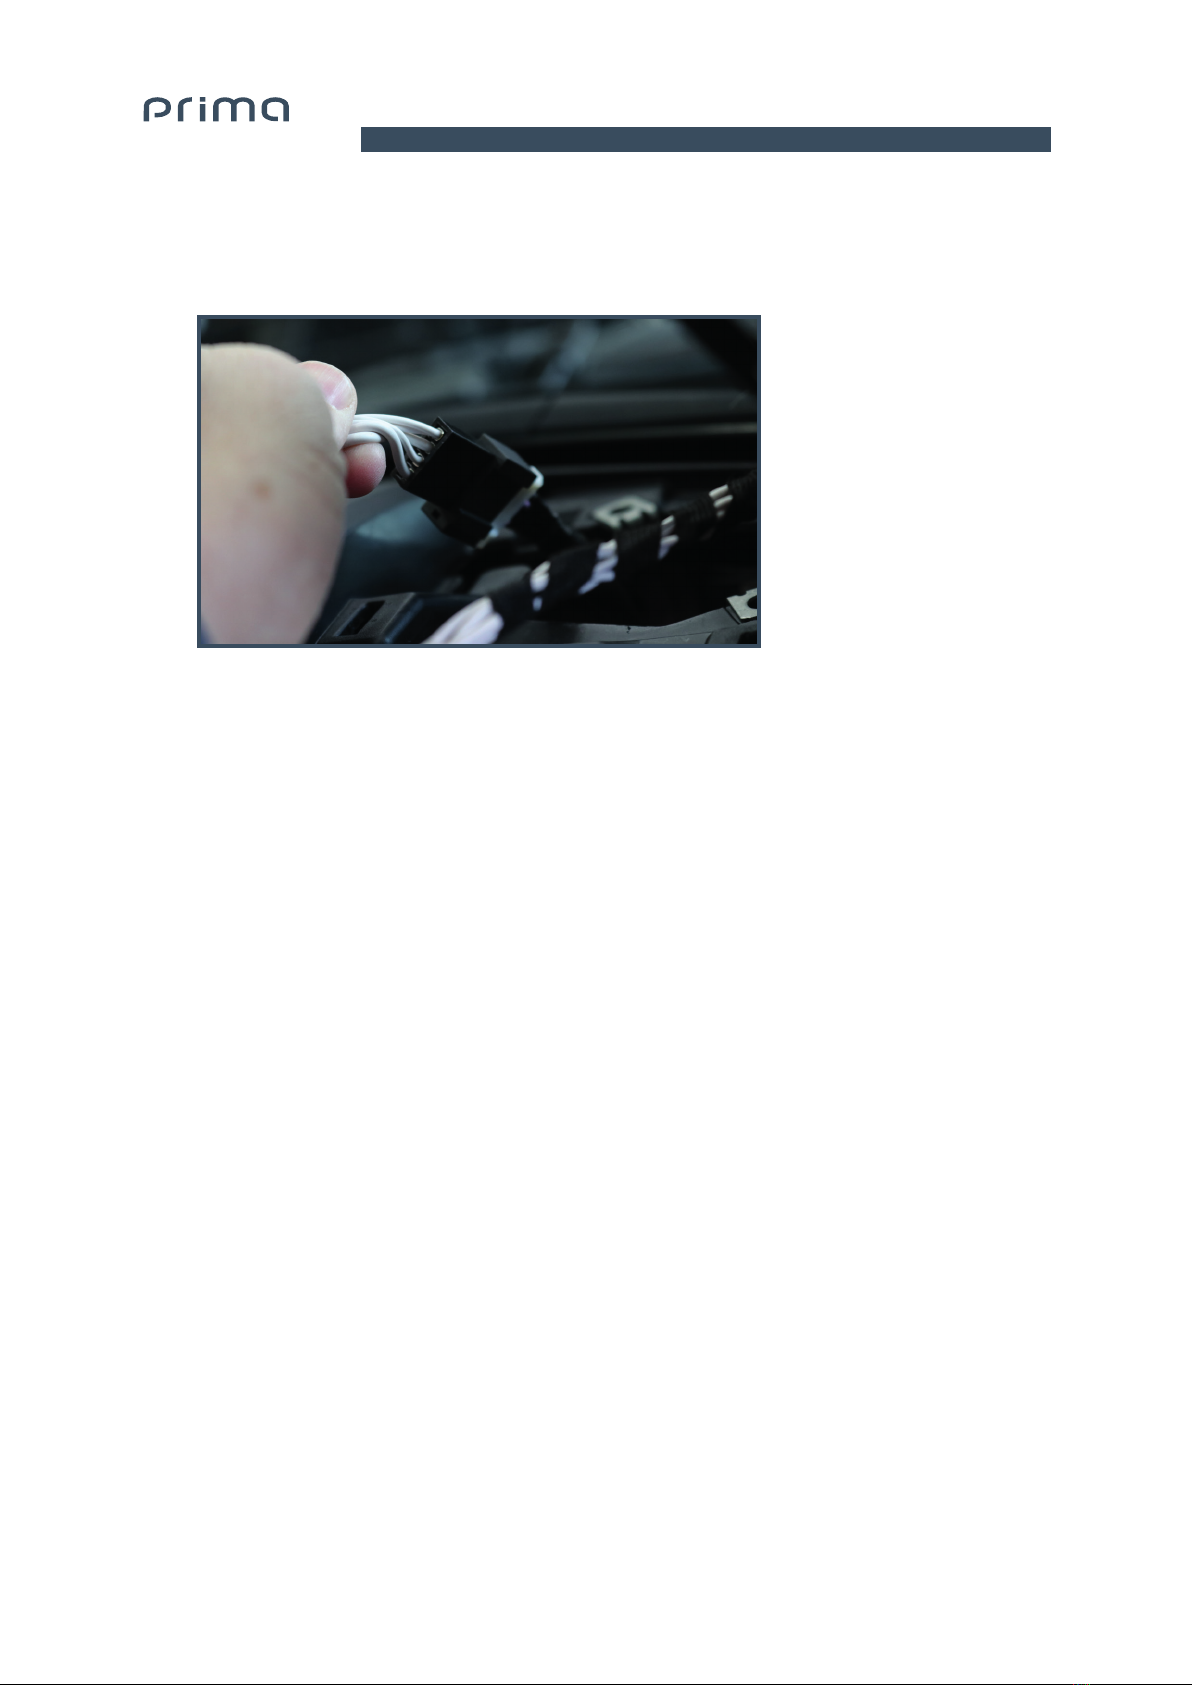
7.2.1 Route sections Dand Eof the P&P HARNESS cable from under the seat to the left side of the dashboard
passing through the door sill.
7.2.2 Drive the cable E to the housing of the left speaker.
7.2.3 Connect the 4 pin connector with the one belonging to the OEM TW g. 9.
7.2.4 Drive the cable Dup to the right side of the dashboard. To facilitate this operation it is possible to remove
the source and the glove compartment.
7.2.5 Connect the 4 pin connector with the one belonging to the OEM TW.
7.2.6 Route wire “C” under running board trim and bottom of rear wall trim.
Fig. 9

TOYOTA TACOMA /
INSTALLATION MANUAL
13
8. INSTALLATION OF AP5.9 bit
8.1.1 Pull the carpet up.
8.1.2 Remove underseat heater duct temporarily.
8.1.3 Position Prima Tower Kit under carpet, centered on the duct location.
8.1.4 Make small cuts in the carpet to allow threaded studs on the plate to protrude up through the carpet.
8.1.5 Reinsert duct.
8.1.6 Put carpet back down on top of plate.
8.2.1 Placetheamplierontheplateandsecureitwiththeincludedthreadednuts.g. 10
8.2.2 Plug the connectors “A”, “B”andthepowercablestotheamplier.g. 11
8.1 INSTALLATION of Prima Tower Kit
8.2 INSTALLATION of AP5.9 bit
Fig. 11Fig. 10
8
A
B

14
TOYOTA TACOMA /
INSTALLATION MANUAL
9. INSTALLATION OF APBX 8 DS SUBWOOFER
9.1.1 Fold the rear seats (Fig 12).
9.1.2 Unplug 4-pin square connector on subwoofer between binding posts, and plug cable C4-pin connector.
(Fig 13).
9.1.3 Pull two 10mm bolts from back wall of truck. Screw brackets to subwoofer using hardware included with
subwoofer enclosure. Bolt brackets to truck using provided longer bolts. (Fig 14)
9.1 APBX 8 DS INSTALLATION
Fig. 12
Fig. 13
Fig. 14
9
TOYOTA TACOMA /
INSTALLATION MANUAL
15
10
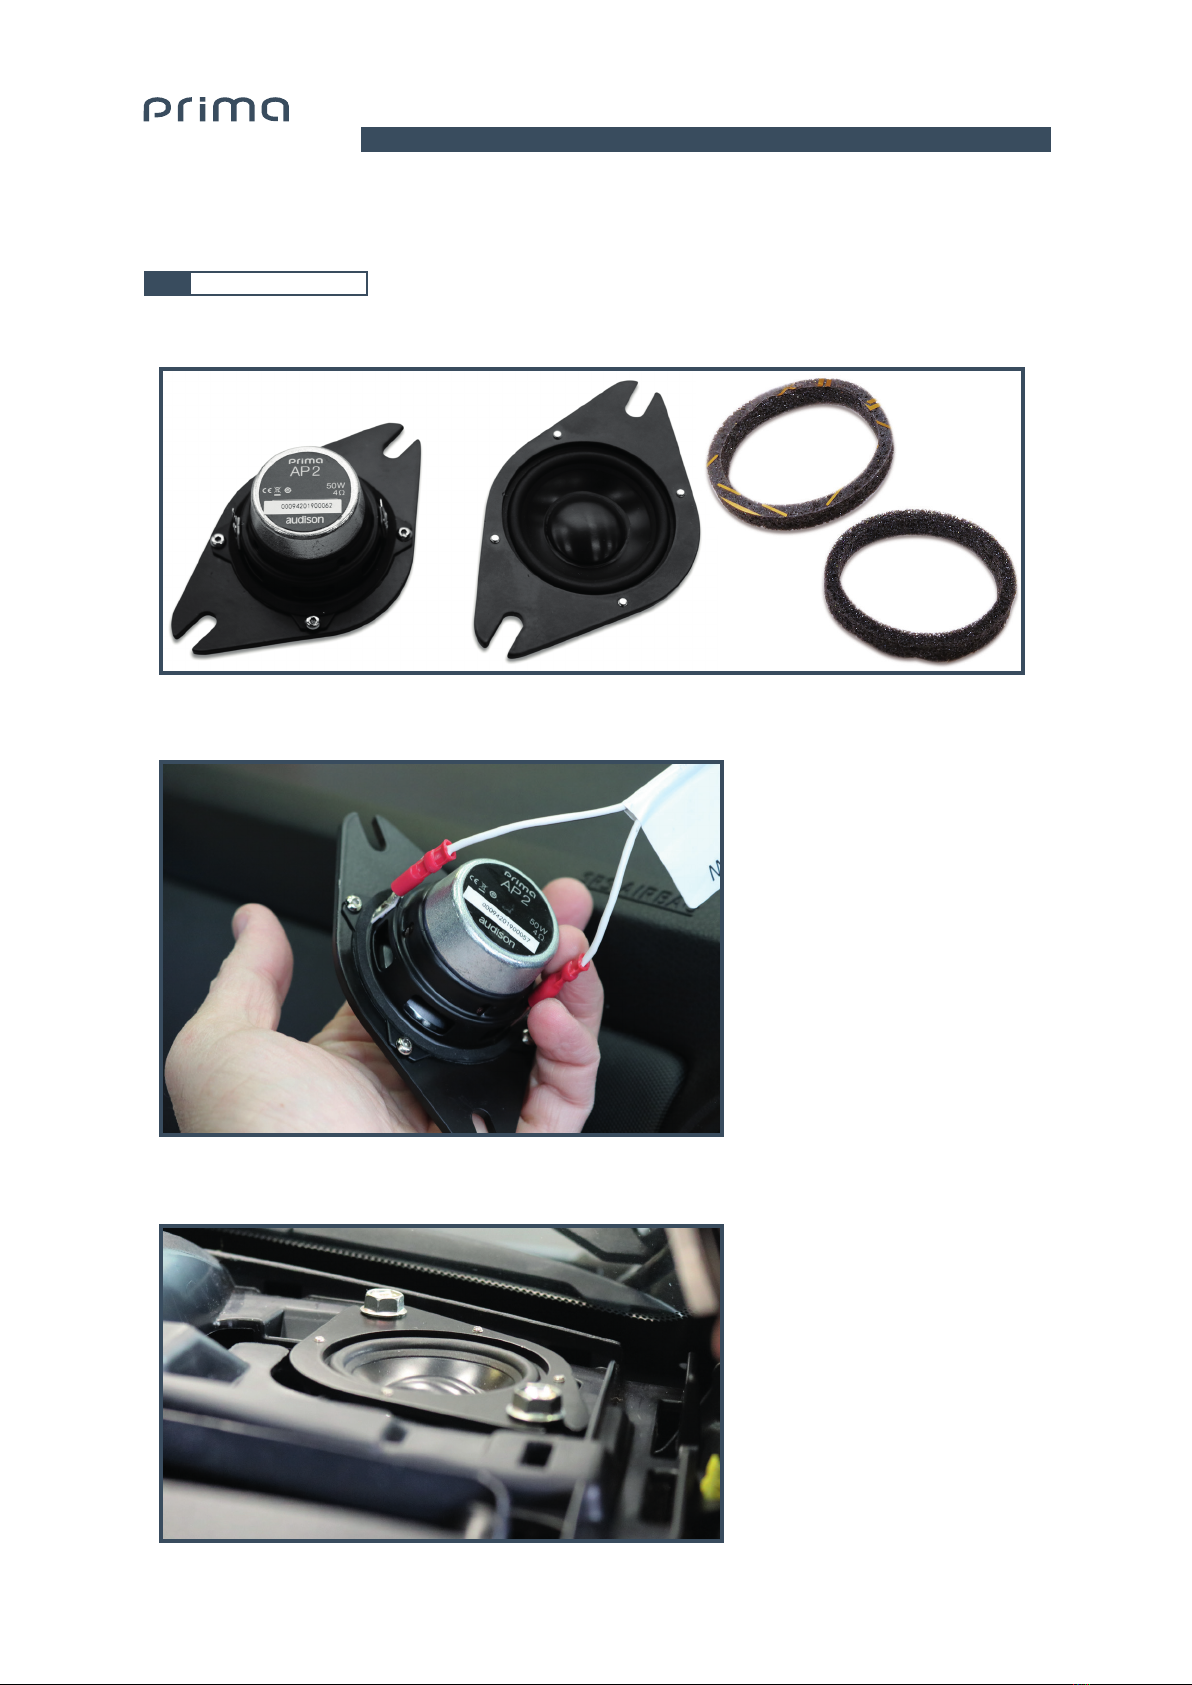
10. INSTALLATION OF AP 2 WIDE RANGE
10.1.1 FixtheAP2speakerstomountingadaptersfromunderneathusingsuppliedhardwareandthe
FOAM GASKET over the mounting adapters. (Fig. 15).
10.1.2 Connect the cable “F” to left AP2 and the “G” to the right one. g.16.
10.1.3 Mount the AP2 using the OEM hardware. g.17.
10.1 AP 2 INSTALLATION
Fig. 15
Fig. 16
Fig. 17
TOYOTA TACOMA /
INSTALLATION MANUAL
16
11
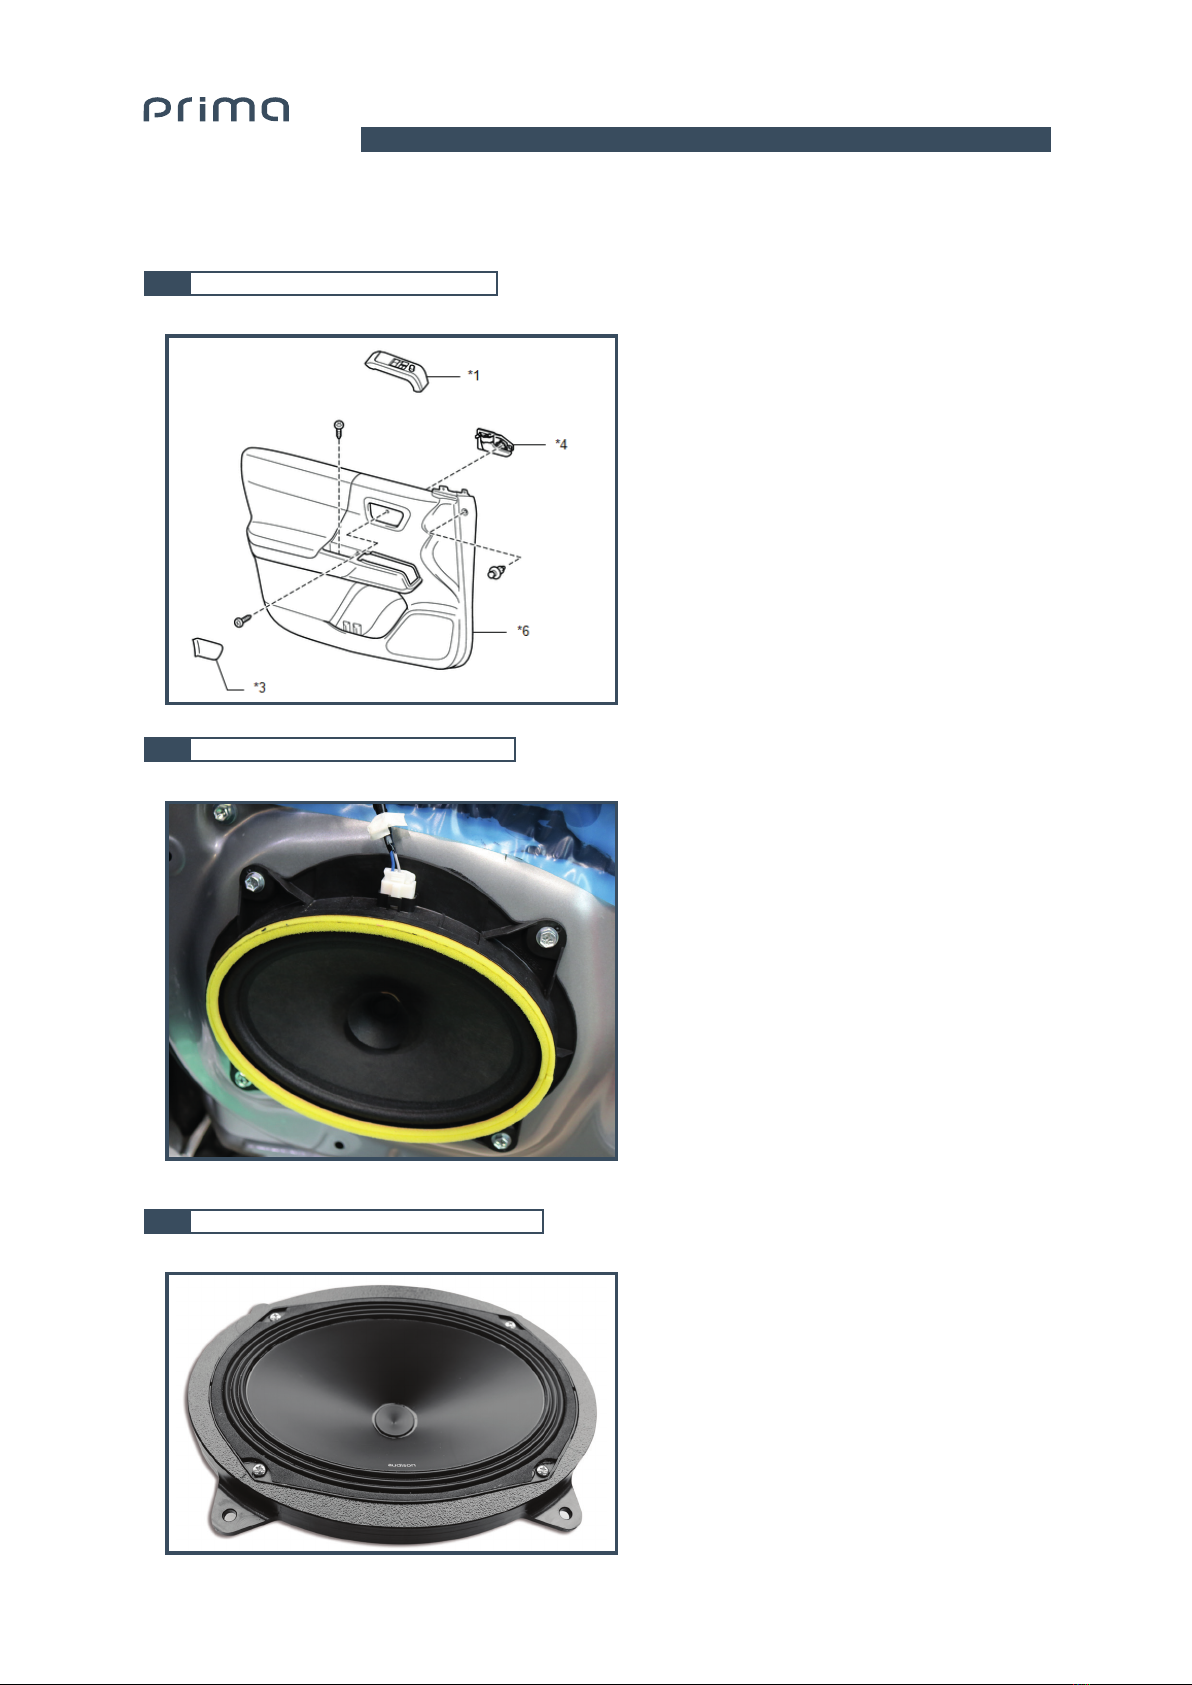
11. INSTALLATION OF AP690 WOOFER
11.1.1 Remove left and right door panels. (Fig 18).
11.2.1 Unplug and remove OEM speakers. Retain hardware to use to install new speaker (Fig 19).
11.3.1 Secure the speaker using the fastening screws provided with the KIT (Fig 20).
11.1 REMOVAL OF FRONT DOOR PANELS
11.2 REMOVAL OF FRONT DOOR SPEAKERS
11.3 MOUNTING THE WOOFER IN ITS HOUSING
Fig. 18
Fig. 19
Fig. 20

TOYOTA TACOMA /
INSTALLATION MANUAL
17
11
11.4 SECURE WIRING ADAPTER TO AP690 WOOFER (Fig. 21)
11.5 BOLT SPEAKER AND MOUNT TO DOOR, AND PLUG INTO SPEAKER CONNECTOR HARNESS (Fig. 22)
11.6 FIX THE FOAM RING TO THE BACK OF THE DOOR PANEL AROUND THE GRILL (Fig. 23)
Fig. 21
Fig. 22
Fig. 23

TOYOTA TACOMA /
INSTALLATION MANUAL
18
12. RE-ASSEMBLY OF UNINSTALLED COMPONENTS
13. UPLOAD OF THE TUNING FILE
14. NOTES
12.1.1Beforereinstallingtheseatcheckiftheamplierturnsonwiththeradio.Updatermwareifneeded
(see the manual of the AP5.9bit).Onceamplierisupdated,conrmthatitpowersup.
Then reinstall front seat.
13.1.1Downloadthesetuplefromhttps://www.audison.eu/sound-pack-congurator/#start_now
13.1.2Open AP5.9 bit software. Connect PC to USB cable (already plugged into AP5.9 bit).
13.1.3Loadprovidedtuningle.
13.1.4Finalize Device.
13.1.5CloseSoftwareandunplugUSBcablefromtheamplier.Ensurealltonesettingsintheheadunitarecentered
for all sources.
14.1.1Use the hi-level outputs of the aftermarket Head Unit by connecting them to the OEM speaker cable with
thespecicharness.
14.1.2OpentheAudisonsoftwareandloadthesetuple.
14.1.3Disable De-EQ in Settings and change the value for the distance to the left front door woofer (Channel 3)
to the actual distance.
14.1.4Save and Finalize.
JBL-equippedvehicleshavetheOEMsubwooferandtheJBLamplieronthebackwall,underadifferenttrimpanel.
Youwillhavetotakeresponsibilityforttingasubwooferenclosureintothevehicle,sincethepocketthisenclosure
tsintoisnotpresent.TheAP5.9bitisoptimizedfora2-ohmloadonthesubwooferchannel.
Use the Maestro AR interface and the iDatalink optional integration harness for this vehicle. Connect the Audison
speakers directly to the OEM speaker leads, as you would in a traditional installation. Modify the Integration Harness -
Connectthespeaker-wireharnessfromiDatalinktotheIntegrationHarness(usingtheIntegrationHarnesstoextend
totheJBLamplierlocation).TheIntegrationHarnessnolongerconnectsdirectlytothevehicleinthisscenario.A
differenttunelewillneedtobecreated.
This will require modication to the input (https://www.audison.eu/products/ap-f-in-adp/) and output portions of the P&P
Harness.Itwillalsorequiremodicationtothesubwooferharnesssothatthetwovoicecoilscanbedrivenby2pairs
ofbridgedchannels.Adifferenttunelewillneedtobecreated.
12.1 RE-ASSEMBLY OF THE VEHICLE’S COMPONENTS PERFORMING INVERSE OPERATIONS COMPARED TO
THE ONES DESCRIBED IN THE DISASSEMBLY SECTIONS
13.1 UPLOAD OF THE TUNING FILE
14.1 WHAT IF I AM USING THE SOUND PACK WITH AN AFTERMARKET HEAD UNIT?
14.2 WHAT IF I WANT TO INSTALL THE SOUND PACK INTO A JBL-EQUIPPED VEHICLE?
14.3 WHAT IF I WANT TO USE THE SOUND PACK WITH APF8.9BIT?
12 / 13 / 14
TOYOTA TACOMA /

TOYOTA TACOMA /
INSTALLATION MANUAL
19
15. TROUBLESHOOTING
FREQUENTLY ASKED QUESTIONS
The car radio is
turned on but no
sound can be heard
The AP5.9 bit logo is off.
Check the power supply fuse. If necessary, replace it
with a new one of the same type and value.
Check that the power supply terminals have a
voltage of 12V. Make sure connector Bhas been
installed correctly.
The AP8.9 bit G7 logo flashes
blue,blue/red, red.
The “Status Logo” indicates the operating status of
the product and any malfunctions. Refer to the user’s
manual of the AP5.9 bit, sec. 4.12. The user’s manual
is loaded in the CD-ROM provided or available for
download from the website ww.audison.eu.
The AP8.9 bit G7 logo is correctly
on. The Head Unit volume is too low.
The sound is not
natural and does not
come from all the
speakers
Incorrect setting of volume /
balance / fader controls. Adjust the OEM source controls.
Connections are not correct or not
well secured. Check the connections and secure them rmly.
15

All the specications herein are subject to change wihout prior notice
PART OF ELETTROMEDIA
62018 Potenza Picena (MC) Italy
T +39 0733 870 870 - F +39 0733 870 880
www.elettromedia.it
This manual suits for next models
4
Table of contents


