M.N.C„CaliforNia” MUlTiMÉDiÁS fEJEGYSÉG
Wifi, BT, USB, MiCro SD, aUX HU
A készülék üzembe helyezése előtt kérjük olvassa át
részletesen és gyelmesen a használati utasítást!
Megjegyzés: A készülék Android 8.1 operációs rendszert
használ, melynek felépítése és funkciói lehetővé
teszik, hogy teljes értékű multimédiás központot
hozzon létre járművében. A használati utasítás nem
tér ki részletesen ennek belső felépítésére, részletes
beállítási lehetőségeire, kérjük olvasson utána, majd
tanulmányozza annak működését.
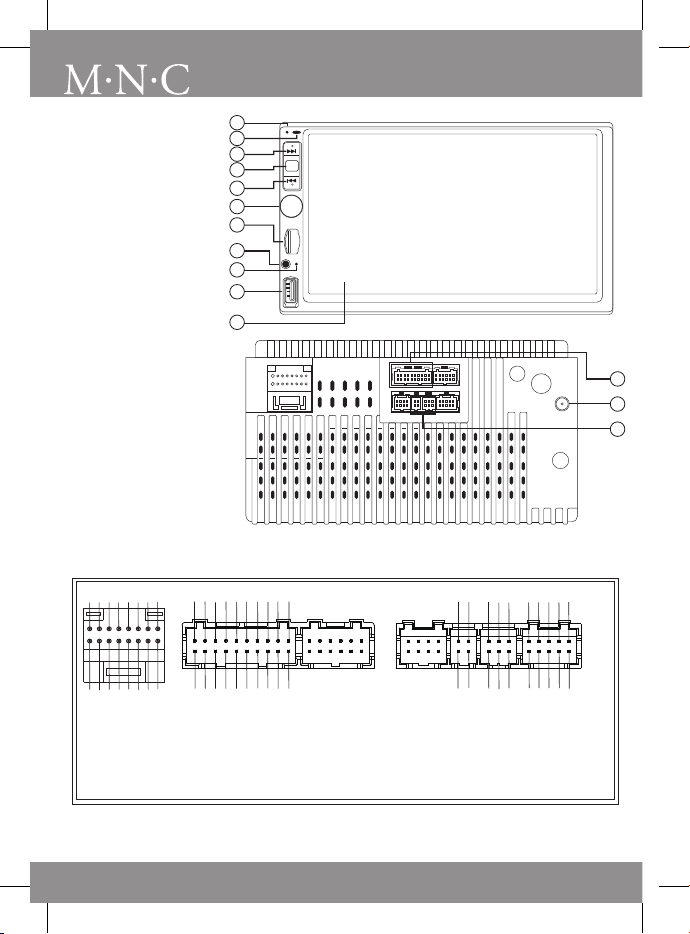
BEÜZEMELÉS
A készülék kizárólag 12 voltos egyenfeszültségű,
negatív testelésű elektromos hálózatú járművekbe
építhető. Beszerelés előtt győzödjön meg róla,
hogy járműve elektromos rendszere megfelelő-e a
készüléknek!
Vegye le az akkumulátor negatív saruját mielőtt
bekötné a készüléket, így megakadályozva az
esetleges vezetékelés során keletkező zárlatot.
Győződjön meg róla, hogy a hangszórók negatív
(-) vezetéke a készülék hangszóró csatlakozójának
negatív pólusához van kötve! Soha ne csatlakoztassa
a jobb és bal oldali hangszóró vezetékeket egy
pontba és az autó karosszériájához! Ne takarja el a
hűtőbordát, mert az a készülék túlmelegedéséhez és
meghibásodásához vezethet!
A teljes beszerelést és feszültség alá helyezést
követően nyomja meg a készülék előlapján található
RES feliratú RES gombot egy vékony hegyű tárgy
segítségével! Ezzel a készülék beállításai alap
helyzetbe kerülnek. A feszültség alá helyezést követő
első bekapcsolásnál kell 1-2 perc a készüléknek mire
teljesen betölt az operációs rendszer, kérjük várja ki
türelmesen a műveletet.
FIGYELMEZTETÉSEK
FIGYELEM!
ÁRAMÜTÉS VESZÉLYE!
NE NYISSA FEL!
FIGYELMEZTETÉS: AHHOZ, HOGY CSÖKKENTSE
AZ ÁRAMÜTÉS ÉS A TŰZ KOCKÁZATÁT, ÓVJA A
KÉSZÜLÉKET AZ ESŐTŐL ÉS PÁRÁS KÖRNYEZETTŐL!
FIGYELEM: AHHOZ, HOGY CSÖKKENTSE AZ ÁRAMÜTÉS
KOCKÁZATÁT, NE TÁVOLÍTSA EL A BURKOLATOT, A
KÉSZÜLÉK NEM TARTALMAZ AZ ÁTLAG FELHASZNÁLÓ
SZÁMÁRA JAVÍTHATÓ ALKATRÉSZT. A JAVÍTÁST ÉS A
BESZERELÉST MINDEN ESETBEN BÍZZA SZAKEMBERRE!
A villám jel az egyenlő oldalú háromszögben
arra gyelmezteti a felhasználót hogy a
készülék belsejében szigeteletlen veszélyes
feszültség van jelen, melynek mértéke
elegendő ahhoz, hogy érintéskor áramütés
érje a felhasználót.
A felkiáltójel az egyenlő oldalú
háromszögben arra gyelmezteti a
felhasználót, hogy a készülékhez tartozó
dokumentumok fontos kezelési és
karbantartási utasításokat tartalmaznak.
1. Olvassa el a használati utasítást mielőtt beszerelné és
használatba venné a készüléket!
2. Ne érintse meg a tápcsatlakozót nedves kézzel!
3. Kapcsolja ki a készüléket ha az használaton kívül van!
(Húzza ki a tápcsatlakozót ha hosszabb ideig nem
használja)
4. Ne nyissa fel a tetejét és ne nyúljon a készülék
alkatrészeihez, bízza azt szakemberre!
5. Ne tegye ki a készüléket közvetlen napsugárzásnak
illetve sugárzó hőhatásnak, ez a készülék
meghibásodásához vezethet!
6. Ne használja a készüléket nedves, párás környzetben,
ez a készülék meghibásodásához vezethet.
7. A készüléket jól szellőző helyre szerelje be, ne
takarja el a szellőző nyílásokat, megelőzve ezzel a
túlmelegedés okozta helytelen működést!
8. A kijelzőt csakis puha, száraz kendővel tisztítsa meg,
ne használjon semmilyen alkoholt és tisztító sprayt.
9. Óvni kell a készüléket bármilyen folyadéktól, mert
kárt tehet a benne.
ÁLTALÁNOS
Tápellátás: 12 V DC (negatív testelésű)
Hangszóró impadancia: 4 - 8
Max. kimenő teljesítmény: 4 × 50 W
Méretek (beépítési/külső): 178 x 103 x 43 mm
Súly: ~ 800 g
KIJELZŐ ÉS VIDEO TULAJDONSÁGOK
Kijelző méret: 7”(16:9)
Video kimeneti szint: 1.0 V / 75
Kijelző felbontás: 1080 x 768 px
AUDIO TULAJDONSÁGOK
RCA max. kimeneti jelszint: 2 V RMS
Frekvencia átvitel: 20 Hz ~ 20 kHz (±3 dB)
Jel/Zaj viszony: 60 dB
Csatorna elválasztás: 60 dB
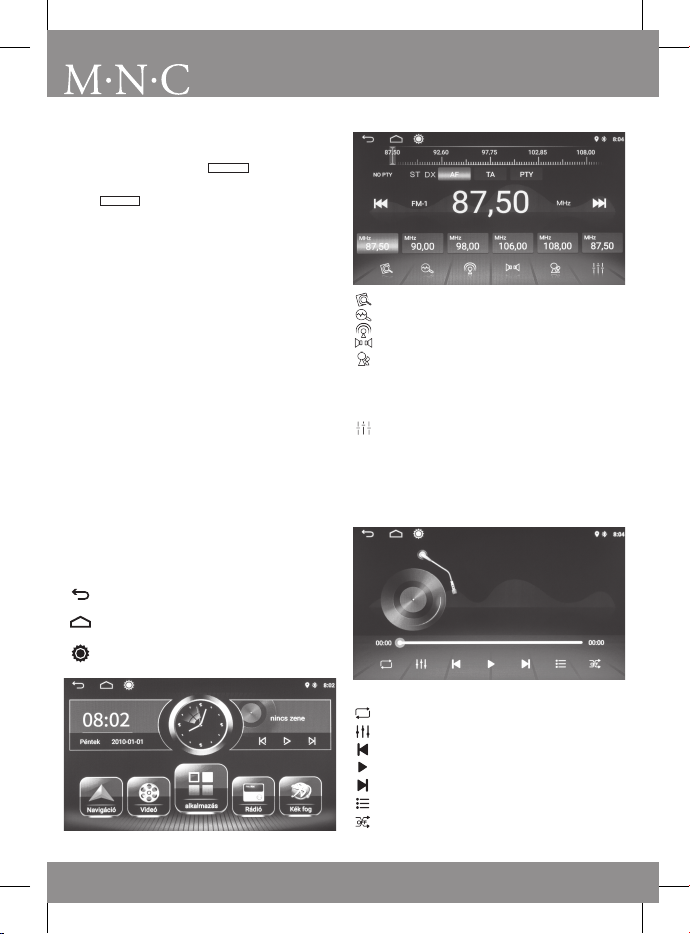
FM TUNER SECTION
Frekvencia sáv: 87.5 ~ 108 MHz
Érzékenység: (FM -30 dB) 12 dB
Jel/zaj viszony: 60 dB
Csatorna elválasztás: 30 dB (1 kHz)