Auger Torque AGR1300H User manual

WARNING ONE PERSON POWER AUGER
Any piece of equipment can be dangerous if not operated properly. YOU are responsible for the safe operation of this equipment.
The operator must carefully read and follow any warnings, safety signs and instructions provided with or located on the equipment.
Do not remove, defeat, deface or render inoperable any of the safety devices or warnings on this equipment. If any safety devices or
warnings have been removed, defeated, defaced or rendered inoperable, DO NOT USE THIS EQUIPMENT!!!
WARNING: Operating, servicing and maintaining this equipment can expose you to chemicals including engine exhaust, carbon
monoxide and lead, which are known to the State of California to cause cancer and birth defects or other reproductive harm. To
minimize your exposure, avoid breathing exhaust, do not idle the engine except as necessary, operate and service your equipment in a
well-ventilated area and wear gloves or wash your hands frequently when servicing your equipment. For more information go to
www.P65warnings.ca.gov
Warning metal conducts electricity. Do Not use this Auger where it may come into contact with underground power lines or
other electric circuts. Failure to comply to this warning will result in serious personal injury or death.
Smart digging means calling 811 before each job. Whether you are a homeowner or a professional excavator, one call to 811
gets your underground utility lines marked for FREE
Always wear Foot, Hand, Hearing and Eye Protection whenever operating this equipment.
The AGR1300H is designed to run safely and efficiently with certain ground conditions. Ideally, run your auger in damp or moist soil.
The AGR1300H can also run efficiently in dry or sandy soil. NEVER operate the auger during a thunderstorm, snowstorm, or if the
ground is frozen. Operating the auger in frozen soil can damage the flights and/or bit.
A - Drill in reverse motion (counter-
clockwise)
B - Drill in forward motion
(clockwise)
C - Drive in reverse motion
D - Drive in forward motion
To drive your BILLY GOAT® Auger safely to
desired work location, familiarize yourself with the
operator controls shown above. Always drive with the
transport lock handle down in the locked position
(See Figure B in the “Drilling a Hole” section). The
transport lock handle locks the operator’s handles into
a manageable driving position. Engage both parking
brakes to ensure the unit does not tip or slide while
transporting in the trailer.
Figure F
STARTING THE ENGINE
Never start the engine inside a building or other enclosed space.
Always check the engine oil level and fill when necessary before starting!
To start the engine on your BILLY GOAT® Auger:
1. From the operator’s position, push the throttle lever completely forward to the “RUN” position.
2. Walk around to the front of the machine where the engine is located. Locate the engine’s choke lever. Pull out the choke lever.
3. Pull the recoil handle to start the engine.
4. With the engine running, push the choke lever back into place.
5. Adjust the throttle lever to dictate the desired ground speed.
Note: in colder temperatures, there may be too much load on the engine to start it quickly. Locate the belt-drive disengage
chain on the left side of the machine (see decal P/N 540504 on the Instruction Labels page). Pull and lock the chain to
disengage the belt drive. Start the engine, then re-engage the chain after a few minutes. Pg. 1
Drilling a Hole
To drill a hole with your BILLY GOAT® Auger:
1. Squeeze the forward drive handle (See Figure F, Item D) and
steer to drive the Auger to desired hole location. Let up on the
handle to stop the machine.
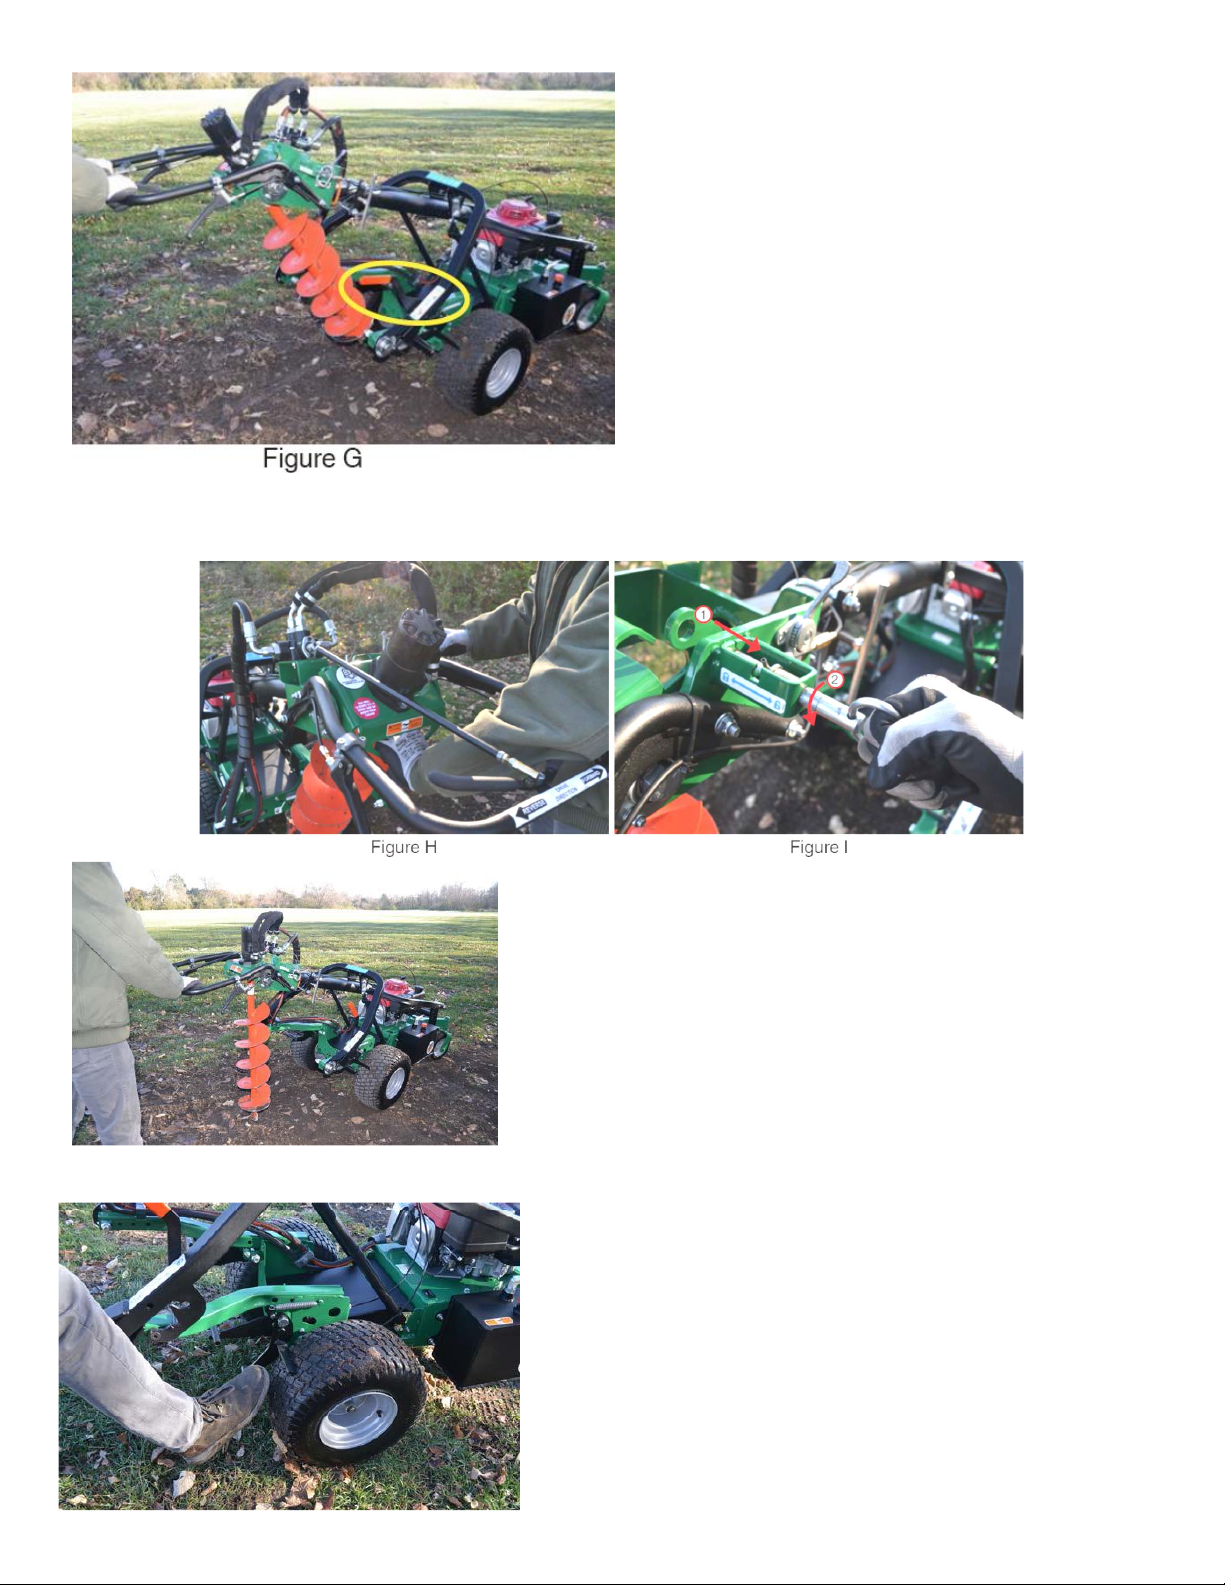
2. With both hands grasped on the handles, push the entire
operator’s handle straight down to release the transport lock
handle (See Figure G). Then, release your grip on the operator’s
handle and allow the handle to rise to its natural position.
3. Push in the motor plate handle to release pressure off the pin (See Figure H). Simultaneously, pull the motor-plate locking-pin and
twist the pin away from yourself (See Figure I). The drill assembly is now unlocked.
4. Position the bit to desired hole location. Gently press down to create contact
between the bit and the ground before activating the drill bit. See Figure J.
Push the throttle lever completely forward to the “RUN” position before
drilling.
5. Engage right drill handle (See Figure F, Item B). Watch the drill bit spin
clockwise. Squeeze the handle tighter for higher drill speed.
6. Push down on the operator’s handle to create a hole of desired depth.
7. Engage the left drill handle (See Figure F, Item A). The drill bit spins
counter-clockwise. Simultaneously, lift up on the operator handle to remove
drill bit from the freshly dug hole.
Figure J
Engaging the Parking Brakes
Always Engage the Parking Brake on the trailer before securing it and
whenever the auger is left unattended. Park on flat surfaces only, never on a
slope!
For further stability while drilling or transporting your Auger, engage each
parking brake. 1. Locate the parking brakes. They can be found on the frame
slightly above each rear wheel. Use your foot to press the parking brakes
down, one at a time, until contact is made with each rear wheel and the
brake “clicks” into place. See Figure K
Figure K Pg. 2
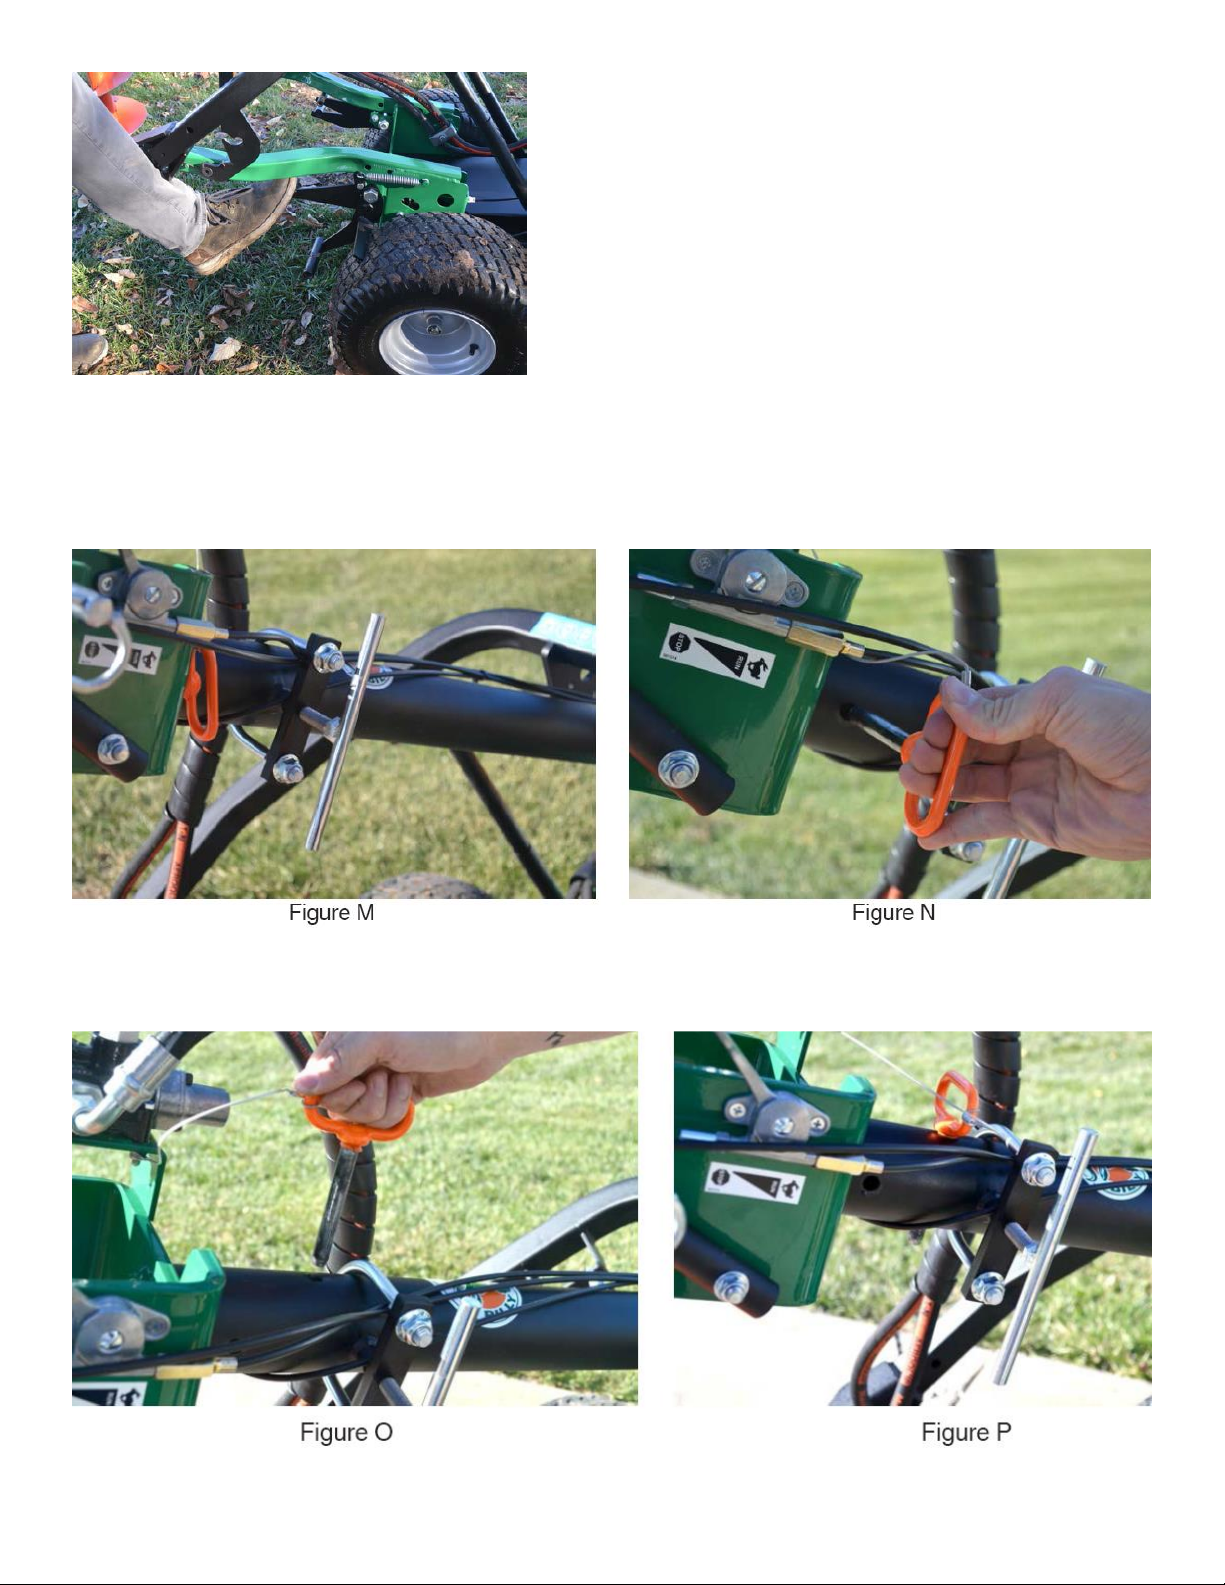
Releasing the Parking Brakes
1. Use your foot to press the parking brake release lever. See Figure L.
Press until the parking brake releases. Repeat on the opposite rear wheel.
Figure L
Pivoting the Bit Head
To better align the auger bit while drilling on uneven slopes, pivot the bit head.
1. Locate the T-handle clamp and loosen it. See Figure M.
2. Locate the quick release pin. See Figure N. Pull the quick release pin from the horizontal pivot point.
3. Insert the quick release pin into the vertical pivot port. See Figures O and P. The bit head will now pivot from left to
right.
4. Select the desired bit position. Lock the bit head into position by tightening the T-handle clamp. Pg. 3

Figure Q Figure R
Replacing the Bit
1. To replace the bit, first unclamp the bit locking pin. See Figures Q and R.
2. Gently slide the bit from the pin and carefully set aside.
Attach the new bit by clamping it onto the adapter using the bit locking pin.
If the person receiving this handout will not be the user of the equipment, forward these instructions to the operator. If there is any
doubt as to the operation or safety of the equipment. DO NOT USE!!! CALL A TOOL SHED IMMEDIATELY!!! FAILURE TO
FOLLOW THESE INSTRUCTIONS COULD RESULT IN INJURY OR DEATH! Pg. 4
Table of contents
Other Auger Torque Lawn And Garden Equipment manuals

Popular Lawn And Garden Equipment manuals by other brands

EINHELL
EINHELL GE-CG 18/100 Li operating instructions

Gilmour
Gilmour Professional 1000P Safety and operating instructions

Grizzly
Grizzly 202 000 Operator's instruction manual

Craftsman
Craftsman 358.796356 - 22" Blade Operator's manual

Ryobi
Ryobi RGS18X15 Original instructions

Garden Treasures
Garden Treasures VA68098 manual


