Auloma Diva-6x6 User manual

Working theory
1. Children from 0 to 14 years of age are not allowed to use the camera.
The camera is composed by detachable components that could be
ingested.
2. Do not use the pinhole of the camera to observe the sun or other
sources of light, this could damage your eyes.
3. Keep the camera away from heat sources >90°C, to avoid irreparable
damage
4. Keep the camera away from fire to avoid damage or burning.
5. Keep the camera at least 30mm away from objects that could be
damaged by the magnetic field by the neodymium magnet mounted on
the shutter, such as: magnetic stripe cards or badges, hearing aids,
pacemakers, mechanical watches in accordance with ISO 764,
For NON ISO 764 watches, maintain a distance of at least 61mm.
A safety distance cannot be determined to avoid damage to hard disks.
14
Thank you for purchasing the pinhole camera Auloma Diva-6x6. Please read
this instruction manual carefully before operating
The pinhole camera Auloma Diva 6x6 to take shots uses 120 film format and
uses the principle of pinhole photography. The camera produces images of
dimensions 56 x 60 mm and has the capacity to take a number of 12 photos
using a standard film roll. You can use films of any sensitivity, the opening
times of the shutter depends on the film sensitivity, in the package is provided
a reference table with the approximate opening times of the shutters using a
film ISO / ASA 100 in various light conditions, while to obtain more accurate
shutter opening values we recommend a visit at our website
www.auloma.com.
Caution - Safety precautions
EN
ES
FR
IT
Note
•Do not disassemble the camera
•The camera isn't waterproof. Do not immerse the camera in liquids or
under running water.
•Do not use acids, corrosive substances, hydrocarbons or anything else not
indicated for cleaning surfaces.
Preparation before use
•The camera uses a neodymium magnet that can lose part of its attraction
force when heated to a temperature of >80°.
15
EN
ES
FR
IT
•The camera is an handcrafted product with surfaces finished by abrasive
discs. Possible scratches due to processing are a characteristic of our
product and can't to be considered defects or that the product has been
used.
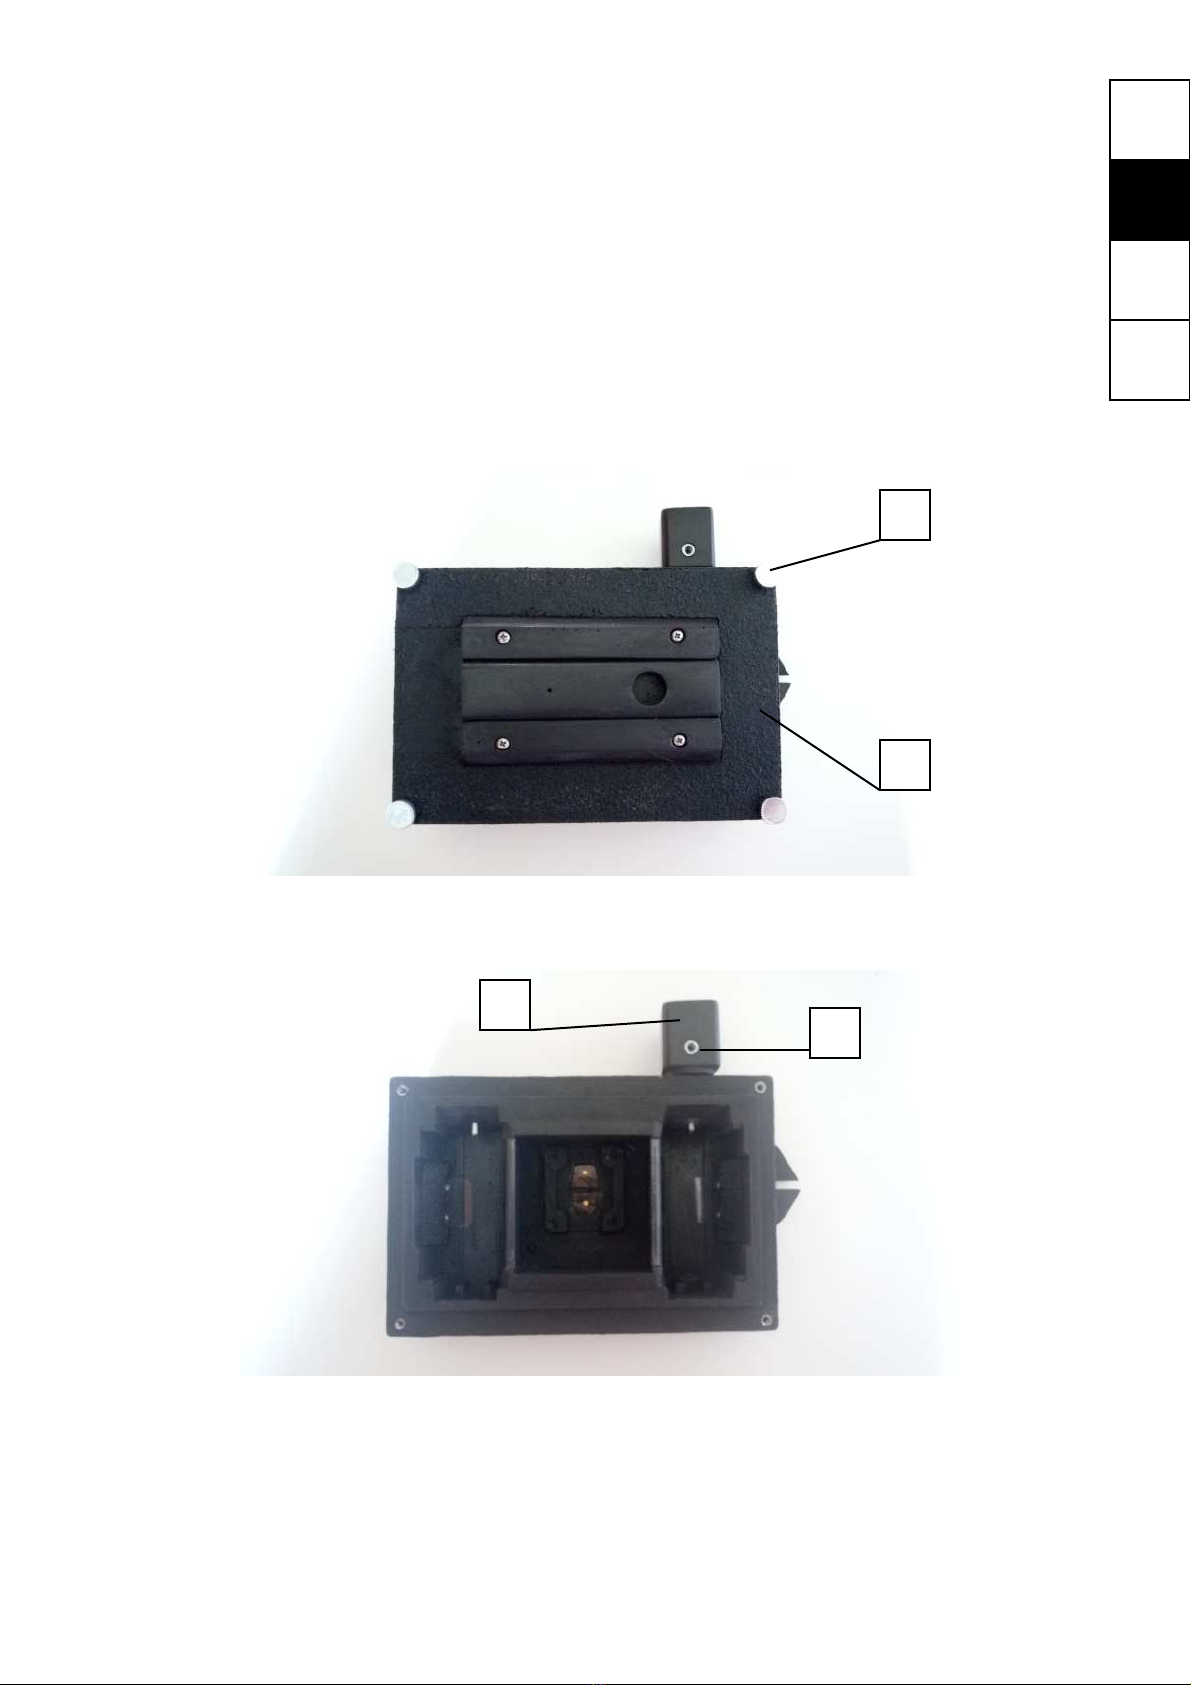
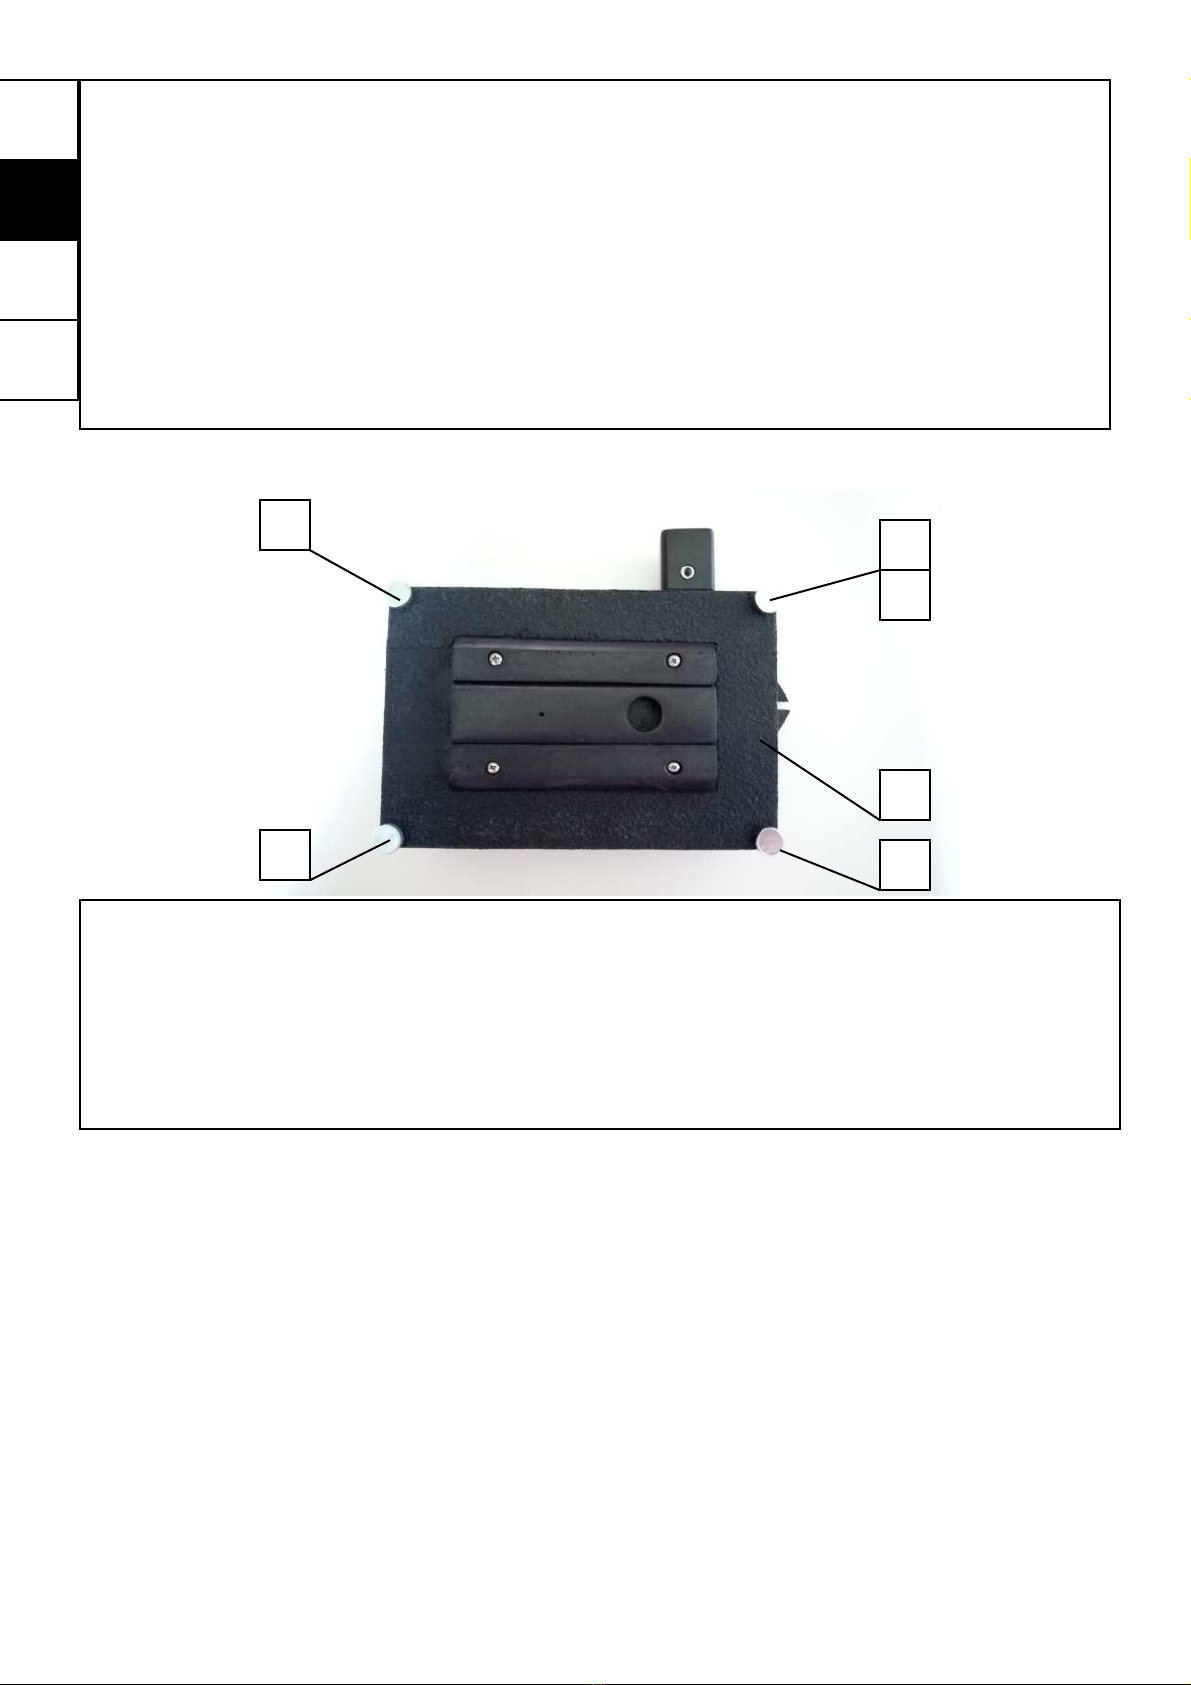
Release eight knobs 1, then remove the cover 2from the camera.
1
2
3
Positioning the knob 3with the bush 4in front of you, such as the picture belo-
w
4
In this way the rewinding palette 5will be oriented in the correct position to al-
low the coil insertion

16
Tilting the coil and insert its slot into the rewind palette 5, pressing smothly the
coil onto the surface above the palette and then insert the coil into the seat 6
5
5
6
7
8
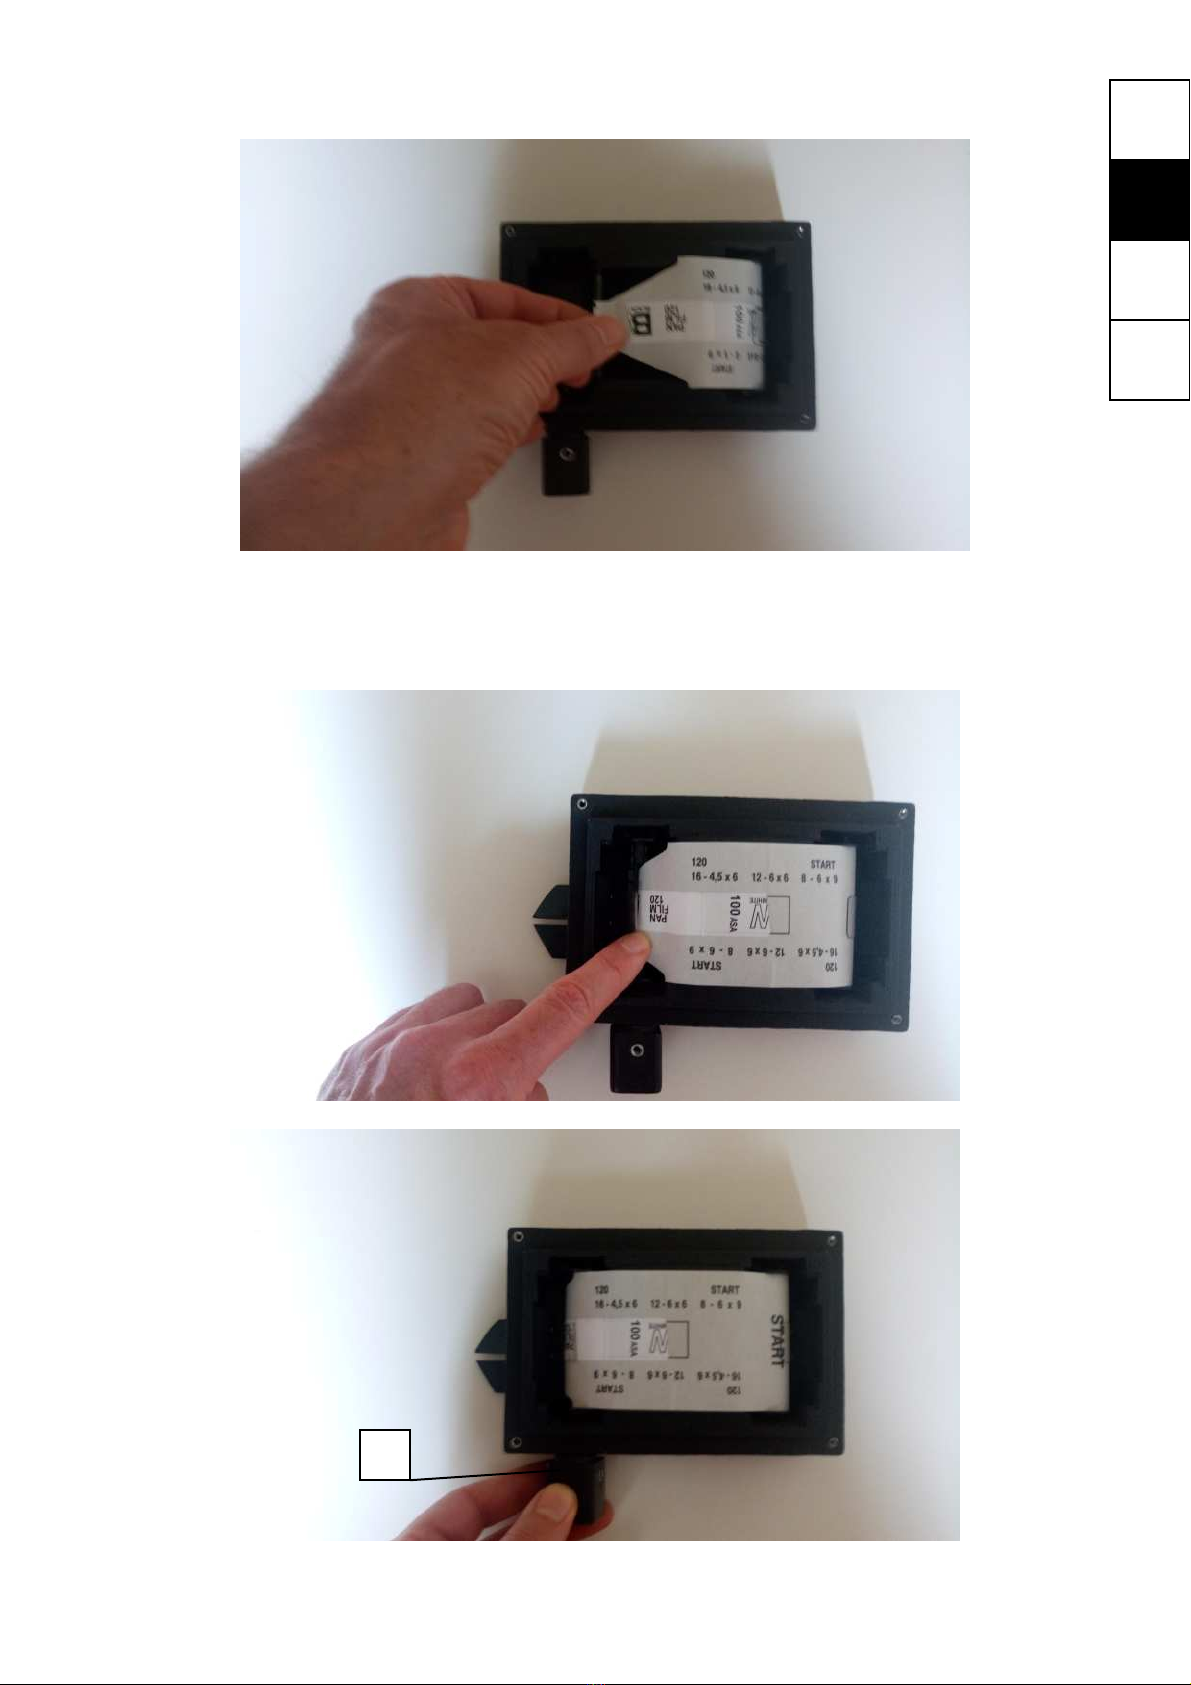
Position the film roll with the tape oriented to the empty coil, remove the tape,
tilt the film roll to insert its slot into the pin 7and then push the film roll into the
seat 8
EN
ES
FR
IT
17
Pull the back paper until reach the empty coil
Insert the back paper into the vertical slot of the empty coil and then rotating
the knob 3to wind the back paper around the empty coil. Executing two or th-
ree knob rounds to verify that back paper is winded correctly.
3
EN
ES
FR
IT
Warning:
The knob 3own a mechanism that allow only a rotation in counterclockwise
sense. If you forcing a clockwise rotation of the knob 3with an excessive
strength, the socket set screw that fixing the knob on the palette 5could be
released. Use a metric hexagonal key to release completely the knob. Mount
the knob on the palette in manner that the screw placed in the knob working
on the flat layer of the shaft palette.
EN
ES
FR
IT
18
Close the camera with the cover 2and tight the four threaded knobs 1
Take the photos
Mount the camera on the tripod using threaded holes 9or 10, otherwise place
the camera on a surface that insures the camera in a stable position, bubble
levels 11 and 12 help you to level the camera.
1
2
A
BC
D
Suggestion:
To obtain a perfect closure of the cover 2, tight fours threaded knobs accor-
doing the follow sequence:
A-B-C-D

19
Shift the cover 13 until its end stroke to have the porthole 14 visible.
Rotate the knob 3and winding the film to find the number one printed on the
back paper, this means that the film is in the correct position to shoot the first
photo.
9
10
11
12
13
14 3
EN
ES
FR
IT

As soon as the correct film position is find, shut-up the cover 13 until its stroke
end.
The camera own two pinholes openable through two manual shutters 15 and
16, insured against accidental opening thanks to magnets
16
15
The shutter 16 opens the pinhole lens placed on the framing center , the
shutter 15 opens the pinhole lens placed 13.75 millimiters off the central
pinhole lens, the shifted pinhole lens allow the horizon curve management. Ac-
cording the connection used to mount the camera on tripod, the final result of
the horizon curve management will be opposite.
Note:
The back paper of the 120-Film format has printed a series of progressive
numbers to indicate the correct film position before shooting, in relation of the
camera format. In the back paper are printed numerations to shooting photos
in the follow camera formats:
•6x4.5
•6x6
•6x9
The pinhole camera Auloma Diva 6x6 take photos in the format 6x6, the
porthole 14 displays the series of numbers printed in the back paper
dedicated for 6x6 camera, thus to obtain twelve pictures well spaced between
them, is enough rotate the knob 3and wind the film to have in the middle of
the porthole the number printed in the back paper. Numbers printed on the
back paper are is sequence and start from one until twelve.
EN
ES
FR
IT
20

To each pinhole lens correspond a different scene detechtable trough the
viewfinders available on the camera. To find the scene on the horizontal side
of the picture, joint viewfinders 17-19 and 18-19 this is valid for both shutters
15 and 16 with the camera mounted in both tripod connections.
21
In case is used the shutter 15 the scene on the vertical side of the picture will
be determineted from the conjunction of viewfinders 20-22 and 21-22. the
viewfinder 22 is red.
17 18
19
20 21
22
In case is used the shutter 16 the scene on the vertical side of the picture will
be determineted from the conjunction of viewfinders 20-23 and 21-23.
EN
ES
FR
IT

22
Film roll storage
After take the last photo, shift the cover 13 and rotate in counterclokwise sen-
se the knob 3, check trough the porthole that the back paper is completelly
passed from this window. Execute with knob 3further two or three complete
rounds to be sure that the film roll is well winded. Release the four threaded
knobs 1end remove the cover 2from the camera. Place the knob 3with bush
4as in indicated in the picture below and then remove the film roll.
20 21
23
13
14 3
1
As soon as you have find the scene and calculated the exposure time, to take
the photo pull the shutter until its end stroke and then push the shutter to close
the pinhole to end the exposition.
4
EN
ES
FR
IT

Maintenance and cleaning
1. Before inserting the film roll, after removing the cover 2use a pump with
dust filter to clean the inside of the camera and the cover.
2. Clean the outside of the camera with a soft, clean cloth, preferably a dust-
capturing cloth or a soft brush.
3. Clean the eco-leather coating using a dampened microfiber cloth. For
persistent stains or dirt, use a specific eco-leather cleaner to apply to a
soft cloth and not directly to the camera.
Specifications
1. Overall dimansions (HxWxD): 136x175x57mm (5-23/64"x6-57/64"x2-1/4")
2. Weight: 0.675Kg (1,48lb)
3. Material: Composite of polyuretane resin and iron oxide
4. Focal length: 31mm (1"7/32)
5. Pinhole diameter: 0.2mm (0"1/64;)
6. Angle of View: 105°12'
7. Film stop: f=155
8. Film size: 120
9. Image size: 56mmx60mm (2-13/64"x2-23/64")
10. Tripod thread type:: UNC 1/4"x20
11. Working temperature without film: min -30°C.........max 60°C
12. Storage temperature: min -40°C ........ max 70°C
Storage
Store the camera in an environment with a temperature within the range
indicated for storage. The manufacturing material makes it resistant to humid
environments, however, it is recommended to store it in a dry environment to
avoid possible oxidation of metal components.
EN
ES
FR
IT
23


Customer service
To ensure speedy handling of your issue, please email us for assistance
Email: [email protected]
Social comunity
Owning an Auloma pinhole camera allows you to share your experiences and
emotions obtained using this product also through dedicated social platforms.
If you are interested in sharing your photos with other photography
enthusiasts, publish your photos on the dedicated flickr space:
https://www.flickr.com/groups/auloma/,
Or share your photos on the web using #auloma tag
https://www.auloma.com
https://attaphoto.com
https://twitter.com/aulomaholding
https://www.facebook.com/aulomaholding/
https://www.instagram.com/aulomaholding/
EN
ES
FR
IT
25
Tutorials
Video tutorials to use the camera Auloma DIVA 6x6 are available on our web
site at the follow address :
https://www.auloma.com/en/resources/learning/tutorials.html
Note:
Cause web site up-grade sometime video tutorial couldn't be available.
In alternative visit our you tube channel:
https://www.youtube.com/channel/UCLnokIcLj1JCPSIu0VqzuiQ
Table of contents
Other Auloma Digital Camera manuals


