Aunt Flow E User manual

Copyright Aunt Flow 2022 – Patent Pending Dispenser + Product, ALL RIGHTS RESERVED
Questions + Additional Languages: hello@goauntflow.com 562-320-8250
|
Installation & Operations Manual
MODEL E - Wall Mounted Dispenser
SKU: AF-DISP-ESTR-1 / AFL 03691

TABLE OF CONTENTS
2
Product Overview ............................................................................................................ 3
Legal Information ............................................................................................................ 4
Installation Guide ............................................................................................................ 5
Filling + Refilling Aunt Flow® Menstrual Tampons ...................................... 8
Filling + Refilling Aunt Flow® Applicator Pad Cartridges......................... 9
Have Questions or Need More Products? ...................................................... 10
Copyright Aunt Flow 2022 – Patent Pending Dispenser + Product, ALL RIGHTS RESERVED
Questions + Additional Languages: hello@goauntflow.com 562-320-8250
|
SCAN HERE
Installation Videos
Loading Videos
Download Guides

Dispenser Size
Height: 26 inches
Width: 16.25 inches
Depth: 7 inches
Dispenser Weight
Empty : 11 lbs
Fully Loaded : 13 lbs
Package
Height: 28.5 inches
Width: 19 inches
Depth: 10.5 inches
Capacity + Product
Aunt Flow® Menstrual
Pad Cartridges - 50 pads
Aunt Flow® Menstrual
Applicator Tampons -
50 tubed tampons
Our dispensers are
only compatible with
Aunt Flow® products
Locking
Slide Latch
Optional Key Lock
Product Overview
3
16.25”
26”
Copyright Aunt Flow 2022 – Patent Pending Dispenser + Product, ALL RIGHTS RESERVED
Questions + Additional Languages: hello@goauntflow.com 562-320-8250
|
SCAN HERE
Installation Videos
Loading Videos
Download Guides

The dos and don’ts of dispensers
Legal Information
4
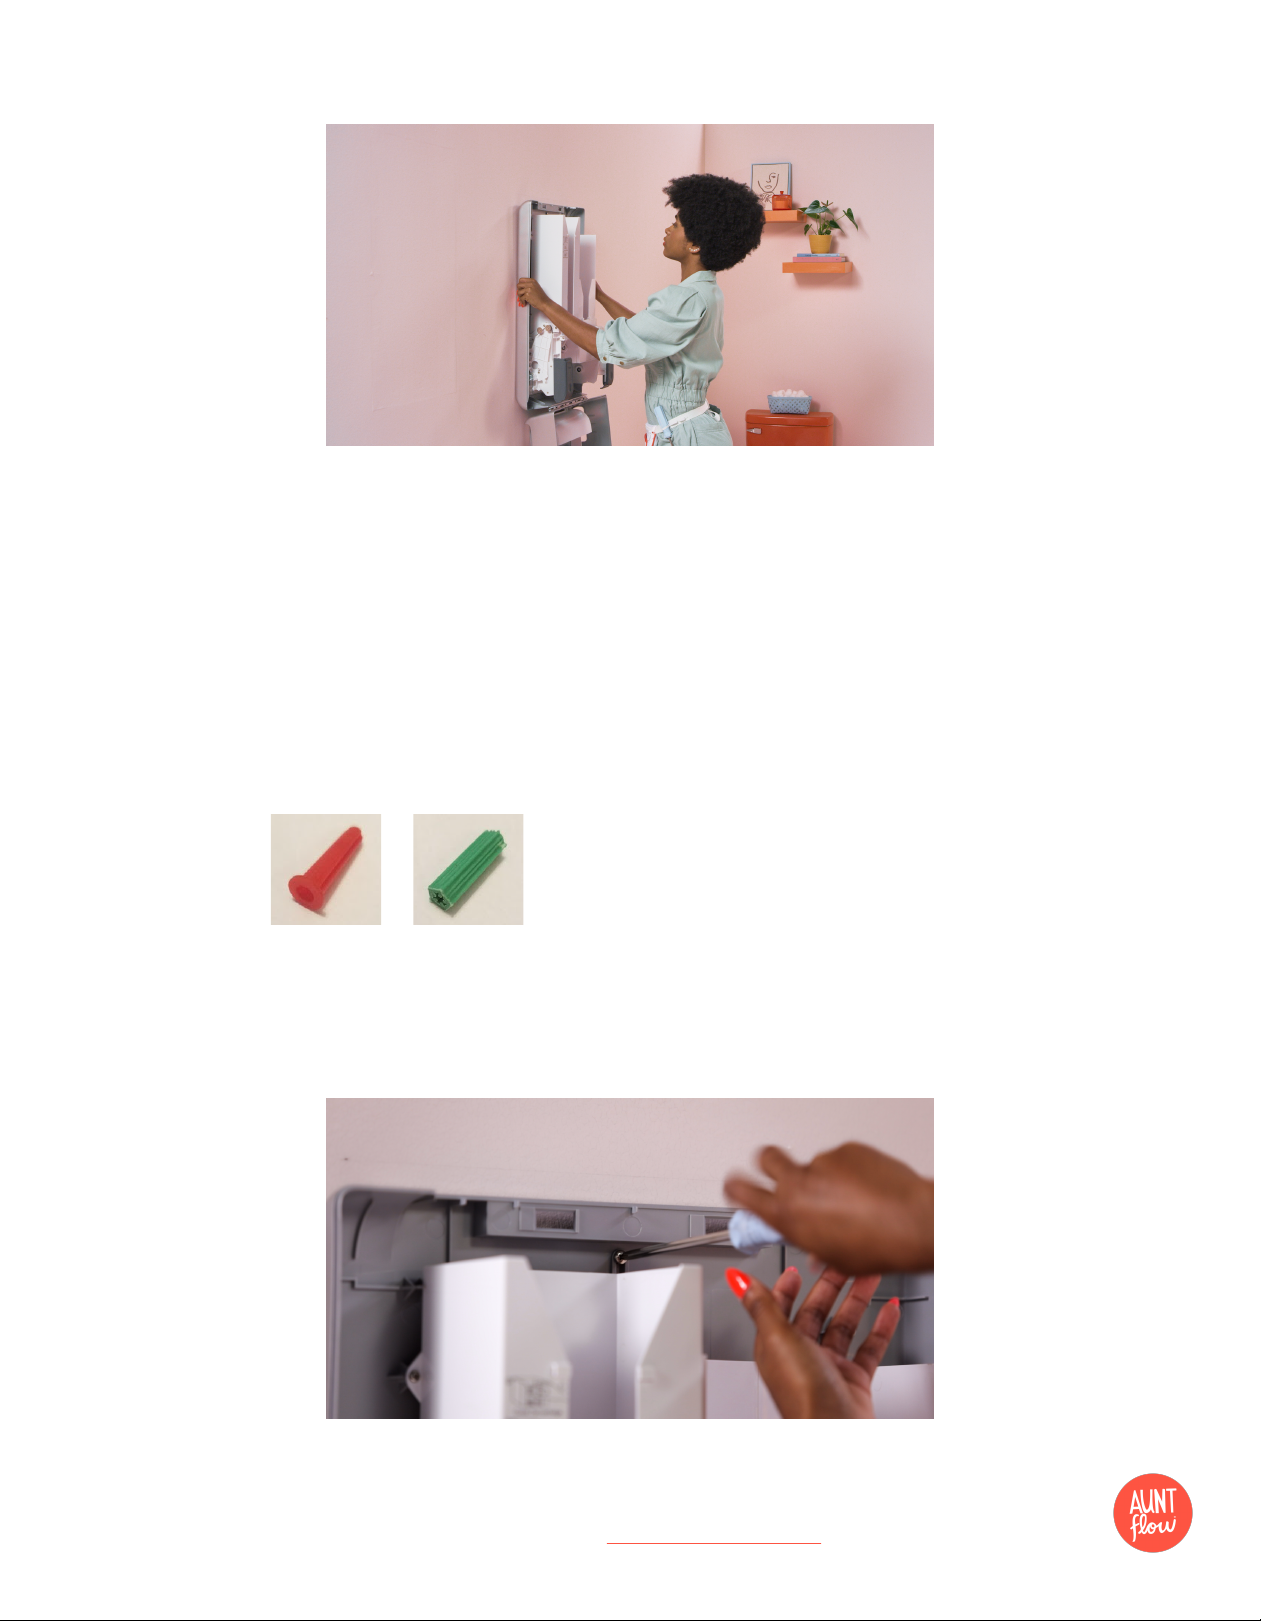
The dispenser must be installed properly
on a solid surface or structurally adequate
wall using appropriate mounting
hardware. Aunt Flow recommends that
the dispenser be installed by a qualified,
professional contractor.
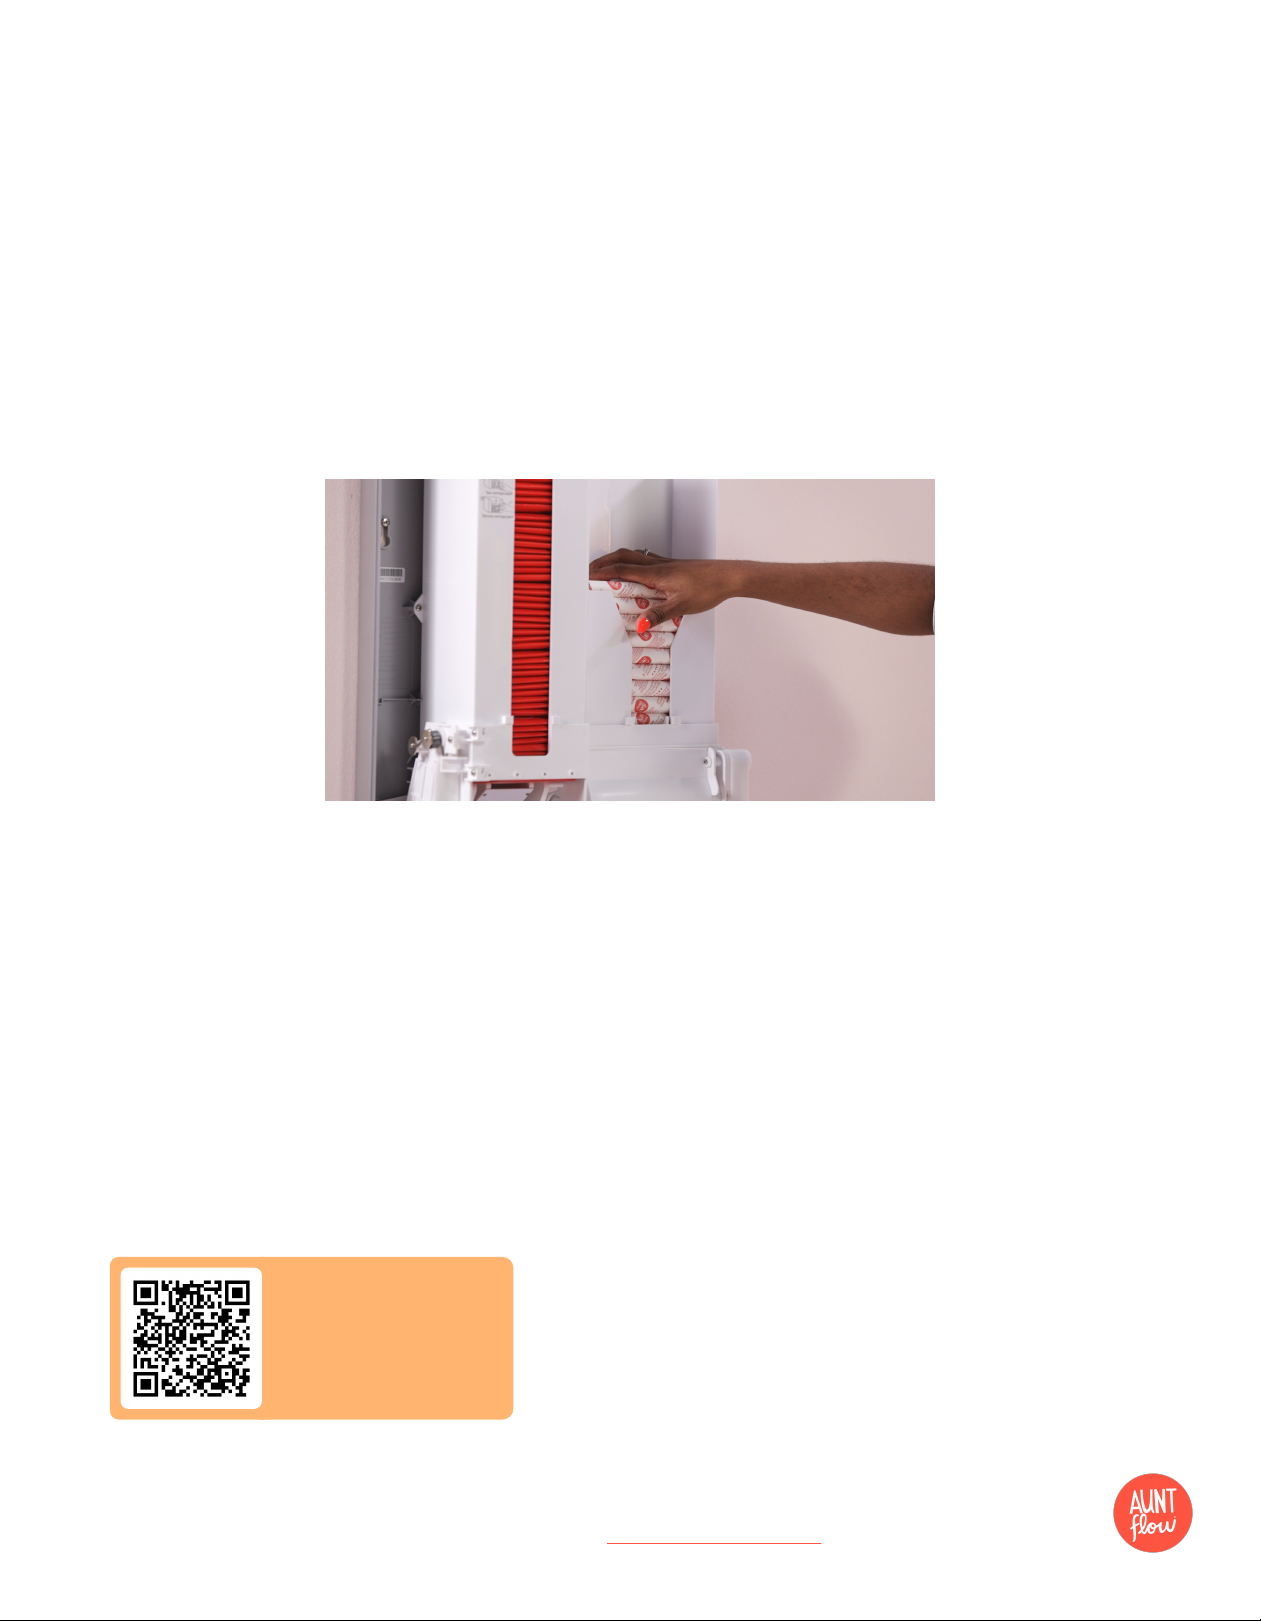
The dispenser roller inside the cabinet
may create a pinch point. To avoid
injury, do not insert fingers upwards into
the dispenser cabinet at the opening
where the product is dispensed. If the
product is not dispensed, contact
hello@goauntflow.com.
When operating the dispenser, always
press on the center of the dispenser
button and never allow your finger to
slip into the space between the
depressed button and the cabinet.
Properly maintain the dispenser at all
times.
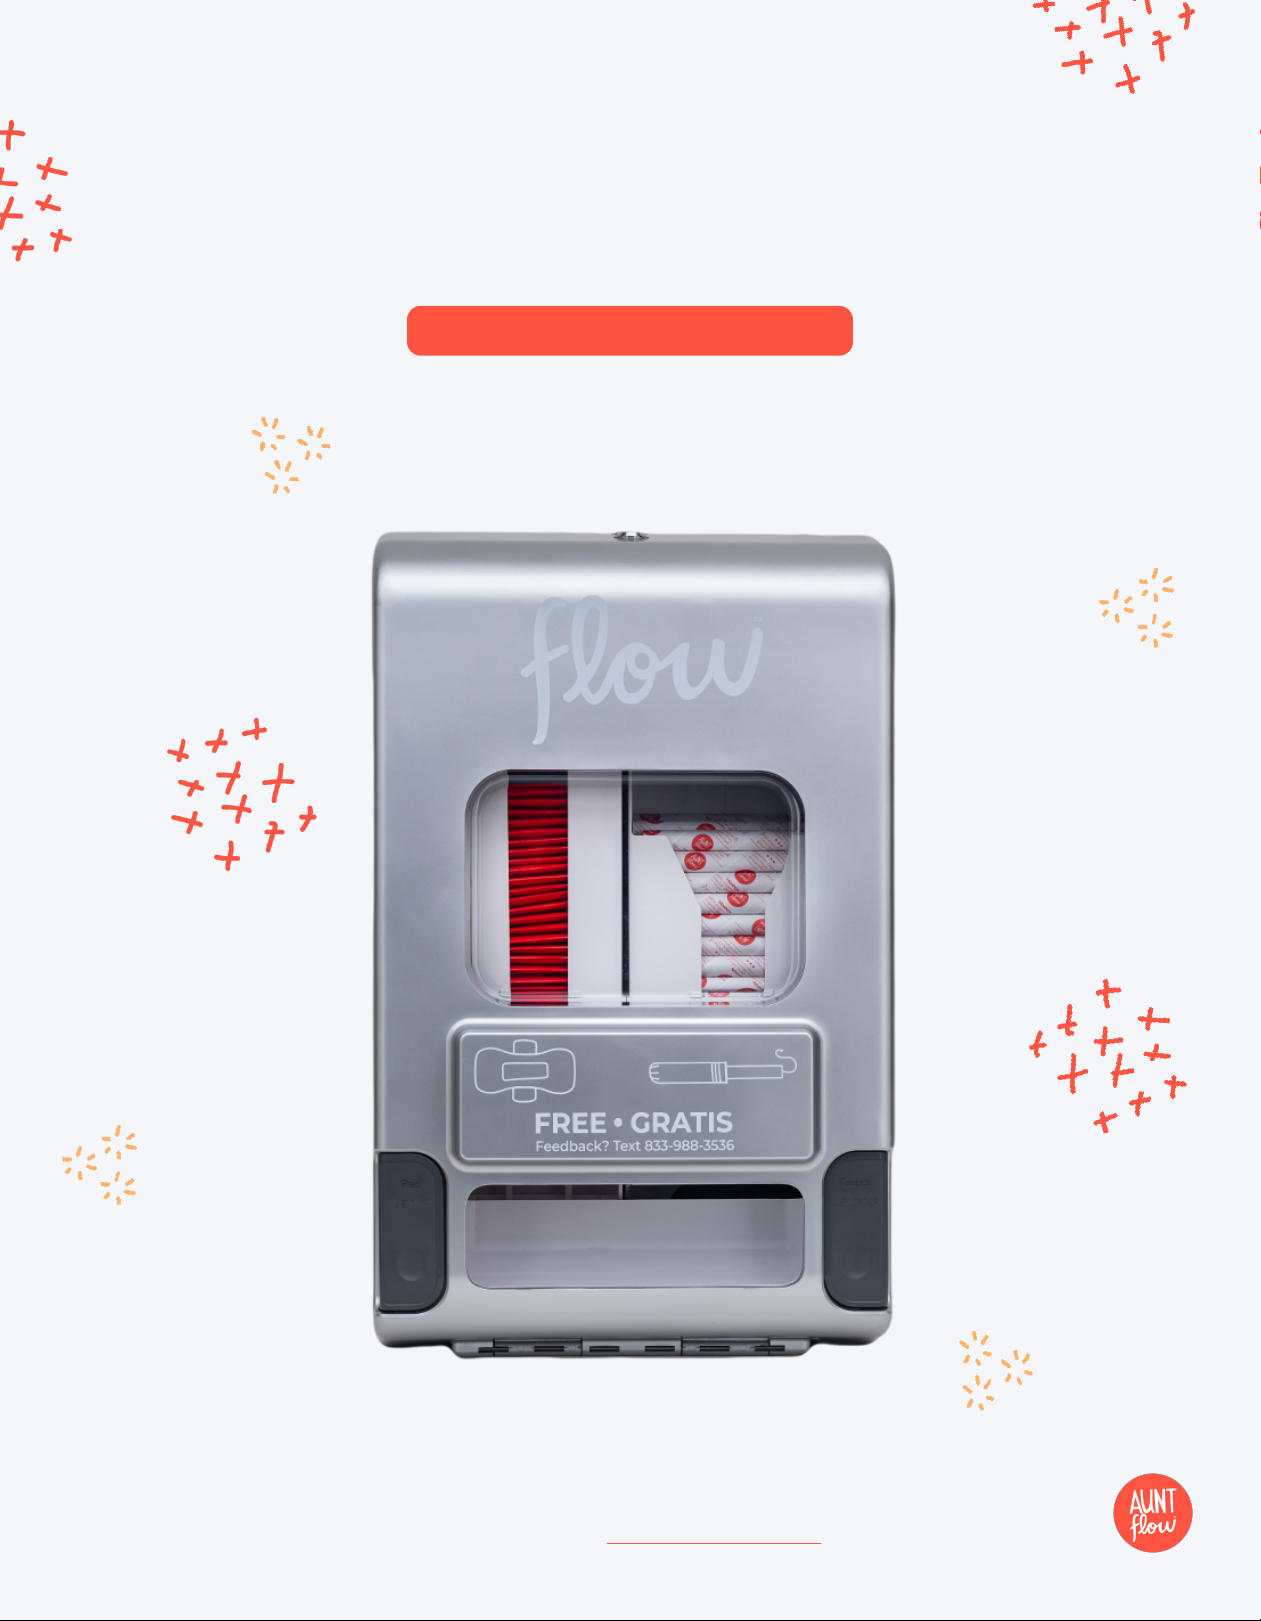
Only use the dispenser as designed and
intended, reloading with only Aunt Flow®
Tampons and Pads.
Never hang or pull on the dispenser.
The dispenser is not designed to
support additional weight.
The dispenser’s internal parts present
pinch points that could cause finger or
hand injuries unless avoided. Do not
open the dispenser cabinet unless you
have read and fully understand these
instructions. To avoid injury, do not
cause the internal gears or arms to
operate or move while fingers or hands
are near the moving parts.
Do not attempt to repair the dispenser.
If the dispenser fails to work properly,
contact hello@goauntflow.com.
Do not subject the dispenser to
misuse, abnormal use, or abuse.
Do not modify or alter the dispenser
in any way.
Do not expose the dispenser to
abnormal heat, water, or other
environmental conditions.
Don’tDo
Copyright Aunt Flow 2022 – Patent Pending Dispenser + Product, ALL RIGHTS RESERVED
Questions + Additional Languages: hello@goauntflow.com 562-320-8250
|
SCAN HERE
Installation Videos
Loading Videos
Download Guides

How to install the Model E
Installation Guide
5
Inspect packaging.
Report any damage to Aunt Flow and the shipping company.
Unpack unit from packaging.
Inspect dispenser and record and report any damage to Aunt Flow.
Included in the package are:
a) Dispenser with locking key
b) Installation Operations Manual with mounting template
c) Installation Kit with hardware
1.
2.
3.
4. Unlock the cabinet and obtain the mounting template inside the
dispenser. Retain keys for later use.
5. Using the mounting template, position the top hole 61” to 73” from
the floor. This will position the access point (buttons) at the ADA
required 40” to 48” above the floor. Ensure the mounting template
is even and level with the floor.
6. Mark the location of the 3 mounting holes shown on the template
into the wall. There is a 4th mounting hole located at the bottom
of the dispenser - this will be installed after the first 3. Use the
cabinet back to mark the hole on the wall and install similar to the
other 3 screws.
ADA Guidelines
Access to the dispenser should be 40” to 48” above the floor to allow forward and side reach by anyone in
a wheelchair. The dispenser can be operated by using only one hand by pushing in the push button. There
is no need for tight grasping, pinching, or twisting of the wrist.
Determine location.
Locate on the wall where the dispenser will be mounted ensuring
there is adequate clearance space.
Copyright Aunt Flow 2022 – Patent Pending Dispenser + Product, ALL RIGHTS RESERVED
Questions + Additional Languages: hello@goauntflow.com 562-320-8250
|

6
Copyright Aunt Flow 2022 – Patent Pending Dispenser + Product, ALL RIGHTS RESERVED
Questions + Additional Languages: hello@goauntflow.com 562-320-8250
|
Drill 4 holes at the marked mounting location using a 3/16” drill bit.
If mounting to drywall, standard drill bits may be used. If mounting
onto tile or cinder block wall, special drill bits may be required.
7.
Insert the 3 included mounting screws into the wall inserts and
tighten until there is ½ inch space from the wall.
9.
Determine which wall inserts are required, and collect from the
provided hardware bag:
8.
a) Drywall, Tile Wall: Use RED inserts (figure one)
b) Concrete, Cinder Block Wall: Use GREEN inserts (figure two)
Fig 1. Fig 2.

7
Copyright Aunt Flow 2022 – Patent Pending Dispenser + Product, ALL RIGHTS RESERVED
Questions + Additional Languages: hello@goauntflow.com 562-320-8250
|
Unlock the slide latch at the top of the dispenser and open the cover.
With the cover open, mount the dispenser onto the wall locating all
3 screw heads through the key slots.
10.
11.
Tighten down all 3 screws, so the dispenser is secured to the wall.
12.
Insert the 4th screw at the bottom and tighten down.
13.
Close the cover by lining up the edges and gently applying pressure.
Ensure the slide lock is engaged and securely retains the cover.
14.
Lock the dispenser with the key provided.
15.
Activate both buttons and ensure they fully return.
16.
The dispenser is now ready to be loaded with Aunt Flow® Menstrual
Applicator Tampons and Banded Pad Cartridges.
17.
SCAN HERE
Installation Videos
Loading Videos
Download Guides

8
Copyright Aunt Flow 2022 – Patent Pending Dispenser + Product, ALL RIGHTS RESERVED
Questions + Additional Languages: hello@goauntflow.com 562-320-8250
|
How stock the Model E with Aunt Flow® Applicator Tampons
Filling + Refilling with
Aunt Flow® Applicator Tampons
With the front cover open, grab a handful of 4-6 tampons at a time.1.
Carefully drop each handful directly to the bottom of the feeder, ensuring tampons
lay flat. Continue to load until there are 50 tampon tubes in the feeder.
2.
Test the dispenser by pushing the right button to ensure that the product is
dispensed and the button returns to the original position.
3.
Close the front cover and secure the slide latch. Using the key, rotate the lock
(if needed).
4.
SCAN HERE
Installation Videos
Loading Videos
Download Guides

9
Copyright Aunt Flow 2022 – Patent Pending Dispenser + Product, ALL RIGHTS RESERVED
Questions + Additional Languages: hello@goauntflow.com 562-320-8250
|
How stock the Model E with Aunt Flow® Menstrual Pad Cartridges
Filling + Refilling
Aunt Flow® Menstrual Pad Cartridges
Unlock the front cover with the provided key. Slide
the notch at the top to the right to disengage.
1.
Slowly guide the front cover downwards.2.
Aunt Flow® Menstrual Pad Cartridges are loaded on
the left side of the dispenser (50 pads per column).
a) The Aunt Flow® Menstrual Pad Cartridges
are shipped in a bundle of 10 units with a
banding strip securing the bundle.
3.
With the banding strip still attached, slide the entire
bundle into the column. Ensure the Aunt Flow logo
is facing up AND away.
4.
Guide the Aunt Flow® Menstrual Pad Cartridge
down the hopper.
5.
Step 5
Step 4
Step 6
Step 6
With your fingers, tear away the front piece of the
banding strip from the bottom and pull it away, so
the pads are freely allowed to slide.
6.
Repeat steps 3-6 until the column is full.7.
Test the dispenser by pushing the left button to
ensure that product is dispensed and the button
returns to the original position. NOTE: You know
the pad is loaded correctly if the pad dispenses
with the “Changing the World one Cycle at a
Time” design facing forward on the white shelf.
8.
Unused, dispensed products may be placed back
in the dispenser.
9.
Close the front cover and secure the slide latch.
Using the key, rotate the lock (if needed).
10.

10
Copyright Aunt Flow 2022 – Patent Pending Dispenser + Product, ALL RIGHTS RESERVED
Questions + Additional Languages: hello@goauntflow.com 562-320-8250
|
Have questions or need more product?
We are here for you!
Contact the Aunt Flow team at: hello@goauntflow.com 562-320-8250
Order online at goauntflow.com
|
This manual suits for next models
1
Table of contents
Popular Dispenser manuals by other brands

DEMA
DEMA Extreme 4 manual

Calfarme
Calfarme ASDW-950 quick start guide

Georgia Pacific
Georgia Pacific GP PRO Pacific Blue Ultra 56602A reference guide

rosseto
rosseto EZ535 quick start guide

Perrin & Rowe
Perrin & Rowe Country 6695 Installation & user guide

Hampton Research
Hampton Research HR8-165 user guide