AUO PUS43A User manual

Connecting To The DisplayInputs/Outputs
Quick Start Guide
AUO PID Display
http://pid.auo.com/
PUS43A (SN43UNA01.0)
PUS50A (SN50UNA01.0)
PUS55A (SN55UNA01.0)
PUS65A (SN65UNA01.0)
Item Description
9 SERVICE PORT
11 IR IN Connects with the supplied IR extender.
12 RS232 Connects with the serial I/O connector of a host device.
13 DC IN Connects with the supplied power adapter.
6RJ45 Connects with a local network using a standard Ethernet cable.
2Power Button Turns the display on/off. When the display is turned on:
Connects with external speakers to output the audio that is supplied by
the video source.
10 LINE OUT
7HDMI 1
Connects with devices transmitting audio/video using the HDMI interface.
8HDMI 2 NOTE: The HDMI port complies with the HDMI 2.0
specifications and supports the CEC function.
1Screw Slots for
Intel NUC Mount
Bracket
Allows installation of a mount bracket compatible with Intel NUC specifications.
NOTE: For details regarding the specifications of the
mount bracket, you may refer to Intel’s official website.
5USB
Digital Connection
RS232
LAN RJ45
USB
Connects with USB 2.0 devices such as keyboards, pointing devices, or
flash drives.
4
3Connects to Kensington-compatible security locks.
Kensington
Lock Slot
HDMI
USB 2.0
External Speakers
50"/55"/65"
43"
•Press the power button to turn off the display backlight.
•Press and hold the power button for three seconds, the display will
be put into standby mode.
NOTE: For details regarding the specifications of the
mount bracket, you may refer to Intel’s official website.
NOTE: If you need to connect a USB flash drive to each of
the USB ports on the display at the same time, use the
supplied USB-A male-to-female cable for one of the USB ports.
For debugging purposes by the manufacturer only.
49.S5001.003
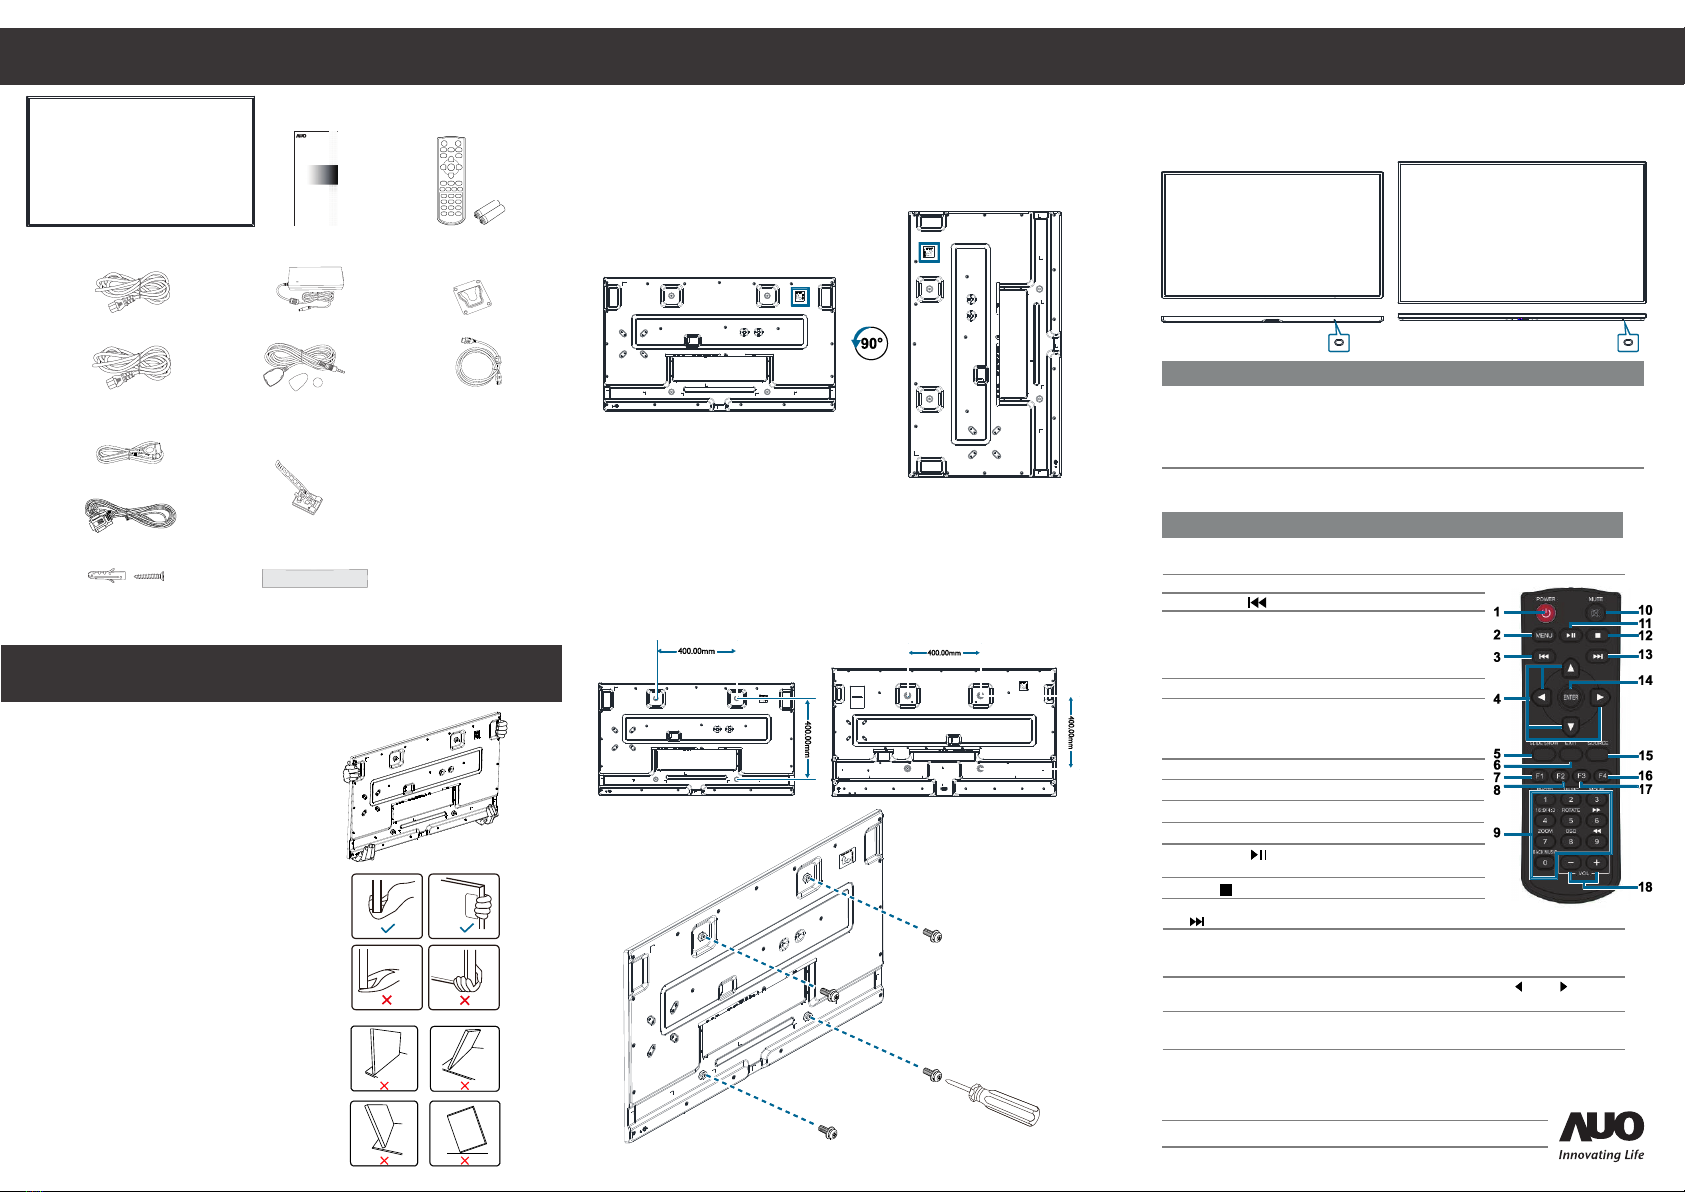
Quick Start Guide
InstallationPackage Contents
Safety Information
Adjusting Directions Keypad
Remote Control
VESA Mounting
The back of the display is equipped with four screw-holes with
dimensions of VESA mount 400 x 400mm (for all 43",50",55",65").
Controlling The Display
Display
Carrying the Display
When carrying the display, always hold the
carrying handles securely with two people
using both hands and the screen facing
forward.
CAUTION: Avoid applying force or using
sharp objects on the screen at all times.
Placing the Display
When placing the display, keep the display
upright. Never tilt the display towards the
left, right or balanced on a single corner of
the frame.
Item Description
•Press the power button to turn off the display backlight.
•Press and hold the power button for three seconds, the
display will be put into standby mode.
Power Button Turns the display on/off. When the display is turned on:
Button Description
ENTER •Displays the OSD menu.
•Confirms the item selected in the OSD menu.
•In the sub-menu, unlocks the settings.
POWER Turns the display on/off. When the display is turned on, press
the [POWER] button to put the display into standby mode.
MENU Displays the OSD menu.
EXIT •Exits the current menu.
•In the sub-menu, confirms the
item selected in the OSD menu
and return to the previous menu.
Play/Pause [ •Plays the media file.
•Pauses playback of the media file.
MUTE Silences the audio.
4Moves the selection in the
OSD menu.
[] / [] /
[] / []
UP/DOWN/
LEFT/RIGHT
Horizontal (Landscape) Vertical (Portrait)
Quick Start Guide
InnovatingLife
43" 50"/55”/65"
43" 50"/55"/65"
Play Back [ Plays the previous media file.
]
HOME Returns to the home screen.
F1 Turns the backlight on and off.
F2 No function.
Number Pad Inputs numbers.
1
2
3
5
7
6
Stop [ ] Stops playback of the media file.
Play Forward
[ ]
Plays the next media file.
SOURCE Switches the video input source. Use the [ ] or [ ]
buttons to directly select [HDMI 1], [HDMI 2].
F4 •Displays which HDMI port is currently used.
•Displays the resolution and frame rate.
8
9
10
11
12
13
14
15
16
F3
•Press the [F3] button on the remote control followed by [0],
[0], and [2] to lock IR sensor/remote control.
•Press the [F3] button on the remote control followed by [0],
[0], and [3] to unlock IR sensor/remote control.
17
VOL Increases [+] or decreases [-] the audio level.
18
Power Cord (UL/BSMI/PSE) x 1
Power Cord (EU/KC) x1 Power
Cord (UK) x1
USB-A Male-to-Female Cable
RS232 Cable
Power Adapter
HDMI Cable
Remote Control and AAA
Batteries
Wall Mounts x2 (SN65 x4)
Screw Anchors x8 (SN65 x16)
Screws x8 (SN65 x16)
IR Extender with
Sticker & Magnet
To learn how to use the IR extender,
refer to the “Setting Up the IR Extender” section.
Cable Routing Hooks x 6
To learn how to use the cable routing hooks, refer to
the “Installing the Cable Routing Hooks” section.
Side Chassis Stickers x 3
To learn how to use the side chassis sticker, refer to the
“Adhering the Side Chassis Stickers” section.
Other manuals for PUS43A
2
This manual suits for next models
7


