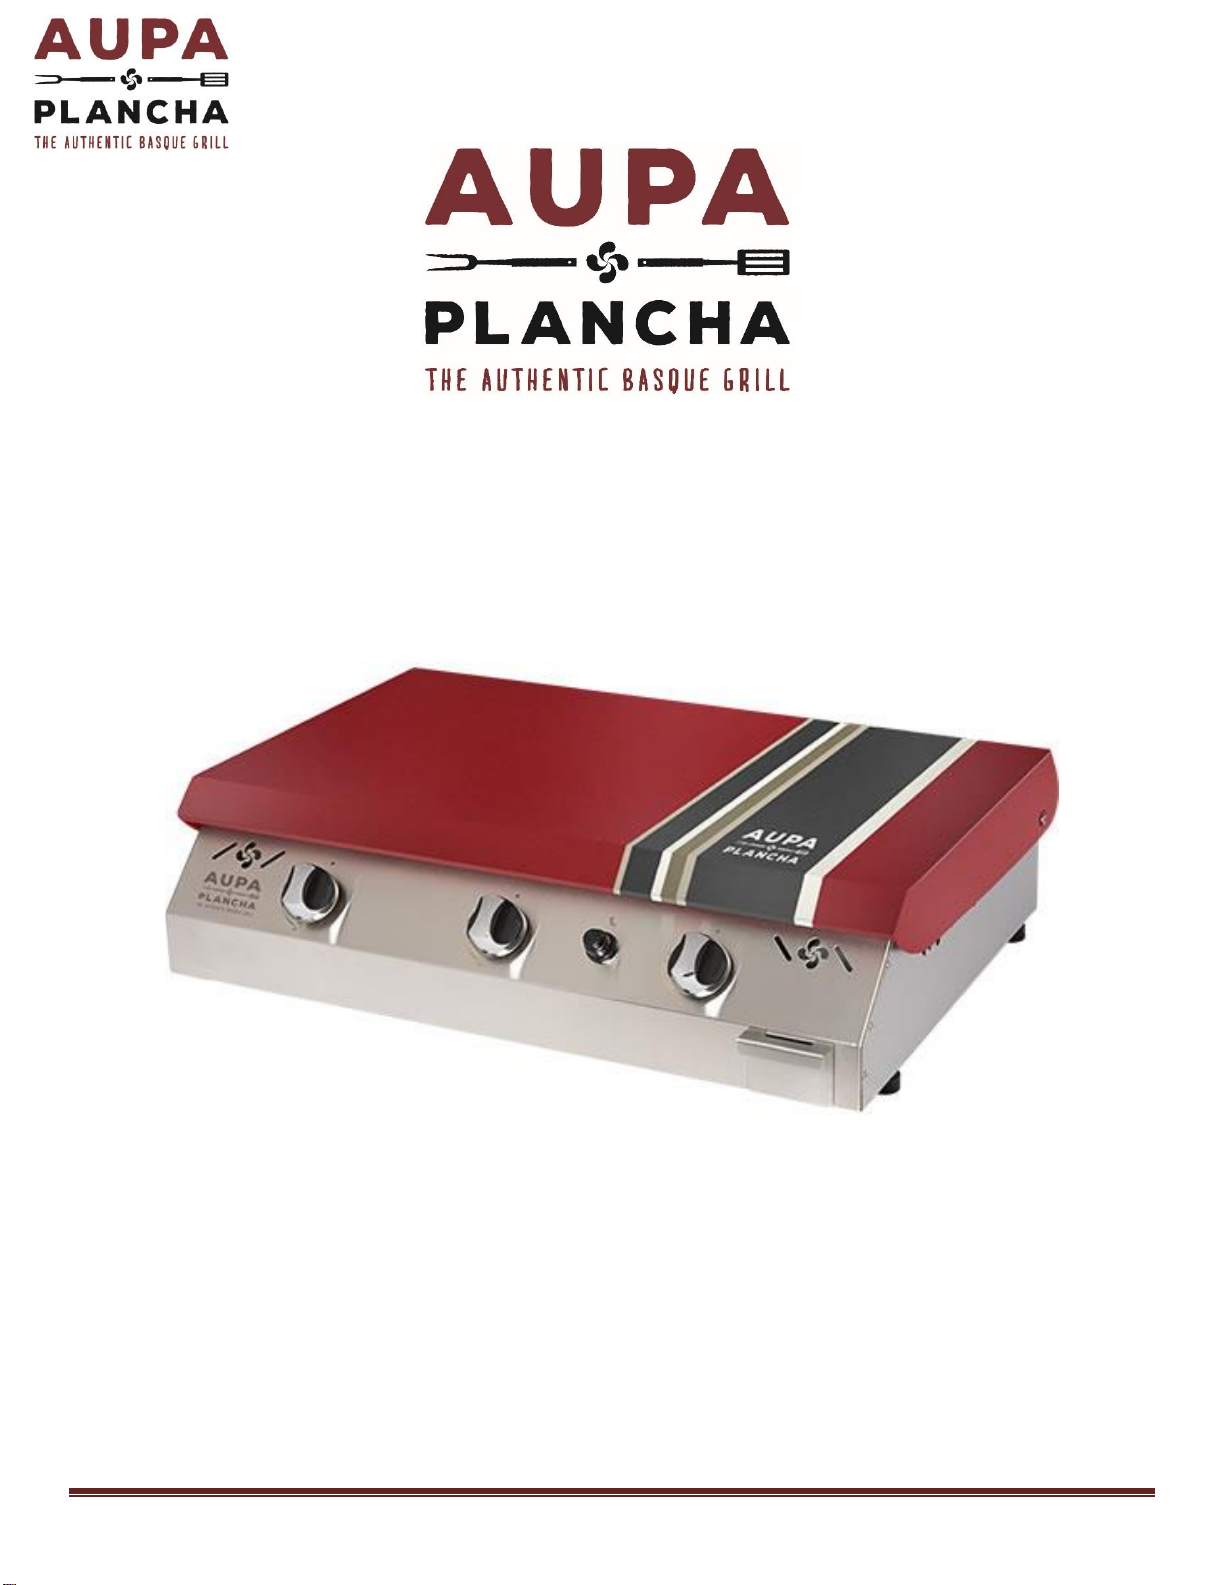
AUPA Plancha AP-3BURN User manual
USER AND INSTALLATION MANUAL
AUPA PLANCHA 3 BURNERS
AUPA Plancha LLC. 2020 Howell Mill Rd, Suite D #180. Atlanta, Ga 30318. USA.
Phone 404.228.5304 - Fax 404.601.9778 - www.aupaplancha.com Page 1
OWNER MANUAL
READ BEFORE USING
AUPA Plancha 3 Burners
Outdoor Gas Cooktop
10 years Warranty on Stainless Steel cooking surface
2 years Warranty on Spare Parts
USER AND INSTALLATION MANUAL
AUPA PLANCHA 3 BURNERS
AUPA Plancha LLC. 2020 Howell Mill Rd, Suite D #180. Atlanta, Ga 30318. USA.
Phone 404.228.5304 - Fax 404.601.9778 - www.aupaplancha.com Page 2
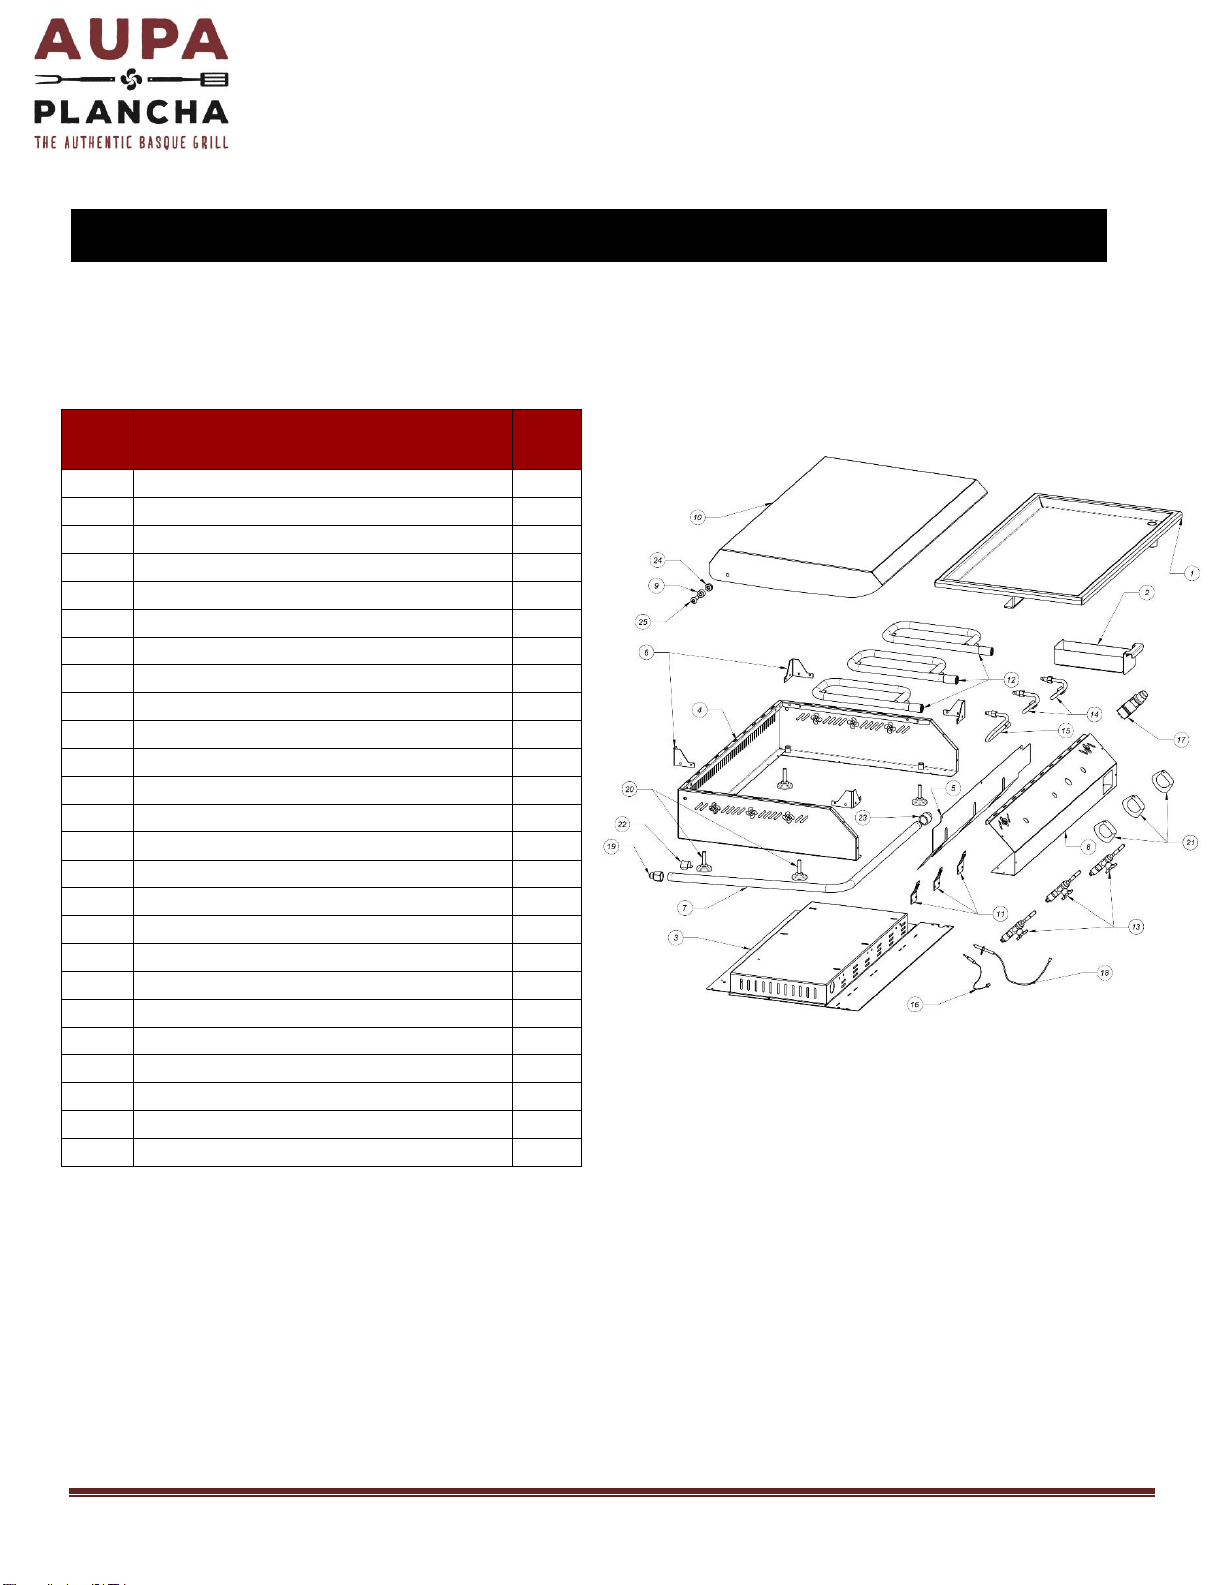
ITEM
MAIN PIECE DESCRIPTION
QTY.
1
PLANCHA
1
2
GREASE TRAY
1
3
BOTTOM PLATE
1
4
MAIN FIREBOX
1
5
SPACER
1
6
SUPPORT ANGLE
4
7
"L" SHAPE TUBING
1
8
FRONT PLATE
1
9
BRASS SPACER HUB
2
10
COVER
1
11
IGNITION SUPPORT
3
12
MAIN BURNER
3
13
GAS VALVE
3
14
SHORT ALUMINIUM TUBE CONNECTOR
2
15
LONG ALUMINIUM TUBE CONNECTOR
1
16
THERMOCOUPLE
3
17
IGNITION COIL
1
18
IGNITION SPARK
3
19
BRASS CONNECTOR
1
20
LEVELER
4
21
CONTROL KNOB
3
22
Ø1/2" TUBING CLAMP
1
23
Ø1/2" TUBING CAP
1
24
Ø5/16" LOCK HEX NUT
2
25
Ø5/16 BALL HEAD BOLT
2
3 BURNERS PART LIST

USER AND INSTALLATION MANUAL
AUPA PLANCHA 3 BURNERS
AUPA Plancha LLC. 2020 Howell Mill Rd, Suite D #180. Atlanta, Ga 30318. USA.
Phone 404.228.5304 - Fax 404.601.9778 - www.aupaplancha.com Page 3
All Stainless Steel: food grade.
Cooking surface: 304 stainless steel, 4 mm thickness
Dimensions: 31W x 22L x 8H in.
Cooking area: 420 sq. inch
Weight: 70 lbs.
Removable Grease tray
Thermocouple safety function
Electronic embedded Ignition
Heat time: 5 minutes
BTU: 9,500 per burner
THIS MANUA
To Installer or Person Uncrating Grill: Leave these instructions with purchaser.
To Purchaser: Keep these instructions for future reference.
Complete Now For Future Reference:
Model #_______________________________ Serial # _________________________________
Date Purchased ________________________ Location Purchased _______________________
Date Installed __________________________ Location Installed _________________________
THIS MANUAL MUST BE RETAINED FOR FUTURE REFERENCE. READ, UNDERSTAND, AND
FOLLOW THE INSTRUCTIONS AND WARNINGS CONTAINED IN THIS MANUAL.
TECHNICAL DATA
USER AND INSTALLATION MANUAL
AUPA PLANCHA 3 BURNERS
AUPA Plancha LLC. 2020 Howell Mill Rd, Suite D #180. Atlanta, Ga 30318. USA.
Phone 404.228.5304 - Fax 404.601.9778 - www.aupaplancha.com Page 4
FOR YOUR SAFETY
1. Do not store or use gasoline or other flammable vapors and liquids in the vicinity of this or any
other appliance.
2. An LP (Liquid Propane) Tank not connected for use shall not be stored in the vicinity of this or any
other appliance.
FOR YOUR SAFETY
If You Smell Gas:
1. Disconnect gas supply to your AUPA Plancha.
2. Extinguish any open flame.
3. Remove grill cooking surface.
4. If odor continues, immediately call your gas supplier or your fire department.
5. Evacuate all personnel from the area.
CAUTION:
It is the responsibility of the assembler/owner to assemble, install and maintain gas grill
according to instructions in this user manual. Failure to follow these instructions could result
in serious personal injury and / or property damage.
AUPA Plancha is for outdoor use only, and should be operated in a well-ventilated space.
Never operate near flammable liquids or vapors. Do not install or use grill within 36” of
combustible materials from back and sides of grill. Grill shall not be located under
unprotected overhead made of combustible construction. Do not obstruct the flow of combustion and
ventilation air, including ventilation of cylinder enclosures, if applicable.
WARNINGS
USER AND INSTALLATION MANUAL
AUPA PLANCHA 3 BURNERS
AUPA Plancha LLC. 2020 Howell Mill Rd, Suite D #180. Atlanta, Ga 30318. USA.
Phone 404.228.5304 - Fax 404.601.9778 - www.aupaplancha.com Page 5
CAREFULLY FOLLOW ALL INSTALLATION INSTRUCTIONS AND CONSTRUCT ALL COUNTER SPACE,
STANDS, OR OTHER SURFACES TO THE RECOMMENDED INSTALLATION SPECIFICATIONS AS
OUTLINED IN THIS MANUAL.
THIS UNIT IS HEAVY AND SHOULD BE INSTALLED BY TWO PEOPLE.
ALWAYS KEEP ANY AND ALL FLAMMABLE LIQUIDS AND COMBUSTIBLE MATERIALS AWAY FROM
UNIT. DO NOT STORE TOWELS OR UTENSILS, OR ANY OTHER ITEMS ON UNIT’S DRIP PAN.
DO NOT CLEAN THE COOK SURFACE WITH GRILL BRICKS OR CLEANING SOLUTIONS. USE ONLY
THE PRESCRIBED METHOD OF CLEANING AS OUTLINED IN THIS MANUAL.
SAFETY:
Use the Plancha on a nonflammable flat area (brick, tiles, stainless steel plate…)
Do not put the Plancha on the floor or on a table with flammable materials.
It is recommended to use protection gloves upon actuation of hot elements.
This appliance shall only be used in an above ground open-air situation with natural ventilation,
without stagnant areas, where gas leakage and products of combustion are rapidly dispersed
by wind and natural convection.
Any modifications, misapplications, or unreasonable use can prove to be dangerous.
Do not move this appliance with burners ignited.
Do not use your Plancha during high wind weather.
Close the gas supply after use.
Do not let children operate or play around the AUPA Plancha.

USER AND INSTALLATION MANUAL
AUPA PLANCHA 3 BURNERS
AUPA Plancha LLC. 2020 Howell Mill Rd, Suite D #180. Atlanta, Ga 30318. USA.
Phone 404.228.5304 - Fax 404.601.9778 - www.aupaplancha.com Page 6
AUPA Plancha, warrants to the original residential consumer-purchaser that the AUPA Plancha grill
shall be free from rust-through on all metal surfaces and shall be free from defects in materials and
workmanship under normal and reasonable use from the original date of purchase.
AUPA Plancha promises to replace, at its determination, any product or component that is defective
and covered under this warranty for as long as you, the registered original consumer-purchaser, owns
the AUPA Plancha. This is your sole and exclusive remedy. This warranty is for the benefit of the
original consumer-purchaser and is non-transferable, and is subject to the limitations, exclusions and
other provisions listed below.
Limitations Involving Materials and Components: Warranty does not apply to normal wear and
tear, which are expected over the course of ownership. The materials and components listed below
are covered according to the following schedule from the original date of purchase:
• Ten Years –Stainless steel plate.
• Two Years –electrical and electronic components [including, but not limited to, electronic displays,
overlay and membrane switches, temperature sensors (RTD and K-Value Thermal Couple), hot
surface igniters, transformers, heater elements, relays, igniters, ignition controllers, wiring, switches,
encoders, outlets and plugs.
• Two Years –gas components [including, but not limited to, regulator, hoses, manifold assemblies]
• Two Years –accessories and repair parts
The original purchase invoice or payment record must be retained and produced upon request
if claims are made under this warranty. Warranties are void if the original serial numbers have
been removed, altered, or cannot be readily determined.
AUPA PLANCHA RESIDENTIAL LIMITED WARRANTY TERMS

USER AND INSTALLATION MANUAL
AUPA PLANCHA 3 BURNERS
AUPA Plancha LLC. 2020 Howell Mill Rd, Suite D #180. Atlanta, Ga 30318. USA.
Phone 404.228.5304 - Fax 404.601.9778 - www.aupaplancha.com Page 7
THIS WARRANTY APPLIES ONLY TO PRODUCTS PURCHASED AND LOCATED WITHIN THE
UNITED STATES OR CANADA.
WHAT IS NOT COVERED?
1. Conditions and damages resulting from any of the following:
a. Improper installation, delivery, use, storage or maintenance
b. Any repair not authorized in writing by AUPA Plancha, Inc., Any modifications, misapplications,
or unreasonable use
c. Improper setting of any control
d. Harsh environmental conditions, including, but not limited to, continual seawater spray, high
pressure water, and direct contact with corrosive chemicals and materials
e. Excessive or inadequate electrical, or gas supply
f. Accidents, natural disasters
g. Conditions covered by the purchaser’s liability insurance
h. Cleaning supplies and filters
2. Products purchased or utilized for commercial use without the express authorization of AUPA
Plancha, for such use
3. Labor not pre-authorized by AUPA Plancha, and labor not performed by an authorized AUPA
Plancha service agency or representative
4. Pre-authorized warranty labor performed outside of normal business hours, and at overtime and
premium rates
5. The cost of service or a service call to:
a. Identify or correct installation errors
b. Transport the product or component for service to/from the manufacturer or service center
c. Instruct the user of the proper use of the product
6. The cost for any inconvenience, personal injury or property damage due to failure of the product,
and cost of damage arising out of the transportation of the product is covered under different terms
with the carrier.
7. Natural variations in color and finishes that are inherent to the material and unavoidable (and
therefore not defects) or resulting from excessive exposure to natural elements.

USER AND INSTALLATION MANUAL
AUPA PLANCHA 3 BURNERS
AUPA Plancha LLC. 2020 Howell Mill Rd, Suite D #180. Atlanta, Ga 30318. USA.
Phone 404.228.5304 - Fax 404.601.9778 - www.aupaplancha.com Page 8
ALL IMPLIED WARRANTIES, INCLUDING THE IMPLIED WARRANTIES OF MERCHANTABILITY,
SUITABILITY, QUALITY AND/OR FITNESS FOR A PARTICULAR PURPOSE, ARE LIMITED IN
DURATION TO THE EXPRESS WARRANTY PERIODS SPECIFIED ABOVE FOR THE PARTS
DESCRIBED THEREIN. AUPA PLANCHA, MAKES NO OTHER WARRANTY AND WILL NOT BE
LIABLE FOR ANY DIRECT OR INDIRECT, CONSEQUENTIAL OR INCIDENTAL DAMAGES.
Some states do not allow limitations on how long an implied warranty lasts, so the above limitation
may not apply to you. Neither AUPA Plancha manufacturer representatives and dealers, nor the retail
establishment selling this product has any authority to make any warranties or to promise remedies in
addition to or inconsistent with those stated above.
The maximum liability to AUPA Plancha, in any event, shall not exceed the purchase price of the
product paid by the original consumer-purchaser. Some states do not allow the exclusion or limitation
of incidental or consequential damages, so the above limitations or exclusions may not apply to you.
This warranty gives you specific legal rights, and you may also have other rights.

USER AND INSTALLATION MANUAL
AUPA PLANCHA 3 BURNERS
AUPA Plancha LLC. 2020 Howell Mill Rd, Suite D #180. Atlanta, Ga 30318. USA.
Phone 404.228.5304 - Fax 404.601.9778 - www.aupaplancha.com Page 9
Do not ignite burners or use an open flame to check for gas leaks. Be sure there are no sparks or
open flames in the area while you check for gas leaks.
Flames and sparks will result in a fire or explosion which can cause serious bodily injury or death and
damage to property.
Note: All factory-made connections have been thoroughly checked for gas leaks. The burners and
ignition system has been flame tested. As a safety precaution, we recommend you recheck all fittings
for leaks before using your AUPA Plancha grill. Shipping and handling may loosen or damage a gas
fitting.
To perform a leak check you will need a solution of soap and water and a brush or rag to wet all gas
connections.
1. Turn all control knobs to the OFF position.
2. Turn on gas supply and check for leaks by wetting the connections with the soap and water
solution and watching for bubbles. If bubbles appear, or if a bubble grows, there is a leak, and in that
case, please call AUPA Plancha to replace the defective part.
Note: Since some leak test solutions, including soap and water, may be slightly corrosive, all
connections should be rinsed with water after checking for leaks.
CHECKING GAS LEAKS (LP)
USER AND INSTALLATION MANUAL
AUPA PLANCHA 3 BURNERS
AUPA Plancha LLC. 2020 Howell Mill Rd, Suite D #180. Atlanta, Ga 30318. USA.
Phone 404.228.5304 - Fax 404.601.9778 - www.aupaplancha.com Page 10
1. Make sure the burners valves are in the OFF position.
2. Make sure the gas tank valve is off and in the closed position by turning clockwise (left to right) to a
full stop.
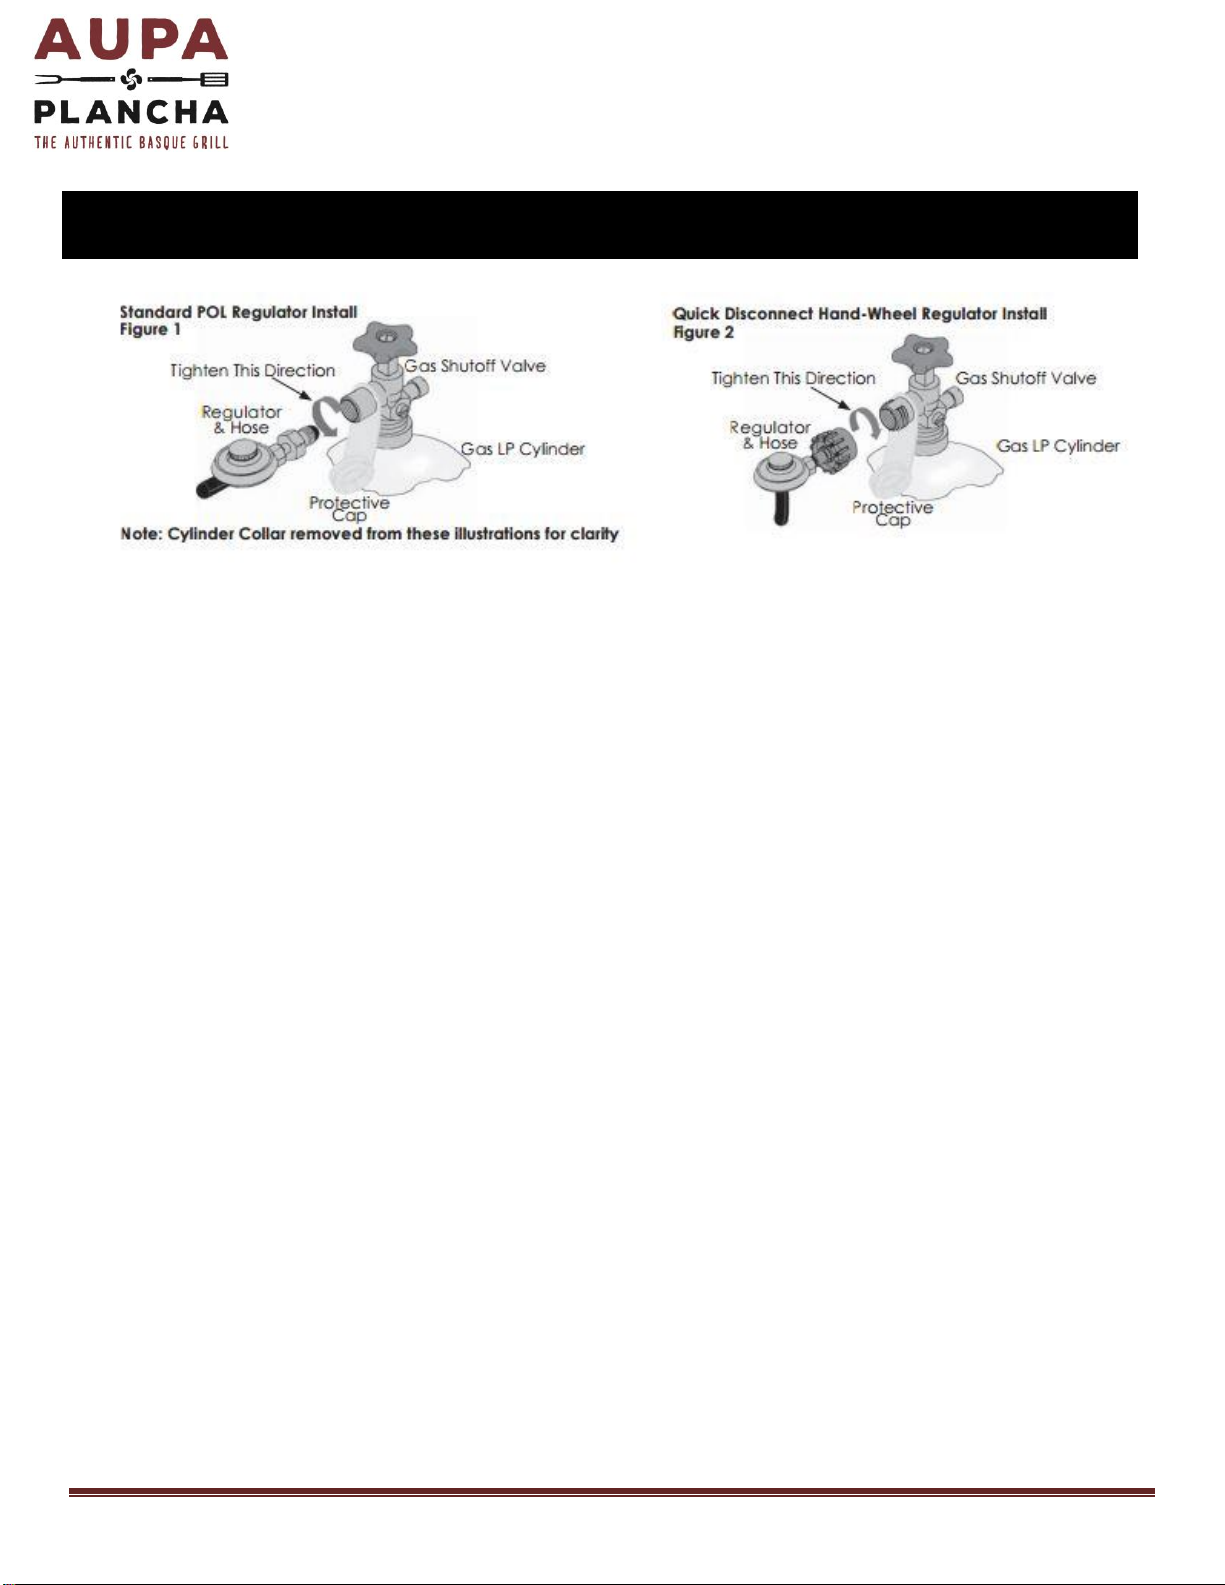
3. Remove the protective cap from the gas cylinder valve.
4. Hold the supplied regulator in one hand and position the plastic coupling nut on the cylinder valve
outlet threads using care to engage the center of the coupling nut to the center of the cylinder valve
outlet. When completing this procedure, take care to not cross-thread the connection.
5. Observe the direction in Figure 1 and Figure 2 for installing the regulator to the cylinder valve. For
a Standard POL (Point-Of-Load) regulator turn the coupling nut counterclockwise (right to left- Fig 1)
and tighten to a full stop. For the Quick Disconnect Regulator turn the coupling nut clockwise (left to
right- Fig 2) and tighten to a full stop. In the connection process, the regulator will seal on the back-
check feature in the cylinder valve resulting in a slight resistance. The connection requires about a
1/2 to 3/4 additional turn to complete the connection. Tighten by hand only - do not use tools. If you
cannot make the connection, disconnect the regulator and repeat steps 4 and 5.
If the unit is not in use, turn off the gas at supply cylinder. Inspect hoses before each use of the unit. If
it is evident there is excessive abrasion or wear, or the hose is cut, replace it prior to operating your
AUPA Plancha. Regulator and hose assembly can be purchased from AUPA Plancha by calling
404.228.5304 or from a local gas supply company.
CONNECTING GAS - LP CYLINDER CONNECTION

USER AND INSTALLATION MANUAL
AUPA PLANCHA 3 BURNERS
AUPA Plancha LLC. 2020 Howell Mill Rd, Suite D #180. Atlanta, Ga 30318. USA.
Phone 404.228.5304 - Fax 404.601.9778 - www.aupaplancha.com Page 11
TRANSPORTATION OF LP CYLINDER:
Never remove or alter cylinder labeling. Labels contain critical information on the safe handling of gas
products. The DOT (Department of Transportation) requires that proper labeling must be in place
before the products can be offered for transportation.
Never transport flammable gases in the trunk or passenger compartment of a vehicle. Transporting
cylinders in cars, vans, or in any enclosed vehicle is extremely dangerous, and should be avoided.
Always install the protective cap on the cylinders when they are being transported, or any time they
are not in use. If the cylinders were not designed to accept a protective cap over the valve, special
care must be taken to prevent the valve from damage or opening during transportation.
Secure your cylinders. DOT regulations require that all compressed gas cylinders be secured from
movement during transportation. Cylinders that can move can open accidentally, or roll off the vehicle
into the path of oncoming traffic.
STORAGE, REMOVAL and TRANSPORTATION OF LP
CYLINDER
STORAGE & REMOVAL OF LP GAS CYLINDER:
Never store LP gas cylinder indoors. When cooktop is stored indoors, shut
cylinder valve off and disconnect cylinder from grill and remove to an outdoor
location. Cylinder must be stored outdoors in well-ventilated area, away from and
out of the reach of children. Cylinder should not be allowed to remain in a high
heat area such as a closed car, trunk, or in direct sunlight.
Loosen coupling nut located on regulator and cylinder valve by turning counterclockwise
using hands only - do not use tools. Next loosen thumb screws securing cylinder to lower
rack and remove tank. Install safety cap over cylinder valve coupling.

USER AND INSTALLATION MANUAL
AUPA PLANCHA 3 BURNERS
AUPA Plancha LLC. 2020 Howell Mill Rd, Suite D #180. Atlanta, Ga 30318. USA.
Phone 404.228.5304 - Fax 404.601.9778 - www.aupaplancha.com Page 12
Check:
Control knobs are in the OFF position
Venturi tubes are clear of insects and or insect nests.
There is no gas leakage.
Gas cylinder is placed on a flat surface, far from any heat source.
Remove the old battery (AA LR6) inside the ignitor knob by unscrewing it and replace it with the new
one.
Open the cover.
Check if control knobs are in the OFF position.
Open gas valve.
Push the ignition button and at the same time, turn the control knob to full flame position.
Pressure on both button and knob must be kept 5 seconds.
If ignition does not occur in 5 seconds release igniter, turn the burner Control Knob OFF, wait
few minutes, and repeat lighting instructions.
BEFORE USING THE APPLIANCE
REPLACING ELECTRONIC IGNITOR BATTERY
START AND SHUT DOWN
USER AND INSTALLATION MANUAL
AUPA PLANCHA 3 BURNERS
AUPA Plancha LLC. 2020 Howell Mill Rd, Suite D #180. Atlanta, Ga 30318. USA.
Phone 404.228.5304 - Fax 404.601.9778 - www.aupaplancha.com Page 13
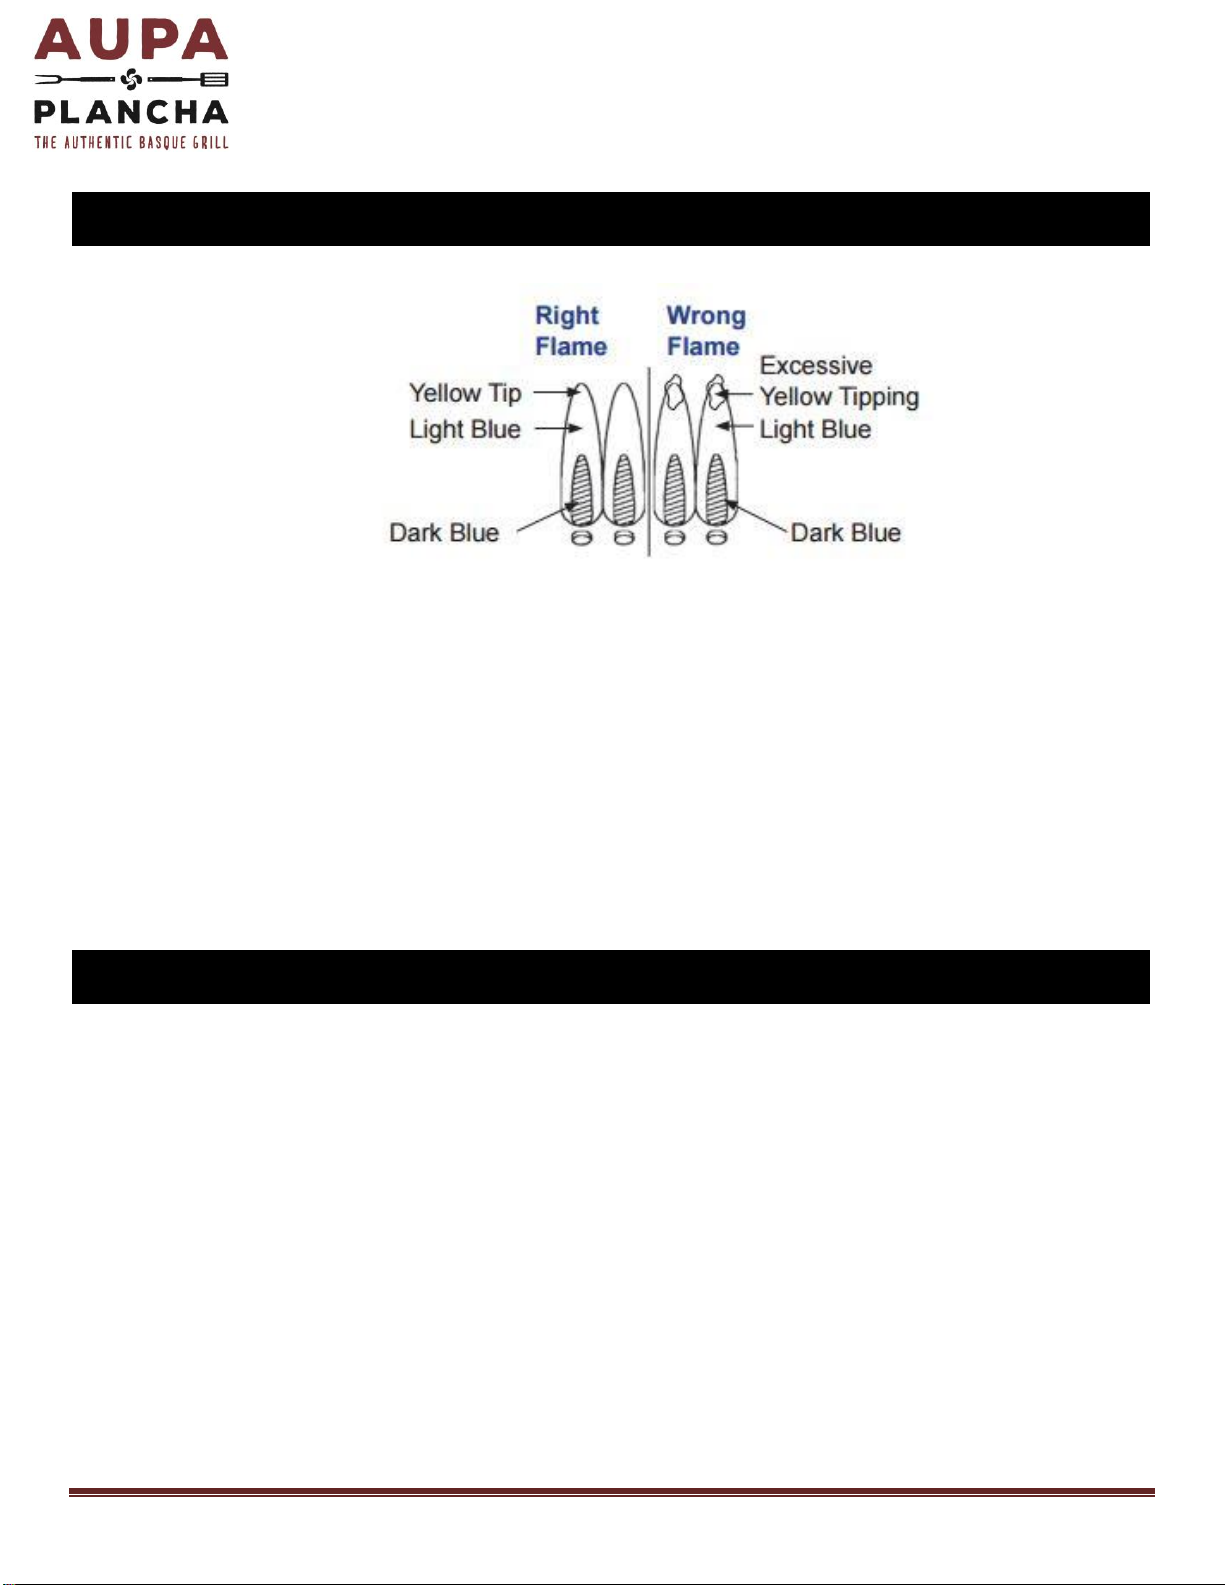
Any of the following are considered to be abnormal operation and may require servicing:
• Excessive yellow tipping of the burner flame (See diagram above).
• Shooting up of cooking utensils.
• Burners not igniting properly.
• Burners failing to remain alight.
• Gas valves, which are difficult to turn. In case the appliance fails to operate correctly,
contact the authorized service provider in your area.
Before storing your plancha, unplug the gas cylinder and store it outside in a dry area and
away from any heat source.
Your plancha has been conceived to resist to different kind of weather, but if you want to keep
its original color, we advise you to store it in a dry and covered area.
RECOGNIZING ABNORMAL GAS OPERATION
APPLIANCE STORAGE

USER AND INSTALLATION MANUAL
AUPA PLANCHA 3 BURNERS
AUPA Plancha LLC. 2020 Howell Mill Rd, Suite D #180. Atlanta, Ga 30318. USA.
Phone 404.228.5304 - Fax 404.601.9778 - www.aupaplancha.com Page 14
Regular cleaning and care for your AUPA Plancha 3 burners unit will keep it looking and
functioning its best. It is easy and fast:
Turn the control knobs to the OFF position, then, close the gas valve.
It is recommended to wear protection gloves to continue this cleaning operation.
Pour a small amount of water on the soiled surface while the grill is still warm. Scrape the
debris away with a spatula or a sponge for stainless steel surfaces. Repeat if necessary.
Rinse the cooking plate with clear water and a paper towel.
You can finish the cleaning operation by using also a micro fiber towel to make your AUPA
Plancha bright as new.
Empty the grease receptacle.
If the appliance was not used for an extended length of time, check area around hoses and
Venturi for insects or debris. Clean if necessary.
For more information about our AUPA Plancha cleaning and maintenance, please visit us on
YouTube: https://www.youtube.com/watch?v=tfXu2-6YVpU&feature=youtu.be
CLEANING AND MAINTENANCE

USER AND INSTALLATION MANUAL
AUPA PLANCHA 3 BURNERS
AUPA Plancha LLC. 2020 Howell Mill Rd, Suite D #180. Atlanta, Ga 30318. USA.
Phone 404.228.5304 - Fax 404.601.9778 - www.aupaplancha.com Page 15
ISSUES
RELATED PARTS
SOLUTIONS
The burner doesn’t work
The Venturi Tube
Check if not BLOCK
Electrical ignition
Check the battery- Replace
Gas Cylinder
Check if the valve is opened
Check if the cylinder is
empty
Thermo-couple
Keep pressure on control
knob for 5 seconds
Leak at the connection point
Connecting point
Leak check with a solution of
soap and water and a brush
or rag to wet all gas
connections. Tight the 2
connections with a wrench.
I can’t connect the gas hose
Thread
When you turn the
connecting valve, check if
the thread is not damaged.
Do not modify this appliance
All modification on this appliance could be dangerous.
If you can’t resolve this issue, please write to:
AUPA Plancha –2020 Howell Mill, Suite D # 180, Atlanta, GA 30318
TROUBLESHOOTING

Popular Cooktop manuals by other brands

Thermador
Thermador SGC304 Care and use manual

Omega
Omega OG65XA Installation and operating instructions

Monogram
Monogram ZGU36RS owner's manual

Vitek
Vitek VT-3704 Manual instruction

West Bend
West Bend Cooker instruction manual

KitchenAid
KitchenAid KGCP463KSS - 36" Sealed Burner Commercial-Style Gas... Dimension Guide


