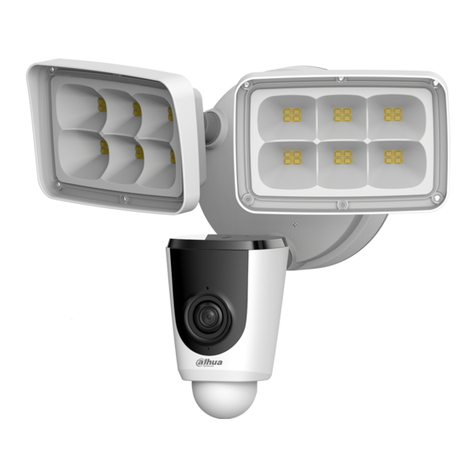
aurum AEC-9332BSD-AC16W-WF User manual

Model #AEC-9332BSD-AC16W-WF
THANK YOU
We appreciate the trust and confidence you have placed in Nightwatcher through the purchase of this motorized LED flood light
with Wi-Fi camera. We strive to continually create quality products designed to enhance your home. Visit us online to see our full
line of products available for your home improvement needs. Thank you for choosing Nightwatcher!
USE AND CARE GUIDE
ROBOTIC LED FLOOD LIGHT WITH VIDEO CAMERA
OS Windows 2000 / XP / Vista / 7 / MAC
Micro Memory Card 1GB SD ~ 32GB SDHC (max) Class 4 LISTED

2
Table of Contents
Table of Contents..........................................................2
Safety Information.........................................................2
Warranty.........................................................................3
What Is
Covered………………… ……….…………………3
What Is Not
Covered…………………………………………3
Pre-Installation ..............................................................4
Planning Installation ...............................................4
Tools and Hardware Required ...............................4
Package Contents ..................................................5
Specifications ......................................................... 5
Nightwatcher Overview................................................6
Installation………………………………………………......
7
Operation-Programing your Nightwatcher............8-11
System Set Up (Link Camera with WIFI Network)12
Images Functions................................................. 18
Troubleshooting…………………………………………....
22Care and
Cleaning………………………………………….22
F.A.Q.
Section…..…………………..…..…………...…..…23_Toc
322073577
Safety Information
□Near the outlet of a central heating boiler.
□Near an air condition unit.
□Pointing directly at moving vehicles.
□Within sight of reflection from moving water.
□Where other lights could be pointed onto the sensor.
□Avoid installing the product where the direct sunlight
could shine on the detector.
IMPORTANT:
This light fixture must be grounded.

3
CAUTION:
Do not immerse the light fixture in the water.
Do not mount the light fixture against flammable
surfaces.
Warranty
12 MONTH WARRANTY
WHAT IS COVERED
12 month limited warranty from date of purchase. Please retain proof of purchase. The manufacturer reserves the right to
replace or repair the faulty unit.
WHAT IS NOT COVERED
The warranty does not cover damage to the unit that may occur as a result of improper installation. This product is
designed to illuminate, it will not prevent the perpetration of any act, legal or illegal. The manufacturer assumes no liability
for any damage to property, injury to person, or death.

4
Pre-installation
PLANNING INSTALLATION
Never attempt to turn the light head by hand as this can damage the internal motor components.
NOTE:
Before attempting any installation or
maintenance, ensure that the electrical supply is
switched off and the circuit fuses removed or
the circuit breaker is in the “OFF” position.
TOOLS REQUIRED (NOT INCLUDED)
Hammer
Safety
goggles
Phillips
screwdriver Level
HARDWARE INCLUDED
NOTE: Hardware not shown to actual size.
Part Description Quantity
AA Mounting screw 2
BB Drywall screw 2
CC Plastic masonry anchor 2
DD Wire nut 3
EE Cross bar 1
FF Allen Key 1
AA BB CC DD EE FF

Pre-installation (continued)
PACKAGE CONTENTS
SPECIFICATIONS
Detection Method Passive infrared sensor
(with continuous detect function)
Sensor Range Up to 55ft x 220°
Power Source AC120V 60Hz
Light Source AC16W LED
Illumination Time Fixed at 3 minutes
IP Rating IP55 (Weather-Proof)
Suitable for outdoor permanent
use
Part Description Quantity
A Light fixture 1
B Backplate screw 2
C Screw nut 2
D Micro card and card adapter
(Micro card is already inside the
card compartment of the light)
1
E User manual 1
F EVA gasket 1
NOTE:
Nightwatcher Wi-Fi camera is designed to illuminate,
record video and produce audio warnings when a person
enters the detection area. While it will detect a moving heat
source, there is no guarantee implied that it will provide
total security or prevent illegal entry.
D
- Records 20 second video events at 15 frames per
second. 720 pixels (HD) resolution.
- Built-in Micro card slot for Micro memory card
- Micro card slot can accommodate up to 32GB
(SDHC)
- Micro card video file format: FAT or FAT16 (SD)
FAT32 (SDHC)
- Automatic exposure control, white balance and
sharpness
E
A
EE
AA
C
B
F

6
Nightwatcher Overview
Camera angle adjustable downward by 25
degrees
Bottom View
Top View
S
i
de
Vi
e
w
Fr
o
n
t
Vi
e
w

Installation
1 Mounting and wiring the light
fixture 2Mounting and wiring the light
fixture (Continued)
DANGER:
Incorrect voltage may cause electric shock. If you are
not sure, please contact your retailer.
CAUTION:
Do not remove the tape until you finish the installation.
If the tape comes off the light, please replace it or hold
the light head to avoid swiveling and damage to the
product.
CAUTION:
LED lamps are extremely bright. Under no
circumstances should you stare into an LED beam
since this may cause irreparable damage to the eye.
IMPORTANT:
Please make sure the voltage and polarity are correct
before connection.
NOTE:
To ensure correct operation of the sensor, mount the
light fixture so that the traffic passes across the
detector.
For optimum performance the recommended mounting
height of the unit has to be between 2m (6.6ft) and 3m
(10ft) – with 2,5m (8ft) the best performance height -
Do not mount the unit higher than 3 meters (10ft) as this
will affect the detection functions of the unit.
When selecting your installation area it’s important to be
aware of positioning the Night Watcher fixture sight line
due to possible factors that could cause false triggering;
such as direct sunlight, window refection, air condition
units, swimming pool reflection, direct street lighting or
large vegetation in the installation area.
To prolong the lifespan of the Night Watcher fixture it is
advised to install the unit in a selected area that is not
directly exposed to extreme weather conditions and if
possible under an eave based on the recommended
Installing your Nightwatcher on a wall or
building surface - use cross bar
□Attach the crossbar to junction box and fix by mounting
screw (AA).
□Connect the black wire (live wire) from the AC power
cord to the single black wire coming from unit using one
of the supplied wire nuts (DD).
□Connect the white wire from the AC power cord to the
white wire coming from unit using one of the supplied
wire nuts (DD).
□Connect the green/yellow wire from the AC power cord
to the green/yellow wire coming from unit using one of
the supplied wire nuts (DD).
□Make sure the polarity is correct.
□Attach the unit (A) and EVA gasket (F) to the crossbar
(EE) and fix by backplate screw (B) and screw nut (C).
CAUTION:
Please allow 30 seconds warm-up time after switching
on.
Do not touch unit during warm-up time to avoid
interruption of start-up sequence. Push the RESET
button after switching on.
IMPORTANT:
Remove the security tape from unit
and plastic lens cover from camera
after installation.
Recommended installation
A
E
AA
C
B
F

8
Installation
Operation
1 Detection range 2Adjusting the settings

Installation
□This light is equipped with three motion sensors: zone 1
covers 60 degrees, zone 2 covers 100 degrees and
zone 3 covers 60 degrees. There is a 220 degree
maximum total in all three zones.
Ensuring correct operation
□To ensure correct operation of the sensor, mount the
light fixture so that the traffic passes across the motion
sensor.
□Selecting working mode: There is a “Mode” LED
indicator hidden inside the motion detector window that
will display different colored lights when switching
between modes. Once a mode has been selected, the
colored LED light will turn off after 30 seconds.
□Mode 1: Recommended for home or business (default
setting)
- Camera will follow motion and record during the
day and night
- Light will illuminate at night only
- Speaker will operate at night only
□Mode 2:
- Light illuminates during the day and night
- Camera records motion during the day and night
- Speaker operates during the day and night
□Mode 3:
- Camera will follow motion and record during the day
and night
- Light will illuminate at night only
- Speaker will operate during the day only
NOTE:
For the above 3 modes, after audio has been triggered,
no audio will be triggered again during the following 30
seconds.
Mode LED indicator
(Hidden inside the lens) Symbol
Mode 1 RED
Mode 2 ORANGE
Mode 3 GREEN
Top
Good Sensitivity
Less Sensitivity

10
Installation
Operation (continued)
3 Adjusting the settings 4Removing and formatting the
memory card

Installation
Camera LED indicator
□The LED light next to the card compartment indicates
the function status of the camera by using different
colored LED lights.
- Flash slow in RED:AP Mode
- Remain in RED: P2P Mode
- Green: The unit is recording.
NOTE:
Before removing the micro card from the slot, please
press the mode button on the bottom of the
Nightwatcher for 3 seconds to stop the light from
turning – the “Mode” LED will flash orange. To resume
working, press the mode button once.
NOTE:
When OFF/REC button is pressed, remove micro card
within 30 seconds (now the LED will turn red after
micro card is removed from the slot).
□Static mode : this is a new option to allow the end-
user's or consumers to select between a motorized LED
head or a standard static directional light head. Press
the push-button for 3 seconds to stop the light turning,
the hidden LED will flash RED in Night Mode and flash
GREEN in ALL Day Mode in a quick flash pattern. To
resume working, press the push-button for 3 seconds
again.
□Before removing the micro card from the card slot, please
press the mode button on the bottom of the Nightwatcher
for 3 seconds to stop the light from turning – the ‘Mode’
LED will flash orange. (To resume working, press the
mode button again.)
□To remove micro card, open the card compartment using
the provided Allen key and push in Micro card to eject
then pull out.
□For viewing and/or formatting, please slide the micro card
into the card adapter that has been provided. Then, slide
the card adapter into the card slot on your laptop.
Formatting the micro card
□It is good practice to format the micro card each time it is
removed and files are viewed on your PC. Once the
necessary files have been saved to your computer,
please follow these steps for formatting.
To format the micro card
□Please ensure that any required images are saved to an
alternative folder prior to formatting.
- Place micro card into the card adapter supplied
- Place the adapter in a spare card slot on your PC /
Laptop
- Right click on the micro card location
- Select Format
- Ensure the correct file system is selected FAT16
(or FAT) for SD and FAT32 for SDHC
- Select quick format

12
Installation
Operation (continued)
5 On-board controls 6Recording audio message

Installation
NOTE:
You must press the “Mode” button on the bottom of the
unit for 3 seconds to disable the rotation of the light.
□Reset button: restore functions to default settings
- Press this RESET button, the camera will turn to
AP mode
- Press this RESET button for 5 seconds, the
camera will restore the functions to default settings.
□Audio mode: for selecting which audio message will
play when motion sensor detects movement.
- Pre-set default is “silent mode”
- Push once for “doorbell chime”
- Push again for “dog barking”
- Push once more for the message you recorded
(Message 1)
- Push again for additional message you recorded
(Message 2- you can record up to 2 messages at a
time)
□Recording:
1. Press the SET/REC button for 3 seconds, and you
will hear a single beep. After the beep, start recording
your message by talking into the microphone. Push
the button again to stop recording, and you will hear
a series of 2 beeps, meaning the recording is
finished. If you do not push the button again after you
have recorded the message, the recording will stop
automatically after 10 seconds.
2. The Nightwatcher can hold 2 custom-recorded
messages. If you have recorded one message,
repeat above step for message 2.
3. If you hear a series of 3 beeps when you want to
record your message by pressing the SET/REC
button for 3 seconds, this means the self-recorded
messages are full, please erase previous messages.
□Play/Erase: allows you to listen to and erase messages
1. If you have only recorded 1 message, push the
button one time to listen to recorded Message 1. If
you wish to erase it, press the PLAY/ERASE button
and hold it for 3 seconds. You will hear a series of 2
beeps, indicating the message has been erased.
2. If you have recorded 2 messages, push the button
one time to listen to the first message, and push it
again to listen to the second message. If you want to
erase a message, select that message, and after
listening to it, push the PLAY/ERASE button and hold
it for 3 seconds to erase it.
3. If message 1 is erased, message 2 will
automatically become message 1. The next message
you record will then become the new message 2.

14
Operation (continued)
7 Viewing recorded videos
Viewing image by computer through a card
reader.
□Press the push button on the bottom of the unit for 3
seconds to disable the unit.
□Open the waterproofed cover on the unit.
□To remove Micro card, press on micro card to eject
then pull out.
□Slide micro card into supplied card adapter as indicated
in the pictures at right.
□If your computer has a card slot you may insert the
micro card directly into the computer. Otherwise you
will need to use a USB card reader (not supplied).
□Once your computer is powered on, insert the card
adapter into your computer. Regardless of whether you
are using Windows or MAC OS, your card should be
recognized by your computer after a few seconds.
□Follow the instructions of your computer to view the
contents of the removable storage device (micro card).
Each recorded event will be listed in order by date.
Simply click on the filename to view the file.
□After viewing the files, remove the card from your
computer and remove the micro card from the adapter.
□Insert the micro card into the slot on the light until it is
secure. Then close the card compartment door and
tighten the screw with the Allen key.
□Press the “Mode” button once to resume normal
tracking operation.

Operation (continued)
Operation
8 System Set Up (Link camera with WIFI Network)
1.1 Link camera with Smart phone/Tablet (AP Mode)
□Using smartphone or tablet to launch “Smart Guard HD” APP from APP store (iOS) or Google Play store (android).
Download.
□Go to smart phone’s Wi-Fi setting and site survey UID “Smart Guard HD”.
□Once the connection is established, open “Smart Guard HD” app and the camera screen will appear on your smart
phone or tablet.
□
Connect “Smart Guard HD”
with default password
“12345678”

16
Operation (continued)
※ If there has below message “ Cannot connect to internet through “Smart Guard HD” or Internet connection unstable
“Smart Guard HD “ shown on the screen, please disregard the message and you still can continue next step. The
different smartphone/tablet will show the different message.
1.2 Link camera with home AP
□Link camera with home AP allows user to watch their camera from anywhere in the world as long as they have
internet access.
□Touch the screen twice, it will appear 5 red function keys on the right side.
□Touch the screen twice again, 5 red function keys will be hided.
□On your smart phone/tablet screen, click on “SETTING” icon . Enter camera default password “12346578”.

Operation (continued)
□Select your home AP from the site survey menu.
□Enter Home AP password if is encrypted, and click “Join”
□Click “OK” and exit the app.
□Wait for 60 seconds camera boot up again and link to WiFi AP router.
If Join home AP connection is successful, LED indicator besides waterproof cover will display a RED light.
If Join home AP connection is failed, LED indicator on the sensor will flash quick in Red & Green light.
Press Reset button to return to AP mode and follow up this step “1.2 Link camera with home AP” to reset Join
home AP again. Make sure your router account and password is correct.
LED

18
Operation (continued)
□Launch “Smart Guard HD” APPs again and you will see video streaming from Smart Guard HD.
Note: You may access your camera from anywhere as long as there is internet access.
1.3 Set Camera name and password: Select Wi-Fi Setting. You can change SSID name and password
Select Wi-Fi Setting. YoucanchangeSSIDnameandpassword,thepasswordshouldbe8digitalnumbersorEnglishletters.
After the change, it will return toAP mode, please go to smart phone’s Wi-Fi setting and site survey UID to find the name you
have changed. Please then follow up this step “1.2 Link camera with home AP” to reset Join home AP router.
**We recommend it is not necessary to change SSID name.
1.4 Camera Setting
□Set Camera Time: Change this APP time depending on the time in your smartphone

Operation (continued)
1.5 Frequency Setting: Set Power Frequency
1.6 PIR Notification: Send PIR Notification signal to your smartphone/tablet
□Click OFF: Not to send PIR Notification signal
□Click ON: To send PIR Notification signal
□You also can go to Camera List and press “ ” for the selected camera. Click “Notification” that also can send the
PIR notification signal to your smartphpone/tablet

20
Operation (continued)
1.7 Set Description name: You can set your own name for this Description.
□You can set your own name for this Description.
□NOTE: Your "Push Notification" name will be same as this Description.
1.8 Reset to Default: Press this “Reset to Default”, the camera will restore the functions to default settings and LED
indicator on the product will flash quickly in RED light. Please wait about 3 minutes till RED light to change to flash
slowly.
□Press this “Reset to Default”, then press “YES”, the camera will restore the functions to default settings.
□LED indicator on the product will flash quick in RED light. Please wait about 3-4 minutes till RED light will change to
flash slow.
NOTE: If you click on ” PIR Notification” and there
has no micro SD card inside the unit, when PIR is
triggered, it will send PIR Notification signal
continuousl
y
to
y
our smart
p
hone until no an
y
Table of contents
Popular Security Camera manuals by other brands

Countryside
Countryside CLS Revo 360 Setup guide
JVC
JVC VN-V685U - Ptz Network Dome Camera Specifications
Sanyo
Sanyo VCC-3944 - 1/4" Color CCD DSP Camera instruction manual
Basler
Basler BIP2-D series user manual
Motorola solutions
Motorola solutions PELCO Sarix Enhanced 4 instruction manual
American Dynamics
American Dynamics ADC720D datasheet
