AUS Foldy User manual

Foldy
MANUALE PER IL MONTAGGIO
AUFBAUANLEITUNG
ASSEMBLY MANUAL
con aste uscenti
mit Standardstangen
with solid rods
A.u.S. Spielgeräte GmbH
A-1210 Wien Scheydgasse 48
Tel. +43-1-271 66 00
Fax. +43-1-271 66 00 75
www.aus.at www.garlando.at

Pag. 2 – Seite - Page
Gratulation! Sie haben einen Fußballtisch von erster Qualität gekauft.
Es ist ein Tisch für den Innenbereich: bitte, montieren Sie ihn und benutzen Sie ihn nur in einem
geschlossenem Raum.
ACHTUNG: Nach der Montage ist der Fußballtisch breit und deshalb könnte er durch die Türen
nicht gehen. Aus diesem Grund empfehlen wir den Aufbau direkt im gewählten Raum. Im Fall Sie
den Tisch in einen anderen Raum rücken möchten, könnte es notwendig sein, die Beine
auszubauen und sie wieder zu montieren.
Um eine lange Lebensdauer des Fußballtisches und das beste Spielen zu gewährleisten, beachten
Sie die folgenden Punkte:
1.) Lassen Sie den Fußballtisch nicht draußen stehen. Regen, Schnee und Feuchtigkeit
könnten die Bauteile beschädigen. Auch eine lange Sonneneinwirkung kann die Farben verändern.
2.) Reinigen Sie Ihren Fußballtisch regelmäßig. Sie können einfach mit einem feuchten Tuch
die Fläche reinigen, um den Staub zu wischen. Für eine sorgfältige Reinigung verwenden Sie
einen Haushaltsreiniger ohne Wachs und Scheuerwirkung, beseitigen Sie völlig die Spuren und
trocknen Sie die nasse Fläche ab.
3.) Die Garlando Kugellager sollen normalerweise nicht geölt werden, aber um Ihre
Gleitfähigkeit weiter zu verbessern, benutzen Sie nur ein gutes Silikonspray. Verwenden Sie kein
pflanzliches oder mineralisches Öl, das den Schmutz anziehen und die Kugellager verstopfen
könnte.
Die Firmen Garlando und A.u.S. Spielgeräte GesmbH übernehmen keine Haftung für Schäden,
die durch die Nichtbeachtung dieser Gebrauchsanweisung entstehen.

Pag. 3 – Seite - Page
ATTENZIONE: LEGGERE E CONSERVARE
ACHTUNG: LESEN UND AUFBEWAHREN
ATTENTION: READ AND KEEP
Prodotto non adatto a minori di 3 anni.
Contiene piccole parti che potrebbero essere ingerite
Dieses Produkt ist nicht für Kinder unter 3 Jahren geeignet,
die Kleinteile könnten verschluckt werden.
This product is not suitable for children under 3 years.
Small parts could be swallowed .
PREMESSA – EINLEITUNG – PRELIMINARY REMARKS
Prima di disimballare e montare il calciobalilla si prega di prendere visione di quanto segue:
Per ragioni di sicurezza, si raccomanda fortemente di effettuare il montaggio del calciobalilla in non
meno di due persone.
Aus Sicherheitsgründe sollte der Fußballtisch von wenigstens zwei erwachsenen Personen
aufgebaut werden.
Before football-table unpacking and assembly, please note that for safety reasons it is strongly
recommended the football-table assembly by at least two people.
DISIMBALLO - AUSPACKUNG - UNPACKING
Posare il calciobalilla ancora imballato sul pavimento. N.B: l’etichetta sul cartone mostra
chiaramente il lato in alto. Tagliare i nastri e rimuovere completamente la parte superiore del
cartone. Abbassare i lati della parte inferiore: il calciobalilla si trova a testa in giù (fig. 1).
Legen Sie den verpackten Fußballtisch auf dem Boden, und zwar so dass die Etikette auf dem
Karton deutlich die Oberseite zeigt. Durchschneiden Sie die Bänder und öffnen Sie den Oberteil
des Kartons. Öffnen Sie die Seitenteile der Unterseite, der Fußballtisch liegt somit auf dem Kopf
(Bild 1).
Lay the carton box on the floor. Note: the box label shows clearly the upper part. Cut the adhesive
tapes and remove completely the carton top. Lower the sides of the box bottom: the football-table
is packed upside down (fig.1)

Pag. 4 – Seite - Page
fig. 1
Bild 1
Rimuovere i pannelli in legno che trattengono gli oggetti all’interno del cassone: sono solo una parte
dell’imballo, di cui non si avrà più bisogno.
Beseitigen Sie die Holzplatten, die die Gegenstände im Korpus stillhalten: sie gehören zu der Verpackung
und sind deshalb nicht mehr notwendig.
Remove the wooden panels for things clamping inside the cabinet: they belong to the packing and they are
of no use.
fig. 2
Bild 2

Pag. 5 – Seite - Page
MONTAGGIO – MONTAGE - ASSEMBLY
Importante: tenere lontani i bambini durante tutte le operazioni di montaggio.
Wichtig: Bitte nicht in Beisein von Kindern montieren.
Important: keep away the children during the assembly.
Attrezzi necessari – Montagewerkzeug – List of tools
un cacciavite (non fornito)
un martello (non fornito)
una pinza (non fornita)
una chiave da 10(fornita) fig. 3/a
una chiave da 17(fornita) fig. 3/b
una chiave esagonale ad elle(fornita) fig. 3/c
ein Schraubzieher (nicht beigelegt)
ein Hammer (nicht beigelegt)
eine Zange (nicht beigelegt)
ein Schlüssel 10 (liegt bei) Bild 3/a
ein Schlüssel 17(liegt bei) Bild 3/b
ein Sechskanteinsteckschlüssel (liegt bei) Bild 3/c
a screwdriver (not supplied)
a hammer (not supplied)
a pliers (not supplied)
a spanner 10 (supplied) fig. 3/a
a spanner 17 (supplied) fig. 3/b
a hexagonal spanner (supplied) fig. 3/c
fig. 3/c
Bild 3/c
fig. 3/b
Bild 3/b
fig. 3/a
Bild 3/a

Pag. 6 – Seite - Page
All’interno del calciobalilla si trovano:
un sacchetto contenente:
- 10 palline bianche in plastica
-8 manopole in plastica nera (fig. 5)
-16 cuscinetti a sfera (fig. 4)
-16 flangie (mezzelune), di cui 8 con perno (fig.7) e
8 senza perno (fig. 7a)
-2 segnapunti a cubetti (fig. 6)
-2 bocchettoni di introduzione delle palline con relativo anello (fig. 8)
-viti per fissare il tutto
Im Fußballtisch finden Sie,
eine Hülle, die die folgenden Teile enthält:
- 10 weiße Kunststoffbälle
-8 schwarze Kunststoff-Handgriffe (Bild 5)
-16 Kugellager (Bild 4)
-16 Rosettenhälften: 8 mit Stift und 8 ohne Stift (Bild 7) (Bild 7a)
-2 Würfel-Torzähler (Bild 6)
-2 Balleinwurf mit Ring (Bild 8)
-Schrauben für die Befestigung
Inside the football-table cabinet you can find a plastic bag which includes:
-10 white plastic balls
-8 black plastic handles (fig.5)
-16 roller bearings (fig.4)
-16 bearing retainers (like halfmoons): 8 with pin (fig.7) and 8 without pin (fig.7a)
-2 score counters (fig.6)
-2 ball entry fillers with ring (fig.8)
-fixing screws
fig.4
Bild 4
fig. 7
Bild 7
fig. 8
Bild 8
fig. 6
Bild 6
fig. 7a
Bild 7a
fig.5
Bild 5

Pag. 7 – Seite - Page
b) un sacchetto contenente le aste (complete di ometti e
molle) (fig. 9)
quattro aste per ogni squadra.
Per ogni squadra sono fornite:
•un’asta a 1 ometto
•un’asta a 2 ometti
•un’asta a 3 ometti
•un’asta a 5 ometti
Weiters eine Hülle mit den Stangen (ausgestattet mit Spielern und Federn) (Bild 9)
Es sind 4 Stangen für jede Mannschaft. Für jede Mannschaft werden geliefert:
•eine Torwartstange – 1 Spieler-Stange
•eine Verteidigungsstange – 2 Spieler-Stange
•eine Sturmstange – 3 Spieler-Stange
•eine Mittelfeldstange – 5 Spieler-Stange
a plastic bag containing the rods (included players and springs) (fig.9): four rods for each team:
•Goalkeeper – 1 player-rod
•Defence – 2 player-rod
•Forward – 3 player-rod
•Midfielder – 5 player-rod
c) 2 coppie di gambe: 2 contrassegnate con
la lettera D, e 2 con la lettera S(fig. 12)
2 Traverse sagomate (fig 12a)
4 Piedini in plastica (fig.12b)
2 Paare von Beinen: 2 mit dem Buchstaben Dund 2 mit dem Buchstaben S(Bild 12)
2 geformte Querhölzer (Bild 12a)
4 Kunststoff-Füße (Bild 12b)
2 couple of legs: 2 legs marked with the letter Dand 2 legs marked with the letter S (fig. 12)
2 shaped crossbars (fig.12a)
4 plastic feet (fig. 12b)
fig.12
Bild12
fig. 10
Bild 10
fig. 9Bild 9

Pag. 8 – Seite - Page
d) un sacchetto contenente:
•4 pomoli con gambo filettato (fig. 11)
•4 viti complete di rondelle e dadi (fig. 12)
•4 perni in acciaio (fig. 13)
•4 dadi ciechi con relative rondelle (fig. 14)
•4 dischi in nylon (fig.15)
•2 barre filettate (fig. 16)
Weiters eine Hülle mit diesen Teilen:
•4 Knöpfe mit Gewindeschaft (Bild 11)
•4 Schrauben ausgestattet mit Unterlegscheiben und Muttern (Bild 12)
•4 Stahlstifte (Bild 13)
•4 Blinde Mutter mit Unterlegscheiben (Bild 14)
•4 Nylonscheiben (Bild15)
•2 Gewindestangen (Bild 16)
fig. 11
Bild 11
fig. 12
Bild 12
fig. 14
Bild 14
fig. 13
Bi
ld 13
fig.12a
BIld 12a
fig.12b
Bild 12b

Pag. 9 – Seite - Page
a plastig bag including:
•4 knobs with threaded shank (fig. 11)
•4 screws with washers and nuts (fig. 12)
•4 steel pins (fig. 13)
•4 cap nuts with washers (fig. 14)
•4 nylon disks (fig.15)
•2 threaded bars (fig. 16)
Togliere tutto il contenuto dall’interno del calciobalilla e procedere al montaggio dalle gambe.
Nehmen Sie alle Teile aus dem Fußballtisch und beginnen Sie die Montage der Beine.
Take off all the items inside the cabinet and start the leg – assembly.
Montaggio gambe - Montage der Beine – Leg assembly
Mantenendo il calciobalilla rovesciato (fig. 10) prendere una coppia di gambe, una contrassegnata
con la lettera D e una con la lettera S e inserire il perno in acciaio nel foro per circa il 50% della
sua lunghezza utilizzando un martello (fig. 17, 18, e 19).
Mit dem Fußballtisch auf dem Kopf (BIld 10) nehmen Sie die Beine, ein Bein mit dem Buchstaben
Dund das andere mit dem Buchstaben Sund setzen Sie den Stahlstift durch einen Hammer in die
Bohrung ungefähr 50% seiner Länge ein. (Bild 17, 18, e 19).
fig. 17
Bild 17
fig. 18
Bild 18
fig. 15
Bild 15
fig. 16
Bild 16

Pag. 10 – Seite - Page
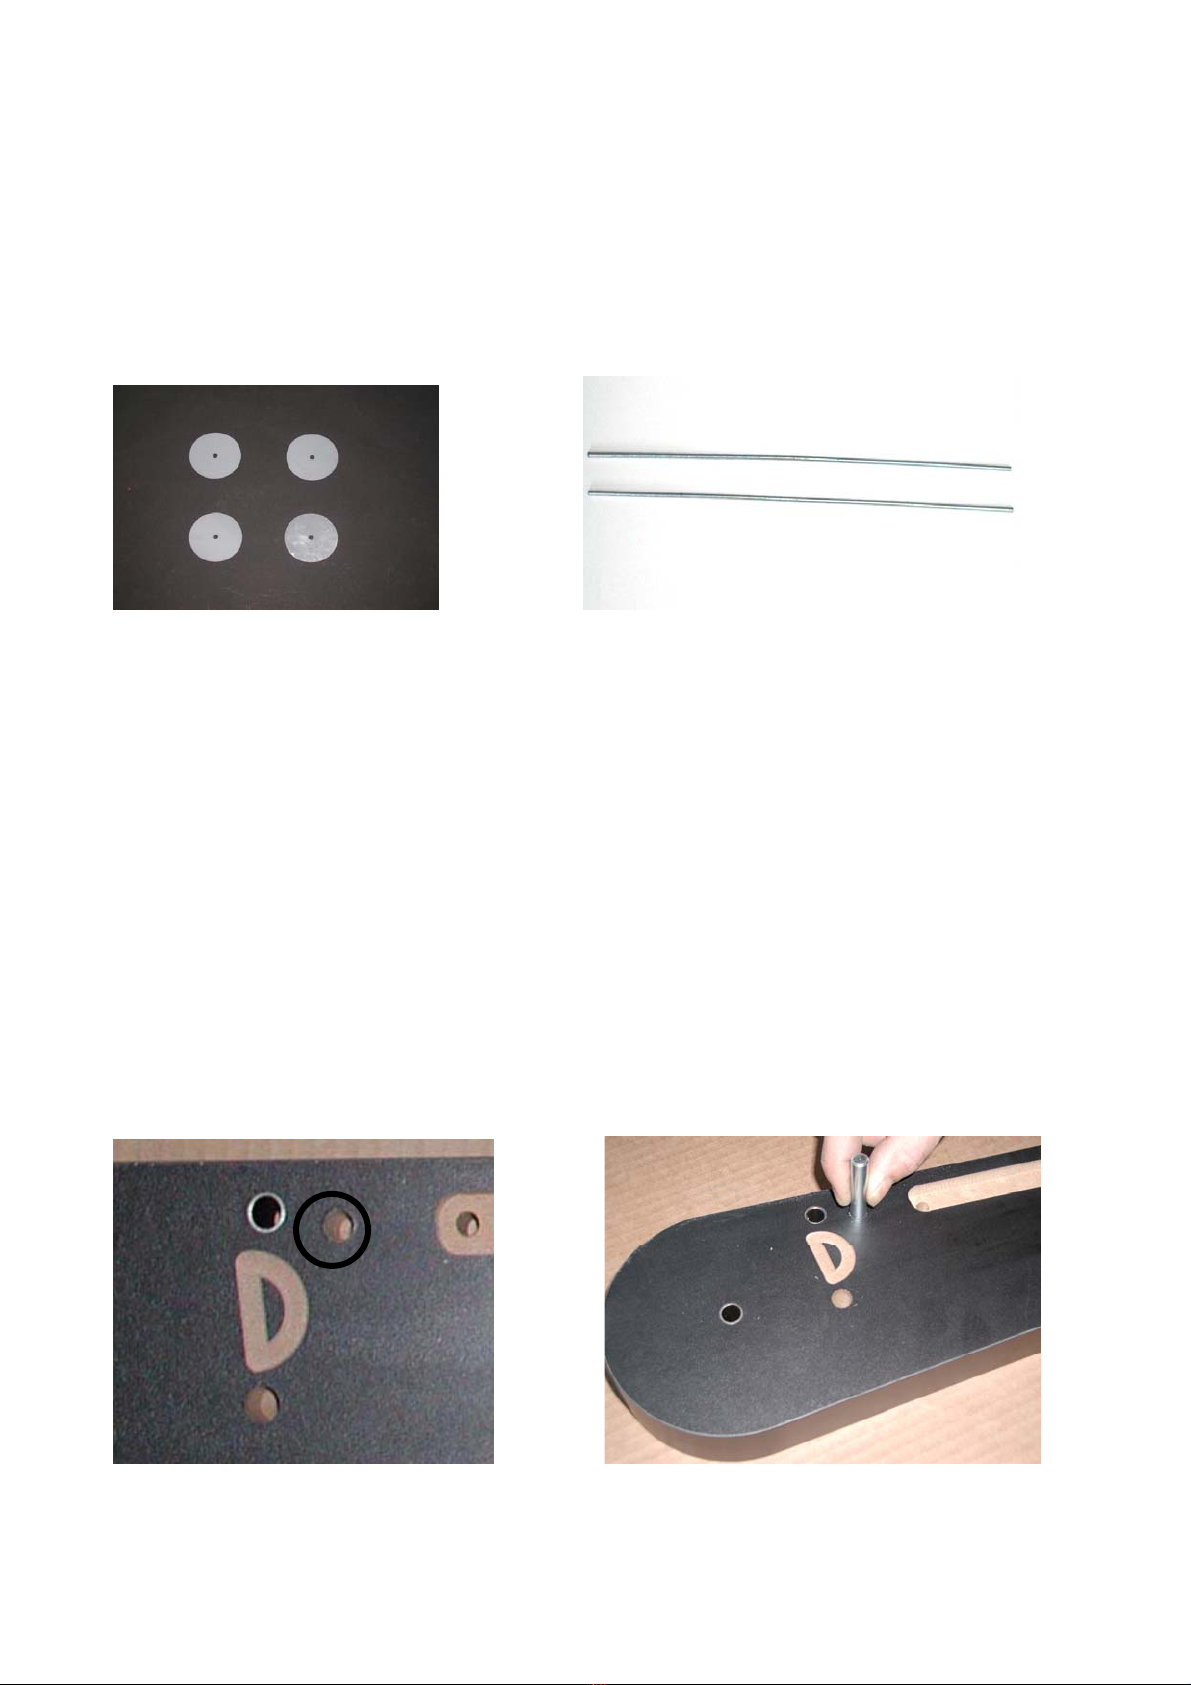
With the upturned football-table take one couple of legs, the one marked with the letter Dand the
other one marked with the letter Sand insert the steel pin into the blind hole for about 50% of its
length using a hammer. (fig. 17, 18, e 19)
Quindi ripetere l’operazione di inserimento del perno sulla gamba contrassegnata con la lettera S.
Stecken Sie den Stift auch in das andere Bein mit dem Buchstaben S.
Afterwards repeat the same pin insertion into the leg marked with the letter S.
Utilizzando i particolari (viti completi di rondelle e dadi) ed i dischi in nylon, fig.20, montare la
gamba posizionando il disco tra gamba e sponda del calciobalilla, serrare con le chiavi in
dotazione. (fig. 21 e 22)
Durch die Schrauben (ausgestattet mit Unterlegscheiben und Muttern) und die Nylonscheiben
bauen Sie das Bein auf, legen Sie die Scheibe zwischen Bein und Fußballtischbande, ziehen Sie
mit den beigestellten Schlüsseln an. (Bild 21 e 22)
With the screws (inclusive of washers and nuts) and with the nylon disks (fig.20) assemble the leg
and place the disk between leg and football-table side, tighten them with the supplied spanners
(fig.21 and 22)
Attenzione: prima di proseguire nel montaggio, accertarsi che i fori sulla gamba e sulla
sponda corrispondano e quindi che si possa infilare ed avvitare fino in fondo il pomolo con
gambo filettato come da fig.23. Se i fori non corrispondono, significa che in quella
posizione deve essere montata una gamba contrassegnata con una lettera diversa.
Achtung: vergewissern Sie sich, daß die Bohrungen auf dem Bein und auf der Bande sich
decken, so daß der Knopf bis auf den Grund gesteckt und verschraubt werden kann. (Bild
23) Im Fall die Bohrungen nicht zusammenfallen, ist die Montage eines anderen Beines
mit dem verschiedenen Buchstaben notwendig.
Attention: before assembly continuation make sure that the holes on the legs and on the
table side coincide in order to insert and screw the knob with threaded shank fig.23. In
case the holes do not coincide, it is necessary to assemble the leg marked with another
letter.
fig. 19
Bild 19
fig. 20
Bild 20

Pag. 11 – Seite - Page
Inserire il pomolo con gambo filettato (fig. 23)
Stecken Sie den Knopf mit Gewindeschaft (Bild 23)
Insert the knob with threaded shank (fig. 23)
Inserire la traversa nelle scanalature all’interno delle gambe (fig. 24), accertandosi che la traversa
abbia la curva volta verso l’alto.
Stecken Sie das Querholz in die Rillen auf der Innenseite der Beine (Bild 24), vergewissern Sie
sich, daß die Krümmung vom Querholz nach oben dreht.
Fit in the crossbar into the leg grooves (fig. 24), make sure that the crossbar curve turns upward.
fig. 24
Bild 24
fig. 23
Bild 23
fig. 22
Bild 22
fig. 21
Bild 21

Pag. 12 – Seite - Page
Procedere al montaggio dell’altra gamba (fig. 25 e 26)
Beginnen Sie die Montage des anderen Beines. (Bild 25 e 26)
Begin the assemble of the other leg (fig. 25 and 26)
Preparare la barra filettata con un dado avvitato all’estremità (fig. 26) ed inserirla come da fig.27,
28, 29
Verschrauben Sie am Ende der Gewindestange die Mutter (Bild 26) und stecken Sie sie in die
Bohrung wie in Bilder 27, 28,29
Screw a nut at the end of the threaded bar (fig. 26) and insert it as illustrated in the images 27, 28,
29.
fig. 26
Bild 26
fig. 25
Bild 25
fig. 26
Bild 26
Fig. 27
Bild 27

Pag. 13 – Seite - Page
Bloccare bene i dadi sulla barra filettata utilizzando da un lato una pinza e dall’altro la chiave da
10 mm (fig.30)
Ziehen Sie die Mutter auf der Gewindestange mit der Hilfe einer Zange einerseits und eines
Schlüssels 10mm andererseits fest. (Bild 30)
Tighten strongly the nuts on the threaded bar using, on the one side, a pliers and, on the other
side, the spanner 10mm (fig.30)
Ripetere le operazioni di montaggio per le due gambe del lato opposto. E calzare i piedini a
corredo (fig.31)
Verfahren Sie genauso bei der Montage der anderen Beine für die entgegengesetzte Seite des
Fußballtisches. Stecken Sie anschließend die Kunststoff-Füße. (Bild 31)
Repeat the assembly operation for the legs of the opposite side and insert the equipped plastic feet
(fig. 31)
fig. 28
Bild 28
fig. 30
Bild 30
fig. 29
Bild 29

Pag. 14 – Seite - Page
Posizionare il calciobalilla in posizione eretta (fig. 32 ) e continuare le operazioni di montaggio.
Stellen Sie den Fußballtisch in die aufrechte Position (Bild 32) und setzen Sie die Montage fort.
Set the table upright (fig. 32) and continue the assembly.
Bocchettoni di introduzione delle palline - Balleinwurf – Ball entry fillers
Questa operazione si può compiere anche alla fine del montaggio, tuttavia si consiglia di inserire i
bocchettoni prima di montare le aste.
Die Montage des Balleinwurfs kann am Ende des Fußballtischaufbaus sein, aber vor der Montage
der Stangen.
We suggest you to put on the ball entry fillers before the rod assembly.
fig. 31
Bild 31
fig. 32
Bild 32

Pag. 15 – Seite - Page
Inserire manualmente il bocchettone (fig. 33), inserire le viti entro i fori e avvitare (fig. 34). Inserire
e avvitare l’anello all’interno del calciobalilla (fig. 35). Fare lo stesso con l’altro bocchettone.
Stecken Sie den Balleinwurf (Bild 33) und verschrauben Sie die Schrauben (Bild 34). Stecken Sie
und verschrauben Sie den Ring auf der Innenseite des Fußballtisches. (Bild 35) Verfahren Sie
genauso bei dem anderen Balleinwurf.
Insert manually the ball entry fillers (fig. 33), insert and tighten the screws into the holes (fig. 34)
and screw up the ring in the interior cabinet (fig. 35). Do the same with the other ball entry filler.
Montaggio aste - Montage der Stangen – Rod assembly
Il calciobalilla è fornito di 4 aste per ogni squadra. Ogni squadra è composta come segue:
asta a 1 ometto
asta a 2 ometti
asta a 3 ometti
asta a 5 ometti
Der Fußballtisch hat 4 Stangen für jede Mannschaft. Jede Mannschaft hat die folgenden Stangen:
Torwartstange – 1 Spieler-Stange
Verteidigungsstange – 2 Spieler-Stange
Sturmstange – 3 Spieler-Stange
Mittelfeldstange – 5 Spieler-Stange
The football-table is equipped with 4 rods for each team:
Goalkeeper - 1 player-rod
Defence - 2 player-rod
Forward - 3 player-rod
Mid-fielder - 5 player-rod
fig. 33
Bild 33
fig. 34
Bild 34
fig. 35
Bild 35

Pag. 16 – Seite - Page
Posizione delle aste - Stellung der Stangen – Rod position
•I portieri (1 ometto per asta) si posizionano agli estremi del campo di gioco.
•I terzini (2 ometti per asta) si posizionano direttamente davanti al portiere dello stesso
colore.
•L’asta a 3 ometti si posiziona davanti all’asta a due ometti di colore opposto. Per
esempio: l’asta a 3 ometti blu fronteggia la porta rossa.
•L’asta a 5 ometti si pone dallo stesso lato del campo del portiere dello stesso colore.
•Torwartstange (1 Spieler-Stange): am Ende des Spielfeldes.
•Verteidigungsstange (2 Spieler-Stange): vor der Torwartstange derselben Farbe.
•Sturmstange (3 Spieler-Stange): vor der Verteidigungsstange (2 Spieler-Stange ) der
Gastmannschaft (entgegengesetzte Farbe) Zum Beispiel: die blaue Sturmstange findet
sich vor der roten Verteidigungsstange.
•Mittelfeldstange – 5 Spieler-Stange: vor der Torwartstange derselben Farbe.
•Goalkeeper/1 player-rod: at the end of the playfield.
•Defence/2 player-rod: in front of the same colour goalkeeper.
•Forward/3 player-rod: in front of the 2 player-rod of the opposite colour. For example:
the blue forward rod faces the red defence rod.
•Mid-fielder/ 5 player-rod: in front of the same colour goalkeeper.
Cominciare a inserire l’asta a 1 ometto e poi tutte le altre secondo le posizioni sopradescritte.
Montieren Sie die 1 Spieler-Stange und dann die anderen Stangen nach den obengenannten
Stellungen.
Start by placing the 1 player-rod and then all the others following the abovementioned positions.
Installare l’asta a un ometto inserendo un’estremità nel relativo foro del mobile (fig. 36), poi inserire
l’estremità opposta nell’altro foro. Applicare il cuscinetto a sfera sull’estremità dell’asta (fig. 37) e
farlo scivolare all’interno del foro nel mobile.
Stecken Sie die Torwartstange in die Bohrung einer Seite des Korpus (Bild 36) und das
entgegengesetzte Ende der Stange in die andere Bohrung des Fußballtischkorpus. Montieren Sie
das Kugellager am Ende der Stange (Bild 37) und lassen Sie nun es in die Bohrung rutschen.
fig. 36
Bild 36
fig. 37
Bild 37

Pag. 17 – Seite - Page
Insert one end of the 1 player-rod into the proper football-table hole (fig. 36), then insert the
opposite end into the other hole. Fit the roller bearing into the rod (fig. 37) and let it slide into the
cabinet hole.
Procedere ad applicare le flangie intorno ai cuscinetti a sfera. Accoppiare due flangie con perno
intorno all’asta all’interno del mobile, avendo cura di inserire i perni nei fori predisposti (figg. 38-39-
40).
Montieren Sie die Innenrosetten-Hälften und die Außenrosetten-Hälften um die Kugellager.
Stecken Sie zwei Rosetten mit Stift zusammen, so daß diese einen Kreis um der Stange auf der
Innenseite des Fußballtisches ergeben und dann stecken Sie die Stifte in die Bohrungen. (Bilder
38-39-40).
Put the bearing retainers around the roller bearings. Join two bearing retainers with pin around the
bar inside the cabinet and make sure to insert the pins into the proper holes (fig. 38-39-40)
Accoppiare due flangie senza perno intorno all’asta dal lato esterno del mobile (fig. 41). Inserire le
viti nei fori predisposti senza stringerle.
Seguire i passaggi descritti sopra fino al completo inserimento di tutte le aste. A questo punto si
possono stringere le viti (fig. 42). Mentre si avvita, è consigliabile tenere le flangie dal lato interno
del calciobalilla con una mano, per impedire che si allentino (fig. 43).
Stecken Sie zwei Rosetten ohne Stift um der Stange auf der Außenseite des Fußballtisches
zusammen (Bild 41). Stecken Sie die Schrauben in die Bohrungen ohne sie festzuziehen.
Verfahren Sie genauso bei allen Stangen. Jetzt kann man die Schrauben festziehen (Bild 42).
Während der Verschraubung halten Sie mit einer Hand die Rosetten auf der Innenseite des
Fußballtisches fest, so daß sie nicht lösen. (Bild 43).
Join two bearing retainers without pin around the bar on the cabinet outer side (fig. 41). Insert the
screws into the proper holes and do not tighten them. Follow the above steps for the insertion of all
the rods. Now tighten the screws (fig. 42). During the screwing keep with one hand the bearing
retainers inside the cabinet in order to prevent their loosening.
fig. 38
Bild 38
fig. 39
Bild 39
fig. 40
Bild 40
fig. 41
Bild 41

Pag. 18 – Seite - Page
Attenzione: non utilizzare un trapano per avvitare le viti, perché danneggerebbe il calciobalilla.
Achtung: verwenden Sie keine Bohrmaschine für die Verschraubung, denn sie könnte den
Fußballtisch beschädigen.
Warning: do not use a drill for screwing which could damage the football-table cabinet.
Montaggio delle manopole - Montage der Handgriffe – Handle assembly
Attenzione: non inserire le manopole se la plastica è fredda. In questo caso si raccomanda di
scaldarle appena prima di installarle.
Achtung: Stecken Sie die Handgriffe nicht, wenn der Kunststoff kalt ist. In diesem Fall wärmen Sie
die Griffe vor der Montage.
Attention: do not insert the handles if the plastic is cold. In this last case warm them before their
insertion.
Cominciare con l’inserire manualmente la manopola sull’asta senza coprire la zigrinatura
(chiaramente visibile in fig. 44). Premere delicatamente con il martello (fig. 45) finché la manopola
nasconde completamente la zigrinatura (fig. 46).
Zuerst stecken Sie mit der Hand den Griff, ohne die Rändelung zu decken (sie ist klar deutlich im
Bild 44). Drücken Sie leicht mit dem Hammer (Bild 45), bis der Handgriff die Rändelung völlig
versteckt. (Bild 46).
Insert manually the knob without covering the bar knurling (evident in the image fig. 44). Slightly
hammer (fig. 45) until the knob hides the knurling (fig. 46)
fig. 44
Bild 44
fig. 45
Bild 45
Fig. 42
Bild 42
fig. 43
Bild 43

Pag. 19 – Seite - Page
fig. 46
Bild 46
fig. 47
Bild 47
Completare l’assemblaggio fissando i segnapunti, accertandosi che il segnapunti sia dello stesso
colore del portiere posto sullo stesso lato (fig. 47).
Montieren Sie die Torzähler, beachten Sie, daß der Torzähler dieselbe Farbe wie die Torwartfigur
hat. (Bil 47).
Finish the assembly by fixing the score counters, make sure that the score counter has the same
colour of the goalkeeper on the same side (fig. 47)
Il calciobalilla è ora pronto per essere utilizzato. Garlando Vi augura buon divertimento. Non
dimenticate però di seguire i consigli per la pulizia e manutenzione riportati nella sezione
seguente.
Der Fußballtisch ist jetzt fertig zum Spiel. Garlando wünscht Ihnen viel Spaß. Bitte, beachten Sie
unsere Informationen über die Reinigung und Pflege des Fußballtisches.
The football-table is now ready for the play. Have a good time! Do not forget to follow our care and
maintenance advice.

Pag. 20 – Seite - Page
Come piegare le gambe del calciobalilla
Wie Sie die Beine des Fußballtisches zusammenklappen
The way of leg folding up
Posizionare il calciobalilla in verticale con le rotelle rivolte verso il basso. (fig.48)
Legen Sie den Fußballtisch in die aufrechte Position mit den Rollen zu Boden. (Bild 48)
Put the table upright with the small wheels downwards (fig. 48)
Svitare i pomoli delle gambe inferiori e avvitarle parzialmente all’interno (fig.49, 50 e 51)
Schrauben Sie die Knöpfe der Beine ab und verschrauben Sie teilweise in die Innenseite. (Bilder 49,
50 und 51)
Unscrew the knobs of the lower legs and screw them partially inside the cabinet (fig. 49, 50, 51)
fig.48
Bild 48
fig. 49
Bild 49
fig. 50
Bild 50
Table of contents
Popular Game manuals by other brands

Costway
Costway UY10001 user manual

Tiger Electronics
Tiger Electronics Franklin the Turtles 1-2-3 Tri Language... instruction manual

Radica Games
Radica Games Noughts & Crosses 75011 instruction manual

Adidas
Adidas X360 miCoaCh online game manual

Learning Resources
Learning Resources School Time Counters LER 0782 manual

Franklin
Franklin crosswords CW-40 user manual